Irresistible Garlic Parmesan Cheeseburger Bombs for Burger Lovers
Garlic Parmesan Cheeseburger Bombs: The Ultimate Comfort Food Delight
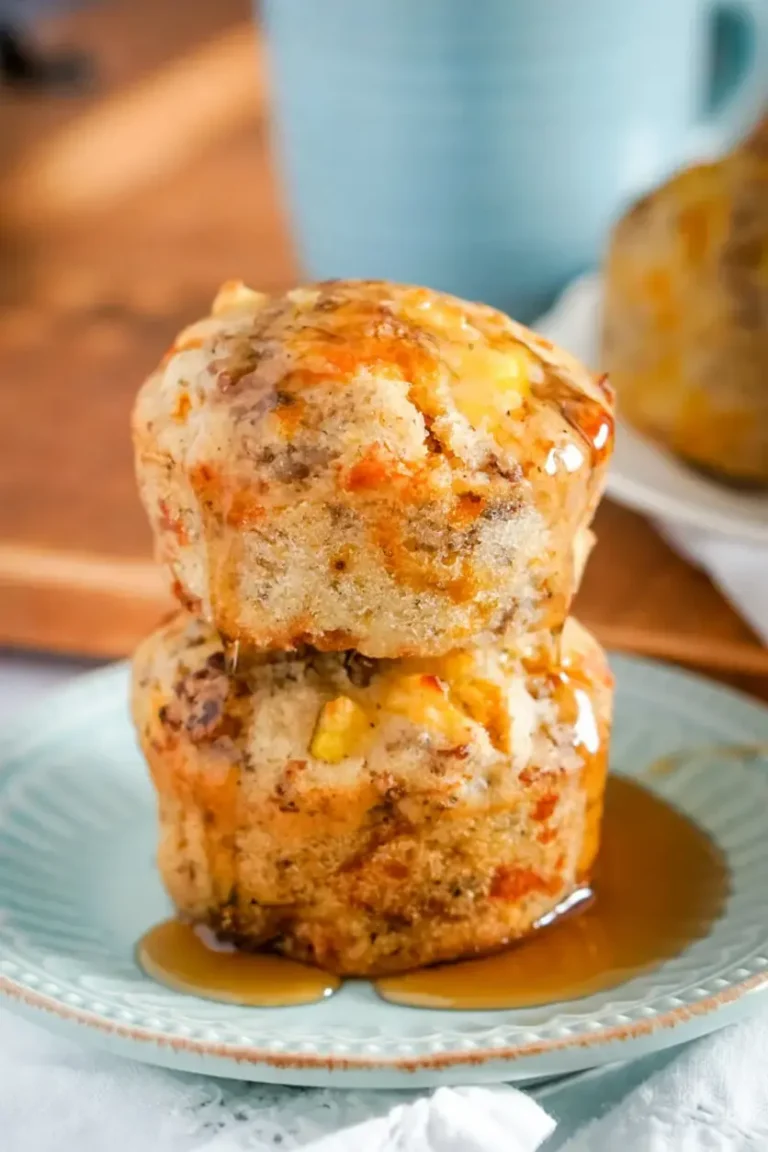
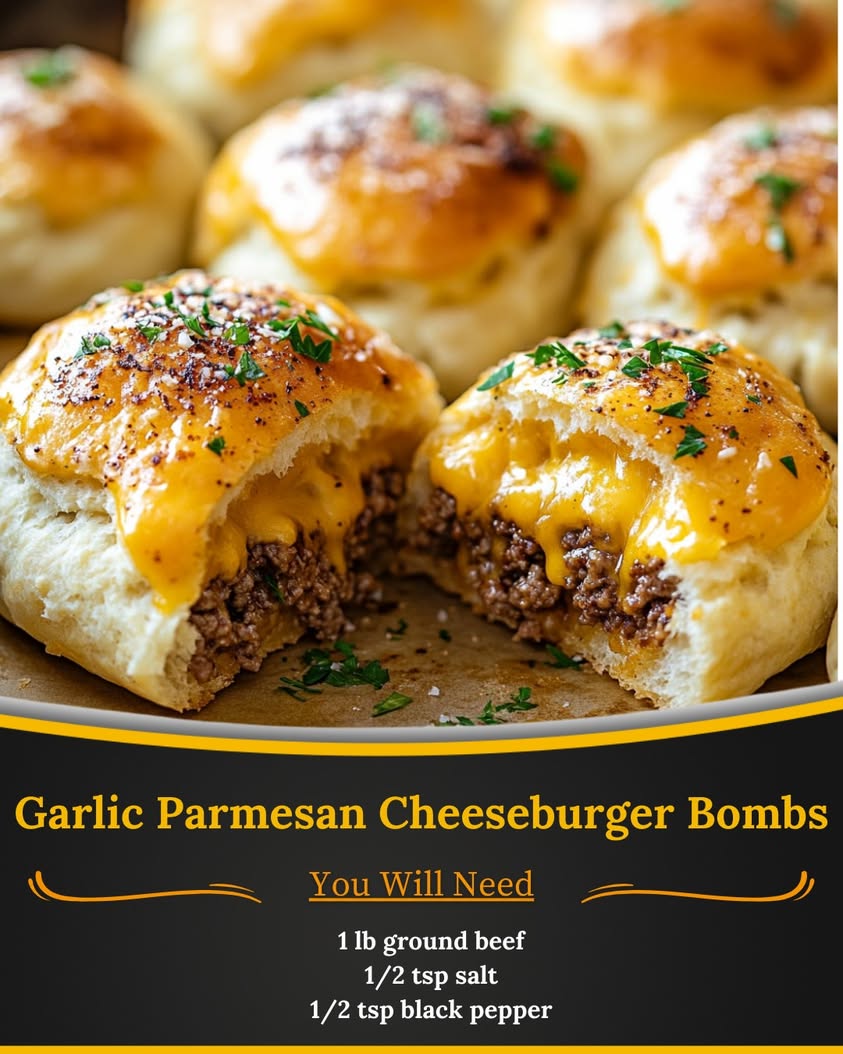
Delve into the rich delight of Garlic Parmesan Cheeseburger Bombs, a recipe that brings the best of comfort food right to your table. These savory bombs are oozing with melty cheese, perfectly seasoned beef, and a delightful garlic parmesan crust that adds a burst of flavor to each bite. Imagine biting into a golden, flaky exterior, only to discover the tender seasoned burger within, all enhanced by the aromatic garlic and rich parmesan. This dish is perfect for parties, game nights, or a cozy family dinner, promising smiles all around!
Not only are these Garlic Parmesan Cheeseburger Bombs incredibly easy to make, but they also come together in just 45 minutes, making them a quick and satisfying meal option. The use of store-bought dough simplifies the process, allowing you to focus on the juicy beef mixture and cheese filling that awaits within. Each bomb is a delightful explosion of flavor, making this recipe an instant favorite for those who love hearty, flavorful snacks that are sure to impress!
Quick Recipe Highlights
- Flavor Profile: These bombs burst with savory ground beef flavor, enhanced by rich parmesan and subtle garlic notes, creating an irresistible taste sensation.
- Texture: The light, flaky exterior complementing the tender, juicy beef filling offers a satisfying contrast that will have you coming back for more.
- Aroma: The enticing aroma of garlic and parmesan wafts through the air while baking, igniting anticipation and drawing everyone to the kitchen.
- Visual Appeal: Golden-brown and generously topped with parmesan, these cheeseburger bombs are visually appealing, tempting your taste buds from first glance.
- Skill Level Needed: Perfect for beginner cooks, this recipe requires simple preparation and straightforward cooking techniques.
- Special Equipment: You’ll need a baking sheet and parchment paper to make the cooking process easy and clean.
Recipe Overview
- Difficulty Level: This is an easy level recipe, making it accessible for all home cooks. With clear instructions and minimal techniques involved, it’s perfect for beginners.
- Category: Ideal for appetizers or snacks, these bombs can also serve as a main dish depending on your serving size, making them quite versatile.
- Cuisine: This recipe takes inspiration from classic American flavors, with a twist that combines Italian seasoning through the garlic and parmesan.
- Cost: Budget-friendly, the total cost for ingredients is relatively low, ensuring you can whip this dish up without straining your wallet!
- Season: Enjoy these cheeseburger bombs year-round, but they are particularly great for gatherings during fall and winter when comfort foods reign supreme.
- Occasion: Perfect for casual gatherings, game day, or family movie nights, Garlic Parmesan Cheeseburger Bombs are sure to be a crowd-pleaser!
Why You’ll Love This Recipe
These Garlic Parmesan Cheeseburger Bombs are a taste sensation that promises to delight your taste buds. With each bite, you’ll experience the rich flavors of seasoned beef and melted cheese wrapped in a warm, flaky crust. It’s comfort food at its best, and the divine garlic aroma will have everyone waiting impatiently for a taste!
Convenience is key in this recipe; having a delicious dish come together in less than an hour is a major plus. The use of pre-made dough not only saves time but also makes it easier to create a beautiful presentation, allowing you to focus on assembling and baking those tasty bombs.
Nutritionally, these cheeseburger bombs can be a satisfying option for a balanced meal. With protein from the beef and the option to include veggies, they can cater to various dietary preferences while still being incredibly flavorful.
When it comes to social gatherings, these bombs are not just delicious; they also elevate any event. Their shareable nature allows for great conversations over tasty bites, making them a fantastic choice for parties with friends and family.
Lastly, the cost-effectiveness of this recipe makes it accessible for everyone. You can indulge in this delightful snack without overspending, serving up smiles without breaking the bank!
Historical Background and Cultural Significance
The origins of cheeseburger bombs can be traced back to the American hamburger craze, which began in the early 20th century, becoming a symbol of American food culture. Rooted in the concept of playful and fun food, the cheeseburger bomb was developed to enhance the convenience of enjoying a beloved flavor while adding a delightful twist.
These delightful bites hold a place in modern American culture as a crowd-pleasing snack, particularly suited for gatherings and casual dining. Their versatility allows for global adaptations, making them popular in various cuisine styles, from spicy Mexican versions to traditional Asian-inspired flavors used in fillings.
Over time, this recipe has evolved, incorporating different types of fillings and dough. Whether using different cheeses or meat options, the cheeseburger bomb continues to inspire creativity in the kitchen, welcoming experimentation from food enthusiasts everywhere.
Regional variation also plays a role; some areas may opt for local twists on flavors, such as barbecued options or added spices reflecting their regional palates. The continued popularity of these savory snacks ensures they remain a staple in comfort food recipes.
Ingredient Deep Dive
Ground Beef: Ground beef serves as the heart of these cheeseburger bombs. Historically associated with American cuisine, ground beef is not only flavorful but also rich in protein, making it a staple in many households. For the best flavor and texture, opt for ground beef with some fat, ideally 80/20. Store it in the coldest part of your refrigerator or in the freezer for longer shelf life. You might also substitute ground turkey for a leaner option without compromising taste.
Parmesan Cheese: Parmesan cheese brings a rich, salty flavor to this dish. Known for its cultural significance in Italian cooking, this cheese has gathered popularity worldwide. It’s high in calcium and protein, essential for a balanced diet. When selecting Parmesan, look for freshly grated options for the best flavor. Store it sealed in the refrigerator to preserve its freshness. If you’re in need of a substitution, Pecorino Romano or Grana Padano can work well.
Common Mistakes to Avoid
- Not preheating the oven: Always preheat your oven to ensure even cooking and proper puffing of the dough.
- Overstuffing the bombs: Keep the filling balanced; too much filling can lead to a messy and difficult cooking process.
- Using cold dough: Allow the dough to sit at room temperature for easy handling and to ensure a better bake.
- Cutting the dough too thin: Make sure your dough has enough thickness to hold the filling without splitting during cooking.
- Inefficient sealing: Ensure that you properly seal the dough around the filling to avoid leaks during baking.
- Skipping the egg wash: An egg wash helps achieve that golden-brown color; don’t skip this step!
- Not letting them rest: Allow the bombs to cool slightly after baking to improve handling and flavor consistency.
- Rushing the cooling process: Letting them cool helps enhance flavors and makes them easier to handle.
Essential Techniques
Proper Dough Handling: Important for achieving the perfect outer layer, proper dough handling prevents tearing. Always flour your workspace and roll out to an even thickness for uniform cooking.
Sealing the Bombs: To keep all the delicious filling inside, create a tight seal with the dough by pinching together the edges. This technique prevents leakage and ensures that every bite remains flavorful.
Egg Wash Application: Applying an egg wash provides a beautiful golden-brown finish as the cheeseburger bombs bake. Use a pastry brush to apply the egg wash evenly on each bomb.
Monitoring Baking Time: Keep an eye on the baking time to achieve a perfectly cooked outer layer. Overbaking can lead to dryness while underbaking can leave the dough raw.
Pro Tips for Perfect Garlic Parmesan Cheeseburger Bombs
Consider using a combination of meats for varied flavors—the addition of ground sausage or turkey can add an exciting twist!
For extra flavor, mix additional herbs and spices into the beef mixture, like smoked paprika or Italian seasoning.
Experiment with various fillings—adding sautéed onions, diced jalapeños, or even different types of cheese can create delicious alternatives.
Frozen dough can be used for easy preparation; simply allow it to thaw at room temperature before starting.
For a beautiful finish, sprinkle additional parmesan or parsley on top just before serving for an added gourmet touch.
Make sure not to overcrowd the baking sheet, as this can lead to irregular baking results; space the bombs evenly.
If you prefer a crispy bottom, place the baking sheet on the lower rack of your oven as they cook.
Lastly, let the bombs rest for a few minutes before serving—this helps prevent burns and enhances the flavors.
Variations and Adaptations
For a regional twist, consider a Southwest version incorporating black beans and corn into the filling, paired with a spicy salsa for dipping.
During the holidays, you could create a festive adaptation by adding cranberries or stuffing them with classic holiday flavors like turkey and stuffing.
To accommodate dietary restrictions, gluten-free dough options are readily available, allowing those with gluten sensitivities to enjoy these delicious bombs.
Boost the flavor profile by using flavored cheeses, such as cheese infused with herbs or spices for an exciting twist.
Changing the texture is also doable! Try adding crispy bacon bits to the beef mixture for added crunch or utilizing puff pastry instead of traditional dough for a lighter alternative.
For a unique presentation, serve the bombs over a bed of fresh spinach or arugula dressed lightly with vinaigrette for a refreshing contrast.
Serving and Presentation Guide
When plating these cheeseburger bombs, stack them in a pyramid formation to create an inviting visual appeal. This also encourages sharing and community during meals.
Garnishing with fresh herbs such as parsley or cilantro brings color and freshness to the dish, enhancing its visual allure.
Common accompaniments can include dips like marinara, ranch, or garlic aioli, enriching the meal with flavorful contrasts.
For trendy serving ideas, consider using wooden boards or slate serving platters to add a rustic touch to your presentation.
When serving, be mindful of temperature; cheeseburger bombs are best enjoyed warm, so allow them a few minutes after baking before serving for optimal taste.
Aim for portion control by providing small plates for diners to serve themselves, allowing for a relaxed dining experience.
Wine and Beverage Pairing
Pair these delightful bombs with a light-bodied red wine like Pinot Noir, which offers berry flavors without overpowering the dish.
For a non-alcoholic alternative, consider serving a sparkling water infused with citrus or a light iced tea that complements the savory flavors.
If coffee is preferred, a mild medium roast can balance the richness of the cheese and beef without overwhelming the palate.
Ensure that beverages are served chilled, as a refreshing drink enhances the flavor experience significantly.
Storage and Shelf Life
To maintain their freshness, store cooked Garlic Parmesan Cheeseburger Bombs in an airtight container in the refrigerator for up to three days.
For longer storage, consider freezing them; wrap individually in foil and place them in a freezer-safe bag for up to two months.
When reheating, allow them to thaw in the refrigerator overnight, then reheat in the oven at 350°F (175°C) for about 10-15 minutes to restore crispness.
Signs of spoilage include a change in smell or texture; always ensure they are thoroughly cooked before storing or consuming.
Make Ahead Strategies
For easy preparation, consider shaping the bombs and refrigerating them up to one day prior to baking. Just add an extra few minutes to the bake time for optimal results.
You can also prepare the filling a day ahead, storing it in the refrigerator and saving time on the day of cooking.
When assembling, consider placing them on the baking sheet and covering with plastic wrap until ready to bake to keep them fresh.
Quality is maintained by ensuring everything is fresh before assembly; check expiration dates on ingredients like cheese and dough.
If adding fresh elements such as herbs, wait until just before baking to maintain their flavor and aroma.
Scaling Instructions
If you decide to halve the recipe, simply divide the ingredients by two and adjust your baking time as needed, keeping an eye on the color and texture.
For larger gatherings, doubling or tripling the recipe is easy; just ensure you have extra baking sheets available and space your bombs out adequately for even baking.
Adjust kitchen equipment accordingly, such as using multiple oven racks to bake more at once, but remember to rotate for even cooking.
Timing modifications may include a slight increase in baking time for larger batches; keep checking them to avoid overcooking.
When storing larger quantities, ensure each layer is separated with parchment paper to prevent sticking.
Nutritional Deep Dive
This recipe offers impressive macros, balancing protein from beef and cheese with fats from the dough. Each serving delivers a hearty portion without excessive calories, making it a satisfying option.
Notable micronutrients also include calcium from cheese, essential for healthy bones and teeth. Moreover, ground beef is a great source of zinc and B vitamins crucial for energy production.
Health benefits extend to including proteins necessary for muscle repair, making it an excellent option for post-exercise meals.
For those monitoring calories, assessing portion sizes is crucial; each bomb provides a balanced yet indulgent treat without excessive fat.
Weight management can also be supported by adding more veggies to the beef mixture, enhancing nutrient density without significantly increasing calories.
Dietary Adaptations
For gluten-free options, consider utilizing gluten-free dough or a crust made from almond flour or cauliflower for a low-carb alternative.
Dairy-free alternatives can be achieved by substituting regular cheese with vegan cheese options, ensuring the filling remains rich and satisfying.
For a vegan twist, use plant-based ground beef alternatives while ensuring to spice it appropriately for a satisfying flavor profile.
If you’re on a low-carb or keto diet, swap regular dough with keto-friendly pastry options or simply serve the filling in lettuce wraps.
The paleo diet can be accommodated by using almond or coconut flour for the dough and focusing on natural ingredients without processed sugars.
Other specific diets might require attention to portion sizes and ingredient selections; always opt for whole foods where possible.
Troubleshooting Guide
Texture issues can often stem from overbaking; keep a close watch and ensure they are golden but not dry. Use a thermometer to check internal temperatures if unsure.
Flavor balance is key—if the bombs taste bland, ensure ample seasoning in both the beef mixture and dough to enhance the overall dish.
Temperature problems can arise if the oven isn’t preheated; always ensure it warms up adequately before putting the bombs in, ensuring even cooking.
Equipment challenges, such as sticky dough, can be fixed by dusting flour on your workspace and hands, making handling easier.
Ingredient substitutions may cause variations; consider testing different cheeses or meats to find the perfect combination for your palate.
Timing concerns largely involve baking; always check on your cheeseburger bombs a few minutes before the designated time to prevent burning.
Recipe Success Stories
Community feedback has been overwhelmingly positive, with many trying variations like adding bacon bits or using different cheeses for unique flavors.
Readers have shared adaptation stories, turning these bombs into sliders for game day or creating bite-sized versions for cocktail parties.
Photography tips suggest using natural lighting to capture the golden hues and melted cheese, enticing others to try making their own bombs.
Successes with these bombs often come from personal family traditions, bringing them together to create new memories while enjoying delicious food.
Frequently Asked Questions
How can I store leftovers?
Store any leftover cheeseburger bombs in an airtight container in the refrigerator for 3-4 days. Reheat them in the oven for the best texture.
Can I freeze these bombs?
Yes! You can freeze unbaked bombs for up to two months. When ready to bake, you can cook them from frozen, just add extra baking time.
What type of ground beef should I use?
Using an 80/20 ground beef is ideal for a juicy filling. However, you can also use ground turkey or chicken for a leaner option.
Can I use different cheeses?
Absolutely! Feel free to experiment with different cheeses like cheddar, mozzarella, or Gouda for varied flavors.
Are there vegetarian options for this recipe?
Yes! Substitute the beef with a plant-based ground meat or cooked mushrooms for a hearty filling.
How do I ensure my bombs are crispy?
Apply an egg wash before baking and avoid overcrowding the baking tray, which ensures they crisp up nicely.
Can I add vegetables to the filling?
Yes, finely chopped bell peppers or onions can add extra flavor and nutrition; just be cautious not to add too much moisture.
What can I serve with these bombs?
Serve with dipping sauces like ranch, ketchup, or garlic aioli for an extra burst of flavor!
How long do they take to cook if baked from frozen?
If baking from frozen, add approximately 10-15 minutes to the baking time to ensure they’re fully cooked.
Can I make these bombs ahead of time?
Yes! You can assemble them the night before and store them in the fridge until you’re ready to bake them.
Additional Resources
Explore related recipes like BBQ Meatball Bombs and Pepperoni Pizza Bombs for more variations that excite the taste buds!
Check out our technique guides for mastering flaky dough or the perfect burger seasoning, ensuring you’re equipped with all skills needed to create amazing dishes.
Gain ingredient information and best practices for using fresh produce and herbs, enhancing your cooking sessions at home.
Look for equipment recommendations such as the best baking sheets or non-stick sprays that make preparation seamless for recipes like these!
Seasonal variations are also available; consider incorporating summer ingredients like zucchini or tomatoes into your stuffing for a fresh twist!
Join the Conversation
We invite you to share your thoughts on this recipe on social media! Use the hashtag #CheeseburgerBombs to connect with others who love this delightful dish.
Photography tips: Try to capture your bomb creations with a simple backdrop to make them pop, and be sure to use natural light for the best results.
Leave a recipe review below and let us know how your Garlic Parmesan Cheeseburger Bombs turned out; we’d love to hear about your variations!
Engage with our community by sharing your own ideas and adaptations; let’s inspire each other to create amazing meals.
The Recipe
Garlic Parmesan Cheeseburger Bombs
Serves: 12 bombs
Prep Time: 15 mins
Cook Time: 30 mins
Total Time: 45 mins
Kitchen Equipment Needed
- Baking sheet
- Parchment paper
- Mixing bowl
- Pastry brush
- Rolling pin
Ingredients
- 1 lb ground beef
- 1 cup shredded parmesan cheese
- 1 package pre-made pizza dough
- 2 cloves garlic, minced
- 1 egg (for egg wash)
- Salt and pepper, to taste
- Optional: herbs/spices, as desired
Directions
- Preheat your oven to 375°F (190°C) and line a baking sheet with parchment paper.
- In a mixing bowl, combine ground beef, minced garlic, salt, and pepper. Mix until well combined.
- Divide dough into equal pieces and flatten each piece into a circle.
- Place a tablespoon of the beef mixture in the center of each dough circle.
- Add a tablespoon of parmesan cheese over the beef.
- Carefully fold the dough over the filling and seal the edges tightly.
- Place the bombs on the prepared baking sheet, leaving space in between.
- Beat the egg and brush the mixture over the tops of each bomb for a golden finish.
- Bake in the preheated oven for 25-30 minutes until the bombs are golden brown.
- Allow them to cool slightly before serving to enhance flavors and textures.
Recipe Notes
- Feel free to add additional spices to the beef mixture for enhanced flavor.
- These bombs can be made ahead of time and stored in the refrigerator before baking.
- Any leftover bombs can be stored in an airtight container and reheated in the oven.