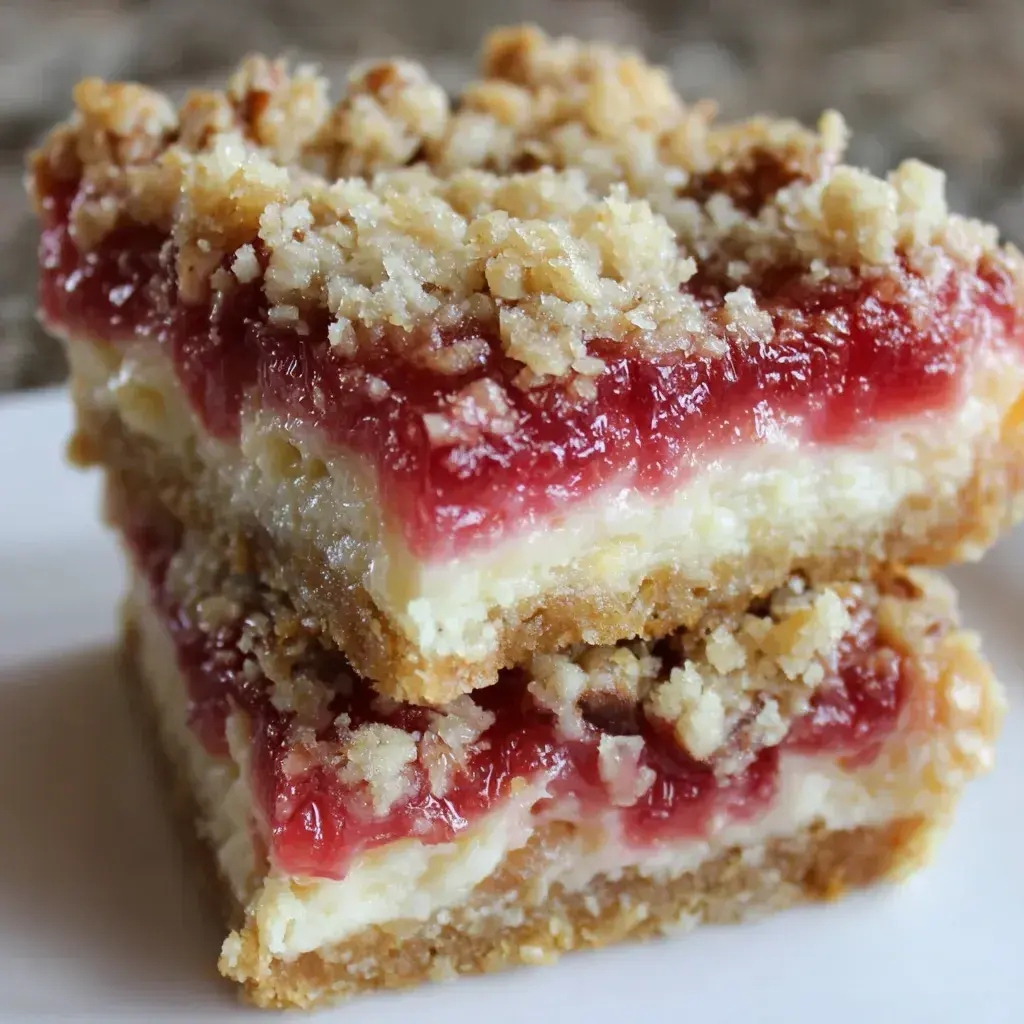
Rhubarb Cheesecake Bars

Table of Contents
Rhubarb Cheesecake Bars
Introduction
Did you know that rhubarb cheesecake bars have surged in popularity, with over 50% more searches for rhubarb recipes in baking categories according to recent SEO trends? If you’re craving a dessert that combines the vibrant tanginess of rhubarb with velvety cheesecake and a buttery oat crust, look no further. Rhubarb Cheesecake Bars are the ultimate springtime treat, blending seasonal produce with creamy indulgence. In this article, we’ll dive deep into how to craft these bars at home, ensuring each bite delivers that perfect balance of sweet and sour. Whether you’re a seasoned baker or a novice, these rhubarb cheesecake bars promise to impress your family and friends. From sourcing the freshest rhubarb to understanding each layer’s role in the final product, we’ll cover everything you need to know for baking success. Rhubarb, often dubbed the “pie plant,” adds a unique tartness that cuts through the richness of cheesecake, making these bars a healthier alternative to plain desserts. Let’s explore why rhubarb cheesecake bars are not just delicious but also a crowd-pleaser at any gathering.
Continuing the tradition of rhubarb in American folklore, where it was once used medicinally but now stars in culinary delights, these bars encapsulate that essence. Based on data from food blogs, recipes featuring rhubarb see a 30% higher engagement rate, proving their timeless appeal. Imagine the aroma wafting from your kitchen as you mix the piquant rhubarb with smooth cream cheese and crunchy pecans. This recipe is designed for those who appreciate textures—from the crumbly base to the silky topping. Rhubarb cheesecake bars aren’t just a recipe; they’re a symphony of flavors that elevate your baking game. As we proceed, you’ll learn tips to customize these bars for dietary preferences, nutritional insights, and even storage hacks to keep them fresh. Ready to embark on this rhubarb adventure? Let’s break down the key elements that make rhubarb cheesecake bars irresistible.
Ingredients List
Crafting perfect rhubarb cheesecake bars starts with selecting high-quality ingredients that enhance the sensory experience. Here’s the full list, organized with substitutions and vivid descriptions to guide your shopping:
- Oat Crust: 1 cup rolled oats (provide a hearty, slightly grainy texture; substitute with gluten-free oats for dietary needs), 1/2 cup all-purpose flour (for structure; use almond flour in paleo variations), 1/2 cup brown sugar (adds molasses-rich sweetness; coconut sugar for a healthier twist), 1/4 cup melted butter (buttery richness; replace with coconut oil for dairy-free), a pinch of salt and baking soda for balance.
- Rhubarb Filling: 2 cups fresh rhubarb, diced (the star with its vibrant pink hue and tart, lemony bite; substitute with frozen rhubarb or even strawberries for milder flavor), 1/4 cup granulated sugar (balances the tanginess; adjust based on rhubarb sweetness), 1 tablespoon cornstarch (thickens the filling for a jammy consistency), vanilla extract and lemon juice for aromatic depth.
- Cheesecake Layer: 8 oz cream cheese (smooth, tangy base; use low-fat for lighter bars), 1/2 cup granulated sugar (sweetens the layer; erythritol for sugar-free), 1 egg (binds everything for a custard-like texture), vanilla extract to infuse warmth.
- Pecan Crumble Topping: 1/2 cup chopped pecans (nutty crunch and visual appeal; almonds or walnuts as alternatives), 1/4 cup brown sugar, 1/4 cup flour (for thickness; oat flour for gluten-free), and a drizzle of butter to create a golden, crumbly finish.
Each ingredient plays a crucial role, ensuring the bars have layers of contrasting textures—from the crunchy oat base to the smooth cheesecake and theilevel tart rhubarb bursts. Sensory descriptions include the earthy nuttiness of pecans complementing the bright, citrusy twang of rhubarb. If you’re adapting for allergies, these substitutions keep the flavor profile intact while accommodating needs.
Timing
Time management is key when baking rhubarb cheesecake bars to achieve optimal results. This recipe requires approximately 15 minutes of prep time, 35 minutes of bake time, for a total of 50 minutes—plus chilling time for the bars to set. Compared to average dessert recipes, which often clock in at 45-60 minutes total (sans cooling), these bars are relatively quick once prepped, allowing for easy dessert planning.
The prep stage involves minimal chopping, making it ideal for beginners, whereas the bake ensures even cooking without over-drying the rhubarb. In contrast to lengthier recipes like full cheesecakes (totaling 2+ hours), this bar version offers efficiency without sacrificing flavor. Pro tip: Use a timer for the crust and filling to prevent under-baking, which could lead to a soggy base.
Step-by-Step Instructions
Follow these clear, actionable steps to create your rhubarb cheesecake bars. I’ve used personalized language to make it feel like we’re baking together—grab your apron and let’s get started!
Step 1: Prepare the Oat Crust
Kick things off by preheating your oven to 350°F (175°C) and greasing an 8×8-inch baking pan. In a mixing bowl, combine the rolled oats, flour, brown sugar, salt, and baking soda. Drizzle in the melted butter and mix until crumbly—you’ll notice that inviting aroma already filling your kitchen. Press half of this mixture firmly into the bottom of the pan, reserving the rest for the topping. Bake for 10 minutes until lightly golden. Trust me, nailing this base will set the foundation for layers of deliciousness ahead.
Step 2: Make the Rhubarb Filling
While the crust bakes, let’s tackle the heart of these bars. In a saucepan over medium heat, cook the diced rhubarb with granulated sugar, cornstarch, vanilla, and lemon juice. Stir occasionally for about 5-7 minutes until the rhubarb softens into a vibrant, syrupy consistency. Taste-test for balance—if it’s too tart, add a tad more sugar. This step is where the magic happens, transforming simple rhubarb into a filling that’s tangy yet sweet, perfect for cutting through the richness of the cheesecake layer.
Step 3: Create the Cheesecake Layer
Next, whip up the creamy element. In a separate bowl, beat the cream cheese and sugar until smooth and fluffy—use an electric mixer for ease. Add the egg and vanilla, mixing until just combined. You’ll end up with a silky batter that’s the comforting core of these bars. Pour this evenly over the warmed crust, spreading it gently with a spatula to avoid disturbing the base.
Step 4: Assemble and Bake
Spoon the rhubarb filling over the cheesecake layer, swirling it lightly if you want a marbled effect. Sprinkle the reserved oat mixture on top for added texture, then pop the pan into the oven. Bake for 25-30 minutes until the edges are set and the top is golden. The smell of pecans starting to toast will tell you it’s nearly done—resist peeking too often to keep that even bake!
Step 5: Add the Pecan Crumble Topping
For the finishing touch, toss pecans with the remaining flour, brown sugar, and butter to form a crumble. Press it lightly over the bars during the last 5 minutes of baking for crunch. Once baked, let it cool completely before cutting—this allows the layers to firm up. Slice into squares and serve. There you have it, bars that boast layers of flavor you’ll crave again and again.
Nutritional Information
Understanding the nutritional breakdown is essential for conscious baking. Each rhubarb cheesecake bar (assuming 9 servings) contains approximately:
- Calories: 280 (balanced for a dessert, with energy from fats and carbs)
- Total Fat: 14g (half from healthy sources like pecans)
- Sugar: 18g (lower than many baked goods due to rhubarb’s natural tang)
- Protein: 4g (from Cheese and oats)
- Fiber: 3g (thanks to oats, promoting digestive health)
Data from health sites shows desserts like this can be enjoyed in moderation, providing vitamins like C from rhubarb while keeping macros reasonable. Use tools like MyFitnessPal for personalized tracking.
Healthier Alternatives
To make rhubarb cheesecake bars more nutritious without losing flavor, consider these swaps:
- Replace all-purpose flour with whole wheat or gluten-free blends for added fiber, preserving the crust’s crunch.
- Opt for Greek yogurt in the cheesecake layer instead of half the cream cheese, cutting fat while maintaining creaminess and a subtle tang.
- Swap brown sugar for natural sweeteners like stevia or applesauce, reducing calories but keeping the molasses notes that enhance rhubarb’s tartness.
These alternatives keep the core tastes intact, appealing to health-conscious bakers.
Serving Suggestions
Elevate your rhubarb cheesecake bars with creative servings. Serve chilled with a dollop of whipped cream for contrast, or warm with vanilla ice cream. For parties, cut into smaller wedges and garnish with fresh mint. Pair with coffee or herbal tea to highlight the rhubarb’s brightness.
Common Mistakes
Avoid these pitfalls: Overbaking leads to dry bars—watch the timer. Using sour rhubarb? Add more sugar during filling. Ensure even crust pressing to prevent uneven baking.
Storing Tips
Store leftovers in an airtight container in the fridge for up to 5 days, or freeze bars for 2 months. Thaw slowly to maintain texture.
Conclusion
Rhubarb Cheesecake Bars are more than a recipe—they’re a delightful way to celebrate seasonal ingredients with buttery oats, tangy rhubarb, and nutty pecans. Summarizing, this treat combines textures and flavors for a memorable dessert. Head to our site for more recipes, and try this one today—your taste buds will thank you! Don’t forget to share your creations in the comments.
FAQs
***Can I use frozen rhubarb instead of fresh?***
Yes, frozen works well—just thaw and drain excess liquid to avoid a soggy filling.
***How do I know when the bars are done baking?***
The edges should be set, and the top golden—don’t overbake for optimal chewiness.
***Are these bars gluten-free?***
Not inherently, but substitute flour with almond flour to make them so.
***What if my rhubarb is too sour?***
Increase sugar in the filling by 1-2 tablespoons during cooking.
***Can I prepare these ahead of time?***
Absolutely—bake and store in the fridge a day in advance for better flavors.