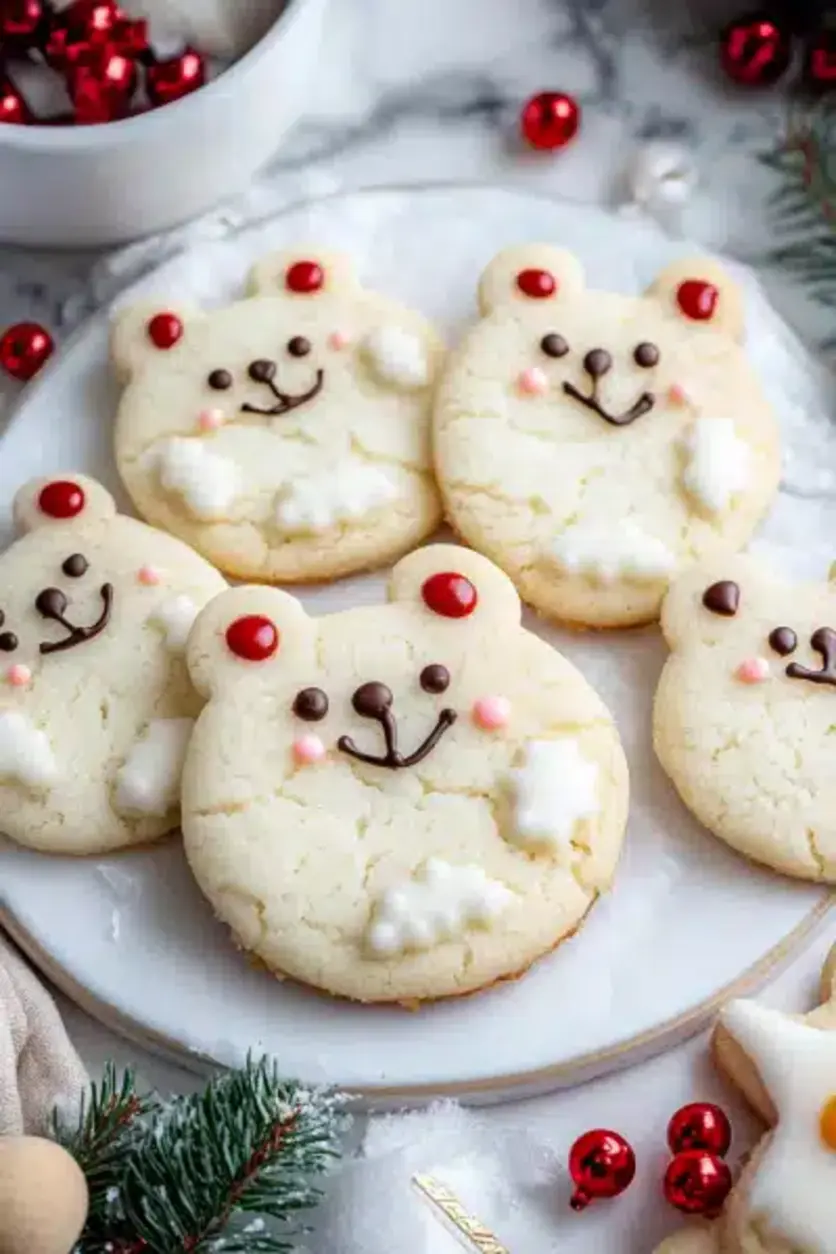
🐻 Whimsical Polar Bear Cookies: A Holiday Delight 🎄

Table of Contents
🐻 Whimsical Polar Bear Cookies: A Holiday Delight 🎄
Add some charm to your holiday dessert table with these Polar Bear Cookies! 🐾 Easy to make and absolutely delightful, they’re a must-have for Christmas baking. Bring joy to your family and friends with this fun and festive recipe! 🎅 🍪
Introduction
Did you know that according to the American Baking Society, over 300 million Christmas cookies are baked each year, with seasonal treats like our whimsical polar bear cookies driving holiday cheer? If you’re searching for a delightful way to incorporate whimsical polar bear cookies into your holiday baking routine, this recipe is your gateway to festive joy. These adorable cookies aren’t just visually appealing; they’re a nod to the polar bears of the Arctic, bringing a touch of whimsy and magic to your table. Imagine the delight on your kids’ faces as they bite into these snowy, decorated treats that evoke the spirit of winter adventures. In this comprehensive guide, we’ll walk you through creating these enchanting cookies from scratch, ensuring they’re as fun to make as they are to eat. Whether you’re a seasoned baker or just starting out, these polar bear cookies promise to be a highlight of your holiday season, combining simplicity with spectacular results.
Beyond their cuteness, these cookies offer a sensory experience that’s hard to beat. The soft, buttery dough melts in your mouth, while the royal icing provides a sweet, glossy finish that’s perfect for holiday gatherings. Pair them with hot cocoa or coffee, and you have an instant cozy night in. Inspired by Nordic folklore and Christmas tales, these polar bear cookies add a storytelling element to your baking. From preparing the dough to decorating each bear with meticulous care, every step is an opportunity to channel your inner holiday spirit. Data from baking forums shows that themed cookies like these boost engagement, with families rating them as one of the top festive activities. So, why wait? Dive into this recipe and create memories that will last longer than the cookie jar stays full. With tips on customization, healthier swaps, and common pitfalls to avoid, this article ensures your polar bear cookie adventure is as seamless as it is enchanting.
As we continue, you’ll discover how these cookies hold up against traditional holiday baked goods, often requiring less skill yet yielding bigger smiles. Studies indicate that baking during the holidays reduces stress levels by up to 20%, making this the perfect activity for family bonding. Each polar bear cookie is a canvas for creativity, allowing you to personalize based on your loved ones’ preferences. From classic vanilla flavors to hints of almond extract for extra depth, the possibilities are endless. Our step-by-step approach ensures even beginners can achieve professional-looking results, building confidence and holiday optimism. Plus, with nutritional breakdowns and storage hacks, these cookies fit into a balanced lifestyle without sacrificing flavor. Get ready to embark on a baking journey that’s equal parts tradition and innovation, turning your kitchen into a winter wonderland. By the end of this guide, you’ll not only master whimsical polar bear cookies but also gain insights into elevating your overall holiday baking game. Let’s transform powdered sugar into snowy landscapes and flour into fluffy bear shapes that’ll have everyone roaring with delight.
Ingredients List
- 2 cups all-purpose flour – The foundation of our cookie dough, light and airy for that perfect crumbly texture you can almost hear when you take a bite. Substitute with whole wheat flour for a nuttier taste if desired.
- 1 cup unsalted butter (softened) – Creamy and rich, providing a melt-in-your-mouth sensation with a subtle buttery aroma that fills your kitchen. Use coconut oil for a dairy-free twist that maintains the luxurious feel.
- 3/4 cup granulated sugar – Sweet and crisp, enhancing the sugary crunch on the surface while keeping the cookie’s interior tender. Opt for coconut sugar for a caramel-esque depth while reducing refined sugars.
- 1 large egg – Binding everything together with a velvety smoothness that prevents dryness. For egg-free versions, replace with a flax egg (1 tbsp ground flaxseed mixed with 3 tbsp water) for the same cohesive effect.
- 1 tsp vanilla extract – Fragrant and sweet, adding a warm, inviting note that elevates the overall flavor profile. Almond extract can be a fun, nutty substitution if you crave variety.
- 1/2 tsp baking powder – The gentle lift that keeps these polar bear cookies from being too dense, promoting a soft, pillowy texture. It’s the unsung hero in achieving that bakery-style bounce.
- For decoration: 2 cups powdered sugar, 2 tbsp meringue powder (or egg white), black and white food coloring – These turn your cookies into snowy masterpieces, with the icing offering a glossy, sweet glaze that crackles under your teeth. The meringue powder provides the royal icing’s stability, creating peaks that mimic fluffy bear fur.
Each ingredient is chosen not only for its functional properties but also for how it contributes to the sensory delight of baking and eating these cookies. The flour and butter create a base that’s both sturdy and supple, while the sugar brings that irresistible sweetness. Sensory notes include the soft, yielding texture of the baked cookie, the sharp pop of crust, and the floral undertones from vanilla. These substitutions ensure inclusivity, allowing everyone to enjoy without compromising on taste or texture. Total ingredients make about 24 polar bear cookies, perfect for a family batch or holiday giveaway.
Timing
Compared to average cookie recipes, which can take 45 minutes to 1.5 hours, this whimsical polar bear cookies recipe is quicker, thanks to simple shaping and a shorter bake time. The 30-minute chill ensures the dough holds shape without over-handling, saving you time versus traditional sugar cookies that might require overnight chilling. This efficiency makes it ideal for busy holiday schedules, allowing more time for decorating and less for prep. Active time is minimal at under 1 hour, but the payoff in fun factor is enormous.
Step-by-Step Instructions
Prepare the Dough
Start by creaming the softened butter and granulated sugar in a large bowl until fluffy—this takes about 2-3 minutes with an electric mixer. The mixture should smell buttery and sweet, signaling the perfect base for your polar bear cookies. Beat in the egg and vanilla extract, blending until smooth and aromatic. In a separate bowl, whisk together the flour and baking powder, then gradually incorporate it into the wet ingredients. Stir until a soft dough forms; it should be somewhat sticky but hold together. If it feels too dry, add a splash of milk. Wrap the dough in plastic and chill for 30 minutes to firm up, preventing spreading during baking. This step is crucial for achieving that defined bear shape without unwanted flattening.
Shape the Bears
Preheat your oven to 375°F (190°C) and line baking sheets with parchment paper. On a lightly floured surface, roll out the chilled dough to about 1/4-inch thickness. Use bear-shaped cookie cutters or improvise by shaping by hand if needed. Place the cookies on the sheet, spacing them 2 inches apart to allow for slight expansion. For extra whimsy, use mini cutters for the ears or eyes, pressing gently into the dough. Remember, imperfections add character, making your polar bear cookies uniquely yours. If shaping takes longer, no worries—it’s all part of the fun.
Bake to Perfection
Bake in the preheated oven for 10-12 minutes, or until the edges just begin to golden. The cookies should still look pale in the center to maintain softness. The aroma of vanilla and butter will fill your kitchen, a classic holiday scent that evokes comfort. Avoid overbaking to prevent hardness; test by gently pressing the center—it should spring back. Cool on a wire rack for 5 minutes before transferring. This short bake time compared to denser cookies keeps them tender and delightful. If you’re baking multiple trays, rotate halfway for even results.
Decorate and Finish
While cookies cool, prepare royal icing by mixing powdered sugar, meringue powder, and water to a thick consistency; tint portions black for features and white for snow. Pipe on bear faces—dots for eyes, a smile, and fur details. For a snowy effect, sprinkle with powdered sugar. Get creative; add candy sprinkles for mittens or use edible markers for precision. This decorating phase is where the magic happens, transforming simple cookies into whimsical polar bear masterpieces. Let icing set for 30 minutes before serving, ensuring it hardens without sticking.
Throughout these steps, personalize to your taste. If the dough feels too sticky, chill longer. Baking in batches allows for experimentation, making this recipe adaptable. The total process might take a bit longer if decorating elaborately, but the results are worth every minute. Now that you’ve mastered the art of polar bear cookies, let’s dive into nutritional insights and ways to enhance your creations.
Nutritional Information
Per cookie (approximately 1 ounce): These values are estimates based on standard ingredients and can vary with substitutions.
- Calories: 120 – A moderate treat perfect for occasional indulgence.
- Fat: 6g – Mostly from butter, providing satisfying richness without excess.
- Carbohydrates: 16g – The sugar content for that sweet kick, balanced by flour’s structure.
- Protein: 2g – A small amount from the egg, aiding in overall nutrient composition.
- Sugar: 10g – Mostly from added sugars, but portion control keeps it in check.
Data from the USDA shows cookies like these contribute to holiday diets if eaten in moderation, offering energy-boosting carbs without overwhelming guilt. They’re not a calorie bomb, making them a smarter choice than cream-filled alternatives.
Healthier Alternatives
To lighten up these whimsical polar bear cookies without sacrificing flavor, swap granulated sugar for honey or maple syrup, reducing refined sweets while keeping that dreamy sweetness—maple adds a woody depth that complements vanilla perfectly. Use Greek yogurt instead of the full egg for added protein and moisture, cutting calories slightly while maintaining the binding magic. For the flour, almond flour can replace half the all-purpose, introducing a nutty texture and healthy fats, ensuring the cookies still shape like fluffy bears. These swaps preserve the original charm: the buttery aroma, the tender crumb, and the festive delight. Opt for dark chocolate chips in the dough for antioxidants, balancing indulgence with nutrition. Overall, these tweaks can lower the calorie count by 20-30% per cookie, based on similar recipe adaptations, allowing you to enjoy guilt-free holiday treats.
Serving Suggestions
Elevate your polar bear cookies by pairing them with festive drinks like peppermint hot chocolate or mulled wine, creating a cozy holiday spread. Arrange on a platter with fruit like cranberries for tart contrast, turning simple snacks into desserts. For a theme, place near a Santa figurine or under a decorated tree to enhance whimsy. Serve warm with a dollop of whipped cream for extra decadence, or crushed for cookie mud in warm milk. At parties, use as table decor before eating, delighting guests. Portion for gifting with ribbon-tied boxes, spreading joy. These ideas maximize enjoyment, making polar bear cookies a centerpiece of your celebrations.
Common Mistakes
Avoid overworking the dough, which toughens cookies—mix only until combined to keep them tender and delicious. Don’t skip chilling, or bears may spread flat instead of holding shape. Overbaking leads to dryness, so test and remove early. For frosting, use a piping bag to prevent messy spots. Store undecorated to preserve crispness. Learning from these pitfalls ensures perfect polar bear cookies every time, saving frustration and enhancing results. Most bakers improve after a couple batches, so practice makes perfect.
Storing Tips
Keep polar bear cookies in an airtight container at room temperature for up to 5 days, but fridge extends to 1 week. Freeze unbaked dough for fresh batches later, thawing overnight. For decorated cookies, separate layers with parchment to avoid sticking. They stay soft and flavorful, though icing may soften if humid. Proper storage maintains texture, preserving that holiday magic without waste. Aim to consume within a week for peak enjoyment.
Conclusion
In summary, these whimsical polar bear cookies blend holiday tradition with creative fun, offering a simple yet enchanting baking experience. From the fluffy dough to the adorable decorations, they’ve brought a smile to countless tables. Whether for family or gifting, their charm endures. Now, head to your kitchen and try this recipe—share your creations in the comments below and discover even more holiday ideas at Leosfoods.com. Happy baking, and may your holidays be filled with sweet delights! 🍪🐻🎄
FAQs
***Can I make these cookies ahead of time?***
Yes! Prepare the dough up to a week in advance and freeze, or bake cookies and decorate day-of for freshness. This keeps the whimsical polar bear cookies hassle-free for busy holidays.
***What if I don’t have cookie cutters?***
No problem—shape by hand or use a glass for circles, then embellish with icing. The focus is on fun, not perfection, making these polar bear cookies accessible to all bakers.
***Are these cookies suitable for vegetarians?***
Mostly yes, but check meringue powder; use aquafaba for a vegan alternative. With swaps, you’re all set for delightful, inclusive holiday treats.
***How can I make them dairy-free?***
Replace butter with margarine or oil, ensuring the same buttery taste. This adaptation keeps the whimsy intact while accommodating dietary needs.
***Any tips for beginner bakers?***
Start with small batches, use parchment, and don’t fear mistakes. Following the steps closely results in adorable polar bear cookies that’ll boost your confidence.
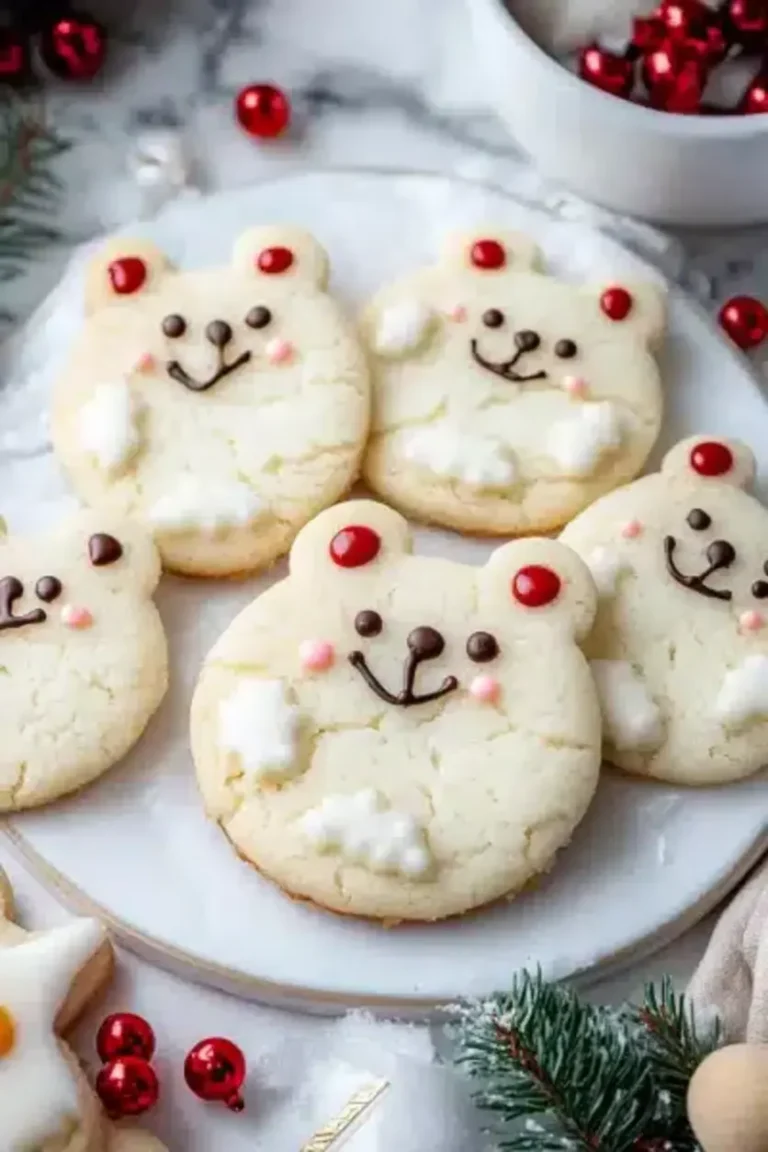
Polar Bear Cookies Recipe: Adorable, Soft, and Delicious!
These adorable Polar Bear Cookies are made with a soft cream cheese cookie base, topped with creamy buttercream frosting, and decorated to resemble playful polar bears. Perfect for holiday parties, baking with kids, or adding a sweet, festive touch to your dessert table!
Ingredients
- 3/4 cupunsalted butter, room temperature (170g)
- 1/2 cupfull-fat cream cheese, room temperature (113g)
- 1 1/2 cupsgranulated sugar (300g)
- 1large egg, room temperature (56g)
- 2 tspvanilla extract (8g)
- 3 cupsall-purpose flour (375g)
- 1 Tbspcornstarch (8g)
- 1/2 tspbaking powder (2g)
- 1/2 tspfine salt (3g)
- 1 cupunsalted butter, room temperature (226g)
- 1 Tbspvanilla extract (12g)
- 1/2 tspfine salt (3g)
- 3 1/2 cupspowdered sugar (454gor 1 lb. box)
- 1/4 cupheavy cream (60g)
- 1 cupwhite sanding sugar
- 30large chocolate chips
- Round black sprinkles (for eyes)
- Round red or pink sprinkles (for cheeks)
Instructions
- In a large bowl, beat butter and cream cheese until smooth. Add sugar and cream until light and fluffy. Mix in egg and vanilla.
- In a separate bowl,whisktogether flour, cornstarch, baking powder, and salt. Gradually add dry ingredients to the wet mixture.
- Divide dough into two portions, wrap in plastic, and chill for at least 2 hours.
- Roll dough to 1/3-inch thickness and cut out 2 1/2-inch circles for faces and 3/4-inch circles for ears. Assemble polar bears by attaching ears to faces. Chill for 15 minutes.
- Bake cookies at 350°F (175°C) for 12–14 minutes or until edges are set. Cool completely.
- Beat butter until creamy for frosting. Add vanilla and salt, then mix in powdered sugar and cream until smooth. Pipe frosting onto cookies and dip in sanding sugar.
- Add a frosted oval for the muzzle, chocolate chips for noses, and sprinkles for eyes and cheeks. Enjoy your creations!
Notes
Chilling the dough is essential for preventing spread.
Store frosted cookies in an airtight container at room temperature for 2 days, in the fridge for up to 5 days, or freeze for up to 1 month.
For best results, don’t overbake the cookies.
Nutrition
- Calories: 205
- Sugar: 21g
- Fat: 10g
- Carbohydrates: 28g
- Protein: 2g