Loaded Cheesy Pocket Tacos

“`html
Loaded Cheesy Pocket Tacos
Table of Contents
Introduction
Did you know that over 70% of home cooks are actively seeking “fusion” recipes that combine familiar comfort with exciting new textures? If you’re part of that majority craving something deliciously different for taco night, you’ve hit the jackpot. These Loaded Cheesy Pocket Tacos are the ultimate answer to the midweek dinner slump, transforming the humble taco into a crispy, portable, cheese-stuffed masterpiece. Imagine a golden-brown tortilla pocket, crackling with each bite to reveal a molten core of seasoned beef and a luxuriously creamy, salsa-infused cheese blend. This isn’t just another taco recipe; it’s a textural revolution in your kitchen, delivering maximum satisfaction with minimal fuss. Perfect for busy weeknights, game-day snacks, or a fun hands-on meal with the family, these pockets promise a quick and utterly satisfying experience that will have everyone asking for seconds.
Ingredients List
Gather these simple ingredients for a flavor-packed result. I’ve included sensory notes and smart substitutions to make this recipe your own.
- 1 lb Ground Beef (80/20 blend): The ideal fat content for juicy, flavorful filling. For a leaner option, use 90/10 or ground turkey (add a tbsp of olive oil while cooking).
- 1 packet (1 oz) Taco Seasoning: The quick flavor backbone. For a homemade touch, mix 2 tsp chili powder, 1 tsp cumin, 1 tsp paprika, ½ tsp garlic powder, ½ tsp onion powder, and ¼ tsp cayenne.
- 8 Medium Flour Tortillas (Burrito-size): They should be pliable and slightly thick for sturdy pockets. For a gluten-free version, use large gluten-free tortillas or corn tortillas (you may need to warm them first).
- 4 oz Cream Cheese, softened: Provides a tangy, creamy base. Feel it soften at room temperature for easy mixing. For a lighter version, use Neufchâtel cheese.
- ½ cup Chunky Salsa (medium heat): Infuses moisture and a bright, tomatoey kick with bits of onion and pepper. Choose a fire-roasted variety for a deeper, smoky aroma.
- 1 ½ cups Shredded Sharp Cheddar Cheese: Delivers the essential gooey, salty melt. The sharpness cuts through the richness. A Monterey Jack blend offers a milder, equally melty alternative.
- 2 tbsp Vegetable Oil or Butter: For frying to a perfect, crispy golden brown. Butter adds a rich, nutty flavor.
- Optional Toppings for Serving: Cool, creamy sour cream, vibrant diced tomatoes, crisp shredded lettuce, sliced jalapeños for heat, and fresh cilantro for a herbal finish.
15 minutes
10 minutes
25 minutes
Timing
One of the biggest wins for this recipe is its speed. With a total time of just 25 minutes from fridge to plate, it significantly outpaces the average taco or enchilada recipe, which often requires 45-60 minutes including baking time. The prep is a swift 15 minutes—mostly browning meat and mixing the creamy filling—while the cook time is a mere 3-5 minutes per batch in the skillet. Compared to waiting for an oven to preheat and bake, this stovetop method delivers that crave-worthy crispy texture in half the time, making it a champion of efficient, satisfying cooking.
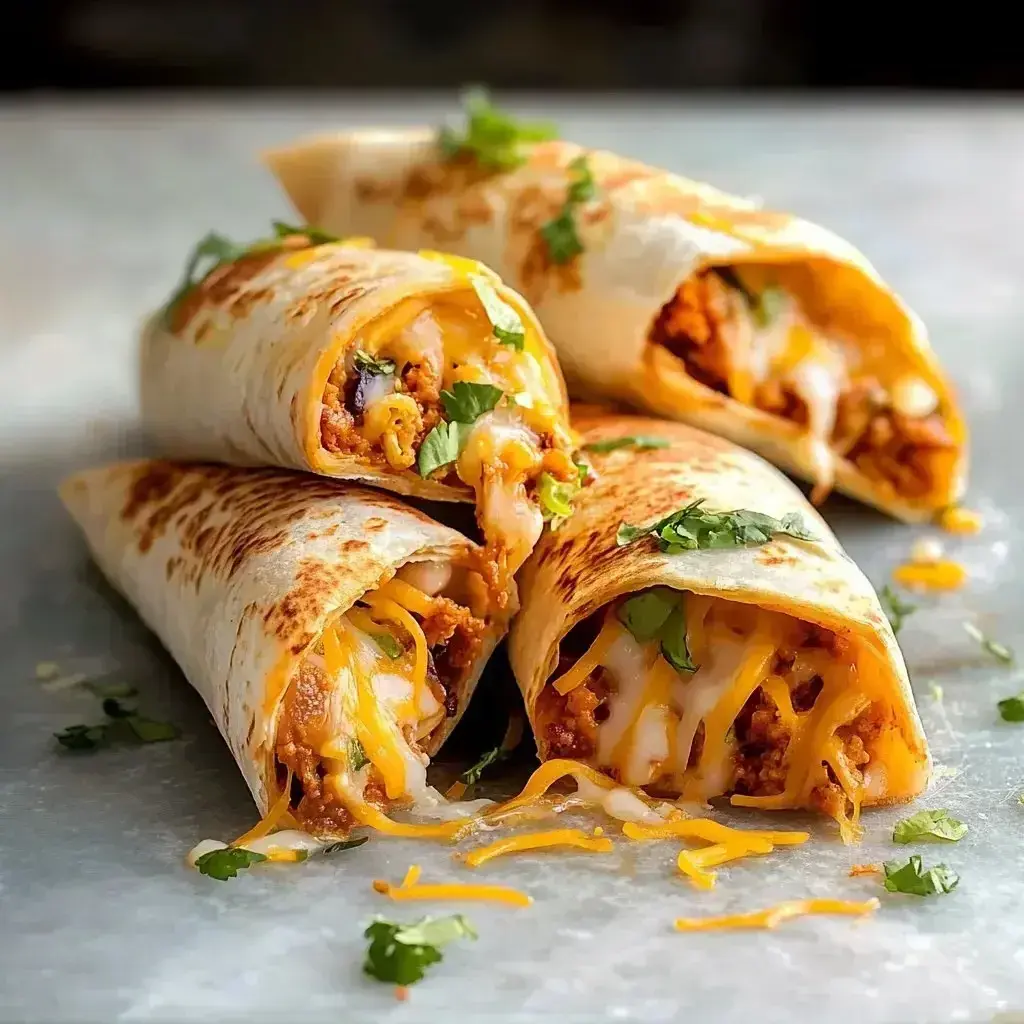
The perfect crispy pocket, filled with molten cheese and savory beef.
Step-by-Step Instructions
Step 1: Prepare the Filling
In a large skillet over medium-high heat, cook the ground beef, breaking it up with a spatula, until it’s fully browned and no pink remains. This should take about 6-7 minutes. Now, here’s my pro tip: drain most of the excess grease, but leave about a tablespoon behind. This residual fat will help the taco seasoning bloom and stick to the meat, amplifying its flavor. Sprinkle the taco seasoning over the beef, add ¼ cup of water, and stir. Let it simmer for 2-3 minutes until the liquid is absorbed and the meat is beautifully coated. Remove from heat and set aside. In a medium bowl, combine the softened cream cheese and salsa. Use a fork or hand mixer to blend until smooth and creamy. This salsa-infused cream cheese is the secret weapon—it keeps the filling moist and adds a tangy complexity.
Step 2: Assemble the Pockets
Lay a flour tortilla flat on your work surface. Spread about 2 tablespoons of the salsa cream cheese mixture in the center, leaving a 2-inch border around the edges. Top with a generous scoop (about ⅓ cup) of the seasoned beef, then sprinkle with a hearty handful of shredded cheddar. The key to a good seal is to not overfill! Fold the tortilla in half over the filling, pressing gently. Now, crimp the edges shut. You can use a fork to press and seal the curved edge firmly, or for a more rustic look, fold and pinch the edge with your fingers. This creates the iconic “pocket” that will hold all the cheesy goodness inside during cooking.
Step 3: Cook to Perfection
Heat your vegetable oil or butter in a clean skillet over medium heat. You want it hot enough that a drop of water sizzles, but not smoking. Carefully place 2-3 pockets in the skillet, without crowding. Cook for 2-3 minutes on the first side, until it’s a deep, golden brown and crispy. Peek underneath to check! Using a spatula, gently flip and cook the other side for another 2 minutes. The tortilla should be uniformly crisp, and you might see little bubbles of melted cheese trying to escape—that’s a good sign! Transfer to a plate lined with a paper towel to absorb any excess oil. Repeat with the remaining pockets, adding a bit more oil to the pan if needed.
Step 4: Serve and Enjoy
Let the pockets rest for just a minute—this allows the cheese to set slightly so it doesn’t all rush out on the first bite. Serve them immediately while they’re hot and supremely crispy. I love to present them on a platter with bowls of all the optional toppings so everyone can customize their perfect bite. The contrast of the hot, crunchy exterior with the cool, fresh toppings is what makes this meal truly special.
Nutritional Information
(Approximate values per pocket, without additional toppings)
- Calories: 380 kcal
- Protein: 18g
- Carbohydrates: 24g
- Dietary Fiber: 2g
- Sugars: 3g
- Fat: 24g
- Saturated Fat: 10g
- Cholesterol: 65mg
- Sodium: 720mg
Healthier Alternatives
You can easily lighten up this dish without sacrificing the indulgent feel. For the meat, swap in 93% lean ground turkey or chicken. For the cheese, use reduced-fat cream cheese and part-skim mozzarella or a “light” Mexican blend—they melt beautifully. Opt for low-carb or whole wheat tortillas to boost fiber. Instead of pan-frying, you can achieve a satisfying crisp by spraying the pockets lightly with olive oil and air-frying at 400°F for 6-8 minutes, flipping halfway. The salsa cream cheese mixture already adds moisture, so these swaps will still yield a delicious, family-friendly result.
Serving Suggestions
While these pockets are a meal unto themselves, pairing them right elevates the experience. For a classic combo, serve with a side of cilantro-lime rice and black beans. For a lighter spread, a simple avocado salad or charred corn and pepper salad provides a fresh contrast. Don’t forget the dips! A bowl of creamy avocado crema or extra salsa for dipping is non-negotiable in my house. For brunch, serve alongside scrambled eggs and fresh fruit.
Common Mistakes
- Overfilling the Pocket: This is the #1 reason for blowouts. Stick to the recommended amounts—the pocket should close easily without pressure.
- Using Cold Cream Cheese: If it’s not softened, you’ll have lumps that won’t mix smoothly with the salsa, leading to uneven filling.
- Skimping on the Seal: A poor seal means filling leaks into the pan. Take an extra 10 seconds to firmly crimp the edges with a fork.
- Cooking at Too High Heat: This will burn the tortilla before the cheese inside has a chance to melt. Medium heat is perfect for a golden-brown finish.
Storing Tips
To Store: Cool leftovers completely and store in an airtight container in the refrigerator for up to 3 days.
To Reheat: For best results, reheat in an air fryer at 375°F for 3-4 minutes or in a toaster oven to restore crispiness. The microwave will make them soggy, but if you must, do so for 30-45 seconds and then finish in a hot, dry skillet for a minute.
To Freeze: Assemble uncooked pockets, place on a parchment-lined baking sheet to freeze solid, then transfer to a freezer bag for up to 2 months. Cook from frozen, adding 1-2 minutes to the cooking time.
A complete, vibrant meal ready for sharing.
Conclusion
These Loaded Cheesy Pocket Tacos are more than just a recipe; they’re a guaranteed way to bring fun and fantastic flavor to your table in under 30 minutes. They combine the best elements of tacos, quesadillas, and handheld pies into one irresistible package. I encourage you to make them your own—try different proteins, spice levels, and cheeses. Once you master the simple technique, you’ll find yourself