Chocolate Cherry Cookies
“`html
Chocolate Cherry Cookies
Table of Contents
Introduction
Did you know that the combination of chocolate and cherries is not just a match made in heaven but also one backed by science? Studies in flavor pairing suggest that the deep, earthy notes of cocoa and the bright, tart sweetness of cherries share key aromatic compounds, creating a synergistic taste experience that our brains find deeply satisfying. This is the secret behind the irresistible allure of these Chocolate Cherry Cookies.
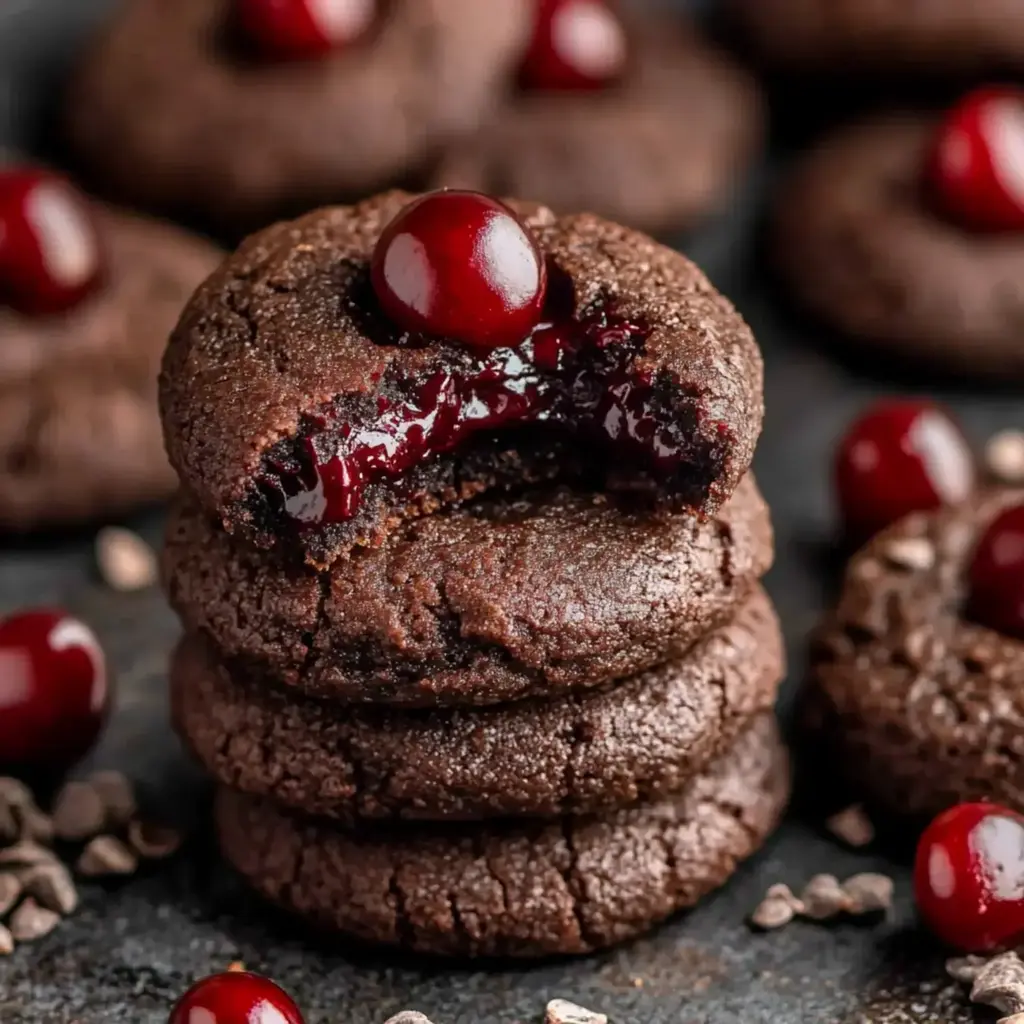
Imagine a cookie that’s not just a cookie, but a miniature dessert experience. A fudgy, intensely chocolate base gives way to a center of luxurious, velvety chocolate cherry ganache. It’s the kind of treat that makes you pause after the first bite, close your eyes, and savor the moment. This recipe is for those who believe a cookie should be an event, a small indulgence that feels decadent and special. Whether you’re a seasoned baker looking for a show-stopper or a chocolate lover seeking your next fix, these thumbprint cookies are engineered for maximum flavor impact and visual appeal. Let’s dive into creating these rich, beautiful, and utterly delicious chocolate cherry cookies.
Ingredients List
Gathering high-quality ingredients is the first step to cookie perfection. Here’s what you’ll need, along with sensory notes and smart substitutions.
For the Chocolate Cookie Base:
- 1 ¾ cups (220g) All-Purpose Flour: Provides structure. For a slightly denser, chewier cookie, you can substitute with bread flour.
- ¾ cup (75g) Unsweetened Cocoa Powder: Use a high-quality Dutch-processed cocoa for a deeper, less acidic chocolate flavor that gives these cookies their rich, dark color and fudgy taste.
- 1 teaspoon Baking Soda: The leavening agent that gives the cookies a slight lift and tender crumb.
- ½ teaspoon Salt: A crucial flavor enhancer that makes the chocolate taste more chocolatey. Use fine sea salt.
- 1 cup (2 sticks / 226g) Unsalted Butter, softened: Creates a tender, melt-in-your-mouth texture. It should be cool to the touch but yield to gentle pressure. For a dairy-free version, use a high-quality vegan butter stick.
- 1 ¼ cups (250g) Granulated Sugar: Sweetens and helps with browning and spreading.
- 1 large Egg + 1 large Egg Yolk, at room temperature: The extra yolk adds richness and a chewier texture. The eggs should not be cold, as they will cause the butter to seize.
- 2 teaspoons Pure Vanilla Extract: Adds a warm, floral background note that complements the chocolate.
For the Chocolate Cherry Ganache Filling:
- 4 oz (115g) Semi-Sweet or Bittersweet Chocolate, finely chopped: Use a bar chocolate (around 60-70% cacao) for the best flavor and smooth texture. Chocolate chips contain stabilizers and won’t melt as smoothly.
- ½ cup (120ml) Heavy Cream: The base of the ganache, providing fat for a silky mouthfeel. For a lighter version, full-fat coconut milk can be substituted, though the flavor will be slightly different.
- ¼ cup Cherry Preserves or Jam: Look for a high-fruit-content preserve for the most authentic cherry flavor. You can also use Luxardo cherry syrup for a more sophisticated, adult twist.
- Pinch of Salt: Balances the sweetness of the ganache.
- Optional Garnish: Flaky sea salt, chopped dried cherries, or a drizzle of melted white chocolate.
Timing
While the total time is around 1 hour and 40 minutes, note that over an hour of this is inactive chilling time—perfect for prepping other meal components or simply relaxing. The active prep and baking time of about 35-40 minutes is comparable to, or even less than, many standard cookie recipes. The chilling step is non-negotiable for these chocolate cherry cookies; it prevents excessive spreading and ensures the thumbprint wells hold their shape, resulting in a perfectly fudgy, not flat, cookie.
Step-by-Step Instructions
Step 1: Prepare the Cookie Dough
In a medium bowl, whisk together the flour, cocoa powder, baking soda, and salt. Sift if your cocoa is lumpy—this ensures a perfectly smooth dough. In the bowl of a stand mixer fitted with the paddle attachment (or using a hand mixer), beat the softened butter and granulated sugar on medium-high speed for 2-3 minutes. You’re looking for the mixture to become light, fluffy, and pale in color. This step incorporates air, which contributes to the cookie’s texture. Scrape down the bowl. Add the whole egg, egg yolk, and vanilla extract. Mix on medium until fully combined, scraping the bowl again. With the mixer on low, gradually add the dry ingredients. Mix just until no dry streaks of flour remain. The dough will be thick, sticky, and intensely chocolatey.
Step 2: Chill and Portion
Turn the dough out onto a piece of plastic wrap. Press it into a flat disc, wrap tightly, and refrigerate for at least 1 hour, or up to 3 days. This chilling firms up the butter, which is critical for shape. When ready to bake, preheat your oven to 350°F (175°C) and line two baking sheets with parchment paper. Using a cookie scoop (about 1.5 tablespoons), portion the dough. Roll each portion into a smooth ball between your palms. This creates a uniform cookie.
Step 3: Create the Thumbprint
Place the dough balls about 2 inches apart on the prepared sheets. Now, for the signature thumbprint: I like to use the rounded end of a wooden spoon or a small, lightly floured measuring teaspoon. Gently press straight down into the center of each ball to create a well, being careful not to press all the way through to the baking sheet. The sides may crack slightly—this is normal and adds character. If the dough gets too soft, pop the entire sheet back in the fridge for 10 minutes.
Step 4: Bake to Perfection
Bake one sheet at a time in the center of the preheated oven for 10-12 minutes. The cookies are done when the edges look set and the centers appear dry but still soft. They will puff up slightly but the thumbprint indent should remain visible. Do not overbake—remember, they continue to cook on the hot sheet. Upon removing from the oven, the wells may have puffed up. Immediately use the same spoon end to gently redefine the indentations. Let the cookies cool on the baking sheet for 5 minutes before transferring them to a wire rack to cool completely.
Step 5: Make the Ganache
While the cookies cool, make the luxurious filling. Place the finely chopped chocolate in a heatproof bowl. In a small saucepan, heat the heavy cream over medium heat until it just begins to simmer—you’ll see small bubbles form around the edges. Immediately pour the hot cream over the chocolate. Let it sit, undisturbed, for 3 minutes. This allows the chocolate to melt gently. Add the cherry preserves and a pinch of salt. Starting in the center, whisk slowly until the mixture is completely smooth, glossy, and uniform in color. Let the ganache cool and thicken slightly at room temperature for about 15-20 minutes, stirring occasionally. It should be thick enough to hold its shape when spooned.
Step 6: Fill and Serve
Once the cookies are completely cool and the ganache has thickened, it’s time for the grand finale. Using a small spoon or a piping bag, fill each cookie’s well with the chocolate cherry ganache. Don’t be shy—fill it right to the top for a generous, decadent bite. If desired, garnish with a tiny sprinkle of flaky sea salt or a single piece of chopped dried cherry. Allow the ganache to set for about 30 minutes before serving for a cleaner bite, or enjoy immediately for a gooey, luxurious experience.
Nutritional Information
(Approximate values per cookie, recipe yields about 24 cookies)
- Calories: ~180 kcal
- Total Fat: 10g
- Saturated Fat: 6g
- Carbohydrates: 23g
- Fiber: 1.5g
- Sugars: 14g
- Protein: 2g
Healthier Alternatives
You can make mindful swaps without sacrificing the soul of this chocolate cherry cookie recipe:
- Flour: Substitute half the all-purpose flour with whole wheat pastry flour for added fiber and a nuttier note.
- Sugar: Replace up to half the granulated sugar with coconut sugar. It has a lower glycemic index and adds a subtle caramel flavor that pairs beautifully with chocolate.
- Butter: Use avocado oil or melted coconut oil in a 1:1 ratio by volume for the butter. The texture will be slightly different but still delicious.
- Ganache: For the filling, use a high-quality dark chocolate (85% cacao) and swap the heavy cream for full-fat, canned coconut milk. The ganache will be just as rich and silky.
- Cherry Element: Opt for a no-sugar-added cherry spread or mash fresh/frozen cherries with a touch of maple syrup for a more natural fruit filling.
Serving Suggestions
- Dessert Platter: Arrange these cookies on a slate board with fresh cherries, dark chocolate shards, and a glass of port or a cherry-infused craft soda for a stunning dessert presentation.
- À la Mode: Serve slightly warmed with a scoop of vanilla bean ice cream or cherry garcia ice cream. The contrast of temperatures and textures is sublime.
- Coffee Pairing: These rich cookies are the perfect companion to a strong cup of black coffee, an espresso, or a latte. The bitterness of the coffee cuts through the sweetness beautifully.
- Gift Giving: Package in a decorative box or tin lined with parchment paper. They make a thoughtful, impressive homemade gift for holidays, hostesses, or any chocolate lover.