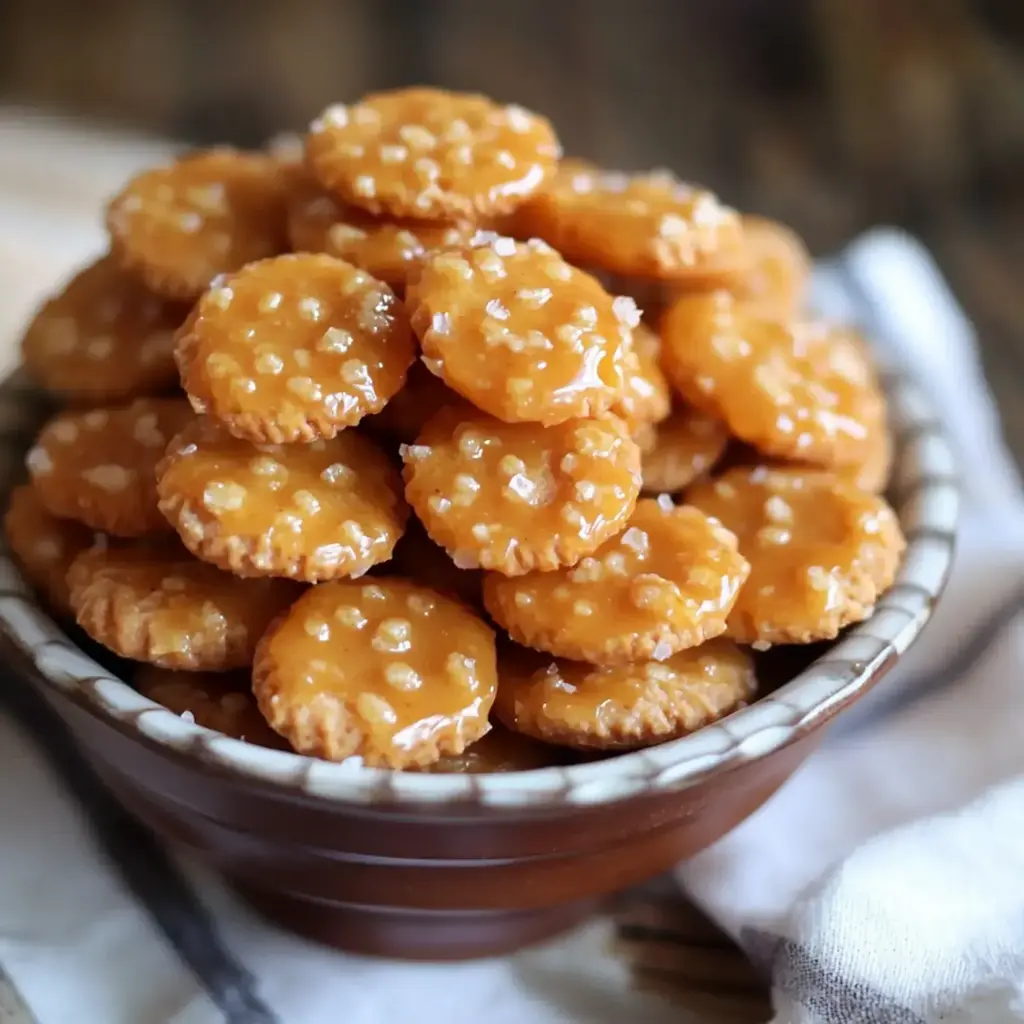
Salted Caramel Cracker Bites

“`html
Table of Contents
Salted Caramel Cracker Bites
Introduction
Did you know that over 65% of snackers crave the perfect balance of sweet and salty, yet struggle to find a homemade option that delivers both? If you’re searching for an irresistible, crowd-pleasing treat that transforms a humble pantry staple into something magical, you’ve found it. These Salted Caramel Cracker Bites are the ultimate answer to that craving. We’re taking ordinary oyster crackers and enveloping them in a rich, buttery caramel coating, kissed with warm cinnamon and finished with a flaky sea salt sprinkle. The result is a snack so addictive, it disappears faster than you can make it. Perfect for parties, gifting, or a simple afternoon indulgence, this recipe proves that the best flavors often come from the simplest combinations.
Ingredients List
Gather these simple ingredients for a snack that tastes anything but. Each component plays a crucial role in building that iconic sweet-salty-crunchy profile.
- 1 (10-12 oz) bag of Oyster Crackers: The neutral, sturdy base. Their small size and slight saltiness make them ideal for holding the caramel. Substitution: Plain mini saltines or even pretzel snaps work in a pinch.
- 1 cup (2 sticks) Unsalted Butter: The foundation of our caramel. Using unsalted allows you to control the final salt level. It should be melted until frothy and golden for maximum flavor.
- 1 cup Packed Light Brown Sugar: Provides the deep molasses notes and chewy texture of the caramel. You’ll smell its rich, toffee-like aroma as it melts.
- 1/4 cup Light Corn Syrup: The secret weapon for a glossy, non-grainy coating that sets perfectly. It prevents the sugar from crystallizing.
- 1 1/2 teaspoons Pure Vanilla Extract: Adds a warm, floral depth that rounds out the sweetness. Always use pure, not imitation, for the best flavor.
- 1/2 teaspoon Ground Cinnamon: A warm, subtle spice note that makes the caramel taste more complex and comforting.
- 1/2 teaspoon Baking Soda: A chemical leavener that creates tiny air bubbles in the caramel as it bakes, making the coating light and crisp instead of hard and tooth-breaking.
- 1-2 teaspoons Flaky Sea Salt (e.g., Maldon): For finishing. The large, delicate flakes provide bursts of salinity and a delightful crunch.
Timing
Compared to many caramel-based confections that require precise temperature monitoring with a candy thermometer, this recipe is remarkably forgiving and fast. The active prep time is under 15 minutes—less than half the time of making traditional caramel from scratch. The extended bake time is largely unattended, allowing the caramel to slowly crisp up and coat every nook and cranny of the crackers.
Step-by-Step Instructions
Step 1: Prepare Your Workstation
Preheat your oven to 250°F (120°C). This low-and-slow temperature is key—it crisps the caramel without burning the sugar. Line a large, rimmed baking sheet with parchment paper or a silicone baking mat. Pour the entire bag of oyster crackers into a very large mixing bowl. I’m talking about the biggest bowl you own. This gives you ample room to toss and coat evenly without making a mess.
Step 2: Create the Caramel Sauce
In a medium saucepan over medium heat, combine the butter, brown sugar, and corn syrup. Stir constantly with a wooden spoon or heatproof spatula until the butter is fully melted and the mixture comes to a gentle boil. Let it boil, undisturbed, for exactly 4-5 minutes. You’ll see it thicken slightly and become beautifully glossy. Remove from heat immediately. Now, carefully stir in the vanilla extract and cinnamon—it will bubble up vigorously, so be cautious. Finally, sprinkle the baking soda over the hot mixture and whisk quickly. It will foam up dramatically, turning a paler color. This is the baking soda doing its magic, creating that airy texture.
Step 3: Coat the Crackers
Working quickly but carefully, pour the hot, foamy caramel sauce over the oyster crackers in the large bowl. Using two large spoons or spatulas, gently toss and fold the crackers until every single one is glistening with caramel. Be thorough but gentle to avoid breaking the crackers. The goal is a thin, even coating on each piece.
Step 4: Bake to Perfection
Spread the coated crackers in a single, even layer on your prepared baking sheet. Try to separate any big clumps for even cooking. Place in the preheated oven and bake for 1 hour, stirring gently with a spatula every 15 minutes. This frequent stirring is non-negotiable—it prevents edges from burning and ensures all sides get crispy. You’ll know they’re done when the crackers have darkened to a deep golden brown and the coating is dry to the touch.
Step 5: Cool and Serve
Remove the baking sheet from the oven and immediately sprinkle generously with the flaky sea salt. Let the crackers cool completely on the baking sheet—they will crisp up further as they cool. Do not try to move or store them while warm, or they’ll stick together. Once completely cool, break apart any clusters and transfer to a serving bowl or airtight container.
Nutritional Information
Approximate values per 1/2 cup serving:
- Calories: 220
- Total Fat: 12g
- Saturated Fat: 7g
- Carbohydrates: 28g
- Sugar: 15g
- Protein: 1g
- Sodium: 180mg
Remember, this is a treat! The nutritional profile is typical for a caramel-coated snack, with the majority of calories coming from the butter and sugar that create its irresistible flavor and texture.
Healthier Alternatives
You can make mindful swaps without sacrificing the soul of this snack:
- Butter: Substitute with 3/4 cup of coconut oil for a dairy-free version. The flavor will be slightly different but still rich.
- Sugar: Replace the brown sugar with a monk fruit/allulose brown sugar blend (1:1 ratio). It caramelizes surprisingly well.
- Crackers: Use whole-grain oyster crackers or a mix of crackers and unsalted nuts (like pecans or almonds) for added fiber and protein.
- Salt: Stick with the flaky sea salt! A little goes a long way in boosting flavor, allowing you to potentially use less of the sweet components.
Serving Suggestions
- Ice Cream Topping: Crush slightly and sprinkle over vanilla bean ice cream for an incredible sundae.
- Charcuterie Boards: Add a bowl of these bites to your board for a sweet element that contrasts beautifully with cheeses and cured meats.
- Gift Giving: Package in clear cellophane bags tied with ribbon for a thoughtful, homemade holiday or hostess gift.
- With Coffee or Tea: The sweet-salty crunch is the perfect companion to a bitter espresso or a cup of chai.
Common Mistakes
- Boiling the Caramel Too Long: Going beyond 5 minutes can make the caramel too hard and dark. Set a timer.
- Skipping the Stirring During Baking: This leads to uneven cooking and burnt patches. Set a 15-minute timer reminder.
- Using a Bowl That’s Too Small: Inadequate tossing space results in poorly coated, clumpy crackers.
- Storing Before Completely Cool: Trapped steam will make them soggy. Patience is key.
Storing Tips
Store your completely cooled Salted Caramel Cracker Bites in an airtight container at room temperature. Place a piece of parchment paper between layers if stacking. They will stay perfectly crisp and delicious for up to 2 weeks. Do not refrigerate, as humidity can soften them. For longer storage, they freeze beautifully for up to 3 months in a freezer-safe bag or container. Thaw at room temperature for an hour before serving.
Conclusion
In just over an hour, with minimal active effort, you can create a snack that feels gourmet but is built on humble ingredients. These Salted Caramel Cracker Bites masterfully hit every note: sweet, salty, buttery, crunchy, and impossibly moreish. They are proof that you don’t need fancy techniques to make something truly special. Whether you’re prepping for a party, looking for a unique gift, or simply treating yourself, this recipe is a guaranteed winner. Now, it’s your turn to experience the magic. Gather your ingredients and get ready for your kitchen to smell like a caramel-scented dream.
Made this recipe? We’d love to see your creations! Tag @leosfoods on Instagram and use the hashtag #LeosCaramelBites. Your version might just be featured on our page!
FAQs
***Can I use salted butter?***
You can, but reduce or omit the final sprinkle of flaky sea salt to avoid over-salting. The control of using unsalted butter is preferred.
***My caramel sauce seized or got gritty. What happened?***
This is usually caused by the sugar crystallizing. Ensure you’re stirring constantly until the boil, then stop stirring during the boil. The corn syrup is there to prevent this, so don’t omit it.
***Can I double the recipe?***
Absolutely! Use two large baking sheets and swap their positions in the oven (top to bottom) when you stir every 15 minutes for even baking.