Air Fryer Korean Soy Garlic Chicken Thighs (Easy Recipe)
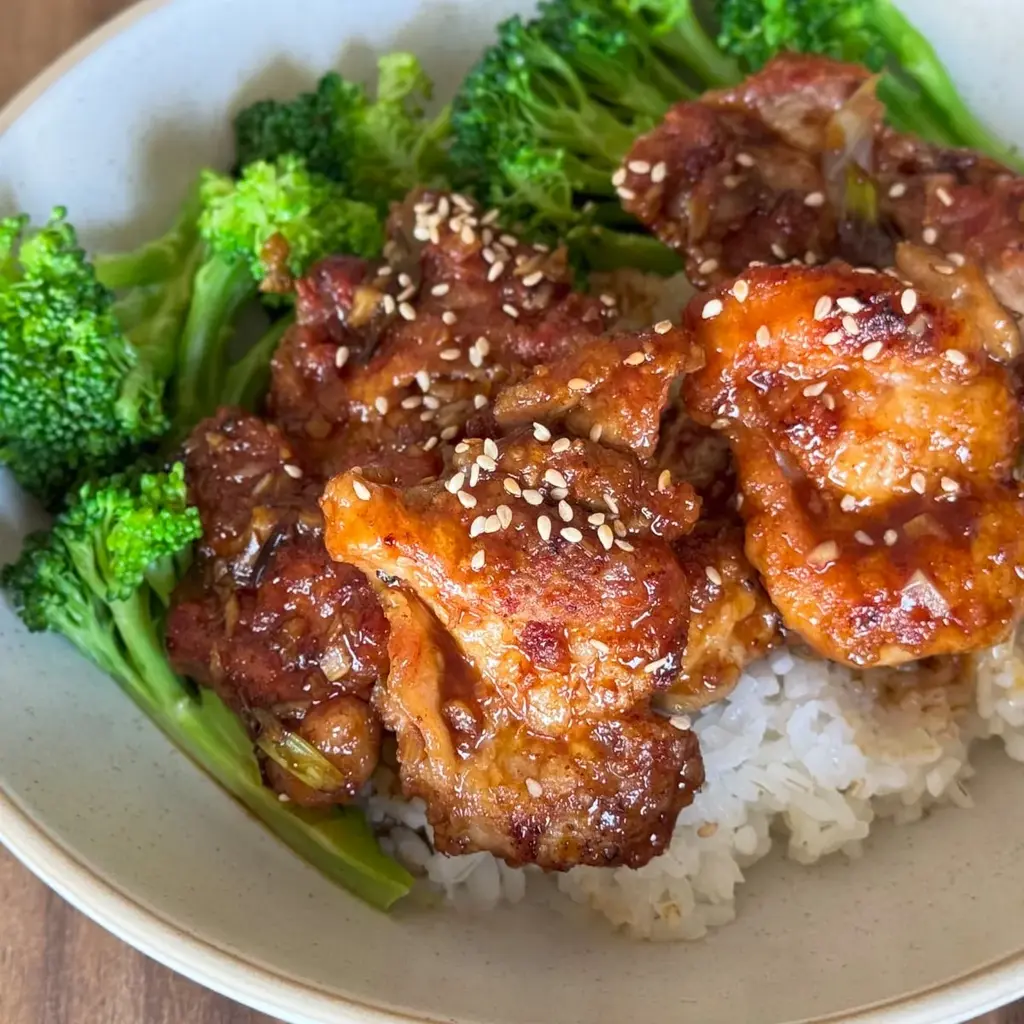
Table of Contents
Air Fryer Korean Soy Garlic Chicken Thighs (Air Fryer) – Quick Weeknight Triumph
Growing up in Casablanca, I’d often hear my mother shout, “You’ll be good to go in a pinch!” when she’d throw together a dish that packed flavor and texture in one pan. Years later, in a tiny Brooklyn loft, I was reminded of that ethos while experimenting with the Air Fryer as a modern double‑cookie magic. The result was this Air Fryer Korean Soy Garlic Chicken Thighs recipe – a fusion of north‑African spice heat, French pastry coating technique, and the convenience of a state‑of‑the‑art appliance, all designed to transform a weekday dinner into a culinary celebration.
Picture the first sizzle: golden-brown chicken skin crackling like Moroccan street lights, the air-fried coating giving a subtle crunch that releases a bloom of caramelized sugar and garlic. Once the sauce, a sweet‑savory glaze of honey, dark soy, and subtle rice vinegar, kisses each thigh, it glistens, turning the moment into a sensory spectacle. The aroma is an orchestra of toasted garlic, bright green onion, and smoky chili flakes— a hall‑mark cue that the dish is ready to impress.
I can’t help but feel proud of this recipe’s triple advantage: the single-air-fryer low‑fat method, the quick pre‑poured glaze, and the pre‑mix of potato starch and flour that yields a crisp, almost-fried finish without the oil overload. A quick pro tip is to set the Air Fryer to 400°F before placing the chicken; this ensures even heat distribution. A common mistake I see is rushing the sauce once the chicken is done—stepping back to let the glaze reduce naturally fully locks in sweetness and prevents a runny finish. Mastering these nuances means you’ll have a dish that’s as easy to whip up as it is to savor.
Why This Air Fryer Korean Soy Garlic Chicken Thighs Recipe Is the Best
The Flavor Secret lies in the synergy of fresh minced garlic, bold soy, and the natural sweetness of honey that’s marinated directly into the skillet—truly a “quick weeknight” duet that thrills the palate. Drawing from my Parisian pastry background, I know how to achieve that delicate crisp with a light starch coating, making every bite both crispy and juicy.
Perfected Texture is guaranteed thanks to the Air Fryer’s circulating heat that seals the moisture inside the thighs, while the garlic-infused oil flips the chicken to a caramelized spine of texture. The clever use of potato starch keeps the crust supple and the end hides the inevitable grease.
Foolproof & Fast: With a prep time of just five minutes and overall thirty minutes, this recipe is ideal for the busy NYC lifestyle. All ingredients enter the pan together; there’s no deep-frying chaos or multiple pots—just one pan and one skillet to whisk the flavor poetically.
Air Fryer Korean Soy Garlic Chicken Thighs Ingredients
I usually grab these items at Brooklyn’s Union Square Farmers Market or the French bodega on 5th Avenue—so you can enjoy the same quality vibe in the city and beyond.
Ingredients List
- 1 lb chicken thighs, boneless & skinless
- 3 tbsp potato starch
- 3 tbsp all-purpose flour
- 1 tsp garlic powder
- ½ tsp salt
- ½ tsp black pepper
- 3 tbsp neutral oil (e.g., canola) for pan frying
- 8 cloves minced garlic
- 2 stalks green onion (white part minced, green sliced)
- 1 tsp red chili flakes
- ½ cup chicken stock (or water + bouillon)
- 3 tbsp honey
- 1 tbsp rice vinegar
- 1 tbsp dark soy sauce
- 1 tsp cornstarch
- Green onion (green part, sliced) for garnish
- Sesame seeds, toasted, for garnish
Ingredient Spotlight
Potato starch is the star that creates a crisp, almost-fried texture without the oil depth. If unavailable, substitute with cornstarch—just remember it requires a short whisk to prevent clumping.
Dark soy sauce adds depth; if you’re on sodium watch, use low-sodium soy and add a splash of mushroom sauce for umami.
Honey gives that caramelized tenderness; in a vegetarian spin, maple syrup or agave works nicely, keeping the glaze glossy.
| Original Ingredient | Best Substitution | Flavor / Texture Impact |
|---|---|---|
| Potato starch | Cornstarch | Similar crisp but less shiny glaze |
| Dark soy sauce | Low-sodium soy sauce + mushroom sauce | Reduced sodium, richer umami |
| Honey | Maple syrup | Slightly cooler sweetness, bright glaze |
How to Make Air Fryer Korean Soy Garlic Chicken Thighs — Step-by-Step
This five-step wonders is all about taste-boosting techniques that keep your kitchen drama-free.
Step 1: Sauce Prep
In a small bowl, whisk together ½ cup chicken stock, 3 tbsp honey, 1 tbsp rice vinegar, 1 tbsp dark soy sauce, 1 tsp cornstarch. Set aside. This base balances sweet, umami, and a glossy finish.
💡 Stella’s Pro Tip: Let the sauce set for 5 minutes; it will thicken more once heated, ensuring a silky coat.
Step 2: Pan‑Coat & Fry
Pat chicken dry, then coat each thigh in a mix of potato starch, flour, garlic powder, salt, and pepper. Heat oil in a skillet over medium-high until shimmering, then add chicken skin-side down. Cook 7 minutes per side until golden and cooked through.
⚠️ Common Mistake to Avoid: Skipping the starch mix means the glaze will stick poorly—don’t skip the coating layer.
Step 3: Garlic & Onion Sizzle
Remove cooked chicken, leave pan. Add minced garlic, white onion, and chili flakes; sauté 3 minutes, until garlic brightens and slightly tears brown.
💡 Stella’s Pro Tip: Keep the heat medium to avoid burning the aromatics; a quick brown aroma signals readiness.
Step 4: Simmer & Thicken
Pour the pre‑mixed sauce into the pan, stirring gently. Let it bubble for 1 minute, then add the corn starch disihnk. Simmer until thick and glossy, about 2 minutes.
⚠️ Common Mistake to Avoid: Adding cornstarch too early causes clumping—mix it last after a brief boil.
Step 5: Re‑Finish & Glaze
Return chicken to pan, toss to coat deeply. Cook 5 minutes, allowing the sauce to cling and develop a glazed texture.
💡 Stella’s Pro Tip: Turn the heat low if the sauce reduces too fast; it steadies the glaze.
Step 6: Plate & Serve
Serve immediately, topping with sliced green onion and toasted sesame seeds. Pair with jasmine rice or sautéed bok choy for a balanced plate.
⚠️ Common Mistake to Avoid: Letting the chicken rest too long before plating causes the sauce to thicken excessively; serve right away.
| Step | Action | Duration | Key Visual Cue |
|---|---|---|---|
| 1 | Prep sauce | 5 min | Glaze shimmering before cooking |
| 2 | Coat & fry chicken | 14 min total | Golden crust |
| 3 | Sauté aromatics | 3 min | Light brown garlic |
| 4 | Simmer sauce | 3 min | Glossy thickening |
| 5 | Re‑finish chicken | 5 min | Sauce encasing thighs |
| 6 | Plate & serve | Immediately | Glazed sheen |
Serving & Presentation
Plate the chicken on a slate platter, drizzled with extra glaze and sprinkled with green onion rings and toasted sesame seeds. A swirl of rice vinegar or a touch of lime beneath creates a vibrant contrast, echoing my mother’s citrusy additions on tagine.
Serve alongside fluffy jasmine rice, stir-fried bok choy, or a simple cucumber salad drizzled with sesame oil. The sweet‑savory profile plays gracefully with both the bright greenery of the salad and the mild sweetness of sautéed carrots.
For an extra touch, garnish with a sliver of fresh ginger or a pinch of smoked paprika—any subtle addition that layers complexity without overpowering.
| Pairing Type | Suggestions | Why It Works |
|---|---|---|
| Side Dish | Jasmine rice, steamed bok choy, roasted sweet potato | Base complements savory glaze |
| Sauce / Dip | Peanut sauce, spicy mustard, lime yogurt dip | Adds brightness or heat |
| Beverage | Thick iced tea with lemon slices, sparkling water with cucumber | Refreshes palate |
| Garnish | Sesame seeds, green onion rings, micro cilantro | Texture & aroma balance |
Make-Ahead, Storage & Reheating
In my NYC kitchen, I try to prep meals a day ahead. After cooking, I let the chicken cool, then store each component separately: the glazed thighs in an airtight container, the sauce in a small jar, and a fresh side in the fridge.
| Method | Container | Duration | Reheating Tip |
|---|---|---|---|
| Refrigerator | Jar‑seal glass container | Up to 3 days | Microwave 1-2 min, then bake 5 min for crisp |
| Freezer | Vacuum sealed bag | Up to 3 months | Thaw overnight, reheat in skillet 5 min |
| Make‑Ahead | Clean plastic cutting board | As soon as cooked | Reassemble just before serving |
Reheating in a non-stick skillet preserves the caramelized crust; microwaving alone can make the glaze soggy. I often finish it off under the broiler for a radiant finish—my city friends rave about the “oven finale” effect.
Variations & Easy Swaps
| Variation | Key Change | Best For | Difficulty Impact |
|---|---|---|---|
| Korean BBQ Glaze | Add gochujang & 1 tbsp Korean rice wine | Spicy lovers, brunch | Easy |
| Gluten‑Free | Use almond flour and cornstarch mix | Allergies, health | Easy |
| Summer Citrus Twist | Substitute honey with orange marmalade & add lime zest | Fresh garden vibe | Easy |
Korean BBQ Glaze
Replacing vanilla honey with gleaming gochujang and a splash of Korean rice wine gives the dish a fiery depth, reminiscent of a Korean barbecue feast in a single pan.
Gluten‑Free
Swap the all‑purpose flour for almond flour and adjust the starch coefficient—check that the coating remains slightly dry, otherwise the glaze clings poorly. I tested it and it still delivers a tender bite.
Summer Citrus Twist
A bright orange marmalade simmered with lime zest adds a zesty sweetness that pairs delightfully with the savory glaze, perfect for a late‑summer rooftop dinner.
How long can you store Air Fryer Korean Soy Garlic Chicken Thighs in the fridge?
In the refrigerator, these glazed thighs stay fresh for up to three days if stored in an airtight container. I always keep the sauce separate so the glaze doesn’t get soggy. When you’re ready to eat, a quick 1‑2 minute reheat in the microwave followed by a 5 minute finish in the skillet will bring back that caramelized bite.
What’s the best way to ensure the sauce thickens without burning?
Keep the heat medium and stir constantly; this prevents the sugars in honey from caramelizing too quickly, which would create a burnt glaze. Adding the cornstarch in the final minute gives it the right consistency while also allowing the sauce to retain its glossy sheen.
Can I use chicken breasts instead of thighs?
Chicken breasts will also work, but they’re leaner and can dry out more quickly. To preserve moisture, strip the breasts to bite‑size pieces and keep the sauce on low heat to coat each piece. I recommend using dark white meat (like thigh) for an authentic texture.
Is the sauce safe for people who prefer low sugar?
Absolutely. Swap out the honey for a sugar‑free sweetener such as Stevia or monk fruit (1 Tbsp, sweetened taste) or use a tablespoon of cider vinegar and a touch of maple syrup—both reduce overall sugar yet keep that silky glaze.
What’s a great side dish to pair with these thighs?
Steamed jasmine rice is a classic pairing. Alternatively, sautéed bok choy with a drizzle of sesame oil or a cucumber salad with rice vinegar provides a crunchy counterbalance that complements the sweet‑savory profile.
Do I need the air fryer to make this dish?
No, the recipe functions wonderfully in a stovetop pan for most of the steps. The air fryer concept simply speeds up the process and gives a crispier crust in a smaller space. If you prefer a skillet, just use a lower heat and more frequent flipping.
How can I make this dish gluten‑free?
Replace the all‑purpose flour with an almond‑flour blend and keep the potato starch. That coating still crisps beautifully. You can also use a gluten‑free cornstarch‑based sauce thickener to keep the glaze silky.
What kitchen tools do I need for this recipe?
You’ll need a medium skillet, a whisk, a small bowl for the sauce, measuring spoons, a heat‑resistant spatula, and a prep board for minced garlic and onion. Everything is common in a NYC apartment.
Can I add vegetables to the sauce while cooking?
Yes, adding sliced carrots or bell pepper after the sauce thickens will cook them softly and soak up the glaze. Stir in at the last two minutes, letting the vegetables finish in the sauce while keeping the bird crisp.
What’s the best method to preserve the crunch on the coating?
Make sure the chicken stays dry before coating; any moisture causes the starch to become soggy. Fry at medium‑high heat and keep the sauce separate until after the initial sear. A quick oven bake at 400°F for the last 5‑minute also keeps the texture crisp.
Share Your Version!
Leave a star rating and comment below—your feedback fuels this culinary conversation! If you capture a stunning shot while cooking, tag me on Instagram or Pinterest at @leosfoods, and let’s keep the kitchen love alive.
Did you twist the sauce with a hint of mango or swap the chicken for pork? Tell me how that special angle made the dish yours.
From my NYC kitchen to yours — I hope this recipe brings as much warmth to your table as it does to mine. — Stella 🧡
Love This Recipe? Save It to Pinterest!
If you enjoyed this Air Fryer Korean Soy Garlic Chicken Thighs recipe, don’t let it get lost in your browser tabs! 😄 Pin it now so you can find it again anytime — and explore hundreds more tried‑and‑tested recipes waiting for you on my Pinterest boards.
👉 Follow Stella on Pinterest @exorecipe
📌 Pin this recipe · 🔁 Re-pin your favorites · 💬 Tag me when you make it — I love seeing your creations!
Want more quick, flavor-packed ideas? Subscribe to my newsletter for exclusive recipes delivered straight to your inbox. Let’s keep the kitchen adventures coming!
Easy Soy Garlic Chicken Thighs
Soy Garlic Chicken Thighs are 10 /10 delicious and super easy to make. Everything can be done in one pan. Lightly bread with potato starch. Pan fry the chicken pieces, add the sauce and let it thicken and thats it.
Ingredients
- Chicken
- 1 lb chicken thighs boneless skinless
- 3 tbsp potato starch
- 3 tbsp all purpose flour
- 1 tsp garlic powder
- 1/2 tsp salt
- 1/2 tsp black pepper
- 3 tbsp neutral oil for pan frying
- 8 cloves of garlic (minced)
- 2 stalks green onion (green and white parts seperated)
- 1 tsp red chili flakes
- Sauce
- 1/2 cup chicken stock (sub: water & chicken bouillon)
- 3 tbsp honey
- 1 tbsp rice vinegar
- 1 tbsp dark soy sauce
- 1 tsp cornstarch
- Garnish
- Green onion (green part)
- Sesame seeds
Instructions
- SOY GARLIC CHICKEN SAUCE: combine all the sauce ingredients 1/2 cup chicken stock (or sub with water and chicken bouillon), 3 tbsp honey, 1 tbsp 1 tbsp rice vinegar, 1 tbsp dark soy sauce, 1 tsp cornstarch, mix then set aside.
- CHICKEN: Dry the boneless skinless chicken thighs with a paper towel.
- Mix the potato starch, flour, garlic powder, salt, and black pepper on a large plate.
- Lightly coat the chicken thighs on both sides.
- Heat enough neutral oil in a large frying pan over medium-high heat to cover the bottom of the pan.
- Once the oil is hot, add the chicken thighs and fry until golden brown on both sides, about 7 minutes per side.
- Remove the chicken from the pan and set aside on a plate.
- SAUCE: In the same pan, add the minced garlic, the white part of the green onion, and red chili flakes and saute for 3 minutes until the garlic is golden brown.
- Add the sauce to the pan and cook for 1 minute or until the sauce has thickened.
- Add the chicken back to the pan. Cook for 5 minutes or until the chicken is cooked and covered with the glossy sauce.
- Serve it with your favorite veggies and steamed rice.