Oreo Ice Cream Sandwich Cake
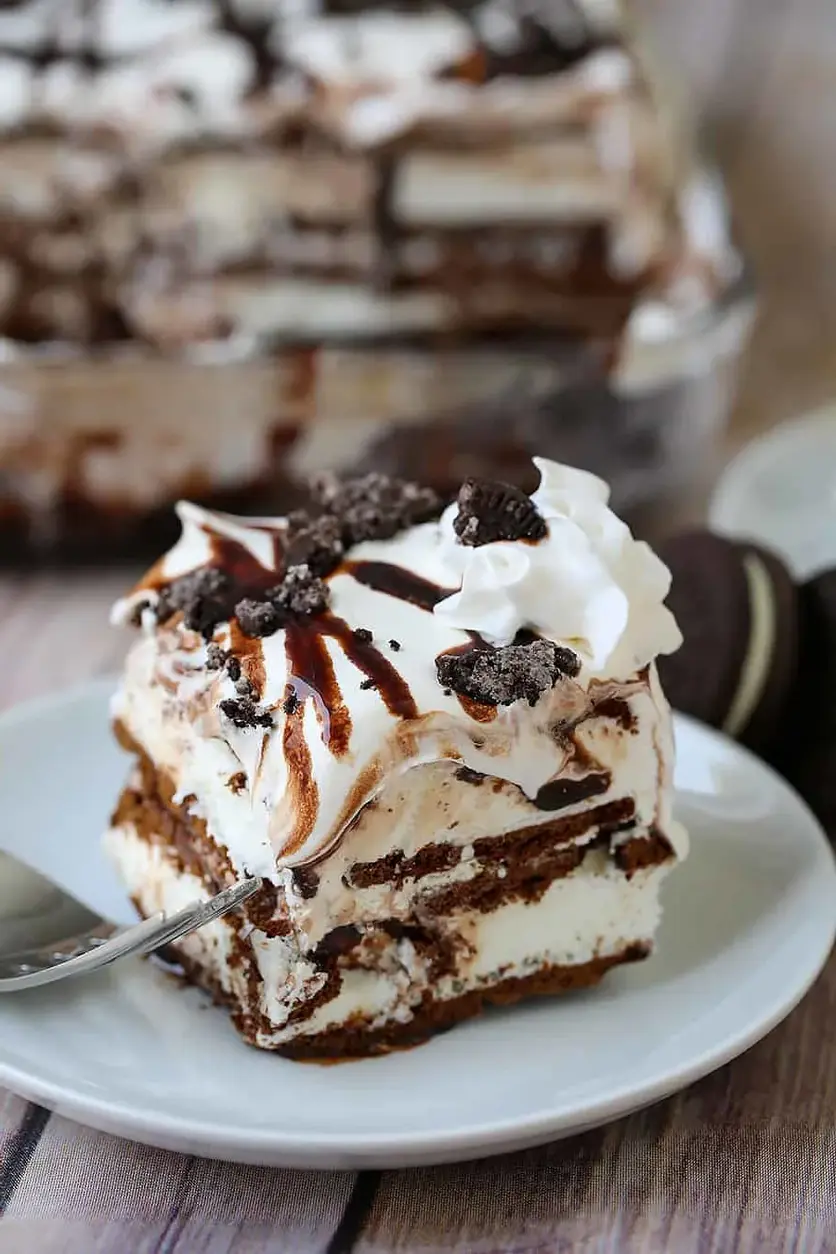
Table of Contents
Oreo Ice Cream Sandwich Cake – The Easiest No-Bake Layered Dessert
I’ll never forget the first time I made this Oreo Ice Cream Sandwich Cake. It was a sweltering July afternoon in my tiny NYC apartment, and I was craving something cold and chocolatey that would come together without turning on the oven. This no-bake layered dessert, with its dreamy combination of ice cream sandwiches, whipped topping, hot fudge, and crushed Oreos, was the perfect solution. It’s the kind of recipe my Moroccan mother would approve of for its simplicity, and yet it has the decadent flair I learned to appreciate during my pastry training in Paris. The secret is in the layering: each element is carefully placed to create that iconic six-layer structure that makes this cake a showstopper.
The flavors in this Oreo Ice Cream Sandwich Cake are pure nostalgia with a sophisticated edge. The ice cream sandwiches soften just enough to become a creamy, cake-like base, while the whipped topping stays light and airy. The hot fudge sauce seeps into the cracks, creating pockets of rich, molten chocolate that contrast with the crunchy Oreo crumbles. Every bite is a beautiful balance of textures — soft, creamy, crunchy, and gooey. The aroma of vanilla and chocolate fills your kitchen as you layer it together, and the visual of those stacked stripes is undeniably satisfying. It reminds me of the rich, layered pastries I used to make at Le Cordon Bleu, but without any of the fuss.
What I love most about this recipe is how forgiving and foolproof it is. You don’t need a mixer, a food processor, or any special equipment. Just your hands, a baking dish, and a freezer. My Parisian chef would joke that this is a “gateau de paresseux” — a lazy cake — but it’s actually a brilliant example of how simple ingredients can create something spectacular. 💡 Stella’s Pro Tip: the key to perfect layers is making sure your whipped topping is fully thawed but still cold, so it spreads smoothly without melting the sandwiches. A common mistake is to rush the freezing time — let it set for at least 4 hours or overnight for the cleanest slices. Trust me, the wait is worth it.
Why This Oreo Ice Cream Sandwich Cake Recipe Is the Best
The flavor secret here is the subtle Moroccan twist I’ve added: a pinch of sea salt and a dash of cinnamon in the crushed Oreo layer. It’s a trick I learned from my mother’s kitchen in Marrakech, where we always balance sweet desserts with a touch of warmth and savory contrast. The cinnamon amplifies the chocolate notes of the Oreos, while the sea salt cuts through the richness and makes every bite more craveable. In a world of heavy, overly sweet ice cream cakes, this version is bright, balanced, and unforgettable. It’s the kind of delicate touch that turns a simple dessert into a conversation starter at any NYC dinner party.
Perfected texture is about mastering the freeze time. From my training in Paris, I learned that the best frozen desserts are neither rock-hard nor too soft. The trick is to freeze the cake for at least 4 hours, but no longer than 24 hours before serving. This allows the ice cream sandwiches to meld into a cohesive, sliceable cake that still has a slight give when you bite into it. The whipped topping stays pillowy, and the fudge remains fudgy (never icy). I also recommend letting the cake thaw on the counter for exactly 10 minutes before slicing — this is the magic window where every layer is at its prime.
Foolproof and fast — that’s the Stella promise. This Oreo Ice Cream Sandwich Cake is ideal for beginners because there’s no baking, no candy making, and no knife work. You just layer, freeze, and serve. Even my 10-year-old nephew can make it. The ingredients are available at any standard US grocery store: the ice cream sandwiches are in the frozen aisle, the Oreos are in the cookie aisle, and the whipped topping and fudge sauce are in the dairy aisle. It’s a last-minute dessert hero for summer barbecues, birthday parties, or just a Tuesday night craving. And because it’s no-bake, you can even make it on a hot day without sweating over a stove.
Oreo Ice Cream Sandwich Cake Ingredients
When I shop for these ingredients, I usually head straight to my local Trader Joe’s or Whole Foods in the Upper West Side. They have the best-quality ice cream sandwiches that don’t get too soggy. It reminds me of roaming the spice souks in Marrakech, where every ingredient told a story. Here’s everything you’ll need.
Ingredients List
- 24 ice cream sandwiches
- 12 Oreos (crushed)
- 1 jar (about 12 oz) hot fudge topping
- 8 oz whipped topping (thawed and divided)
- Pinch of sea salt (optional, but recommended)
Ingredient Spotlight
Ice cream sandwiches are the backbone of this cake. Look for the classic vanilla ones — avoid the “premium” brands with extra-thick cookies or added fillings, as they don’t soften evenly. A standard 12-pack from most grocery stores works perfectly. Hot fudge topping is another key player; always go for a thick, quality brand like Hershey’s or Ghirardelli. Avoid the “light” versions, which have a thinner consistency and can make the cake soggy. Whipped topping must be fully thawed in the refrigerator (never on the counter) to avoid a watery texture.
| Original Ingredient | Best Substitution | Flavor / Texture Impact |
|---|---|---|
| Ice cream sandwiches | Graham crackers or vanilla wafers | Crunchier texture; less creamy, more biscuit-like |
| Oreos (crushed) | Chocolate wafer cookies or brownie pieces | Less intense chocolate flavor; brownies add chewiness |
| Hot fudge topping | Chocolate syrup or caramel sauce | Syrup is thinner; caramel adds sweetness |
| Whipped topping (thawed) | Heavy cream whipped to stiff peaks | Richer, more decadent; must be stabilized |
How to Make Oreo Ice Cream Sandwich Cake — Step-by-Step
Follow these simple steps, and you’ll have a stunning dessert ready in no time. I promise, even if you’ve never baked before, you can nail this.
Step 1: Layer Ice Cream Sandwiches
Unwrap 24 ice cream sandwiches and arrange them in a single layer at the bottom of a 9×13-inch baking dish. You may need to cut one or two sandwiches to fit snugly. This forms the base of your cake.
💡 Stella’s Pro Tip: Work quickly so the sandwiches stay cold. If they start to soften too much, pop the dish in the freezer for 5 minutes.
Step 2: Spread Whipped Topping
Spread about half of the thawed whipped topping (4 oz) evenly over the ice cream sandwiches. Use a spatula to smooth it out, ensuring even coverage to the edges.
⚠️ Common Mistake to Avoid: Using cold whipped topping straight from the fridge will make it hard to spread. Let it sit at room temp for 5–10 minutes first.
Step 3: Drizzle Hot Fudge
Drizzle about a third of the hot fudge sauce over the whipped topping. Use a spoon to create a zigzag pattern — this ensures every bite gets some fudge.
💡 Stella’s Pro Tip: Warm the fudge jar in a bowl of hot water for 2 minutes for easier drizzling. Never microwave it — it can scorch.
Step 4: Sprinkle Crushed Oreos
Crush 12 Oreos inside a ziplock bag using a rolling pin or your hands. Sprinkle half of the crushed Oreos over the fudge layer. The smaller the crumbs, the better they’ll stick.
⚠️ Common Mistake to Avoid: Crushing Oreos too coarsely can create uneven layers. Aim for a mix of fine crumbs and small chunks.
Step 5: Repeat Layers
Repeat steps 1–4 once more: add another layer of ice cream sandwiches, the remaining whipped topping, more fudge, and the rest of the crushed Oreos. Finish with a final drizzle of fudge on top for visual appeal.
💡 Stella’s Pro Tip: For the top layer, save a few whole Oreos to crush separately and sprinkle as a garnish for a bakery look.
Step 6: Freeze
Cover the dish with plastic wrap or aluminum foil and freeze for at least 4 hours, or overnight for best results. If freezing longer than a couple of hours, wrap tightly to prevent freezer burn.
⚠️ Common Mistake to Avoid: Freezing for less than 4 hours results in a sloppy, unsliceable mess. Patience is key for that perfect, clean slice.
Step 7: Thaw & Serve
Allow the cake to thaw on the counter for about 10 minutes before slicing. Use a sharp knife dipped in hot water (wiped clean between cuts) for the neatest slices. Enjoy!
💡 Stella’s Pro Tip: For an extra-decadent finish, drizzle additional hot fudge and a dollop of fresh whipped cream on each slice just before serving.
| Step | Action | Duration | Key Visual Cue |
|---|---|---|---|
| 1 | Layer ice cream sandwiches | 2–3 minutes | No gaps; sandwiches touch edges |
| 2 | Spread whipped topping | 2 minutes | Even, smooth layer |
| 3 | Drizzle hot fudge | 1 minute | Zigzag pattern visible |
| 4 | Sprinkle crushed Oreos | 1 minute | Even crumb coverage |
| 5 | Repeat layers | 2–3 minutes | Second layer identical to first |
| 6 | Freeze | At least 4 hours | Firm to the touch |
| 7 | Thaw & serve | 10 minutes | Slightly softened but still firm |
Serving & Presentation
This Oreo Ice Cream Sandwich Cake is a showstopper when served straight from the freezer. I love to slice it into neat squares and plate each piece on a chilled dessert plate. For an extra touch, garnish with a fresh mint sprig — the green contrast against the chocolate is beautiful. A light dusting of powdered sugar or cocoa powder adds a bakery-like finish. In my NYC apartment, I serve it alongside a pile of fresh berries or a drizzle of raspberry coulis for a pop of acidity that cuts through the richness. It’s a trick I borrowed from the bouchons of Paris.
For a family-style presentation, I sometimes leave the cake in the dish and let everyone scoop their own portions — it feels more casual and fun, like a summer barbecue in Morocco where we gather around a communal platter. Whatever way you serve it, this cake is always the star of the table. My friends in New York rave about its creamy texture and how it feels so much more special than store-bought ice cream cake.
| Pairing Type | Suggestions | Why It Works |
|---|---|---|
| Side Dish | Fresh strawberries, mango slices, or a green salad | The acidity and freshness balance the rich chocolate |
| Sauce / Dip | Extra hot fudge, caramel sauce, or fruit coulis | Adds another layer of flavor and decadence |
| Beverage | Cold milk, iced coffee, or a rich red wine (like Zinfandel) | Milk cools the palate; coffee and wine complement chocolate |
| Garnish | Mint sprig, chocolate shavings, fresh berries, edible flowers |
|