Homemade Nutter Butters
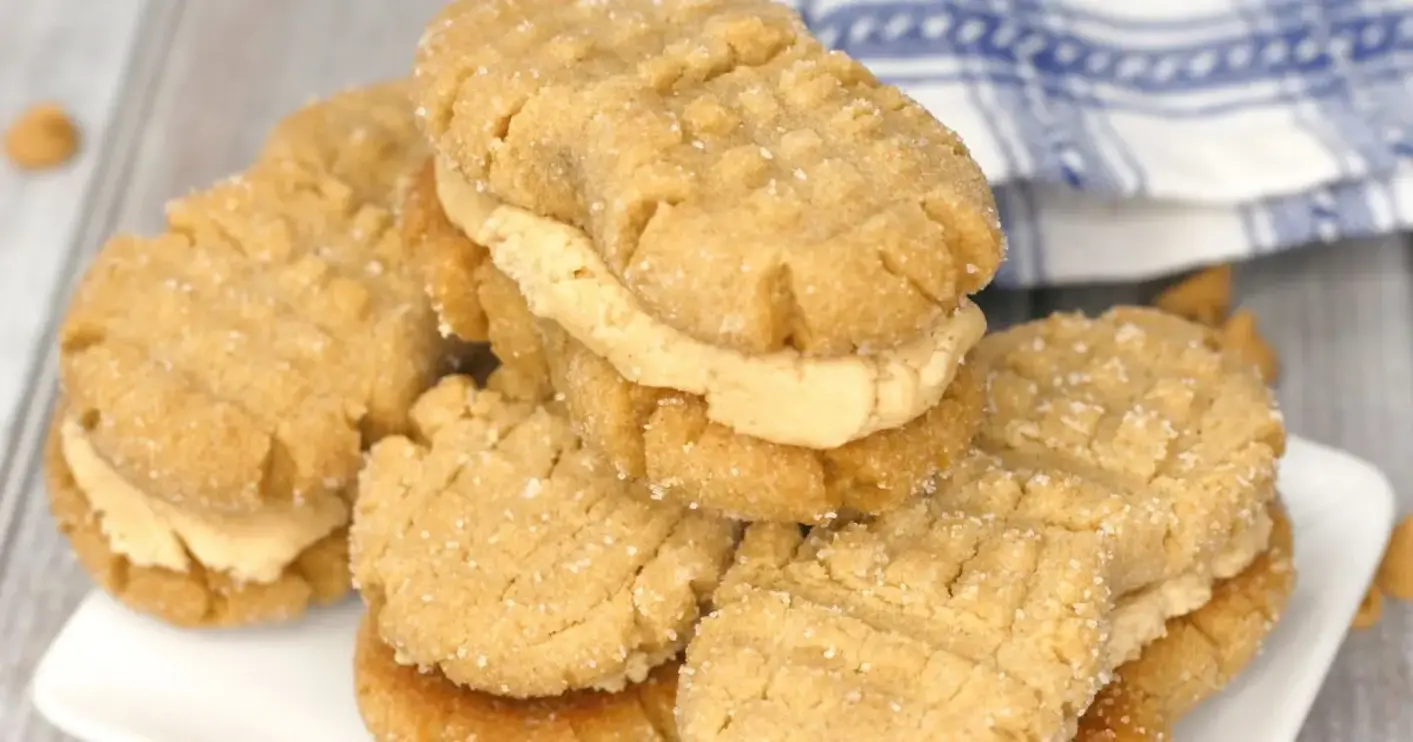
Table of Contents
Homemade Nutter Butters: Soft Peanut Butter Sandwich Cookies – Even Better Than the Original!
I still remember the first time I bit into a Nutter Butter as a kid, right after my family moved from Morocco to New York City. That crunchy, sweet, salty peanut butter sandwich cookie was a revelation. Now, after years of training in Parisian pastry kitchens and cooking in NYC, I knew I could create a version that was softer, more flavorful, and truly unforgettable. These Homemade Nutter Butters are that dream come true — a soft-baked peanut butter sandwich cookie with a creamy, luscious filling that puts the store-bought version to shame.
The texture here is everything. The cookie itself is tender and slightly crumbly, with a deep, nutty flavor that comes from using both creamy peanut butter in the dough and rolling the logs in sugar before baking. The filling is a billowy, cloud-like mixture of peanut butter, butter, and powdered sugar — it’s the perfect balance of sweet and salty. The aroma of peanut butter and vanilla filling my kitchen takes me straight back to my mother’s kitchen in Marrakech, where she’d make honey-soaked pastries with a similar warmth.
What makes these Homemade Nutter Butters truly the best is a simple technique I learned in Paris: using brown sugar in the cookie dough for moisture and a subtle molasses depth. Plus, I’ll share a pro tip for shaping the cookies into perfect little peanut shapes that bake up beautifully. A common mistake I see is overbaking — these cookies should be just set at the edges and still soft in the center. Trust me, follow these steps, and you’ll never buy the packaged kind again.
Why This Homemade Nutter Butters Recipe Is the Best
The Flavor Secret – I use light brown sugar instead of white sugar in the cookie dough. The molasses in brown sugar adds a subtle caramel note that deepens the peanut butter flavor. This is a trick I picked up in a Paris patisserie for making sables — it gives the cookies a richer, more complex taste without making them too sweet.
Perfected Texture – These cookies are soft-baked with a tender, melt-in-your-mouth interior. The key is to not overmix the dough — mix just until combined after adding the flour. This keeps the cookies from becoming tough. The rolling in sugar before baking creates a delicate, crackly exterior that contrasts beautifully with the soft center.
Foolproof & Fast – Even if you’re new to baking, this recipe is straightforward. The dough comes together in one bowl, and there’s no chilling required. I’ve tested this dozens of times in my own NYC kitchen to make sure it works perfectly for home bakers. The filling is also incredibly easy — just beat everything together and spread it on. You’ll have 24 perfect sandwiches in under 40 minutes.
Homemade Nutter Butters Ingredients
When I make these Homemade Nutter Butters, I think about the ingredients I buy at the Union Square Greenmarket in NYC. I get the best creamy peanut butter there — just peanuts and salt. The butter I use is always unsalted and high-quality, the kind that comes from a local dairy. And for the sugar, I love the deep flavor of light brown sugar from a Vermont brand. These simple, honest ingredients are what make the cookies taste so extraordinary.
Ingredients List
- 1 1/2 cups all purpose flour
- 1 teaspoon baking soda
- 1/4 teaspoon kosher salt
- 1/2 cup unsalted butter (softened)
- 1 cup light brown sugar
- 1 cup creamy peanut butter
- 1 large egg
- 1/2 teaspoon pure vanilla extract
- 1/2 cup sugar to roll the cookie dough in
- 1/4 cup unsalted butter (softened) — for filling
- 1/2 cup creamy peanut butter — for filling
- 1 1/2 cups powdered sugar
- 2 Tablespoons milk
- 1/4 teaspoon vanilla extract — for filling
Ingredient Spotlight
Peanut Butter: The star of the show! For the best flavor, use creamy peanut butter with no added sugar or stabilizers. Look for natural peanut butter that’s just peanuts and salt — stir it well before using. A non-natural brand like Jif or Skippy also works but will make the cookies slightly sweeter.
Butter: Unsalted butter gives you full control over the salt level. I always use European-style butter (like Plugrà) for its higher fat content, which yields a more tender cookie. If you only have salted butter, reduce the salt in the dough to a pinch.
Light Brown Sugar: This adds moisture, chewiness, and a hint of molasses flavor. You can substitute dark brown sugar for an even deeper caramel note, but don’t swap in white sugar — it changes the texture completely.
Flour: All-purpose flour is best here. For a more tender crumb, you can replace 1/4 cup of the flour with cornstarch. If you need a gluten-free version, use a 1:1 gluten-free baking flour blend.
| Original Ingredient | Best Substitution | Flavor / Texture Impact |
|---|---|---|
| Creamy Peanut Butter (dough) | Natural peanut butter (no sugar added) | Less sweet, more pronounced peanut flavor |
| Light Brown Sugar | Dark brown sugar | Deeper caramel flavor, slightly more moisture |
| Unsalted Butter | Coconut oil (virgin, room temp) | Coconut aroma, dairy-free, slightly less tender |
| All-Purpose Flour | 1:1 gluten-free baking blend | Slightly different texture, still delicious |
| Powdered Sugar (filling) | Honey (reduce milk to 1 Tbsp) | Less stiff filling, honey flavor, less sweet |
How to Make Homemade Nutter Butters — Step-by-Step
Don’t worry — these Homemade Nutter Butters look fancy but they are actually really easy to make! Just follow each step and you’ll have perfect little peanut-shaped cookies in no time.
Step 1: Preheat and Prep
Preheat your oven to 350°F (175°C). Line two large baking sheets with parchment paper or silicone baking mats. Pour 1/2 cup of granulated sugar into a small bowl — you’ll use this to roll the shaped dough logs later. This sugar coating is what gives the cookies that classic slightly crackly look.
💡 Stella’s Pro Tip: For even baking, always use light-colored baking sheets. Dark ones cause the bottoms to brown too quickly. And if you don’t have parchment, a silicone mat works beautifully — just make sure it fits your pan.
Step 2: Mix Dry Ingredients
In a medium bowl, whisk together the all-purpose flour, baking soda, and kosher salt. Make sure there are no lumps. This ensures the leavener is evenly distributed, so your cookies rise evenly.
Step 3: Cream Butter and Sugars
Using a standing mixer with the paddle attachment or an electric hand mixer, cream together the softened butter, light brown sugar, and creamy peanut butter on medium speed until light and fluffy — about 2 minutes. The mixture should look pale and aerated. This step is crucial for a tender texture.
⚠️ Common Mistake to Avoid: Don’t rush this step! If the butter is too cold, it won’t cream properly. Your butter should be at cool room temperature — it should give slightly when pressed, not be greasy or melted.
Step 4: Add Egg and Vanilla
Add the large egg and the vanilla extract to the creamed mixture. Mix on low speed until just combined. Scrape down the bowl with a spatula to ensure everything is incorporated evenly.
Step 5: Combine Dry and Wet Ingredients
Gradually pour the dry ingredient mixture into the wet ingredients. Mix on low speed just until the flour disappears. Do not overmix — overworking the dough develops gluten and leads to tough cookies. You should have a soft, slightly sticky dough.
💡 Stella’s Pro Tip: For perfectly tender cookies, stop mixing the moment you see the last streak of flour disappear. Use a rubber spatula to fold in any remaining bits from the bottom of the bowl. This gentle touch is what I learned in Paris for making delicate sables.
Step 6: Shape the Cookie Logs
Divide the dough into small balls, about 1 1/2 tablespoons each. Using your hands, roll each ball into a small log shape about 2 inches long. Then roll each log in the prepared bowl of sugar to coat completely. Place the sugared logs onto your lined baking sheets, spacing them about 2 inches apart (you’ll get about 12 per sheet).
Step 7: Make the Peanut Shape
Using the tines of a fork, gently press down on each log lengthwise to flatten slightly, then make a criss-cross pattern. Next, use your finger to pinch the middle of each cookie to create a classic peanut shape — a faint waistline in the center. This step is optional but makes them look like real Nutter Butters!
⚠️ Common Mistake to Avoid: Don’t press the fork too hard or the cookies will spread too much. Just a gentle indent is enough. Also, if the dough sticks to your fingers when pinching, lightly dust your hands with a little flour.
Step 8: Bake to Perfection
Bake the cookies for 10-12 minutes, rotating the pan halfway through for even baking. The cookies are done when they are lightly browned on the edges but still very soft and puffed in the center. They will continue to set as they cool.
💡 Stella’s Pro Tip: The key to soft-baked Nutter Butters is to pull them out of the oven when they look slightly underdone in the middle. They should be golden at the edges but pale and soft in the center. Overbaking gives you crunchy cookies, which aren’t ideal for sandwiching.
Step 9: Cool Completely
Allow the cookies to cool on the baking sheet for 5 minutes — this is important because they are very fragile when hot. Then use a thin spatula to transfer them to a wire rack to cool completely. They must be fully cooled before you add the filling, or the filling will melt.
Step 10: Make the Filling
While the cookies cool, make the filling. In the same mixing bowl (no need to wash it), beat together the softened butter and creamy peanut butter on medium speed until light and fluffy — about 1 minute. Add the powdered sugar, milk, and vanilla extract. Beat on low speed until combined, then increase to medium-high and whip for 1-2 minutes until the filling is smooth, light, and spreadable.
Step 11: Assemble the Sandwiches
Group your completely cooled cookies into pairs of similar size and shape. Flip one cookie over and spoon about 1 tablespoon of the filling onto the flat side. Place the second cookie on top, flat-side down, and gently press to create the sandwich. The filling should spread to the edges. Repeat with the remaining cookies.
💡 Stella’s Pro Tip: For the most authentic look, use a small offset spatula to spread the filling evenly, leaving a tiny rim around the edge. If you want a thicker filling, go up to 1.5 tablespoons per sandwich. These cookies stay fresh for days!
| Step | Action | Duration | Key Visual Cue |
|---|---|---|---|
| 1 | Preheat & line sheets | 5 min | Oven hot, parchment down |
| 2-5 | Make dough | 5-7 min | Soft, cohesive, not sticky |
| 6-7 | Shape logs & coat in sugar | 5-7 min | Logs even, sugar coated |
| 7b | Fork & pinch for peanut shape | 2-3 min | Criss-cross pattern, pinched center |
| 8 | Bake | 10-12 min | Golden edges, soft center |
| 9 | Cool on sheet & rack | 20 min total | Warm to touch, then completely cool |
| 10 | Make filling | 3-4 min | Fluffy, spreadable |
| 11 | Assemble sandwiches | 5-7 min | Filling spreads to edge |
Serving & Presentation
These Homemade Nutter Butters are perfect for so many occasions. Serve them at a birthday party, pack them in lunch boxes, or arrange them on a pretty plate for an afternoon tea. I love to place them on a rustic wooden board or a ceramic cake stand — their golden brown color and peanut shape are just so charming. For a grown-up twist, dust them lightly with flaky sea salt right before serving.
Growing up, my mother would serve peanut sweets with hot mint tea, a Moroccan tradition. These cookies pair wonderfully with a cold glass of milk, a chai latte, or even a rich hot chocolate. If you’re feeling extra indulgent, serve them alongside a scoop of vanilla ice cream — the warm cookie and cold ice cream create a magical contrast.
| Pairing Type |
Similar Posts |
|---|