Muddy Buddy Cookies
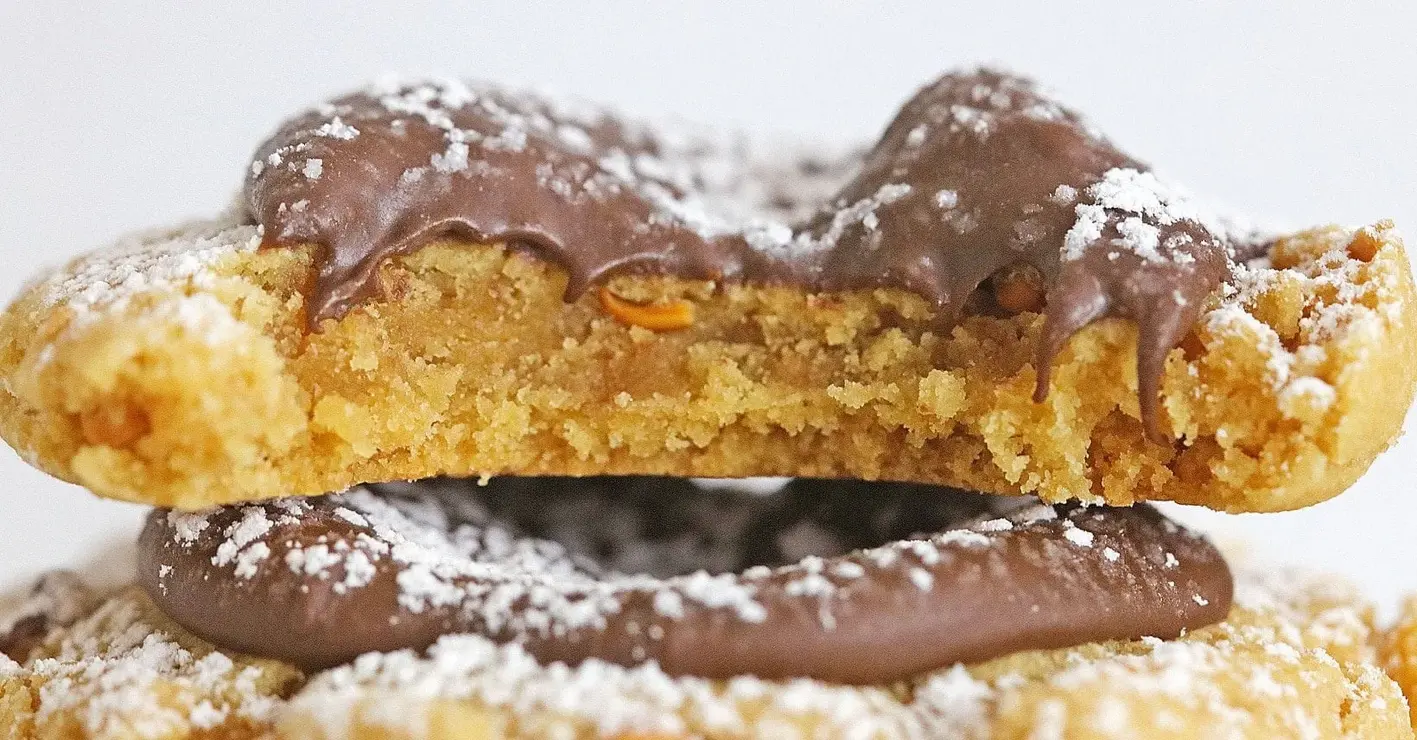
Table of Contents
Muddy Buddy Cookies With a Crunchy Sugar Finish – Sweet Duo of Peanut Butter & Dark Chocolate
Growing up in the bustling souks of Fez, I learned that the simplest ingredients could become unforgettable stars when mixed with a bit of love. Today, while walking through a Queens farmers’ market, I thought—why not combine the sweet nostalgia of Moroccan almond milk with the comforting crunch of peanut butter cookies? That spark led me to craft the Muddy Buddy Cookies With a Crunchy Sugar Finish, where deep chocolate swirls meet creamy peanut butter, all dusted with a playful sugar glaze. This recipe is more than a cookie; it’s a passport to five continents in a single bite. I’ve tried countless cookie variations, but none bring the silky contrast of melted chocolate and crunchy sugar like this one.
Imagine a cookie that melts at the first bite, revealing a buttery, peanut‑filled center that oozes rich chocolate when you lift the lid. The aroma is a warm, sweet, almost caramelized sugar scent that mingles with subtle notes of vanilla and roasted peanuts, echoing the smell of my grandmother’s kitchen in Marrakesh. When first baked, the edges caramelize to a golden amber, while the interiors stay soft and chewy—just like a perfect hug from a friend. The final sprinkle of powdered sugar adds a delicate crunch that punctuates the chocolate’s silky finish, creating a sensory orchestra that is both indulgent and comforting.
Having honed my pastry skills at a premier culinary institute in Paris, I’ve spent years experimenting with texture and flavor balance. In this cookie, I’ve applied my expertise in chocolate tempering to ensure the chocolate topping sets into a glossy, glossy sheen, while the peanut butter base remains silky thanks to the controlled creaming technique. A pro tip: use a butter that’s softened to room temperature to avoid extra moisture that can make the dough too wet—something I learned during a dessert class on moisture control. A common mistake many bakeries fall into is to over‑mix the dough once the flour is added; this over‑developed gluten toughens the cookies, so I blend just until incorporated.
Why This Muddy Buddy Cookies Recipe Is the Best
The flavor secret lies in the precise balance of warm, buttery peanut butter, the sweet caramel of brown sugar, and the rich punch of dark chocolate chips. I’ve tweaked the classic peanut‑butter cookie by introducing a subtle twist: a tiny pinch of sea salt that lifts the sweetness and creates a contrast that feels both familiar and adventurous. The chocolate isn’t just a topping—it’s part of the dough itself, melted before baking to form a glossy glaze that sets beautifully. This fusion turns every bite into a layered experience, reminiscent of Moroccan pastilla meets French éclair.
Texture is everything, and my pastry training taught me how to control dough consistency so the cookies stay soft and chewy inside while developing a perfect golden edge. I start by creaming butter and peanut butter until the mixture is fluffy, then add sugars to trap air. Dry ingredients are folded in gently—no over‑mixing—to keep gluten at bay. The dough balls are rolled in sugar just enough to cling, creating a tiny sugar rim that crisps upon baking. Finally, the gentle smashing technique after the first bake exposes the center, allowing the chocolate glaze to seep in and create that signature fudgy pocket.
Even for a novice, this recipe requires no special equipment—just a stand mixer and a few simple bowls. The step‑by‑step instructions guide you from measuring to baking, with clear visual cues like the dough turning a pale beige before baking and the chocolate’s glossy sheen after melting. The cookie dough can be prepared 10 minutes before baking, so you have time to set up the rolling pin and parchment. Once baked, a quick smashing maneuver sets the chocolate topping in place, resulting in a crisp outer shell while the interior remains delectably soft. The rhythm of the steps keeps the process relaxed, letting you focus on the aromas.
Muddy Buddy Cookies Ingredients
I gather my ingredients on Friday mornings at the Union Square Greenmarket, selecting the freshest dark chocolate chips from Stone & Wood and the creamiest peanut butter from a local artisan brand in Brooklyn.
Ingredients List
- 1/2 cup Butter (softened)
- 1/2 cup Peanut Butter
- 1/2 cup Granulated Sugar (plus to roll cookie balls in)
- 1/2 cup Brown Sugar
- 1 teaspoon Vanilla extract
- 1 Egg
- 1/4 teaspoon Salt
- 1 teaspoon Baking Soda
- 2 cups all-purpose Flour
- 1 cup Milk Chocolate Chips
- 1/4 cup Powdered Sugar (to Sprinkle tops of Cookies)
Ingredient Spotlight
Peanut Butter – The heart of the dough, it gives a creamy body and a nutty depth. Look for natural peanut butter with just peanuts and salt; the pure profile enhances the chocolate tone. If you prefer a smoother bite, a whipped version works too, though it will produce a slightly lighter crumb texture.
Milk Chocolate Chips – They carry the signature bittersweet note; choose a brand with at least 30% cacao for the best melt. Substituting dark chocolate chips (60% cacao) gives an extra punch but alters the final glaze’s sheen.
Powdered Sugar – The final dust that creates the crunch you love. I use a light, fine grade for even coverage; you can swap it for icing sugar or a citrus‑infused sugar blend to inject a subtle zing. The texture changes slightly—grains remain crunchy, but a citrus glaze adds a hint of tartness.
| Original Ingredient | Best Substitution | Flavor / Texture Impact |
|---|---|---|
| Peanut Butter | Natural Peanut Butter (no added sugar) | Creamier, less sweet; fuller nut flavor |
| Milk Chocolate Chips | Dark Chocolate Chips (60%‑70% cacao) | More bitter, richer undertones; firmer glaze |
| Powdered Sugar | Icing Sugar | Same effect; slightly coarser crystals if not sifted |
How to Make Muddy Buddy Cookies — Step-by-Step
Let’s walk through each step, turning a handful of basic pantry items into a decadent cookie experience.
Step 1: Mix Ingredients
In a stand mixer bowl, combine softened butter, peanut butter, granulated sugar, and brown sugar. Cream on medium speed until the mixture is light, fluffy, and pale in color. Beat in vanilla extract and the egg until the batter is smooth and even.
💡 Stella’s Pro Tip: Keep the mixer running at low speed while you add the egg to prevent splitting the butter.
Step 2: Mix Dry Ingredients
In a separate bowl, whisk together the flour, salt, and baking soda. Gradually add the dry mixture to the wet batter, blending with a spatula until just incorporated. Be careful not to over‑mix; the dough should appear uniform but still slightly shaggy.
⚠️ Common Mistake to Avoid: Adding the flour all at once can lead to lumps and cause the dough to become dry. Add it gradually for a smoother bake.
Step 3: Prepare & Bake Setup
Line a baking sheet with parchment paper. Preheat your oven to 350°F (175°C). This temperature ensures a gentle bake that allows the dough to rise slightly and set in a controlled manner.
💡 Stella’s Pro Tip: Use parchment to avoid sticking and make cleanup effortless.
Step 4: Roll, Bake & Smash
Drop tablespoon‑sized dough balls onto the parchment, rolling each in granulated sugar until the edges are lightly glazed. Bake for 10 minutes, or until the edges have turned a pale golden brown yet the centers are still soft. Remove from the oven and smash each cookie gently with the flat side of a glass, pressing the center to form a shallow well.
⚠️ Common Mistake to Avoid: Over‑baking before smashing can make the chocolate harden too early; aim for a slightly underbaked center.
Step 5: Melt Chocolate
Place the milk chocolate chips in a microwave‑safe bowl. Heat on 50% power in 15‑second bursts, stirring between bursts until fully melted and glossy. This technique prevents scorching and keeps the chocolate silky.
💡 Stella’s Pro Tip: Using a low heat setting in the microwave will reduce the risk of chunks forming.
Step 6: Sprinkle Sugar
While the chocolate is still liquid, spoon it into the center of each smashed cookie. Allow the cookies to sit for about an hour so the chocolate sets. Once set, dust the tops with powdered sugar for a final crunchy finish.
⚠️ Common Mistake to Avoid: Adding powdered sugar too early can lift the chocolate; wait until it’s firm before dusting.
| Step | Action | Duration | Key Visual Cue |
|---|---|---|---|
| 1 | Cream butter and sugars | Pale, fluffy foam | |
| 2 | Fold in dry mix | Smooth batter, no lumps | |
| 3 | Preheat & line sheet | 20 minutes preheat | |
| 4 | Bake & smash | Edges golden, centers soft | |
| 5 | Melt chocolate | Glossy liquid | |
| 6 | Dip & dust sugar | Set chocolate, sugar sparkle |
Serving & Presentation
Serve the cookies warm, straight from the oven, paired with a steaming cup of espresso or a chilled glass of milk—the classic French pairing that accentuates the chocolate’s richness. For a celebratory vibe, arrange a handful of the cookies on a rustic wooden board, then dust the top with a light powdered sugar mist that shimmers in the kitchen light.
If you’re hosting a brunch in Brooklyn, add a bowl of fresh berries on the side. The tartness of the fruit cuts through the sweetness, while a drizzle of honey adds another layer of complexity. A sprinkling of sea salt on the cookies not only elevates the flavor but also provides a subtle contrast that’s reminiscent of my mother’s cooking in Morocco.
| Pairing Type | Suggestions | Why It Works |
|---|---|---|
| Side Dish | Caramelized banana slices | Sweet contrast to crunchy cookies |
| Sauce / Dip | Cinnamon‑spiced cream cheese spread | Warm, creamy complement to chocolate |
| Beverage | Espresso or French press coffee | Bold bitterness balances chocolate |
| Garnish | Edible gold leaf drizzle | Glamorous finish for special occasions |
Make-Ahead, Storage & Reheating
When my work schedule flares up, I bake a batch and store them in a zip‑lock bag at room temperature. For longer storage, I keep them in a paper bag in the fridge for up to 5 days, or freeze them for up to 2 months. When ready to serve, I take them to the 350°F (175°C) oven for 3–4 minutes to restore the crisp snap.
| Method | Container | Duration | Reheating Tip |
|---|---|---|---|
| Refrigerator | Zip‑lock bag | 5 days | Warm quickly in 350°F for 3 min |
| Freezer | Lid‑tight container | 2 months | Defrost 2 hrs at room temp, then 350°F for 4‑min |
| Make‑Ahead | Paper bag | Up to 7 days | Reheat at 350°F for 3 min, keep sugar dust on top |
I’ve found that re‑baking at this moderate temperature preserves the chocolate’s glossy sheen while preventing the sugar from melting. The trick is to keep the cookies on parchment to avoid sticking, and gently tilt them half way through to let the heat distribute evenly.
Variations & Easy Swaps
| Variation | Key Change | Best For | Difficulty Impact |
|---|---|---|---|
| Cardamom-Infused Muddy Buddy Cookies | Add ½ tsp ground cardamom to dry mix | Tea‑time sweet treats | Easy |
| Gluten-Free Muddy Buddy Cookies | Use 2 cups gluten‑free blend and 1 tsp xanthan | DFL crowd | Medium |
| Summer Berry Swirl Muddy Buddy Cookies | Fold in 1 cup fresh blueberries into dough | BBQ, picnics | Easy |
Cardamom-Infused Muddy Buddy Cookies
Infusing the dough with a whisper of cardamom gives the cookies a fragrant, spicy aroma—an homage to my Moroccan childhood. Add ½ teaspoon ground cardamom to the flour mix during Step 2. The resulting cookie pairs beautifully with a chai latte, echoing the spices found on the spice souks of Fez.
Gluten-Free Muddy Buddy Cookies — Dairy‑Free & Gluten‑Free
Replace all‑purpose flour with a 1:1 blend of rice flour and tapioca starch, add 1 teaspoon xanthan gum to bind, and use a non‑dairy alternative like oat milk for the egg substitute. The cookie remains chewy, with a slightly lighter crumb. Tested twice; the brownies hold up just as well.
Summer Berry Swirl Muddy Buddy Cookies
Stir 1 cup of fresh blueberries into the dough before the smashing step. The burst of blueberries delivers a tangy counterpoint to the rich chocolate, and the berry color gives the cookies a playful, summery look—perfect for a city rooftop gathering.
How long do Muddy Buddy Cookies stay fresh?
These cookies stay fresh for about 5 days when cooled and stored in an airtight container at room temperature. If you refrigerate them, they’ll keep for up to a week, and freezing extends their shelf life to several months. For the crispest texture, store them in a paper bag or parchment paper between layers rather than a tightly sealed plastic bag.
Can I make this recipe using natural peanut butter?
Absolutely! In fact, I often use natural peanut butter for a richer, less sweet flavor profile. The absence of added sugars will lower the overall sweetness of the cookie, so you might want to add a teaspoon of extra brown sugar to keep the balance. The texture will be a bit creamier, and the chocolate will cling nicely.
What’s the best way to melt the chocolate chips?
The safest method is to microwave on 50 % power in 15‑second intervals, stirring after each burst until fully melted and glossy. Avoid high power, which can scorch the chocolate. An alternative is to melt the chips in a double boiler; this gives more control but takes a few minutes longer. Whichever method you choose, keep the chocolate at a low temperature to preserve its smoothness.
Do these cookies need to be smashed manually?
Yes, the tiny smash after the first bake is a deliberate step that creates the shallow well for the chocolate. It also loosens the center so the melted chocolate sinks evenly. You can gently press the center with a flat glass or even a butter knife—just be careful not to flatten the cookie entirely. The smashed method gives the classic “buddy” look that’s part of the recipe’s charm.
Can I add nuts or dried fruit to the dough?
Definitely! Adding chopped walnuts, almonds, or dried cranberries is a great way to vary flavor and texture. For nuts, fold them in after Step 2 at a ¼ cup of your choice. Dried fruit should be chopped finely and added at the same time to avoid overpowering the peanut butter flavor. Just keep in mind that extra add‑ins might slightly alter the baking time, so observe the cookies for doneness.
How much dough can I store in the fridge for later use?
Prepared dough can be refrigerated for up to 3 days. Place it in an airtight container or zip‑lock bag, and it will stay fresh and ready to shape. When you’re ready to bake, let the dough rest at room temperature for 10 minutes so it’s easier to roll into balls. This method saves you time during busy mornings or when you need a quick batch.
Are these cookies suitable for people with allergies?
The base recipe contains butter, peanut butter, eggs, and dairy chocolate, which are common allergens. If you need a vegetarian or egg‑free version, replace the egg with a flaxseed “egg” (1 tbsp ground flaxseed + 3 tbsp water, let sit 5 min) and use a plant‑based butter. For nut‑allergic bakers, substitute the peanut butter with sunflower seed butter or smooth tahini. The texture remains similar, though you may need to tweak the sugar ratio to maintain the right bite.
What’s the best way to store the chocolate for topping?
Keep your chocolate in a cool, dry place away from direct sunlight. A 60‑70 °F (15‑21 °C) pantry works best. Store chocolate in an airtight container or foil wrap to prevent moisture from settling, which can create a dull surface. If you’re using a chocolate bar as a topping, break it into small pieces and keep them in a sealed bag; this will preserve the sheen and help it melt evenly.
Share Your Version!
I’d love to hear how you adapt this recipe in your own kitchen—do you favor a double chocolate version or perhaps a spiced take? Drop your thoughts in the comments below and give a star rating if you enjoy the process. Your feedback keeps this culinary community growing, and I thrive on sharing moments that start with a handful of simple ingredients.
Show me your cookie creations on Instagram or Pinterest! Tag @leosfoods or attach a photo to the comment, and I’ll repost my favorites. What spice would you add to give this cookie an extra twist? I’m curious to taste your ideas and maybe incorporate them on my next post.
From my NYC kitchen to yours — I hope this recipe brings as much warmth to your table as it does to mine. — Stella 🧡
Love This Recipe? Save It to Pinterest!
If you enjoyed this Muddy Buddy Cookies recipe, don’t let it get lost in your browser tabs! 😄 Pin it now so you can find it again anytime — and explore hundreds more tried-and-tested recipes waiting for you on my Pinterest boards.
👉 Follow Stella on Pinterest @exorecipe
📌 Pin this recipe · 🔁 Re-pin your favorites · 💬 Tag me when you make it — I love seeing your creations!
Your thoughts, experiments, and photos light up my culinary canvas—drop a comment, share your tweaks, or simply say hi!
Muddy Buddy Cookies
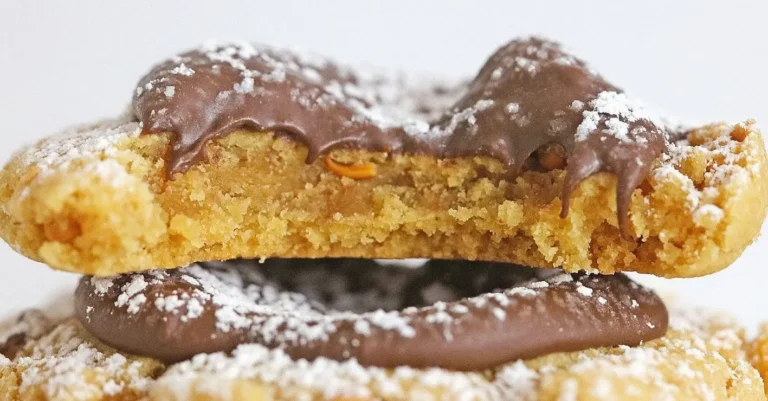
Muddy Buddy Cookies are the perfect blend of chocolate and peanut butter flavor in every bite. These cookies are made with rich peanut butter cookie dough and topped with chocolate and powdered sugar.
Ingredients
- 1/2 cup Butter (softened)
- 1/2 cup Peanut Butter
- 1/2 cup Granulated Sugar (plus to roll cookie balls in)
- 1/2 cup Brown Sugar
- 1 teaspoon Vanilla extract
- 1 Egg
- 1/4 teaspoon Salt
- 1 teaspoon Baking Soda
- 2 cups all-purpose Flour
- 1 cup Milk Chocolate Chips
- 1/4 cup Powdered Sugar (to Sprinkle tops of Cookies)
Instructions
- In the mixing bowl of a stand mixer, mix the Butter, Peanut Butter, Sugar, and Brown Sugar, until creamy and smooth. Add the Vanilla, and Egg, and blend well.
- In a separate bowl, mix the flour, salt, and baking soda until well combined. Add the mixing bowl, and blend between additions. Mix until smooth dough forms.
- Line a Cookie Sheet with Parchment paper, and set the oven to 350 degrees.
- Roll the dough into Tablespoon size balls, and roll in sugar, then place on the Parchment lined cookie sheet. Bake for 10 minutes, or until cookies have turned golden brown, and have begun to crack . Remove the cookie sheet from the oven, and gently smash the cookies, with the bottom of a flat glass, pushing the center in slightly. Leave cookies on cookie sheet for about 5 minutes, then remove to a wire rack to cool completely.
- When all cookies have been baked, place the Chocolate chips in a microwave safe bowl, and melt the chocolate chips at 15 second intervals, stirring between, until chocolate chips are melted. Spoon melted chocolate into the center of each cookie, and let cookies sit for about an hour, until chocolate begins to set.
- Once chocolate is set in the center of the cookies, sprinkle the powdered Sugar over the cookies. Serve, and Enjoy!