No-Bake Vegan Blueberry Chia Seed Pie
The Easiest (and Prettiest) No-Bake Vegan Blueberry Chia Seed Pie
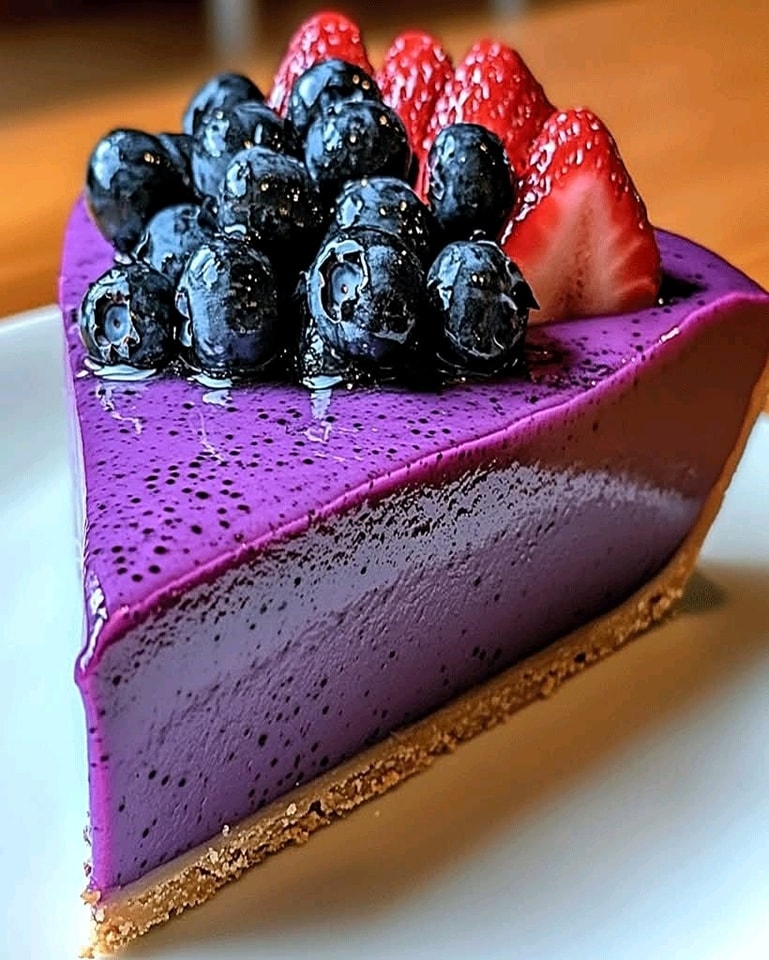
There’s something magical about a dessert that comes together without turning on the oven—especially when summer’s heat makes even the thought of baking unbearable. This no-bake vegan blueberry chia seed pie was born on one of those sweltering afternoons when my sweet tooth demanded satisfaction, but my kitchen felt like a sauna. The result? A creamy, jewel-toned pie that’s as nourishing as it is indulgent, with a crust so simple you’ll wonder why you ever bothered with fussy pastry dough.
Ingredients You’ll Fall in Love With
- For the crust:
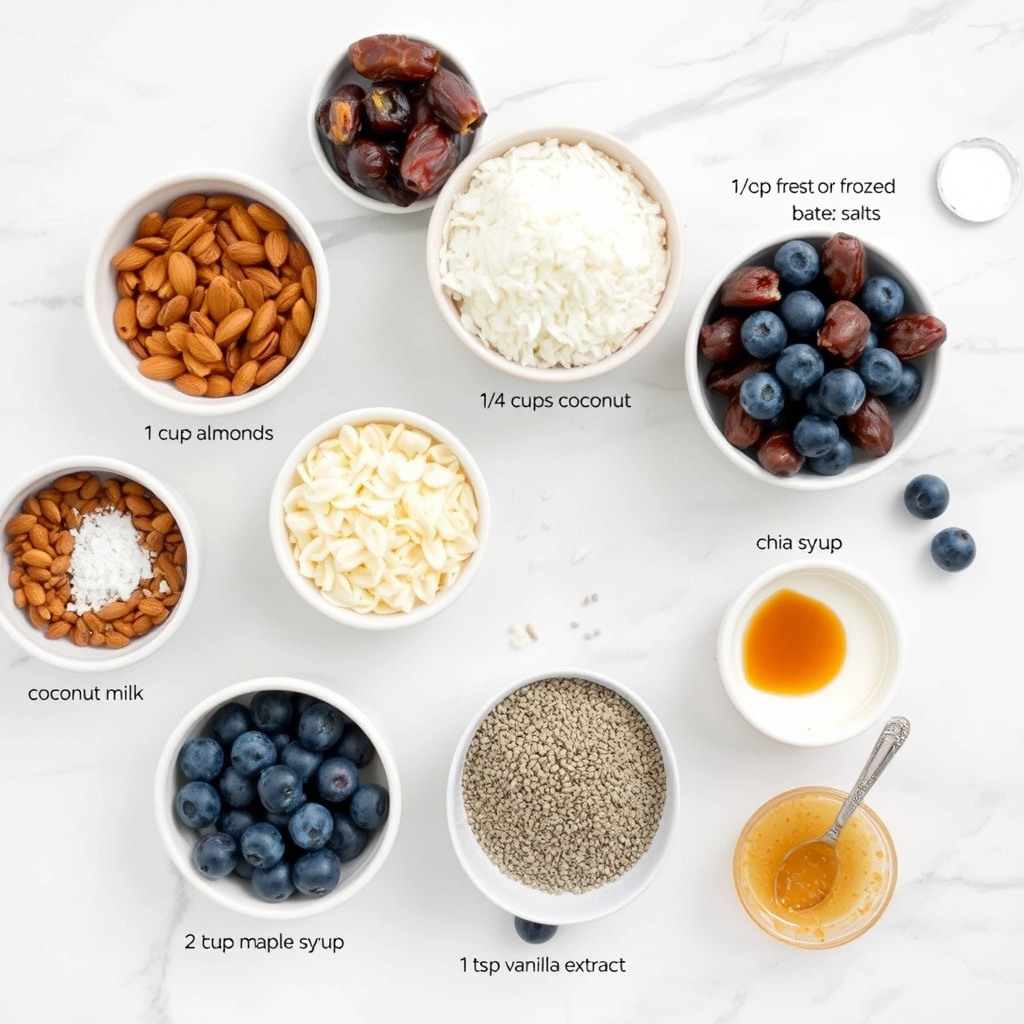
- 1 ½ cups raw almonds (or walnuts for a deeper flavor)
- ½ cup pitted Medjool dates (stick with these—they’re naturally sweeter and softer!)
- 2 tablespoons melted coconut oil (the glue that holds it all together)
- A pinch of sea salt (trust me, it makes the flavors pop)
- For the luscious chia filling:
- 1 ½ cups fresh or frozen blueberries (bursting with antioxidants)
- ½ cup full-fat coconut milk (the canned kind—shake it well before opening!)
- ¼ cup pure maple syrup (or agave if you prefer)
- 3 tablespoons chia seeds (tiny but mighty thickeners)
- 1 teaspoon vanilla extract (the cozy, aromatic touch)
- Zest of 1 lemon (brightens everything up)
Let’s Make Pie Magic—No Oven Required
Step 1: The No-Fuss Crust
Pulse the almonds in your food processor until they resemble coarse sand. Add the dates, coconut oil, and salt, then blend until the mixture starts clumping together like damp cookie crumbs. Press this into a pie dish with your fingers—I like to use the bottom of a glass to smooth it evenly. Pop it in the fridge to set while you work on the filling.
Step 2: The Dreamy Chia Filling
In a blender, combine the blueberries, coconut milk, maple syrup, and vanilla. Blend until velvety smooth—no blueberry bits left behind! Pour this gorgeous purple liquid into a bowl and whisk in the chia seeds and lemon zest. Let it sit for 5 minutes, then whisk again to prevent clumping. Here’s my secret: cover the bowl with a towel (not plastic wrap) to let it breathe as it thickens in the fridge for 2 hours.
Step 3: The Grand Assembly
Once your chia filling has transformed into a spoonable pudding consistency, give it one last stir and pour it over the chilled crust. Use the back of a spoon to swirl the top decoratively—it’ll look like a watercolor painting. Now, the hardest part: letting it set in the fridge for at least 4 hours (overnight is even better). I like to tuck a tea towel over the pie to keep it cozy.
Pro Tips, Variations, and Substitutions
This no-bake vegan blueberry chia seed pie is wonderfully forgiving, so don’t be afraid to make it your own! Here are some ideas to customize it:
- Fruit Swap: Swap blueberries for raspberries, strawberries, or a mix of your favorite summer berries.
- Nut-Free Crust: Replace the almond flour in the crust with sunflower seed flour or gluten-free oat flour.
- Sweetener Adjustments: If you prefer a less sweet pie, reduce the maple syrup by a tablespoon or two.
- Extra Creaminess: For a richer filling, blend in a tablespoon of coconut butter or almond butter.
What to Serve It With
This pie is delightful on its own, but if you want to take it to the next level, try pairing it with:
- A dollop of coconut whipped cream for extra indulgence.
- A scoop of dairy-free vanilla ice cream for a dreamy dessert combo.
- Fresh mint leaves or a sprinkle of lemon zest for a refreshing touch.
Storage and Reheating Tips
Since this pie is no-bake, it keeps beautifully in the fridge for up to 5 days—just cover it with plastic wrap or store it in an airtight container. If you’d like to freeze it, slice it first and store individual pieces in freezer-safe bags for up to 2 months. Thaw in the fridge overnight before serving.
Frequently Asked Questions
Can I use frozen blueberries?
Absolutely! Frozen blueberries work just as well—just thaw and drain any excess liquid before blending.
Why isn’t my filling setting?
If your chia filling is too runny, it may need more time to thicken. Let it sit in the fridge for an extra hour or two. If it’s still too loose, add another tablespoon of chia seeds and stir well.
Can I make this pie ahead of time?
Yes! This pie actually tastes even better the next day as the flavors meld together. Just keep it refrigerated until ready to serve.
Is this pie gluten-free?
Yes, as long as you use certified gluten-free oats in the crust, this pie is naturally gluten-free.
A Sweet Final Thought
There’s something so comforting about a dessert that’s both nourishing and indulgent—this no-bake blueberry chia seed pie is exactly that. Whether you’re serving it at a summer gathering or enjoying a quiet slice with a cup of tea, I hope it brings a little extra joy to your day. Happy baking (or rather, happy no-baking)!
PrintNo-Bake Vegan Blueberry Chia Seed Pie
A delicious and healthy no-bake pie with a nutty crust and a creamy blueberry chia seed filling.
Ingredients
For the Crust:
- 1 cup almonds
- 1 cup dates, pitted
- 1/4 cup shredded coconut
- 1/4 tsp salt
- 2 cups fresh or frozen blueberries
- 1/4 cup chia seeds
- 1/2 cup coconut milk
- 2 tbsp maple syrup
- 1 tsp vanilla extract
Instructions
1. Prepare the Crust:
- In a food processor, blend almonds, dates, shredded coconut, and salt until a sticky dough forms.
- Press the mixture into a pie dish to form the crust and refrigerate for 30 minutes.
- In a blender, combine blueberries, chia seeds, coconut milk, maple syrup, and vanilla extract. Blend until smooth.
- Pour the blueberry mixture over the crust and spread evenly.
- Refrigerate for at least 4 hours or until set before serving.
Notes
You can customize the seasonings to taste.