Garlic Sesame Noodles
“`html
Table of Contents
Garlic Sesame Noodles – 15-Minute Magic: Your New Favorite Weeknight Dinner
I still remember the first time I made these garlic sesame noodles in my tiny Manhattan apartment, the scent of toasted sesame oil and sizzling garlic wrapping around me like a warm hug from my mother’s kitchen in Morocco. Noodles are a girl’s best friend, and these easy garlic sesame noodles are without a doubt my favorite noodle recipe to date! They require just a few ingredients, are gluten free, ready in 15 minutes, and can be eaten hot or cold. That magical combination of nutty tahini, rich toasted sesame oil, and just enough sriracha to make things interesting — it’s the kind of dish that feels both deeply comforting and excitingly fresh, all at once.
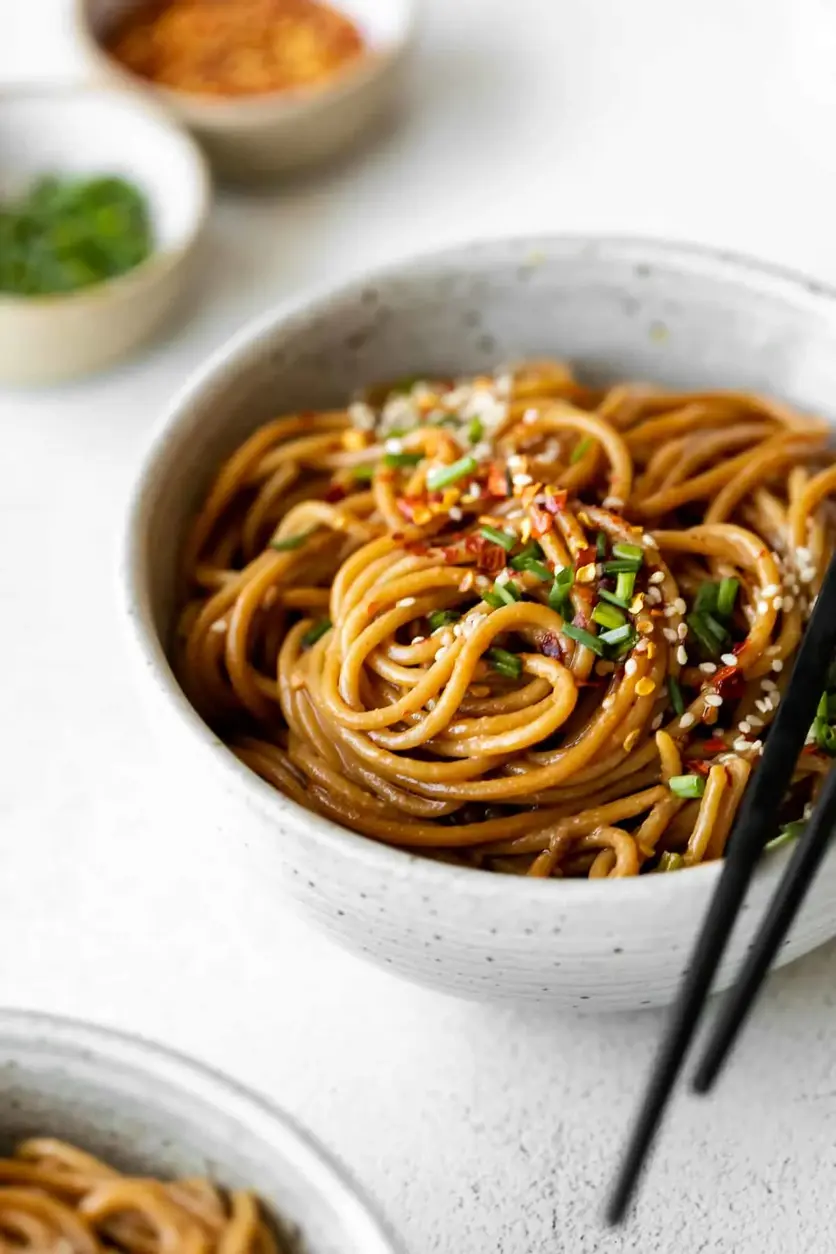
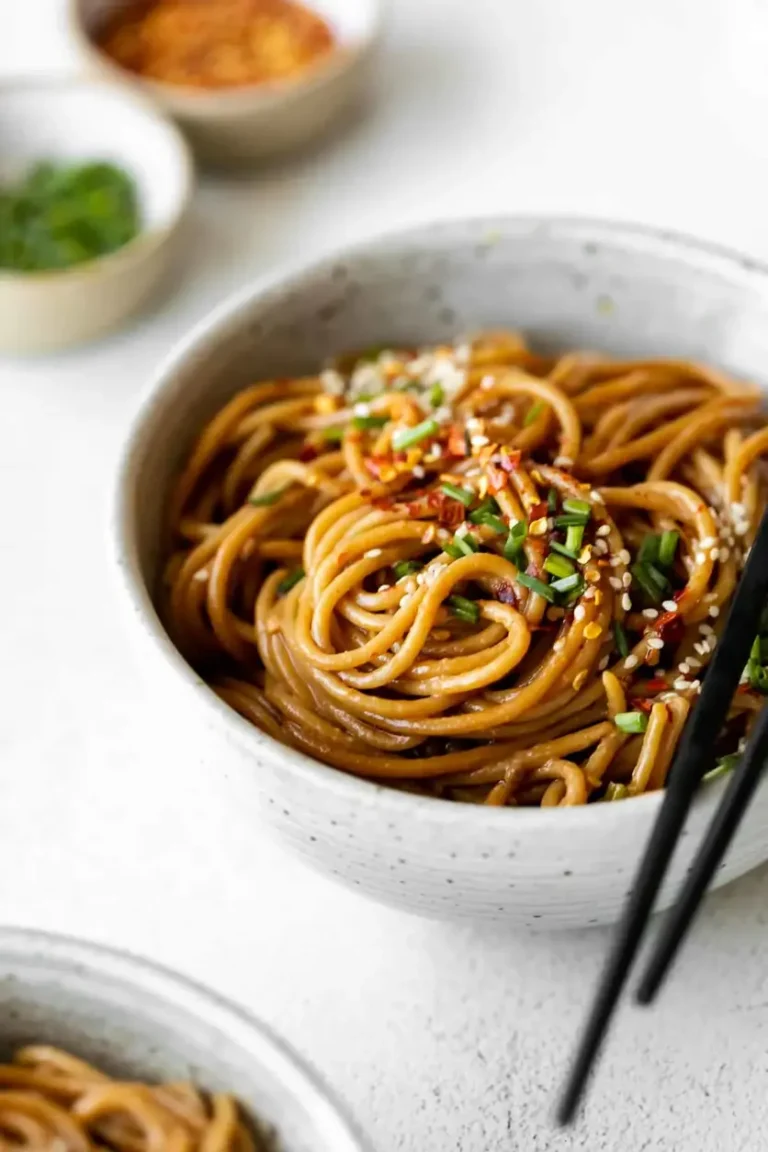
When you toss the warm brown rice noodles with that velvety, garlic-flecked sauce, something beautiful happens. The noodles drink up every drop, turning glossy and fragrant, with each strand carrying a perfect balance of salty, sweet, tangy, and spicy. I love how the toasted sesame oil adds this deep, almost smoky richness, while the rice vinegar keeps everything bright and lively. A sprinkle of crushed peanuts and fresh scallions on top adds crunch and color — and honestly, I could eat this every single day and never get tired of it. My husband often jokes that I should open a noodle window in our neighborhood, and honestly, he might be onto something.
What sets my version apart is the technique I learned during my culinary training in Paris: we sauté the minced garlic gently in oil until the edges turn golden brown, which mellows the sharpness and brings out a sweet, nutty depth. Then we build the sauce with tahini for creaminess (a trick I picked up from my North African roots) and just a touch of maple syrup to round out the savory edges. One common mistake? Not whisking the tahini thoroughly into the sauce — it can clump and leave bitter pockets. But don’t worry, I’ll walk you through every step so your garlic sesame noodles turn out silky, balanced, and absolutely irresistible. From my NYC kitchen to yours, let’s make some magic.
Why This Garlic Sesame Noodles Recipe Is the Best
The Flavor Secret. The real magic here is in the sauce — a carefully balanced blend of toasted sesame oil, tamari, tahini, rice vinegar, and a whisper of maple syrup. I learned the art of balancing savory and sweet from my mother’s tagines in Morocco, and the technique of layering flavors from my French training. The tahini adds a creamy, nutty richness that clings to every noodle, while the sriracha gives just enough heat to wake up your palate without overwhelming it. This is not a one-note sauce; it’s a symphony, and every ingredient has a role to play.
Perfected Texture. The key to perfect garlic sesame noodles lies in how you treat the garlic. Instead of using raw garlic (which can be harsh) or burning it (which turns bitter), we sauté the minced garlic in neutral oil until the edges just start to turn golden brown. This French technique — known as “blonding” the garlic — unlocks a sweet, mellow aroma that melts into the sauce beautifully. Combined with the chewy-tender bite of brown rice noodles and the velvety sauce, every forkful delivers a perfect contrast of textures that keeps you coming back for more.
Foolproof & Fast. I’ve designed this recipe to be absolutely foolproof for home cooks of any skill level. The entire dish comes together in the time it takes to boil pasta, and there’s no complicated technique or hard-to-find ingredient. Whether you’re a busy parent, a student living on ramen, or just someone who wants a delicious dinner without spending hours in the kitchen, these garlic sesame noodles are your answer. Plus, they’re naturally gluten-free (when using brown rice noodles) and easily made vegan with maple syrup instead of honey. Dinner doesn’t get easier — or more delicious — than this.
Garlic Sesame Noodles Ingredients
I love how accessible these ingredients are — almost everything comes from my regular rotation at the Union Square Greenmarket and my neighborhood Asian market in Chinatown. The combination of pantry staples with a few fresh items makes this recipe both practical and deeply flavorful. Let me walk you through what you’ll need.
Ingredients List
- 12 ounces brown rice noodles
- 1 tablespoon neutral oil (avocado, olive, or refined coconut)
- 6 cloves garlic, very finely minced or pressed
- ¼–⅓ cup low-sodium soy sauce or tamari
- 2 tablespoons veggie broth
- 1½ tablespoons rice vinegar
- 2 tablespoons toasted sesame oil
- 1 tablespoon honey or maple syrup
- 2 tablespoons tahini
- 2 teaspoons sriracha
- ½ teaspoon ground ginger
- For garnish: scallions, red pepper flakes, crushed peanuts
Ingredient Spotlight
Brown Rice Noodles. These are my go-to for a gluten-free option that still feels satisfyingly chewy. Look for brands like Lotus Foods or MamaFa — they hold their shape well and don’t turn mushy. You can substitute with soba noodles (look for 100% buckwheat for gluten-free) or regular wheat noodles if gluten isn’t a concern. The texture will be slightly different but still delicious.
Tahini. This is the secret weapon that gives the sauce its luscious, creamy body. I use a Middle Eastern brand like Soom or Al Wadi — make sure to stir it well before measuring, as the oil naturally separates. The toasty, nutty flavor of tahini is irreplaceable here, but if you’re in a pinch, you can use sunflower seed butter or cashew butter for a similar creaminess, though the flavor will shift slightly.
Toasted Sesame Oil. This is not the time for regular sesame oil — toasted sesame oil is dark amber and intensely aromatic, with a rich, nutty depth that defines this dish. I love the Kadoya brand for its pure, robust flavor. A little goes a long way, so measure carefully. If you only have untoasted sesame oil, the dish will lack that signature toasty character.
Sriracha. The 2 teaspoons add a gentle warmth that builds rather than overwhelms. I use Huy Fong brand (the one with the rooster on the bottle) for its balanced heat and slight sweetness. If you’re sensitive to spice, start with 1 teaspoon; if you love heat, feel free to bump it up to 1 tablespoon. You can also substitute with sambal oelek or chili garlic sauce for a different flavor profile.
| Original Ingredient | Best Substitution | Flavor / Texture Impact |
|---|---|---|
| Brown rice noodles | Soba noodles (100% buckwheat) or wheat ramen | Soba adds a nutty, earthy flavor; ramen is chewier but not gluten-free |
| Tahini | Sunflower seed butter or cashew butter | Slightly sweeter, less nutty, but still creamy |
| Toasted sesame oil | Regular sesame oil + a drop of smoked sesame seeds | Lighter flavor; lacks the deep toasty character |
| Sriracha | Sambal oelek or chili garlic sauce | More garlicky, slightly different heat profile |
| Honey | Maple syrup or agave nectar | Maple adds a subtle caramel note; agave is neutral |
How to Make Garlic Sesame Noodles — Step-by-Step
I promise you, this comes together faster than you can order takeout — and tastes twice as good. Let me walk you through each step with the tips I’ve learned from making this dish hundreds of times.
Step 1: Cook the Noodles
Bring a large pot of water to a rolling boil and cook the brown rice noodles according to the package instructions. Most brown rice noodles take 6–8 minutes — you want them al dente, with a slight chew. Be careful not to overcook them, as they can turn mushy quickly. Drain well and rinse briefly with cool water to stop the cooking process and remove excess starch.
💡 Stella’s Pro Tip: Reserve about ½ cup of the starchy pasta water before draining. If your sauce needs a little thinning when you toss everything together, a splash of that starchy water works wonders to help the sauce cling to the noodles.
Step 2: Mince the Garlic
Mince the 6 cloves of garlic very finely — you want them almost paste-like, since we won’t be blending this sauce. A garlic press works beautifully here, or you can use the flat side of your chef’s knife to crush and then mince. The finer the garlic, the more evenly it will distribute and the faster it will cook.
⚠️ Common Mistake to Avoid: Don’t use a microplane for the garlic — it releases too much juice and can make the sauce watery and bitter. Finely mincing or pressing gives you the perfect texture and flavor.
Step 3: Sauté the Garlic
Add the 1 tablespoon of neutral oil to a pan over medium heat. Once the oil is shimmering, add the minced garlic. Sauté gently, stirring constantly, until the edges of the garlic look golden brown — about 60 to 90 seconds. The aroma at this stage is absolutely intoxicating. Do not walk away; garlic can burn in seconds.
💡 Stella’s Pro Tip: Lower the heat slightly if the garlic starts browning too quickly. You want it golden at the edges, not crispy or dark brown. That sweet spot is where the magic happens.
Step 4: Whisk the Sauce
While the garlic is sautéing, whisk together all the remaining sauce ingredients in a medium bowl: ¼ to ⅓ cup tamari, 2 tablespoons veggie broth, 1½ tablespoons rice vinegar, 2 tablespoons toasted sesame oil, 1 tablespoon honey or maple syrup, 2 tablespoons tahini, 2 teaspoons sriracha, and ½ teaspoon ground ginger. Whisk vigorously until there are no visible clumps of ginger and the tahini is fully incorporated — this is crucial for a silky sauce.
⚠️ Common Mistake to Avoid: If you don’t whisk the tahini thoroughly, it will form little clumps that taste bitter and grainy. Take an extra 30 seconds to make sure it’s completely smooth before pouring into the pan.
Step 5: Combine and Simmer
Pour the whisked sauce into the pan with the sautéed garlic and stir well to combine. Bring the sauce to a gentle simmer and let it cook for 2–3 minutes, stirring occasionally, until it thickens slightly. You should see it reduce and become glossy, coating the back of a spoon. This step concentrates the flavors and melds everything together beautifully.
💡 Stella’s Pro Tip: Taste the sauce at this point and adjust if needed. Want it more savory? Add a splash more tamari. More heat? Another dash of sriracha. This is your moment to make it perfect for your palate.
Step 6: Toss and Garnish
Add the drained noodles to the pan with the sauce and toss well, using tongs or two forks, until every strand is evenly coated. The noodles will absorb the sauce as they sit, so don’t worry if it looks a little loose at first. Serve immediately in warm bowls, garnished generously with sliced scallions, a sprinkle of red pepper flakes, and crushed peanuts for crunch.
⚠️ Common Mistake to Avoid: Don’t let the noodles sit in the hot pan after tossing — they can overcook and become sticky. Serve right away for the best texture, or if serving cold, rinse with cool water and toss with a tiny bit of sesame oil to keep them from clumping.
| Step | Action | Duration | Key Visual Cue |
|---|---|---|---|
| 1 | Cook noodles | 6–8 min | Al dente, chewy, not mushy |
| 2 | Mince garlic | 1–2 min | Fine, almost paste-like |
| 3 | Sauté garlic | 60–90 sec | Golden edges, fragrant |
| 4 | Whisk sauce | 1–2 min | Smooth, no clumps |
| 5 | Simmer sauce | 2–3 min | Thickened, glossy |
| 6 | Toss and garnish | 1–2 min | Evenly coated, vibrant |
Serving & Presentation
I love serving these garlic sesame noodles in deep, wide bowls that show off the glossy, saucy strands. A generous sprinkle of sliced scallions (both green and white parts) adds a fresh, oniony pop, while crushed peanuts bring a satisfying crunch that contrasts with the tender noodles. A final pinch of red pepper flakes gives a hint of heat and a beautiful red accent against the golden sauce. For an extra touch, I sometimes add a handful of fresh cilantro leaves or a squeeze of lime — both brighten the dish beautifully.
These noodles are incredibly versatile when it comes to pairings. In my NYC kitchen, I often serve them alongside steamed edamame sprinkled with sea salt, or a simple cucumber salad with rice vinegar and a touch of sugar. They also make a fantastic base for protein — try topping them with grilled chicken, pan-seared tofu, or even a soft-boiled egg with a jammy yolk that mingles into the sauce. For a Moroccan-inspired twist, I sometimes add a sprinkle of toasted cumin seeds and a dollop of harissa on the side for extra warmth.
Whether you’re serving these as a quick weeknight dinner, a cold lunch the next day, or a potluck contribution that everyone will rave about, they always deliver. I’ve brought them to friends’ apartments in Brooklyn and to family gatherings upstate, and the response is always the same: wide eyes, happy sighs, and requests for the recipe. They’re simple enough for a Tuesday but special enough for company — that’s the kind of recipe I love most.
| Pairing Type | Suggestions | Why It Works |
|---|---|---|
| Side Dish | Steamed edamame, cucumber salad, miso soup | Light, fresh sides balance the rich, creamy noodles |
| Sauce / Dip | Extra sriracha, chili crisp, hoisin sauce | Adds another layer of heat, sweetness, or crunch |
| Beverage | Green tea, sake, crisp white wine (Sauvignon Blanc) | Cleanses the palate and complements the sesame |
| Garnish | Scallions, crushed peanuts, cilantro, lime wedges | Adds freshness, crunch, and brightness |
Make-Ahead, Storage & Reheating
Between recipe testing for the blog and feeding my family in our busy NYC apartment, I’ve learned exactly how to handle leftovers of these garlic sesame noodles. The good news: they store beautifully and actually taste amazing cold straight from the fridge the next day — like a noodle salad situation that I often crave even more than the original. Here’s everything you need to know.
| Method | Container | Duration | Reheating Tip |
|---|---|---|---|
| Refrigerator | Airtight container | Up to 4 days | Toss with a splash of water or tamari before reheating in a pan or microwave |
| Freezer | Freezer-safe zip-top bag or container | Up to 2 months | Thaw overnight in the fridge, then reheat in a pan with a little oil |
| Make-Ahead | Separate sauce and noodles | Sauce up to 5 days, noodles 2 days | Combine and reheat just before serving for freshest texture |
My favorite way to enjoy leftovers is cold — straight from the fridge, maybe with an extra sprinkle of crushed peanuts and a dash of sriracha. The flavors actually meld and deepen overnight, and the chilled noodles have a satisfyingly firm, chewy texture. If you prefer them hot, reheat in a non-stick pan over medium heat with a splash of water or vegetable broth to loosen the sauce. Microwave works too — just cover the bowl and heat in 30-second bursts, stirring between each, until warmed through. I don’t recommend reheating more than once, so portion out only what you’ll eat at a time.
For meal prep, I like to cook the noodles and sauce separately, then combine them the day I plan to serve. The sauce keeps beautifully in a jar in the fridge for up to 5 days, and the noodles can be cooked, tossed with a little sesame oil to prevent sticking, and stored for up to 2 days. When you’re ready, just reheat the noodles briefly in hot water (or run them under hot tap water), warm the sauce, and toss together. Dinner in 5 minutes, with zero compromise on flavor.
Variations & Easy Swaps
One of the things I love most about this recipe is how endlessly adaptable it is. Over the years, I’ve experimented with dozens of variations — some inspired by my Moroccan roots, some by my French training, and some by whatever I found at the farmers market that week. Here are my favorite ways to change it up.
| Variation | Key Change | Best For | Difficulty Impact |
|---|---|---|---|
| Spicy Peanut Noodles | Replace tahini with peanut butter, add 1 tbsp lime juice | Peanut lovers, Thai-inspired cravings | Easy (same technique) |
| Harissa Sesame Noodles | Add 1 tbsp harissa paste to the sauce, reduce sriracha to 1 tsp | North African flavor twist | Easy (one extra ingredient) |
| Veggie-Loaded Noodles | Add 2 cups shredded cabbage, carrots, and bell peppers | Adding veggies, extra nutrition | Easy (sauté before adding sauce) |
Spicy Peanut Variation
This is the variation my husband begs for most often. Simply swap the 2 tablespoons of tahini for 2 tablespoons of creamy peanut butter (I like Skippy natural or a local artisanal brand from the Union Square market). Add 1 tablespoon of fresh lime juice to the sauce, and consider tossing in a handful of fresh cilantro at the end. The peanut butter makes the sauce even richer and slightly sweeter, with a comforting, familiar flavor that pairs beautifully with the toasted sesame oil. It’s like your favorite Thai peanut noodles, but faster and made entirely from pantry staples.
Gluten-Free & Vegan Adaptation
This recipe is already naturally gluten-free when you use brown rice noodles and tamari (which is gluten-free soy sauce). To make it vegan, simply use maple syrup instead of honey — I actually prefer the subtle caramel notes that maple adds to the sauce. Both substitutions work seamlessly without compromising texture or flavor. For a soy-free version, try coconut aminos in place of tamari; the sauce will be slightly sweeter and less salty, so you may want to add a pinch of salt to balance it.
Harissa Sesame Twist
This variation is a nod to my Moroccan heritage and absolutely one of my favorites. Stir 1 tablespoon of harissa paste (I love the brand Mina or homemade) into the sauce along with the other wet ingredients, and reduce the sriracha to 1 teaspoon. The harissa adds a smoky, complex heat with notes of roasted red pepper, caraway, and coriander that pairs stunningly with the sesame and tahini. Garnish with a sprinkle of toasted cumin seeds and fresh mint leaves for a truly North African-inspired bowl. It’s unexpected, deeply flavorful, and always gets rave reviews from guests.
Can I use regular wheat noodles instead of brown rice noodles?
Absolutely! Regular wheat noodles like ramen, lo mein, or even spaghetti work beautifully in this recipe. The key is to cook them al dente according to the package directions, then rinse briefly with cool water to stop the cooking and remove excess starch. If you’re using fresh ramen noodles, they’ll cook in just 2–3 minutes. Keep in mind that using wheat noodles means the recipe will no longer be gluten-free, but the flavor and texture will still be wonderful. I often make this with whatever noodles I have on hand — that’s the beauty of a flexible recipe.
How do I keep the noodles from sticking together after cooking?
Great question — this is something I learned through trial and error in my early NYC cooking days! After draining the noodles, rinse them briefly with cool water to remove excess starch, then toss them with about a teaspoon of toasted sesame oil (or any neutral oil) to coat lightly. This prevents sticking and adds a subtle boost of flavor. If you’re not using them right away, spread them out on a baking sheet or plate so they cool evenly before storing. When you’re ready to combine with the sauce, the noodles will separate easily and each strand will be perfectly coated.
Can I add protein to these garlic sesame noodles?
Yes, and I do it all the time! These noodles are fantastic with grilled chicken, pan-seared tofu, shrimp, or a soft-boiled egg with a runny yolk. For chicken, I like to season it simply with salt, pepper, and a little garlic powder, then slice and place on top of the finished noodles. For tofu, press it dry, cube it, and pan-fry until golden before adding to the bowl. A jammy soft-boiled egg (7 minutes in boiling water, then an ice bath) is my personal favorite — the yolk creates an extra-silky sauce when broken into the noodles. Any of these additions make the dish more substantial for a main course.
How do I make the sauce less spicy?
It’s very easy to adjust the heat level to your preference. The recipe calls for 2 teaspoons of sriracha, which gives a mild to medium warmth. For a milder version, start with just ½ teaspoon of sriracha and taste the sauce before adding more. You can also leave the sriracha out entirely — the sauce will still be incredibly flavorful thanks to the garlic, tahini, toasted sesame oil, and ginger. If you’re serving a crowd with varying spice tolerances, I recommend making the sauce without the sriracha and letting everyone add their own at the table. That way, everyone gets exactly the level of heat they love.
Can I make this recipe ahead of time for meal prep?
Yes, and it’s a meal prep superstar! The best approach is to cook the noodles and the sauce separately, then combine them when you’re ready to eat. The sauce keeps beautifully in an airtight jar in the refrigerator for up to 5 days. The cooked noodles can be stored in a separate container for up to 2 days (toss them with a little sesame oil first to prevent sticking). When you’re ready to serve, reheat the noodles quickly in hot water or a pan, warm the sauce, and toss together. If you already combined everything, the leftovers are delicious cold or reheated — just add a splash of water or tamari to loosen the sauce if needed.
What can I substitute for tahini in this recipe?
If you don’t have tahini on hand, there are several great substitutes that still give you a creamy, rich sauce. The best option is sunflower seed butter — it has a similar consistency and a mild, slightly nutty flavor that works beautifully with sesame. Cashew butter is another excellent choice, adding a buttery sweetness that complements the other ingredients. For a nut-free version, try sesame seed paste (which is essentially tahini without the brand name) or even a well-stirred creamy almond butter. Each substitution will slightly change the flavor profile, but all are delicious in their own way. Avoid peanut butter unless you’re going for the peanut variation.
Is this recipe suitable for a gluten-free diet?
Yes, this recipe is naturally gluten-free when you use brown rice noodles and tamari instead of regular soy sauce. Brown rice noodles are made from rice flour and are widely available in most grocery stores — I like the brands Lotus Foods and Annie Chun’s. Tamari is a gluten-free soy sauce alternative that tastes very similar to traditional soy sauce. If you use regular soy sauce and wheat-based noodles, the recipe will no longer be gluten-free. Always check labels to be sure, especially if you’re cooking for someone with celiac disease or a serious gluten sensitivity.
How do I make the sauce thicker or thinner?
The sauce consistency is easy to adjust to your liking. If you prefer a thicker sauce that really clings to the noodles, let it simmer for an extra 2–3 minutes — the natural starch from the tahini and the reduction will thicken it nicely. You can also add an extra teaspoon of tahini for body. If your sauce is too thick (or has thickened after refrigeration), simply whisk in a splash of warm water, vegetable broth, or extra rice vinegar until it reaches the consistency you want. A little reserved starchy pasta water works wonders here too — it helps the sauce emulsify and coat the noodles beautifully.
Can I serve these noodles cold?
Absolutely! These garlic sesame noodles are fantastic served cold, like a noodle salad. In fact, I often make a double batch specifically so I can enjoy them cold for lunch the next day. To serve cold, after cooking the noodles, rinse them thoroughly under cold water until they’re completely cool, then drain well and toss with a tiny bit of toasted sesame oil to prevent sticking. Toss with the cooled sauce (don’t reheat it) and garnish as usual. The flavors actually meld and deepen as they sit, and the chilled noodles have a wonderfully chewy, refreshing texture. It’s my go-to summer lunch.
What is the best way to reheat leftover garlic sesame noodles?
I’ve tested several methods, and here’s what works best. For stovetop reheating, place the noodles in a non-stick pan or skillet over medium heat with a splash of water, vegetable broth, or tamari. Toss frequently for 2–3 minutes until heated through — the liquid helps rehydrate the sauce and prevents sticking. For microwave reheating, place the noodles in a microwave-safe bowl, cover with a damp paper towel, and heat in 30-second bursts, stirring between each, until hot. Add a tiny splash of water before microwaving if the noodles seem dry. I don’t recommend reheating more than once, so take only what you’ll eat.
Share Your Version!
I absolutely love hearing how these garlic sesame noodles turn out in your kitchen — and I know I’m not alone! There’s something so special about a recipe that makes it onto your regular rotation, and I’d be honored if this one becomes a favorite in your home too. Did you add a twist? Discover a new favorite garnish? Serve it with something unexpected? Drop a comment below and let me know — your ideas might just inspire the next person who’s looking for a way to make it their own.
If you snap a photo of your creation (and I hope you do!), tag me on Instagram or Pinterest @leosfoods — I love scrolling through my feed and seeing your beautiful bowls. And if you’re feeling extra generous, leave a star rating right here on the recipe card. Your feedback helps other home cooks find their way to this dish and gives me the sweetest encouragement to keep creating. So tell me: what’s the first thing you’re going to serve alongside these noodles? I can’t wait to read your answers.
From my NYC kitchen to yours — I hope this recipe brings as much warmth to your table as it does to mine. — Stella 🧡
Love This Recipe? Save It to Pinterest!
If you enjoyed this Garlic Sesame Noodles recipe, don’t let it get lost in your browser tabs! 😄 Pin it now so you can find it again anytime — and explore hundreds more tried-and-tested recipes waiting for you on my Pinterest boards.
👉 Follow Stella on Pinterest @exorecipe
📌 Pin this recipe · 🔁 Re-pin your favorites · 💬 Tag me when you make it — I love seeing your creations!
💬 What’s Your Favorite Way to Enjoy Garlic Sesame Noodles?
I’d love to hear from you! Drop a comment below with your favorite add-in, garnish, or pairing idea — or just tell me how they turned out. 🍜✨
⬇️ Scroll down to leave your rating and comment ⬇️
“`
Print
Garlic Sesame Noodles
Noodles are a girls best friend and these easy garlic sesame noodles are without a doubt my favorite noodle recipe to date! They require just a few ingredients, are gluten free, ready in 15 minutes, and can be eaten hot or cold!
Ingredients
- 12 ounces brown rice noodles
- 1 tablespoon oil
- 6 cloves garlic
- 1/4–1/3 cup low sodium soy sauce or tamari
- 2 tablespoons veggie broth
- 1 1/2 tablespoons rice vinegar
- 2 tablespoons toasted sesame oil
- 1 tablespoon honey or maple syrup
- 2 tablespoons tahini
- 2 teaspoon sriracha
- 1/2 teaspoon ground ginger
Instructions
- Bring a large pot of water to a boil and cook the pasta according to package instructions.
- Mince the garlic very finely or use a garlic press to get it super small since we won't be blending up this sauce.
- Add the minced garlic to a pan with the neutral oil. This can be avocado, olive, or refined coconut oil.
- Saute until the edges of the garlic look golden brown.
- Meanwhile, whisk together all of the remaining sauce ingredients in a bowl until there are no visible clumps of ginger and the tahini is spread throughout.
- Pour the sauce into the pan with the garlic and mix well.
- Let simmer for 2-3 minutes or until the sauce thickens slightly.
- When the pasta is done cooking, combine with the sauce.
- Garnish with scallions, red pepper flakes, crushed peanuts and enjoy!