Peanut Butter Chocolate Oat Cups
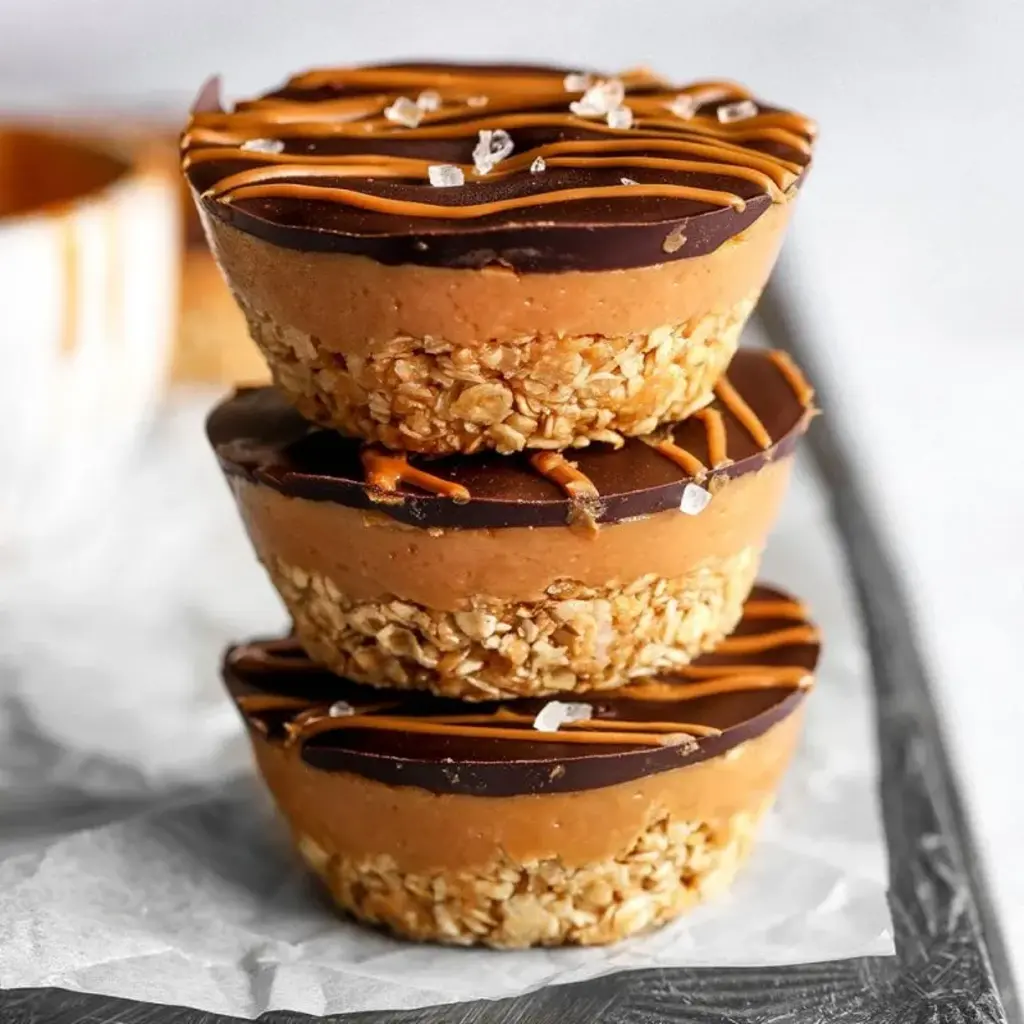
Table of Contents
Peanut Butter Chocolate Oat Cups – No-Bake, Vegan & Gluten-Free
I still remember the first time I made these Peanut Butter Chocolate Oat Cups — it was a sweltering August afternoon in my tiny NYC apartment, and I was craving something sweet but refused to turn on the oven. Back in my mother’s kitchen in Morocco, we never baked in the heat of summer; instead, she’d make chilled treats with dates, nuts, and honey. This no-bake, vegan AND gluten-free recipe is my modern tribute to that wisdom — a layered indulgence that comes together in minutes, with zero oven time and maximum flavor. The combination of a crunchy oat base, a creamy peanut butter middle, and a rich dark chocolate top is pure magic, and the optional Biscoff drizzle? That’s my little Parisian pastry chef wink.
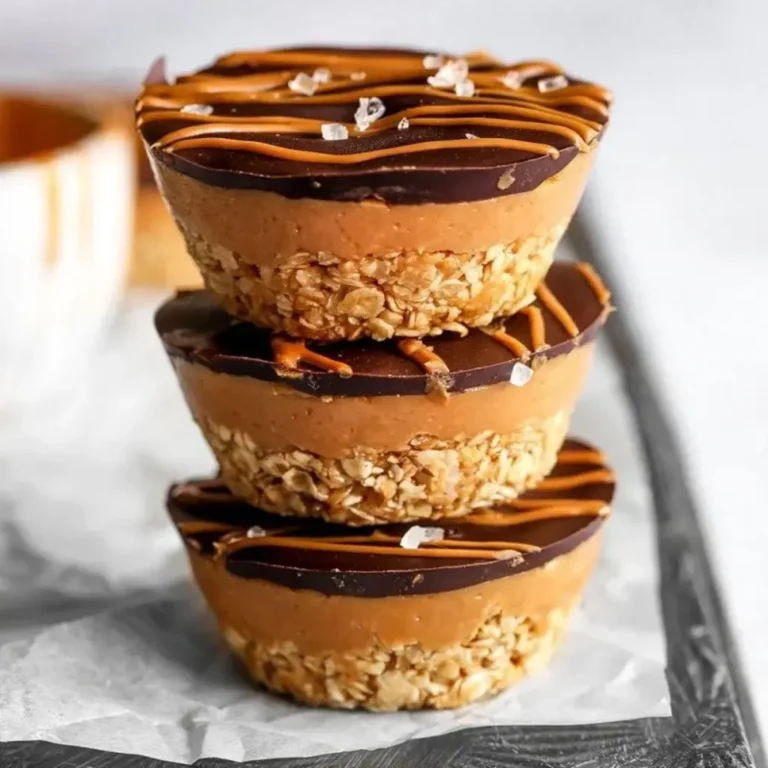
Imagine biting into one of these Peanut Butter Chocolate Oat Cups: the oats offer a tender, slightly chewy foundation, followed by a luscious layer of peanut butter sweetened with maple syrup, and finally a snappy shell of dark chocolate that shatters as you bite. The salt in the base balances the sweetness, while the optional Biscoff adds a caramelized, spiced note that reminds me of the chebakia we’d drizzle with honey during Ramadan. The textures alone are a conversation — hearty, creamy, crisp, and silky all at once. It’s a treat that feels fancy but is deceptively simple, which is exactly the kind of cooking I love.
Over the years, I’ve refined this recipe through dozens of test batches in my NYC kitchen, and I’m confident this version is the most foolproof. I use a silicone muffin tray for easy release, a quick freeze for the base, and a simple two-step assembly that anyone can master. 💡 Stella’s Pro Tip: warm your maple syrup slightly before mixing with the peanut butter for the middle layer — it blends like a dream and spreads evenly over the oat base. Avoid pressing the oat mixture too thin on the bottom, or the cups may crack when you bite into them. Trust me, you’re going to love making (and eating) these.
Why This Peanut Butter Chocolate Oat Cups Recipe Is the Best
The flavor secret behind these Peanut Butter Chocolate Oat Cups lies in the balance of salt and sweet. I add just a pinch of salt to the oat base — a trick I learned from my Moroccan mother, who always salted her sweet pastries to deepen the flavor. The maple syrup in both the base and the middle layer brings a gentle, fruity sweetness that doesn’t overpower the peanut butter, while the dark chocolate (I prefer 70% cacao) adds a sophisticated bitterness. This layered approach ensures every bite is complex, not just sugary.
Texture perfection comes from a technique I mastered at culinary school in Paris: using a silicone mold and a brief freeze for the base. The oats and peanut butter firm up just enough to hold the weight of the middle and top layers, but they stay tender and never become rock-hard. The middle layer — peanut butter whisked with maple syrup — stays creamy and slightly soft, creating a beautiful contrast with the firm dark chocolate shell. It’s the same principle we used for layered entremets: each component should retain its own distinct texture.
This recipe is foolproof and fast because there’s no baking, no tempering chocolate, and no complicated steps. You mix, press, freeze, spread, and chill. Even beginner cooks can nail it on the first try. I’ve made these with my niece in my NYC kitchen, and she loved pressing the oat mixture into the muffin cups — it’s a great recipe to make with kids. Plus, it’s naturally vegan and gluten-free when you use certified gluten-free oats, so it fits almost any diet. You’ll have a gorgeous, crowd-pleasing dessert ready in about half an hour.
Peanut Butter Chocolate Oat Cups Ingredients
When I shop for these ingredients, I head to my favorite neighborhood market in Brooklyn or the Union Square farmers market. For the oats, I look for gluten-free rolled oats from Bob’s Red Mill — they’re reliable and widely available. The peanut butter I prefer is the natural, no-stir kind from a local NYC brand called “Spread the Love,” but any smooth peanut butter works beautifully. And the dark chocolate? I spring for a quality bar like Ghirardelli or Lindt 70% cacao; it makes a real difference in the final taste. Here’s everything you’ll need.
Ingredients List
- 70g (about ¾ cup) rolled oats — use gluten-free if necessary
- 2 tbsp smooth peanut butter (or nut butter of choice)
- 2 tbsp maple syrup
- Pinch of salt
- 100g (about ⅓ cup plus 1 tbsp) smooth peanut butter
- 1 tbsp maple syrup
- 70g (about ½ cup) dark chocolate, melted
- Optional: melted Biscoff spread for drizzling
Ingredient Spotlight
Rolled oats are the backbone of the base layer. They provide structure, a gentle chew, and a wholesome flavor. I always use rolled oats rather than quick oats, because quick oats can turn mushy and won’t hold their shape as well in the cup. In a US grocery store, look for the classic round canister of Quaker rolled oats, or check the gluten-free aisle if you need certified GF oats.
Peanut butter is the star of both the base and the middle layer. For best results, use a smooth, creamy peanut butter with no added sugar or oil — natural peanut butter works perfectly. The oil in natural peanut butter helps the base bind, while the rich flavor shines through. If you’re substituting with almond or cashew butter, expect a slightly thinner middle layer and a milder flavor.
Dark chocolate adds the crowning touch. I recommend a bar with 70% cacao — it’s bittersweet enough to balance the sweetness from the maple syrup and peanut butter. Avoid chocolate chips, which often contain stabilizers that prevent them from melting as smoothly. Chop a good-quality chocolate bar into small pieces and melt it gently in a double boiler or in the microwave in 30-second bursts.
| Original Ingredient | Best Substitution | Flavor / Texture Impact |
|---|---|---|
| Rolled oats | Certified gluten-free rolled oats | Same texture; essential for gluten-free diets |
| Smooth peanut butter | Almond butter or cashew butter | Milder nut flavor; slightly thinner consistency |
| Maple syrup | Agave nectar or honey (not vegan) | Similar sweetness; honey adds floral notes |
| Dark chocolate | Dairy-free dark chocolate chips | May need a bit of coconut oil for smooth melting |
How to Make Peanut Butter Chocolate Oat Cups — Step-by-Step
Making these Peanut Butter Chocolate Oat Cups is as easy as 1-2-3. Follow each step, and you’ll have a gorgeous batch of treats ready in no time. I’ve included my best pro tips and common pitfalls so you can nail it on the first try.
Step 1: Make the Oat Base
In a medium bowl, combine 70g rolled oats, 2 tbsp smooth peanut butter, 2 tbsp maple syrup, and a pinch of salt. Stir with a fork until the mixture is fully combined and has a slightly sticky, crumbly texture. It should hold together when pressed between your fingers. Divide the mixture evenly among 6 cups of a silicone muffin tray (about 1 heaping tablespoon each), and press firmly into an even layer about ¼ inch thick. Use the back of a small spoon or your fingertips to compact the oats well — this ensures the base holds together after freezing.
💡 Stella’s Pro Tip: Lightly wet your fingers with water before pressing the oat mixture — it prevents sticking and makes it easier to create a smooth, even layer.
Step 2: Freeze the Bases
Place the silicone muffin tray in the freezer and freeze for 15 minutes, or until the oat bases are firm to the touch. This quick freeze sets the base so it can hold the weight of the peanut butter layer and the chocolate topping without crumbling. While the bases are freezing, you can prepare the middle layer.
⚠️ Common Mistake to Avoid: Don’t skip the freeze step! If the base is too soft, it will mix into the peanut butter layer and you’ll lose the distinct layers. A full 15-minute freeze is key.
Step 3: Make the Peanut Butter Middle Layer
In a small bowl, mix 100g smooth peanut butter with 1 tbsp maple syrup until smooth and well combined. The mixture should be spreadable but not runny. If it looks too thick, warm it for 10 seconds in the microwave or place the bowl in a warm water bath for a minute. Remove the frozen oat bases from the freezer and divide the peanut butter mixture evenly among the 6 cups (about 1 tablespoon per cup). Spread it gently over the oat base, leaving a small border around the edge so the chocolate can seal the top.
💡 Stella’s Pro Tip: For an extra-smooth middle layer, warm the peanut butter and maple syrup together in the microwave for 10–15 seconds before stirring. This makes the mixture much easier to spread without pulling up the oat base.
Step 4: Top with Melted Chocolate
Melt 70g dark chocolate in a heatproof bowl over a pot of simmering water (double boiler method) or in the microwave in 30-second bursts, stirring between each, until completely smooth. Let the melted chocolate cool slightly for 1–2 minutes, then spoon it evenly over the peanut butter layer in each cup. Tilt the tray gently to help the chocolate flow to the edges, covering the peanut butter completely. If you’re using the optional Biscoff drizzle, add it now by drizzling a small spoonful over the chocolate and swirling with a toothpick.
⚠️ Common Mistake to Avoid: If the chocolate is too hot when you pour it, it can melt the peanut butter layer and create a muddy look. Let the melted chocolate cool for a minute or two until it’s warm but not hot to the touch.
Step 5: Chill and Serve
Place the muffin tray in the refrigerator for at least 20 minutes, or until the chocolate is completely set and firm. The cups are ready when the chocolate is hard and glossy, and the cups pop easily out of the silicone tray. If you’re in a hurry, you can freeze them for 10 minutes instead, but refrigeration gives a cleaner, more even set. Once set, remove from the tray and serve cold or at room temperature. Store any leftovers in the refrigerator.
💡 Stella’s Pro Tip: For picture-perfect cups, use a silicone muffin tray — the cups pop out effortlessly without cracking the chocolate. If you’re using a metal tray, line it with paper liners for easy removal.
| Step | Action | Duration | Key Visual Cue |
|---|---|---|---|
| 1 | Mix and press oat base into muffin tray | 5 minutes | Mixture holds together when pressed |
| 2 | Freeze the bases | 15 minutes | Firm to the touch |
| 3 | Mix and spread peanut butter layer | 3 minutes | Smooth and evenly spread |
| 4 | Pour melted chocolate on top | 5 minutes | Chocolate covers peanut butter completely |
| 5 | Chill until set | 20 minutes | Chocolate is hard and glossy |
Serving & Presentation
These Peanut Butter Chocolate Oat Cups are beautiful on their own, but I love to dress them up for company. Arrange 2–3 cups on a small plate, and add a tiny pinch of flaky sea salt (like Maldon) on top of each — it brings out the chocolate and cuts the sweetness, a trick I picked up at a patisserie in Paris. For a Moroccan touch, I sometimes sprinkle a few toasted sesame seeds on the chocolate before it sets. The cups look stunning on a dessert board alongside fresh berries and a pot of mint tea.
In my NYC kitchen, I often serve these after a casual dinner with friends — they’re elegant but unfussy. You can also cut them into halves or quarters for a dessert tasting plate. Pair them with a cold glass of oat milk or a warm espresso for a delightful contrast. If you’re feeling indulgent, drizzle a little extra melted Biscoff on top just before serving and add a dollop of coconut whipped cream.
| Pairing Type | Suggestions | Why It Works |
|---|---|---|
| Side Dish | Fresh berries, sliced banana, or a small green salad | Fresh fruit adds acidity and lightness to balance the richness |
| Sauce / Dip | Coconut whipped cream, extra melted Biscoff, or a berry coulis | Adds creaminess or tangy contrast |
| Beverage | Oat milk latte, espresso, Moroccan mint tea, or a cold glass of almond milk | Coffee and tea enhance the chocolate; milk drinks add a creamy pairing |
| Garnish | Flaky sea salt, toasted sesame seeds, cacao nibs, or a drizzle of tahini | Adds texture, visual appeal, and flavor contrast |
Make-Ahead, Storage & Reheating
One of the best things about these Peanut Butter Chocolate Oat Cups is how well they store. I often make a double batch on Sunday evening so I have a healthy, grab-and-go treat all week — perfect for my busy NYC lifestyle. They keep beautifully in the fridge or freezer, and they actually get better after a day or two as the flavors meld. Here’s my tried-and-tested storage guide.
| Method | Container | Duration | Reheating Tip |
|---|---|---|---|
| Refrigerator | Airtight container, layers separated by parchment paper | Up to 7 days | No reheating needed — enjoy straight from the fridge or let sit 5 minutes at room temperature |
| Freezer | Freezer-safe container or zip-top bag with parchment between layers | Up to 3 months | Thaw in the refrigerator for 1 hour, or eat frozen for an ice-cream-like treat |
| Make-Ahead | Prepare fully and store in the refrigerator | Up to 2 days before serving | Add garnishes like sea salt or Biscoff drizzle just before serving for best presentation |
If you’ve stored the cups in the freezer and want a softer texture, let them thaw in the fridge for about an hour before serving. I actually love eating them straight from the freezer on a hot day — the oat base stays chewy, the peanut butter layer becomes fudge-like, and the chocolate stays snappy. Just be sure to wrap them well so they don’t absorb any freezer odors. A pro tip from my Paris days: store them with a small piece of bread in the container to absorb excess moisture and keep the chocolate from developing a white bloom.
Variations & Easy Swaps
These Peanut Butter Chocolate Oat Cups are endlessly adaptable. I’ve experimented with different nut butters, sweeteners, and toppings, and every version brings something new. Whether you’re catering to an allergy, changing up the flavor profile, or just using what’s in your pantry, here are my favorite variations. Each one has been tested in my NYC kitchen, so you can swap with confidence.
| Variation | Key Change | Best For | Difficulty Impact |
|---|---|---|---|
| Almond Butter & Honey | Replace peanut butter with almond butter, maple syrup with honey | A milder, floral flavor | No change — same method |
| Coconut & Lime | Add 2 tbsp shredded coconut to the base, zest of 1 lime to the middle layer, and use white chocolate on top | A tropical, bright twist | Slightly more prep — easy |
| Spiced Pumpkin | Add 1 tbsp pumpkin purée + ½ tsp pumpkin pie spice to the base, use white chocolate or milk chocolate | A cozy fall treat | No change — same method |
Almond Butter & Honey Cups
This variation is a favorite of mine when I want a milder, more delicate flavor. Swap the peanut butter in both the base and middle layer for smooth almond butter, and replace the maple syrup with honey (if you’re not vegan). The almond butter has a softer, nuttier quality that pairs beautifully with the dark chocolate. To evoke a touch of Moroccan tradition, I sometimes add a pinch of cinnamon to the oat base — it’s a subtle warmth that reminds me of the sellou my mother made for celebrations.
Coconut & Lime Cups
This variation is pure summer vibes. Mix 2 tablespoons of unsweetened shredded coconut into the oat base before pressing. For the middle layer, add the zest of one lime to the peanut butter (or almond butter) and maple syrup mixture. Top with melted white chocolate instead of dark — the sweetness of white chocolate lets the lime and coconut shine. It’s a refreshing, tropical twist that I love serving after a backyard gathering in my Brooklyn neighborhood.
Spiced Pumpkin Cups
For a cozy autumn version, stir 1 tablespoon of pumpkin purée and ½ teaspoon of pumpkin pie spice into the oat base mixture. The purée adds moisture, so the base will be slightly softer — that’s fine, it firms up in the freezer. Use milk chocolate or white chocolate on top for a sweeter, creamier finish. This variation is a hit at Thanksgiving potlucks and Halloween parties. I like to top each cup with a tiny dusting of cinnamon before the chocolate sets for a beautiful presentation.
Are Peanut Butter Chocolate Oat Cups healthy?
These Peanut Butter Chocolate Oat Cups are definitely a healthier dessert option! They’re made with whole-food ingredients like rolled oats, natural peanut butter, maple syrup, and dark chocolate, and they contain no refined sugar, no eggs, and no dairy. Each cup has about 273 calories, 7g of protein, and 4g of fiber, which makes them a satisfying treat that also provides some nutritional value. The oats provide complex carbohydrates for steady energy, while the peanut butter adds protein and healthy fats. Of course, they’re still a dessert — so enjoy them in moderation — but they’re far better for you than most store-bought candy bars or processed snacks. If you want to boost the nutrition even further, you can add a tablespoon of chia seeds or flax meal to the oat base.
Can I use quick oats instead of rolled oats?
I don’t recommend using quick oats for these Peanut Butter Chocolate Oat Cups. Quick oats are more finely processed and have a softer, mushier texture when combined with wet ingredients. In this recipe, rolled oats provide the perfect chewy, hearty base that holds its shape after freezing and chilling. Quick oats would break down too much and result in a paste-like layer that doesn’t have the same satisfying bite. If rolled oats are all you have on hand, they’ll work beautifully — just make sure to use certified gluten-free rolled oats if you need the recipe to be gluten-free. Steel-cut oats are also not a good substitute, as they remain too crunchy and won’t bind properly.
How long do these oat cups last in the fridge?
These Peanut Butter Chocolate Oat Cups will stay fresh in the refrigerator for up to 7 days when stored properly. Place them in an airtight container, separated by layers of parchment paper to prevent them from sticking together. The texture actually improves after a day or two as the flavors meld and the oats soften slightly. After about a week, the oat base may start to dry out and the chocolate might begin to develop a white bloom (this is called “fat bloom” and is harmless but less attractive). If you want to keep them longer, the freezer is your best bet — they’ll last for up to 3 months frozen. Just thaw them in the fridge for an hour before eating, or enjoy them straight from the freezer for a firmer, fudge-like texture.
Can I make these without a silicone muffin tray?
Absolutely! While a silicone muffin tray makes it super easy to pop the cups out without damaging the chocolate, you can definitely make these Peanut Butter Chocolate Oat Cups without one. The best alternative is a standard metal muffin tin lined with paper baking cups. Simply press the oat mixture into the bottom of each paper liner, then proceed with the recipe as written. The paper liners peel away easily once the cups are set. You can also use small silicone baking cups placed on a baking sheet, or even a mini-muffin pan for bite-sized cups. If you don’t have any muffin pan at all, you can press the oat mixture into a small loaf pan lined with parchment, and then cut the chilled block into bars — the method is the same, just a different shape.
Can I use a different nut butter besides peanut butter?
Yes, you can easily swap the peanut butter for another nut or seed butter. Almond butter, cashew butter, and sunflower seed butter (for nut-free) all work beautifully in these Peanut Butter Chocolate Oat Cups. Each will bring its own unique flavor: almond butter is milder and slightly sweeter, cashew butter is very creamy and neutral, and sunflower seed butter has an earthy, slightly savory note. Keep in mind that different nut butters have different fat contents, which can affect the texture. Almond butter and cashew butter are similar to peanut butter and will work as a 1:1 swap. Sunflower seed butter is a bit thinner, so you may need to add an extra tablespoon of oats to the base to help it hold together. Avoid very runny nut butters (like some natural walnut butters) that won’t bind the oats properly.
Are these cups gluten-free and vegan?
Yes, these Peanut Butter Chocolate Oat Cups are naturally both vegan and gluten-free, with one simple caveat. To keep them gluten-free, you need to use certified gluten-free rolled oats — standard oats are often cross-contaminated with wheat during processing. For the vegan part, the recipe uses maple syrup and dark chocolate (most high-quality dark chocolate is naturally vegan, but always check the label for milk solids). The peanut butter and oats are naturally plant-based, so the entire recipe aligns with a vegan diet. If you’re using the optional Biscoff drizzle, note that Biscoff spread is also vegan. I always double-check my chocolate and oat labels, and I recommend you do too if these dietary needs are important for you.
Can I add protein powder to these oat cups?
You can add protein powder to the oat base, but you’ll need to adjust the liquid slightly. I’ve tested this with vanilla and chocolate protein powders in my NYC kitchen. Start by replacing 1 tablespoon of the oats with 1 tablespoon of protein powder (about 10g). Because protein powder absorbs more moisture, add an extra teaspoon of maple syrup or a splash of almond milk to keep the mixture from becoming too dry and crumbly. The texture will be slightly denser and less chewy, but still delicious. I recommend using a plant-based protein powder (pea or brown rice) for the best flavor and texture. Whey protein will also work but may make the base a bit more sticky. Don’t add more than 2 tablespoons of protein powder total, or the base will become too dry to hold together.
What can I use instead of maple syrup?
There are several excellent substitutes for maple syrup in these Peanut Butter Chocolate Oat Cups. Agave nectar is the closest replacement and works beautifully — it has a similar sweetness level and consistency, so use the same amount. Honey is another great option (though it’s not vegan), and it adds a lovely floral note that pairs well with peanut butter. For a lower-glycemic option, you can use date syrup or brown rice syrup. Date syrup has a rich, caramel-like flavor that’s wonderful with chocolate. Brown rice syrup is less sweet, so you may want to add an extra half tablespoon. Avoid liquid stevia or monk fruit syrup without adjusting the liquid, as they are much more concentrated. Whichever substitute you choose, warm it slightly before mixing to ensure it blends smoothly with the peanut butter.
Can I double this recipe?
Absolutely! This Peanut Butter Chocolate Oat Cups recipe doubles beautifully. I frequently make a double batch (12 cups) for parties and meal prep. Simply double all the ingredients and use two silicone muffin trays, or work in batches if you only have one tray. The freezing and chilling times remain the same — the bases still need only 15 minutes in the freezer, and the assembled cups need about 20 minutes in the fridge. One thing to note: if you’re using a standard metal muffin tin with paper liners, make sure you have enough space in your freezer and refrigerator for both trays. The doubled recipe is perfect for sharing, and the cups freeze wonderfully, so you can always save half for later.
Why did my chocolate bloom or turn white?
White spots or a white film on your chocolate — called “bloom” — is completely harmless but can look unappealing. There are two types of bloom. Fat bloom happens when the chocolate is stored at fluctuating temperatures; the cocoa butter melts and rises to the surface, then recrystallizes as white spots. Sugar bloom occurs when moisture comes into contact with the chocolate, dissolving the sugar and leaving a white, grainy layer when the water evaporates. To prevent bloom on your Peanut Butter Chocolate Oat Cups, store them in the refrigerator at a consistent temperature, and make sure the chocolate is fully set before covering them. If you’re freezing the cups, wrap them tightly in plastic wrap or parchment paper first, then place them in an airtight container to protect them from moisture. If bloom does appear, the cups are still perfectly safe to eat — the flavor and texture are unaffected.
Share Your Version!
I hope you love making these Peanut Butter Chocolate Oat Cups as much as I do! Every time I pull a batch out of the fridge, I’m reminded of my mother’s resourceful Moroccan sweets and my Parisian training in simple elegance. This recipe is a true reflection of how I cook — blending heritage, technique, and everyday ingredients into something special. I’d love to see how they turn out in your kitchen. Leave a star rating and a comment below to let me know what you think — your feedback helps me create better recipes for you.
Snap a photo of your Peanut Butter Chocolate Oat Cups and share it on Instagram or Pinterest with the hashtag #LeosFoods. Tag me @leosfoods so I can see your beautiful creations — it genuinely makes my day! And if you tried the Biscoff drizzle or added your own twist, tell me all about it in the comments. What’s your favorite way to customize these cups? I’m always inspired by your ideas and love hearing about the variations you come up with in your own kitchen.
From my NYC kitchen to yours — I hope this recipe brings as much warmth to your table as it does to mine. — Stella 🧡
Love This Recipe? Save It to Pinterest!
If you enjoyed this Peanut Butter Chocolate Oat Cups recipe, don’t let it get lost in your browser tabs! 😄 Pin it now so you can find it again anytime — and explore hundreds more tried-and-tested recipes waiting for you on my Pinterest boards.
👉 Follow Stella on Pinterest @exorecipe
📌 Pin this recipe · 🔁 Re-pin your favorites · 💬 Tag me when you make it — I love seeing your creations!
💬 Got a question or a twist on this recipe? Drop a comment below — I personally read every one and I’d love to hear how your Peanut Butter Chocolate Oat Cups turned out! 🧡
Peanut Butter Chocolate Oat Cups
A simple treat with a layer of peanut butter all topped with rich dark chocolate. No-bake, vegan AND gluten-free!
Ingredients
- 70g rolled oats (used gluten-free if necessary)
- 2 tbsp smooth peanut butter (or nut butter of choice)
- 2 tbsp maple syrup
- Pinch of salt
- 100g smooth peanut butter
- 1 tbsp maple syrup
- 70 g dark chocolate (melted)
- Optional drizzle of melted Biscoff spread
Instructions
- Mix all the base ingredients in a bowl, then press into a 6 cup silicon muffin tray. Freeze for 15 minutes.
- In the meantime mix the peanut butter and maple syrup in a small bowl to create the middle layer, then spread over the oat bases and top with the melted chocolate.
- Refrigerate until hardened. Enjoy!