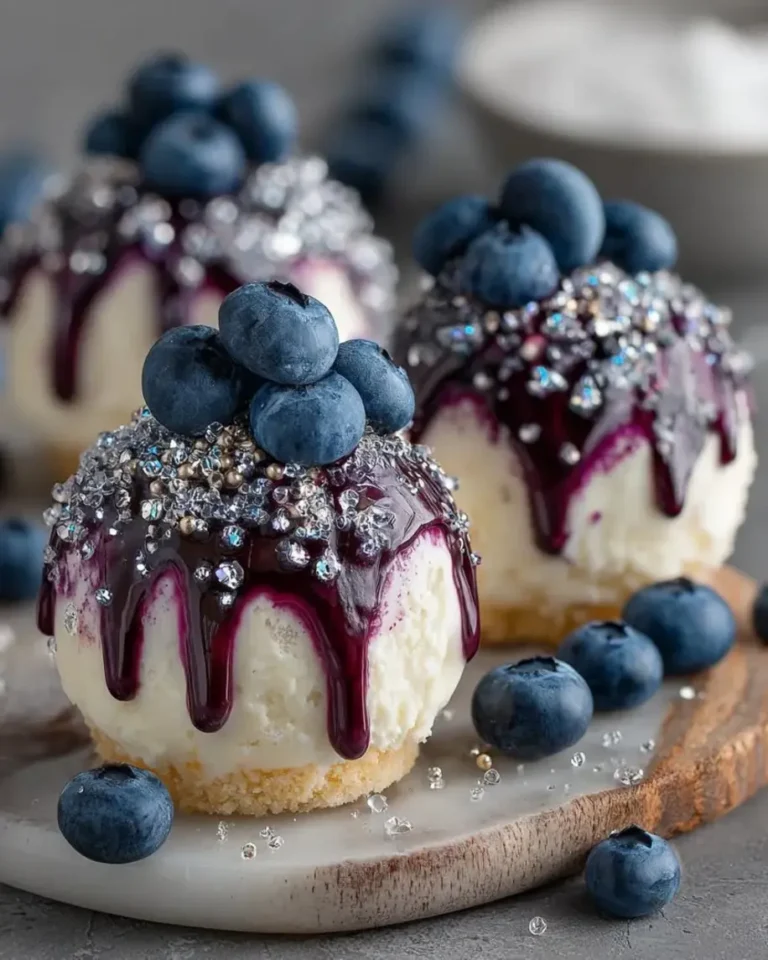
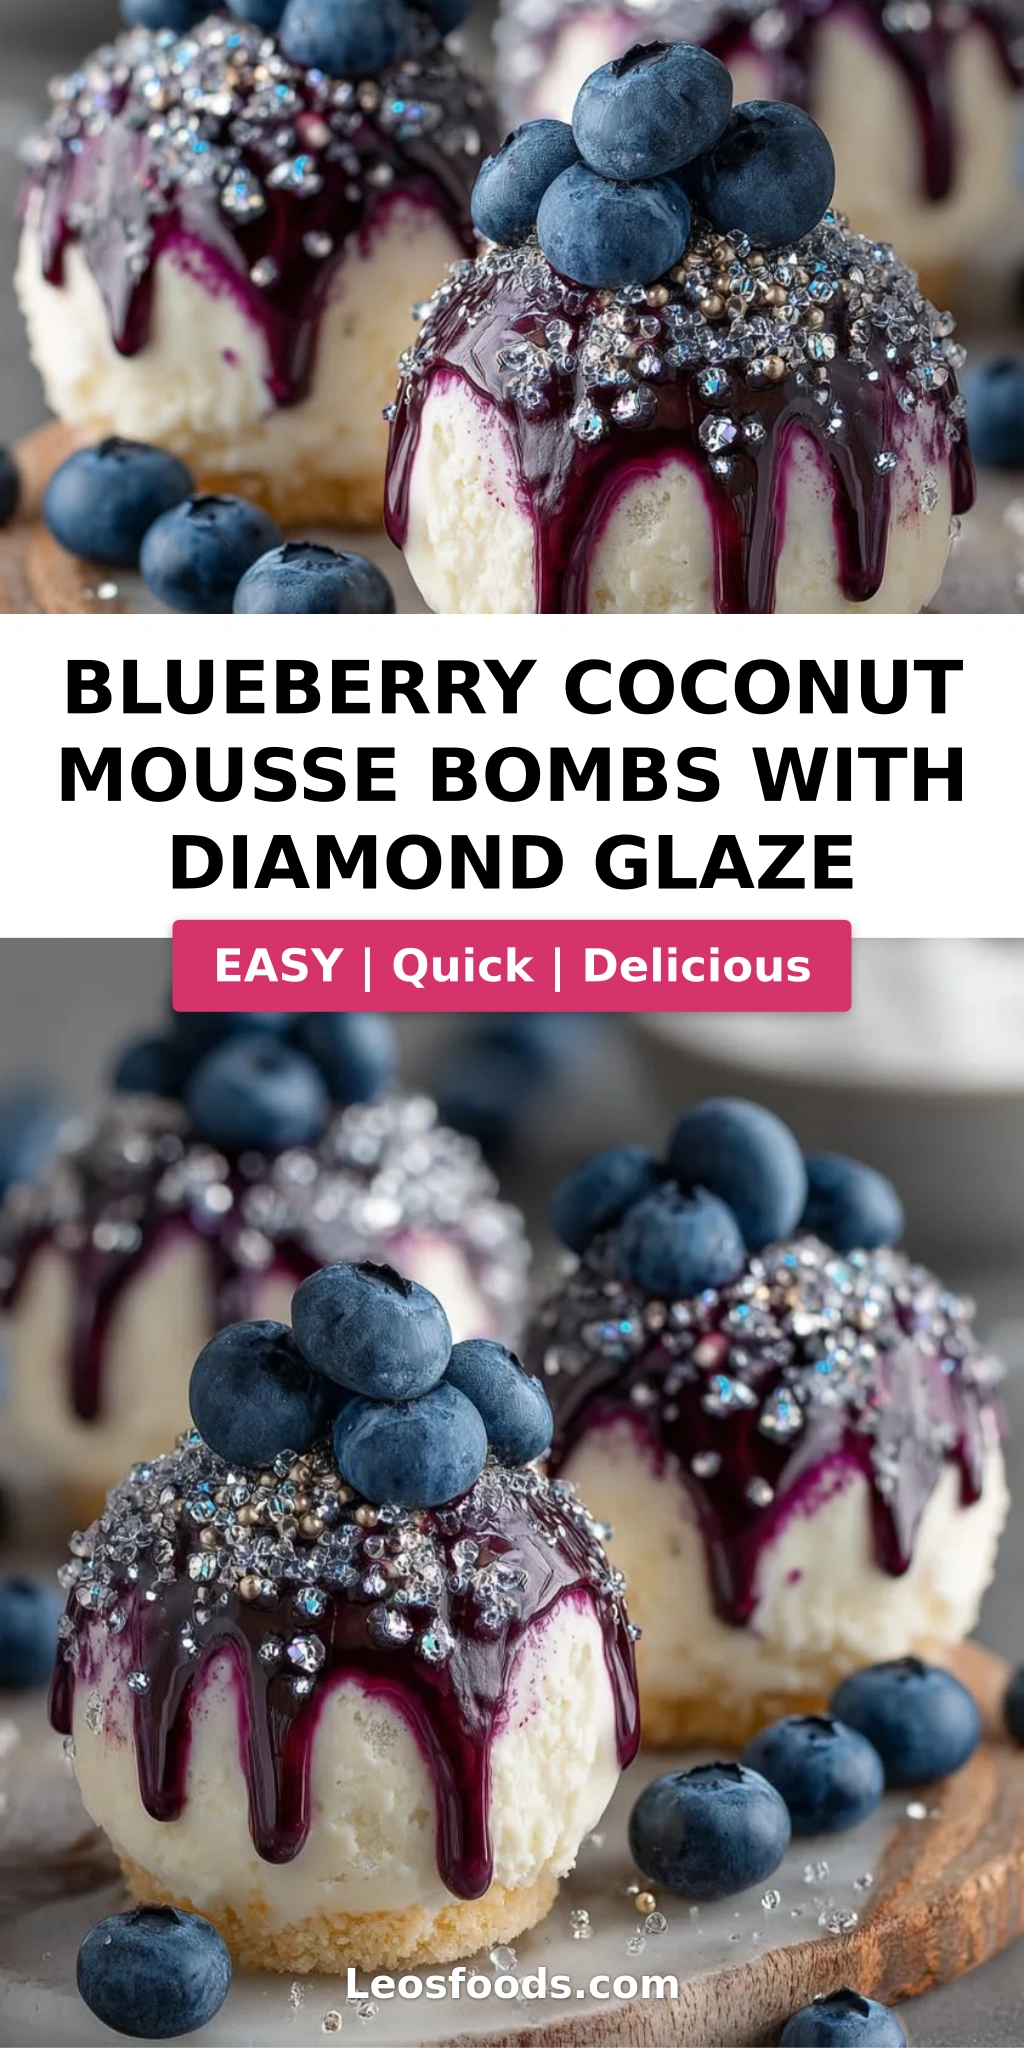
Stunning Blueberry Coconut Mousse Bombs with Diamond Glaze

Table of Contents
Blueberry Coconut Mousse Bombs with Diamond Glaze – A Showstopper Dessert
I still remember the first time I made a Blueberry Coconut Mousse Bomb. It was a rainy Saturday in my tiny Paris apartment, where I was perfecting my pastry techniques at Le Cordon Bleu. I wanted something that captured both the wild berries of my childhood in Morocco and the polished elegance of French pâtisserie. The result? A dessert that feels like a jewel – a frozen blueberry core wrapped in silky coconut mousse, perched on a buttery biscuit base, all draped in a shimmering diamond glaze. These Blueberry Coconut Mousse Bombs are more than just a recipe; they’re a celebration of contrasts: tart and sweet, creamy and crunchy, matte and glossy. And that diamond glaze – oh, it’s a showstopper.
Imagine breaking through the mirror-like glaze with your spoon: the first bite yields a soft, velvety mousse scented with coconut and vanilla, followed by a burst of intense blueberry from the frozen core. The biscuit base adds a gentle crunch, and the toasted coconut flakes and edible silver flakes make every bite feel like an occasion. This is the kind of dessert that makes people stop and stare. I’ve served them at dinner parties in my Manhattan loft, and guests always ask for the recipe before the last bite is gone. The secret lies in the technique – a careful layering of textures and temperatures that I’ve refined over years of testing in my NYC kitchen.
What makes my version different? I use a classic French mousse base that’s light but stable, thanks to a proper gelatin bloom and careful folding. The blueberry core is concentrated with lemon to cut through the richness, and the diamond glaze gets its iconic sparkle from edible pearl luster dust – a trick I learned from a master chocolatier in Paris. In this post, I’ll share Stella’s Pro Tip for a flawless glaze every time, plus a common mistake to avoid when freezing the mousse bombs. Whether you’re a seasoned baker or trying your hand at blueberry dessert bombs for the first time, I’ll walk you through each step with the confidence of a friend who’s been in your shoes – and the training of a chef who’s made these dozens of times.
Why This Blueberry Coconut Mousse Bombs Recipe Is the Best
The Flavor Secret – Growing up in Morocco, my mother would make a simple blueberry compote with a splash of orange blossom water. I’ve carried that memory into this recipe, but I’ve swapped the flower water for a more universal lemon juice to brighten the frozen core. The coconut cream, sourced from a little Thai market near Union Square, gives the mousse a lush, dairy-free richness that pairs beautifully with the tangy cream cheese. It’s a fusion of North African fruit, French dairy technique, and New York access to global ingredients.
Perfected Texture – The trick to a mousse bomb that’s both light and sliceable? A two-step gelatin process: one for the blueberry core, one for the mousse itself. By blooming the gelatin in cold water before dissolving it into a warm liquid, you avoid granules and get a silky-smooth consistency every time. And the frozen core stays solid long enough to create that beautiful surprise in the center – a technique I honed during my pastry externship in a three-Michelin-star restaurant in Paris.
Foolproof & Fast – I know the idea of making a glaze from scratch can feel intimidating, but this diamond glaze recipe is remarkably forgiving. You don’t need a candy thermometer – just heat the sugar-water-condensed milk until steaming, not boiling. And the pearl dust is optional, but it’s what gives the bombs that luxury finish. Even if you’re new to working with gelatin, these step-by-step photos and my Stella’s Pro Tip for cooling the glaze to exactly 90°F (32°C) will make you feel like a pro.
Blueberry Coconut Mousse Bombs Ingredients
Whenever I walk through the farmers market in Union Square, I head straight for the berry stall. In summer, local blueberries are the star – juicy, tart, and full of sunshine. For this recipe, I always buy extra to make the puree from scratch. But if you’re in a pinch, a good-quality frozen blueberry puree works beautifully (just thaw and strain). And let me tell you about coconut cream – it’s thicker than coconut milk and gives the mousse that luscious body. You can find it in most US grocery stores near the canned coconut milk, or at any Asian market.
Ingredients List
- For the Blueberry Coconut Mousse: 1 cup blueberry puree, 1 cup coconut cream, 8 oz cream cheese (softened), 1 cup heavy cream, 1/2 cup granulated sugar, 1 tsp vanilla extract, 2 tsp powdered gelatin, 3 tbsp cold water
- For the Blueberry Core: 3/4 cup blueberry puree, 2 tbsp granulated sugar, 1 tsp lemon juice, 1 tsp powdered gelatin, 1 tbsp cold water
- For the Biscuit Base: 1 cup digestive biscuits (finely crushed), 3 tbsp melted butter
- For the Diamond Glaze: 1 cup granulated sugar, 1/2 cup water, 1/2 cup sweetened condensed milk, 1 cup white chocolate (finely chopped), 1 tbsp powdered gelatin, 3 tbsp cold water, 1 tsp clear vanilla extract, 2 drops blue food coloring, 1 tsp edible pearl luster dust
- For Garnish (optional): Fresh blueberries, toasted coconut flakes, edible silver flakes
Ingredient Spotlight
Blueberry Puree – The heart of this dessert. I love using fresh blueberries when they’re in season at the farmers market, but frozen wild blueberries (available year-round) actually have a more intense flavor because they’re flash-frozen at peak ripeness. To make puree, simply simmer blueberries with a little sugar until soft, then blend and strain. You can also buy unsweetened puree in the frozen aisle.
Coconut Cream – This is the key to the mousse’s dairy-free creaminess. Don’t confuse it with cream of coconut (which is sweetened). Look for canned coconut cream with no added sugar. If you can’t find it, you can refrigerate a can of full-fat coconut milk overnight and scoop off the solid top – that’s essentially coconut cream. One test swap: for a completely dairy-free version, use a full can of coconut cream and replace the heavy cream with more coconut cream (though the texture will be slightly denser).
Powdered Gelatin – Gelatin is what gives both the core and the mousse their structure. I use powdered gelatin (like Knox) because it’s easy to measure and dissolve. Always bloom it in cold water first – never hot, or it will clump. For a vegetarian version, you can try agar-agar, but the texture will be more jelly-like and less creamy. It’s not a swap I recommend for this recipe unless you’re experienced with agar.
White Chocolate for Glaze – Use a good-quality white chocolate (like Valrhona or Ghirardelli) that contains cocoa butter. Chips often have stabilizers that prevent smooth melting. Finely chop a bar for the best results. The white chocolate gives the glaze its creamy base and that lovely sheen. For a vegan glaze, you can try a high-quality vegan white chocolate, but the luster dust might not adhere as well.
Edible Pearl Luster Dust – This is what creates the “diamond” effect. You can find it at craft stores, cake decorating shops, or online. It’s safe to eat and adds a subtle shimmer that catches the light. If you can’t find it, you can skip it – the glaze will still be glossy and beautiful. But honestly, it’s worth tracking down for that wow factor.
| Original Ingredient | Best Substitution | Flavor / Texture Impact |
|---|---|---|
| Coconut cream | Full-fat coconut milk (solid top) | Slightly less rich, still dairy-free |
| Heavy cream | Extra coconut cream + 1 tbsp cornstarch | Denser, more coconut flavor |
| Digestive biscuits | Graham crackers or shortbread cookies | Similar crunch, slightly different sweetness |
| White chocolate | High-quality white chocolate chips | May not melt as smooth; add 1 tsp coconut oil |
| Pearl luster dust | Omit or use edible gold dust | Less shimmer, but still beautiful |
How to Make Blueberry Coconut Mousse Bombs – Step-by-Step
Don’t be intimidated by the number of steps! This recipe is broken down into small, manageable tasks. I’ll guide you through each one with the same patience I use when teaching my cooking classes in Brooklyn. You’ve got this.
Step 1: Prepare the Biscuit Base
Mix 1 cup finely crushed digestive biscuits with 3 tbsp melted butter until the mixture resembles wet sand. Press about 1 tablespoon firmly into the bottom of each sphere mold cavity. Use the back of a spoon to create an even, compact layer. Chill in the refrigerator for at least 15 minutes while you work on the next components.
⚠️ Common Mistake to Avoid: Pressing too loosely. A loose base will crumble when you unmold. Really press hard – the biscuit should feel firm and compacted.
Step 2: Make the Blueberry Core
Bloom 1 tsp powdered gelatin in 1 tbsp cold water for 5 minutes. In a small saucepan, heat 3/4 cup blueberry puree, 2 tbsp sugar, and 1 tsp lemon juice until warm (not boiling). Remove from heat, add the bloomed gelatin, and stir until completely dissolved. Pour the mixture into small silicone inserts (or an ice cube tray) that fit inside your sphere molds. Freeze for at least 2 hours, until solid.
💡 Stella’s Pro Tip: Use a silicone mini dome mold or a half-sphere mold for the core – it makes the final assembly much easier. If you’re using a regular ice cube tray, cut the frozen cubes into smaller pieces to fit.
Step 3: Bloom Gelatin for the Mousse
Bloom 2 tsp powdered gelatin in 3 tbsp cold water for 5 minutes. Set aside while you prepare the mousse base.
Step 4: Make the Mousse Base
In a large bowl, beat 8 oz softened cream cheese, 1 cup blueberry puree, 1 cup coconut cream, 1/2 cup sugar, and 1 tsp vanilla extract until smooth and well combined. In a separate small saucepan, warm about 3 tablespoons of heavy cream (take it from the 1 cup total) and dissolve the bloomed gelatin into it, stirring until completely clear. Quickly whisk this into the blueberry-cream cheese mixture until homogenized.
⚠️ Common Mistake to Avoid: Adding the gelatin directly to the cold mixture – it will seize and create lumps. Always dissolve it in a small amount of warm liquid first.
Step 5: Fold in the Whipped Cream
Whip the remaining heavy cream (about 3/4 cup) to soft peaks – you want it thick but still drooping slightly. Gently fold the whipped cream into the blueberry mixture in three additions, using a rubber spatula. Be careful not to deflate the air you’ve whipped in. The final mousse should be airy, light, and a beautiful lavender-blue color.
💡 Stella’s Pro Tip: For a lighter mousse, chill the bowl and beaters before whipping the cream. And when folding, use a figure-eight motion and rotate the bowl – it’s the technique I learned in Paris and it works every time.
Step 6: Assemble the Bombs
Remove the chilled sphere molds with the biscuit base. Spoon or pipe the mousse halfway up each cavity. Press one frozen blueberry core into the center of each, then cover with more mousse until the mold is full. Smooth the tops with an offset spatula. Tap the molds gently on the counter to release air bubbles. Freeze for at least 6 hours, or overnight. The bombs must be completely solid before glazing.
💡 Stella’s Pro Tip: If you don’t have sphere molds, you can use a 1-cup silicone muffin pan. The size will be larger, but still spectacular. Adjust freezing time to 8 hours.
Step 7: Make the Diamond Glaze
Bloom 1 tbsp gelatin in 3 tbsp cold water for 5 minutes. In a saucepan, combine 1 cup sugar, 1/2 cup water, and 1/2 cup sweetened condensed milk. Heat over medium, stirring gently, until the mixture is steaming – about 150°F (65°C) – but NOT boiling. Remove from heat. Add the bloomed gelatin and 1 cup finely chopped white chocolate, stirring until completely smooth and melted. Then stir in 1 tsp clear vanilla extract, 2 drops blue food coloring, and 1 tsp pearl luster dust. Use an immersion blender or whisk vigorously to incorporate the lust dust – you want a uniform shimmer.
⚠️ Common Mistake to Avoid: Overheating the glaze. If it boils, the sugar can crystalize and the white chocolate can seize. Keep the heat low and steady.
Step 8: Glaze the Frozen Bombs
Cool the glaze to about 90°F (32°C) – it should feel warm to the touch but not hot. Unmold the frozen bombs and place them on a wire rack set over a baking sheet (to catch drips). Working quickly, pour the glaze evenly over each bomb until fully coated. Don’t worry if the first coat is thin – you can do a second coat if needed. Let the excess drip off for a few seconds, then transfer the bombs to a parchment-lined tray. Refrigerate for at least 30 minutes to set the glaze.
💡 Stella’s Pro Tip: For the smoothest glaze, chill the bombs for exactly 30 minutes before glazing – not longer, or the glaze may crack. And if the glaze thickens as you work, reheat it gently over a pan of warm water
Step 9: Garnish and Serve
Once the glaze is set, garnish each bomb with a few fresh blueberries, a sprinkle of toasted coconut flakes, and a pinch of edible silver flakes. Transfer to a serving plate and let them sit at room temperature for 5–10 minutes before serving to soften slightly – this makes them easier to cut and eat.
⚠️ Common Mistake to Avoid: Letting them sit out too long. These bombs are best eaten within 30 minutes of being taken out of the fridge. If they sit too long, the mousse softens and the glaze may become tacky.
| Step | Action | Duration | Key Visual Cue |
|---|---|---|---|
| 1 | Press biscuit base | 15 min chill | Firm, compact layer |
| 2 | Make blueberry core | 2 hr freeze | Solid, easily unmolded |
| 3-4 | Mousse base | 10 min | Smooth, no lumps |
| 5 | Fold whipped cream | 5 min | Light, airy, uniform color |
| 6 | Assemble and freeze | 6+ hr freeze | Rock solid |
| 7 | Make glaze | 10 min | Shiny, smooth, no lumps |
| 8 | Glaze bombs | 30 min set | Even coating, glossy finish |
| 9 | Garnish & serve | 5-10 min rest | Glaze set, garnishes in place |
Serving & Presentation
These Blueberry Coconut Mousse Bombs are made for a grand entrance. Place each bomb on a small dessert plate, perhaps with a dollop of coconut whipped cream and a few extra fresh blueberries scattered around. The diamond glaze catches the light like a jewel. I love to serve them after a rich meal – the light, fruity mousse is a perfect palate cleanser. For a special touch, you can dust the plate with a little extra pearl dust or a sprinkle of toasted coconut.
At my dinner parties in the West Village, I often pair these bombs with a crisp sauvignon blanc or a sparkling rosé. The acidity in the wine cuts through the creamy mousse, and the bubbles amplify the jewel-like presentation. For a non-alcoholic option, a blueberry-hibiscus iced tea complements the berry notes beautifully. And if you’re serving these at a holiday table, they look stunning alongside a cheese board with aged gouda and fig jam.
| Pairing Type | Suggestions | Why It Works |
|---|---|---|
| Side Dish | Light lemon sorbet, fresh fruit salad | Keeps dessert light, complements blueberry |
| Sauce / Dip | Warm berry compote, caramel drizzle | Adds warmth and extra sweetness |
| Beverage | Sauvignon Blanc, sparkling rosé, blueberry iced tea | Acidity and bubbles cut the richness |
| Garnish | Fresh blueberries, toasted coconut, edible flowers, silver flakes | Enhances visual appeal and flavor |
Make-Ahead, Storage & Reheating
Living in New York means I’m always planning ahead – and these mousse bombs are a dream for meal prep. You can make the components over two days: make the cores and assemble the bombs on day one (freeze overnight), then glaze and serve on day two. They also freeze beautifully for up to 2 months, which is perfect for last-minute entertaining. Here’s how to store them properly.
| Method | Container | Duration | Reheating Tip |
|---|---|---|---|
| Refrigerator (glazed) | Covered container | Up to 3 days | Serve cold – do not reheat |
| Freezer (unglazed) | Freezer-safe bag, remove air | 2 months | Glaze directly from frozen – no thawing needed |
| Make-Ahead (assembled) | Molds, covered with plastic wrap | Up to 1 week frozen | Unmold and glaze when ready |
When you’re ready to serve, there’s really no reheating needed – these are meant to be enjoyed chilled. If stored in the refrigerator, simply let them sit at room temperature for 5–10 minutes to soften slightly before serving. If frozen, glaze them while still frozen (step 8) then refrigerate for 30 minutes. They are best enjoyed within a day of glazing, as the glaze can soften over time.
Variations & Easy Swaps
| Variation | Key Change | Best For | Difficulty Impact |
|---|---|---|---|
| Raspberry Coconut Bombs | Replace blueberry with raspberry puree and raspberry cores | Berry lovers, Valentine’s Day | Same – easy swap |
| Vegan / Dairy-Free Option | Use vegan cream cheese, coconut cream for both mousse and whip, agar-agar instead of gelatin | Vegan guests, Dairy-sensitive friends | Medium – agar requires careful handling |
| Citrus Twist | Add 1 tbsp orange zest to mousse and use lemon curd core instead of blueberry | Summer parties, brunch | Easy – just a flavor swap |
Raspberry Coconut Bombs
This is my go-to variation when raspberries are at their peak at the Union Square Greenmarket. Simply replace all blueberry puree with raspberry puree (strained to remove seeds). The process is identical – just use raspberry instead of blueberry. The color turns a deep ruby, and the tartness of the raspberries cuts through the coconut richness beautifully. For extra romance, add a drop of rose water to the mousse – a trick from my Parisian pastry chef days.
Vegan / Dairy-Free Option
Yes, you can make these completely plant-based! Use a high-quality vegan cream cheese (like Kite Hill) and replace the heavy cream with an equal amount of coconut cream – just make sure to refrigerate the cans and use only the solid top. For gelatin, use agar-agar powder: use 1 tsp agar for the core (same liquid) and 2 tsp for the mousse (same liquid). The key difference: agar must be boiled for 2 minutes to activate, whereas gelatin just warms. The texture will be slightly firmer, but still delicious. The glaze can be made with vegan white chocolate (check ingredients) and agar instead of gelatin. It’s a bit more finicky, but worth it for your vegan friends.
Citrus Twist
On a hot summer day, I love making a lemon-blueberry version. Fold 1 tbsp of fresh orange zest into the mousse base, and for the core, use a simple lemon curd (add 1 tbsp cornstarch to stabilize) instead of the blueberry puree. The bright, sharp lemon pairs wonderfully with the creamy coconut. You can even swap the blue food coloring in the glaze for a drop of yellow – the bombs will look like little suns. This variation was a hit at my Fourth of July picnic in Brooklyn.
What is the best way to achieve a smooth diamond glaze for blueberry coconut mousse bombs?
The key to a silky-smooth diamond glaze lies in three things: proper gelatin blooming, gentle heating, and the right temperature at application. First, always bloom the gelatin in cold water for exactly 5 minutes – don’t rush it. When heating the sugar, water, and condensed milk, heat only until steaming (about 150°F / 65°C) – never let it boil, or the sugar can crystallize and the white chocolate may seize. After adding the white chocolate and gelatin, whisk thoroughly or use an immersion blender to eliminate any lumps. Finally, cool the glaze to exactly 90°F (32°C) before pouring. Too hot, and it will melt the frozen mousse; too cold, and it will be too thick to coat evenly. Use a thermometer for best results, and if you don’t have one, test a small drip on the back of your hand – it should feel warm but not hot.
Can I use frozen blueberries instead of fresh for the mousse filling?
Absolutely! In fact, I often prefer frozen wild blueberries for the puree because they’re picked at peak ripeness and flash-frozen, which concentrates their flavor. Just thaw them completely and drain any excess liquid before pureeing. If you’re making the blueberry core, frozen blueberries work beautifully as well – just simmer them with the sugar and lemon juice until they break down, then strain and use as directed. The only caution: if you’re using frozen blueberries for the core, be sure they are fully thawed and pureed to a smooth consistency; any icy chunks can make the core grainy. For the mousse itself, frozen blueberry puree (thawed and strained) is an excellent time-saver – I keep a stash in my freezer for quick dessert fixes.
How long do blueberry coconut mousse bombs need to set in the freezer before glazing?
They need to be completely frozen solid – at least 6 hours, but overnight is even better. The mousse bombs must be rock-solid before you even think about glazing them. If there’s any softness in the center, the warm glaze (even at 90°F) will start to melt the mousse, creating a mess instead of a smooth coating. I usually assemble them the day before I plan to glaze and serve. For best results, after the 6-hour minimum freeze, do a quick test: gently press the side of one bomb with your finger – it should feel like a frozen ice cube with no give. If it feels slightly soft, give it another hour or two. Patience here pays off in that perfect mirror finish.
What can I substitute for coconut cream in this recipe to make it dairy-free?
If you need a dairy-free alternative but want to avoid coconut, you can use full-fat oat cream or cashew cream. Oat cream has a neutral flavor and works well as a 1:1 substitute for the coconut cream in the mousse base. Cashew cream (soaked raw cashews blended with water until smooth) also gives a luscious texture, though it may add a slight nutty flavor. However, these substitutes will not whip the same way as coconut cream. For the whipped element in the mousse, you’ll need a dairy-free heavy cream alternative, like a barista oat cream or a soy-based whipping cream – just make sure it’s labeled “whippable.” Keep in mind that the final flavor will be less coconut-forward, but still delicious. The biscuit base already uses butter; you can swap that with a plant-based butter stick to keep it fully dairy-free.
How do I prevent the diamond glaze from cracking after application?
Glaze cracking usually happens when the temperature difference between the frozen bomb and the glaze is too extreme, or when the glaze is applied too thickly. To avoid this, first make sure the bombs are not straight out of a deep freeze – let them sit in the refrigerator for 15 minutes before glazing so the surface warms slightly (but still stays frozen inside). Second, ensure your glaze is at 90°F – not colder. Third, apply the glaze in a thin, even coat; you can always do a second coat after the first sets for 5 minutes in the fridge. If you see small cracks, you can fix them by pouring a tiny bit of warm glaze over the crack and smoothing with a small offset spatula. Also, avoid moving the glazed bombs too soon – let them set in the refrigerator for at least 30 minutes before handling.
Can I make these blueberry coconut mousse bombs without gelatin?
Gelatin is crucial for the structure of both the core and the mousse in this recipe – it prevents the bombs from melting at room temperature and gives them that clean, sliceable texture. If you need a vegetarian option, you can try agar-agar powder, but the results will be different. For the core, use 1 tsp agar with the same liquid; for the mousse, use 2 tsp agar. However, agar sets at a higher temperature and gives a firmer, almost jelly-like texture rather than a creamy mousse. I’ve tested it, and the mousse becomes less airy and more firm. For the glaze, you can also use agar, but the shine may not be as brilliant. My honest advice: if you can eat gelatin, stick with it for this specific recipe. If you need a fully vegetarian dessert, consider a different recipe – maybe a blueberry panna cotta or a coconut mousse that relies on whipped cream alone (but it won’t have the same freeze-and-glaze structure).
What kind of molds do I need for blueberry dessert bombs?
For perfect sphere-shaped mousse bombs, I recommend using silicone half-sphere molds (about 2.5 inches in diameter). They’re available online or at baking supply stores. The silicone material makes unmolding easy – just flex the mold gently. You’ll need two halves per bomb if you want full spheres, but I actually prefer to use a single half-sphere cavity and leave the top flat (so the glaze pools on top). That’s what I do in this recipe. If you don’t have sphere molds, you can use a silicone muffin pan (each cavity about 3/4 cup capacity) – the shape will be a dome on top, which still looks elegant. Just increase the freezer time to 8 hours. For the blueberry core, small silicone ice cube trays with half-sphere cavities are perfect, but a regular ice cube tray works – just cut the cubes to fit.
How do I make the blueberry puree from scratch for this mousse recipe?
Homemade blueberry puree is simple and far superior to store-bought. Start with 2 cups of fresh or frozen blueberries (if using frozen, no need to thaw). Place them in a saucepan with 1/4 cup water and 2 tablespoons sugar. Bring to a simmer over medium heat, then reduce heat and cook for 8–10 minutes until the berries have burst and the mixture has thickened slightly. Remove from heat and let cool for 10 minutes. Then, pour the mixture into a fine-mesh sieve set over a bowl, and press with a spatula to extract as much puree as possible – discard the skins and seeds. You should get about 1 cup of puree. This puree can be stored in the refrigerator for up to a week or frozen for 3 months. For this recipe, you’ll need 1 cup for the mousse plus 3/4 cup for the core, so start with about 3–4 cups of whole blueberries.
Can I use white chocolate chips instead of a bar for the diamond glaze?
You can, but the results may not be as smooth. White chocolate chips often contain stabilizers and less cocoa butter, which can cause them to seize or become grainy when melted. If chips are all you have, try adding 1 teaspoon of coconut oil or vegetable shortening when melting to help thin them out. For professional results, I recommend using a good-quality white chocolate bar (like Valrhona or Callebaut) and chopping it finely with a chef’s knife. The extra cocoa butter in bar chocolate melts more evenly and gives the glaze that signature silky shine. If you’re using chips, also be extra careful not to overheat – stir constantly and remove from heat as soon as most of the chips have melted (the residual heat will finish the job).
How should I store leftover blueberry coconut mousse bombs?
Leftover bombs (if you somehow have any!) should be kept in the refrigerator, covered loosely with plastic wrap or in an airtight container. They will stay fresh for up to 3 days. However, the diamond glaze will soften over time and may become slightly tacky, so they’re best eaten within 24 hours of glazing. If you want to store them longer, I recommend freezing the unglazed bombs (as in step 6) for up to 2 months, then glazing and serving on the day you need them. To freeze the finished glazed bombs, place them on a parchment-lined baking sheet in a single layer, freeze for 1 hour until solid, then transfer to a freezer bag. They’ll keep for 1 month. To serve, transfer frozen glazed bombs to the refrigerator overnight to thaw – the glaze will regain some shine.
Share Your Version!
I’d love to see your Blueberry Coconut Mousse Bombs! Did you stick with the classic, or try one of the variations? Maybe you added a pinch of cardamom like my Moroccan mother would? Drop a star rating and a comment below – your feedback helps other home bakers discover what works. Snap a photo and tag me on Instagram @leosfoods or on Pinterest @stellarecipeblog – I feature my readers’ creations every month! And here’s a question for you: what’s your favorite part of the diamond glaze technique? Is it the shimmer, the smoothness, or that satisfying pour? Let me know in the comments!
From my NYC kitchen to yours – I hope this recipe brings as much warmth to your table as it does to mine. — Stella 🧡
Love This Recipe? Save It to Pinterest!
If you enjoyed this Blueberry Coconut Mousse Bombs recipe, don’t let it get lost in your browser tabs! 😄 Pin it now so you can find it again anytime – and explore hundreds more tried-and-tested recipes waiting for you on my Pinterest boards.
👉 Follow Stella on Pinterest @stellarecipeblog
📌 Pin this recipe · 🔁 Re-pin your favorites · 💬 Tag me when you make it – I love seeing your creations!
Hungry for more? Try my classic Blueberry Coconut Mousse Bombs or browse all easy gluten-free dessert recipes on the blog. Subscribe to my newsletter for weekly gems from my NYC kitchen!
Blueberry Coconut Mousse Bombs with Diamond Glaze
Decadent blueberry coconut mousse bombs with a frozen blueberry core, biscuit base, and a shimmering diamond glaze.
- Yield: 8 1x
Ingredients
- For the Blueberry Coconut Mousse:
- 1 cup blueberry puree
- 1 cup coconut cream
- 8 oz cream cheese, softened
- 1 cup heavy cream
- 1/2 cup granulated sugar
- 1 tsp vanilla extract
- 2 tsp powdered gelatin
- 3 tbsp cold water
- For the Blueberry Core:
- 3/4 cup blueberry puree
- 2 tbsp granulated sugar
- 1 tsp lemon juice
- 1 tsp powdered gelatin
- 1 tbsp cold water
- For the Biscuit Base:
- 1 cup digestive biscuits, finely crushed
- 3 tbsp melted butter
- For the Diamond Glaze:
- 1 cup granulated sugar
- 1/2 cup water
- 1/2 cup sweetened condensed milk
- 1 cup white chocolate, finely chopped
- 1 tbsp powdered gelatin
- 3 tbsp cold water
- 1 tsp clear vanilla extract
- 2 drops blue food coloring
- 1 tsp edible pearl luster dust
- For Garnish (optional):
- Fresh blueberries
- Toasted coconut flakes
- Edible silver flakes
Instructions
- 1. Mix crushed biscuits with melted butter and press into sphere molds as a thin base layer. Chill for 15 minutes.
- 2. Bloom gelatin for the blueberry core in cold water for 5 minutes.
- 3. Heat blueberry puree, sugar, and lemon juice until warm.
- 4. Stir in gelatin until dissolved and pour into small silicone inserts.
- 5. Freeze until firm.
- 6. Bloom gelatin for the mousse in cold water for 5 minutes.
- 7. Beat cream cheese, blueberry puree, coconut cream, sugar, and vanilla extract until smooth.
- 8. Warm a small portion of the cream and dissolve the gelatin, then mix into the blueberry mixture.
- 9. Whip the remaining cream to soft peaks and fold into the mixture.
- 10. Fill sphere molds halfway with mousse.
- 11. Place a frozen blueberry core into the center of each mold.
- 12. Cover with remaining mousse and smooth the tops.
- 13. Freeze for at least 6 hours or until completely firm.
- 14. Bloom gelatin for the glaze in cold water.
- 15. Heat sugar, water, and condensed milk until steaming.
- 16. Remove from heat and stir in gelatin and white chocolate until smooth.
- 17. Add vanilla extract, blue food coloring, and pearl luster dust. Blend until glossy.
- 18. Cool glaze to about 90°F (32°C).
- 19. Unmold frozen bombs and place on a wire rack.
- 20. Pour the diamond glaze evenly over each bomb until fully coated.
- 21. Refrigerate for 30 minutes before serving.
- 22. Garnish with fresh blueberries, toasted coconut flakes, and silver flakes.
Nutrition
- Calories: 350
- Sugar: 34g
- Fat: 20g
- Carbohydrates: 39g
- Protein: 4g
Tried This Recipe? Leave a Comment!
Did you make this recipe? I’d love to hear how it turned out! Please leave a comment and a rating below. Your feedback helps other home cooks and supports cheerychop.com!
For more delicious inspiration, follow me on Pinterest!