Perfect Vanilla Orchid Dream Bombs with Mirror Glaze
“`html
Table of Contents
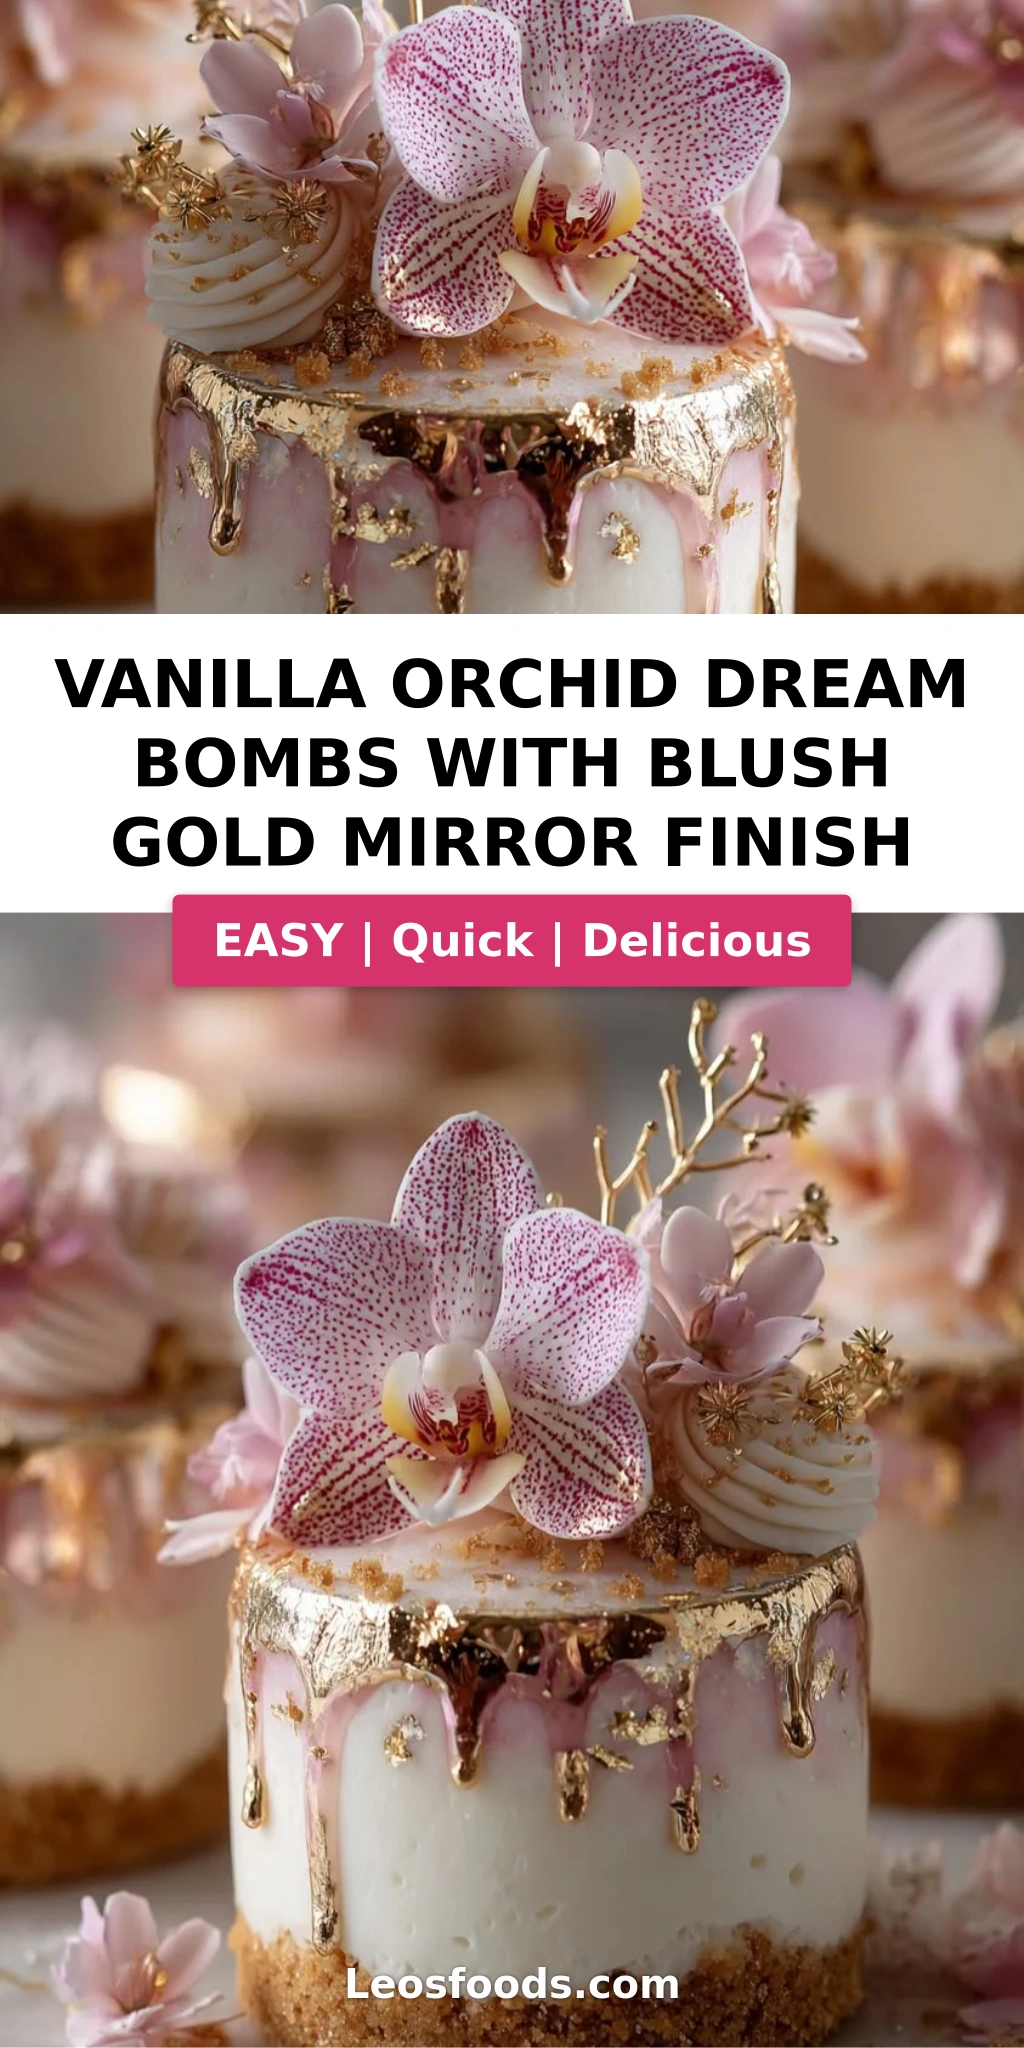
Vanilla Orchid Dream Bombs with Blush Gold Mirror Finish – A Stunning Dessert Masterpiece
I still remember the first time I tasted orchid—it was in Marrakech, in my mother’s kitchen, where she’d add a drop of rose or orange blossom to nearly everything. But orchid? That was something I discovered years later, during my pastry training in Paris. The moment I tried orchid-infused crème anglaise, I knew I had to bring that elegant floral note into my own dessert repertoire. These Vanilla Orchid Dream Bombs with Blush Gold Mirror Finish are the result of that journey—a dessert that bridges my Moroccan roots, my French training, and the bold, unapologetic sweetness of my New York City kitchen. Every bite tells a story.
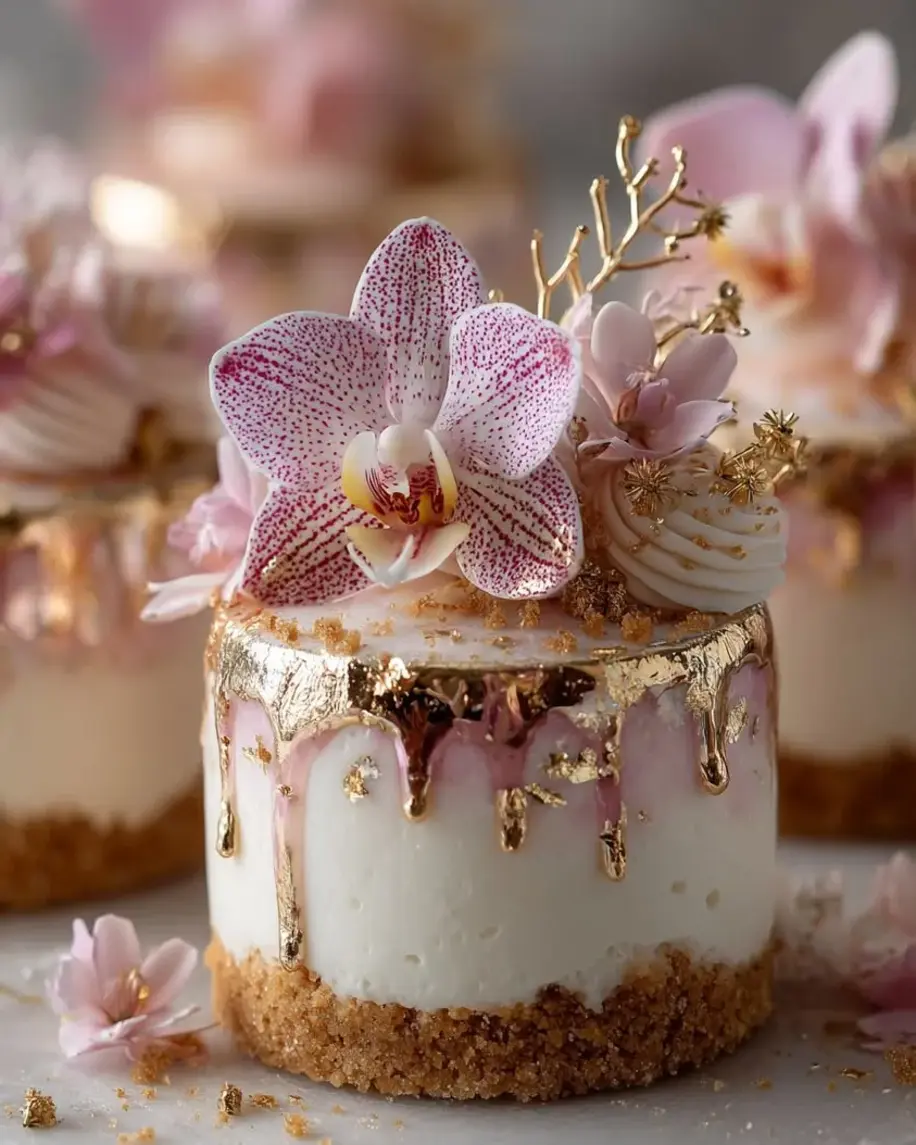
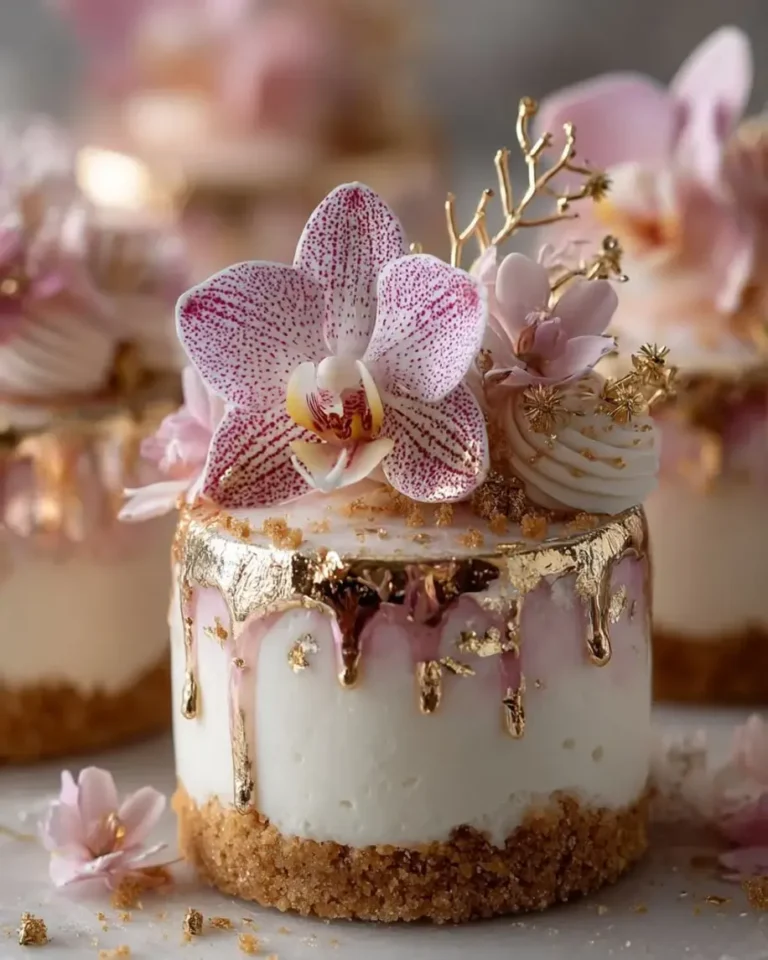
Imagine this: a crunchy biscuit base, a silky vanilla orchid mousse that melts on your tongue, a hidden core of luscious mascarpone cream, and then—the showstopper—a glossy blush gold mirror finish that shimmers like liquid sunset. The orchid extract brings an almost honeyed, jasmine-like floral note that dances with the vanilla, while the mirror glaze creates a flawless, reflective surface that feels almost too beautiful to eat. But trust me, you’ll want to. The texture is impossibly smooth, the flavors are balanced and dreamy, and the presentation is straight out of a high-end patisserie window.
I’ve tested this recipe a dozen times to make sure it works for home bakers who are ready to level up. The mirror glaze can be intimidating, but I’ve broken it down into foolproof steps. My secret? Temperature control is everything—and I’ll show you exactly how to nail it. Whether you’re making these for a birthday, a dinner party, or just because you deserve something extraordinary, these vanilla orchid dream bombs will earn you standing ovations. Let’s dive in.
Why This Vanilla Orchid Dream Bombs Recipe Is the Best
The Flavor Secret: Most orchid desserts rely on synthetic flavoring, but I insist on using real orchid extract combined with vanilla bean paste. The orchid adds a delicate floral complexity that elevates the mousse from simple to sublime. Growing up in Morocco, I learned that floral notes should whisper, not shout—and this recipe gets that balance exactly right. The mascarpone center provides a creamy, tangy counterpoint that keeps every bite interesting.
Perfected Texture: The magic of these bombs lies in the contrast between the frozen mousse and the silky room-temperature glaze. The biscuit base stays crunchy even after freezing, thanks to the butter-to-biscuit ratio I perfected during my pastry days in Paris. The mousse is aerated just enough to feel light, yet rich enough to satisfy. Every layer has a purpose, and every texture is deliberate.
Foolproof & Fast: I know mirror glaze can feel like advanced pastry sorcery, but I’ve simplified the process without sacrificing results. The glaze comes together in one pot, and as long as you use an instant-read thermometer, you’ll get that flawless finish every time. This recipe is designed for confident home cooks who want to create something spectacular without a pastry degree.
Vanilla Orchid Dream Bombs Ingredients
I source my orchid extract from a lovely spice shop in Chelsea Market, and the vanilla bean paste I order online from a craft baker in Vermont. The rest is standard grocery store fare—but quality matters. Here’s what you’ll need to create these little masterpieces.
Ingredients List
- For the Vanilla Orchid Mousse: 8 oz cream cheese, softened; 1 cup heavy cream; 1/2 cup granulated sugar; 2 tsp vanilla bean paste; 1 tsp orchid extract; 2 tsp powdered gelatin; 3 tbsp cold water
- For the Vanilla Cream Center: 3/4 cup mascarpone cheese; 2 tbsp powdered sugar; 1 tsp vanilla extract
- For the Biscuit Base: 1 cup digestive biscuits, finely crushed; 3 tbsp melted butter
- For the Blush Gold Mirror Finish: 1 cup granulated sugar; 1/2 cup water; 1/2 cup sweetened condensed milk; 1 cup white chocolate, finely chopped; 1 tbsp powdered gelatin; 3 tbsp cold water; 1 tsp clear vanilla extract; 1 tsp edible gold luster dust; 1 drop soft pink food coloring
- For Garnish (optional): White chocolate curls; Edible gold flakes; Dried edible flowers
Ingredient Spotlight
Orchid Extract: This is the star of the show. Look for culinary-grade orchid extract at specialty baking shops or online. It has a honeyed, slightly spicy floral profile that’s distinct from vanilla. If you can’t find it, a combination of vanilla extract and a drop of jasmine or rose water can approximate the floral note—but the real deal is worth seeking out.
Mascarpone Cheese: For the cream center, use full-fat mascarpone for the richest texture. It’s available at most grocery stores in the specialty cheese section. If you can’t find it, cream cheese blended with a tablespoon of heavy cream makes a decent substitute, though the flavor will be tangier.
White Chocolate: Use a high-quality brand like Lindt or Ghirardelli for the mirror glaze. The smoother the chocolate melts, the glossier your finish will be. Avoid white chocolate chips, which often contain stabilizers that can make the glaze grainy.
Edible Gold Luster Dust: This gives the mirror finish its signature shimmer. Look for it at craft stores or online baking retailers. A little goes a long way—one teaspoon is plenty for the entire batch.
| Original Ingredient | Best Substitution | Flavor / Texture Impact |
|---|---|---|
| Orchid Extract | Vanilla extract + 1 drop rose water | Loses the unique orchid floral; sweeter, more familiar |
| Mascarpone Cheese | Cream cheese + 1 tbsp heavy cream | Tangier, slightly less rich |
| Digestive Biscuits | Graham crackers or shortbread | Sweeter or less malty; still crunchy |
| White Chocolate | High-quality white chocolate bar (not chips) | Smoother glaze, better shine |
| Edible Gold Luster Dust | Edible gold leaf (applied after glazing) | More dramatic visual, less integrated shimmer |
How to Make Vanilla Orchid Dream Bombs — Step-by-Step
Take a deep breath—you’ve got this. I’ll walk you through every step with the precision I learned in Paris and the warmth my mother taught me. Follow along, and soon you’ll have a tray of stunning dessert bombs that look like they cost $20 each at a fancy patisserie.
Step 1: Prepare the Biscuit Base
Mix the finely crushed digestive biscuits with melted butter until the texture resembles wet sand. Press about 1 tablespoon of the mixture into the bottom of each dome mold (or silicone hemisphere mold), creating a thin, even layer. Use the back of a small spoon or a shot glass to press it firmly. Chill the molds in the refrigerator for 15 minutes while you prepare the next components.
⚠️ Common Mistake to Avoid: Pressing the base too thick. A thin, even layer—about 1/8 inch—is all you need. Too much biscuit will overwhelm the delicate mousse.
Step 2: Make the Vanilla Cream Center
In a small bowl, combine the mascarpone cheese, powdered sugar, and vanilla extract. Stir until smooth and creamy. Spoon the mixture into small silicone hemisphere inserts (or mini silicone ice cube trays) — each portion should be about 1 tablespoon. Freeze for at least 30 minutes, or until completely firm. These frozen centers will be embedded inside the mousse bombs.
💡 Stella’s Pro Tip: Use a piping bag to fill the silicone inserts for cleaner, more uniform centers. Snip just a small corner off the bag for better control.
Step 3: Bloom the Gelatin for the Mousse
Sprinkle the 2 teaspoons of powdered gelatin over 3 tablespoons of cold water in a small bowl. Let it sit for 5 minutes without stirring. The gelatin will absorb the water and become a firm, jiggly mass. This process, called blooming, ensures the gelatin dissolves evenly and gives the mousse its silky structure.
Step 4: Prepare the Vanilla Orchid Mousse
In a large mixing bowl, beat the softened cream cheese with the granulated sugar, vanilla bean paste, and orchid extract until the mixture is completely smooth and free of lumps. In a small saucepan, gently warm about 2 tablespoons of the heavy cream (just until warm to the touch, not hot). Remove from heat, add the bloomed gelatin, and stir until fully dissolved. Pour this gelatin-cream mixture into the cream cheese mixture and beat until well combined.
⚠️ Common Mistake to Avoid: Adding the gelatin mixture to cold cream cheese. The gelatin can seize into lumps. Make sure the cream cheese is at room temperature for a seamless blend.
Step 5: Whip and Fold the Cream
In a separate chilled bowl, whip the remaining heavy cream to soft peaks—meaning the cream holds a gentle shape but still droops slightly. Using a rubber spatula, fold the whipped cream into the cream cheese-gelatin mixture in three additions. Fold gently but thoroughly, scraping from the bottom of the bowl to ensure no streaks remain. The mousse should be light, airy, and pale ivory in color.
💡 Stella’s Pro Tip: Chill your bowl and beaters in the freezer for 10 minutes before whipping the cream. This extra cold start helps the cream whip faster and hold its structure better.
Step 6: Assemble the Bombs
Remove the dome molds from the refrigerator. Spoon or pipe the mousse into each mold, filling them about halfway. Take one frozen mascarpone center and press it gently into the center of the mousse. Then pipe or spoon the remaining mousse over the top, smoothing it flush with the rim of the mold. The biscuit base should be at the bottom of the mold, the mousse in the middle, and the cream center suspended within.
Step 7: Freeze Until Firm
Place the filled molds in the freezer for at least 6 hours, or overnight. The bombs must be completely frozen solid before glazing—this is non-negotiable. A frozen bomb ensures the warm glaze sets instantly and evenly without melting the mousse.
⚠️ Common Mistake to Avoid: Rushing the freeze time. If the bombs aren’t frozen solid, the glaze will soak into the mousse instead of forming a shiny shell. Patience pays off here.
Step 8: Prepare the Blush Gold Mirror Glaze
Bloom the 1 tablespoon of powdered gelatin in 3 tablespoons of cold water for 5 minutes. In a medium saucepan, combine the granulated sugar, water, and sweetened condensed milk. Heat over medium heat, stirring gently, until the mixture is steaming and the sugar has dissolved—do not let it boil. Remove from heat. Add the bloomed gelatin and stir until fully dissolved. Add the finely chopped white chocolate and stir until smooth. Add the clear vanilla extract, edible gold luster dust, and one drop of soft pink food coloring. Use an immersion blender to blend the glaze until completely smooth and glossy. Cool to exactly 90°F (32°C) before using.
💡 Stella’s Pro Tip: An instant-read thermometer is your best friend here. If the glaze is too hot, it will melt the frozen bombs. If too cool, it will thicken and lose its mirror shine. 90°F is the sweet spot.
Step 9: Glaze the Frozen Bombs
Unmold the frozen bombs from the silicone molds and place them on a wire rack set over a baking sheet (to catch drips). Working quickly, pour the warm blush gold mirror glaze evenly over each bomb, covering the entire surface. Let any excess drip off. The glaze will set almost instantly on the frozen surface. Transfer the glazed bombs to a plate or tray and refrigerate for at least 30 minutes before serving.
⚠️ Common Mistake to Avoid: Pouring the glaze too slowly. A steady, generous pour in one motion gives the most even coverage. Hesitation can cause streaks and uneven spots.
Step 10: Garnish and Serve
Once the glaze has set, garnish each bomb with white chocolate curls, a pinch of edible gold flakes, and a few dried edible flowers. Serve immediately, or keep refrigerated until ready to serve. The bombs are best enjoyed within 24 hours of glazing for the most dramatic mirror finish.
💡 Stella’s Pro Tip: Use tweezers to place the gold flakes and flowers precisely. A steady hand and a little patience will give you that high-end bakery look.
| Step | Action | Duration | Key Visual Cue |
|---|---|---|---|
| 1 | Prepare biscuit base | 15 mins chill | Firm, compacted layer |
| 2 | Make cream center | 30 mins freeze | Firm, scoopable |
| 3 | Bloom gelatin | 5 mins | Firm, jiggly mass |
| 4 | Prepare mousse | 10 mins | Smooth, lump-free |
| 5 | Whip & fold cream | 5 mins | Soft peaks, airy |
| 6 | Assemble bombs | 10 mins | Layers visible |
| 7 | Freeze | 6+ hrs | Rock solid |
| 8 | Prepare glaze | 15 mins | Glossy, 90°F |
| 9 | Glaze bombs | 5 mins | Shiny, even coat |
| 10 | Garnish & serve | 10 mins | Stunning presentation |
Serving & Presentation
These vanilla orchid dream bombs are showstoppers, so let them shine. Serve each bomb on a small dessert plate or a mirrored tray for extra glamour. I like to pair them with a light dusting of powdered sugar around the plate and a few fresh raspberries or edible flowers for color contrast. The blush gold mirror finish catches the light beautifully, so keep the plating simple and elegant.
In my NYC dinner parties, I serve these after a rich main course—the lightness of the mousse and the floral notes cleanse the palate without feeling heavy. A small glass of chilled Moscato d’Asti or a floral white tea complements the orchid flavor beautifully. For a non-alcoholic option, try a sparkling rose lemonade with edible flower ice cubes.
Growing up in Morocco, we’d serve delicate pastries with mint tea, and the ritual of pausing to enjoy something beautiful is one I carry with me. These bombs deserve that same reverence—take a moment to admire the mirror finish before you dive in. Trust me, it tastes even better than it looks.
| Pairing Type | Suggestions | Why It Works |
|---|---|---|
| Side Dish | Fresh raspberries, lightly sweetened whipped cream, shortbread cookies | Bright acidity cuts the richness; textural contrast |
| Sauce / Dip | Raspberry coulis, passion fruit sauce, honey drizzle | Tart fruit sauce balances the sweet floral mousse |
| Beverage | Moscato d’Asti, floral white tea, sparkling rose lemonade | Complementary floral and fruity notes without overpowering |
| Garnish | White chocolate curls, edible gold flakes, dried edible flowers, fresh mint | Adds visual height, texture, and a touch of luxury |
Make-Ahead, Storage & Reheating
I live by make-ahead cooking in my NYC kitchen—it’s the only way to stay sane when hosting. The good news: these vanilla orchid dream bombs are practically designed for advance preparation. The mousse bombs can be fully assembled and frozen up to a week before glazing. The glaze itself can be made a day ahead and stored in the fridge, then gently rewarmed to 90°F before using. Glaze the bombs the day you plan to serve them for the most spectacular mirror finish.
| Method | Container | Duration | Reheating Tip |
|---|---|---|---|
| Refrigerator | Airtight container, single layer | Up to 3 days | Serve cold; do not reheat |
| Freezer | Airtight container, layered with parchment | Up to 1 month | Thaw in fridge overnight; glaze may lose some shine |
| Make-Ahead | Freeze unglazed bombs; store glaze separately | Unglazed: 1 week; Glaze: 3 days | Rewarm glaze to 90°F, then glaze straight from freezer |
If you’re storing leftover glazed bombs (lucky you!), place them in a single layer in an airtight container and refrigerate. The mirror finish will stay shiny for about 24 hours. After that, the glaze may start to absorb moisture from the fridge, so they’re best enjoyed fresh. If you freeze already-glazed bombs, the mirror finish will lose its brilliance—so I recommend freezing unglazed and glazing fresh when you’re ready to impress.
Variations & Easy Swaps
One of the things I love most about this recipe is how adaptable it is. Whether you’re catering to dietary needs or just craving a flavor twist, here are some of my favorite variations that I’ve tested in my own kitchen.
| Variation | Key Change | Best For | Difficulty Impact |
|---|---|---|---|
| Berry Bliss | Add 1/4 cup raspberry puree to mousse | Fruit lovers, spring/summer entertaining | Easy – no extra steps |
| Gluten-Free | Use gluten-free graham crackers or almond flour base | Gluten-sensitive guests | Easy – swap only |
| Chocolate Orchid | Add 2 oz melted dark chocolate to mousse; use chocolate base | Chocolate lovers, winter entertaining | Moderate – extra melting step |
Berry Bliss Variation
Fold 1/4 cup of raspberry or strawberry puree into the mousse just before filling the molds. The tartness of the berries cuts through the richness of the mascarpone and adds a gorgeous pink hue to the mousse. I love this version in late spring when berries at the Union Square Greenmarket are at their peak. The mirror glaze remains the same, but you can swap the pink food coloring for a drop of violet for a deeper berry tone.
Gluten-Free Adaptation
Simply substitute the digestive biscuits with certified gluten-free graham crackers or a mixture of almond flour, melted butter, and a tablespoon of sugar. Press the mixture into the molds exactly as you would the original. The texture will be slightly more crumbly, so handle gently when unmolding. Everything else in the recipe remains unchanged—the mousse, cream center, and glaze are all naturally gluten-free.
Chocolate Orchid Twist
Melt 2 ounces of high-quality dark chocolate (70% cocoa) and fold it into the mousse after adding the whipped cream. Swap the biscuit base for a chocolate cookie base (Oreo crumbs without the filling work beautifully). The orchid extract pairs surprisingly well with chocolate—the floral notes enhance the dark chocolate’s fruity undertones. For the glaze, add a tiny pinch of cocoa powder along with the pink food coloring for a deeper, more complex blush tone.
What is a blush gold mirror finish and how do I achieve it for these vanilla orchid dream bombs?
A blush gold mirror finish is a glossy, reflective glaze that coats the frozen dessert bomb in a smooth, shiny layer with a soft pink hue and a subtle gold shimmer. It’s made by combining sugar, water, sweetened condensed milk, white chocolate, gelatin, and edible gold luster dust, then coloring it with a single drop of pink food coloring. To achieve the perfect mirror finish, the glaze must be cooled to exactly 90°F (32°C) before pouring over the frozen bombs. The key steps are: bloom the gelatin properly, blend the glaze with an immersion blender until completely smooth, and ensure your bombs are frozen solid. Pour the glaze in one steady motion over the dome for even coverage, and let the excess drip off before the glaze sets.
Can I substitute vanilla orchid extract with regular vanilla extract in these dream bombs?
Yes, you can substitute vanilla orchid extract with regular vanilla extract, but the flavor profile will shift significantly. Orchid extract has a honeyed, slightly spicy floral character that regular vanilla doesn’t replicate. If you use vanilla extract alone, you’ll still have a delicious dessert, but you’ll lose the distinctive floral nuance that makes these bombs special. For a closer approximation, use a combination of vanilla extract and a tiny drop of rose water or orange blossom water—about 1/8 teaspoon per batch. This will give you a floral undertone that echoes the orchid without being identical. Keep in mind that the dessert will taste more like a classic vanilla mousse with a floral hint rather than the unique orchid flavor the recipe intends.
How far in advance can I make vanilla orchid dream bombs with a mirror glaze?
You can make the components of vanilla orchid dream bombs several days in advance, but the timing matters for the best results. The unglazed mousse bombs can be frozen for up to one week before glazing. The mirror glaze itself can be prepared up to three days ahead and stored in an airtight container in the refrigerator. When you’re ready to serve, rewarm the glaze to 90°F, unmold the frozen bombs, and glaze them fresh. Once glazed, the bombs are best served within 24 hours—the mirror finish stays shiny and flawless for about a day. For the most spectacular presentation, I recommend glazing the bombs the morning of your dinner party or event.
What is the best way to store leftover vanilla orchid dream bombs to keep the mirror finish intact?
To keep the mirror finish intact on leftover vanilla orchid dream bombs, place them in a single layer in an airtight container and refrigerate immediately. Do not stack them or cover them with plastic wrap directly against the glaze, as this will ruin the shiny surface. The mirror finish will remain glossy for about 24 hours in the refrigerator. After that, the glaze may start to absorb moisture and lose its reflective quality. If you need to store them longer, it’s better to freeze the unglazed bombs and glaze them fresh later. Avoid freezing already-glazed bombs, as the temperature shock will cause the mirror finish to crack and dull. Leftover glazed bombs are still delicious for up to three days, even if the shine fades.
Can I use a different type of chocolate for the mirror glaze?
Yes, you can use different types of chocolate for the mirror glaze, but the results will vary. White chocolate is the classic choice for a blush gold mirror finish because it creates a pale, translucent base that takes pink food coloring and gold luster dust beautifully. If you use milk chocolate, the glaze will be darker and the pink blush will become a deeper rose or copper tone. Dark chocolate will produce a rich, almost mahogany-colored glaze that won’t show the pink or gold as distinctly. Keep in mind that different chocolates have different fat contents, which can affect the glaze’s consistency and set. If you’re experimenting, I recommend sticking with white chocolate for the signature blush gold look.
What can I use instead of gelatin to make the mousse and glaze vegetarian-friendly?
To make the mousse and glaze vegetarian-friendly, you can substitute the powdered gelatin with agar-agar, a plant-based gelling agent derived from seaweed. For the mousse, use 1 teaspoon of agar-agar powder dissolved in 3 tablespoons of water, then brought to a boil and simmered for 2 minutes before mixing in. For the mirror glaze, use 1 tablespoon of agar-agar powder dissolved in 3 tablespoons of water, boiled and simmered before adding to the sugar mixture. Note that agar-agar sets more firmly than gelatin and at a higher temperature, so the mousse will have a slightly firmer, almost jelly-like texture rather than the silky, creamy texture of gelatin-set mousse. The glaze will also set more quickly, so work fast.
Why did my mirror glaze crack or look streaky?
A mirror glaze can crack or look streaky for several common reasons. Cracking usually happens when the glaze is too cold when poured—if it’s below 85°F, it becomes thick and sets unevenly, leading to cracks. Streaks often occur from pouring the glaze too slowly or in multiple motions, which creates overlapping layers that set at different times. Another cause is unmelted gelatin or chocolate lumps that create uneven spots. To prevent these issues, always use an immersion blender to ensure the glaze is smooth, cool it to exactly 90°F, and pour it over the frozen bombs in one confident, generous motion. Make sure your bombs are fully frozen—partially thawed bombs will cause the glaze to absorb unevenly, leading to a patchy finish.
Can I make these vanilla orchid dream bombs without a dome mold?
Yes, you can make these vanilla orchid dream bombs without a dome mold by using alternative shaping methods. The easiest substitute is a standard muffin tin lined with plastic wrap—press the biscuit base into the bottom, fill with mousse and cream center, and freeze. Once frozen, you can shape the tops by hand or simply serve them as mousse cups with the glaze poured over the top. Another option is to use small glass bowls or ramekins as molds, though the bombs will be bowl-shaped rather than domed. For a truly dome-like shape, you can buy inexpensive silicone hemisphere molds online or at baking supply stores. If you’re serving them as cups, skip the glaze pour and simply spoon the room-temperature glaze over the top before serving.
How do I know when the mirror glaze is at the right temperature for pouring?
The ideal temperature for pouring a mirror glaze is exactly 90°F (32°C). At this temperature, the glaze is fluid enough to flow evenly over the frozen bomb but cool enough to set instantly on contact, creating a smooth, shiny surface. The best way to measure this is with an instant-read digital thermometer. If you don’t have one, you can test the glaze by spooning a small amount onto a chilled plate—it should flow smoothly and start to set within 10-15 seconds. If the glaze is too hot (above 95°F), it will melt the frozen mousse and create a thin, runny coat. If it’s too cool (below 85°F), it will be thick and may form lumps or streaks. I recommend investing in a reliable thermometer—it’s the single most important tool for achieving a flawless mirror finish.
Can I use store-bought vanilla pudding or mousse mix instead of making it from scratch?
I don’t recommend using store-bought vanilla pudding or mousse mix for this recipe. The texture and stability of homemade mousse are critical for the bombs to hold their shape during glazing and to achieve the right mouthfeel. Store-bought pudding has a different gelatin structure and won’t freeze as firmly, which means it may not unmold cleanly or hold up under the weight of the mirror glaze. Additionally, the orchid flavor needs to be infused into the base—pre-made mixes won’t absorb the extract as well. If you’re short on time, you can make the mousse a day ahead and freeze the bombs overnight. The active preparation takes about 30 minutes, and the results are far superior to any shortcut.
Share Your Version!
I absolutely love seeing how you make these vanilla orchid dream bombs your own. Did you try the berry variation? Did your mirror glaze turn out perfectly glossy? Drop a comment below with your star rating and any questions—I read every single one and answer as many as I can. Your feedback helps other home bakers who are trying this recipe for the first time.
Tag me in your photos on Instagram or Pinterest @leosfoods when you make these—I feature my favorites on my stories every week! And if there’s one thing I’d love to know: what’s the most ambitious dessert you’ve ever tackled? These bombs might just become your new proudest achievement. From my NYC kitchen to yours — I hope this recipe brings as much warmth to your table as it does to mine. — Stella 🧡
Love This Recipe? Save It to Pinterest!
If you enjoyed this Vanilla Orchid Dream Bombs with Blush Gold Mirror Finish recipe, don’t let it get lost in your browser tabs! 😄 Pin it now so you can find it again anytime — and explore hundreds more tried-and-tested recipes waiting for you on my Pinterest boards.
👉 Follow Stella on Pinterest @stellarecipeblog
📌 Pin this recipe · 🔁 Re-pin your favorites · 💬 Tag me when you make it — I love seeing your creations!
“`
Print
Vanilla Orchid Dream Bombs with Blush Gold Mirror Finish
A decadent dessert featuring vanilla orchid mousse, a creamy mascarpone center, a biscuit base, and a stunning blush gold mirror glaze.
- Yield: 8 1x
Ingredients
- For the Vanilla Orchid Mousse:
- 8 oz cream cheese, softened
- 1 cup heavy cream
- 1/2 cup granulated sugar
- 2 tsp vanilla bean paste
- 1 tsp orchid extract
- 2 tsp powdered gelatin
- 3 tbsp cold water
- For the Vanilla Cream Center:
- 3/4 cup mascarpone cheese
- 2 tbsp powdered sugar
- 1 tsp vanilla extract
- For the Biscuit Base:
- 1 cup digestive biscuits, finely crushed
- 3 tbsp melted butter
- For the Blush Gold Mirror Finish:
- 1 cup granulated sugar
- 1/2 cup water
- 1/2 cup sweetened condensed milk
- 1 cup white chocolate, finely chopped
- 1 tbsp powdered gelatin
- 3 tbsp cold water
- 1 tsp clear vanilla extract
- 1 tsp edible gold luster dust
- 1 drop soft pink food coloring
- For Garnish (optional):
- White chocolate curls
- Edible gold flakes
- Dried edible flowers
Instructions
- Mix crushed biscuits with melted butter and press into dome molds as a thin base layer. Chill for 15 minutes.
- Combine mascarpone cheese, powdered sugar, and vanilla extract until smooth.
- Spoon into small silicone inserts and freeze until firm.
- Bloom gelatin for the mousse in cold water for 5 minutes.
- Beat cream cheese, sugar, vanilla bean paste, and orchid extract until smooth.
- Warm a small portion of the cream and dissolve the gelatin, then mix into the cream cheese mixture.
- Whip the remaining cream to soft peaks and fold into the mixture.
- Fill dome molds halfway with mousse.
- Place a frozen vanilla cream center into each mold.
- Cover with remaining mousse and smooth the tops.
- Freeze for at least 6 hours or until completely firm.
- Bloom gelatin for the mirror finish in cold water.
- Heat sugar, water, and condensed milk until steaming.
- Remove from heat and stir in gelatin and white chocolate until smooth.
- Add vanilla extract, gold luster dust, and pink food coloring.
- Blend until glossy and silky smooth.
- Cool glaze to about 90°F (32°C).
- Unmold frozen bombs and place on a wire rack.
- Pour the blush gold mirror finish evenly over each bomb until fully coated.
- Refrigerate for 30 minutes before serving.
- Garnish with white chocolate curls, gold flakes, and dried edible flowers.
Nutrition
- Calories: 355
- Sugar: 34g
- Fat: 20g
- Carbohydrates: 39g
- Protein: 4g
Tried This Recipe? Leave a Comment!
Did you make this recipe? I’d love to hear how it turned out! Please leave a comment and a rating below. Your feedback helps other home cooks and supports cheerychop.com!
For more delicious inspiration, follow me on Pinterest!