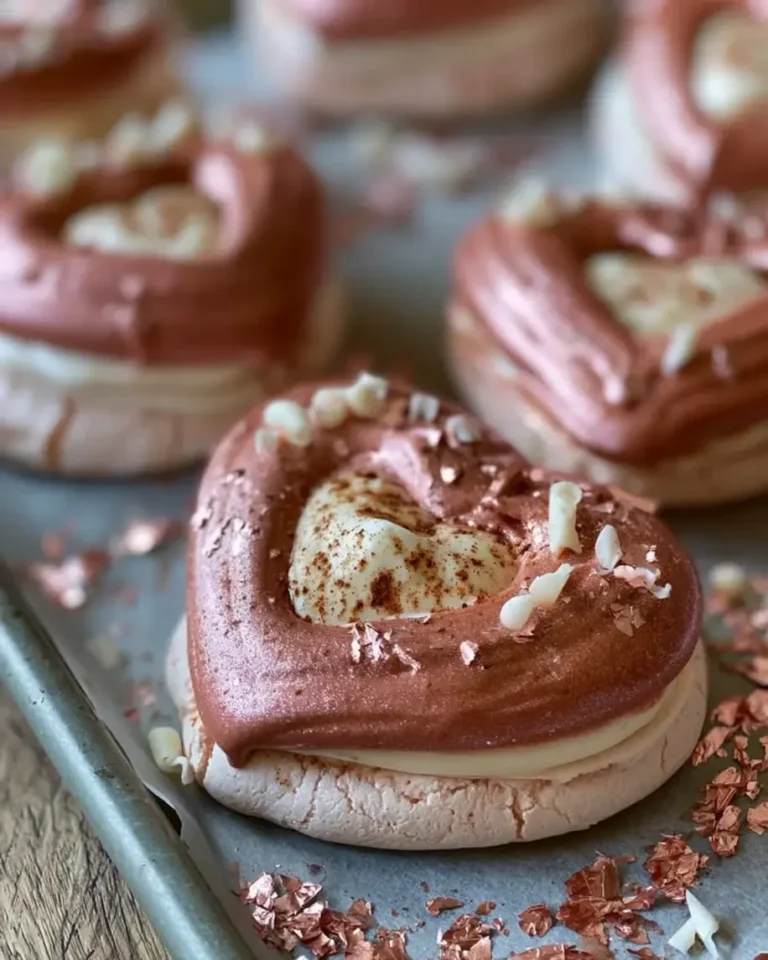
Velvet Vanilla Rose Gold Cheesecake Bombs Recipe

Table of Contents
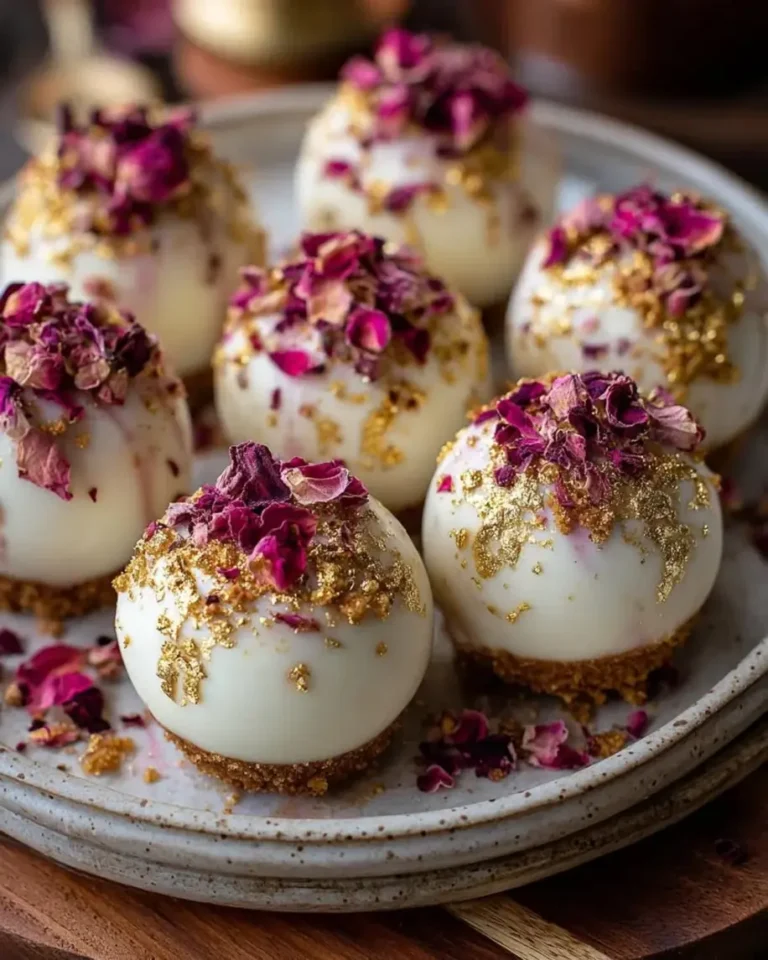
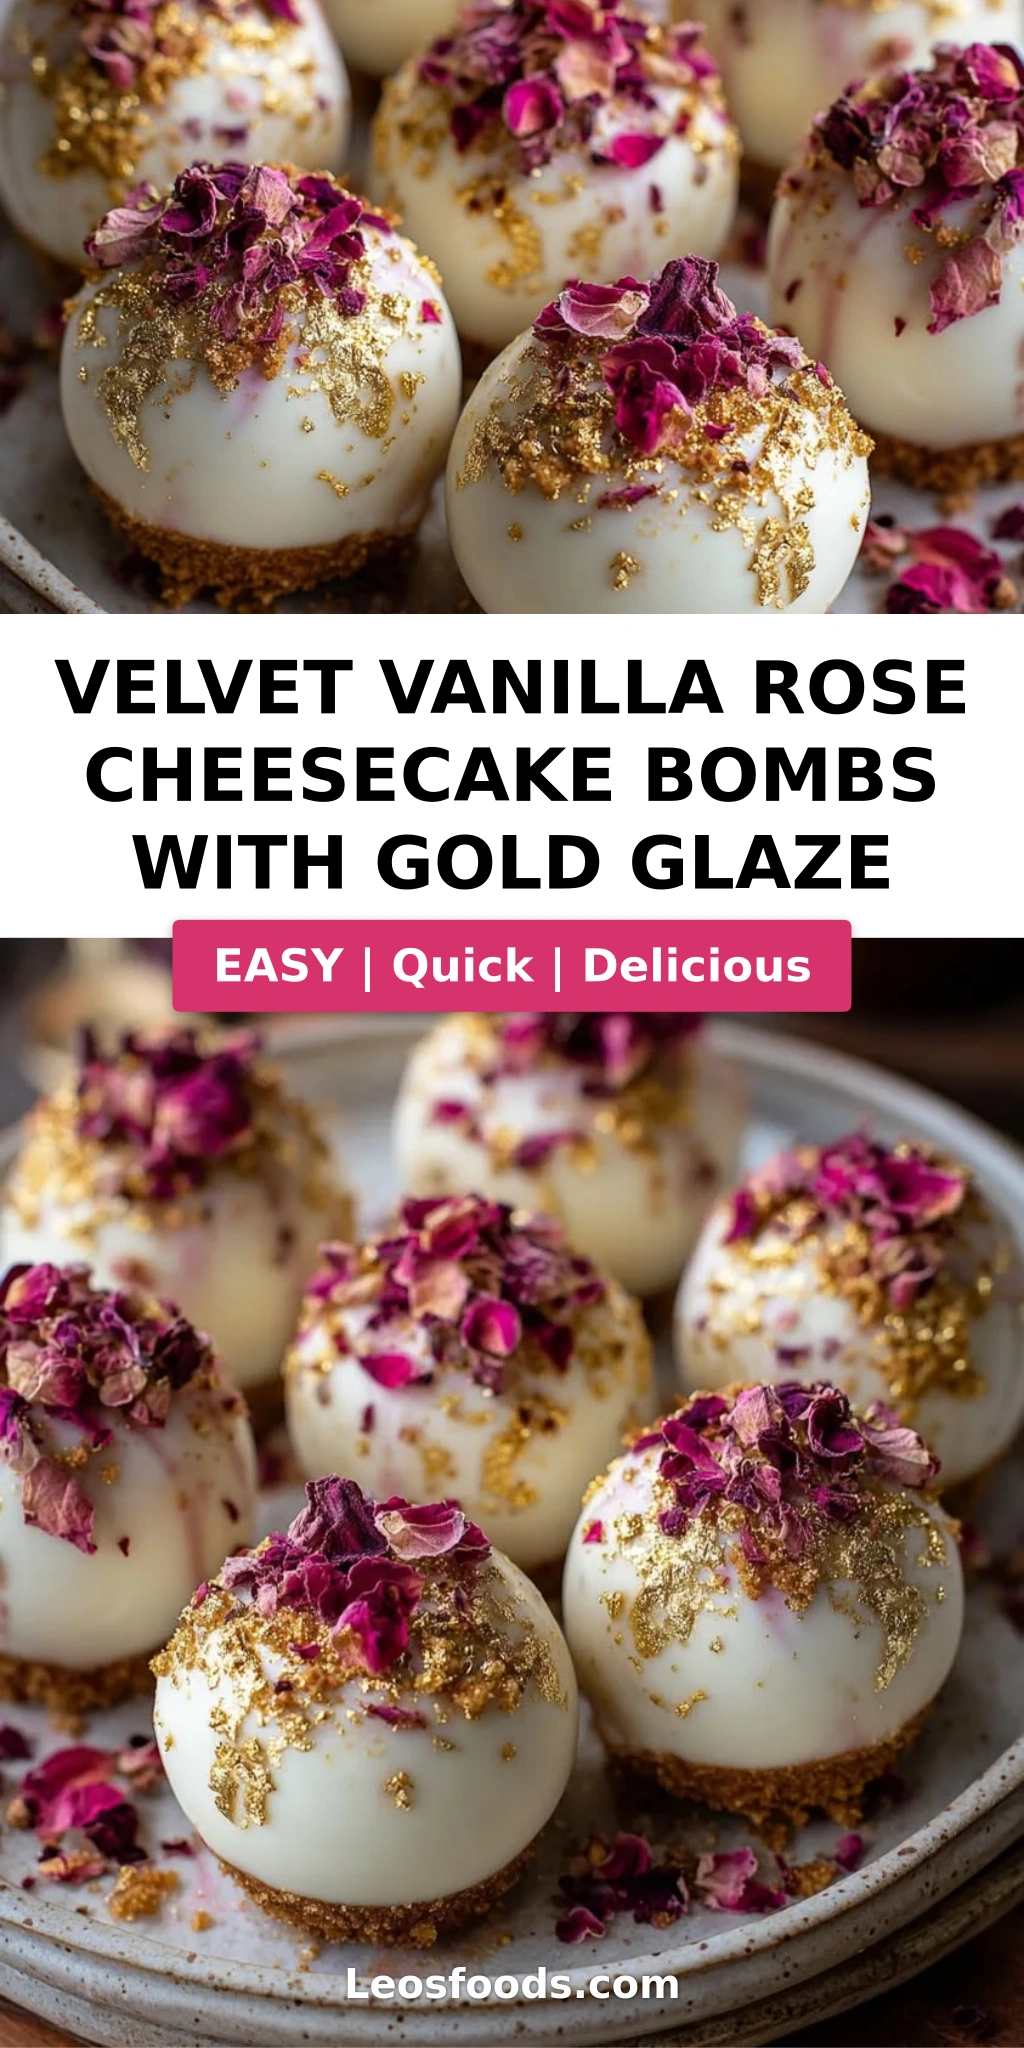
Velvet Vanilla Rose Cheesecake Bombs with Gold Glaze – A Moroccan-French Fusion Dessert That Shines
I still remember the first time I made a rose dessert that truly tasted like my grandmother’s garden in Marrakech. I was twenty-two, fresh out of culinary school in Paris, and determined to bring a touch of my Moroccan childhood into the patisserie I was dreaming of. These rose gold cheesecake bombs are the result of that dream: a velvet vanilla rose cheesecake shell that melts on your tongue, wrapped in a mirror-like gold glaze cheesecake recipe that catches light like liquid jewelry. The secret? A whisper of rose water — not too much, just enough to transport you. The vanilla rounds it out, and the glaze… the glaze is pure edible art.
Picture this: you crack through a thin, gleaming layer of white chocolate gold glaze to reveal a cloud-soft cheesecake center that tastes like a bouquet of vanilla orchids and fresh petals. The cookie crust adds a buttery crunch. Every bite is a layered experience — floral, creamy, sweet, with a hint of honeyed warmth. Using rose water (always find the food-grade, alcohol-free kind) is key. I source mine from a little spice shop on Atlantic Avenue in Brooklyn, but any Middle Eastern market will have the real deal. The gold luster dust gives that signature bling without any metallic taste.
I’ve tested this recipe a dozen times to get the texture right — the cheesecake must be firm enough to shape into perfect spheres but soft enough to feel luxurious. One common mistake is over-beating the cream cheese; we’ll avoid that with a gentle hand. My Paris pastry chef always said: “La patience est la clé.” Patience, plus a good freeze, makes these bombs flawless. Whether you’re serving them at a bridal shower, a birthday, or simply because you deserve something beautiful, these little spheres of joy will not disappoint. From my NYC kitchen to yours — let’s make gold.
Why This Velvet Vanilla Rose Cheesecake Bombs Recipe Is the Best
The Flavor Secret: Most rose desserts taste like perfume — not this one. I use a 1:1 ratio of vanilla to rose water, and a pinch of salt to balance. The vanilla (I recommend Madagascar Bourbon) grounds the floral notes, making the rose taste natural and delicate. This is a trick I learned from a pastry chef in the 6th arrondissement who made the most sublime rose macarons. The result is a velvet vanilla rose cheesecake that’s both elegant and comforting.
Perfected Texture: Cheesecake bombs can be dense or icy if you rush the process. My technique involves blooming gelatin in cold water, then melting it gently before folding into the cream cheese mixture. This ensures a silky, mousse-like texture that holds its shape even after glazing. The heavy cream is whipped to soft peaks — not stiff — so the filling stays airy. Freezing for at least four hours is non-negotiable; it allows the bombs to be sliced cleanly and glazed without melting.
Foolproof & Fast: I know you’re busy — I’m a mom, a blogger, and a New Yorker. So I designed these rose gold cheesecake bombs to be doable in stages. Make the filling and crust one evening, freeze overnight, then glaze the next day. The gold glaze comes together in five minutes with just four ingredients. Even if you’ve never worked with edible gold dust, I’ll walk you through it. No special equipment needed — just a silicone half‑sphere mold and a wire rack.
Rose Gold Cheesecake Bombs Ingredients
When I shop for these ingredients, I always head to the Union Square Greenmarket for the freshest cream cheese and butter — the difference in quality is real, especially in a simple recipe like this. The vanilla I buy online from a small producer in Madagascar, and the rose water comes from a little Moroccan import store in Astoria. Each component plays a vital role, so choose wisely.
Ingredients List
- For the Cheesecake Bombs:
- 16 oz (450 g) cream cheese, softened
- 1/2 cup granulated sugar
- 1 tsp vanilla extract
- 1 tsp rose water
- 1 cup heavy whipping cream
- 2 tsp unflavored gelatin
- 2 tbsp cold water
- For the Cookie Base:
- 1 cup vanilla cookie crumbs
- 3 tbsp unsalted butter, melted
- 1 tbsp granulated sugar
- For the Gold Glaze:
- 1 cup white chocolate, finely chopped
- 1/4 cup heavy cream
- 1 tbsp edible gold luster dust
- 1 tsp light corn syrup
- For Garnish (optional):
- Dried rose petals
- Edible gold flakes
Ingredient Spotlight
Rose Water: Not all rose waters are equal. Look for a food-grade brand with no sugar or alcohol — Cortas or Nielsen-Massey are excellent. A little goes a long way; too much will taste like soap. If you can’t find rose water, substitute 1/2 tsp rose extract mixed with 1/2 tsp water.
Unflavored Gelatin: This is crucial for structure. I use Knox gelatin sheets or powder. Powder is easiest to find in US grocery stores. Never substitute agar‑agar without adjusting the liquid, as it sets much firmer.
White Chocolate: For the glaze, splurge on a good brand like Callebaut or Ghirardelli. Don’t use white chips — they contain stabilizers that prevent smooth melting. Finely chop the chocolate for even melting.
| Original Ingredient | Best Substitution | Flavor / Texture Impact |
|---|---|---|
| Rose Water | 1/2 tsp rose extract + 1/2 tsp water | Stronger floral, slightly less delicate |
| Heavy Whipping Cream | Coconut cream (chilled, whipped) | Lighter, coconut flavor, dairy‑free |
| Vanilla Cookie Crumbs | Graham cracker crumbs or shortbread crumbs | Crunchier, more buttery, slightly different sweetness |
| Edible Gold Luster Dust | Pearl dust or silver dust (for color only) | Visual change, no flavor impact |
How to Make Velvet Vanilla Rose Cheesecake Bombs with Gold Glaze — Step-by-Step
Trust me, once you get the hang of these little bombs, you’ll want to make them for every celebration. The key is to work with cold ingredients and give yourself enough time for the freeze. I’ll guide you through each step with my pro tips so you get that perfect round shape and glossy finish.
Step 1: Prepare the Cookie Crust
Combine the vanilla cookie crumbs, melted butter, and 1 tbsp sugar in a small bowl until the mixture feels like wet sand. Press about 1 tablespoon of the mixture into each half‑sphere of a silicone mold, using the back of a spoon to pack it firmly. You want a thin, even layer — about 1/8 inch thick. Place the mold in the freezer while you make the filling.
💡 Stella’s Pro Tip: For a cleaner press, use a small flat‑bottomed glass or a tamper. If you don’t have a silicone half‑sphere mold, you can use a mini muffin tin lined with plastic wrap.
Step 2: Bloom the Gelatin
In a small bowl, sprinkle the 2 tsp unflavored gelatin over 2 tbsp cold water. Let it sit for 5–8 minutes until it becomes a firm, wobbly mass. This process, called blooming, ensures the gelatin dissolves evenly without lumps.
⚠️ Common Mistake to Avoid: Adding gelatin directly to warm mixture will create streaks and clumps. Always bloom first in cold water, then melt gently.
Step 3: Make the Cheesecake Filling
In a large bowl, beat the softened cream cheese with an electric mixer on low until smooth and creamy. Add the sugar, vanilla extract, and rose water, and beat on medium speed until fully combined — about 1 minute. Scrape the bowl well. Meanwhile, melt the bloomed gelatin in a small saucepan over low heat or in the microwave (10‑second bursts) until liquid. Let it cool slightly then quickly mix into the cream cheese mixture.
Step 4: Whip and Fold
In a separate bowl, whip the heavy cream on medium‑high speed until soft peaks form — you want the cream to hold its shape but not become stiff. Gently fold the whipped cream into the cream cheese mixture using a spatula, being careful not to deflate the air. The batter should be light, airy, and uniform.
💡 Stella’s Pro Tip: To test if the cream is at soft peak stage, lift the whisk — the peak should droop slightly. Overwhipping can make the filling grainy.
Step 5: Fill and Freeze
Spoon or pipe the cheesecake mixture into the chilled half‑sphere molds over the crust, filling each cavity to the top. Smooth the tops with an offset spatula. Freeze for at least 4 hours, or overnight, until the bombs are solid.
⚠️ Common Mistake to Avoid: Don’t rush this freeze! If the bombs aren’t completely frozen, they will crack when you try to join the halves.
Step 6: Assemble the Bombs
Remove the frozen halves from the molds. Take two halves — one should have a flat top (the crust side) — and press them together, using your fingers to smooth the seam if needed. Return to the freezer on a parchment‑lined tray while you make the glaze.
💡 Stella’s Pro Tip: If the halves don’t stick immediately, warm the seam briefly with your fingers or rub a tiny bit of leftover filling along the edge.
Step 7: Make the Gold Glaze
Place the finely chopped white chocolate in a heatproof bowl. Heat the heavy cream in a small saucepan until it just begins to simmer (do not boil). Pour the hot cream over the chocolate and let sit for 2 minutes, then stir gently until smooth. Mix in the light corn syrup and edible gold luster dust until the glaze is shiny and fully colored.
Step 8: Glaze and Garnish
Let the glaze cool to about 90°F (32°C) — it should be pourable but thick enough to coat the back of a spoon. Place the frozen bombs on a wire rack over a baking sheet. Pour the glaze over each bomb, letting the excess drip off. Immediately garnish with dried rose petals and edible gold flakes before the glaze sets. Refrigerate for 30 minutes to allow the glaze to firm up.
⚠️ Common Mistake to Avoid: If the glaze is too hot, it will slide off the frozen bomb. If too cold, it will clump. Test the temperature on the back of your hand — it should feel just warm, not hot.
| Step | Action | Duration | Key Visual Cue |
|---|---|---|---|
| 1 | Press crust into molds | 5 mins | Firm, thin layer |
| 2 | Bloom gelatin | 5 ins | Firm, wobbly mass |
| 3 | Mix cheesecake base | 5 mins | Smooth, no lumps |
| 4 | Whip cream & fold | 5 mins | Soft peaks, uniform batter |
| 5 | Fill molds & freeze | 4+ hrs | Solid, easy to unmold |
| 6 | Join halves | 5 mins | Smooth spheres |
| 7 | Make glaze | 5 mins | Shiny, golden, smooth |
| 8 | Glaze & garnish | 15 mins + chill | Full coverage, no drips |
Serving & Presentation
These velvet vanilla rose cheesecake bombs are showstoppers. Serve them chilled, straight from the refrigerator, on a white porcelain plate to let the gold glaze pop. I love to add a small dollop of vanilla whipped cream on the side and a sprinkle of crushed pistachios for color contrast. In the winter, I sometimes place them on a bed of chocolate soil (crushed Oreos mixed with cocoa) — it gives a tiny bit of earthy crunch that balances the sweet rose.
For a Moroccan touch, serve with a small glass of mint tea — the freshness of the mint plays beautifully with the floral notes. Or if you’re feeling Parisian, a cup of strong black coffee or espresso is perfect. These bombs also work wonderfully as a wedding dessert, especially if you drizzle a little extra gold sauce on the plate. Remember: take them out of the fridge 5 minutes before serving so the glaze softens slightly but the filling stays cool.
| Pairing Type | Suggestions | Why It Works |
|---|---|---|
| Side Dish | Vanilla whipped cream, chocolate soil | Adds richness and textural contrast |
| Sauce / Dip | Raspberry coulis, honey drizzle | Fruity acidity cuts through sweetness |
| Beverage | Mint tea, espresso, rosé champagne | Herbal or bubbly notes complement floral vanilla |
| Garnish | Dried rose petals, gold flakes, crushed pistachios | Adds color, crunch, and elegance |
Make-Ahead, Storage & Reheating
One of the best things about this gold glaze cheesecake recipe is how well it fits into a busy schedule. I often make the bombs entirely (except the glaze) up to two weeks ahead and store them in the freezer. Then on the day I need them, I make the fresh glaze, pour it over the frozen bombs, and they’re ready after a short chill. No last‑minute stress. Here’s exactly how to store them:
| Method | Container | Duration | Reheating Tip |
|---|---|---|---|
| Refrigerator | Airtight container, layered with parchment | Up to 5 days | Serve cold; no reheating needed |
| Freezer | Freezer‑safe bag or container, separated by wax paper | Up to 3 months | Thaw in fridge 2 hrs before glazing |
| Make-Ahead | Freeze unglazed bombs on a tray, then transfer to bag | Up to 2 weeks in advance | Glaze directly from frozen – no thaw needed |
If you have leftovers (unlikely, but possible!), keep them in the fridge. The glaze may lose a bit of shine after a day or two, but the flavor remains wonderful. For best results, enjoy within 2 days of glazing. Do not microwave the bombs — the glaze will weep and the cheesecake will become rubbery. Just take them out 10 minutes before serving to gently take the chill off.
Variations & Easy Swaps
This velvet vanilla rose cheesecake recipe is a beautiful canvas for creativity. Over the years, I’ve adapted it for different seasons, dietary needs, and flavor cravings — each time with stellar results. Below are three of my favorite variations, plus a quick reference table to see how they change the recipe.
| Variation | Key Change | Best For | Difficulty Impact |
|---|---|---|---|
| Chocolate Rose | Add 2 tbsp cocoa powder to cheesecake | Chocolate lovers | Easy |
| Vegan Rose Gold | Cashew cream + coconut cream base | Dairy‑free dieters | Medium (needs extra soaking) |
| Citrus Gold | Replace rose water with orange blossom water + zest | Summer parties, brunch | Easy |
Chocolate Rose Bombs
For a deeper, more decadent twist, sift 2 tablespoons of unsweetened cocoa powder into the cream cheese mixture along with the sugar. The chocolate amplifies the vanilla and adds a richness that pairs beautifully with the rose water. This version reminds me of the chocolate‑orange truffles I used to make at a patisserie in the Marais — but with a floral Moroccan flair. Keep the gold glaze as is; the contrast between dark chocolate inside and gold outside is stunning.
Vegan Rose Gold Cheesecake Bombs
To make this recipe dairy‑free, soak 1 cup raw cashews for 4 hours, then blend with 1/2 cup coconut cream, sugar, vanilla, rose water, and a pinch of salt until silky smooth. Omit the gelatin and instead add 2 tbsp melted coconut oil and 1 tbsp agar‑agar powder (bloomed in water, then boiled for 2 minutes). The texture will be slightly firmer and more mousse‑like. For the crust, use vegan cookies and coconut oil. The glaze works with dairy‑free white chocolate (such as iChoc). I tested this for a friend’s baby shower and no one could tell the difference.
Citrus Gold Cheesecake Bombs
Swap the rose water for 1 tbsp orange blossom water and add the zest of one orange. This gives a bright, sunshiny flavor that’s perfect for spring and summer. I often find gorgeous blood oranges at the Union Square Greenmarket in winter and use their zest for a deeper color. The gold glaze complements the citrus beautifully, and a tiny piece of candied orange peel on top makes a fantastic garnish. It’s like a creamsicle meets a Moroccan dessert — utterly delightful.
How do you make a gold glaze for cheesecake bombs that looks shiny and smooth?
The secret to a perfectly shiny gold glaze lies in the ratio of white chocolate to cream and the temperature when you pour it. Start with finely chopped high-quality white chocolate — avoid chips as they contain stabilizers. Warm the heavy cream until it just simmers (do not boil) and pour it over the chocolate. Let it sit for 2 minutes undisturbed, then whisk gently in one direction until smooth. Add light corn syrup for extra shine and the edible gold luster dust last, stirring until fully dissolved. Let the glaze cool to about 90°F (just warm to the touch) before pouring. If it’s too hot, it will slide off the frozen bomb; too cold, and it will clump. Pour from a height for an even coating, and tap the wire rack gently to release air bubbles.
Can I substitute the vanilla rose flavor with another extract in these cheesecake bombs?
Absolutely! The base recipe is very flexible. For a completely different profile, replace the rose water with an equal amount of orange blossom water, lavender extract (use 1/2 tsp, as it’s stronger), or even almond extract (1/2 tsp). You can also boost the vanilla by using vanilla bean paste instead of extract and adding the seeds from half a vanilla bean. If you want a boozy twist, try 1 tsp of amaretto or framboise eau de vie. Just remember that water‑based extracts (like rose water) can be swapped 1:1, but alcohol‑based extracts may require a slight reduction in other liquids to keep the filling stable. Always taste the cream cheese mixture before adding the gelatin — you want the flavor to be prominent, as freezing dulls it slightly.
How long do velvet vanilla rose cheesecake bombs need to chill before serving?
After glazing, the bombs need at least 30 minutes in the refrigerator to allow the gold glaze to set completely. This also lets the cheesecake soften slightly from its frozen state to a creamy, mousse-like texture. If you’re short on time, you can speed things up by placing them in the freezer for 10–15 minutes, but be careful — the glaze may become too hard and crack when you bite into it. For the best flavor and texture, I recommend chilling for 1 hour. The bombs will keep beautifully in the fridge for up to 2 days after glazing, though the shine may fade slightly. Serve them straight from the fridge, letting them sit at room temperature for 5 minutes for optimal creaminess.
What is the best way to shape cheesecake bombs so they stay round and don’t crack?
The key to perfect, crack‑free spheres is a proper freeze and gentle handling. First, use silicone half‑sphere molds — they make unmolding effortless. After filling the molds, freeze for at least 4 hours (overnight is better). When you join the two halves, make sure they are still frozen solid; if they start to soften, they’ll become sticky and difficult to work with. Press the halves together firmly but gently, and use the warmth of your fingers to smooth the seam — the slight warmth melts the edge just enough to fuse without cracking. If you see any small cracks, you can fill them with a tiny dab of leftover cheesecake mixture and smooth it with a wet finger. For the roundest shape, roll the assembled bomb between your palms (while still frozen) for a few seconds before returning to the freezer. This also helps the glaze adhere evenly.
Can I use fresh rose petals instead of dried for garnish?
You can, but fresh petals contain moisture that can make the gold glaze soggy over time. Dried rose petals are preferred because they add a delicate crunch and retain their color without weeping. If you insist on fresh petals, lightly brush them with a thin layer of simple syrup and let them dry for an hour before placing on the glaze — this creates a protective barrier. Another option is to crystallize the fresh petals by coating them with egg white (or meringue powder) and superfine sugar, letting them dry for 24 hours. That gives you a beautiful, edible, sparkly garnish that holds up well. Whichever you use, add the garnish immediately after pouring the glaze, before it sets.
Why did my gold glaze turn out dull instead of shiny?
A dull glaze usually means one of three things: the chocolate wasn’t finely chopped (leading to lumps), the cream was too hot (causing the chocolate to seize), or the gold luster dust was added too late. Always chop the white chocolate into small, uniform pieces to ensure even melting. Heat the cream only until tiny bubbles appear around the edge — if it boils, the emulsion can break. Add the luster dust while the glaze is still warm (around 95–100°F) and whisk thoroughly. Corn syrup is your friend here; it adds viscosity and shine. If your glaze still loses luster, try warming it gently in a double boiler and whisking in a teaspoon of coconut oil or extra corn syrup. Finally, store glazed bombs in the fridge uncovered — condensation from a lid can dull the finish.
Can I make these rose gold cheesecake bombs without a silicone mold?
Yes, but you’ll need to adjust the shaping method. Without a half‑sphere mold, you can use a mini muffin tin lined with plastic wrap strips (so you can lift out the frozen halves). Press the crust into the bottom of each cup, fill with cheesecake mixture, and freeze. Once solid, remove the plastic wrap and shape the rounds by hand — or simply serve them as mini domes (only one half per serving) topped with glaze. Another option is to freeze the cheesecake mixture in a lined loaf pan, then cut out rounds with a small cookie cutter and shape into balls. The texture works fine, but the shapes may be less uniform. If you do this, work quickly and keep the mixture frozen. A silicone mold is definitely the easiest path to perfect spheres.
How do I store leftover gold glaze and can I reuse it?
Yes, you can store leftover glaze! Pour it into a small jar or airtight container and refrigerate for up to one week. When you’re ready to reuse it, warm it gently in a double boiler or in the microwave in 10‑second intervals, stirring after each, until it returns to a pourable consistency. You may need to add a tiny splash of cream if it’s too thick. The gold luster dust can settle, so re‑whisk thoroughly. Note that each reheating can slightly diminish the shine, so try to use it in one session if possible. The glaze also freezes well for up to 3 months — just thaw overnight in the fridge and rewarm as above. I often make a double batch and keep half for a quick dessert later.
Can I use a different type of edible glitter or dust for the glaze?
Absolutely! The shine comes from luster dust, which is edible and non‑toxic. You can use pearl dust (silver, champagne, or pink), which will give a softer metallic sheen. For a rainbow effect, try holographic dust — just make sure it’s labeled “edible” and not just “non‑toxic” (some craft glitters are not meant for consumption). Avoid using large glitter flakes directly in the glaze as they can clump; instead, sprinkle them on top after pouring. If you want a more intense gold color, use a higher ratio of dust (up to 2 tbsp). The luster dust I use is from the brand “The Sugar Art” — it’s micron‑fine and gives a mirror‑like finish. A little goes a long way.
What can I serve with these cheesecake bombs for a complete dessert table?
These bombs are rich and decadent, so pair them with lighter elements to create a balanced dessert spread. Fresh berries — especially raspberries and sliced strawberries — provide a tart contrast that cuts through the sweetness. A small glass of champagne or sparkling water with a twist of lemon works beautifully. For a Moroccan‑themed table, add small bowls of dates stuffed with almonds, honeyed baklava, and mint tea. You could also serve a dollop of tangy yogurt sorbet on the side to mirror the creamy cheesecake. If you’re feeling extra, set up a chocolate fondue with additional fruits and marshmallows — your guests will feel like they’re at a luxury patisserie in Paris.
Share Your Version!
I absolutely love seeing how you make these rose gold cheesecake bombs your own. Did you try the chocolate rose variation? Or maybe you swapped in orange blossom water and it turned out even more beautiful than you imagined? Drop a comment below and let me know — your story might inspire someone else! If you share a photo on Instagram or Pinterest, be sure to tag @leosfoods so I can see and share your creation on my stories.
And here’s a little challenge: try making these for a friend who’s never had a rose‑flavored dessert before. I promise you’ll see their eyes light up. Cooking is about connection, and these little golden spheres are pure edible love. From my NYC kitchen to yours — I hope this recipe brings as much warmth to your table as it does to mine. — Stella 🧡
Love This Recipe? Save It to Pinterest!
If you enjoyed this Velvet Vanilla Rose Cheesecake Bombs with Gold Glaze recipe, don’t let it get lost in your browser tabs! 😄 Pin it now so you can find it again anytime — and explore hundreds more tried-and-tested recipes waiting for you on my Pinterest boards.
👉 Follow Stella on Pinterest @stellarecipeblog
📌 Pin this recipe · 🔁 Re-pin your favorites · 💬 Tag me when you make it — I love seeing your creations!
⭐️ Loved this recipe? Leave a rating below! ⭐️
Your feedback helps me create better recipes for you. Have a question about the rose gold glaze or shaping the bombs? Ask in the comments — I reply to every single one!
Velvet Vanilla Rose Cheesecake Bombs with Gold Glaze
- Yield: 8 1x
Ingredients
- For the Cheesecake Bombs:
- 16 oz (450 g) cream cheese, softened
- 1/2 cup granulated sugar
- 1 tsp vanilla extract
- 1 tsp rose water
- 1 cup heavy whipping cream
- 2 tsp unflavored gelatin
- 2 tbsp cold water
- For the Cookie Base:
- 1 cup vanilla cookie crumbs
- 3 tbsp unsalted butter, melted
- 1 tbsp granulated sugar
- For the Gold Glaze:
- 1 cup white chocolate, finely chopped
- 1/4 cup heavy cream
- 1 tbsp edible gold luster dust
- 1 tsp light corn syrup
- For Garnish (optional):
- Dried rose petals
- Edible gold flakes
Instructions
- Combine the cookie crumbs, melted butter, and sugar in a bowl.
- Press the mixture into silicone half-sphere molds to create a thin base layer.
- Bloom the gelatin in cold water for 5 minutes.
- Beat the cream cheese, sugar, vanilla extract, and rose water until smooth.
- Melt the bloomed gelatin and mix into the cream cheese mixture.
- Whip the heavy cream to soft peaks and fold into the cheesecake mixture.
- Fill the molds over the cookie base and freeze for at least 4 hours until firm.
- Remove the frozen cheesecake halves and join two halves together to form round bombs.
- Heat the heavy cream until warm and pour over the white chocolate.
- Stir until smooth, then mix in the corn syrup and edible gold luster dust.
- Allow the glaze to cool slightly until pourable.
- Place the frozen cheesecake bombs on a wire rack.
- Pour the gold glaze evenly over each bomb, coating completely.
- Garnish with dried rose petals and edible gold flakes.
- Refrigerate for 30 minutes before serving.
Nutrition
- Calories: 395
- Sugar: 24 g
- Fat: 29 g
- Carbohydrates: 28 g
- Protein: 6 g
Tried This Recipe? Leave a Comment!
Did you make this recipe? I’d love to hear how it turned out! Please leave a comment and a rating below. Your feedback helps other home cooks and supports cheerychop.com!
For more delicious inspiration, follow me on Pinterest!