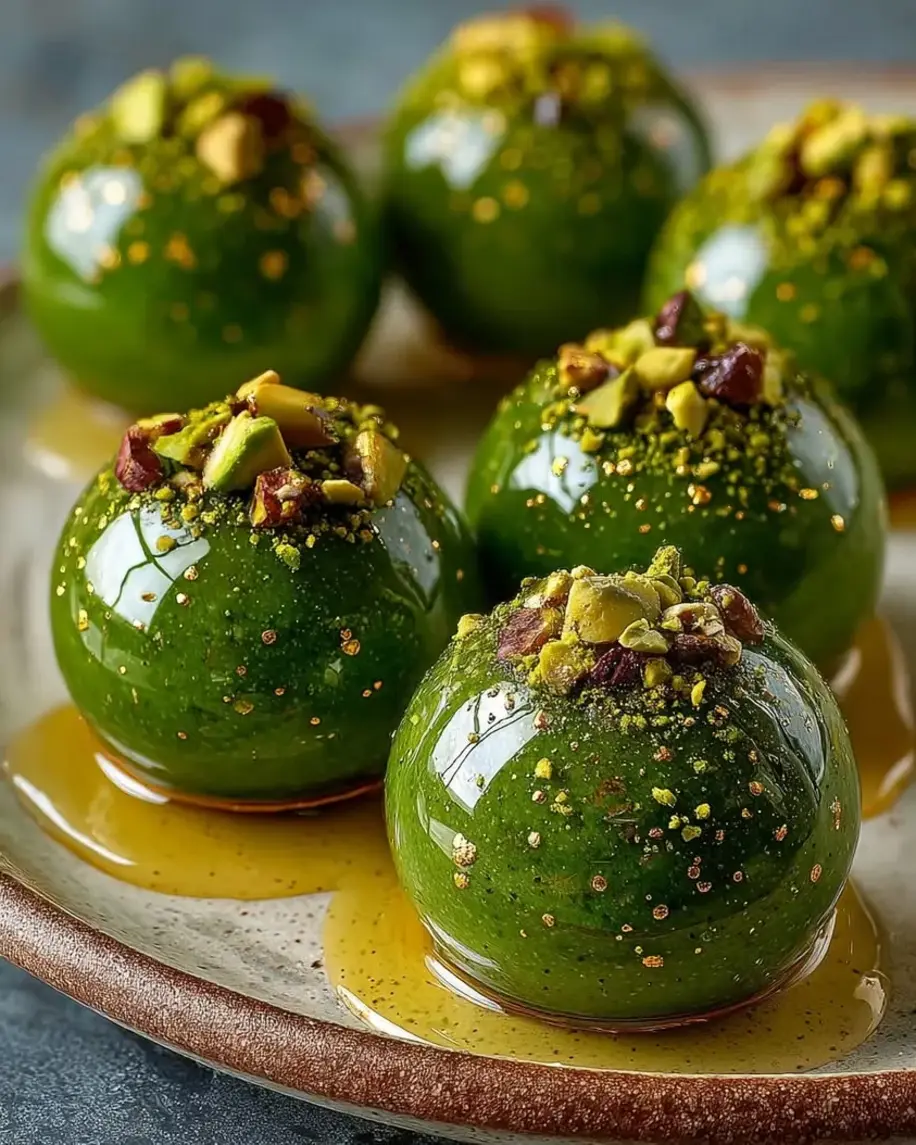
Emerald Matcha Praline Spheres with Gold Mirror Glaze
“`html
Table of Contents
Emerald Matcha Praline Spheres with Gold Mirror Glaze – A Luxurious Dessert Experience
I still remember the first time I tasted a perfect mirror glaze — it was at a tiny patisserie in the 6th arrondissement of Paris, where the sunlight caught the dome of a pistachio-tinged dessert and turned it into liquid jade. That moment stayed with me, and years later, here in my New York City kitchen, I’ve reimagined that memory into these Emerald Matcha Praline Spheres with Gold Mirror Glaze. These matcha praline spheres are the kind of dessert that stops conversation — vibrant green domes with a hidden praline heart, cloaked in a shimmering gold mirror glaze that catches every ray of light. The matcha brings an earthy, slightly sweet depth that balances the rich, nutty praline center, while the glaze adds a dramatic, jewel-like finish.
When you break through that glossy shell with a spoon, you get layers of texture and flavor: the creamy, airy matcha mousse, the velvety praline core with tiny toasted hazelnut crunch, and the sweet, mirror-like glaze that melts on your tongue. The matcha powder I use is ceremonial grade — vibrant green and smooth, not bitter — and it pairs beautifully with the pistachio paste and cream cheese base. I love serving these at dinner parties; they look like they belong in a French pastry case, but the technique is surprisingly achievable at home. The key is patience with the freezing and getting that gold mirror glaze recipe just right — not too hot, not too cold, but perfectly pourable.
This gold mirror glaze dessert draws on everything I’ve learned — from my mother’s tagine-scented kitchen in Morocco, where she taught me to layer flavors with care, to the exacting standards of my Parisian pastry training. My version of these praline dessert balls uses a foolproof gelatin-stabilized mousse that sets firmly enough to unmold cleanly, and a glaze made with white chocolate, condensed milk, and a touch of edible gold luster dust. One common mistake I see home cooks make with mirror glaze is not cooling it to the right temperature — too warm, and it slides right off; too cold, and it sets before you can pour. I’ll show you exactly how to nail it. Let’s make something beautiful together.
Why This Emerald Matcha Praline Spheres Recipe Is the Best
The flavor secret behind these spheres is the way the matcha and praline work in tandem. The matcha, with its grassy, slightly sweet umami notes, cuts through the richness of the cream cheese and mascarpone, while the praline spread — made from caramelized hazelnuts — adds a deep, toasty sweetness that echoes the pistachio paste. Together, they create a taste that’s both sophisticated and familiar, like a green tea latte met a Parisian praline tart. I’ve tested this emerald dessert sphere in my NYC kitchen at least a dozen times, adjusting the matcha ratio and the praline filling until the balance was perfect. The pistachio paste adds a subtle nutty undertone that makes the green flavor feel complete.
Perfected texture is what sets this recipe apart. The matcha mousse uses gelatin for a clean, sliceable set that still feels light and airy on the tongue — a technique I learned from a pastry chef in Paris who specialized in entremets. The whipped cream is folded in gently to preserve the air bubbles, giving the mousse a mousse-like cloudiness that contrasts beautifully with the dense, creamy praline center. The gold mirror glaze recipe here uses gelatin and white chocolate for a shiny, glossy finish that doesn’t crack or wrinkle. When you pour it over the frozen spheres, it sets into a smooth, reflective shell that feels almost lacquer-like. That’s the magic of proper temperature control and gelatin ratios.
Foolproof and fast — well, as fast as a showstopper dessert can be. While the freezing time requires patience, the active hands-on work is only about 45 minutes. I’ve designed this so that even if you’re new to mirrored glazes, you can succeed. The trick is to use a good digital thermometer and to trust the process. The gelatin bloom, the gentle folding, the careful cooling of the glaze — each step is explained in detail with visual cues. These matcha praline spheres are perfect for a special occasion or when you want to impress dinner guests without spending all day in the kitchen. And honestly, seeing that gold glaze cascade over the emerald domes? It’s pure theater.
Matcha Praline Spheres Ingredients
When I’m shopping for these ingredients in New York City, I head to the Union Square Greenmarket in spring for fresh cream and mascarpone, and to Kalustyan’s for high-quality matcha and pistachio paste. The quality of your matcha matters enormously here — a vibrant green ceremonial-grade powder will give you both color and flavor, while a dull or brownish matcha will leave your emerald dessert spheres looking muddy and tasting bitter. For the praline filling, I love using a good-quality praline spread from a specialty shop, but even the jarred versions from the grocery store work beautifully. Let’s go through every ingredient you’ll need.
Ingredients List
- For the Emerald Matcha Spheres:
- 8 oz cream cheese, softened
- 1 cup heavy cream
- 1/3 cup powdered sugar
- 2 tsp matcha powder (ceremonial grade recommended)
- 1 tsp vanilla extract
- 2 tsp unflavored gelatin
- 2 tbsp cold water (for gelatin bloom)
- 1 tbsp pistachio paste
- For the Praline Center:
- 1/2 cup praline spread
- 2 tbsp mascarpone cheese
- 1 tbsp finely chopped toasted hazelnuts
- For the Gold Mirror Glaze:
- 1 cup white chocolate, finely chopped
- 1/2 cup sweetened condensed milk
- 2 tsp unflavored gelatin
- 2 tbsp cold water (for gelatin bloom)
- 1/4 cup warm water
- 1 tsp edible gold luster dust
- For Garnish (optional):
- Chopped pistachios
- Edible gold flakes
Ingredient Spotlight
Matcha Powder — This is the star of the show. Look for a ceremonial-grade matcha with a bright, vibrant green color and a fine, silky texture. Store it in a cool, dark place and use it quickly once opened. If you substitute with a culinary-grade matcha, expect a slightly more bitter flavor and a less vivid green hue. Stella’s Pro Tip: sift your matcha powder before mixing to avoid clumps — it makes a world of difference in the final texture of your matcha praline spheres.
Praline Spread — This is essentially a caramelized hazelnut spread, similar to what you’d find in a French bakery. Look for one that lists hazelnuts as the first ingredient and has a smooth, pourable consistency. You can substitute with a high-quality chocolate-hazelnut spread like Nutella, but the flavor will be sweeter and more chocolate-forward, which competes with the matcha. For the best praline dessert balls, use a pure praline spread if you can find it.
Edible Gold Luster Dust — This gives the gold mirror glaze its shimmering, metallic finish. It’s widely available at baking supply stores or online. Make sure you’re using a food-grade product specifically labeled as edible. The dust dissolves into the glaze and creates that beautiful reflective surface. A little goes a long way — 1 teaspoon is plenty for this gold mirror glaze recipe. Don’t skip it if you want that wow factor.
White Chocolate — The base of the gold mirror glaze dessert. Use a good-quality white chocolate with a high cocoa butter content for the smoothest, glossiest finish. Chips work, but a chopped bar melts more evenly. Avoid white chocolate that contains vegetable fats instead of cocoa butter — it can seize or turn grainy when heated with the condensed milk and gelatin mixture.
| Original Ingredient | Best Substitution | Flavor / Texture Impact |
|---|---|---|
| Matcha powder (ceremonial) | High-quality culinary matcha | Slightly less vibrant color, more bitter edge |
| Praline spread | Chocolate-hazelnut spread (Nutella) | Sweeter, chocolate-forward, less nutty depth |
| Pistachio paste | Almond paste or extra matcha (1 tsp) | Loses nutty complexity, more one-dimensional green flavor |
| White chocolate | White candy melts (chocolate-flavored coating) | Less glossy, slightly waxy texture, faster setting |
| Mascarpone cheese | Full-fat cream cheese | Richer, tangier praline center |
How to Make Emerald Matcha Praline Spheres with Gold Mirror Glaze — Step-by-Step
Making these matcha praline spheres is a labor of love, but I promise you — every step is worth it. Let’s walk through the process together, with my tips and tricks to ensure your success.
Step 1: Bloom the Gelatin for the Matcha Mousse
In a small bowl, combine 2 teaspoons of unflavored gelatin with 2 tablespoons of cold water. Stir gently with a fork until the gelatin is evenly moistened. Let it sit for 5 minutes — the gelatin will absorb the water and form a firm, jiggly mass. This process is called blooming, and it’s essential for ensuring the gelatin dissolves smoothly into your mixture later. Without blooming, you risk getting grainy lumps in your mousse.
💡 Stella’s Pro Tip: Use cold water, not warm or hot, for blooming. Warm water can start dissolving the gelatin unevenly, leading to a less stable set. I always use ice-cold water straight from the fridge.
Step 2: Make the Matcha Base
In a large mixing bowl, beat 8 oz of softened cream cheese with 1/3 cup of powdered sugar, 2 teaspoons of matcha powder, 1 teaspoon of vanilla extract, and 1 tablespoon of pistachio paste. Beat on medium speed for 2–3 minutes until the mixture is completely smooth, with no lumps of cream cheese visible. The color should be a uniform, pale green. If you see streaks of white, keep beating. The matcha should be fully incorporated for the best color and flavor in your emerald dessert spheres.
⚠️ Common Mistake to Avoid: Don’t rush the beating. Cream cheese that’s not fully softened can leave lumps that won’t smooth out. Let your cream cheese sit at room temperature for at least 30 minutes before starting.
Step 3: Melt and Incorporate the Gelatin
Once the gelatin has bloomed, microwave it for 10–15 seconds or place the bowl over a pan of simmering water until it melts into a clear, liquid state. Stir it gently — don’t let it boil. Pour the melted gelatin into the matcha mixture while beating on low speed. Continue mixing until the gelatin is fully incorporated, about 30 seconds. The mixture should be smooth and slightly thickened. Work quickly here so the gelatin doesn’t start setting before you add the cream.
💡 Stella’s Pro Tip: If you’re nervous about the gelatin setting too fast, keep the bowl over a warm water bath while you work. This keeps the mixture fluid and easy to fold later.
Step 4: Whip and Fold the Cream
In a separate bowl, whip 1 cup of heavy cream to soft peaks — you want it to hold a gentle shape but still be soft and pillowy. Be careful not to overwhip; if it starts looking grainy or curdled, you’ve gone too far. Gently fold the whipped cream into the matcha mixture in three additions, using a rubber spatula in a J-shape motion. Fold just until no white streaks remain. Over-folding will deflate the mousse and make it dense instead of airy.
⚠️ Common Mistake to Avoid: Adding all the cream at once makes it hard to fold evenly without overworking. Go slowly and gently — you want to preserve those air bubbles for a light, mousse-like texture in your matcha praline spheres.
Step 5: Prepare the Praline Center
In a small bowl, combine 1/2 cup of praline spread, 2 tablespoons of mascarpone cheese, and 1 tablespoon of finely chopped toasted hazelnuts. Stir until smooth and fully combined. The mixture should be thick but spreadable. Taste it — the praline should be nutty and sweet, with little bits of hazelnut for texture. Set aside at room temperature while you assemble the molds. This filling is what makes these praline dessert balls so special — a hidden creamy, crunchy center that surprises everyone.
💡 Stella’s Pro Tip: Toast your hazelnuts in a dry skillet over medium heat for 3–4 minutes until fragrant and the skins start to flake. Rub them in a clean kitchen towel to remove most of the skins, then chop finely. The toasting brings out an incredible depth of flavor.
Step 6: Fill the Sphere Molds
You’ll need 8 sphere molds — silicone half-sphere molds work best, each about 2.5 inches in diameter. Spoon the matcha mousse mixture into each cavity, filling them about halfway. Tap the molds gently on the counter to release any air bubbles. Then, drop a small spoonful (about 1 generous teaspoon) of the praline mixture into the center of each. Gently press it down slightly so it’s fully surrounded by mousse. Cover with the remaining matcha mousse, filling each cavity to the top. Smooth the tops with an offset spatula so they’re flat.
⚠️ Common Mistake to Avoid: Don’t overfill the molds. If you spread mousse over the edges, it can make unmolding messy later. A flat, smooth top is your goal. If you have extra mousse, you can pipe it in — just be neat.
Step 7: Freeze the Spheres
Place the filled molds on a baking sheet and transfer to the freezer. Freeze for at least 5 hours, or preferably overnight. The spheres need to be completely solid — ice-cold and firm to the touch — before you unmold them. A partially frozen sphere will collapse when you try to glaze it. Plan ahead for this step; it’s not one you can rush. The freezing step is crucial for the gold mirror glaze dessert to work properly.
💡 Stella’s Pro Tip: Cover the molds loosely with plastic wrap to prevent freezer burn. If you’re in a hurry, you can freeze for 4 hours, but check that they’re rock-solid before proceeding. I usually make these a day ahead and freeze overnight — it makes the whole process stress-free.
Step 8: Bloom Gelatin for the Glaze
In a small bowl, combine 2 teaspoons of unflavored gelatin with 2 tablespoons of cold water. Let it bloom for 5 minutes while you prepare the other glaze ingredients. The same principle applies — cold water is essential for a smooth, even bloom. You’ll be using this bloomed gelatin to give the gold mirror glaze its glossy, firm finish that sets beautifully over the frozen spheres.
⚠️ Common Mistake to Avoid: Forgetting to bloom the gelatin. If you skip this step or add dry gelatin directly to the hot liquid, you’ll end up with a lumpy, unappealing glaze that won’t set properly. Always bloom first!
Step 9: Heat the Condensed Milk Mixture
In a small saucepan, combine 1/2 cup of sweetened condensed milk with 1/4 cup of warm water. Heat over medium heat, stirring constantly with a whisk, until the mixture is hot and steaming — about 3–4 minutes. Do not let it boil. Once it’s hot, remove it from the heat and add the bloomed gelatin, whisking until the gelatin is fully dissolved. The mixture should be smooth and slightly syrupy.
💡 Stella’s Pro Tip: Use a whisk instead of a spoon for this step. The whisk helps break up any gelatin clumps and ensures a silky-smooth glaze. I learned this trick from a pastry chef in Paris who never used anything else for her mirror glazes.
Step 10: Make the Gold Glaze
Place 1 cup of finely chopped white chocolate in a heatproof bowl. Pour the hot condensed milk mixture over the chocolate and let it sit for 1 minute without stirring. Then, gently whisk until the chocolate is fully melted and the mixture is smooth and glossy. Stir in 1 teaspoon of edible gold luster dust until evenly incorporated. The glaze should be a shimmering, pale gold color — absolutely gorgeous. Let it cool to about 90°F (32°C) before using. This is the perfect consistency for pouring over your matcha praline spheres.
⚠️ Common Mistake to Avoid: Whisking too vigorously can incorporate air bubbles into the glaze, which will show as tiny holes on the surface of your finished dessert. Stir gently and steadily. Also, make sure the glaze isn’t too hot — above 95°F, it will melt the frozen mousse and slide right off.
Step 11: Unmold and Glaze
Remove the sphere molds from the freezer. Gently pop each frozen sphere out of its silicone mold — they should release easily if they’re fully frozen. Place the spheres on a wire rack set over a baking sheet (to catch drips). Pour the cooled gold mirror glaze evenly over each sphere, making sure to cover the entire surface. Work quickly but carefully, pouring in a steady stream. The glaze will set almost instantly on contact with the frozen surface, creating a smooth, shiny shell.
💡 Stella’s Pro Tip: Don’t pour the glaze too slowly — you want an even, continuous flow. If you stop and start, you’ll get uneven coverage. I like to hold the bowl about 8 inches above the sphere and pour in a spiral motion from top to bottom. It gives the most professional finish.
Step 12: Garnish and Serve
Once the glaze has set (about 2–3 minutes), transfer each sphere to a serving plate or a small dish. Garnish with chopped pistachios and a few edible gold flakes while the glaze is still slightly tacky so the garnishes stick. Serve immediately, or keep chilled in the refrigerator for up to 4 hours before serving. The contrast between the cold, creamy mousse and the glossy, sweet glaze is absolutely stunning. Your emerald dessert spheres are ready to impress.
⚠️ Common Mistake to Avoid: Don’t wait too long to garnish — if the glaze sets completely, the pistachios and gold flakes won’t stick. Work within the first minute after glazing. Also, handle the spheres gently; the glaze is delicate and can smudge if touched.
| Step | Action | Duration | Key Visual Cue |
|---|---|---|---|
| 1 | Bloom gelatin | 5 mins | Firm, jiggly mass |
| 2 | Make matcha base | 3 mins | Smooth, pale green |
| 3 | Melt & incorporate gelatin | 1 min | Clear liquid, fully dissolved |
| 4 | Whip & fold cream | 5 mins | Soft peaks, no white streaks |
| 5 | Prepare praline center | 3 mins | Smooth, thick, nutty |
| 6 | Fill sphere molds | 10 mins | Evenly filled, smooth tops |
| 7 | Freeze spheres | 5+ hours | Rock solid, firm to touch |
| 8 | Bloom gelatin for glaze | 5 mins | Firm, jiggly mass |
| 9 | Heat condensed milk | 4 mins | Steaming, not boiling |
| 10 | Make gold glaze | 5 mins | Shimmering, smooth, ~90°F |
| 11 | Unmold & glaze | 5 mins | Even coverage, glossy shell |
| 12 | Garnish & serve | 5 mins | Pistachios & gold flakes stick |
Serving & Presentation
These emerald dessert spheres demand a dramatic presentation. I like to serve each one on a small, white ceramic dish or a flat dessert plate, with a tiny dollop of crème fraîche or a dusting of extra matcha powder swirled on the plate. The white backdrop makes the gold glaze and green sphere pop like a jewel. For a touch of Parisian elegance, add a single edible flower — a small violet or a rose petal — next to the sphere. The contrast of the glossy gold, the deep green, and the delicate flower is pure art.
When I serve these at dinner parties in my NYC apartment, I always pair them with a light dessert wine or a jasmine tea — the floral notes complement the matcha beautifully. A scoop of vanilla or coconut ice cream on the side is always a hit, adding a creamy, cold contrast. If you’re feeling extra indulgent, drizzle a little honey or caramel sauce around the plate before placing the sphere. The golden glaze already has a glamorous sheen, so keep the garnishes simple and refined. Let the matcha praline spheres be the star.
For a more casual presentation, you can serve these praline dessert balls in mini glass jars or small bowls, with a sprinkle of crushed pistachios and a pinch of flaky sea salt on top. The salt cuts the sweetness of the glaze and enhances the matcha’s savory notes — a trick I picked up from a pastry chef in Paris who salted her caramel desserts. No matter how you serve them, these spheres are guaranteed to earn you rave reviews. They’re a conversation starter, a centerpiece, and a delicious finale to any meal.
| Pairing Type | Suggestions | Why It Works |
|---|---|---|
| Side Dish | Vanilla ice cream, coconut sorbet, crème fraîche | Creamy contrast to the glossy glaze and earthy matcha |
| Sauce / Dip | Honey drizzle, caramel sauce, raspberry coulis | Adds sweetness and acidity that balance the rich praline |
| Beverage | Jasmine tea, light dessert wine, unsweetened matcha latte | Floral and tea notes echo the matcha without overpowering |
| Garnish | Chopped pistachios, edible gold flakes, crushed pink peppercorns | Adds texture, color, and a subtle spicy or salty kick |
Make-Ahead, Storage & Reheating
One of the best things about this gold mirror glaze dessert is how make-ahead friendly it is. My busy NYC schedule means I’m always looking for recipes I can prepare in stages — and these matcha praline spheres are perfect for that. The frozen spheres can be made days ahead, and the glaze can be prepared on the day of serving. Here’s everything you need to know about storing and reheating (though honestly, reheating isn’t really a thing for a frozen mousse dessert — it’s all about proper storage).
| Method | Container | Duration | Reheating Tip |
|---|---|---|---|
| Refrigerator | Airtight container, single layer | Up to 3 days (glazed) | Serve chilled directly from fridge |
| Freezer | Airtight container, unglazed, separated by parchment | Up to 2 months | Glaze directly from frozen, add 1–2 mins to setting time |
| Make-Ahead | Freeze unglazed spheres on a baking sheet, then transfer to container | Up to 5 days before glazing | Glaze on day of serving for best shine |
If you’re planning to make these emerald dessert spheres for a party, here’s my recommended timeline: Up to 1 week ahead, make and freeze the unglazed spheres. On the day of serving, prepare the gold mirror glaze, pour it over the frozen spheres, and let them set in the refrigerator for 1–2 hours before serving. The glaze will remain glossy and the mousse will soften slightly to a perfect, creamy texture. If you have leftovers (rare, but possible), store them in an airtight container in the refrigerator for up to 3 days. The glaze may lose some of its mirror shine, but the flavor will still be lovely.
For reheating — well, you don’t really reheat a mousse sphere. If you’ve stored them in the refrigerator, simply serve them chilled. If they’ve been in the freezer, let them sit at room temperature for 10–15 minutes before glazing to take the edge off the extreme cold, which helps the glaze flow more evenly. Never microwave or heat these — the mousse will melt and the glaze will become a sticky mess. Trust me, I learned that the hard way during a trial run in my NYC kitchen! Serve cold, and you’ll get that perfect contrast of textures.
Variations & Easy Swaps
One of the things I love most about this gold mirror glaze dessert is how versatile it is. You can switch up the flavors, adapt it for dietary needs, or make it your own with seasonal twists. Here are some of my favorite variations, tested in my own kitchen.
| Variation | Key Change | Best For | Difficulty Impact |
|---|---|---|---|
| Rose & Pistachio | Add 1 tsp rose water to matcha base, swap pistachio paste for almond paste | Floral twist for spring or Middle Eastern flair | Easy |
| Dairy-Free / Vegan | Use dairy-free cream cheese, coconut cream, vegan white chocolate, and agar-agar instead of gelatin | Dairy-free or vegan guests | Medium (agar sets differently) |
| Salted Caramel Praline | Add 1/2 tsp flaky sea salt to praline filling, use salted caramel praline spread | Sweet-salty lovers, holiday gatherings | Easy |
Rose & Pistachio Variation
This variation takes me straight back to my mother’s kitchen in Morocco, where rose water was used in everything from pastries to tagines. Add 1 teaspoon of culinary rose water to the matcha base along with the vanilla. Swap the pistachio paste for almond paste — the almond and rose combination is a classic Middle Eastern pairing that works beautifully with matcha. The flavor is floral, nutty, and slightly exotic. If you’re serving these at a spring brunch or a bridal shower, this version is a showstopper. The gold mirror glaze dessert takes on an even more romantic feel with the rose undertone.
Dairy-Free / Vegan Variation
I’ve tested a dairy-free version of these matcha praline spheres for a friend’s vegan dinner party, and it was a hit. Use a dairy-free cream cheese substitute (I like the one from Miyoko’s) and full-fat coconut cream instead of heavy cream. For the gelatin, use agar-agar powder — but be careful, as agar sets much firmer than gelatin and at a higher temperature. You’ll need about 1 1/2 teaspoons of agar-agar, bloomed in 2 tablespoons of water, then heated to a boil before incorporating. The praline filling can use a vegan praline spread and a dairy-free mascarpone alternative. The texture is slightly less creamy but still delicious. The matcha mirror glaze recipe adapts well with vegan white chocolate — just make sure it’s labeled dairy-free.
Salted Caramel Praline Variation
For those who love the sweet-salty combination, this one’s for you. Use a salted caramel praline spread (or add 1/2 teaspoon of flaky sea salt to your regular praline spread along with the mascarpone and hazelnuts). The salt cuts the sweetness of the matcha and the glaze, creating a more complex, adult flavor profile. I love serving this version after a rich dinner — it’s light enough to not feel heavy, but the caramel-praline notes feel deeply satisfying. A sprinkle of sea salt flakes on top of the glaze, right before serving, adds an extra crunch and visual appeal. This emerald dessert sphere variation is always a crowd-pleaser at my NYC dinner parties.
What is the best way to achieve a smooth gold mirror glaze for the spheres?
The key to a perfectly smooth gold mirror glaze is temperature control and straining. First, make sure your gelatin is properly bloomed in cold water before melting it into the condensed milk mixture. Once you’ve combined the white chocolate, condensed milk, and gelatin, whisk gently to avoid incorporating air bubbles — then strain the entire glaze through a fine-mesh sieve into a clean bowl. This removes any undissolved bits of gelatin or chocolate. Let the glaze cool to exactly 90°F (32°C) before pouring. If it’s too warm, it will melt the frozen mousse and slide off; if too cold, it will set before you can pour it evenly. Pour in a steady, continuous spiral motion over the frozen spheres for the most even, mirror-like finish.
Can I substitute matcha powder with another green tea powder in this praline sphere recipe?
Yes, you can substitute matcha with other green tea powders, but the results will vary. Culinary-grade matcha is the most common alternative — it’s less expensive and still provides a green color, though it tends to be more bitter and less vibrant than ceremonial-grade. You can also use hojicha powder (roasted green tea), which gives a lovely toasty, caramel-like flavor and a brownish-green color — this pairs surprisingly well with the praline filling. Another option is moringa powder, which isn’t a tea but offers a similar grassy, earthy flavor with a bright green hue. Keep in mind that the flavor profile of your emerald dessert spheres will shift with each substitute, so adjust the sugar slightly to balance any bitterness.
How far in advance can I prepare emerald matcha praline spheres before serving?
You can prepare these matcha praline spheres several days in advance. I recommend making the unglazed spheres up to 1 week ahead and storing them frozen in an airtight container. On the day you plan to serve them, prepare the gold mirror glaze, unmold the spheres, and pour the glaze over them. Once glazed, they can be refrigerated for up to 4 hours before serving — this allows the mousse to soften slightly to a perfect creamy texture. If you need to glazed them a day ahead, you can, but the mirror shine may dull slightly. For the best presentation — that dazzling, reflective finish — glaze them within a few hours of serving. The frozen spheres themselves can also be stored in the freezer for up to 2 months if unglazed.
What type of praline filling works best inside matcha-flavored chocolate spheres?
The best praline filling for matcha praline spheres is one that balances the earthy, slightly sweet flavor of matcha with a rich, nutty sweetness. A classic praline spread made from caramelized hazelnuts is ideal — it has a deep, toasty sweetness that doesn’t overpower the matcha. I like to mix it with a bit of mascarpone cheese for creaminess and chopped toasted hazelnuts for texture. You can also use a chocolate-hazelnut spread like Nutella, but be aware that the chocolate flavor will be more prominent and may compete with the matcha. For a lighter, fruitier note, try a pistachio praline spread instead. The key is to avoid anything too tart or acidic, which would clash with the creaminess of the mousse and the sweetness of the glaze.
Can I use a different color for the mirror glaze instead of gold?
Absolutely! The gold mirror glaze recipe is incredibly versatile, and you can easily change the color to suit any occasion. Instead of edible gold luster dust, use food coloring — gel or powder food coloring works best because it doesn’t dilute the glaze like liquid food coloring might. For a vibrant pink or rose color, add a drop of pink gel food coloring. For a deep blue or purple, use a combination of blue and red. You can also use colored luster dusts — silver, pink, or blue — to create a metallic finish in a different shade. Just keep in mind that the base glaze is white (from the white chocolate), so pastel colors will show up beautifully, while darker colors may require a bit more coloring agent. A fun option for holidays: emerald green for St. Patrick’s Day or red for Valentine’s Day.
What if I don’t have sphere molds? Can I use a different shape?
Yes, you can absolutely use a different shape if you don’t have sphere molds. Silicone half-sphere molds are ideal, but you can also use small silicone dome molds, mini Bundt pans, or even a muffin tin lined with plastic wrap for easy removal. If using a muffin tin, fill each cup about two-thirds full, add the praline center, and top with more mousse — then smooth the tops and freeze. When unmolded, the shape will be more like a rounded dome or a small cupcake shape, but the flavor and texture will be the same. You can also use a small ice cream scoop to portion the mousse onto a parchment-lined baking sheet, then freeze and shape them by hand into rough spheres — though this takes a bit more finesse. For a more rustic presentation, you can even layer the mousse and praline in small glasses or jars for a deconstructed version.
How do I prevent the mirror glaze from cracking or wrinkling after pouring?
Cracking or wrinkling in a mirror glaze is usually caused by temperature shock or improper gelatin ratios. To prevent this, make sure your spheres are frozen solid but not freezer-burned — ice crystals on the surface can cause the glaze to crack as it sets. Also, ensure your glaze is at the correct temperature (90°F / 32°C) before pouring. If the glaze is too cold, it will set too quickly and can crack as the sphere continues to expand slightly. If it’s too warm, it will melt the mousse surface and create a wrinkled, uneven finish. Another common cause: not using enough gelatin in the glaze. Follow the recipe exactly — 2 teaspoons of gelatin per batch — and make sure the gelatin is fully dissolved before cooling. Finally, pour the glaze in one steady motion without stopping to ensure an even, seamless coat.
Can I make these matcha praline spheres without gelatin?
Yes, you can replace gelatin with agar-agar or other plant-based setting agents, but note that the texture and setting behavior will differ. Agar-agar sets much firmer and at a higher temperature than gelatin, so you’ll need to adjust your technique. For the mousse, use 1 1/2 teaspoons of agar-agar powder bloomed in 2 tablespoons of water, then bring it to a full boil (agar needs to boil to activate) before incorporating into the cream cheese mixture. The mousse will set more firmly, almost like a panna cotta. For the gold mirror glaze, use 1 teaspoon of agar-agar powder bloomed in 1 tablespoon of water, again boiled before adding to the condensed milk mixture. The glaze will set more quickly, so work fast. The final texture will be less creamy and more jelly-like, but still delicious. This works well for those avoiding animal products or with gelatin sensitivities.
What’s the best way to store leftover gold mirror glaze?
If you have leftover gold mirror glaze, you can store it in an airtight container in the refrigerator for up to 5 days. When you’re ready to use it again, gently reheat it in a double boiler or microwave in short bursts (10 seconds at a time, stirring between each) until it’s liquid and smooth. You may need to add a teaspoon of warm water to thin it out if it’s too thick. The glaze can also be frozen for up to 3 months — freeze it in a zip-top bag or airtight container, then thaw in the refrigerator overnight and reheat gently. Keep in mind that the shine may not be as brilliant the second time around, but it’s perfect for drizzling over ice cream, cakes, or even as a dip for fresh fruit. I always make extra glaze on purpose — it’s too good to waste.
What is the best way to achieve a smooth gold mirror glaze for the spheres?
The best way to achieve a smooth gold mirror glaze is through careful temperature management, proper gelatin blooming, and straining. Begin by blooming the gelatin in cold water for exactly 5 minutes — this ensures even dissolution. When you combine the condensed milk, warm water, and bloomed gelatin, whisk gently to avoid introducing air bubbles. After adding the white chocolate and gold luster dust, strain the entire mixture through a fine-mesh sieve into a clean bowl to catch any undissolved bits. Cool the glaze to 90°F (32°C) — use a digital thermometer for accuracy. Pour it over the frozen spheres in a continuous, steady spiral from top to bottom. Work in a cool room (not a hot kitchen) so the glaze sets evenly. The result will be a flawless, mirror-like finish every time.
Share Your Version!
I would absolutely love to see how your Emerald Matcha Praline Spheres with Gold Mirror Glaze turn out! There’s something so special about watching a home baker take a recipe and make it their own — whether you add a sprinkle of extra pistachios, a different colored glaze, or you try one of the variations I shared above. Drop a star rating in the comments below and let me know how it went. Did the gold mirror glaze set perfectly? Did your guests gasp when you brought them to the table? I want to hear every detail. You can also tag me on Instagram or Pinterest @stellarecipeblog — I’m always scrolling through my feed looking for your beautiful creations. And if you have a question about a specific step or substitution, just ask in the comments. I read every single one and I’ll get back to you with a personalized tip. Happy cooking, and don’t forget — every great chef started with a single recipe. This is yours.
From my NYC kitchen to yours — I hope this recipe brings as much warmth to your table as it does to mine. — Stella 🧡
Love This Recipe? Save It to Pinterest!
If you enjoyed this Emerald Matcha Praline Spheres with Gold Mirror Glaze recipe, don’t let it get lost in your browser tabs! 😄 Pin it now so you can find it again anytime — and explore hundreds more tried-and-tested recipes waiting for you on my Pinterest boards.
👉 Follow Stella on Pinterest @stellarecipeblog
📌 Pin this recipe · 🔁 Re-pin your favorites · 💬 Tag me when you make it — I love seeing your creations!
✨ Did you make this recipe? I’d love to hear how your matcha praline spheres turned out! Leave a star rating in the comments below, share a photo on Instagram with @stellarecipeblog, or save this post to Pinterest to find it again later. Every tag, rating, and comment makes my day — and helps other home cooks find this recipe too. 💬⭐📌
“`
Print

Emerald Matcha Praline Spheres with Gold Mirror Glaze
- Yield: 8 1x
Ingredients
- For the Emerald Matcha Spheres:
- 8 oz cream cheese, softened
- 1 cup heavy cream
- 1/3 cup powdered sugar
- 2 tsp matcha powder
- 1 tsp vanilla extract
- 2 tsp unflavored gelatin
- 2 tbsp cold water
- 1 tbsp pistachio paste
- For the Praline Center:
- 1/2 cup praline spread
- 2 tbsp mascarpone cheese
- 1 tbsp finely chopped toasted hazelnuts
- For the Gold Mirror Glaze:
- 1 cup white chocolate, finely chopped
- 1/2 cup sweetened condensed milk
- 2 tsp unflavored gelatin
- 2 tbsp cold water
- 1/4 cup warm water
- 1 tsp edible gold luster dust
- For Garnish (optional):
- Chopped pistachios
- Edible gold flakes
Instructions
- 1. Mix gelatin and cold water in a small bowl and let bloom for 5 minutes.
- 2. Beat cream cheese, powdered sugar, matcha powder, vanilla extract, and pistachio paste until smooth.
- 3. Melt the bloomed gelatin and stir into the matcha mixture.
- 4. Whip heavy cream to soft peaks and gently fold into the mixture.
- 5. Combine praline spread, mascarpone cheese, and toasted hazelnuts until smooth.
- 6. Fill sphere molds halfway with the matcha mixture.
- 7. Add a spoonful of praline center into each mold.
- 8. Cover with the remaining matcha mixture and smooth the tops.
- 9. Freeze for at least 5 hours or until completely firm.
- 10. Bloom gelatin for the glaze.
- 11. Heat condensed milk and warm water, then stir in gelatin until dissolved.
- 12. Pour over white chocolate and mix until smooth and glossy.
- 13. Stir in edible gold luster dust until evenly incorporated.
- 14. Allow glaze to cool to a pourable consistency.
- 15. Unmold frozen spheres and place on a wire rack.
- 16. Pour the gold mirror glaze evenly over each sphere.
- 17. Garnish with chopped pistachios and edible gold flakes.
- 18. Serve chilled.
Nutrition
- Calories: 380
- Sugar: 24 g
- Fat: 28 g
- Carbohydrates: 29 g
- Protein: 6 g
Tried This Recipe? Leave a Comment!
Did you make this recipe? I’d love to hear how it turned out! Please leave a comment and a rating below. Your feedback helps other home cooks and supports cheerychop.com!
For more delicious inspiration, follow me on Pinterest!