Show-Stopping Golden Apricot Mascarpone Dream Bombs
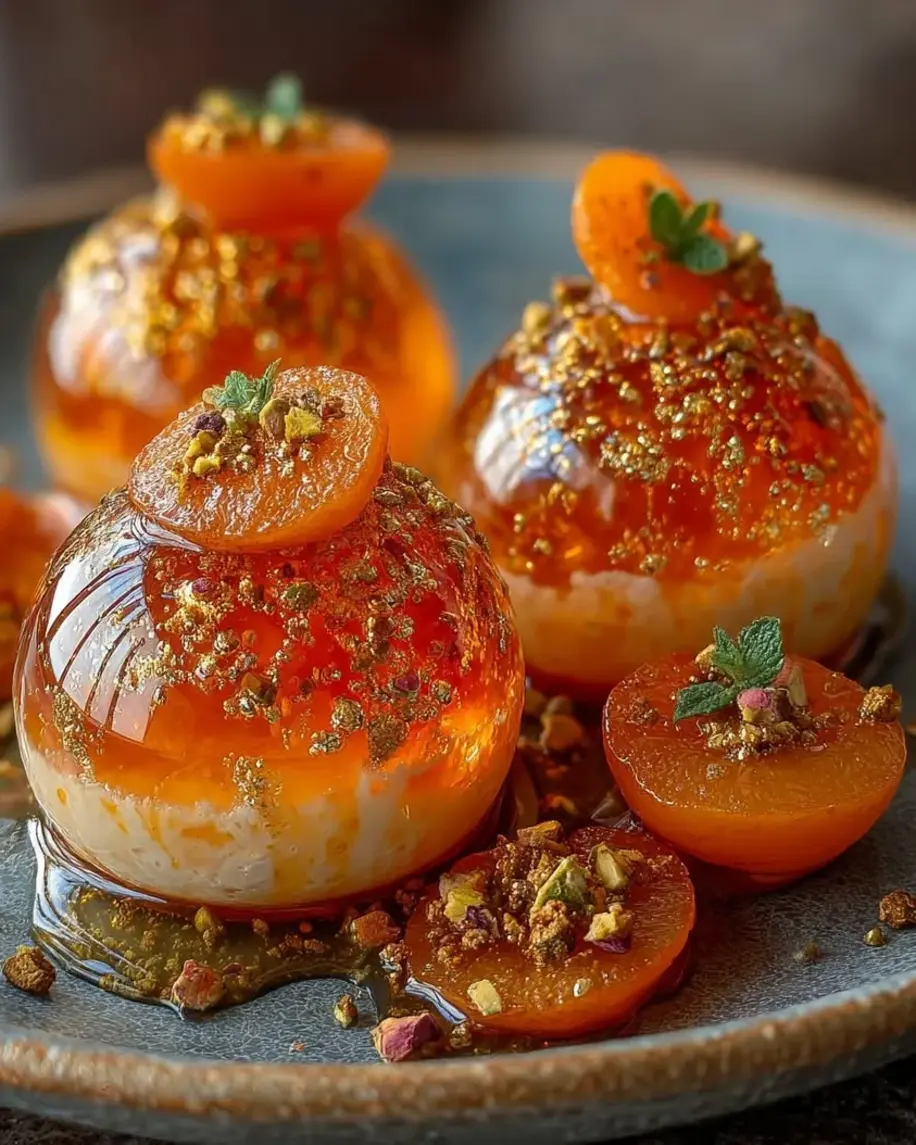
Table of Contents
Golden Apricot Mascarpone Dream Bombs with Honey Glass Glaze — A Show-Stopping Dessert That Shines
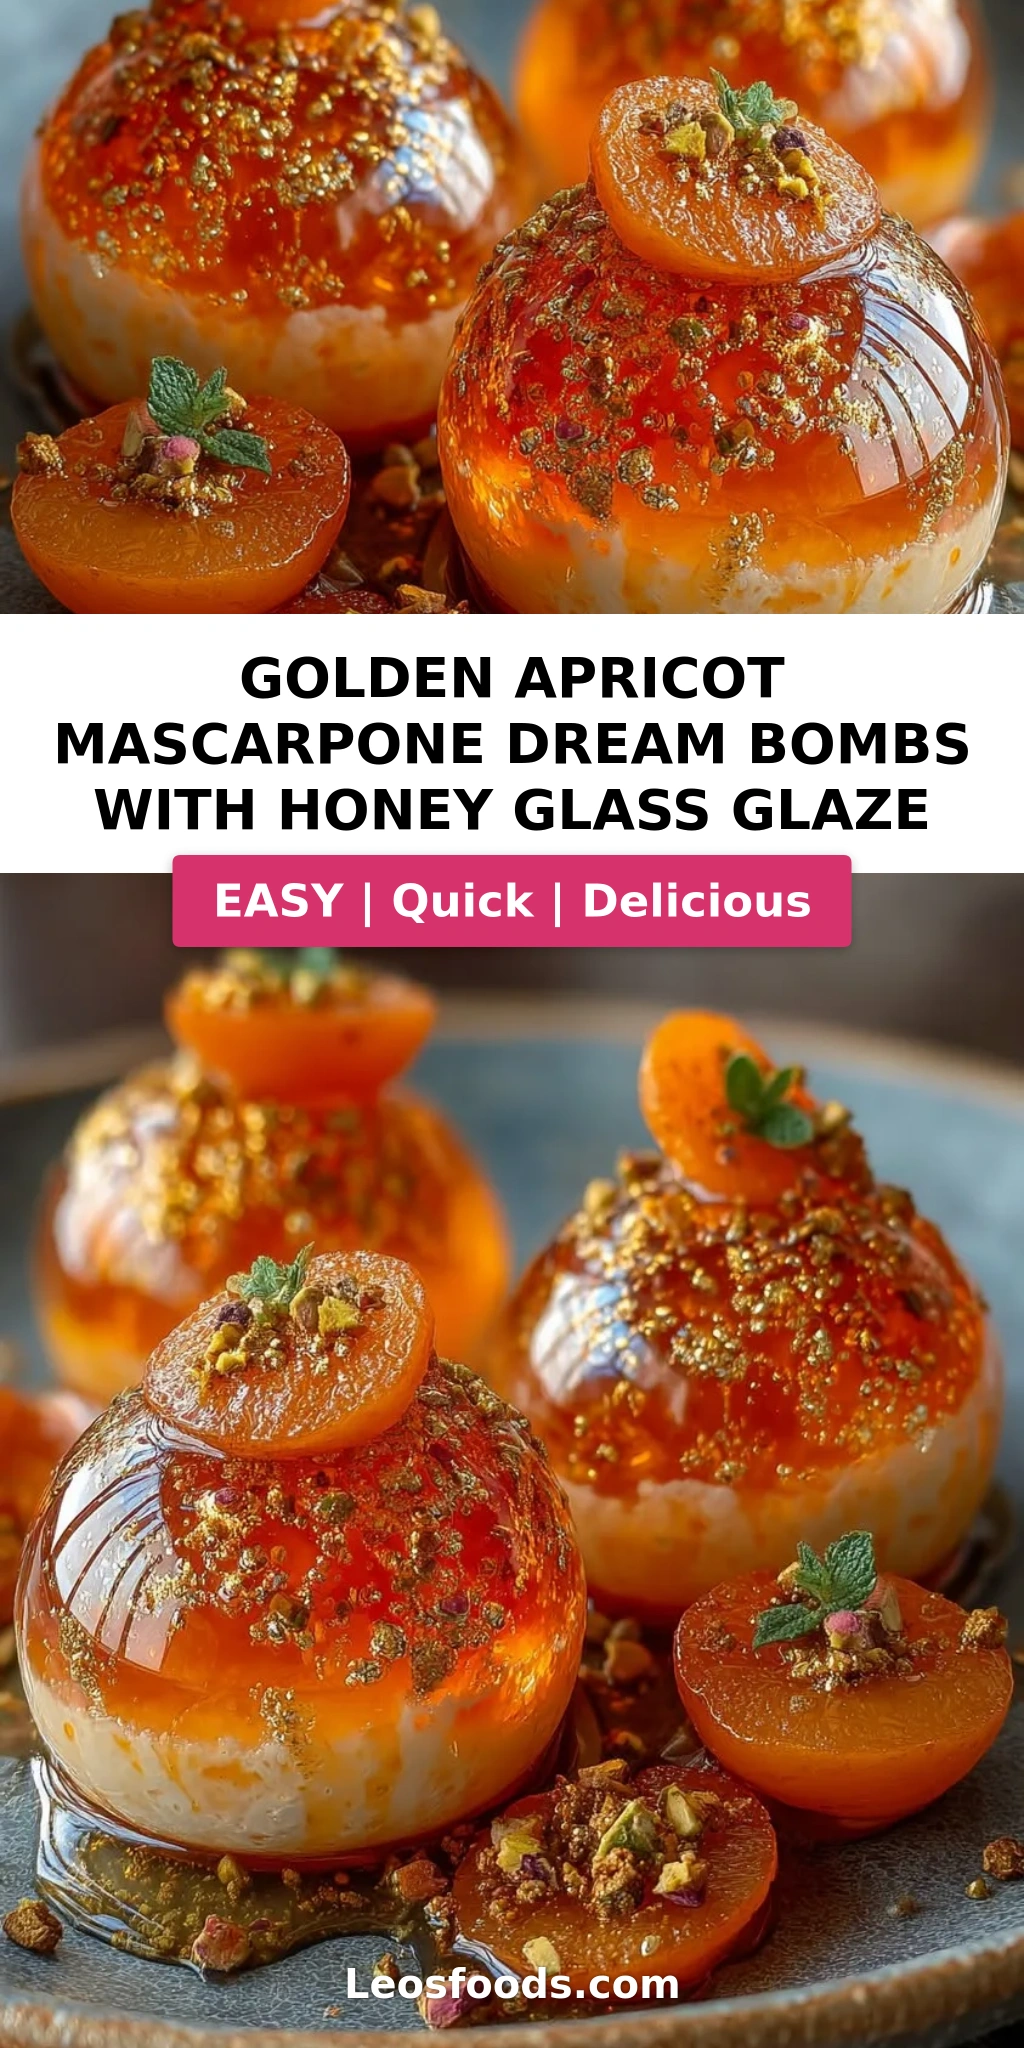
I still remember the first time I bit into a golden apricot mascarpone dream bomb at a tiny patisserie in the 9th arrondissement of Paris. The translucent shell shattered ever so slightly, releasing a cloud of silky mascarpone cream infused with honey and vanilla. It was one of those moments that stops time — a perfect collision of texture, flavor, and artistry. I knew right then I had to bring this dream back to my NYC kitchen and make it my own. Growing up in Morocco, my mother would slow-cook apricots with orange blossom water and cinnamon until they turned into liquid gold. That memory became the soul of this recipe. These golden apricot mascarpone dream bombs are my love letter to both worlds — the French precision of a perfect gel sphere and the warm, sun-drenched sweetness of North African apricots. The unique angle here is the honey glass glaze: a luminous, brittle-sweet finish that turns each bomb into a jewel. Every bite is a journey from the glossy, fruit-forward shell to the cloud-like mascarpone heart, kissed with honey and finished with a whisper of gold dust.
Let me paint you a picture: imagine holding a perfect, golden-orange sphere in the palm of your hand. The surface catches the light like stained glass, revealing a creamy white center suspended within. As you bring it closer, you catch the fragrance of ripe apricots — floral, honeyed, with a hint of vanilla. The first crack of the glass-like shell gives way to a velvety mascarpone filling that melts on your tongue, while the honey glaze leaves a lingering sweetness that dances with the bright acidity of apricot. The crushed pistachios add a tiny crunch, and the edible gold dust makes each bomb feel like a treasure. It’s a dessert that engages every sense — sight, smell, touch, taste, and even sound, with that delicate shatter of the glaze. I’ve perfected this technique over many test batches in my small NYC apartment, adjusting the agar-agar ratio and the chilling time to achieve that ideal translucent sphere that holds its shape but yields to the gentlest pressure. This isn’t just a dessert; it’s an experience, and I’m so excited to walk you through every step.
What sets my version apart is the depth of flavor in the shell. Most recipes rely on plain fruit juice, but I use a combination of strained apricot puree and apricot nectar, which gives the spheres a more intense, authentic apricot taste — the way my mother would have made it. I also add a touch of vanilla bean paste to the mascarpone filling, a trick I learned at culinary school in Paris, where Chef Antoine insisted that vanilla should never be an afterthought. One common mistake I see home cooks make is rushing the agar-agar setting process. Agar needs a full set at the right temperature, or the spheres turn cloudy instead of crystal clear. In this post, I’ll share my 💡 Stella’s Pro Tip for achieving that glass-like transparency every time, plus the exact timing for each step so you feel confident from start to finish. Whether you’re a seasoned baker or a curious beginner, these golden apricot mascarpone dream bombs are within your reach. Let’s dive in and create something truly magical together.
Why This Golden Apricot Mascarpone Dream Bombs Recipe Is the Best
The flavor secret starts with the apricots. I use a double layer of apricot — puree and nectar — to build a concentrated fruit flavor that shines through the creamy mascarpone filling. Growing up in Morocco, I learned that the best apricot desserts start with fruit that tastes like sunshine. Here in NYC, I source my apricots from the Union Square Greenmarket in peak season, but high-quality canned apricot puree works beautifully year-round. The honey glass glaze adds a sophisticated finish that balances the tangy fruit with floral sweetness. This is a dessert that tastes as extraordinary as it looks, with every component playing a harmonious role.
Perfected texture is what truly elevates these bombs. The agar-agar shell sets into a delicate, jelly-like sphere that holds its shape but breaks with a gentle spoon. Getting the agar ratio right is critical — too much and the shell becomes rubbery, too little and it won’t set. I’ve tested this recipe a dozen times to find the sweet spot. The mascarpone filling is whipped to soft peaks, creating an airy, mousse-like center that contrasts beautifully with the firm shell. 💡 Stella’s Pro Tip: Whip the mascarpone filling just until it holds its shape — over-whipping can cause it to separate, and nobody wants a grainy dream bomb.
Foolproof and fast might sound contradictory for a recipe that looks this elegant, but I’ve designed the steps to be approachable for home cooks. The agar-agar mixture comes together in under 10 minutes, and the filling takes just 5 minutes of whipping. The real work is patience — letting the spheres set fully in the fridge. But the active time is minimal, making this an impressive yet manageable dessert for dinner parties, holidays, or any occasion where you want to wow your guests. Plus, you can make the components ahead and assemble just before serving, which is my go-to strategy for stress-free entertaining in my busy NYC life.
Golden Apricot Mascarpone Dream Bombs Ingredients
I love shopping for these ingredients at Eataly in the Flatiron district — their imported Italian mascarpone is phenomenally creamy, and they carry beautiful apricot nectar. But everything on this list is easy to find at any well-stocked US grocery store. Let me walk you through each component so you know exactly what to look for and why it matters.
Ingredients List
- For the Apricot Glass Bomb Shells:
- 2 cups apricot puree, strained
- 1 cup apricot nectar
- 2 cups water
- 3/4 cup sugar
- 2 1/2 tsp agar-agar powder
- 1 tbsp lemon juice
- 1/4 tsp salt
- For the Mascarpone Dream Filling:
- 8 oz mascarpone cheese
- 1/2 cup heavy whipping cream
- 1/4 cup powdered sugar
- 1 tsp vanilla bean paste
- 1 tbsp honey
- For the Honey Glass Glaze:
- 1/4 cup apricot preserves
- 2 tbsp honey
- 1 tbsp water
- 1 tsp lemon juice
- For Garnish (optional):
- Thin apricot slices
- Edible gold dust
- Crushed pistachios
Ingredient Spotlight
Agar-Agar Powder: This plant-based gelling agent, derived from seaweed, is what gives the apricot spheres their signature glass-like texture. Unlike gelatin, agar sets at room temperature and remains stable even in warm environments, making it ideal for these dream bombs. Look for it in the baking aisle or Asian grocery section. I prefer the powder form because it dissolves more evenly than flakes. 💡 Stella’s Pro Tip: Whisk the agar into the cold liquid before heating to prevent clumps.
Mascarpone Cheese: This Italian cream cheese is the heart of the filling. Its high butterfat content (around 44%) creates a luscious, velvety texture that’s impossible to replicate with regular cream cheese. I buy mine fresh from Murray’s Cheese in Greenwich Village — the quality makes a noticeable difference. If you can’t find mascarpone, you can make a quick substitute by blending 8 oz of cream cheese with 2 tablespoons of heavy cream and 1 tablespoon of sour cream, but the texture will be slightly tangier and less rich.
Apricot Puree and Nectar: Using both puree and nectar creates a layered apricot flavor that’s both intense and smooth. The puree provides body and fiber, while the nectar adds sweetness and a clean fruit taste. If you can’t find apricot nectar in stores, you can substitute with apricot juice or even a high-quality apricot-mango blend. For the puree, I often make my own by blending fresh or frozen apricots and straining them, but store-bought works great too.
Vanilla Bean Paste: This is my secret weapon for the filling. The paste includes real vanilla bean seeds, giving the mascarpone cream those beautiful little specks and a deeper, more complex vanilla flavor than extract. I order mine online from Nielsen-Massey, but you can substitute with the seeds scraped from one vanilla bean or 2 teaspoons of pure vanilla extract. 💡 Stella’s Pro Tip: Store your vanilla bean paste in the pantry away from light to preserve its potency.
| Original Ingredient | Best Substitution | Flavor / Texture Impact |
|---|---|---|
| Agar-Agar Powder | Gelatin (3 tbsp, bloomed) | Softer, less stable at room temp; not vegan |
| Mascarpone Cheese | Cream cheese + 2 tbsp heavy cream | Tangier, slightly less creamy |
| Apricot Nectar | Apricot juice or mango nectar | Slightly different fruit profile |
| Vanilla Bean Paste | 1 vanilla bean, scraped | Identical flavor; slightly more work |
How to Make Golden Apricot Mascarpone Dream Bombs — Step-by-Step
Trust me when I say this recipe is easier than it looks. The key is reading through all the steps once before you start, so you know exactly what to expect. I’ve broken everything down into clear, manageable actions with visual cues to guide you. Let’s make some magic.
Step 1: Prepare the Apricot Bomb Shell Mixture
In a medium saucepan, combine 2 cups strained apricot puree, 1 cup apricot nectar, 2 cups water, 3/4 cup sugar, 2 1/2 tsp agar-agar powder, 1 tbsp lemon juice, and 1/4 tsp salt. Whisk everything together until the agar is fully dissolved — this is crucial for a smooth set. Place the saucepan over medium heat and bring the mixture to a gentle simmer, stirring frequently. Let it simmer for about 2 minutes to activate the agar, then remove from heat.
⚠️ Common Mistake to Avoid: Boiling the mixture too vigorously can create bubbles that get trapped in the set spheres, making them cloudy instead of clear. Use a gentle simmer only, and if you see bubbles forming, skim them off with a spoon.
Step 2: Fill and Partially Set the Spheres
Carefully pour the warm apricot mixture into sphere-shaped silicone molds, filling each cavity about halfway. You want enough room to add the mascarpone filling later. Place the mold in the refrigerator for about 20-25 minutes, until the mixture is partially set — it should be firm enough to hold a filling but still slightly tacky on the surface. This partial set is what allows the filling to stay suspended in the center of the sphere.
💡 Stella’s Pro Tip: Use a small offset spatula or the back of a spoon to spread the mixture evenly inside each mold cavity before chilling. This ensures the shell thickness is uniform, which gives you a more polished final look.
Step 3: Make the Mascarpone Dream Filling
While the shells are chilling, prepare the filling. In a large mixing bowl, combine 8 oz mascarpone cheese, 1/2 cup heavy whipping cream, 1/4 cup powdered sugar, 1 tsp vanilla bean paste, and 1 tbsp honey. Using a hand mixer or stand mixer with the whisk attachment, whip the mixture on medium speed until smooth, light, and fluffy — about 2-3 minutes. You’re looking for soft peaks that hold their shape but are still creamy. Transfer the filling to a piping bag fitted with a round tip.
⚠️ Common Mistake to Avoid: Over-whipping the mascarpone mixture can cause it to curdle or separate. Mascarpone is delicate, so stop as soon as the mixture is smooth and holds a soft peak. If you see it turning grainy, you’ve gone too far.
Step 4: Fill and Seal the Spheres
Remove the partially set shells from the fridge. Pipe a small amount of mascarpone filling into the center of each cavity — about 1 to 2 teaspoons, depending on the size of your mold. You want to leave enough space around the filling to cover it with the remaining apricot mixture. Gently pour or spoon the remaining warm apricot mixture over the filling, filling each cavity to the top. Smooth the surface with a spatula if needed. Return the mold to the refrigerator and chill for at least 2-3 hours, or until the spheres are fully set and crystal clear.
💡 Stella’s Pro Tip: To avoid disturbing the filling, pour the remaining apricot mixture over the back of a spoon held just above the mold. This gentle technique prevents the filling from shifting or mixing with the shell liquid.
Step 5: Unmold the Dream Bombs
Once the spheres are fully set, carefully unmold them onto a serving platter. The best way to do this is to gently flex the silicone mold from the bottom, pushing each sphere out. If they resist, let them sit at room temperature for 1-2 minutes — the slight warmth helps release them. Handle them gently, as the shells are delicate.
⚠️ Common Mistake to Avoid: Pulling the spheres out by the edges can tear the shell. Always push from the bottom of the mold for a clean release. If you’re nervous, lightly spray the mold with non-stick cooking spray before filling.
Step 6: Make the Honey Glass Glaze
In a small saucepan, combine 1/4 cup apricot preserves, 2 tbsp honey, 1 tbsp water, and 1 tsp lemon juice. Warm over low heat, stirring constantly, until the preserves melt and the mixture becomes smooth and glossy — about 2-3 minutes. Do not let it boil. Remove from heat and allow it to cool slightly for 2-3 minutes, but keep it warm enough to be pourable. If it thickens too much, add a few drops of warm water and stir.
💡 Stella’s Pro Tip: For an extra-clear glaze, strain the warm mixture through a fine-mesh sieve before glazing. This removes any bits of fruit pulp and gives you a mirror-like finish that really makes the gold dust pop.
Step 7: Glaze and Garnish
Using a small pastry brush, gently brush the honey glass glaze over each sphere, or drizzle it sparingly for a more dramatic effect. The glaze should coat the surface in a thin, luminous layer. Immediately garnish with thin apricot slices, a pinch of edible gold dust, and a sprinkle of crushed pistachios. Serve thoroughly chilled — the cold temperature keeps the shells firm and the filling creamy.
⚠️ Common Mistake to Avoid: Applying the glaze while the spheres are too cold can cause it to seize and become streaky. Let the spheres sit at room temperature for 2-3 minutes before glazing, and make sure the glaze is warm but not hot.
| Step | Action | Duration | Key Visual Cue |
|---|---|---|---|
| 1 | Simmer shell mixture | 5 minutes | Gentle bubbles, mixture slightly thickens |
| 2 | Partial set in fridge | 20-25 minutes | Firm but tacky surface |
| 3 | Whip mascarpone filling | 2-3 minutes | Soft peaks, smooth and fluffy |
| 4 | Fill and seal spheres | 5 minutes | Filling centered, top surface smooth |
| 5 | Full set in fridge | 2-3 hours | Crystal clear, firm to touch |
| 6 | Prepare glaze | 3 minutes | Smooth, glossy, pourable |
| 7 | Glaze and garnish | 5 minutes | Luminous finish, garnishes adhered |
Serving & Presentation
These golden apricot mascarpone dream bombs are made for celebration. I love serving them on a simple white platter — the contrast makes the apricot-golden color pop like jewels. Arrange them in a single layer, spaced slightly apart so each sphere gets its moment in the spotlight. For an extra touch of elegance, place a thin slice of fresh apricot beneath each bomb and a tiny sprinkle of crushed pistachios on top. The edible gold dust is optional but absolutely worth it for special occasions — just a small pinch on each one catches the light and makes the whole dish feel magical.
When it comes to pairings, I think of my favorite NYC dessert experiences. These bombs are stunning on their own, but they also play beautifully with a side of lightly whipped cream flavored with orange blossom water — a nod to my Moroccan roots. For a French touch, serve them with a small glass of late-harvest Riesling or a chilled Moscato d’Asti. The honeyed sweetness of the wine echoes the honey glass glaze, while the bubbles provide a playful contrast to the silky texture. If you’re serving these at a brunch or afternoon tea, pair them with mint tea with fresh mint leaves — the herbal notes cut through the richness and refresh the palate between bites.
💡 Stella’s Pro Tip: For the most dramatic presentation, serve the bombs on a mirror or glass plate with a few drops of leftover honey glass glaze drizzled artfully around them. The reflection doubles the visual impact and makes each bomb look like a floating golden orb. I learned this plating trick from a pastry chef at a three-Michelin-star restaurant in Paris, and it never fails to elicit gasps from guests.
| Pairing Type | Suggestions | Why It Works |
|---|---|---|
| Side Dish | Lightly whipped cream, fresh berries, honey-drizzled shortbread | Adds texture and complementary sweetness |
| Sauce / Dip | Orange blossom cream, warm caramel sauce, raspberry coulis | Enhances the floral and fruit notes |
| Beverage | Late-harvest Riesling, Moscato d’Asti, mint tea, espresso | Acidity and bubbles balance the richness |
| Garnish | Edible flowers, thin apricot fans, candied lemon zest | Adds color, texture, and visual height |
Make-Ahead, Storage & Reheating
As a busy NYC food blogger and mom, I’m all about recipes that let me get ahead. These apricot dessert bombs are ideal for make-ahead entertaining because the components can be prepared separately and assembled just before serving. Here’s how I plan my timeline: I make the apricot shell mixture and the mascarpone filling the day before, then chill the shells overnight and assemble the next morning. The glaze is best made fresh, but it only takes 3 minutes, so that’s a non-issue. For storage, keep the unglazed spheres in an airtight container in the refrigerator for up to 3 days. Add the glaze and garnishes just before serving for the most stunning presentation.
| Method | Container | Duration | Reheating Tip |
|---|---|---|---|
| Refrigerator | Airtight container, single layer | Up to 3 days | Serve cold — no reheating needed |
| Freezer | Freezer-safe container, parchment between layers | Up to 1 month | Thaw in fridge 4 hours; glaze after thawing |
| Make-Ahead | Shells in mold, filling in piping bag | 2 days in advance | Assemble day of serving for best texture |
If you’re freezing these mascarpone filled apricot spheres, I recommend freezing them without the glaze or garnishes. The glaze can become sticky and lose its glass-like shine after thawing. Simply freeze the fully set, unglazed spheres, then thaw them in the refrigerator for about 4 hours. Warm the glaze fresh and apply it just before serving. The pistachios should also be added fresh to maintain their crunch. 💡 Stella’s Pro Tip: If you’re pressed for time on the day of serving, you can glaze the spheres up to 2 hours ahead and keep them chilled. The glaze will stay glossy and beautiful for several hours.
Variations & Easy Swaps
One of the things I love most about this recipe is how versatile it is. Once you master the basic technique of the agar sphere, you can adapt it with different fruits, fillings, and flavors. Here are three of my favorite variations to keep things exciting, whether you’re cooking for a crowd or just craving something different.
| Variation | Key Change | Best For | Difficulty Impact |
|---|---|---|---|
| Berry Bliss Bombs | Replace apricot with mixed berry puree | Summer parties, berry lovers | Same technique, easy swap |
| Dairy-Free Dream Bombs | Use coconut cream + dairy-free cream cheese | Vegan guests, lactose intolerance | Slightly more delicate texture |
| Spiced Mango Dream Bombs | Mango puree + pinch of cardamom + cayenne | Fall gatherings, adventurous palates | Same technique, bold flavor twist |
Berry Bliss Bombs
For a vibrant twist that’s perfect for summer, swap the apricot puree and nectar with an equal amount of mixed berry puree — I love using half raspberries and half strawberries. The natural acidity of berries pairs beautifully with the creamy mascarpone filling. I add a tablespoon of balsamic vinegar to the shell mixture for an extra layer of complexity, a trick I picked up from a pastry chef in Paris who used it in her fruit gelées. The result is a stunning ruby-red sphere with a sweet-tart pop that brightens any dessert table. The honey glass glaze can remain unchanged, or you can swap the apricot preserves for seedless raspberry jam for a monochromatic look.
Dairy-Free Dream Bombs
This variation is a lifesaver when I’m cooking for friends with dairy sensitivities. Substitute the mascarpone with an equal amount of full-fat coconut cream that’s been chilled and whipped, and use a high-quality dairy-free cream cheese alternative. The coconut cream adds a subtle tropical note that actually complements the apricot beautifully. I’ve tested this version multiple times in my NYC kitchen, and the key is to whip the coconut cream until it’s very stiff — it’s a bit more delicate than mascarpone, so pipe the filling gently. The shells remain the same since they’re naturally dairy-free. This version is also naturally gluten-free, making it a fantastic option for guests with multiple dietary restrictions.
Spiced Mango Dream Bombs
This variation is inspired by the chaat masala-spiced fruit stalls I visited during a trip to Mumbai, and it’s become a fall favorite in my NYC home. Replace the apricot puree and nectar with mango puree and add a pinch of cardamom and a tiny pinch of cayenne to the shell mixture. The mascarpone filling gets a teaspoon of orange blossom water instead of vanilla, and the glaze uses mango preserves instead of apricot. The heat from the cayenne is subtle — just enough to make you take notice — while the cardamom adds an aromatic warmth that feels perfect for cooler months. Garnish with toasted coconut flakes instead of pistachios for a tropical finish. This variation always surprises people in the best way possible.
What is the best way to soften dried apricots for the filling in these mascarpone bombs?
For the filling in these golden apricot mascarpone dream bombs, I actually use fresh or frozen apricot puree rather than dried apricots, because the fresh fruit gives a brighter, more vibrant flavor and a smoother texture that’s essential for the glass-like shell. However, if you want to incorporate dried apricots for a more concentrated sweetness, here’s my tested method: place 1 cup of dried apricots in a small bowl, cover them with boiling water, and let them soak for 20-30 minutes until they’re plump and soft. Drain them well, then puree in a blender with 2-3 tablespoons of the soaking liquid until completely smooth. Strain the puree through a fine-mesh sieve to remove any fibrous bits. This softened apricot puree can replace up to half of the fresh apricot puree in the shell mixture. Keep in mind that dried apricots are much sweeter, so you may want to reduce the sugar by 1-2 tablespoons to balance the flavor. I tested this method during a snowy NYC weekend when fresh apricots were out of season, and it worked beautifully — the final spheres had a deeper, almost honeyed apricot taste that my family loved.
Can I substitute the mascarpone with cream cheese for the Golden Apricot Dream Bombs?
Yes, you can substitute mascarpone with cream cheese, but there are a few important adjustments to make. Mascarpone has a higher butterfat content (around 44%) and a neutral, slightly sweet flavor, while cream cheese is tangier and lower in fat (about 33%). To mimic the texture of mascarpone, I recommend using full-fat block cream cheese (not the spreadable kind) and blending it with 2 tablespoons of heavy cream and 1 tablespoon of sour cream per 8 oz of cream cheese. This mixture will be smoother and less tangy than plain cream cheese, though it won’t be quite as luxuriously creamy as the real mascarpone. Whip it gently — cream cheese can become grainy if over-beaten. The flavor will be slightly tangier, which actually pairs nicely with the sweet apricot shell, but if you want a more neutral taste, add an extra tablespoon of powdered sugar. I’ve used this substitution when I couldn’t find mascarpone at my local NYC grocery store, and while the texture was slightly firmer, the dream bombs were still absolutely delicious and received rave reviews from my dinner guests.
How do I achieve a smooth honey glass glaze without it crystallizing?
Crystallization happens when sugar molecules recrystallize into solid form, and it’s a common issue with honey-based glazes. The key to a smooth, glossy honey glass glaze is controlling the temperature and acid balance. First, always use a combination of honey and another liquid — in this recipe, the apricot preserves, water, and lemon juice provide extra moisture and acidity that inhibit crystallization. Warm the glaze over low heat, stirring constantly, and never let it boil. Boiling can cause the sugars to concentrate and eventually crystallize as the glaze cools. If you see any sugar crystals forming on the sides of the pan, brush them down with a wet pastry brush — this is a classic French pastry technique I learned in Paris. The lemon juice is crucial because the acid inverts some of the sugar, which helps prevent crystallization. If your glaze does start to crystallize, simply add a teaspoon of warm water and stir gently over low heat until it smooths out again. 💡 Stella’s Pro Tip: For the most stable glaze, use a honey that’s naturally high in glucose, like clover or orange blossom honey — these are less prone to crystallizing than varietals like Manuka or buckwheat honey.
How far in advance can I make these mascarpone dream bombs before serving?
You can absolutely make these golden apricot mascarpone dream bombs ahead of time, which is one of the reasons I love this recipe for entertaining. The fully set, unglazed spheres can be stored in an airtight container in the refrigerator for up to 3 days. I recommend making the shell mixture and the mascarpone filling up to 2 days in advance — keep the shells in the silicone mold (covered with plastic wrap) and the filling in a piping bag in the fridge. Assemble the spheres on the day you plan to serve them, then add the glaze and garnishes just before serving for the most stunning presentation. The glaze is best applied within 2 hours of serving because it can become slightly tacky over time. If you need to freeze the spheres, freeze them unglazed for up to 1 month, then thaw in the refrigerator for 4 hours before glazing. I often make a double batch and keep some in the freezer for spontaneous dinner parties — just add the glaze and garnishes, and you have a show-stopping dessert in minutes.
Can I use gelatin instead of agar-agar for the apricot spheres?
Yes, you can substitute gelatin for agar-agar, but there are several important differences to keep in mind. Agar-agar is plant-based and sets at room temperature, creating a firmer, more stable gel that’s ideal for these spheres. Gelatin, which is animal-based, sets only when chilled and produces a softer, more delicate gel that melts at warmer temperatures. If you use gelatin, use 3 tablespoons of powdered gelatin (about 4 standard packets) bloomed in 1/2 cup of cold water for 5 minutes, then dissolved into the warm apricot mixture. The spheres will be less firm and more prone to losing their shape at room temperature, so they must be kept thoroughly chilled until serving. The texture will be more like a traditional jelly rather than the glass-like firmness of agar. I tested this version for a friend who doesn’t eat seaweed-based products, and while the spheres were delicious, they were noticeably softer and less dramatic when unmolded. For the most impressive visual effect, I highly recommend sticking with agar-agar. 💡 Stella’s Pro Tip: If you do use gelatin, reduce the water in the shell mixture by 1/2 cup to compensate for the blooming liquid.
Why did my apricot spheres turn cloudy instead of clear?
Cloudy spheres are usually caused by one of three things: air bubbles trapped in the mixture, insufficient straining, or the agar not being fully dissolved. First, when you simmer the apricot mixture, stir gently and avoid vigorous boiling, which introduces air bubbles. If you see bubbles forming on the surface, skim them off with a spoon before pouring the mixture into the molds. Second, always strain your apricot puree through a fine-mesh sieve before using it — this removes any fibrous bits that can create cloudiness. I use a chinois or a fine-mesh strainer lined with cheesecloth for the clearest results. Third, agar-agar must be fully dissolved in the cold liquid before heating. Whisk it thoroughly and let it sit for 2 minutes before turning on the heat, then whisk again as it warms up. If you see any undissolved agar granules, continue stirring until the mixture is completely smooth. Finally, make sure the spheres are fully set before unmolding — rushing the chilling process can result in a hazy appearance. 💡 Stella’s Pro Tip: For the clearest spheres, use filtered water and the highest quality apricot nectar you can find. I’ve noticed that cheaper nectars sometimes contain additives that affect clarity.
What type of silicone mold should I use for the dream bombs?
I recommend using a half-sphere silicone mold with cavities that are about 2 to 2.5 inches in diameter. These are widely available online and at baking supply stores — look for molds with smooth, seamless cavities that will give your spheres a perfect glass-like finish. The silicone should be food-grade and flexible enough to allow for easy unmolding. I personally use a set of half-sphere molds from a French brand called Silikomart that I brought back from Paris, but any high-quality silicone mold will work. Avoid molds with intricate designs or textures, as these can make the spheres look cloudy and are harder to unmold. If you can’t find half-sphere molds, you can use small round silicone cake molds or even silicone ice cube trays with round cavities. The key is to have two matching half-spheres that you can glue together with a bit of warm apricot mixture — though this requires a bit more finesse. 💡 Stella’s Pro Tip: Lightly spray your silicone molds with a neutral cooking spray before filling them. This ensures the most effortless release and protects the delicate surface of the spheres.
Can I make these apricot dessert bombs without a piping bag?
Absolutely! While a piping bag makes it easier to place the mascarpone filling precisely in the center of each sphere, you can definitely work without one. The easiest alternative is to use a small zip-top plastic bag: spoon the mascarpone filling into the bag, seal it, and snip off a tiny corner to create a makeshift piping bag. You can also use a small spoon or a melon baller to carefully place a dollop of filling into each partially set shell. The key is to be gentle and precise so the filling stays centered and doesn’t touch the sides of the mold. I’ve made these dream bombs many times when traveling and didn’t have my piping bags handy — the plastic bag method works like a charm. Just be sure to snip a very small opening so you can control the flow. 💡 Stella’s Pro Tip: If you’re using a spoon, chill the spoon in the freezer for 30 seconds first — the cold metal helps the mascarpone slide off more cleanly and keeps the filling from sticking.
How do I store leftover honey glass glaze?
The honey glass glaze can be stored in an airtight container in the refrigerator for up to 2 weeks. When you’re ready to use it again, warm it gently in a small saucepan over low heat or in the microwave in 10-second intervals, stirring between each, until it becomes smooth and pourable again. If the glaze has thickened too much during storage, add a teaspoon of warm water and stir until it reaches the right consistency. I often make a double batch of the glaze and keep it in the fridge for drizzling over pancakes, ice cream, or even roasted fruit. The lemon juice in the recipe helps preserve the glaze and maintain its glossy finish. One thing to note: the glaze may separate slightly upon standing — just give it a good stir after warming and it will come back together beautifully. 💡 Stella’s Pro Tip: Store the glaze in a small squeeze bottle for easy drizzling. It’s my go-to method for precise application, whether I’m glazing dream bombs or adding a finishing touch to a simple bowl of yogurt and fruit.
What can I use instead of edible gold dust for garnish?
If you don’t have edible gold dust or prefer to skip it, there are several beautiful alternatives that will still give your golden apricot mascarpone dream bombs a stunning finish. My favorite substitute is a light dusting of ground freeze-dried apricot — simply grind freeze-dried apricot slices in a spice grinder until you have a fine powder. This adds a concentrated apricot flavor and a beautiful golden color. You can also use a pinch of ground pistachio dust, which adds a lovely green contrast against the golden spheres. For a shimmer effect without gold, try using a tiny pinch of edible pearlescent dust, which is widely available at baking supply stores and gives a subtle iridescent sheen. A light sprinkle of flaky sea salt is another wonderful option — the salt crystals catch the light and provide a savory counterpoint to the sweet honey glaze. I’ve used all of these garnishes depending on the occasion, and each one brings its own unique charm. 💡 Stella’s Pro Tip: Whatever garnish you choose, apply it immediately after glazing while the surface is still slightly tacky, so it adheres beautifully and stays in place.
Share Your Version!
I absolutely love seeing how these golden apricot mascarpone dream bombs turn out in your kitchen. Every time someone tags me in their creation, it makes my day — whether it’s your first time making a gel sphere or you’re a seasoned pro adding your own twist. If you tried this recipe, I’d be so grateful if you left a star rating and a comment below telling me how it went. What garnish did you choose? Did you try one of the variations? Did your family or guests gasp when they saw these golden beauties on the table? Share your stories and questions — I read every single one and I’m always here to help troubleshoot if something didn’t go as planned.
And if you’re active on Instagram or Pinterest, snap a photo of your dream bombs and tag me @leosfoods — I’ll feature my favorites in my stories! Don’t forget to pin this recipe to your dessert boards so you can find it again anytime. One question I’d love to hear from you: what flavor combination would you try for your own version of these bombs? I’m always experimenting in my NYC kitchen, and your ideas might just inspire my next recipe. From my NYC kitchen to yours — I hope this recipe brings as much warmth to your table as it does to mine. — Stella 🧡
Love This Recipe? Save It to Pinterest!
If you enjoyed this Golden Apricot Mascarpone Dream Bombs with Honey Glass Glaze recipe, don’t let it get lost in your browser tabs! 😄 Pin it now so you can find it again anytime — and explore hundreds more tried-and-tested recipes waiting for you on my Pinterest boards.
👉 Follow Stella on Pinterest @stellarecipeblog
📌 Pin this recipe · 🔁 Re-pin your favorites · 💬 Tag me when you make it — I love seeing your creations!
💬 Did you make these Golden Apricot Mascarpone Dream Bombs?
Tag @leosfoods on Instagram or Pinterest and leave a ⭐⭐⭐⭐⭐ rating below! I’d love to hear which variation you tried and how it turned out. 🧡
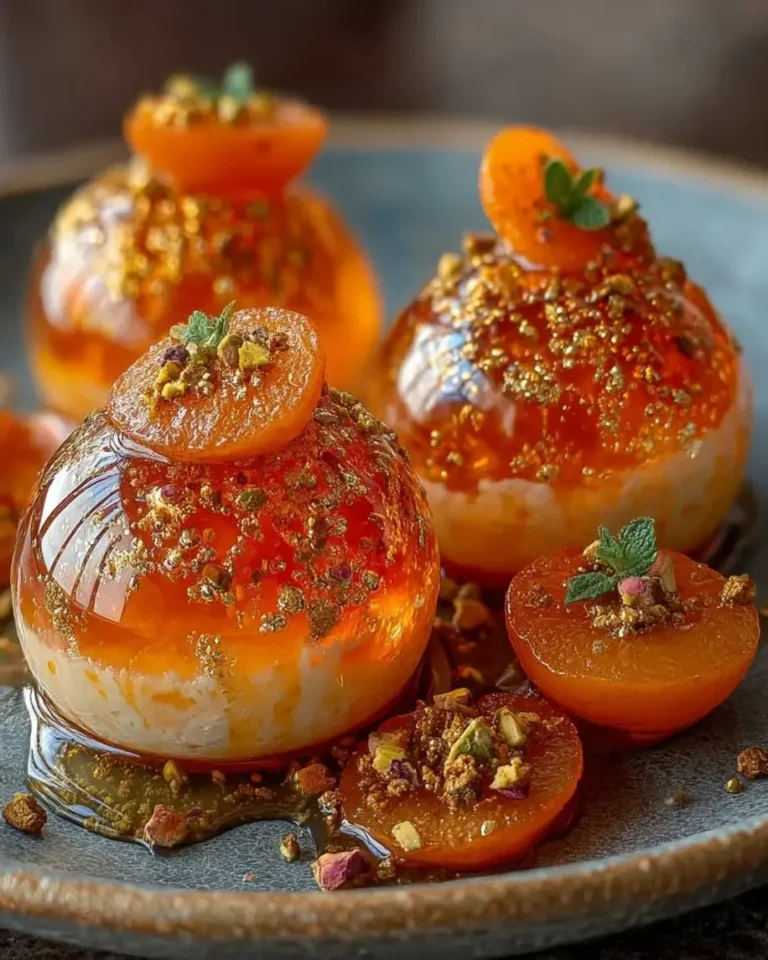
Golden Apricot Mascarpone Dream Bombs with Honey Glass Glaze
A stunning dessert featuring translucent apricot gel spheres filled with a creamy mascarpone center, glazed with honey and apricot preserves, and garnished with gold dust.
- Yield: 6 1x
Ingredients
- For the Apricot Glass Bomb Shells:
- 2 cups apricot puree, strained
- 1 cup apricot nectar
- 2 cups water
- 3/4 cup sugar
- 2 1/2 tsp agar-agar powder
- 1 tbsp lemon juice
- 1/4 tsp salt
- For the Mascarpone Dream Filling:
- 8 oz mascarpone cheese
- 1/2 cup heavy whipping cream
- 1/4 cup powdered sugar
- 1 tsp vanilla bean paste
- 1 tbsp honey
- For the Honey Glass Glaze:
- 1/4 cup apricot preserves
- 2 tbsp honey
- 1 tbsp water
- 1 tsp lemon juice
- For Garnish (optional):
- Thin apricot slices
- Edible gold dust
- Crushed pistachios
Instructions
- Combine apricot puree, apricot nectar, water, sugar, agar-agar powder, lemon juice, and salt in a saucepan. Heat while stirring until fully dissolved and bring to a gentle simmer.
- Pour the mixture into sphere-shaped silicone molds, filling each cavity halfway. Refrigerate until slightly set.
- Whip mascarpone cheese, heavy whipping cream, powdered sugar, vanilla bean paste, and honey until smooth, light, and fluffy. Transfer to a piping bag.
- Pipe a small amount of mascarpone filling into the center of each partially set sphere. Cover with the remaining apricot mixture and refrigerate until fully set and crystal clear.
- Carefully unmold the dream bombs onto a serving platter.
- Warm apricot preserves, honey, water, and lemon juice until smooth and glossy. Allow to cool slightly while remaining pourable.
- Brush or drizzle the honey glass glaze over each sphere for a luminous golden finish.
- Garnish with thin apricot slices, edible gold dust, and crushed pistachios. Serve thoroughly chilled.
Nutrition
- Calories: 275
- Sugar: 29g
- Fat: 14g
- Carbohydrates: 34g
- Protein: 3g
Tried This Recipe? Leave a Comment!
Did you make this recipe? I’d love to hear how it turned out! Please leave a comment and a rating below. Your feedback helps other home cooks and supports cheerychop.com!
For more delicious inspiration, follow me on Pinterest!