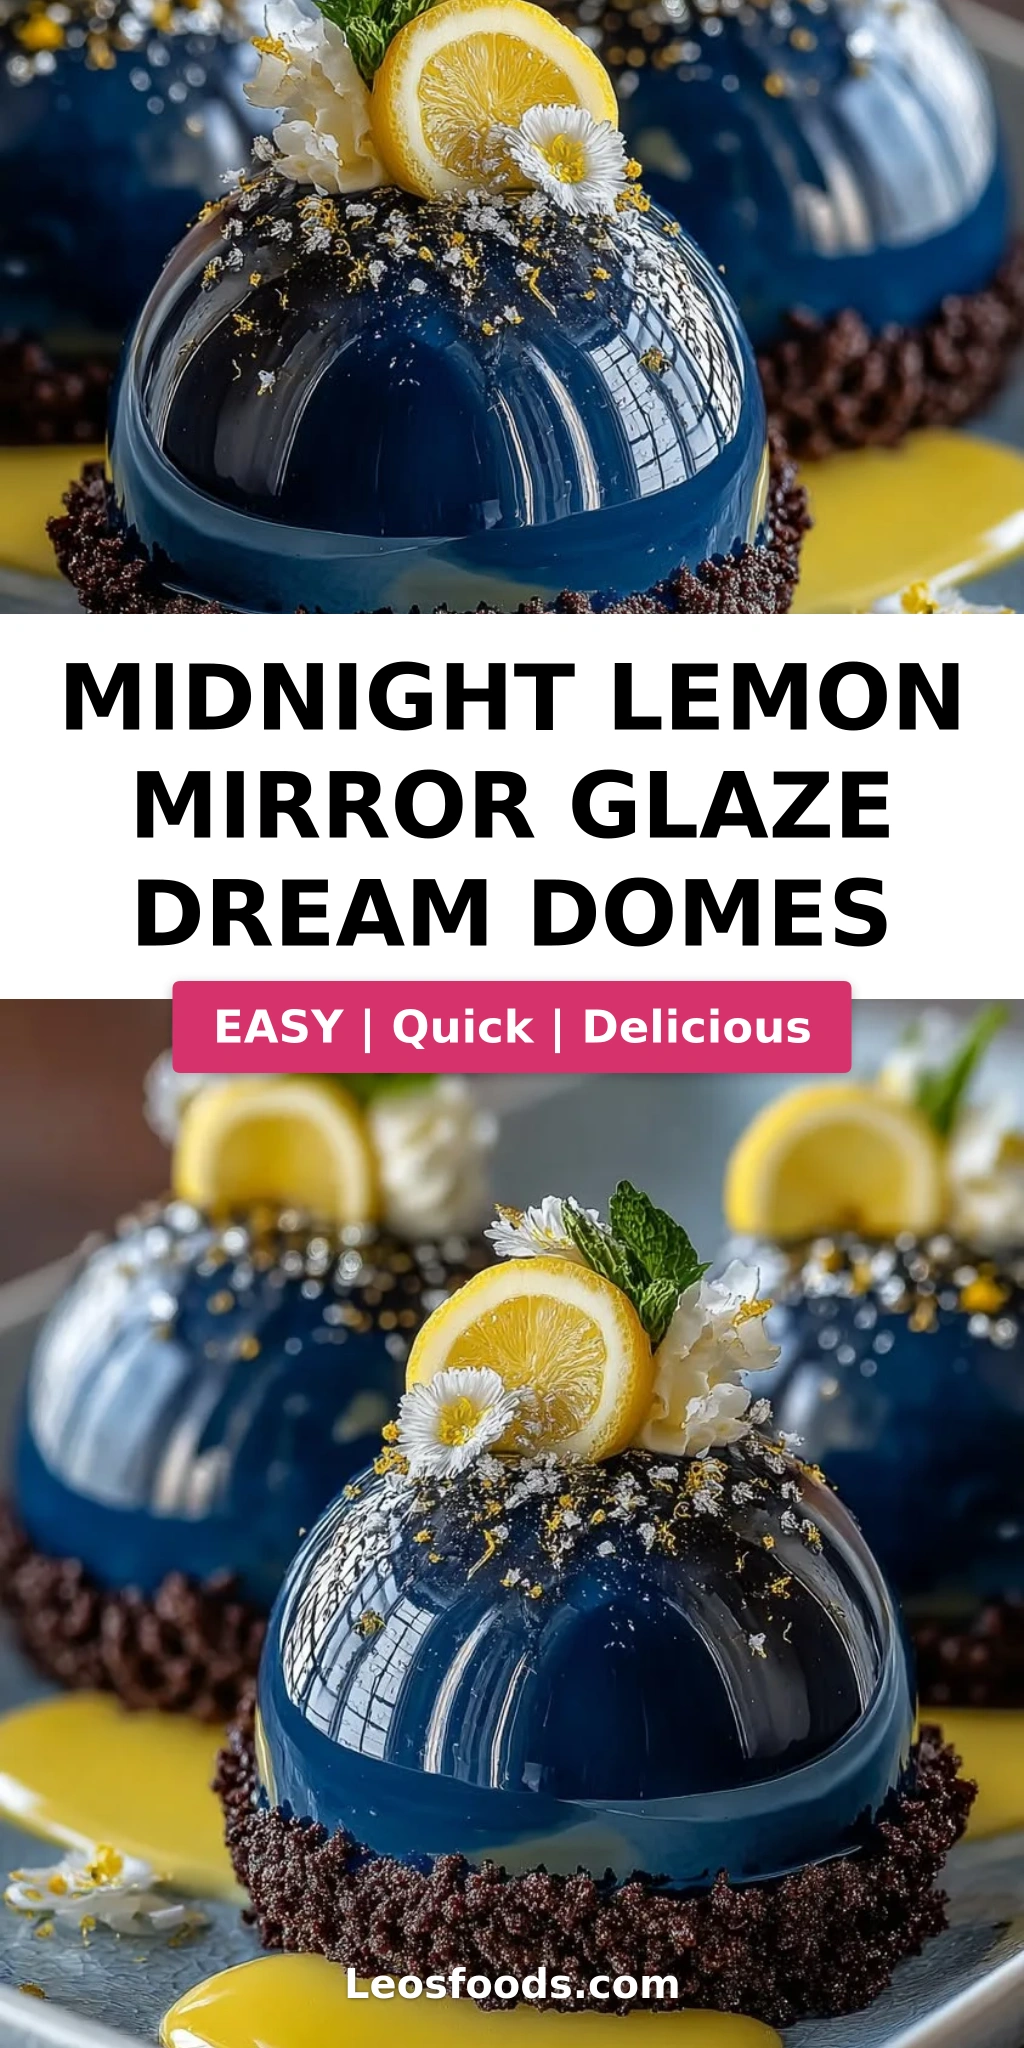
Midnight Lemon Mirror Glaze Dream Domes

Table of Contents
Midnight Lemon Mirror Glaze Dream Domes – A Celestial Citrus Dessert
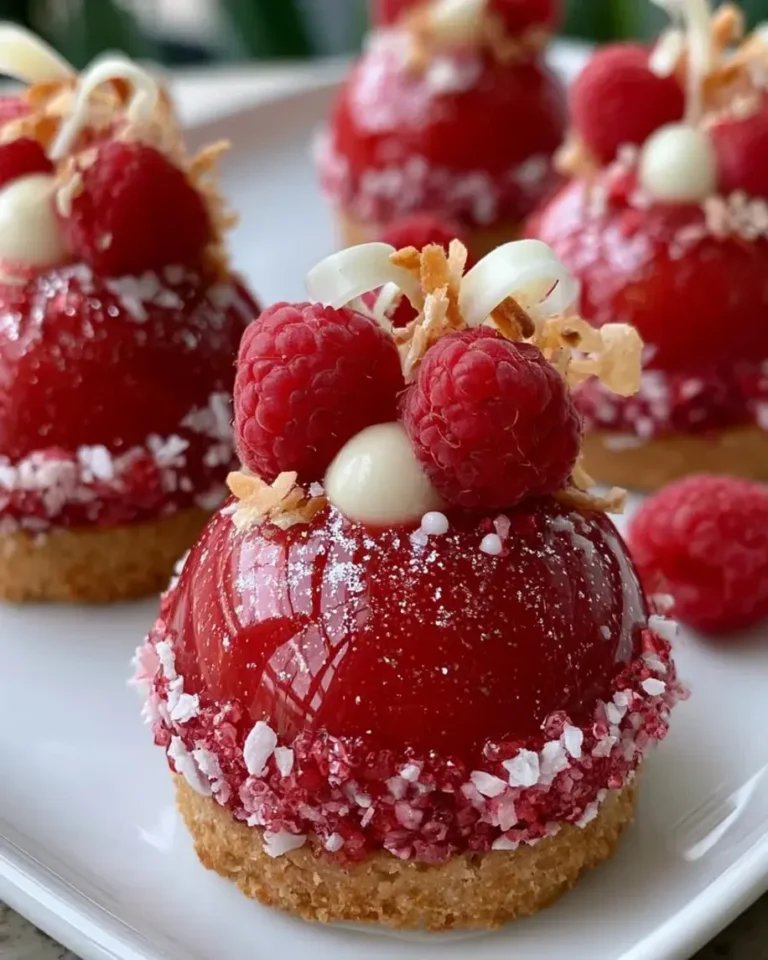
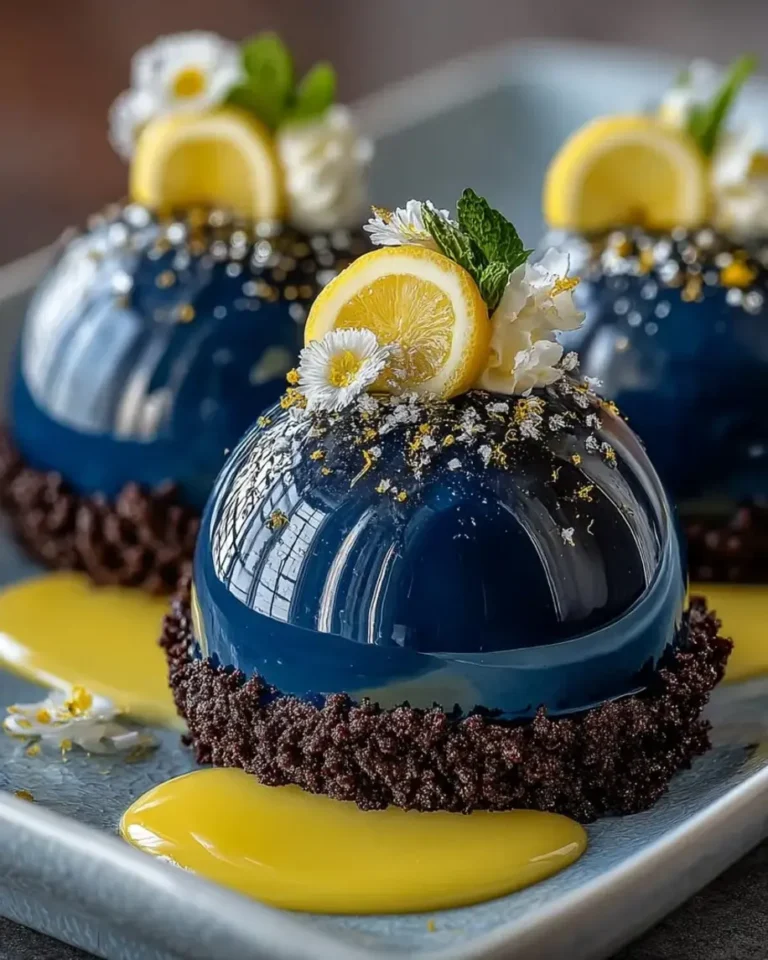
I still remember the first time I saw a mirror glaze dome in a Parisian pâtisserie window — it was midnight blue, gleaming like a polished gem, and I pressed my nose to the glass like a child. That moment stayed with me through years of training at Le Cordon Bleu and eventually into my own NYC kitchen, where I set out to create a version that felt both celestial and deeply personal. These Midnight Lemon Mirror Glaze Dream Domes are exactly that: a bright lemon cream filling wrapped in a dramatic dark mirror glaze, perched on a cocoa biscuit base and finished with edible silver dust and white chocolate shards. The main keyword here is midnight lemon mirror glaze dream domes because that’s exactly what you’re getting — a dreamy, glossy, show-stopping individual dessert that tastes as incredible as it looks.
The flavor is a bright, sunny lemon curd–style cream — rich from mascarpone and heavy cream, lifted by fresh lemon juice and zest. The cocoa biscuit base adds a deep chocolate note that grounds the citrus, while the mirror glaze is subtly sweet with a hint of lemon extract and a color that shifts from black to deep blue depending on the light. When you cut into one, the spoon glides through the glaze, meets the creamy filling, and crunches ever so slightly through the biscuit. It’s a dessert that feels like an occasion, whether you’re serving it for a birthday, a dinner party, or just because you want to feel like a pastry chef in your own home.
I’ve tested this midnight lemon mirror glaze dream domes recipe at least a dozen times to make sure it’s approachable for home cooks while still delivering that wow factor. The mirror glaze technique can feel intimidating, but I’ll walk you through every temperature cue and swirling trick I learned in Paris. My biggest tip? Don’t rush the freeze — the domes need to be solidly frozen to get that perfectly smooth, drip-free glaze. I’m also sharing one common mistake that can ruin your mirror glaze (it’s all about the temperature window), so stick with me. From my NYC kitchen to yours, let’s make some magic.
Why This Midnight Lemon Mirror Glaze Dream Domes Recipe Is the Best
The Flavor Secret — I trained in Paris under pastry chefs who taught me that balance is everything. The lemon cream filling here uses both juice and zest for a bright, natural citrus flavor without being acidic. Mascarpone adds a subtle tang and velvety texture that you don’t get from cream cheese, and the cocoa biscuit base is sweet enough to complement the lemon without overpowering it. This is the kind of dessert that tastes as thoughtful as it looks — every component has a reason for being there.
Perfected Texture — The magic of a mirror glaze dome is in the contrast: the glossy, almost liquid-looking shell gives way to a creamy, airy mousse-like filling, and then a firm but tender biscuit base. I’ve calibrated the gelatin amounts so the filling is stable enough to unmold cleanly but still soft and luscious on the palate. The glaze itself is thin enough to drape like silk but sets just enough to hold its shape. This isn’t a dessert that sacrifices texture for show — it delivers on every level.
Foolproof & Fast for a Show-Stopping Dessert — Yes, there are several steps, but I’ve broken them down so you can work at your own pace. The domes freeze overnight, which means you can do all the active work the day before and simply glaze and garnish before serving. I’ve also included tested substitutions and make-ahead tips so you can adapt this recipe to your schedule. Whether you’re a confident home baker or trying a mirror glaze for the first time, this recipe is designed to make you look like a pro.
Midnight Lemon Mirror Glaze Dream Domes Ingredients
I source my lemons from the Union Square Greenmarket when they’re in season — the fragrance alone is worth the trip. For the chocolate cookie crumbs, I reach for a good-quality chocolate wafer or use crushed chocolate graham crackers in a pinch. The white chocolate for the glaze should be a brand you enjoy eating, since its flavor comes through in the final finish. Here’s everything you’ll need:
Ingredients List
- For the Lemon Dome Filling:
- 1 1/2 cups heavy cream
- 1 cup mascarpone cheese
- 1/3 cup granulated sugar
- 3 tbsp fresh lemon juice (from about 1 large lemon)
- 1 tbsp lemon zest (from about 1 lemon)
- 1 tsp vanilla extract
- 2 tsp gelatin powder
- 2 tbsp cold water (for blooming gelatin)
- For the Cocoa Biscuit Base:
- 1 1/2 cups chocolate cookie crumbs (about 150g)
- 3 tbsp melted butter (unsalted)
- 1 tbsp cocoa powder (unsweetened)
- 1 tbsp granulated sugar
- For the Midnight Mirror Glaze:
- 1 cup granulated sugar
- 1/2 cup water
- 1/2 cup sweetened condensed milk
- 1 cup white chocolate, finely chopped
- 1 tbsp gelatin powder
- 3 tbsp cold water (for blooming gelatin)
- 1 tsp lemon extract
- Black food coloring, as needed (gel preferred)
- Deep blue food coloring, as needed (gel preferred)
- For Garnish (optional but recommended):
- 1 tbsp edible silver dust
- 1 tsp lemon zest (for garnish)
- White chocolate shards (for garnish)
Ingredient Spotlight
Mascarpone Cheese: This Italian cream cheese is the backbone of the lemon filling. Unlike American cream cheese, mascarpone is richer, softer, and has a delicate tang that doesn’t compete with the lemon. Look for it in the specialty cheese section of your grocery store. If you can’t find it, you can substitute an equal amount of full-fat cream cheese blended with 2 tablespoons of heavy cream to soften the texture — the flavor will be slightly tangier but still delicious.
White Chocolate (for the glaze): The quality of your white chocolate directly affects the gloss and flavor of your mirror glaze. Use a couverture or a high-quality baking bar (I like Valrhona or Ghirardelli) — avoid white chocolate chips, which often contain stabilizers that can cause the glaze to seize or turn grainy. The white chocolate provides the sweetness and the silky mouthfeel that makes the glaze so luxurious.
Gelatin Powder: This is the setting agent for both the filling and the glaze. I use standard powdered gelatin (Knox is my go-to). It must be bloomed in cold water before being dissolved into a warm liquid — this ensures it activates evenly without clumps. For a vegetarian alternative, you can use agar-agar, but the texture will be firmer and less creamy; I don’t recommend it for this particular recipe because the mirror glaze needs a specific flexibility to dome properly.
Lemon Juice and Zest: Fresh is absolutely non-negotiable here. Bottled lemon juice lacks the bright essential oils and can leave a flat, metallic taste. Zest the lemon before juicing — you want the fragrant outer yellow layer, not the bitter white pith. One large lemon typically yields about 3 tablespoons of juice and 1 tablespoon of zest. If your lemons are small, you may need two.
| Original Ingredient | Best Substitution | Flavor / Texture Impact |
|---|---|---|
| Mascarpone | Full-fat cream cheese + 2 tbsp heavy cream (blended) | Slightly tangier, still creamy; less delicate on the palate |
| White chocolate (glaze) | High-quality white couverture (Valrhona, Cacao Barry) | Glossier finish, smoother melt, cleaner sweetness |
| Gelatin powder | Agar-agar (1:1 by weight, but different setting method) | Firmer, less creamy texture; not ideal for mirror glaze |
| Chocolate cookie crumbs | Chocolate graham crackers (crushed) or Oreo crumbs (20 cookies, cream removed) | Slightly sweeter, still cocoa-forward; Oreos add a bit more sweetness |
How to Make Midnight Lemon Mirror Glaze Dream Domes — Step-by-Step
This recipe has several components, but I’ve organized the steps so you can move through them without feeling overwhelmed. The key is to work ahead — the domes need at least 4 hours to freeze solid before glazing. I usually make the filling and biscuit base the night before, then glaze and garnish the next day. Let’s get started.
Step 1: Bloom the Gelatin
In a small bowl, sprinkle 2 teaspoons of gelatin powder over 2 tablespoons of cold water. Do not stir — just let it sit for 5 to 10 minutes until the gelatin absorbs the water and becomes a firm, jiggly mass. This is called blooming, and it ensures the gelatin dissolves evenly when added to a warm liquid. While it blooms, you can prepare the cream mixture.
💡 Stella’s Pro Tip: Always use cold water for blooming — warm water will create lumps that never fully dissolve. If your kitchen is warm, set the bowl in the fridge while the gelatin blooms.
Step 2: Whip the Lemon Cream Filling
In a large mixing bowl, combine 1 1/2 cups heavy cream, 1 cup mascarpone, 1/3 cup granulated sugar, 3 tablespoons fresh lemon juice, 1 tablespoon lemon zest, and 1 teaspoon vanilla extract. Using a hand mixer or stand mixer with the whisk attachment, beat on medium speed until the mixture is smooth, airy, and holds soft peaks — about 3 to 4 minutes. It should be thick enough to mound on a spoon but still soft and spreadable. Be careful not to over-whip, or the mixture can become grainy.
⚠️ Common Mistake to Avoid: Over-whipping the cream mixture can cause it to separate into butter and liquid. Stop as soon as the mixture holds soft peaks — the folding step will firm it up further.
Step 3: Make the Cocoa Biscuit Base
In a medium bowl, mix 1 1/2 cups chocolate cookie crumbs, 3 tablespoons melted butter, 1 tablespoon cocoa powder, and 1 tablespoon granulated sugar. Stir with a fork until the crumbs are evenly moistened and the mixture holds together when pressed between your fingers. Divide the mixture evenly among your 6 dome molds (about 2 tablespoons per mold) and press firmly into an even layer on the bottom using the back of a small spoon or your fingertips. The base should be compact and level.
💡 Stella’s Pro Tip: For perfectly even bases, use a small flat-bottomed glass or a measuring cup to press the crumbs. The firmer you press, the less likely the base will crumble when you unmold the domes.
Step 4: Assemble and Freeze
Warm a small portion (about 1/4 cup) of the whipped cream mixture in the microwave for 10 to 15 seconds until just warm to the touch. Add the bloomed gelatin to the warm cream and stir until completely dissolved. Fold this gelatin mixture gently back into the remaining cream mixture until fully incorporated. Spoon or pipe the filling into the dome molds over the biscuit base, filling to the top. Smooth the tops with a small offset spatula. Freeze for at least 4 hours, preferably overnight, until the domes are solidly frozen.
⚠️ Common Mistake to Avoid: If the domes are not frozen solid, the glaze will warm the surface and create a messy, uneven coating. Press the top of a dome — it should feel rock-hard before you glaze. An extra hour in the freezer is always better than rushing.
Step 5: Make the Midnight Mirror Glaze
Bloom 1 tablespoon gelatin powder in 3 tablespoons cold water for 5 minutes. In a small saucepan, combine 1 cup granulated sugar, 1/2 cup water, and 1/2 cup sweetened condensed milk. Heat over medium heat, stirring constantly, until the sugar dissolves and the mixture begins to steam — do not let it boil. Remove from heat and add the bloomed gelatin and 1 cup chopped white chocolate. Stir until completely smooth. Stir in 1 teaspoon lemon extract. Divide the glaze into two bowls: tint one with black food coloring and the other with deep blue food coloring. Let the glaze cool to 90–95°F (32–35°C) — it should be glossy and pourable but not hot.
💡 Stella’s Pro Tip: The ideal pouring temperature for mirror glaze is 90–95°F. If it’s too warm, it will run off the dome and leave a thin, patchy coating. If it’s too cool, it will set too thick and lose that mirror-like smoothness. Use an instant-read thermometer for accuracy.
Step 6: Glaze the Domes
Unmold the frozen domes by gently warming the outside of each mold with your hands or running it briefly under warm water. Place each dome on a wire rack set over a baking sheet. Pour the black and blue glazes simultaneously over each dome, letting the colors swirl together naturally as the glaze coats the surface. Allow the excess glaze to drip off for about 30 seconds. Transfer the glazed domes to a serving plate or tray. Chill in the refrigerator for 10 to 15 minutes to set the glaze. Just before serving, finish with a dusting of edible silver dust, a sprinkle of lemon zest, and a few white chocolate shards.
⚠️ Common Mistake to Avoid: Pour the glaze quickly and confidently — hesitating can cause uneven coverage. The glaze should completely cover the dome in one smooth motion. If you see bare spots, don’t try to patch them; instead, let the first layer set and pour a second thin layer over the top.
| Step | Action | Duration | Key Visual Cue |
|---|---|---|---|
| 1 | Bloom gelatin for filling | 5 minutes | Gelatin becomes firm, jiggly mass |
| 2 | Whip lemon cream filling | 3–4 minutes | Soft peaks form, mixture is airy |
| 3 | Make cocoa biscuit base | 5 minutes | Crumbs hold together when pressed |
| 4 | Assemble and freeze domes | 4+ hours | Domes are rock-solid to the touch |
| 5 | Make midnight mirror glaze | 15 minutes | Glaze is glossy, smooth, 90–95°F |
| 6 | Glaze and garnish domes | 10 minutes | Glaze coats evenly, sets to a mirror finish |
Serving & Presentation
These Midnight Lemon Mirror Glaze Dream Domes are designed to be the centerpiece of any dessert table. I like to serve them on a dark slate board or a white ceramic plate — the contrast makes the midnight glaze and silver dust really pop. Place each dome gently on the plate using a small offset spatula, and add a few white chocolate shards alongside for height and drama. A light dusting of edible silver dust just before serving catches the light beautifully — it’s like serving tiny moons.
For a Moroccan-inspired touch (a little nod to my roots), I sometimes add a pinch of saffron threads to the white chocolate shards or serve the domes with a small dish of orange blossom honey on the side for drizzling. In my NYC dinner parties, I pair these with a crisp sparkling wine or a mint tea — the brightness of the lemon works beautifully with both. If you’re serving them after a heavy meal, the lightness of the citrus cream is a perfect palate cleanser.
| Pairing Type | Suggestions | Why It Works |
|---|---|---|
| Side Dish | Fresh berries (raspberries, blueberries), a light fruit salad | Berries add tartness and color contrast to the rich dome |
| Sauce / Dip | Orange blossom honey, warm berry coulis, salted caramel | Adds a floral or sweet-savory layer that complements the lemon |
| Beverage | Sparkling wine, mint tea, espresso, limoncello | Acidity and bubbles cut through the richness; mint echoes the Moroccan theme |
| Garnish | Edible silver dust, lemon zest curls, white chocolate shards, fresh mint leaves | Adds visual drama, texture, and a hint of elegance |
Make-Ahead, Storage & Reheating
As a busy NYC cook, I rely on make-ahead strategies every week. These domes are perfect for prepping in stages: make the filling and biscuit base, assemble the domes, and freeze them up to a week ahead. The glaze can also be made in advance and stored in the fridge — just rewarm it gently to the correct temperature before pouring. Here’s my full storage guide so you can plan with confidence.
| Method | Container | Duration | Reheating Tip |
|---|---|---|---|
| Refrigerator (glazed domes) | Covered container, single layer | Up to 2 days | Serve chilled directly from fridge; no reheating needed |
| Freezer (unglazed domes) | Airtight container, layered with parchment | Up to 1 month | Glaze directly from frozen — do not thaw first |
| Make-Ahead (glaze only) | Glass jar or airtight container in fridge | Up to 5 days | Rewarm in a double boiler or microwave in 10-second bursts, stirring gently, until fluid and 90–95°F |
If you’re storing glazed domes in the fridge, place them on a tray and cover loosely with plastic wrap so the glaze doesn’t get smudged. The mirror finish will stay glossy for up to 2 days, though it may soften slightly over time. For the most dramatic presentation, glaze the domes within a few hours of serving and keep them chilled until the moment you plate them. The silver dust should be added just before serving, as it can absorb moisture from the fridge and lose its sparkle.
💡 Stella’s Pro Tip: If you’re making these for a party, I recommend freezing the unglazed domes up to a week ahead, then glazing them the morning of your event. The glaze sets in about 15 minutes in the fridge, and the domes can sit chilled for several hours before serving. This takes all the pressure off the day-of!
Variations & Easy Swaps
One of the things I love about this recipe is how adaptable it is. I’ve tested several variations in my NYC kitchen, and they all bring something special to the table. Whether you want a fruity swirl, a dairy-free option, or a floral twist, here are three of my favorite ways to change it up.
| Variation | Key Change | Best For | Difficulty Impact |
|---|---|---|---|
| Raspberry Swirl Dream Domes | Swirl raspberry coulis into the cream filling before freezing | Adding a fruity, tangy layer and a pink surprise inside | Same — just one extra step |
| Gluten-Free & Dairy-Free Version | Use gluten-free chocolate wafers + dairy-free cream cheese and coconut cream | Serving guests with dietary restrictions | Medium — substitutions change texture slightly |
| Orange Blossom & Honey Twist | Replace lemon with orange juice/zest + add orange blossom water and honey | A floral, North African–inspired flavor profile | Same — simple flavor swap |
Variation 1: Raspberry Swirl Dream Domes
For a pop of color and a tart-sweet surprise, make a quick raspberry coulis by simmering 1 cup of raspberries with 2 tablespoons of sugar and a squeeze of lemon until thickened, then strain to remove seeds. After spooning the lemon cream filling into the molds, drop small spoonfuls of coulis on top and swirl gently with a toothpick before freezing. The result is a beautiful pink ribbon running through the creamy lemon — and the raspberry brightens up the citrus even more. This is a nod to the French raspberry-lemon tartlets I learned to make in Paris.
Variation 2: Gluten-Free & Dairy-Free Version
I’ve tested this for friends with dietary restrictions and it works beautifully. Use gluten-free chocolate wafer cookies (like Goodie Girl or Kinnikinnick) for the biscuit base. For the filling, substitute the mascarpone with a dairy-free cream cheese (like Kite Hill or Miyoko’s) and replace the heavy cream with full-fat coconut cream (the solid part from a can of coconut milk). The coconut flavor is subtle and pairs surprisingly well with lemon. The mirror glaze itself contains sweetened condensed milk and white chocolate — use dairy-free white chocolate (like Enjoy Life) and sweetened condensed coconut milk (like Nature’s Charm). The texture will be slightly less firm, so freeze for at least 5 hours before glazing.
Variation 3: Orange Blossom & Honey Twist
This variation is a love letter to my Moroccan roots. Replace the lemon juice and zest with freshly squeezed orange juice and orange zest (from 2 medium oranges). Add 1 tablespoon of orange blossom water and replace the granulated sugar in the filling with 1/3 cup of honey (use a mild honey like orange blossom or acacia). The result is a floral, honeyed cream that pairs beautifully with the midnight glaze. For the garnish, skip the silver dust and use a sprinkle of toasted sesame seeds and a drizzle of honey — it’s an incredible flavor combination that tastes like a garden in bloom.
Share Your Version!
I absolutely love hearing how these Midnight Lemon Mirror Glaze Dream Domes turn out in your kitchen. Did you try the raspberry swirl? Did your glaze come out perfectly glossy? Are you thinking of serving these at a special occasion? Drop a comment below and let me know — I read every single one and I’m always here to help if something didn’t go quite as planned. Your feedback helps me refine the recipe for everyone, and your photos make my day.
If you share your creation on Instagram or Pinterest, be sure to tag me @leosfoods so I can see your beautiful domes and maybe even feature them in my stories. And if you’re feeling adventurous, tell me: what’s one flavor combination you’d love to see inside a mirror glaze dome? I’m always experimenting at my NYC kitchen and your ideas might just inspire my next recipe. From my NYC kitchen to yours — I hope this recipe brings as much warmth to your table as it does to mine. — Stella 🧡
Love This Recipe? Save It to Pinterest!
If you enjoyed this Midnight Lemon Mirror Glaze Dream Domes recipe, don’t let it get lost in your browser tabs! 😄 Pin it now so you can find it again anytime — and explore hundreds more tried-and-tested recipes waiting for you on my Pinterest boards.
👉 Follow Stella on Pinterest @stellarecipeblog
📌 Pin this recipe · 🔁 Re-pin your favorites · 💬 Tag me when you make it — I love seeing your creations!
Can I make the lemon mirror glaze ahead of time and store it?
Absolutely. You can make the midnight mirror glaze up to 5 days in advance and store it in an airtight container in the refrigerator. When you’re ready to use it, gently rewarm the glaze in a double boiler or in the microwave in 10-second bursts, stirring after each, until it becomes fluid again. The key is to bring it back to the ideal pouring temperature of 90–95°F (32–35°C). If the glaze seems too thick after reheating, you can stir in a teaspoon of warm water at a time until it reaches the right consistency. Avoid overheating, as this can cause the white chocolate to seize and ruin the glossy finish.
What can I use as a substitute for gelatin in a mirror glaze?
The most common substitute for gelatin in a mirror glaze is agar-agar, a plant-based setting agent derived from seaweed. However, I want to be honest with you: agar-agar behaves very differently from gelatin. It sets at a higher temperature and creates a firmer, less flexible gel, which can make it more difficult to achieve that smooth, drip-free dome effect. If you need a vegetarian version, use the same amount of agar-agar by weight, but dissolve it in the liquid while boiling (agar must be boiled to activate) and let the glaze cool to about 105–110°F before pouring. The texture will be slightly less silky, and the finish may be a touch less glossy, but it can work in a pinch.
How do I get the mirror glaze to dome perfectly without running off the cake?
The secret to a perfectly domed mirror glaze that stays on the cake rather than running off is all about temperature and timing. First, your domes must be fully frozen — rock-solid — before you pour the glaze. If they’re even slightly thawed, the glaze will warm the surface and slide right off. Second, the glaze itself needs to be at the correct temperature: 90–95°F (32–35°C). If it’s too warm, it will be too thin and run off; if it’s too cool, it will set too thick and not form a smooth, even coating. Pour the glaze quickly and confidently in one smooth motion, covering the entire dome. The excess will drip off in about 30 seconds, leaving a perfect glossy shell.
What is the best way to achieve a deep yellow color in a lemon mirror glaze?
For a deep yellow lemon mirror glaze, I recommend using gel-based food coloring rather than liquid drops, which can thin out the glaze and dull the shine. Start with a lemon-yellow gel and add a tiny touch of orange or warm yellow to deepen the hue — pure yellow can sometimes look a bit artificial on its own. Add the color gradually: dip a toothpick into the gel and swirl it into the glaze, then check the color before adding more. Remember that the glaze will appear slightly darker when poured over the dome than it does in the bowl, so aim for a shade that’s a tone or two lighter than your final goal. A drop of titanium dioxide (white food coloring) can also help make the yellow more opaque and vibrant.
Can I freeze the glazed domes after they’re finished?
I don’t recommend freezing the domes once they’re glazed. The mirror glaze can absorb moisture from the freezer and lose its glossy finish, becoming dull or even sticky when thawed. Instead, freeze the unglazed domes (up to 1 month), then glaze them fresh the day you plan to serve. The glazed domes can be stored in the refrigerator for up to 2 days, but they’re at their absolute best — shiniest and most dramatic — within the first 24 hours of glazing. If you need to prepare well in advance, freeze the unglazed domes and make the glaze up to 5 days ahead, then combine the two on serving day.
Why did my mirror glaze crack when I poured it over the dome?
A cracked mirror glaze is almost always a sign that the dome was not cold enough when the glaze was poured. The frozen dome needs to be rock-solid — if the surface is too warm, the glaze will set unevenly and the rapid temperature change can cause cracking. Another common cause is pouring the glaze when it’s too cool (below 85°F / 29°C), which makes it thick and prone to cracking as it settles. Finally, make sure your wire rack is level and that you’re pouring the glaze in one confident motion. If the glaze hits the dome in multiple small pours, each layer sets at a slightly different rate, which can lead to cracks. If this happens, let the dome come to room temperature, then pour a thin second layer of fresh glaze over the top.
Can I use a different citrus fruit instead of lemon?
Yes, absolutely. This recipe is very adaptable to other citrus fruits. Lime works beautifully — use the same amount of juice and zest for a more tart, bright flavor. Orange is lovely too, especially if you add a splash of orange blossom water for a floral note (see Variation 3 above). Grapefruit can be used, but it’s more bitter, so I recommend adding an extra tablespoon of sugar to the filling. For any citrus swap, keep the total liquid from juice the same (3 tablespoons) and adjust sweetness to taste. The mirror glaze can stay lemon-flavored with the lemon extract, or you can swap the extract for an orange or lime extract to match the filling.
How do I cleanly unmold the frozen domes without breaking them?
Unmolding frozen domes can be tricky, but I’ve got a foolproof method. First, make sure the domes are fully frozen — at least 4 hours, but overnight is better. Remove the molds from the freezer and gently warm the outside of each silicone mold by rubbing it between your palms for about 10 seconds. If your molds are metal (I recommend silicone for this recipe), run the outside of each mold briefly under warm water for 5 seconds. Gently press the bottom of the mold to push the dome out, working it loose from the edges. If it doesn’t release easily, warm the mold for a few more seconds. Place each unmolded dome directly onto a wire rack set over a baking sheet for glazing. Work quickly — the domes should stay frozen until the glaze hits them.
Can I make these domes without a dome mold?
If you don’t have dome molds, you can still make this recipe using other vessel shapes. Small silicone muffin molds or even round silicone ice molds work well — anything with a smooth, rounded interior will produce a dome-like shape. You can also use small glass bowls (like ramekins) lined with plastic wrap for easy removal, though the shape will be more of a hemisphere. The key is that the mold should be flexible and non-stick for clean unmolding. For the biscuit base, you’ll need to press it into the bottom of whatever mold you’re using. The baking time and glaze amounts stay the same — just make sure the total volume of each mold is about 1/2 to 2/3 cup.
What should I do if my mirror glaze is too thick after cooling?
If your mirror glaze has cooled and become too thick to pour smoothly, don’t panic. Gently rewarm it in the microwave in 5-second bursts, stirring vigorously after each burst, until it loosens to a pourable consistency. If it’s still too thick after warming, you can stir in a small amount of additional sweetened condensed milk (1 tablespoon at a time) or warm water (1 teaspoon at a time) to thin it out. Keep in mind that adding liquid will slightly dilute the flavor and sweetness, so adjust in small increments. The ideal consistency is like warm heavy cream — fluid enough to coat the back of a spoon but not watery. Always use an instant-read thermometer to verify the temperature is back in the 90–95°F range before pouring.
⭐️ Loved This Recipe? Leave a Star Rating!
If you made these Midnight Lemon Mirror Glaze Dream Domes, I’d love to hear how they turned out! Tap the stars below to leave a rating, share a comment, or tag me @leosfoods on Instagram — your feedback makes my NYC kitchen so much sweeter. 🧡
Midnight Lemon Mirror Glaze Dream Domes
Elegant individual lemon cream domes with a cocoa biscuit base and a dramatic midnight mirror glaze, finished with edible silver dust and white chocolate shards.
- Total Time: 4 hours 30 minutes
- Yield: 6 1x
Ingredients
- For the Lemon Dome Filling:
- 1 1/2 cups heavy cream
- 1 cup mascarpone cheese
- 1/3 cup granulated sugar
- 3 tbsp fresh lemon juice
- 1 tbsp lemon zest
- 1 tsp vanilla extract
- 2 tsp gelatin powder
- 2 tbsp cold water
- For the Cocoa Biscuit Base:
- 1 1/2 cups chocolate cookie crumbs
- 3 tbsp melted butter
- 1 tbsp cocoa powder
- 1 tbsp granulated sugar
- For the Midnight Mirror Glaze:
- 1 cup granulated sugar
- 1/2 cup water
- 1/2 cup sweetened condensed milk
- 1 cup white chocolate, chopped
- 1 tbsp gelatin powder
- 3 tbsp cold water
- 1 tsp lemon extract
- Black food coloring, as needed
- Deep blue food coloring, as needed
- For Garnish (optional):
- 1 tbsp edible silver dust
- 1 tsp lemon zest
- White chocolate shards
Instructions
- Bloom gelatin in cold water for 5 minutes.
- Whip mascarpone, heavy cream, sugar, lemon juice, lemon zest, and vanilla extract until smooth and airy.
- Warm a small portion of the cream mixture and dissolve the bloomed gelatin, then fold it back into the full mixture.
- Mix chocolate cookie crumbs, melted butter, cocoa powder, and sugar until combined. Press firmly into the base of dome molds.
- Fill molds with lemon cream mixture over the biscuit base. Smooth tops and freeze for at least 4 hours until fully set.
- For the mirror glaze, bloom gelatin in cold water for 5 minutes.
- Heat sugar, water, and condensed milk until fully dissolved and steaming. Remove from heat and stir in gelatin and white chocolate until smooth.
- Divide glaze and tint with black and deep blue food coloring to create a midnight swirl effect. Allow to cool slightly until glossy but pourable.
- Unmold frozen domes and place on a wire rack. Pour glaze evenly over each dome, letting excess drip off.
- Chill briefly to set the glaze before serving.
- Finish with edible silver dust, lemon zest, and white chocolate shards.
Nutrition
- Calories: 435
- Sugar: 33g
- Fat: 30g
- Carbohydrates: 38g
- Protein: 6g
Tried This Recipe? Leave a Comment!
Did you make this recipe? I’d love to hear how it turned out! Please leave a comment and a rating below. Your feedback helps other home cooks and supports cheerychop.com!
For more delicious inspiration, follow me on Pinterest!