Pistachio Emerald Crown Gems Recipe with Vanilla Cream
“`html
Table of Contents
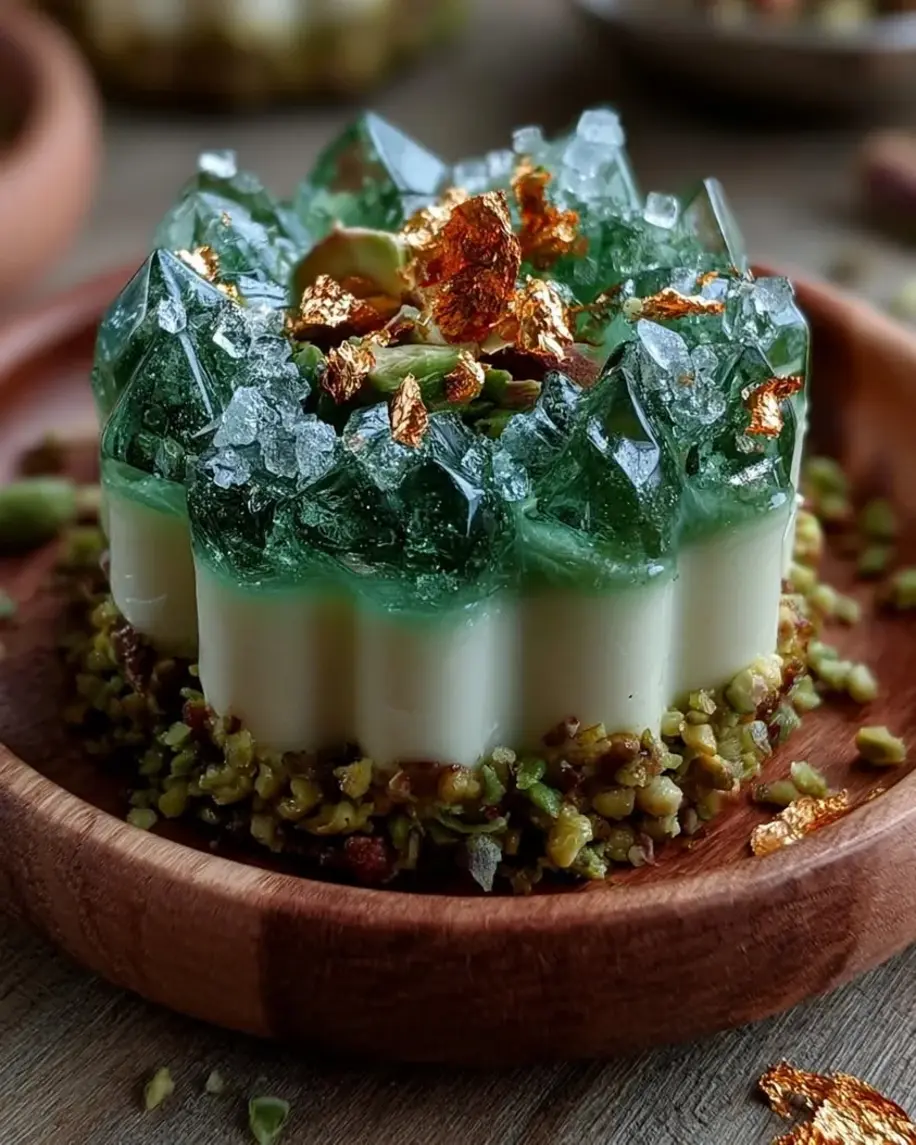
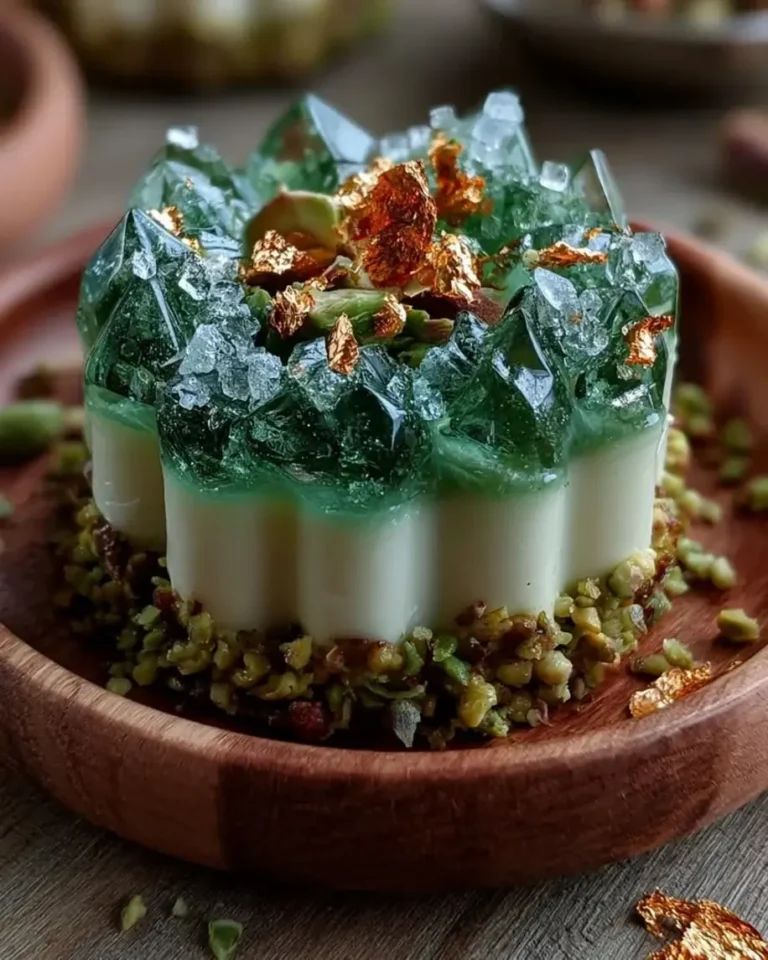
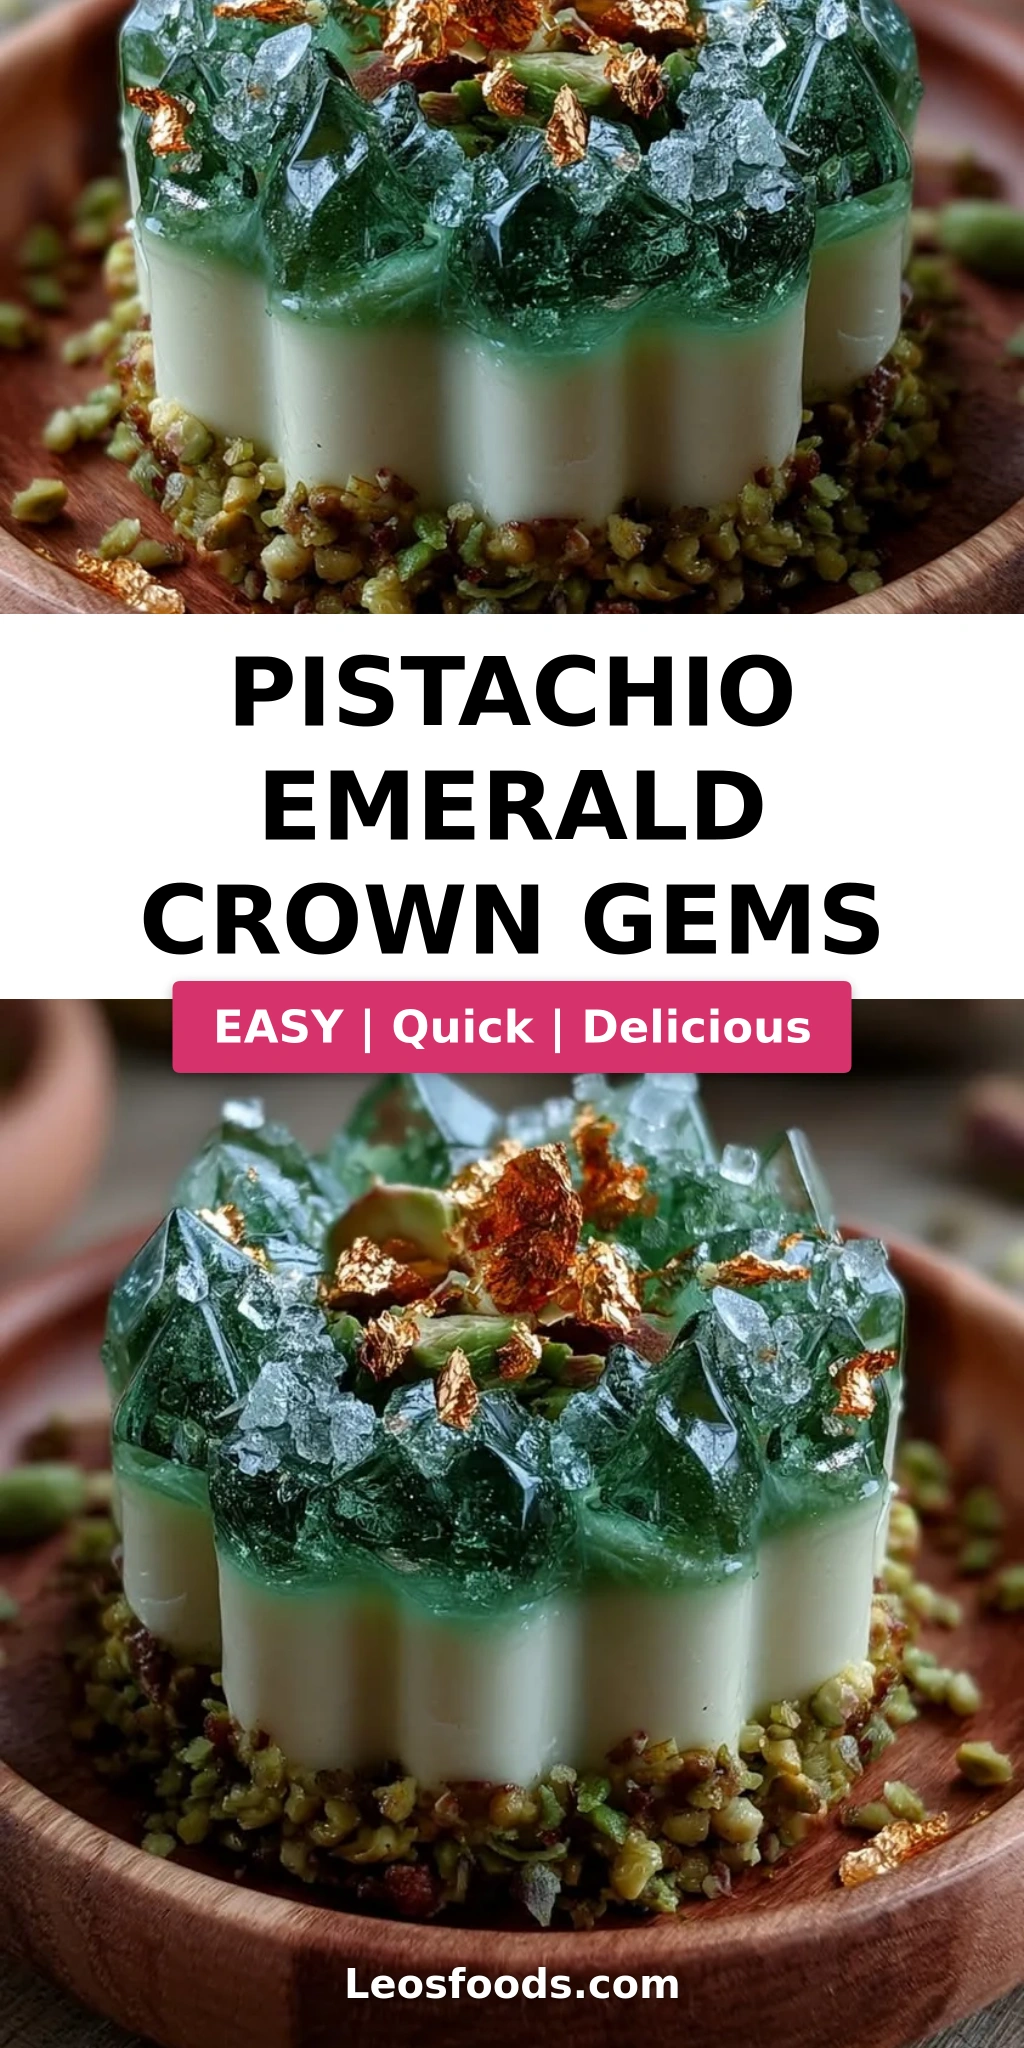
Pistachio Emerald Crown Gems – A Creamy Vanilla Center with Emerald Crystal Glaze
The very first time I tasted a pistachio emerald crown gems recipe, I was standing in a tiny pastry shop in the Marais district of Paris. The display case glowed with jewel-toned desserts, but one in particular caught my eye — a crown-shaped gem with a surface that shimmered like an emerald. I knew right then I had to recreate that magic in my own NYC kitchen. This pistachio emerald crown gems recipe is the result of years of testing, blending my French pastry training with the warm, nutty flavors I grew up with in Morocco. It’s a pistachio dessert recipe that feels luxuriously special yet is absolutely doable at home.
Imagine biting through a glossy emerald shell into a creamy pistachio layer that gives way to a cloudlike vanilla center. The emerald glaze dessert coating shatters ever so slightly as you cut into it, revealing a stunning contrast of green and cream. The aroma of pistachio and vanilla fills the air, and the subtle crunch of crushed rock candy crystals against the smooth glaze creates a sensory experience that’s pure joy. This pistachio and white chocolate dessert is everything I love about elegant confectionery — it looks like a gemstone and tastes like a dream.
I’ve refined this gelatin dessert recipe to make it foolproof for home bakers. The key? Understanding how gelatin behaves at different temperatures — a lesson I learned during my pastry training in Paris. I’ll share my best tips for getting that mirrorlike emerald glaze and the perfectly creamy interior every single time. One common mistake I see is rushing the freezing step — but trust me, patience gives you clean edges and a flawless finish. Let me show you how to make these crown gems shine.
Why This Pistachio Emerald Crown Gems Recipe Is the Best
The Flavor Secret: Most pistachio desserts use artificial flavoring, but I insist on real pistachio paste. It gives a deep, toasty nuttiness that no extract can mimic. Growing up in Morocco, my mother would grind fresh pistachios by hand for her pastries — that aroma is unforgettable. I pair that paste with white chocolate, which adds creaminess without overpowering the delicate pistachio flavor. The vanilla center uses real vanilla bean paste, which brings tiny specks of pure flavor that make this pistachio dessert recipe taste truly artisanal.
Perfected Texture: The magic of this pistachio emerald crown gems recipe is the contrast between the firm, jellylike pistachio shell and the airy mascarpone center. In Paris, I learned that the secret to a clean gelatin set is blooming the powder in ice-cold water and never letting it boil. That technique gives you a silky, bouncy texture that holds its shape beautifully. The emerald glaze is another texture triumph — it sets to a glossy, slightly firm coating that cracks like hard candy when you bite into it.
Foolproof & Fast: Despite its elegant appearance, this emerald glaze dessert is surprisingly forgiving. The gelatin-based shell doesn’t require baking or tempering, and the glaze comes together in minutes. If you can whisk and pour, you can make these crown gems. I’ve designed the steps so even a beginner can achieve stunning results — and I’ve included all my Paris-trained shortcuts so you spend less time fussing and more time enjoying. Plus, you can make them days ahead, which is a lifesaver for dinner parties.
Pistachio Emerald Crown Gems Recipe Ingredients
I pick up most of my ingredients at the Union Square Greenmarket or my favorite Italian specialty shop in Chelsea Market. The pistachio paste I order online from a small producer in Sicily — it makes all the difference in this pistachio and white chocolate dessert. For the gelatin, I always use high-quality platinum-grade sheets or powder for the cleanest flavor and most reliable set.
Ingredients List
For the Pistachio Emerald Crown Shells:
- 1 cup pistachio paste
- 3/4 cup heavy cream
- 1/2 cup white chocolate, finely chopped
- 1/3 cup granulated sugar
- 1 tsp vanilla extract
- 2 tsp gelatin powder
- 2 tbsp cold water
- Pinch of salt
For the Vanilla Cream Center:
- 1 cup mascarpone cheese
- 1/2 cup heavy whipping cream
- 3 tbsp powdered sugar
- 1 tsp vanilla bean paste
For the Emerald Crystal Glaze:
- 1 cup white chocolate, finely chopped
- 1/2 cup sweetened condensed milk
- 1/4 cup water
- 1 tbsp gelatin powder
- 3 tbsp cold water
- 1 tsp pistachio paste
- 1/2 tsp edible pearl luster dust
- Green food coloring, as needed
For Garnish (optional):
- 2 tbsp finely chopped pistachios
- 1 tbsp crushed green rock candy crystals
- Edible gold flakes
Ingredient Spotlight
Pistachio Paste: This is the heart of your pistachio emerald crown gems recipe. Look for a paste made from 100% pistachios, with no added oils or sugar. It should be thick, aromatic, and a deep green color. In US grocery stores, you can find it in specialty baking aisles or order from brands like Sicilian Pistachio or Amoretti. If you can’t find paste, you can grind shelled pistachios in a food processor until smooth — but you’ll need to add a tablespoon of neutral oil to get the right consistency.
White Chocolate: Use a high-quality white chocolate with at least 30% cocoa butter for the silkiest glaze. Chips work, but chopped bars melt more evenly. I prefer Valrhona or Guittard for their creamy texture and clean sweetness. In a pinch, you can substitute white candy melts — just know the flavor will be less nuanced. This ingredient is crucial for both the shell and the emerald glaze dessert coating.
Gelatin Powder: This is what gives your crown gems their structure. Always bloom the powder in cold water for exactly 5 minutes before using — warm water will make it clump. For a vegetarian version, you can use agar-agar, but the texture will be firmer and less silky. I’ve tested both, and gelatin gives the most authentic, melt-in-your-mouth feel for this gelatin dessert recipe.
Mascarpone Cheese: This Italian cream cheese is what makes the vanilla center so luscious. It has a higher fat content than regular cream cheese, which means it whips up lighter and fluffier. Find it in the specialty cheese section of most grocery stores. If you can’t, you can substitute an equal mix of cream cheese and heavy cream, but the texture won’t be quite as velvety.
Edible Pearl Luster Dust: This is the secret to that gemlike shimmer on your pistachio dessert recipe. It’s made from mica and is completely safe to eat. You can find it at cake decorating stores or online. Without it, the glaze will be pretty but not quite as dazzling. Don’t skip it if you want that true emerald effect.
| Original Ingredient | Best Substitution | Flavor / Texture Impact |
|---|---|---|
| Pistachio paste | Ground pistachios + 1 tbsp oil | Slightly grainier texture, less intense color |
| White chocolate (chopped bar) | White chocolate chips or candy melts | Chips take longer to melt; candy melts are less creamy |
| Gelatin powder | Agar-agar powder (use 1 tsp) | Firmer, less silky set; needs boiling to activate |
| Mascarpone cheese | Cream cheese + heavy cream (1:1) | Less rich, slightly tangier |
| Edible pearl luster dust | Skip or use shimmer food spray | Less sparkle, still green but not as gemlike |
How to Make Pistachio Emerald Crown Gems — Step-by-Step
Making these stunning pistachio emerald crown gems is easier than you think. I’ll walk you through each stage with the exact timing and visual cues you need. Take your time, and you’ll be rewarded with showstopping results that look like they came from a Parisian patisserie.
Step 1: Prepare the Pistachio Shell Base
Start by blooming 2 teaspoons of gelatin powder in 2 tablespoons of cold water. Stir gently and let it sit for exactly 5 minutes — it will become a firm, jiggly mass. In a small saucepan, combine 1 cup pistachio paste, 3/4 cup heavy cream, 1/3 cup sugar, 1 teaspoon vanilla extract, and a pinch of salt. Warm over medium heat, whisking constantly, until the mixture is smooth and steaming — about 3 minutes. Do not let it boil. Remove from the heat and add the bloomed gelatin, whisking until fully dissolved. Then add 1/2 cup finely chopped white chocolate and whisk until the mixture is silky and completely melted.
💡 Stella’s Pro Tip: Warm your cream and pistachio paste gently — high heat can cause the pistachio oils to separate, leaving you with a grainy texture. Low and slow is your friend here.
Step 2: Pour and Chill the Shells
Pour a thin layer of the pistachio mixture into crown-shaped silicone molds, using a small offset spatula to coat the sides evenly. You want a shell about 1/8-inch thick. Place the molds on a baking sheet and carefully transfer them to the refrigerator. Chill for 20–25 minutes, or until the mixture is partially set but still slightly tacky to the touch. This is the perfect consistency to hold the cream center.
⚠️ Common Mistake to Avoid: Don’t let the shells fully harden in this step — if they become too firm, the cream center won’t adhere properly, and you’ll get air gaps between the layers.
Step 3: Make the Vanilla Cream Center
While the shells chill, make the vanilla cream. In a large bowl, combine 1 cup mascarpone cheese, 1/2 cup heavy whipping cream, 3 tablespoons powdered sugar, and 1 teaspoon vanilla bean paste. Using a hand mixer or stand mixer with the whisk attachment, beat on medium speed until the mixture is light, fluffy, and holds soft peaks — about 2–3 minutes. Be careful not to overwhip; you want a creamy, spreadable consistency, not stiff butter.
💡 Stella’s Pro Tip: Chill your mixing bowl and beaters for 10 minutes before whipping the cream. Cold equipment helps the mascarpone whip up faster and stay stable longer.
Step 4: Fill and Freeze the Gems
Remove the molds from the refrigerator. Spoon or pipe the vanilla cream into each mold, filling it almost to the top but leaving a small border — about 1/4 inch — around the edges. Carefully spoon the remaining pistachio mixture over the cream, covering it completely. Use a small spatula to smooth the tops flush with the mold. Transfer the baking sheet to the freezer and freeze for at least 4 hours, or until the gems are completely firm and solid to the touch.
⚠️ Common Mistake to Avoid: Skipping the freezing step or cutting it short is the #1 reason these gems fall apart. They need to be fully frozen — like ice cubes — to hold their shape when you unmold and glaze them.
Step 5: Prepare the Emerald Crystal Glaze
About 15 minutes before you’re ready to glaze, make the emerald crystal glaze. Bloom 1 tablespoon of gelatin powder in 3 tablespoons of cold water for 5 minutes. In a small saucepan, heat 1/2 cup sweetened condensed milk and 1/4 cup water until steaming — do not boil. Remove from heat and add the bloomed gelatin, stirring until dissolved. Pour this mixture over 1 cup finely chopped white chocolate in a heatproof bowl. Let it sit for 1 minute, then whisk until smooth and glossy. Add 1 teaspoon pistachio paste, 1/2 teaspoon edible pearl luster dust, and enough green food coloring to achieve a brilliant emerald shade. Allow the glaze to cool to about 90°F — it should be slightly thickened but still pourable, like warm honey.
💡 Stella’s Pro Tip: Test the glaze consistency by dipping a spoon — it should coat the back of the spoon and hold a thin, even layer. If it’s too thick, add a teaspoon of warm water; if too thin, let it cool for another minute or two.
Step 6: Glaze the Crown Gems
Remove the frozen gems from the molds. Working quickly, place each gem on a wire rack set over a baking sheet. Pour the emerald glaze evenly over each gem, starting from the center and letting it flow over the edges. Use a small offset spatula to gently guide the glaze if needed, but avoid touching the surface. Allow the excess glaze to drip away. While the glaze is still wet, sprinkle crushed green rock candy crystals onto selected areas — the edges and peaks look especially beautiful with this gemstone effect. Let the coating set at room temperature for about 10 minutes, then transfer to the refrigerator to fully set for 15 minutes.
⚠️ Common Mistake to Avoid: If your gems are not frozen solid when you glaze them, the warm glaze will cause them to crack or melt. Always give them the full 4-hour freeze — or even overnight for best results.
Step 7: Garnish and Serve
Once the glaze is set, carefully transfer each crown gem to a serving plate. Sprinkle finely chopped pistachios around the base or on top for contrast. Finish with a few edible gold flakes for that luxe, jewel-like sparkle. Serve immediately while still chilled — the contrast between the cold creamy center and the snappy glaze is absolutely perfect.
💡 Stella’s Pro Tip: For the cleanest presentation, use tweezers to place the gold flakes and rock candy crystals. It takes a little extra time, but the result is absolutely stunning — your guests will think these came from a high-end pastry shop.
| Step | Action | Duration | Key Visual Cue |
|---|---|---|---|
| 1 | Bloom gelatin + heat pistachio mixture | 5 min bloom, 3 min heat | Gelatin becomes firm jiggle; mixture steams, not boils |
| 2 | Pour shells into molds, chill | 20–25 min | Shells are partially set, slightly tacky |
| 3 | Whip mascarpone cream center | 2–3 min | Soft peaks form, mixture is light and fluffy |
| 4 | Fill molds, top with pistachio mixture, freeze | 4+ hours | Gems are solid, firm to the touch, no give when pressed |
| 5 | Prepare emerald crystal glaze | 10–12 min | Glossy, smooth, coats spoon like warm honey |
| 6 | Unmold, pour glaze, add crystals | 10 min set + 15 min chill | Glaze drips cleanly, sets to a glossy, non-tacky finish |
| 7 | Garnish and serve | 5 min | Gems are chilled, glaze is firm, garnishes are vibrant |
Serving & Presentation
These crown gems are designed to be the showstopper of any dessert table. I love serving them on a mirrored cake stand or a slate board for that jewel-box effect. Arrange them in a circle or a diamond pattern, and scatter a few extra pistachios and gold flakes around the base for a luxurious tablescape. Because they’re served chilled, they hold their shape beautifully for at least an hour at room temperature — perfect for dinner parties where dessert waits.
In my NYC kitchen, I often pair these with a small glass of sweet Muscat wine or a strong espresso — the contrast of the rich, creamy dessert with a bold coffee is heavenly. For a Moroccan-inspired twist, serve them alongside mint tea with fresh mint leaves for a nod to my heritage. The floral notes of the tea complement the pistachio and vanilla beautifully. You can also add a dollop of lightly whipped cream or a scoop of vanilla ice cream for extra indulgence.
When it comes to garnishing, less is more with these already dramatic desserts. A few finely chopped pistachios, a sprinkle of crushed rock candy crystals, and a dusting of gold flakes are all you need. If you’re feeling extra creative, you can add a tiny edible flower — like a viola or pansy — on top for a pop of color. Just make sure the flowers are food-grade and untreated.
| Pairing Type | Suggestions | Why It Works |
|---|---|---|
| Side Dessert | Fresh berries, almond tuiles, dark chocolate shards | Berries cut the richness; tuiles add crunch; dark chocolate complements pistachio |
| Sauce / Dip | Warm chocolate sauce, salted caramel, raspberry coulis | Chocolate and caramel enhance the nutty flavors; coulis adds bright acidity |
| Beverage | Sweet Muscat wine, espresso, Moroccan mint tea | Wine complements sweetness; espresso cuts richness; tea adds floral notes |
| Garnish | Chopped pistachios, crushed rock candy, edible gold flakes, fresh mint | Adds texture, sparkle, and a fresh herbal contrast |
Make-Ahead, Storage & Reheating
As a busy NYC food blogger, I’m all about make-ahead desserts. These pistachio emerald crown gems are actually better when made in advance — the flavors meld and the texture stabilizes beautifully. I often prepare the gems through Step 4 (fully frozen) up to a week ahead, then glaze and garnish them the day I’m serving. The glaze can be made fresh or stored separately for up to 3 days in the fridge — just rewarm it gently to 90°F before using.
| Method | Container | Duration | Reheating Tip |
|---|---|---|---|
| Refrigerator | Airtight container, single layer | Up to 3 days | Serve directly from fridge — no reheating needed |
| Freezer | Freezer-safe container, parchment between layers | Up to 2 months | Thaw overnight in fridge, then glaze fresh |
| Make-Ahead | In molds, covered with plastic wrap | Up to 1 week frozen | Unmold and glaze on serving day for freshest appearance |
If you have leftover glazed gems, store them in a single layer in an airtight container in the fridge. The glaze may soften slightly over time, but they’ll still taste delicious for up to 3 days. I don’t recommend freezing already-glazed gems — the moisture from thawing can make the glaze sticky and less brilliant. For best results, freeze the unglazed gems and always glaze fresh.
Variations & Easy Swaps
| Variation | Key Change | Best For | Difficulty Impact |
|---|---|---|---|
| Almond Crown Gems | Replace pistachio paste with almond paste | Nut-allergy-friendly, milder flavor | No change |
| Dairy-Free Version | Use coconut cream + dairy-free white chocolate | Vegan / lactose-intolerant guests | Medium — texture is slightly softer |
| Ruby Berry Crown Gems | Add 2 tbsp freeze-dried raspberry powder to glaze | Valentine’s Day, berry lovers | No change |
Almond Crown Gems
If you’re looking for a milder, nuttier flavor, swap the pistachio paste for high-quality almond paste. This variation reminded me of the almond-based pastries my grandmother made in Marrakech — delicate, fragrant, and utterly comforting. The color will be lighter, more ivory than green, so you may want to add a touch more green food coloring to maintain the emerald look. The texture remains just as silky, and the almond pairs beautifully with the vanilla cream center.
Dairy-Free Version
For a dairy-free version that doesn’t compromise on luxury, substitute full-fat coconut cream for the heavy cream and mascarpone. Use a high-quality dairy-free white chocolate made with cocoa butter and rice milk. The texture will be slightly softer and less firm than the original, so I recommend freezing for at least 6 hours — or overnight — for the best results. The coconut adds a subtle tropical note that pairs surprisingly well with pistachio. I tested this version for a friend’s dairy-free dinner party and it was a hit.
Ruby Berry Crown Gems
For a vibrant twist that’s perfect for Valentine’s Day or a summer party, add 2 tablespoons of finely ground freeze-dried raspberry powder to the emerald glaze. The result is a stunning ruby-red crown gem with a tangy-sweet berry note that cuts through the richness of the white chocolate. I discovered this combination at the NYC summer farmers market when I had a surplus of raspberries — the bright acidity is a beautiful contrast to the creamy pistachio center. Garnish with a few fresh raspberries and a dusting of powdered sugar.
Frequently Asked Questions
What are the key ingredients needed to make Pistachio Emerald Crown Gems?
The essential ingredients for this pistachio emerald crown gems recipe include pistachio paste, heavy cream, white chocolate, gelatin powder, mascarpone cheese, vanilla bean paste, sweetened condensed milk, and edible pearl luster dust. Pistachio paste is the star — it gives the dessert its deep nutty flavor and natural green hue. The white chocolate appears in both the shell and the glaze, adding creaminess and structure. Gelatin is crucial for setting both the pistachio shell and the emerald glaze, while mascarpone creates that luscious vanilla center. Don’t forget the edible gold flakes and crushed rock candy crystals for the signature gemstone finish.
How do you get the bright green color in Pistachio Emerald Crown Gems?
The vibrant emerald color comes from a combination of pistachio paste and green food coloring. Pistachio paste naturally contributes a muted green tone, but to achieve that brilliant jewel-like shade, you’ll need to add a few drops of green food coloring — I recommend gel-based colors for the most vivid results without thinning the glaze. The edible pearl luster dust also plays a role: it adds a subtle shimmer that makes the green appear deeper and more dimensional, mimicking the way light interacts with a real emerald crystal.
Can I substitute pistachios with another nut in Pistachio Emerald Crown Gems?
Absolutely — almond paste is the best substitute for pistachio paste in this pistachio dessert recipe. Use the same amount of almond paste, and the texture will remain nearly identical. The flavor will be milder and sweeter, with a lovely marzipan quality. Keep in mind that almond paste is lighter in color, so you’ll need to add more green food coloring to maintain the emerald glaze effect. For a completely different twist, you could try cashew paste, which has a creamier, buttery flavor that also pairs well with white chocolate and vanilla.
What is the best way to store Pistachio Emerald Crown Gems to keep them fresh?
The best way to store these gelatin dessert recipe gems is in an airtight container in the refrigerator for up to 3 days. Layer them with parchment paper to prevent the glaze from sticking. If you want to store them longer, freeze the unglazed gems for up to 2 months — just wrap them tightly in plastic wrap and place in a freezer-safe container. When you’re ready to serve, thaw them in the refrigerator overnight and glaze them fresh. I do not recommend freezing already-glazed gems, as the glaze can become tacky and lose its brilliant shine upon thawing.
Can I make Pistachio Emerald Crown Gems without gelatin for a vegetarian version?
Yes, you can use agar-agar powder as a vegetarian substitute in this pistachio and white chocolate dessert. Use 1 teaspoon of agar-agar powder in place of the gelatin for the shell, and 1 1/2 teaspoons for the glaze. The key difference is that agar-agar needs to be brought to a full boil for 2 minutes to activate — unlike gelatin, which only needs gentle heat. The texture will be firmer and slightly less silky than the gelatin version, and the set will be more brittle. I recommend testing with a small batch first to see if you like the texture.
Why did my emerald glaze turn out cloudy or dull instead of shiny?
A cloudy or dull glaze is usually caused by one of three things. First, the white chocolate may have been overheated — it should never exceed 110°F, or the cocoa butter can separate and cause streaking. Second, the gelatin may not have been fully dissolved — make sure you bloom it in cold water for the full 5 minutes and whisk thoroughly into the warm condensed milk mixture. Third, the glaze may have been poured too cold or too thick. For a brilliant emerald finish, the glaze should be at about 90°F — warm enough to flow smoothly but thick enough to coat the back of a spoon.
How far in advance can I make Pistachio Emerald Crown Gems for a party?
This emerald glaze dessert is perfect for make-ahead entertaining. You can prepare the gems through the freezing step up to 1 week ahead — just keep them in the molds, covered tightly with plastic wrap, in the freezer. On the day of your party, unmold them and prepare the fresh emerald glaze. The entire glazing and garnishing process takes about 30 minutes. For the absolute best texture and shine, I recommend glazing no more than 8 hours before serving. If you need to prepare them fully in advance, glazed gems will keep in the refrigerator for up to 3 days, though the glaze may soften slightly.
What can I use if I don’t have crown-shaped silicone molds?
If you don’t have crown-shaped molds, you can use any small, decorative silicone mold with intricate details — dome shapes, diamond patterns, or even small flower molds work beautifully. The key is to use silicone, as it flexes easily for clean unmolding. Mini bundt pans or small hemispherical molds (like hemisphere cake molds) are also great options. If you use a different shape, just keep an eye on the volume — you want molds that hold about 1/3 to 1/2 cup of filling to maintain the proper proportions between the pistachio shell and vanilla cream center.
Can I use store-bought pistachio cream or pistachio butter instead of pistachio paste?
You can use pistachio cream in place of pistachio paste in this pistachio dessert recipe, but be aware that many pistachio creams contain added sugar and oil, which can affect the sweetness and stability. If your pistachio cream is sweetened, reduce the granulated sugar in the shell mixture by 2 tablespoons. Pistachio butter is a better option — it’s typically just ground pistachios with no additions — but it may be less smooth than paste. I recommend looking for pure pistachio paste online or at specialty stores for the most reliable results in terms of flavor and texture.
My glaze is too thick — how can I thin it without ruining the shine?
If your emerald glaze becomes too thick to pour smoothly, warm it gently by placing the bowl over a pan of warm water (not simmering) and whisking continuously. Add a teaspoon of warm water or sweetened condensed milk at a time until it reaches a pourable consistency. Avoid using high heat or a microwave, which can cause the white chocolate to seize and the shine to dull. If the glaze has already set in the refrigerator, let it come to room temperature for 30 minutes, then rewarm gently. The goal is a consistency like warm honey — thick enough to coat the spoon but fluid enough to drip cleanly off the gems.
Share Your Version!
I absolutely love seeing how these pistachio emerald crown gems turn out in your own kitchens! Did you try a variation like the almond version or the ruby berry twist? Did you master that shiny emerald glaze on your first try? Drop a star rating and a comment below — your feedback helps other home bakers know what to expect, and I personally read every single one.
Snap a photo of your gorgeous crown gems and share it on Instagram or Pinterest tagging @leosfoods. I love featuring my readers’ creations in my stories — it’s the best part of this job! And if you tried a substitution or discovered a new technique, I’d love to hear about it. What’s the one question you still have about this recipe? Ask me in the comments, and I’ll answer you personally. From my NYC kitchen to yours — I hope this recipe brings as much warmth to your table as it does to mine. — Stella 🧡
Love This Recipe? Save It to Pinterest!
If you enjoyed this Pistachio Emerald Crown Gems recipe, don’t let it get lost in your browser tabs! 😄 Pin it now so you can find it again anytime — and explore hundreds more tried-and-tested recipes waiting for you on my Pinterest boards.
👉 Follow Stella on Pinterest @stellarecipeblog
📌 Pin this recipe · 🔁 Re-pin your favorites · 💬 Tag me when you make it — I love seeing your creations!
💬 Did you make this recipe? I’d love to hear how it went!
Rate it ⭐⭐⭐⭐⭐, leave a comment below, and tag @leosfoods in your photos. Your feedback helps me create better recipes for you! 🧡
“`
Print
Pistachio Emerald Crown Gems
A luxurious pistachio dessert with a creamy vanilla center and emerald crystal glaze, shaped like crown gems.
- Yield: 6 1x
Ingredients
- For the Pistachio Emerald Crown Shells:
- 1 cup pistachio paste
- 3/4 cup heavy cream
- 1/2 cup white chocolate, finely chopped
- 1/3 cup granulated sugar
- 1 tsp vanilla extract
- 2 tsp gelatin powder
- 2 tbsp cold water
- Pinch of salt
- For the Vanilla Cream Center:
- 1 cup mascarpone cheese
- 1/2 cup heavy whipping cream
- 3 tbsp powdered sugar
- 1 tsp vanilla bean paste
- For the Emerald Crystal Glaze:
- 1 cup white chocolate, finely chopped
- 1/2 cup sweetened condensed milk
- 1/4 cup water
- 1 tbsp gelatin powder
- 3 tbsp cold water
- 1 tsp pistachio paste
- 1/2 tsp edible pearl luster dust
- Green food coloring, as needed
- For Garnish (optional):
- 2 tbsp finely chopped pistachios
- 1 tbsp crushed green rock candy crystals
- Edible gold flakes
Instructions
- Bloom gelatin in cold water for 5 minutes.
- Heat pistachio paste, heavy cream, sugar, vanilla extract, and salt until warm and smooth.
- Remove from heat and stir in the bloomed gelatin until fully dissolved.
- Add the white chocolate and whisk until silky and completely melted.
- Pour a thin layer of the pistachio mixture into crown-shaped silicone molds, coating the sides evenly.
- Chill until partially set.
- Whip mascarpone, heavy cream, powdered sugar, and vanilla bean paste until light and fluffy.
- Fill each mold with the vanilla cream center, leaving a small border around the edges.
- Cover with the remaining pistachio mixture and smooth the tops.
- Freeze for at least 4 hours until completely firm.
- For the emerald crystal glaze, bloom gelatin in cold water for 5 minutes.
- Heat sweetened condensed milk and water until steaming. Remove from heat and stir in gelatin until dissolved.
- Pour over white chocolate and whisk until smooth and glossy.
- Add pistachio paste, pearl luster dust, and green food coloring until a brilliant emerald finish is achieved.
- Allow glaze to cool until slightly thickened but still pourable.
- Unmold the frozen crown gems and place on a wire rack.
- Pour the emerald glaze evenly over each gem, allowing excess glaze to drip away.
- Sprinkle crushed green rock candy crystals onto selected areas to create a gemstone effect.
- Allow the coating to set before transferring to serving plates.
- Finish with chopped pistachios and edible gold flakes.
- Serve chilled.
Nutrition
- Calories: 470
- Sugar: 28g
- Fat: 35g
- Carbohydrates: 34g
- Protein: 8g
Tried This Recipe? Leave a Comment!
Did you make this recipe? I’d love to hear how it turned out! Please leave a comment and a rating below. Your feedback helps other home cooks and supports cheerychop.com!
For more delicious inspiration, follow me on Pinterest!