Easy Pumpkin Oreo Balls – No-Bake Dessert Recipe
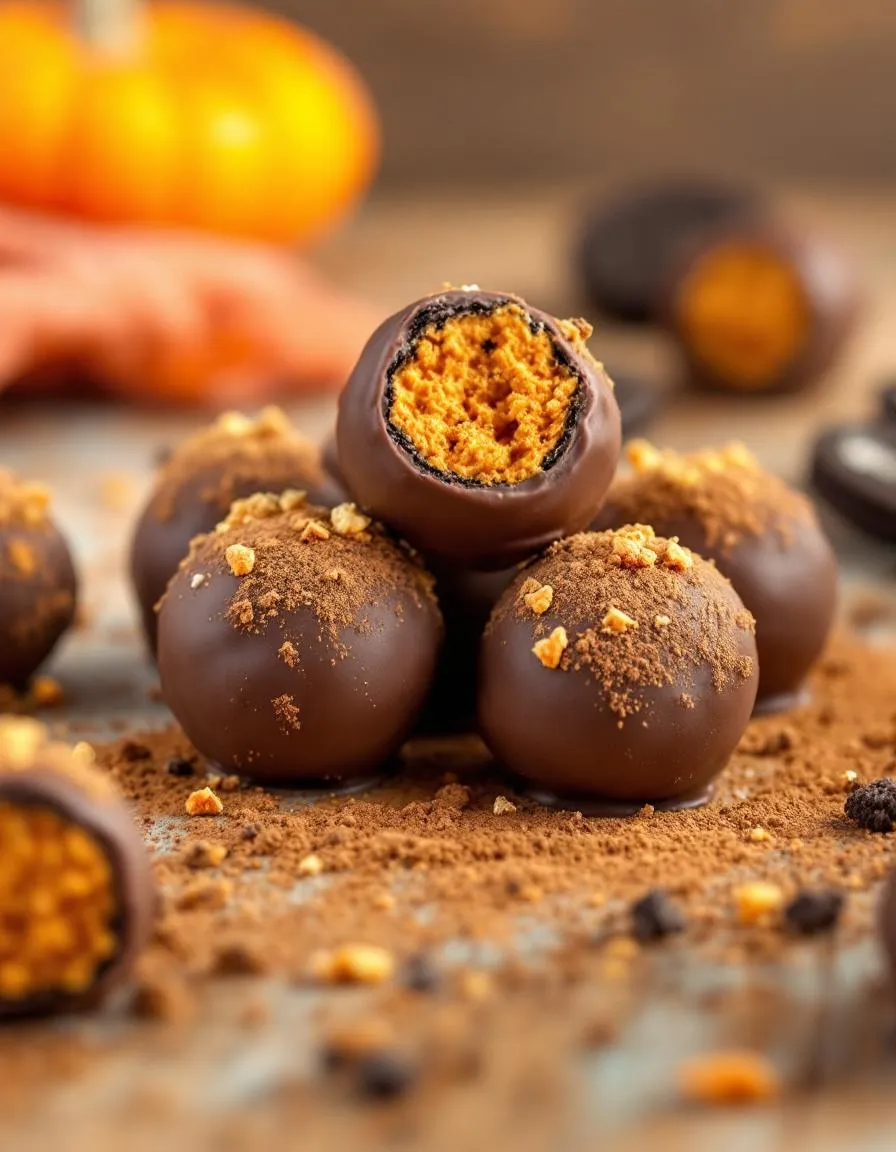
Pumpkin Oreo Balls: The Perfect No-Bake Fall Treat
These Pumpkin Oreo Balls combine creamy pumpkin spice flavors with crunchy Oreo cookies for an irresistible fall dessert. Furthermore, they require no baking, making them perfect for busy holiday seasons. With just a few simple ingredients, you can create festive treats that look as good as they taste.
Imagine biting into a smooth, pumpkin-spiced center wrapped in rich white chocolate. Meanwhile, the Oreo cookie base adds satisfying texture. These bite-sized delights work wonderfully for parties, gifts, or a sweet autumn snack. Best of all, kids and adults alike will love helping to make them.
Quick Recipe Highlights
- Flavor Profile: These Pumpkin Oreo Balls blend warm pumpkin spice with sweet cream cheese and chocolate cookie flavors.
- Texture: You get a creamy interior with a satisfying crunch from the Oreo crumbs, all coated in smooth chocolate.
- Visual Appeal: The bright orange centers peek through white chocolate coatings, creating festive fall treats.
- Skill Level Needed: Beginners can easily master this no-bake recipe with minimal kitchen tools.
- Special Equipment: You only need a food processor, mixing bowls, and a baking sheet.
Why You’ll Love These Pumpkin Oreo Balls
First, Pumpkin Oreo Balls deliver big flavor with minimal effort. The combination of pumpkin puree, cream cheese, and Oreos creates a perfect balance of sweet and spiced. Additionally, they come together quickly without turning on your oven, which makes them ideal for warm fall days.
Second, these treats offer excellent presentation value. Their round shape and chocolate coating make them look professional. Consequently, they work beautifully for holiday parties or edible gifts. You can even package them in decorative boxes for thoughtful homemade presents.
Third, Pumpkin Oreo Balls accommodate various dietary needs with simple substitutions. For example, you can use gluten-free Oreos or dairy-free chocolate. Moreover, they freeze beautifully, letting you prepare them weeks ahead for stress-free entertaining.
Fourth, these no-bake delights cost significantly less than store-bought desserts. Since the recipe uses pantry staples, you likely have most ingredients already. In fact, you can often find Oreos and chocolate on sale during the holiday season.
Finally, Pumpkin Oreo Balls bring people together in the kitchen. Children especially enjoy rolling the mixture into balls. Therefore, they make excellent family baking projects that create lasting memories along with delicious treats.
Ingredients for Pumpkin Oreo Balls
Oreo cookies form the base of these treats, providing structure and chocolate flavor. When selecting Oreos, choose the original variety for classic taste. Alternatively, try golden Oreos for a different flavor profile. Always check for fresh, crisp cookies without staleness.
Cream cheese binds the ingredients while adding richness. Use full-fat cream cheese for best texture and flavor. Make sure it’s softened to room temperature for easy mixing. For longer storage, keep unopened packages refrigerated until ready to use.
Pumpkin puree delivers authentic fall flavor. Choose 100% pure pumpkin, not pumpkin pie filling. Canned works perfectly, but you can use homemade if preferred. Drain excess liquid to prevent soggy dough. Store opened cans in the refrigerator for up to five days.
Pumpkin pie spice provides warm autumn notes. You can buy pre-mixed spice or make your own blend. Typical combinations include cinnamon, ginger, nutmeg, and cloves. Store spices in a cool, dark place to maintain freshness and potency.
White chocolate coating gives Pumpkin Oreo Balls their finished look. Use high-quality melting wafers for easiest handling. Alternatively, chop chocolate bars finely for melting. Avoid chocolate chips which contain stabilizers that can make dipping difficult.
How to Make Pumpkin Oreo Balls
Begin by crushing Oreos into fine crumbs using a food processor. Pulse until no large pieces remain. Then transfer the crumbs to a large mixing bowl. Next, add softened cream cheese and pumpkin puree. Mix thoroughly until fully combined and smooth.
Add pumpkin pie spice to taste, typically 1-2 teaspoons. Stir well to distribute the spices evenly. The mixture should hold together when pressed. If too sticky, chill for 15 minutes. Conversely, if too dry, add a teaspoon of milk.
Use a cookie scoop to portion the mixture. Roll each portion between your palms to form smooth balls. Place them on a parchment-lined baking sheet. Freeze for at least 30 minutes to firm up before coating. This prevents crumbling during the dipping process.
Melt white chocolate in a microwave-safe bowl using 30-second intervals. Stir between each heating to prevent burning. Dip each chilled ball using a fork or dipping tool. Let excess chocolate drip off before returning to the parchment. Sprinkle with additional spices if desired before the chocolate sets.
Allow the chocolate to harden completely at room temperature. For faster setting, refrigerate for 15 minutes. Store finished Pumpkin Oreo Balls in an airtight container in the refrigerator. They keep well for up to one week, though they rarely last that long.
Pro Tips for Perfect Pumpkin Oreo Balls
Measure ingredients precisely for consistent results. Too much pumpkin puree makes the mixture sticky. Similarly, excess cream cheese can cause spreading. Use measuring cups and spoons rather than eyeballing quantities.
Chill the mixture adequately before shaping. Cold dough rolls more cleanly and holds its shape better. If the mixture becomes too soft while working, return it to the freezer briefly. This prevents messy hands and misshapen balls.
Use quality chocolate for best results. Cheap coatings may seize or develop streaks. Look for chocolate with cocoa butter as the first ingredient. When melting, avoid getting any water in the bowl as this causes clumping.
Create uniform sizes for even presentation. A small cookie scoop ensures consistent portions. Aim for about 1-inch diameter balls. This makes them bite-sized while allowing room for coating.
Add decorative touches for special occasions. Drizzle with dark chocolate or sprinkle with crushed cookies. You can also use colored candy melts for seasonal variations. Consider orange and white for Halloween or gold for Thanksgiving.
Frequently Asked Questions
Can I make these ahead of time? Yes, Pumpkin Oreo Balls keep well in the refrigerator for up to one week. You can also freeze them for up to three months in an airtight container.
How do I prevent cracking chocolate coatings? Make sure your balls are very cold before dipping. Also, avoid overheating the chocolate and work in a cool environment.
Can I use other cookie varieties? Absolutely. Ginger snaps or vanilla wafers work well. Just ensure you have about 2 cups of fine crumbs for proper consistency.
Why is my mixture too sticky? This usually means too much liquid. Try adding more crushed cookies or chilling longer. You can also dust your hands with powdered sugar when rolling.
Can I make these vegan? Yes, use dairy-free cream cheese, vegan Oreos, and plant-based chocolate. The method remains exactly the same.
Pumpkin Oreo Balls
Delicious no-bake pumpkin-shaped treats made with Oreo cookies and cream cheese, coated in orange candy melts.
Ingredients
For the Crust:
- 1 package (14.3 oz) Oreo cookies
- 1 package (8 oz) cream cheese, softened
- 1 package (12 oz) orange candy melts
- 1/4 cup green candy melts (for stems)
- 1 tsp vegetable oil (optional, for thinning)
Instructions
1. Prepare the Crust:
- Crush Oreo cookies into fine crumbs using a food processor or rolling pin.
- Mix Oreo crumbs with softened cream cheese until fully combined.
- Roll mixture into small pumpkin-shaped balls (about 1-inch diameter) and place on a parchment-lined baking sheet.
- Chill balls in refrigerator for at least 30 minutes to firm up.
- Melt orange candy melts according to package instructions, adding vegetable oil if needed for smoother consistency.
- Dip each chilled ball into melted orange candy, allowing excess to drip off, then return to parchment paper.
- While coating is still wet, use a toothpick to create vertical lines for pumpkin texture.
- Melt green candy melts and pipe small stems onto the top of each pumpkin.
- Allow to fully set before serving (about 15 minutes at room temperature or 5 minutes in refrigerator).
Notes
You can customize the seasonings to taste.