Delicious No-Bake Banana Split Cake Recipe

Table of Contents
Delicious No-Bake Banana Split Cake Recipe
Introduction
Did you know that according to a survey by the National Ice Cream Association, over 90% of Americans enjoy ice cream or frozen treats during the summer months? If you’re craving that classic banana split flavor without the hassle of baking on a hot day, our No-Bake Banana Split Cake is the perfect solution. This delightful dessert layers creamy textures with fruity bananas, juicy pineapple, crunchy nuts, and decadent chocolate drizzles—all without stepping near the oven. Whether you’re hosting a backyard barbecue or just treating yourself, this cake captures the essence of a traditional banana split in no-bake form, making it an ideal choice for those warm-weather cravings.
What makes this No-Bake Banana Split Cake so irresistible is its simplicity and the way it combines all the beloved elements of the classic dessert into a stunning, layered presentation. You’ll love how the soft graham cracker crust provides a buttery base that contrasts beautifully with the fluffy whipped cream cheese filling. Top it with sliced bananas that offer a natural sweetness and slight tartness, fresh pineapple chunks for a tropical burst, and of course, a generous sprinkle of chocolate shavings and chopped nuts for that nutty crunch. It’s not just a dessert; it’s a nostalgic journey back to the ice cream parlor, but in cake form. Plus, since it’s no-bake, it’s ready in under an hour of active time, leaving you more room for enjoying the moment.
In this comprehensive guide, we’ll walk you through every step to create this mouthwatering treat. From gathering your ingredients to advanced serving tips, we’ve got everything covered to ensure your No-Bake Banana Split Cake turns out perfect every time. Whether you’re a seasoned baker or a kitchen newbie, you’ll find our detailed instructions easy to follow, with plenty of tips to customize it to your preferences. So, if you’re ready to impress your family and friends with a dessert that’s as fun to make as it is to eat, let’s dive into the recipe for our No-Bake Banana Split Cake!
Ingredients List
To make our No-Bake Banana Split Cake, you’ll need a handful of pantry staples and fresh ingredients. This recipe serves 8-10 people and focuses on quality components that deliver layered flavors reminiscent of the classic banana split. We’ve included sensory descriptions to help you visualize the textures and tastes, along with substitution options for dietary needs.
- Graham Cracker Crust: 2 cups crushed graham crackers (for a sandy, slightly sweet base)—substitute with crushed digestive biscuits or shortbread for a richer flavor; it crumbles apart under your fingers, offering a firm yet tender bite at the first layer.
- Butter: 1/2 cup melted unsalted butter (for binding the crust)—substitute with coconut oil for a vegan twist; the warm, nutty aroma melts into the crackers, creating a golden, cohesive layer.
- Cream Cheese Filling: 2 (8-ounce) packages of softened cream cheese (for creaminess)—substitute with dairy-free cream cheese to keep it lactose-free; it’s velvety smooth, with a tangy edge that balances the sweetness.
- Sugar: 1/2 cup granulated sugar (for sweetness)—substitute with a sugar alternative like stevia for low-sugar versions; it dissolves into a subtle, honey-like sweetness that enhances the filling.
- Vanilla Extract: 2 teaspoons (for flavor depth)—substitute with almond extract for a nuttier profile; the fragrant, floral notes brighten the mixture.
- Heavy Whipping Cream: 1 cup (for whipped topping)—substitute with coconut whipped cream for a vegan option; it whips into fluffy clouds with a rich, buttery taste.
- Bananas: 4 ripe bananas, sliced (for fruity freshness)—substitute with plantains if you want a firmer texture; each slice bursts with juicy sweetness and a subtle starchiness.
- Pineapple: 1 (20-ounce) can crushed pineapple, drained (for tropical tang)—substitute with fresh diced pineapple for more intensity; it adds a bright, acidic pop that cuts through the creaminess.
- Chocolate Shavings: 1/2 cup semi-sweet chocolate shavings (for decadence)—substitute with milk chocolate or dark for different cocoa levels; the melty, bitter-sweet shards melt on your tongue.
- Chopped Nuts: 1/2 cup chopped walnuts or peanuts (for crunch)—substitute with almonds for a milder flavor; they provide a toasty, earthy crunch that contrasts the softness.
- Maraschino Cherries: 1 jar maraschino cherries, drained (for vibrant garnish)—substitute with fresh cherries or omit for fruit-free; their candy-like sweetness and bright red hue add playful pops.
These ingredients come together to create a symphony of textures—from crunchy crust to creamy filling and juicy fruits. Ensure your bananas are ripe but not mushy for the best flavor, and adjust quantities based on your crowd size. With these, you’re all set to build layers of indulgence.
Timing
Our No-Bake Banana Split Cake is designed for efficiency, making it faster than traditional baked desserts. You’ll spend about 20 minutes on prep, including crushing crackers and whipping ingredients, with zero cook time since it’s no-bake. The total time is around 4-5 hours, including chilling, as the cake needs to set in the fridge. This is quicker than many cakes, which often require baking for 30-45 minutes and cooling for another hour—perfect for spontaneous summer entertaining where you don’t want to heat up the kitchen.
Compared to average banana bread recipes, which take 60-70 minutes total, this no-bake version saves time on active preparation. Use a 9×13-inch dish for easy slicing, and remember, chilling ensures the creamy layers set properly without any oozing.
Step-by-Step Instructions
Follow these clear, actionable steps to assemble your No-Bake Banana Split Cake. We’ll use personalized language to make it feel like we’re baking together—grab your apron and let’s get started!
Step 1: Prepare the Crust
Start by mixing your dry ingredients for that solid base. In a medium bowl, combine the crushed graham crackers with the melted butter until it resembles wet sand. Press this mixture firmly into the bottom of a 9×13-inch baking dish, using the back of a spoon or your fingers to create an even layer. Pop it in the fridge to set while you prepare the next layer—this will give it a nice, crisp foundation.
Step 2: Whip the Cream Cheese Filling
In a large mixing bowl, beat the softened cream cheese until smooth and creamy—you’ll want it lump-free for the best texture. Gradually add the sugar and vanilla extract, whipping until combined. In a separate bowl, whip the heavy cream to stiff peaks, then fold it gently into the cream cheese mixture. This creates a light, fluffy filling that mimics whipped cream but holds its shape. Spread it evenly over the chilled crust, smoothing the top with a spatula.
Step 3: Layer the Bananas and Toppings
Now for the fun part: arrange half of the sliced bananas in a single layer over the cream cheese filling. Drizzle with chocolate shavings and sprinkle chopped nuts. This layer adds natural sweetness and a crunch that pairs perfectly with the creamy base—imagine the contrast in every bite!
Step 4: Add the Pineapple and Whipped Cream
Top the banana layer with the drained crushed pineapple, spreading it out gently with a spoon. Whip up another batch of whipped cream (or use your extras) and spread it over the pineapple for extra fluffiness. If you don’t have leftover, a fresh can helps— it’s all about building those tropical vibes.
Step 5: Finish with Chocolate and Nuts
Layer the remaining banana slices on top of the whipped cream, then garnish generously with more chocolate shavings, nuts, and drained maraschino cherries. For an extra touch, press a few whole cherries into the cream—they add color and that classic cherry-on-top flair.
Step 6: Chill and Serve
Cover the dish with plastic wrap and refrigerate for at least 4 hours, or overnight for the best results. This allows the flavors to meld and the layers to firm up. When ready to serve, slice into squares and enjoy the masterpiece you’ve created!
Nutritional Information
While this No-Bake Banana Split Cake is indulgent, knowing its nutritional breakdown can help you enjoy it mindfully. Based on standard ingredients and serving 10 people, here’s a per-slice overview (approximate values):
- Calories: Approximately 320 per slice—providing a satisfying energy boost from the carbs and fats.
- Carbohydrates: About 35g, largely from the graham crackers, bananas, and pineapple, offering natural sugars and fiber.
- Protein: Around 6g, derived from the cream cheese and nuts, supporting muscle repair mildly.
- Fat: Roughly 22g, mostly healthy from the butter and nuts, with some saturated fats for richness.
- Vitamins and Minerals: High in potassium from bananas, vitamin C from pineapple, and heart-healthy fats from nuts.
Note that these values can vary based on exact ingredient brands and portion sizes. For a more precise analysis, use a nutrition calculator or app. This dessert isn’t everyday fare due to its calorie content, but it’s great for special occasions when paired with balanced meals.
Healthier Alternatives
If you want to lighten up this No-Bake Banana Split Cake while preserving its signature flavors, consider these flavor-preserving swaps. They maintain the creamy, fruity, and nutty profile without sacrificing taste.
- Low-Calorie Filling: Use Greek yogurt mixed with reduced-fat cream cheese instead of full-fat to cut calories while keeping tanginess—swap 1:1 and whip it the same way for similar fluffiness.
- Glycemic-Friendly Crust: Replace graham crackers with almond flour or oat-based granola for lower carbs, retaining the sandy texture through similar binding with butter.
- Sugar Reduction: Substitute granulated sugar with monk fruit sweetener in a 1:1 ratio; it mimics sweetness without the blood sugar spike, ensuring the vanilla and fruit shine through.
- Nut-Free Option: Omit nuts and boost crunch with toasted coconut flakes for a tropical twist that keeps the mouthfeel intact.
- Fruit Boost: Add more bananas or pineapple while reducing sugar in the filling, enhancing natural sweetness and fiber for a guilt-free indulgence.
These adjustments can reduce calories by up to 30% without altering the core experience. Experiment slowly to find your perfect balance—it’s all about enjoying dessert responsibly!
Serving Suggestions
Enhance your No-Bake Banana Split Cake with creative ways to make each bite even more memorable. Serve it chilled straight from the fridge for the best texture, or customize for different occasions.
- Classic Presentation: Slice into squares and top with extra cherries—pair with coffee for an adult treat or milk for kids.
- Party Twist: Cut into smaller pieces and serve in bowls with vanilla ice cream scoops on the side for a “split” variation.
- Breakfast Hack: Enjoy leftovers in the morning with yogurt; the cake softens slightly after chilling overnight.
- Dietary Variations: Drizzle with sugar-free chocolate syrup for diabetics, or add mint leaves for a fresh contrast.
- Themed Events: For Picnics: Bring pre-sliced and transport in a cooler; for Potlucks: Double the recipe and garnish with themed fruits.
Always serve within 24 hours after dusting with nuts for optimal freshness. This cake pairs wonderfully with light summer beverages like iced tea or lemon water to cut through the richness.
Common Mistakes
Avoid these pitfalls to ensure your No-Bake Banana Split Cake comes out flawless. Many home cooks encounter these, but with awareness, you can achieve perfection.
- Over-Crushing the Crust: Don’t pulverize the crackers into dust—keep them crumbly for better texture; if too fine, the crust becomes gummy.
- Not Draining Pineapple: Failing to drain leads to soggy layers; press excess juice out with a strainer for a firm bite.
- Under-Chilling: Skipping the full 4-hour chill results in sloppy servings; patience is key for setting.
- Banana Oxidation: Bananas brown quickly—coat with lemon juice if making ahead to preserve color.
- Overmixing Cream Filling: Whip cream to stiff peaks, but fold gently to avoid deflation; it should stay airy.
Watch for these and troubleshoot on the fly—our recipe’s steps are designed to minimize errors, but these tips will save your bake!
Storing Tips
To keep your No-Bake Banana Split Cake fresh, focus on airtight storage to prevent drying or absorption of fridge odors. This dessert holds up well thanks to its creamy components.
- Refrigeration: Store covered in the fridge for up to 3 days; the cold keeps the whipped cream stable and prevents bacterial growth.
- Freezing Option: Freeze individual slices wrapped in plastic for up to 2 months—thaw overnight in the fridge for best results, though texture may soften slightly.
- Portion Control: Cut only what you’ll use immediately to maintain crispness; cover leftovers tightly with foil or plastic wrap.
- Make-Ahead: Assemble up to 24 hours before serving, but add bananas and nuts just before eating to avoid sogginess or staleness.
- Avoid Heat: Never store near heat sources; condensation can ruin the layers.
Proper storage extends its shelf life, ensuring you can enjoy remnants for snacks. Always label and date leftovers for safety!
This vibrant, finished cake is ready to delight your guests with its colorful layers and tempting aromas!
Conclusion
In summary, this No-Bake Banana Split Cake recipe brings together the beloved flavors of a classic dessert in a simple, oven-free creation. From the crispy crust to the creamy layers and fruity toppings, it’s a celebration of textures and tastes that’s perfect for any occasion. With our detailed steps, nutritional insights, and helpful tips, you’re equipped to make a standout dish that impresses without the fuss.
If you loved this recipe, why not try experimenting with variations next time? Share your creations with us in the comments or social media—we’d love to see how you personalize it. And don’t forget to subscribe for more easy, delicious recipes like this. Happy baking (or, should we say, no-baking)? Let’s create more memories in the kitchen!
Ready to whip up this No-Bake Banana Split Cake? Gather your ingredients and let’s get started—it’s time to satisfy those sweet cravings!
FAQs
***Can I make this cake ahead of time?***
Absolutely! Assemble it up to 24 hours in advance and keep it chilled. Add perishable toppings like bananas and nuts just before serving to maintain freshness and prevent sogginess.
***What can I use if I don’t have graham crackers?***
No worries! Oreo cookies (for chocolate lovers) or vanilla wafers work well as substitutes. Crush them the same way and bind with butter for a similar crust.
***Is there a dairy-free version of this recipe?***
Yes, swap cream cheese for dairy-free alternatives, use coconut or oat cream for whipping, and choose vegan butter. The flavors remain just as delightful!
***How do I prevent the bananas from turning brown?***
Spritz the sliced bananas with lemon juice or a light citrus marinade before layering. This acidic touch slows oxidation while adding a subtle zing.
***Can I add more chocolate to make it richer?***
Definitely! Melt chocolate and drizzle it over the cake for extra indulgence. It’s all about personal taste—go wild with your toppings!
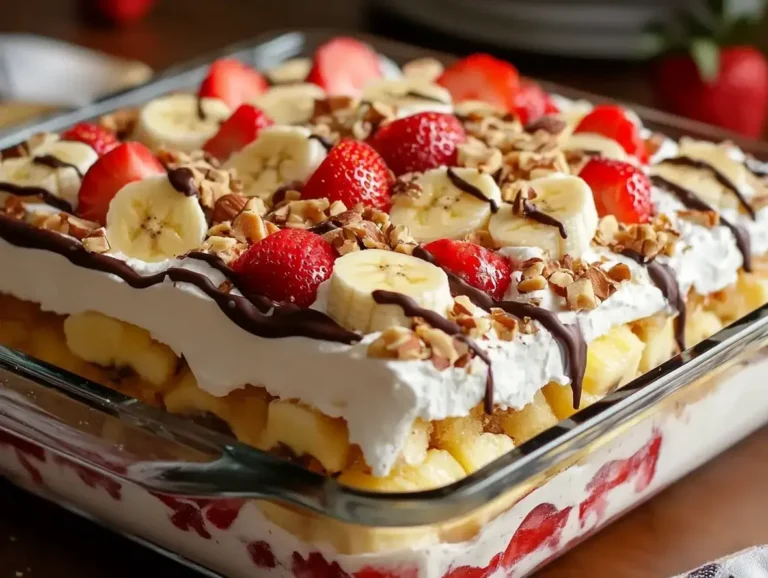
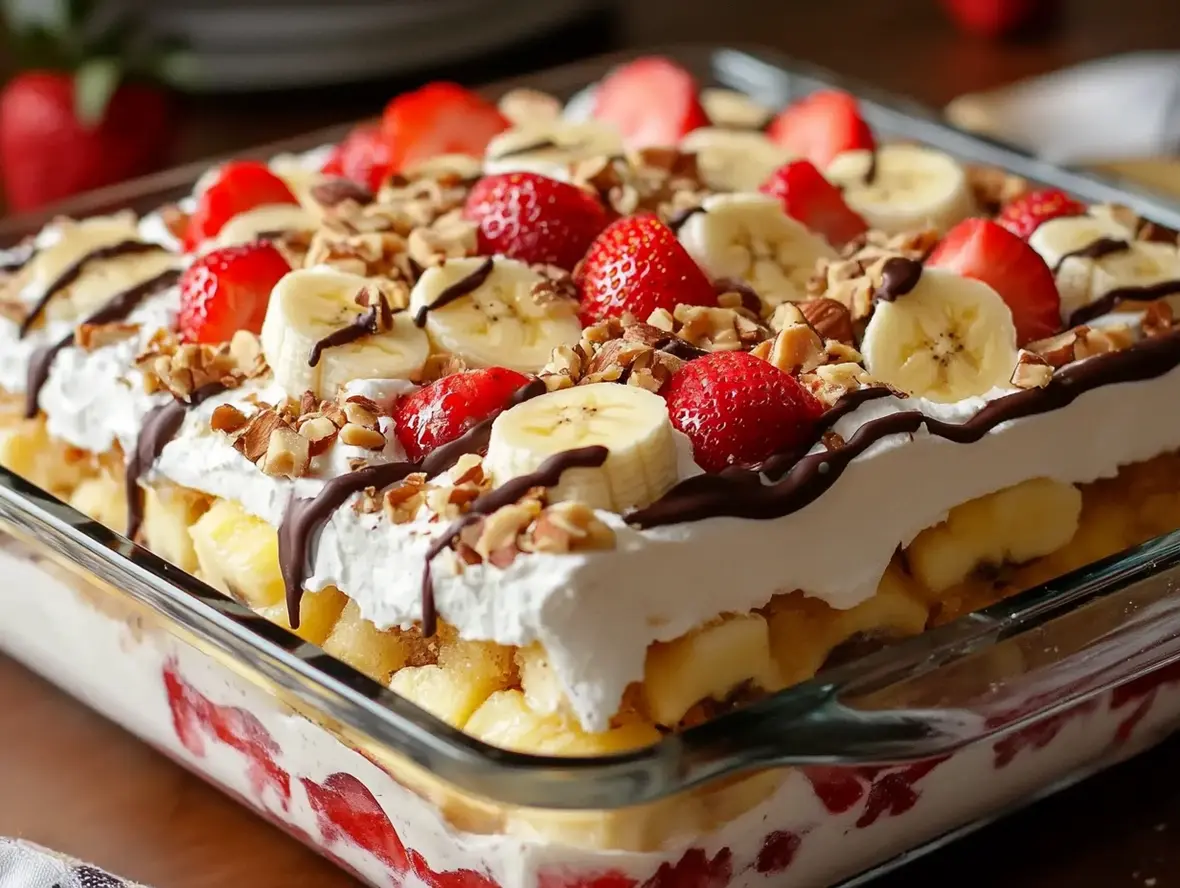
No-Bake Banana Split Cake
This delightful no-bake dessert combines all the flavors of a classic banana split into a luscious, layered cake. Perfect for warm days when you want a sweet treat without turning on the oven. Creamy, fruity, and nutty with a touch of chocolate—this dessert is sure to impress!
Ingredients
- 2 cupsgraham cracker crumbs1/3 cupunsalted butter, melted1 tspsalt
- 1/3 cupunsalted butter, melted1 tspsalt
- 1 tspsalt
- 16 ozcream cheese, softened1/2 cupgranulated sugar8 ozwhipped topping (e.g., Cool Whip)1 tspvanilla extract
- 1/2 cupgranulated sugar8 ozwhipped topping (e.g., Cool Whip)1 tspvanilla extract
- 8 ozwhipped topping (e.g., Cool Whip)1 tspvanilla extract
- 1 tspvanilla extract
- 3to4bananas, sliced20 ozcan crushed pineapple, well-drained20 ozstrawberries, sliced8 ozwhipped topping (e.g., Cool Whip)1/2 cupchopped hazelnuts (or your favorite nuts)Chocolate sauce (for drizzling)
- 20 ozcan crushed pineapple, well-drained20 ozstrawberries, sliced8 ozwhipped topping (e.g., Cool Whip)1/2 cupchopped hazelnuts (or your favorite nuts)Chocolate sauce (for drizzling)
- 20 ozstrawberries, sliced8 ozwhipped topping (e.g., Cool Whip)1/2 cupchopped hazelnuts (or your favorite nuts)Chocolate sauce (for drizzling)
- 8 ozwhipped topping (e.g., Cool Whip)1/2 cupchopped hazelnuts (or your favorite nuts)Chocolate sauce (for drizzling)
- 1/2 cupchopped hazelnuts (or your favorite nuts)Chocolate sauce (for drizzling)
- Chocolate sauce (for drizzling)
Instructions
- 1️⃣Prepare the Crust:In a medium bowl, combine graham cracker crumbs, melted butter, and salt.Press the mixture firmly into the bottom of a greased 9×13-inch baking dish to create an even crust.Refrigerate the crust while preparing the filling.2️⃣Make the Filling:In a large bowl, beat the softened cream cheese with sugar and vanilla extract until smooth and creamy.Gently fold in the whipped topping until fully combined.Spread the filling evenly over the chilled crust, smoothing the top with a spatula.3️⃣Add the Layers:Arrange banana slices evenly over the filling.Spread the well-drained crushed pineapple over the bananas.Add a layer of sliced strawberries on top of the pineapple.4️⃣Top and Chill:Spread another layer of whipped topping over the strawberries.Drizzle chocolate sauce over the whipped topping and sprinkle with chopped hazelnuts.Cover the dish with plastic wrap and refrigerate for at least 4 hours, or preferably overnight, to set the layers.5️⃣Serve:Slice the cake into squares and serve chilled. Enjoy the sweet and fruity goodness of this no-bake dessert!
- In a medium bowl, combine graham cracker crumbs, melted butter, and salt.
- Press the mixture firmly into the bottom of a greased 9×13-inch baking dish to create an even crust.Refrigerate the crust while preparing the filling.2️⃣Make the Filling:In a large bowl, beat the softened cream cheese with sugar and vanilla extract until smooth and creamy.Gently fold in the whipped topping until fully combined.Spread the filling evenly over the chilled crust, smoothing the top with a spatula.3️⃣Add the Layers:Arrange banana slices evenly over the filling.Spread the well-drained crushed pineapple over the bananas.Add a layer of sliced strawberries on top of the pineapple.4️⃣Top and Chill:Spread another layer of whipped topping over the strawberries.Drizzle chocolate sauce over the whipped topping and sprinkle with chopped hazelnuts.Cover the dish with plastic wrap and refrigerate for at least 4 hours, or preferably overnight, to set the layers.5️⃣Serve:Slice the cake into squares and serve chilled. Enjoy the sweet and fruity goodness of this no-bake dessert!
- Refrigerate the crust while preparing the filling.2️⃣Make the Filling:In a large bowl, beat the softened cream cheese with sugar and vanilla extract until smooth and creamy.Gently fold in the whipped topping until fully combined.Spread the filling evenly over the chilled crust, smoothing the top with a spatula.3️⃣Add the Layers:Arrange banana slices evenly over the filling.Spread the well-drained crushed pineapple over the bananas.Add a layer of sliced strawberries on top of the pineapple.4️⃣Top and Chill:Spread another layer of whipped topping over the strawberries.Drizzle chocolate sauce over the whipped topping and sprinkle with chopped hazelnuts.Cover the dish with plastic wrap and refrigerate for at least 4 hours, or preferably overnight, to set the layers.5️⃣Serve:Slice the cake into squares and serve chilled. Enjoy the sweet and fruity goodness of this no-bake dessert!
- 2️⃣Make the Filling:
- In a large bowl, beat the softened cream cheese with sugar and vanilla extract until smooth and creamy.Gently fold in the whipped topping until fully combined.Spread the filling evenly over the chilled crust, smoothing the top with a spatula.3️⃣Add the Layers:Arrange banana slices evenly over the filling.Spread the well-drained crushed pineapple over the bananas.Add a layer of sliced strawberries on top of the pineapple.4️⃣Top and Chill:Spread another layer of whipped topping over the strawberries.Drizzle chocolate sauce over the whipped topping and sprinkle with chopped hazelnuts.Cover the dish with plastic wrap and refrigerate for at least 4 hours, or preferably overnight, to set the layers.5️⃣Serve:Slice the cake into squares and serve chilled. Enjoy the sweet and fruity goodness of this no-bake dessert!
- Gently fold in the whipped topping until fully combined.Spread the filling evenly over the chilled crust, smoothing the top with a spatula.3️⃣Add the Layers:Arrange banana slices evenly over the filling.Spread the well-drained crushed pineapple over the bananas.Add a layer of sliced strawberries on top of the pineapple.4️⃣Top and Chill:Spread another layer of whipped topping over the strawberries.Drizzle chocolate sauce over the whipped topping and sprinkle with chopped hazelnuts.Cover the dish with plastic wrap and refrigerate for at least 4 hours, or preferably overnight, to set the layers.5️⃣Serve:Slice the cake into squares and serve chilled. Enjoy the sweet and fruity goodness of this no-bake dessert!
- Spread the filling evenly over the chilled crust, smoothing the top with a spatula.
- 3️⃣Add the Layers:Arrange banana slices evenly over the filling.Spread the well-drained crushed pineapple over the bananas.Add a layer of sliced strawberries on top of the pineapple.4️⃣Top and Chill:Spread another layer of whipped topping over the strawberries.Drizzle chocolate sauce over the whipped topping and sprinkle with chopped hazelnuts.Cover the dish with plastic wrap and refrigerate for at least 4 hours, or preferably overnight, to set the layers.5️⃣Serve:Slice the cake into squares and serve chilled. Enjoy the sweet and fruity goodness of this no-bake dessert!
- Arrange banana slices evenly over the filling.Spread the well-drained crushed pineapple over the bananas.Add a layer of sliced strawberries on top of the pineapple.4️⃣Top and Chill:Spread another layer of whipped topping over the strawberries.Drizzle chocolate sauce over the whipped topping and sprinkle with chopped hazelnuts.Cover the dish with plastic wrap and refrigerate for at least 4 hours, or preferably overnight, to set the layers.5️⃣Serve:Slice the cake into squares and serve chilled. Enjoy the sweet and fruity goodness of this no-bake dessert!
- Spread the well-drained crushed pineapple over the bananas.
- Add a layer of sliced strawberries on top of the pineapple.4️⃣Top and Chill:Spread another layer of whipped topping over the strawberries.Drizzle chocolate sauce over the whipped topping and sprinkle with chopped hazelnuts.Cover the dish with plastic wrap and refrigerate for at least 4 hours, or preferably overnight, to set the layers.5️⃣Serve:Slice the cake into squares and serve chilled. Enjoy the sweet and fruity goodness of this no-bake dessert!
- 4️⃣Top and Chill:Spread another layer of whipped topping over the strawberries.Drizzle chocolate sauce over the whipped topping and sprinkle with chopped hazelnuts.Cover the dish with plastic wrap and refrigerate for at least 4 hours, or preferably overnight, to set the layers.5️⃣Serve:Slice the cake into squares and serve chilled. Enjoy the sweet and fruity goodness of this no-bake dessert!
- Spread another layer of whipped topping over the strawberries.
- Drizzle chocolate sauce over the whipped topping and sprinkle with chopped hazelnuts.Cover the dish with plastic wrap and refrigerate for at least 4 hours, or preferably overnight, to set the layers.5️⃣Serve:Slice the cake into squares and serve chilled. Enjoy the sweet and fruity goodness of this no-bake dessert!
- Cover the dish with plastic wrap and refrigerate for at least 4 hours, or preferably overnight, to set the layers.5️⃣Serve:Slice the cake into squares and serve chilled. Enjoy the sweet and fruity goodness of this no-bake dessert!
- 5️⃣Serve:
- Slice the cake into squares and serve chilled. Enjoy the sweet and fruity goodness of this no-bake dessert!
Notes
Customization:Swap hazelnuts for walnuts, almonds, or pecans, depending on your preference.Storage:Store leftovers in the refrigerator, covered, for up to 3 days.Make-Ahead Friendly:This dessert can be made the night before for convenience.
Storage:Store leftovers in the refrigerator, covered, for up to 3 days.Make-Ahead Friendly:This dessert can be made the night before for convenience.
Make-Ahead Friendly:This dessert can be made the night before for convenience.