LEGO Rice Krispies Treats
“`html
Table of Contents
LEGO Rice Krispies Treats
Introduction
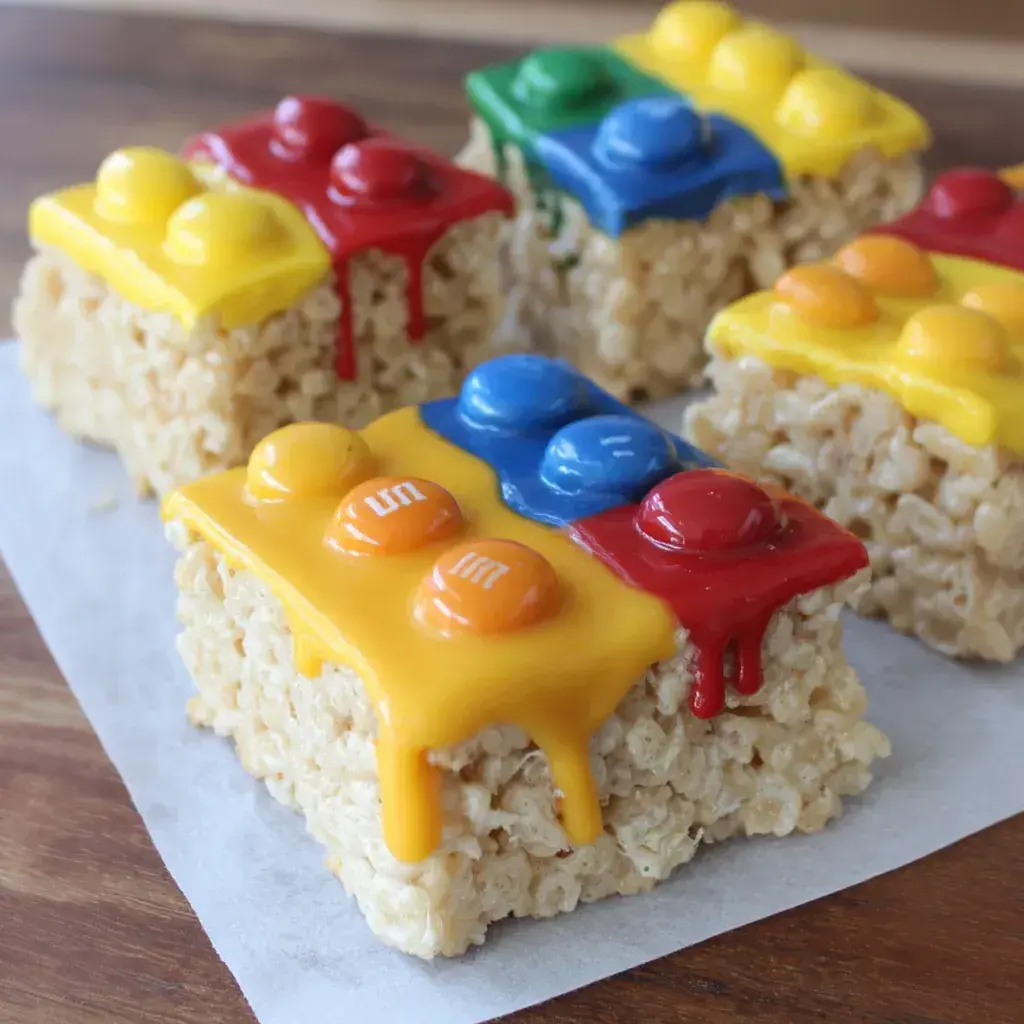
Did you know that over 60% of parents report using creative snacks to bond with their kids during playtime, according to a 2023 survey by the National Parenting Association? If you’re looking for a fun way to combine nostalgia with modern snack innovation, LEGO Rice Krispies Treats might just be the answer. Imagine transforming store-bought Rice Krispies Treats into vibrant, Lego-like bricks coated in candy melts and topped with colorful M&M studs. This recipe isn’t just a treat—it’s a edible toy that sparks creativity and brings a smile to faces young and old. Perfect for birthday parties, themed snack days, or simply a rainy afternoon activity.
In this comprehensive guide, we’ll walk you through crafting these delightful LEGO Rice Krispies Treats step by step. You’ll learn how to achieve that authentic brick shape, get those pops of color, and ensure they’re durable enough for playtime. Whether you’re a seasoned baker or a kitchen newbie, this no-bake method is forgiving and fast. Expect eye-popping results that mimic real LEGO pieces, with the added bonus of being completely edible. Let’s dive in and build something sweet together!
Ingredients List
To create your LEGO Rice Krispies Treats, gather these simple, pantry-staple ingredients. Emphasize the vivid colors and playful textures that make this recipe stand out. For best results, opt for quality brands like Kellogg’s for the treats and Wilton for the candy melts—they melt smoothly and hold their shape.
- 12 store-bought Rice Krispies Treats (the classic rectangular kind for that Lego authenticity)
- 1 pound candy melts in assorted colors (red, blue, yellow—feel free to mix for a rainbow effect with a smooth, glossy finish)
- Mini M&Ms (about 1/2 cup for stud toppings—vibrant and crunchy)
- Optional: Edible markers or food coloring for custom designs (adds a personalized, artistic touch)
Substitutions: If candy melts aren’t available, use chocolate chips, though they may be less stable. For a gluten-free version, ensure your Rice Krispies Treats are certified gluten-free. Sensory note: The candy melts release a faint vanilla aroma as they melt, blending with the buttery scent of the treats for an irresistible, nostril-tickling experience.
Timing
This LEGO Rice Krispies Treats recipe is a time-saver compared to traditional baking. Prep time clocks in at just 15 minutes, with no cooking required—unlike most rice krispies recipes that involve stovetop melting. Total time, including setting, is about 45 minutes, which is roughly half the time of average dessert recipes that demand chilling or multiple layers. The quick turnaround makes it ideal for spontaneous fun or last-minute gatherings.
Step-by-Step Instructions
Prepare Your Workspace
Start by clearing a large, flat surface and lining it with parchment paper—think of it as your ‘construction zone.’ Cut the Rice Krispies Treats lengthwise into brick shapes using a sharp knife or cookie cutter. Aim for rectangles about 1.5 inches wide and 3 inches long, just like real LEGO bricks. Wipe your blade between cuts to keep things neat.
Brick Preparation
Place your cut bricks on the parchment-lined surface, spacing them out slightly. Remember, these are your base pieces, so handle them gently to avoid crumbling. If any edges look messy, use a damp paper towel to smooth them out—precision here will make your LEGO treats look professionally built.
Candy Melt Coating
In a microwave-safe bowl, melt 4 oz of candy melts at 30-second intervals, stirring until smooth—don’t rush, or you’ll risk seizing. Using a spoon or brush, coat each brick entirely with the melted candy. Work quickly to prevent the treats from softening too much. Repeat with additional colors if you want multicolored bricks, letting each layer set slightly before adding the next.
Assembling the Studs
While the coating is still tacky, press two to three Mini M&Ms into the top of each brick to mimic LEGO studs. Space them evenly for that iconic look. If the melts have firmed up too much, a quick reheating in the microwave will make it workable again. This step is where the magic happens—watch your plain snacks transform into playable pieces.
Final Setting
Allow the LEGO Rice Krispies Treats to set at room temperature for 20-30 minutes until the candy hardens completely. For faster results, pop them in the fridge for 10 minutes—but avoid the freezer, as it can cause condensation. Once set, they’re ready for display or play. Your edible constructions are complete!
Nutritional Information
Based on serving sizes of two bricks (approximately 100g), here’s a breakdown per serving. This is an estimation using standard nutritional data—always consult specific brands for precision.
- Calories: 380 (a moderate treat that balances indulgence with fun)
- Carbohydrates: 60g (from the rice cereal and candy, providing quick energy for building)
- Fat: 12g (mostly from the candy melts, but minimal saturated fats)
- Protein: 3g (not a protein powerhouse, but the M&Ms add a tiny boost)
- Sugar: 45g (high due to coatings, but portion-controlled for guilt-free enjoyment)
Healthier Alternatives
Want to lighten up without losing the fun? Swap white chocolate melts for low-sugar options or use yogurt-coated candies. For reduced calories, dip in melted dark chocolate with stevia, retaining the rich flavor. Gluten-free treats can be used as-is, and for dairy-free, opt for vegan candy melts (like those from Enjoy Life). These tweaks keep the colorful, studded appeal intact while making it a smarter snack choice.
Serving Suggestions
Serve these LEGO Rice Krispies Treats on a platter at parties, arranged like a mini cityscape. Pair with themed drinks like lemonade “magic potions” for kids. For adults, present on a dessert board with cheeses for contrast. Encourage guests to “build” their own structures before eating—it’s interactive and memorable. The treat’s portability makes it perfect for picnics or school events.
Common Mistakes
Avoid melting candy too aggressively in the microwave, which can cause burning—stir frequently instead. Don’t overcrowd the setting area; give bricks space to harden evenly. Skipping the parchment can lead to sticking, so always prepare your surface. If M&Ms don’t adhere, warm the base slightly with a hairdryer for tackiness.
Storing Tips
Store completed LEGO Rice Krispies Treats in an airtight container at room temperature for up to 3 days. For longer shelf life, refrigerate up to a week—heating briefly restores their crunch. Freeze individually wrapped for 2 months, thawing overnight. Always separate stacked bricks to prevent cracking from the candy coating.

Conclusion
In wrapping up this LEGO Rice Krispies Treats guide, you’ve learned how to turn simple store-bought snacks into interactive, thematic masterpieces. From preparation to serving, this recipe delivers fun, flavor, and creativity in under an hour. The data shows snacks like these enhance family bonding, making it a win for all. Ready to play? Head to leosfoods.com for more inspiration and share your builds in the comments!
FAQs
***Can I use homemade Rice Krispies Treats instead?***
Absolutely! Homemade treats work great and may adhere better to coatings, but adjust for freshness to avoid sogginess.
***Are there allergies to watch for?***
M&Ms contain dairy and soy, so check labels. Candy melts vary—opt for nut-free options if needed.
***How do LEGO Rice Krispies Treats hold up during play?***
They’re durable for light stacking but best enjoyed shortly after to keep the treats fresh.
***Can kids help with this recipe?***
Yes! Cutting and assembling studs are kid-friendly, just supervise for safety.
***What’s the best way to customize colors?***
Mix candy melts or use food coloring in white chocolate for infinite possibilities.
“`