Irresistible Mini Crème Brûlée Cheesecakes
A Little Indulgence: Mini Crème Brûlée Cheesecakes
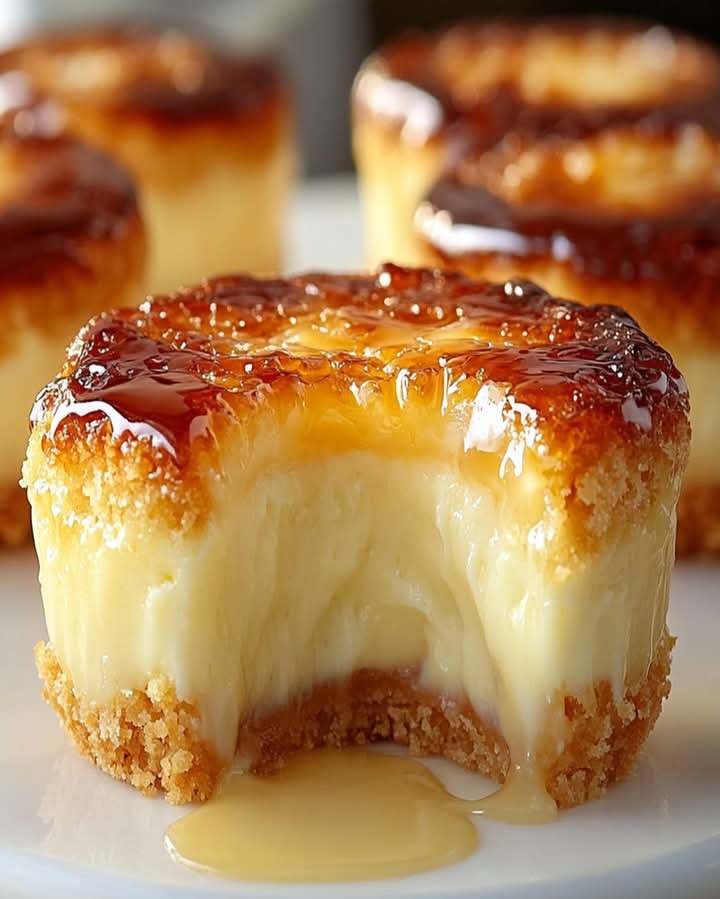
There’s something magical about the moment your spoon cracks through the caramelized sugar of a crème brûlée—that satisfying *snap* followed by the silky custard beneath. But what if I told you we could capture that same magic in a bite-sized cheesecake? These Mini Crème Brûlée Cheesecakes are my latest obsession, born from a rainy afternoon spent dreaming up ways to combine two of my favorite desserts. They’re elegant enough for a dinner party yet simple enough to whip up when the craving strikes (and trust me, it will).
Ingredients You’ll Need
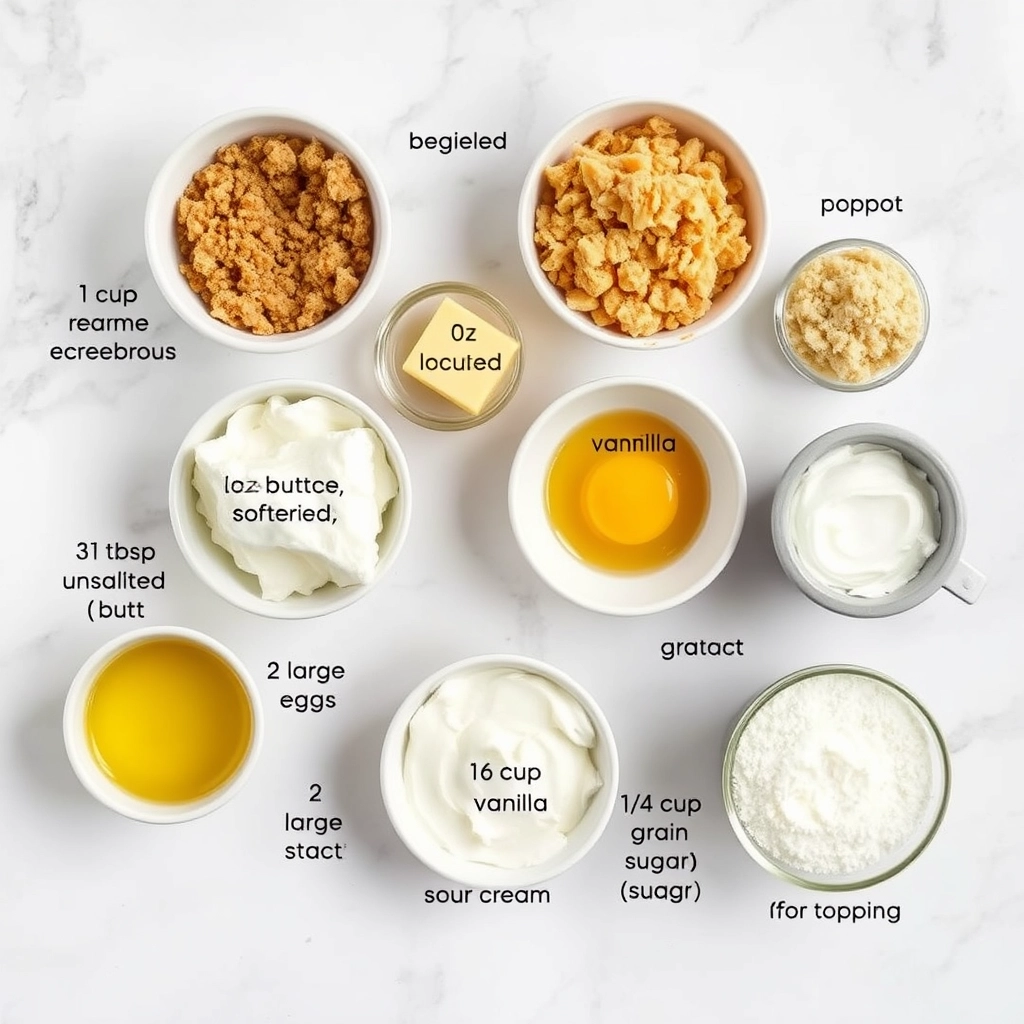
- Graham cracker crumbs – 1 ½ cups, for that buttery, slightly sweet base. If you’re feeling fancy, try biscoff crumbs instead!
- Butter, melted – 6 tablespoons, to bind the crust. Salted butter adds a lovely contrast to the sweetness.
- Cream cheese, room temperature – 16 oz (2 blocks). Full-fat is non-negotiable here—it’s what gives these cheesecakes their luscious texture.
- Granulated sugar – ½ cup, plus extra for torching later. Just enough sweetness without overpowering.
- Sour cream – ½ cup, for that subtle tang and creamy richness.
- Eggs – 2 large, at room temperature. This ensures a smooth, lump-free batter.
- Vanilla extract – 1 teaspoon, or scrape a vanilla bean if you’re feeling extra indulgent.
- Heavy cream – ¼ cup, to mimic that classic crème brûlée custard silkiness.
- Fine sugar for topping – Demerara or turbinado sugar works beautifully for that glass-like caramelized crust.
Let’s Make These Little Luxuries
1. Prep your crust: Preheat your oven to 325°F (165°C) and line a muffin tin with parchment liners. Mix the graham cracker crumbs and melted butter until it resembles wet sand, then press a heaping tablespoon into each liner. Bake for 5 minutes—just enough to set. Let them cool while you work on the filling.
2. Whip the filling: In a large bowl, beat the cream cheese and sugar until completely smooth—no lumps allowed! Scrape down the sides of the bowl often. Add the sour cream and vanilla, mixing until just combined. Then, gently beat in the eggs one at a time, followed by the heavy cream. Pro tip: Overmixing after adding the eggs can lead to cracks, so go easy!
3. Bake to perfection: Pour the filling over the cooled crusts, filling each liner almost to the top. Bake for 18-20 minutes—the centers should still have a slight jiggle. Let them cool in the turned-off oven with the door slightly ajar to prevent sinking (this is my secret for flawless cheesecakes!).
4. Chill out: Transfer the cheesecakes to the fridge for at least 4 hours, though overnight is even better. Patience is key here—they need time to set properly before their caramelized finale.
Pro Tips, Variations, and Substitutions
These mini crème brûlée cheesecakes are wonderfully forgiving, but here are a few expert tips to make them even better:
- Room temperature ingredients are key! Cold cream cheese can lead to lumps in your batter.
- For an extra crackly top, use superfine sugar when torching.
- No kitchen torch? Simply pop them under the broiler for 1-2 minutes (watch carefully!).
Delicious variations to try:
- Swap vanilla for orange zest or almond extract
- Add a teaspoon of instant espresso powder for coffee lovers
- Top with fresh berries before serving for a pop of color
Perfect Pairings
These elegant little desserts shine on their own, but here’s what I love serving them with:
- A pot of earl grey tea for afternoon indulgence
- Sparkling rosé for dinner parties
- Fresh raspberry coulis drizzled on the plate
- A simple whipped cream rosette for extra decadence
Storage & Reheating
These keep beautifully for special occasions:
- Refrigerator: Store covered for up to 5 days
- Freezer: Freeze before torching (up to 3 months). Thaw overnight in fridge.
- Re-crisping: If the sugar softens, just re-torch before serving!
Frequently Asked Questions
Can I make these gluten-free?
Absolutely! Just use gluten-free graham crackers or almond flour for the crust.
Why did my cheesecakes crack?
Don’t worry – they’ll still taste amazing! Cracks usually mean they cooled too quickly. Next time, try leaving them in the turned-off oven with the door slightly ajar.
Can I use a different size muffin tin?
Yes! For standard muffins, increase baking time by 5-7 minutes. For mini muffins, reduce by 3-5 minutes.
A Sweet Final Thought
There’s something magical about desserts that come in their own little packages – and these mini crème brûlée cheesecakes are no exception. Whether you’re hosting a fancy dinner party or just treating yourself to a moment of sweetness, these creamy, crackly delights never fail to bring joy. That satisfying “tap” as your spoon breaks through the caramelized sugar, the velvety cheesecake beneath… it’s pure happiness in every bite. I hope these become a cherished recipe in your kitchen just as they have in mine.
PrintIrresistible Mini Crème Brûlée Cheesecakes
Delicate mini cheesecakes with a caramelized sugar topping, combining the best of crème brûlée and cheesecake.
Ingredients
For the Crust:
- 1 cup graham cracker crumbs
- 3 tbsp unsalted butter, melted
- 16 oz cream cheese, softened
- 1/2 cup granulated sugar
- 2 large eggs
- 1 tsp vanilla extract
- 1/4 cup sour cream
- 1/4 cup granulated sugar (for topping)
Instructions
1. Prepare the Crust:
- Preheat oven to 325°F. Line a muffin tin with 12 liners.
- Mix graham cracker crumbs with melted butter. Press 1 tbsp into each liner.
- Beat cream cheese and sugar until smooth. Add eggs one at a time, then vanilla and sour cream.
- Divide batter evenly among liners. Bake for 20 minutes or until set.
- Chill for 2 hours. Sprinkle with sugar and caramelize with a kitchen torch.
Notes
You can customize the seasonings to taste.