Whipped Shortbread Cookies
“`html
Table of Contents
Whipped Shortbread Cookies
Introduction
Did you know that over 2 billion cookies are baked during the holiday season in the US alone? Among this festive avalanche, the quest for the perfect, melt-in-your-mouth texture is paramount. That’s where these Whipped Shortbread Cookies come in—a recipe that transforms just five simple pantry staples into clouds of buttery bliss. Unlike dense traditional shortbread, the secret lies in the aeration process, creating a texture so light it practically dissolves on your tongue. Perfect for Christmas cookie exchanges, afternoon tea, or as an elegant treat for any special occasion, these cookies prove that simplicity, when executed with precision, yields extraordinary results. Let’s dive into the art of creating these ethereal delights.
Ingredients List
The magic of this recipe is its minimalist ingredient list. Each component plays a critical role in achieving the signature airy texture and rich flavor.
- Unsalted Butter (1 cup / 226g), softened: The star of the show. Use high-quality, European-style butter (with a higher fat content) for the richest flavor and best structure. It should be softened to a cool room temperature—pliable but not greasy or melted. Substitution: For a slightly different flavor profile, you can use salted butter, but omit any additional salt from the recipe.
- Confectioners’ Sugar (1/2 cup / 60g), sifted: Also known as powdered sugar or icing sugar. Its fine texture incorporates seamlessly without the graininess of granulated sugar, contributing to the cookie’s smooth melt-away quality. Substitution: In a pinch, you can blend granulated sugar in a high-powered blender until powdery, but confectioners’ sugar with its cornstarch content is ideal.
- All-Purpose Flour (2 cups / 240g), spooned and leveled: The structural backbone. Spoon the flour into your measuring cup and level it off—don’t scoop directly from the bag to avoid compacting it, which leads to dry, tough cookies.
- Cornstarch (1/2 cup / 60g): The secret weapon for tenderness. Cornstarch inhibits gluten formation, ensuring the cookies stay delicate and crumbly.
- Pure Vanilla Extract (1 teaspoon): Adds a warm, aromatic depth. For an elevated twist, use vanilla bean paste or the seeds from half a vanilla pod.
- Pinch of Salt: Essential for balancing the sweetness and enhancing all the other flavors.
Timing
Compared to the average shortbread recipe which often requires chilling the dough for 30-60 minutes, this whipped version is remarkably quick. The aeration from extended whipping creates a stable dough that can be piped or shaped and baked immediately, saving you significant time—perfect for last-minute baking sessions.
Light as air, these whipped shortbread cookies are the epitome of buttery elegance.
Step-by-Step Instructions
Step 1: Creaming the Butter
In the bowl of a stand mixer fitted with the paddle attachment (or using a large bowl and a hand mixer), place your softened butter. Beat on medium-high speed for a full 5-7 minutes. This isn’t just mixing; it’s the crucial aeration phase. Watch as the butter transforms from a yellow block to a voluminous, pale, and almost whipped cream-like consistency. Scrape down the bowl halfway through to ensure even mixing.
Step 2: Incorporating the Sugar
With the mixer on low, gradually add the sifted confectioners’ sugar. Once incorporated, increase the speed to medium and beat for another 2 minutes. The mixture will become even fluffier. Now, add the vanilla extract and pinch of salt, mixing until just combined.
Step 3: Adding the Flour
In a separate bowl, whisk together the all-purpose flour and cornstarch. This ensures even distribution of the cornstarch, which is key for tenderness. With the mixer on the lowest setting, gradually add the dry ingredients to the butter mixture. Mix only until the flour disappears and a soft, pipeable dough forms. Overmixing at this stage will develop gluten and make the cookies tough.
Step 4: Piping and Shaping
Preheat your oven to 325°F (160°C). Line baking sheets with parchment paper. For classic shapes, fit a large piping bag with a star tip (like a 1M) and pipe rosettes or swirls. For a simpler approach, roll teaspoon-sized portions of dough into balls and place them on the sheet, then gently press the center with your thumb or the back of a spoon to create a slight indentation (perfect for holding a dollop of jam later!).
Step 5: Baking to Perfection
Bake for 12-15 minutes. The cookies are done when the bottoms are just barely golden and the tops are set but still very pale. They should not brown on top. This low-and-slow baking preserves their delicate texture. Let them cool on the baking sheet for 5 minutes before transferring to a wire rack to cool completely.
Nutritional Information
(Approximate values per cookie, based on a batch of 36 cookies)
- Calories: 85 kcal
- Total Fat: 5.5g
- Saturated Fat: 3.5g
- Carbohydrates: 8.5g
- Sugar: 2.5g
- Protein: 0.7g
Healthier Alternatives
You can make mindful swaps without sacrificing the ethereal texture:
- Butter: For a dairy-free version, use a high-fat, plant-based butter stick (not spread) that’s formulated for baking. The flavor will differ but the texture can remain surprisingly good.
- Flour: Substitute up to 1/4 of the all-purpose flour with almond flour for a nutty nuance and a slight protein boost. Do not substitute all the flour, as the structure will suffer.
- Sugar: The confectioners’ sugar is difficult to substitute directly. A monk fruit-based powdered sweetener can work, but check the blend’s composition—it should contain a bulking agent like erythritol to mimic the texture of real powdered sugar.
Serving Suggestions
- Classic & Elegant: Serve plain with a dusting of confectioners’ sugar or edible gold dust.
- Fruity Twist: Fill the thumbprint indentation with a tiny spoonful of raspberry jam, lemon curd, or salted caramel after baking.
- Chocolate Drizzle: Melt high-quality dark or white chocolate and drizzle artistically over the cooled cookies.
- With Beverages: Pair with a strong espresso, a glass of dessert wine, or a cup of Earl Grey tea to cut through the richness perfectly.
Common Mistakes
- Butter Temperature: Using butter that’s too cold won’t whip properly; using melted butter will result in greasy, flat cookies. Aim for cool room temperature (65-68°F).
- Overmixing the Flour: Once the dry ingredients are added, mix just until combined. Overworking the dough activates gluten, leading to tough cookies.
- Overbaking: These cookies bake at a lower temperature. Waiting for them to turn golden brown on top will result in a dry, crumbly texture instead of a melt-in-your-mouth one.
- Skipping the Cornstarch: The cornstarch is non-negotiable for the signature tender bite. Don’t omit it.
Storing Tips
- Room Temperature: Store in an airtight container at room temperature for up to 1 week. They actually taste better the next day as the flavors meld.
- Freezing Dough: Pipe or shape the dough onto a parchment-lined sheet, freeze solid, then transfer the frozen shapes to a freezer bag. Bake directly from frozen, adding 1-2 minutes to the baking time.
- Freezing Baked Cookies: Layer completely cooled cookies between sheets of parchment in an airtight container and freeze for up to 3 months. Thaw at room temperature.

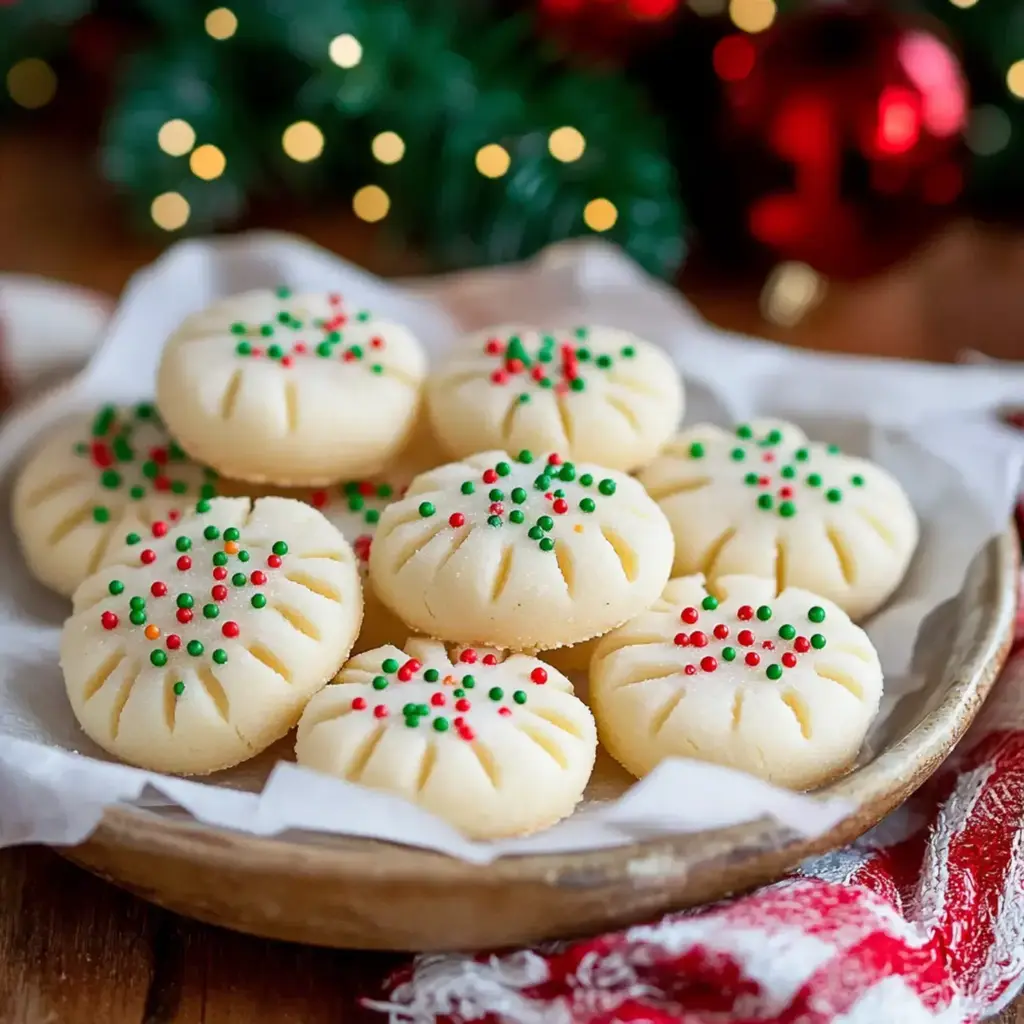
An elegant platter of whipped shortbread cookies, ready to impress at any gathering.
Conclusion
Mastering these Whipped Shortbread Cookies is about embracing the power of technique—transforming humble ingredients into something truly spectacular through the magic of air and patience. They are the ultimate crowd-pleaser, deceptively simple yet profoundly delicious. Whether you’re building a holiday cookie tin or need a last-minute elegant dessert, this recipe is your secret weapon. Now that you have the blueprint for buttery, melt-in-your-mouth perfection, it’s time to preheat your oven and start whipping!
Did you try this recipe? We’d love to see your creations! Tag @leosfoods on social media and share your photos. What’s your favorite way to decorate these airy cookies? Let us know in the comments below!