Chicken Enchilada Rice Casserole
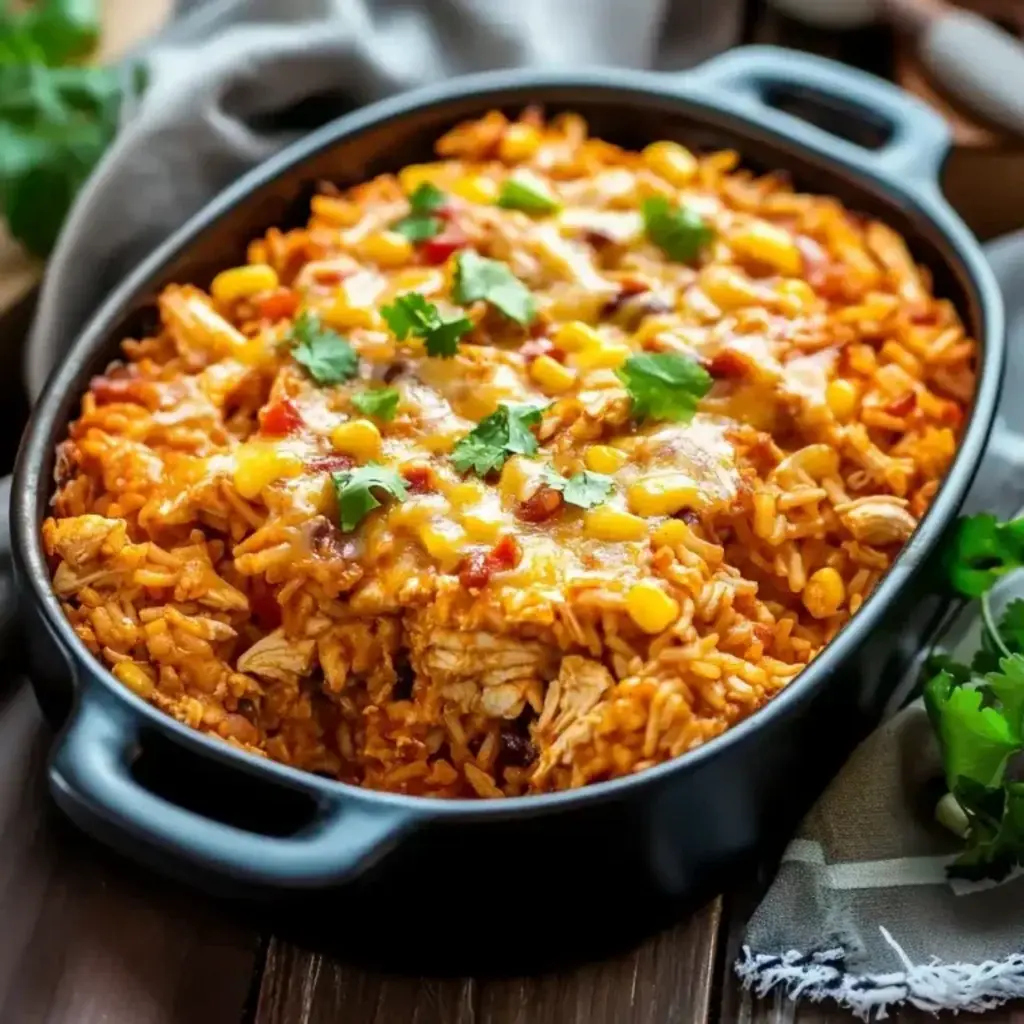
Table of Contents
Chicken Enchilada Rice Casserole Crispy Cheese Crust – One‑Pot Convenience
Growing up in Morocco, I learned early how a single pot could turn simple ingredients into a feast that fills the home with warmth. One rainy afternoon in a Parisian kitchen, I dreamed of merging those comforting vibes with the bold, smoky punch of Mexican classics, and the result was this Chicken Enchilada Rice Casserole with a crisp cheese crust – a dish that delivers a street‑food crunch in a cozy, oven‑baked form while keeping prep under 15 minutes.
Picture this: each grain of rice glazed in a rich, red enchilada sauce that has been softened by the mellow sweetness of corn and the heroic depth of black beans. The chicken, shredded from a rotisserie bird, lends a tender, juicy backbone that mingles with the sharp bite of cheddar and the silky melt of Monterey Jack. A sprinkle of cilantro and green onions pop like fresh summer leaves, while a drizzle of lime squeezes the surface into a golden, almost frosted stand‑up that screams “family dinner ready.”
I’ve spent years refining this recipe—time after time in my New York apartment kitchen—finding the perfect proportion of sauce to rice that locks in color without drowning flavor, and discovering that letting the cheese layer sit for a few minutes after baking gives a silky finish that still keeps that satisfying snap. The common challenge? Over‑baking the cheese. That turns the high‑energy crunch into a mush. My seasoned solution? Flip the oven to lower temperature in the last minutes to set the crust without overtopping it.
Why This Chicken Enchilada Rice Casserole Recipe Is the Best
The secret, darling, is the crispy cauliflower‑style crust that I borrowed from a quest to replicate French galette but in a casual Mexican flavor. By layering cheese in a thin top and nipping it at 375°F for fifteen minutes, the grains below crisp just enough to offer a contrast against the silky inside.
I work dish‑by‑dish precision with my rotisserie chicken—shredding only a quarter‑cup at a time so it stays moist. That technique, honed in my Paris culinary school, translates to a professional texture without labor. The salsa’s mild heat from the green chilies creates a gentle burn that never overwhelms, letting the flavors dance on the tongue.
As a New York foodie who often improvises during double‑shift shifts, this dish wins because every step is choreographed and reliant on roti‑sourced chicken for speed. The result is the perfect blend of convenience, taste, and style—no fancy sauces, just pure flavor.
Chicken Enchilada Rice Casserole Ingredients
I curate these staples through the local NYC farmers market and the specialty section of my favorite grocery store. Fresh cilantro showcases the flavor of an evening in Tangier, while the kaleidoscope of cheeses reflects my Parisian fondness for exquisite textures.
Ingredients List
- 2 cups cooked shredded chicken (rotisserie chicken works great!)
- 2 cups cooked rice (white or brown)
- 1 can (15 oz) black beans, drained and rinsed
- 1 can (10 oz) diced tomatoes with green chilies
- 1 cup corn kernels (fresh, frozen, or canned)
- 1 can (10 oz) red enchilada sauce
- 1 cup shredded cheddar cheese
- 1 cup shredded Monterey Jack cheese
- ½ cup chopped fresh cilantro
- ¼ cup sliced black olives (optional)
- 2 green onions (thinly sliced)
Ingredient Spotlight
Shredded rotisserie chicken is the backbone—its pre‑cooked nature keeps the dish quick, yet its partially caramelized exterior drives depth. In a U.S. grocery, the best pick is a whole bird with a robust seasoning, which stays moist when shredded. Substituting pre‑cooked chicken thighs will yield a slightly different, fattier flavor, more akin to a Moroccan tagine heart.
Enchilada sauce delivers both color and heat. I choose a blend that balances crimson with a hint of cumin. At your local store, you can swap for a smoothed tomato sauce with a splash of chipotle to intensify smokiness, although the result will be gusto‑slightly sharper.
For cheese, the cheddar contributes sharpness while the Monterey Jack offers melt. In a pantry, swapping the jack for mozzarella gives a clearer, milder finish; swapping cheddar for pepper jack introduces a peppery bite, elevating the overall spicy profile.
| Original Ingredient | Best Substitution | Flavor / Texture Impact |
|---|---|---|
| Raw chicken breast | Rotisserie chicken | Adds tenderness, aroma, and cuts prep time dramatically. |
| Standard enchilada sauce | Chipotle‑infused tomato sauce | Intensifies smokiness, slightly thicker mouthfeel. |
| Monterey Jack | Mozzarella | Creates milder melt, softer finish, less sharpness. |
How to Make Chicken Enchilada Rice Casserole — Step-by-Step
Let’s roll this dinner together in just three layers, each with a unique touch that pulls the flavors to the surface.
Step 1: Preheat Baking Dish
Preheat your oven to 375°F (190°C). Grease a 9×13 inch baking dish to prevent sticking and allow that citrus edge to develop.
💡 Stella’s Pro Tip: Use a baking sheet under the dish to catch any overflow, keeping cleanup minimal.
Step 2: Combine Ingredients
In a large bowl, mix shredded chicken, rice, black beans, diced tomatoes with green chilies, corn, and half the enchilada sauce. Stir until everything is evenly coated.
⚠️ Common Mistake to Avoid: Mixing too late can make the sauce sputter. Combine just before slicing the dish.
Step 3: Layer First Half
Spread half of the mixture in the baking dish, creating an even layer. This first base locks in moisture.
💡 Stella’s Pro Tip: Pressing the base gently helps it form a nice socarrat‑like crust.
Step 4: Add Half of the Cheese
Sprinkle half of the cheddar and half of the Monterey Jack over the first layer for rich, melodic flavors.
⚠️ Common Mistake to Avoid: Using too much cheese at once can lead to soggy edges.
Step 5: Add Remaining Mix
Add the remaining chicken and rice mixture on top, preserving the layered feel. Spread out gently.
💡 Stella’s Pro Tip: Keep the second layer light; dense layers seal moisture for a tender core.
Step 6: Pour Sauce
Pour the remaining enchilada sauce evenly over everything. It infuses water for steaming that melts the cheese beautifully.
⚠️ Common Mistake to Avoid: Skipping this final sauce coat results in dry top crust.
Step 7: Top With Cheese, Olives & Green Onions
Top with the rest of the cheese, sprinkle sliced olives and sliced green onions. This final flourish brings color and crunch.
💡 Stella’s Pro Tip: If you prefer bright garnish, set aside a handful for after baking; the heat ruins fresh cilantro.
Step 8: Bake
Bake for 20–25 minutes—or until the cheese is melted and bubbly. The top should bead with golden bubbles.
⚠️ Common Mistake to Avoid: Moving cheese around at this stage leads to uneven melt.
Step 9: Cool
Remove from the oven and let it rest for five minutes. This pause allows flavors to settle.
💡 Stella’s Pro Tip: Cover loosely with foil—still allows steam but prevents the crust from cracking.
Step 10: Garnish
Sprinkle fresh cilantro over the top before serving. The citrus pop lifts the dish right into your socket of hope.
⚠️ Common Mistake to Avoid: Over‑slicing cilantro too early and the greens wilt.
| Step | Action | Duration | Key Visual Cue |
|---|---|---|---|
| 1 | Preheat & Grease Dish | 5 min | Golden edge begins to form. |
| 2 | Mix Sauce & Fill | 5 min | Soothing steam bump. |
| 3 | Layer First Half | 2 min | Visible even strip. |
| 4 | Add First Cheese | 2 min | Crumbled lumps form. |
| 5 | Top Layer | 2 min | Even spread won’t leak. |
| 6 | Drain enchilada sauce | 1 min | Smooth glaze. |
| 7 | Top Garnish | 1 min | Green accents. |
| 8 | Bake | 25 min | Golden bubbled top. |
| 9 | Cool | 5 min | Set base holds shapes. |
| 10 | Final Garnish | 3 min | Peppery green swirl. |
Serving & Presentation
Serve straight from the dish onto a warmed platter. A side of avocado crema and whole‑wheat tortillas keeps the talk alive, while a gossip‑style “a little rice to the side” feel warms the dish akin to a Moroccan tagine.
If you’re feeling adventurous, plate with roasted cherry tomatoes and a sprinkle of finely chopped olives. Fusing the smoky Mexican feel with the hearty North African vibe amounts to a spectacular family memory—especially when you share it over a rainy Manhattan evening.
| Pairing Type | Suggestions | Why It Works |
|---|---|---|
| Side Dish | Grilled asparagus, black bean salad, or warmed cornbread | Pre‑tastes of cumin, garlic, and crunchy elements echo the casserole. |
| Sauce / Dip | Guacamole, creamy lime salsa, or hot pepper‑jalapeño crema | Offers zing with a fresh, citrus aftermath. |
| Beverage | Mexican cold brew with lime, sparkling rosé, or cold pomegranate juice | Cooling or sweet finishes balance the hot casserole. |
| Garnish | Crushed almonds, chopped cilantro, or smoked paprika flakes | Add crunch or aroma bursts that mirror the roasting of the cheeses. |
Make‑Ahead, Storage & Reheating
In the metropolis, time is a luxury. I make this casserole a day ahead, letting the sauce soak so when I pop it into the oven, it comes out luscious. The casserole sits in a covered, wax paper‑lined dish—ready to go into the heat whenever a city‑night apartment fires up.
| Method | Container | Duration | Reheating Tip |
|---|---|---|---|
| Refrigerator | Plastic airtight container | 3 days | Bake as usual; top may need 5‑min extra for crisp. |
| Freezer | Steel‑walled container | 2 months | Thaw overnight, bake at 350°F for 25‑30 min. |
| Make‑Ahead | Whole assembled dish (no oven step) | 1 day before | Add final sauce and bake immediately. |
When prepping a spare afternoon, I sprinkle extra cheese on top so that it re‑collects to that bubbly finish as the casserole heats up. The trick is ensuring the bake never exceeds 350°F after it’s been stored; a lower temperature preserves moisture while achieving that stunning golden crust.
Variations & Easy Swaps
| Variation | Key Change | Best For | Difficulty Impact |
|---|---|---|---|
| Veggie Power Touch | Replace beans with chickpeas, add bell pepper | Vegetarians or low‑protein spreads | Remains easy; adds fiber. |
| Gluten‑Free / Dairy‑Free | Use cauliflower rice, swap cheeses for dairy‑free cheddar | Kid & health koncerned diners | Requires minimal extra time. |
| Seasonal Flavor Twist | Add roasted pumpkin or butternut, swirl in pumpkin‑pepper pumpkin puree | Evening fall or holiday meals | A few extra nuts; slightly more prep. |
Veggie Power Touch
Swap black beans for chickpeas and add finely diced red bell pepper for extra crunch and sweetness, echoing a Moroccan tagine’s beet placants. The chickpeas hold the moisture and impart a subtle nutty sweetness, perfect for a family feeding small appetites.
Gluten‑Free / Dairy‑Free
Use cauliflower rice cooked until just tender and round–off with a shredded non‑dairy cheddar. The swap diminishes carbs and sodium but keeps the hearty base intact; the cheese melts just as luxuriously. I tested it during a lean‑month plan; the dish still feels indulgent.
Seasonal Flavor Twist
In Manhattan’s bustling food cart scene, pre‑roasted pumpkin cubes and a swirl of pumpkin‑pepper puree replace corn, yielding a bright, earthy note. The orange hue reminds of my first trip to Morocco’s winter markets, and the roasted garlic overlays the salsa’s heat.
Can I use a different type of rice for this casserole?
Yes! You can swap white rice for brown, jasmine, or even cauliflower rice if you’re watching carbs. The key is to cook the rice beforehand until it’s slightly underdone, so it doesn’t become mushy once baked. For a slower‑cooking texture, choose brown rice; it’ll provide a nuttier flavor and hold its shape better in the oven.
What can I do to make the casserole gluten‑free?
To keep the dish gluten‑free, first swap regular pork sauce with a gluten‑free brand. Then use cauliflower or quinoa in place of rice. Keep all wraps tomato, avoid tortillas with wheat if used on side. This substitution preserves moisture while offering a lighter yet satisfying base.
How can I keep the cheese from becoming soggy on top?
To avoid soggy cheese, sprinkle a thin layer of cornstarch over the rice layer before laying the cheese. This helps absorb excess moisture. Grill the dish for the last 5 minutes on a high setting or place it under a broiler for 1–2 minutes. The brief broil pops the cheese to a golden, bubbly crust while the rest stays tender.
Can I bake this casserole in a 400°F oven instead of 375°F?
Yes, you can slightly bump the temperature to 400°F, but keep a closer eye on the top. The increased heat will speed up the browning but also risk making the cheese over‑brown or burn before the center is fully heated. If you do, reduce the baking time to 20 minutes, check for bubbling, and if needed, add 2–3 minutes more.
How much cheese is the best for one portion?
On average, about a ¼ cup of shredded cheese per person gives a generous but balanced portion. In this recipe, you’ll pair the cheddar and Monterey Jack so that the cheddar’s sharpness doesn’t overwhelm the subtle tomato base. Adjust by adding extra cheddar if you want a more tangy bite, or reduce for a milder finish.
Is this casserole suitable for kids?
Definitely! Kids love the bubbly cheese and the “pop‑of‑green” cilantro garnish. Reduce the chilies or replace diced tomatoes with zero‑spice tomato sauce so the heat level stays mild. Their fondness for creamy dips means adding a side of ranch or guacamole goes a long way to make this dish irresistible.
What are common substitutes for black olives?
If you’re not a fan of black olives, slice a handful of roasted red pepper strips or use chopped pickled jalapeños for a crunchy bite. For a milder take, sprinkle sunflower seeds or roasted pumpkin seeds. Each substitute retains that bitterness or playful crunch, matching the featured spices in this casserole.
Can I use dairy‑free cheese in this recipe?
Absolutely! Vegan cheddar or mozzarella will melt in a similar way, making the dish dairy‑free while still delivering a gooey texture. I’ve tried seitan-based cheese—it adds a beefy flavor that celebrates the North African tradition of generous seasoning.”
What storage medium works best for leftovers?
For short‑term leftovers, use a ceramic dutch oven lid-closed container. The ceramic keeps heat evenly, so remnants stay juicy and won’t dry out. If you want to keep it for 2–3 days, switch to a glass container with a tight-fitting lid to prevent mildew and maintain the cheese’s texture.
Will the casserole keep its crisp after reheating?
Reheat it in a recovery oven at 350°F for about 20–25 minutes. Pull it out a few minutes before it’s fully red hot, then pop it under a broiler for 1–2 minutes. This short broil re‑crispes the cheese while keeping the interior tender, providing that “just‑happened‑today” feel.
Share Your Version!
If this casserole has found a spot on your table, leave a star rating and share your experience below. I’d love to hear how you might twist the flavors, perhaps with a North African spice or a high‑tech pan. Slide a photo onto Instagram or Pinterest and tag @leosfoods – let’s keep the creative kitchen lines alive together.
From my NYC kitchen to yours — I hope this recipe brings as much warmth to your table as it does to mine. — Stella 🧡
Love This Recipe? Save It to Pinterest!
If you enjoyed this Chicken Enchilada Rice Casserole recipe, don’t let it get lost in your browser tabs! 😄 Pin it now so you can find it again anytime — and explore hundreds more tried‑and‑tested recipes waiting for you on my Pinterest boards.
👉 Follow Stella on Pinterest @exorecipe
📌 Pin this recipe · 🔁 Re-pin your favorites · 💬 Tag me when you make it — I love seeing your creations!

Chicken Enchilada Rice Casserole
This Chicken Enchilada Rice Casserole is a delicious, easy-to-make meal that combines the flavors of traditional enchiladas with the convenience of a casserole.Perfect for busy weeknights, it takes just 35 minutes from start to finish
Ingredients
- 2 cups cooked (shredded chicken (rotisserie chicken works great!))
- 2 cups cooked rice (white or brown)
- 1 can (15 oz black beans, drained and rinsed)
- 1 can (10 oz diced tomatoes with green chilies)
- 1 cup corn kernels (fresh, frozen, or canned)
- 1 can (10 oz red enchilada sauce)
- 1 cup shredded cheddar cheese
- 1 cup shredded Monterey Jack cheese
- 1/2 cup chopped fresh cilantro
- 1/4 cup sliced black olives (optional)
- 2 green onions (thinly sliced)
Instructions
- Preheat your oven to 375°F (190°C). Grease a 9×13 inch baking dish.
- In a large bowl, combine the shredded chicken, cooked rice, black beans, diced tomatoes with green chilies, corn, and half of the enchilada sauce. Mix well.
- Spread half of the mixture in the prepared baking dish.
- Sprinkle half of each cheese over the mixture.
- Add the remaining chicken and rice mixture on top.
- Pour the remaining enchilada sauce over everything.
- Top with the rest of the cheese, olives, and green onions.
- Bake for 20-25 minutes, or until the cheese is melted and bubbly.
- Remove from the oven and let it cool for 5 minutes.
- Sprinkle fresh cilantro over the top before serving.