Pistachio Cheesecake Domes with Raspberry Surprise Recipe
“`html
Table of Contents
Pistachio Cheesecake Domes with Raspberry Surprise – Elegant Mini Desserts with a Hidden Berry Center
I still remember the first time I tasted a pistachio cheesecake dome — it was at a tiny patisserie in the 6th arrondissement of Paris, during my years training at Le Cordon Bleu. That single bite changed everything I thought I knew about cheesecake. The creamy, nutty pistachio filling, the glossy white chocolate shell, and that burst of tart raspberry hidden inside — it was a symphony of textures and flavors that I knew I had to recreate in my own NYC kitchen. These pistachio cheesecake domes with raspberry surprise are my love letter to that moment, blending French pastry precision with the bold, vibrant ingredients I grew up with in Morocco. Whether you’re hosting a dinner party or treating yourself to something special, these mini cheesecake domes are guaranteed to impress.
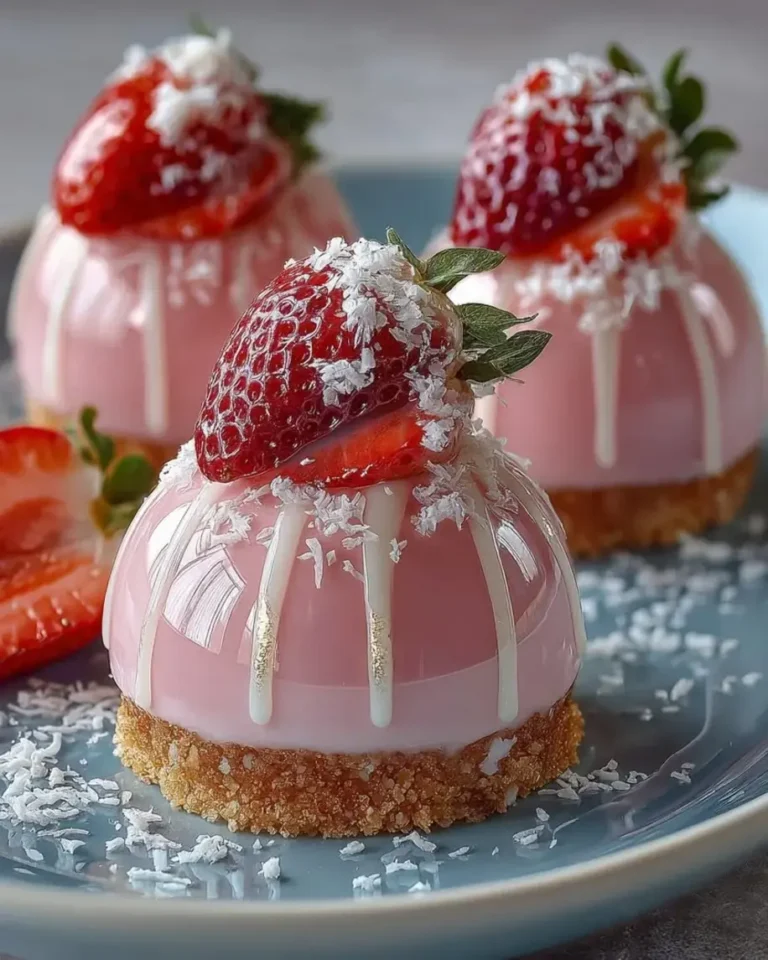
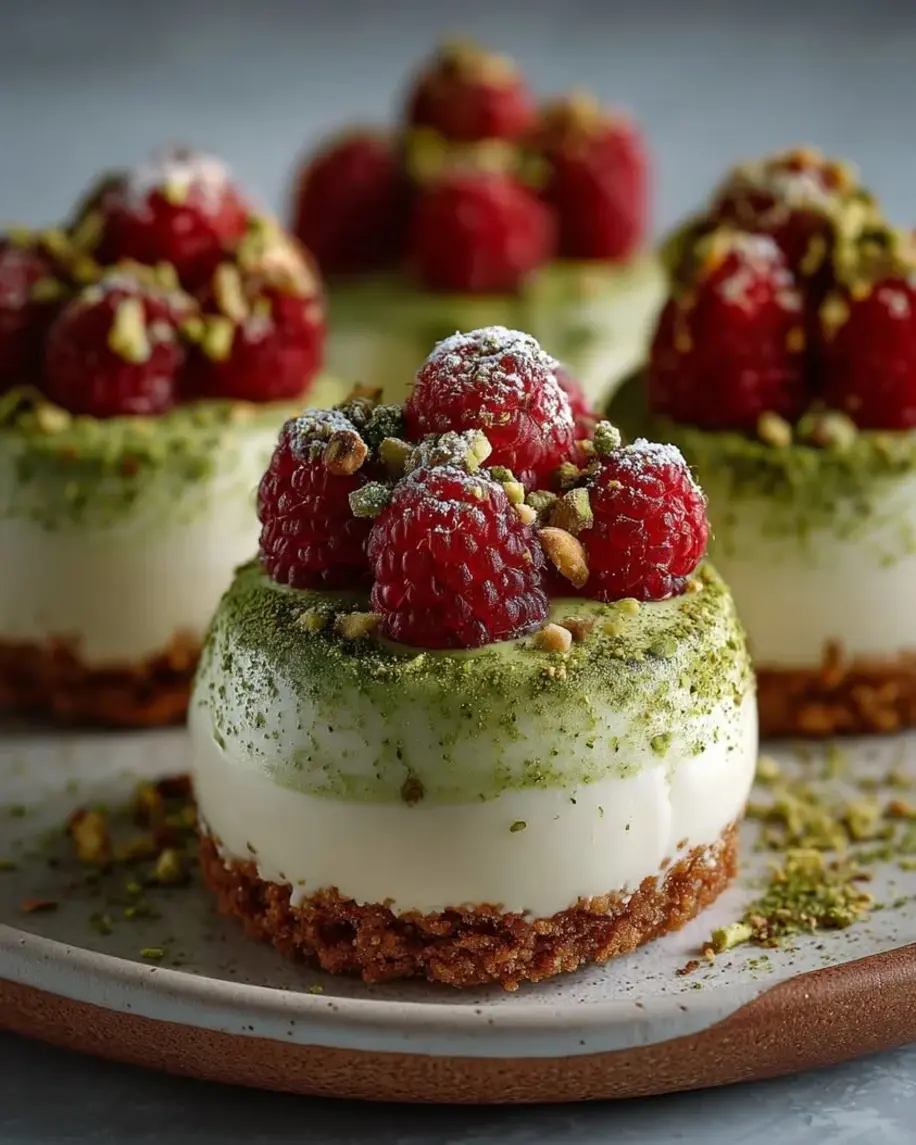
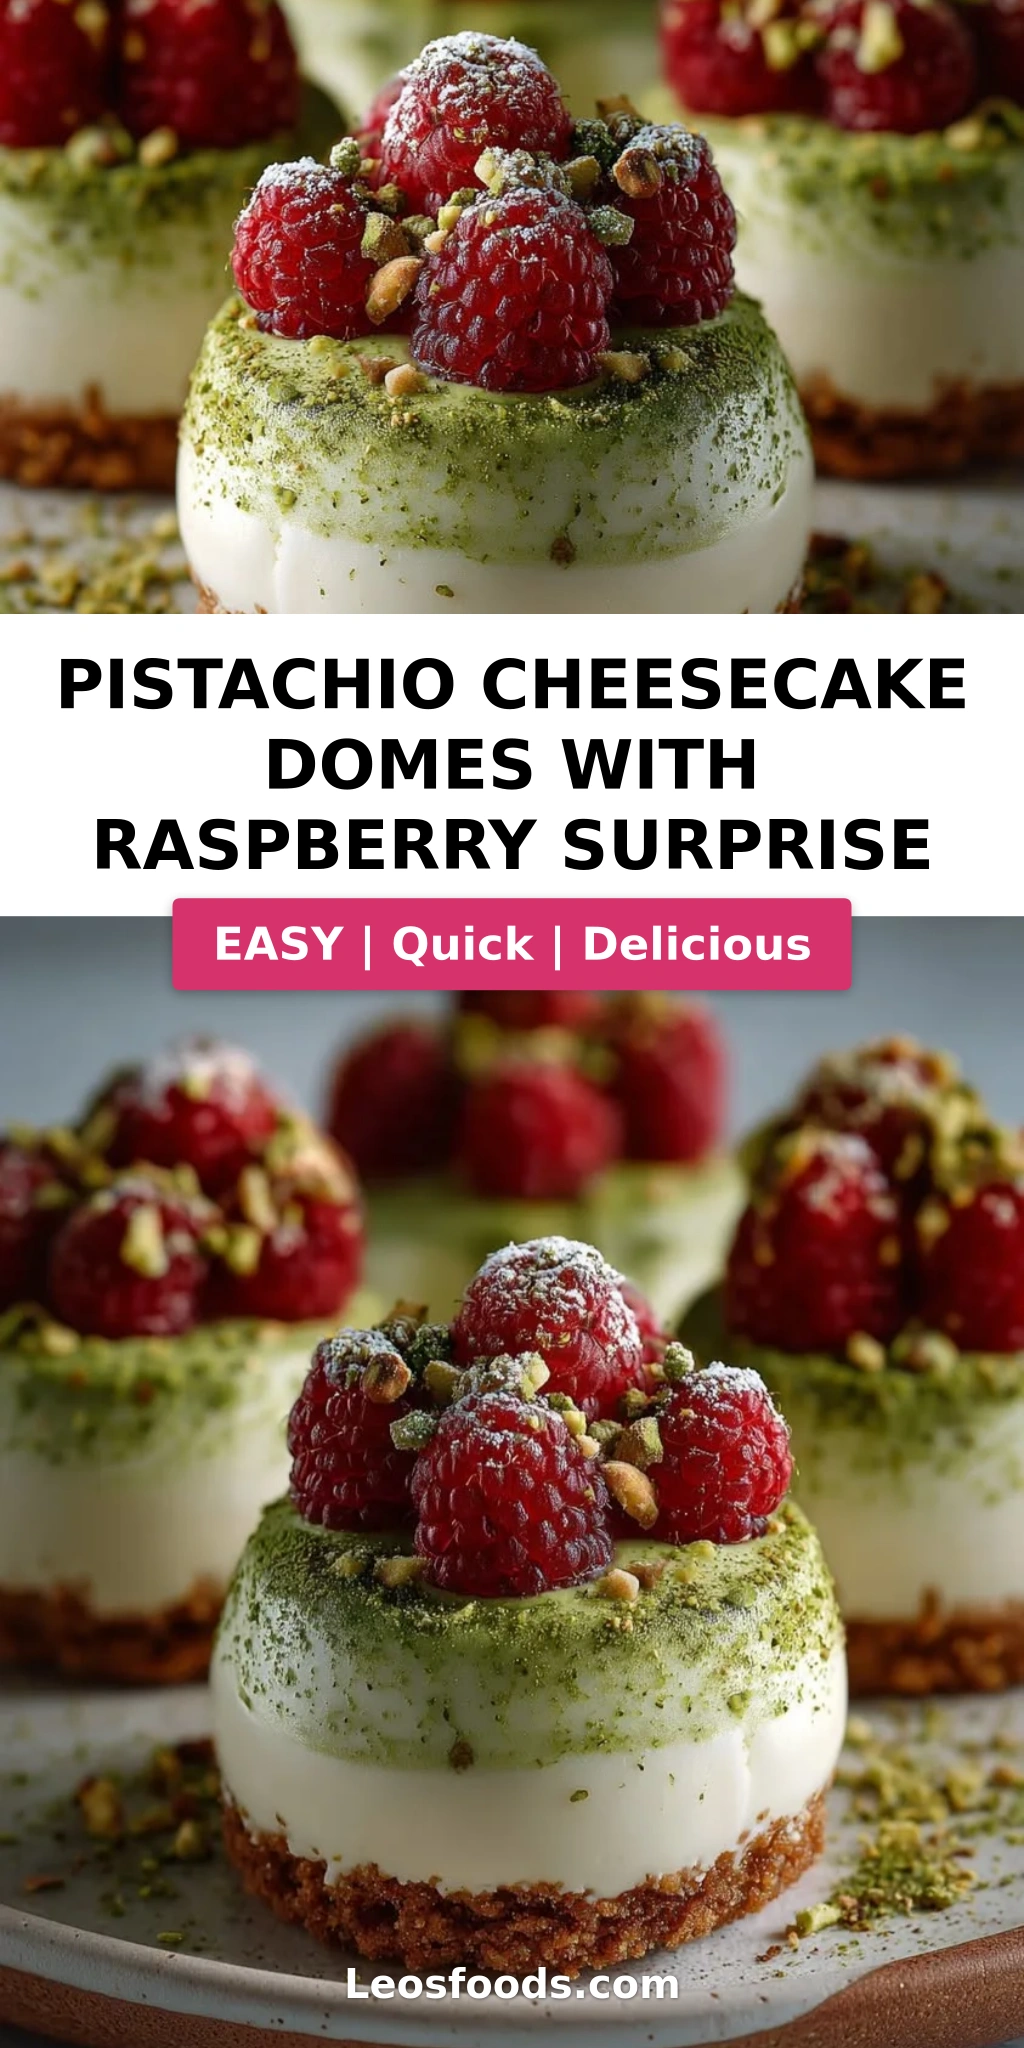
The magic of this dessert lies in its contrasts. The pistachio cheesecake filling is luxuriously smooth, thanks to high-quality pistachio paste and airy whipped cream, while the raspberry surprise center cuts through the richness with a bright, tangy pop. The biscuit base adds a buttery crunch, and the white chocolate shell — tempered with a touch of coconut oil — shatters ever so slightly when you bite into it, revealing the hidden layers within. I love garnishing each dome with crushed pistachios, fresh raspberries, and a dusting of freeze-dried raspberry powder for a touch of drama that feels straight out of a NYC pastry case.
What sets my pistachio cheesecake domes apart is the technique I developed during my time in Paris: a no-bake pistachio cheesecake filling that stays perfectly stable in the freezer, a quick stovetop raspberry compote that doesn’t sink or weep, and a foolproof white chocolate shell that sets with a beautiful glossy finish. I’ll share my Stella’s Pro Tip for preventing the raspberry center from sinking, plus a common mistake to avoid when unmolding the domes. If you’ve ever wanted to make restaurant-quality cheesecake domes at home, this is the recipe to start with. From my kitchen in New York City to yours — let’s make something beautiful together.
Why This Pistachio Cheesecake Domes Recipe Is the Best
The flavor secret behind these pistachio cheesecake domes is the pistachio paste — not pistachio butter or pre-ground nuts, but a true paste made from high-quality Sicilian or Turkish pistachios. I source mine from a specialty shop near the Union Square farmers market in NYC, and it makes all the difference. The paste has an intense, almost floral pistachio flavor that blends seamlessly with the cream cheese and vanilla, creating a filling that tastes like pure pistachio bliss. Growing up in Morocco, my mother always used rose water and orange blossom in her pastries — that same perfumed sensibility carries into this recipe, where the pistachio and raspberry sing together in perfect harmony.
Perfected texture is everything in a dome cheesecake, and I achieved it by folding softly whipped cream into the pistachio-cream cheese mixture rather than using gelatin or heavy stabilizers. This technique, which I learned from a pastry chef in Paris, gives the filling a mousse-like lightness that stays creamy even after freezing. The white chocolate shell, fortified with a tiny amount of coconut oil, sets with a satisfying snap and doesn’t crack when you unmold it. Every layer has been tested and retested in my NYC kitchen to ensure a flawless result every time.
Foolproof and fast — at least for a recipe that looks this impressive. The entire active prep time is under 40 minutes, and the freezer does the heavy lifting for the rest. Unlike traditional baked cheesecakes that require water baths and careful cooling, these pistachio cheesecake domes are no-bake and beginner-friendly once you understand the assembly order. My step-by-step instructions will walk you through each stage, from the raspberry surprise center to the final garnish, so you can serve these beautiful domes with confidence — even if it’s your first time making mini cheesecake domes.
Pistachio Cheesecake Domes Ingredients
When I prepare these pistachio cheesecake domes in my NYC kitchen, I always gather my ingredients from a mix of local markets and trusted specialty shops. The pistachio paste I pick up from a lovely little Italian import store in Chelsea Market, while the fresh raspberries come from the Greenmarket in Union Square — especially peak-season berries that are bursting with flavor. Here’s everything you’ll need to make these elegant raspberry cheesecake domes at home, with a few suggestions on where to find the best ingredients in a US grocery store.
Ingredients List
- For the Pistachio Cheesecake Filling:
- 8 oz (225 g) cream cheese, softened
- 1/3 cup powdered sugar
- 1/2 cup pistachio paste
- 1 tsp vanilla extract
- 1 cup heavy whipping cream, chilled
- For the Raspberry Surprise Center:
- 1 cup fresh raspberries
- 2 tbsp granulated sugar
- 1 tsp lemon juice
- For the Biscuit Base:
- 1 cup digestive biscuit crumbs
- 3 tbsp unsalted butter, melted
- For the White Chocolate Shell:
- 10 oz (280 g) white chocolate, melted
- 1 tsp coconut oil
- For Garnish (optional):
- Crushed pistachios
- Fresh raspberries
- Freeze-dried raspberry powder
Ingredient Spotlight
Pistachio Paste: This is the soul of the pistachio cheesecake filling. Look for a paste that lists pistachios as the only ingredient — no added sugar or oils. Top brands like Sicilian Pistacchione or Italian pistachio paste are ideal. If you can’t find it, you can make your own by blending 1 cup shelled pistachios with 2 tbsp neutral oil until smooth, but the texture won’t be quite as silky. The paste provides both intense pistachio flavor and a beautiful pale green color that makes these cheesecake domes look stunning.
Fresh Raspberries: For the raspberry surprise center, use ripe but firm fresh raspberries. Off-season berries can be watery and lack flavor, so if fresh aren’t available, use frozen raspberries — just thaw them first and drain off any excess liquid before cooking. Cooking the raspberries with sugar and lemon juice concentrates their flavor and creates a jammy consistency that stays put inside the filling without sinking to the bottom of the dome.
White Chocolate: Choose a high-quality white chocolate with cocoa butter listed as an ingredient — brands like Callebaut, Ghirardelli, or Guittard work beautifully. Avoid white baking chips or candy melts, which contain palm oil and won’t set with the same glossy snap. The coconut oil I add helps the chocolate thin out for easier brushing and ensures a clean release from the silicone molds.
Digestive Biscuits: These are the classic base for no-bake cheesecakes in the UK and Europe, and they’re widely available in US stores under brands like McVitie’s or store-brand versions. Graham crackers are an excellent substitute — just note they’re slightly sweeter and less buttery, so adjust the melted butter down by 1 teaspoon if using graham crackers. The biscuit base adds a subtle malty flavor that complements the pistachio and raspberry beautifully.
| Original Ingredient | Best Substitution | Flavor / Texture Impact |
|---|---|---|
| Pistachio paste | Homemade pistachio butter (1 cup pistachios + 2 tbsp oil) | Less silky, slightly grainier, but still intense pistachio flavor |
| Fresh raspberries | Frozen raspberries (thawed and drained) | Slightly softer texture after cooking, but same bright tartness |
| Digestive biscuits | Graham crackers (reduce butter by 1 tsp) | Sweeter, less buttery base, still crunchy |
| White chocolate (with cocoa butter) | High-quality white chocolate chips (not candy melts) | Slightly less glossy, may need extra coconut oil for thin consistency |
| Heavy whipping cream | Full-fat coconut cream (chilled, whipped) | Lighter, dairy-free, slight coconut undertone that pairs well with pistachio |
How to Make Pistachio Cheesecake Domes — Step-by-Step
Making these pistachio cheesecake domes is easier than you think — you just need to follow the steps in order and give each component time to set. I’ll walk you through every stage with pro tips and common mistakes to avoid, so your raspberry cheesecake domes turn out as beautiful as the ones from a NYC pastry shop.
Step 1: Make the Biscuit Base
Mix 1 cup digestive biscuit crumbs with 3 tablespoons melted unsalted butter until the mixture resembles wet sand. Press firmly into the bottom of 8 silicone dome molds using your fingers or the back of a small spoon. The base should be about 1/4-inch thick. Place the molds in the refrigerator to chill for 15 minutes while you prepare the other components.
💡 Stella’s Pro Tip: For an extra-flavorful biscuit base, toast the crumbs in a dry skillet over medium heat for 2-3 minutes before adding the butter. This brings out a nutty, caramel-like depth that pairs beautifully with the pistachio cheesecake filling.
Step 2: Cook the Raspberry Surprise Center
In a small saucepan, combine 1 cup fresh raspberries, 2 tablespoons granulated sugar, and 1 teaspoon lemon juice. Cook over medium heat, stirring gently, for 3-4 minutes until the raspberries break down and the mixture thickens to a jammy consistency. Remove from heat and let cool completely — this is crucial. If the raspberry mixture is even slightly warm when you add it to the cheesecake filling, it will sink to the bottom of the dome.
⚠️ Common Mistake to Avoid: Adding the raspberry filling while it’s still warm. This thins the surrounding cheesecake filling and causes the raspberry center to sink or bleed. Always cool the raspberry compote to room temperature, then refrigerate until completely cold before using.
Step 3: Make the Pistachio Cheesecake Filling
In a large bowl, beat 8 oz softened cream cheese, 1/3 cup powdered sugar, 1/2 cup pistachio paste, and 1 teaspoon vanilla extract together until smooth and creamy — about 2 minutes with an electric mixer. In a separate cold bowl, whip 1 cup chilled heavy whipping cream to soft peaks — when you lift the whisk, the cream should hold a gentle fold that droops slightly. Gently fold the whipped cream into the pistachio mixture using a rubber spatula until fully combined and no white streaks remain. The filling should be airy, light, and a beautiful pale green color.
💡 Stella’s Pro Tip: For the lightest pistachio cheesecake filling, chill your mixing bowl and beaters in the freezer for 10 minutes before whipping the cream. Cold cream whips faster and holds its structure better, giving your cheesecake domes a mousse-like texture that’s divine.
Step 4: Make the White Chocolate Shells
Melt 10 oz white chocolate with 1 teaspoon coconut oil in a heatproof bowl set over a pan of simmering water (or in the microwave in 30-second bursts, stirring between each). Stir until smooth and completely melted. Using a small pastry brush or the back of a spoon, coat the inside of each silicone dome mold with a thin, even layer of melted white chocolate. Make sure to cover the sides all the way to the top edge. Place the molds back in the refrigerator for 10-15 minutes to set the chocolate.
⚠️ Common Mistake to Avoid: Making the white chocolate shell too thick. A thick shell is harder to unmold and can crack when you try to remove it. A thin, even layer — about 1/8-inch — is all you need for a delicate, snappy shell that complements the creamy pistachio filling inside.
Step 5: Assemble the Domes
Spoon or pipe the pistachio cheesecake filling into each white chocolate shell, filling each one halfway. Gently tap the mold on the counter to settle the filling. Add a small spoonful of the cooled raspberry compote in the center of each dome — use about 1 teaspoon per dome. Cover the raspberry center with more pistachio cheesecake filling, filling the mold all the way to the top. Smooth the tops with a small offset spatula or the back of a spoon, making sure the filling is flush with the rim of the mold.
💡 Stella’s Pro Tip: The raspberry filling should be about the size of a small marble — too much and it overwhelms the dome; too little and you won’t taste it in every bite. Use a 1/2 teaspoon measure for consistent results across all 8 cheesecake domes.
Step 6: Freeze and Unmold
Place the filled silicone molds on a small baking sheet and freeze for at least 2 hours, or until the domes are completely solid. To unmold, gently peel the silicone away from the edges of each dome, then press on the bottom of the mold to release. If the dome sticks, let it sit at room temperature for 30-60 seconds to soften the chocolate shell slightly — but don’t leave it too long, or the dome will start to soften and lose its shape. Transfer the unmolded domes to a serving tray or plate.
⚠️ Common Mistake to Avoid: Trying to unmold domes that aren’t fully frozen. If the cheesecake filling is still soft, the dome can collapse or deform. Always wait the full 2 hours minimum — and overnight is even better for a clean release and perfectly set texture.
Step 7: Garnish and Serve
Before serving, garnish each pistachio cheesecake dome with crushed pistachios, a fresh raspberry, and a light dusting of freeze-dried raspberry powder for a pop of color. Serve the domes chilled — straight from the freezer or after 5 minutes at room temperature if you prefer a slightly softer texture. These mini cheesecake domes are best eaten within 24 hours for the most vibrant flavor and perfect texture.
💡 Stella’s Pro Tip: For a professional-looking finish, dust the freeze-dried raspberry powder through a fine-mesh sieve held about 12 inches above the domes. This creates an even, ethereal layer of color that makes each dome look like a work of art.
| Step | Action | Duration | Key Visual Cue |
|---|---|---|---|
| 1 | Make biscuit base | 5 mins prep + 15 mins chill | Crumbly mixture holds together when pressed |
| 2 | Cook raspberry center | 4 mins cook + 20 mins cool | Raspberries break down, mixture thickens to jam consistency |
| 3 | Make pistachio filling | 8 minutes | Smooth, airy, pale green — no streaks of cream |
| 4 | Make white chocolate shells | 5 mins prep + 15 mins set | Thin, glossy, even coating on all sides |
| 5 | Assemble domes | 10 minutes | Raspberry center fully encased in pistachio filling |
| 6 | Freeze and unmold | 2+ hours freeze | Domes are firm, pop out cleanly from mold |
| 7 | Garnish and serve | 5 minutes | Garnishes evenly distributed, domes glistening |
Serving & Presentation
When I serve these pistachio cheesecake domes at dinner parties in my NYC apartment, I like to plate them on simple white ceramic dishes to let the vibrant colors shine — the pale green dome, the bright red raspberry, and the golden crushed pistachios create a stunning visual that looks straight out of a French patisserie. For an extra touch of elegance, drizzle a tiny pool of warm raspberry coulis on the plate before placing the dome in the center, or add a few fresh raspberries and a sprig of mint for color contrast.
These raspberry cheesecake domes are best enjoyed slightly chilled — straight from the freezer for a firmer, ice-cream-like texture, or after 5-10 minutes at room temperature for a softer, creamier consistency. I personally love the contrast of the cold, creamy filling against the snap of the white chocolate shell, especially when paired with a warm cup of Moroccan mint tea or a bold espresso. The pistachio and raspberry combination is naturally elegant, making these domes perfect for special occasions like birthdays, anniversaries, or holiday gatherings.
If you’re serving these cheesecake domes as part of a larger dessert spread, they pair beautifully with other light, fruity desserts like fresh berry tartlets or a citrus sorbet. For a truly memorable presentation, arrange the domes on a tiered cake stand and garnish each one with a tiny edible flower — violas or pansies work wonderfully and complement the pistachio-green color palette. From my Moroccan-inspired kitchen to your table, these domes are designed to impress without hours of frantic last-minute work.
| Pairing Type | Suggestions | Why It Works |
|---|---|---|
| Side Dish | Fresh berry salad, citrus sorbet, almond tuile cookies | Bright, light flavors complement the rich pistachio and white chocolate |
| Sauce / Dip | Warm raspberry coulis, dark chocolate ganache, honey drizzle | Adds moisture and contrasting flavor — tart, rich, or sweet |
| Beverage | Moroccan mint tea, espresso, Prosecco, rosé | Cuts through richness; tea and wine enhance the nutty pistachio notes |
| Garnish | Crushed pistachios, fresh raspberries, freeze-dried raspberry powder, edible flowers | Adds texture, color, and a professional finish |
Make-Ahead, Storage & Reheating
One of the best things about these pistachio cheesecake domes is how well they fit into a busy schedule — I often prepare them over two days in my NYC kitchen, making the raspberry center and biscuit base one evening, then assembling and freezing the domes the next day. The domes actually benefit from at least 6-8 hours in the freezer, which allows the flavors to meld and the texture to become perfectly creamy. Here’s my full guide to storing, freezing, and serving these mini cheesecake domes at their best.
| Method | Container | Duration | Reheating Tip |
|---|---|---|---|
| Refrigerator | Airtight container in single layer | Up to 3 days | Serve chilled, straight from fridge — no reheating needed |
| Freezer | Freezer-safe container, parchment between layers | Up to 2 months | Thaw in refrigerator 20-30 mins before serving, or serve frozen for firmer texture |
| Make-Ahead | Assembled in molds, covered | Up to 2 days before serving | Keep frozen, unmold and garnish just before serving |
If you’re storing these pistachio cheesecake domes in the refrigerator, place them in a single layer in an airtight container to prevent the white chocolate shell from absorbing any fridge odors. The domes are best consumed within 3 days for optimal freshness and texture — after that, the biscuit base can start to soften slightly, though the flavor will still be delicious. For longer storage, the freezer is your best friend: wrap each frozen dome individually in plastic wrap, then transfer to a zip-top bag or freezer container. When you’re ready to serve, simply unwrap and let the domes sit at room temperature for 10-15 minutes, or place them in the refrigerator for 30 minutes to thaw gently. I often keep a batch in my freezer for unexpected guests — just unmold, garnish, and serve in minutes.
One thing I’ve learned from my years in professional kitchens: never microwave these domes to soften them. The white chocolate shell will melt unevenly, and the pistachio filling can become grainy. Always thaw them gradually in the refrigerator or at cool room temperature. If you want a softer, creamier texture, let the domes sit at room temperature for 15-20 minutes before serving — the filling will soften to a mousse-like consistency while the shell stays beautifully intact. This is my favorite way to enjoy them, especially with a cup of strong Turkish coffee or Moroccan mint tea.
Variations & Easy Swaps
These pistachio cheesecake domes are incredibly versatile, and I love experimenting with different flavor combinations in my NYC kitchen. Whether you need a gluten-free version for a friend or want to switch up the fruit for a seasonal twist, here are my tested variations that keep the domes just as elegant and delicious.
| Variation | Key Change | Best For | Difficulty Impact |
|---|---|---|---|
| Chocolate-Hazelnut Domes | Pistachio paste → hazelnut spread; raspberry → dark chocolate ganache | Chocolate lovers, holiday gatherings | Same — easy swap |
| Gluten-Free Domes | Digestive biscuits → gluten-free graham crackers or almond flour base | Gluten-free guests, Celiac-safe dessert | Same — simple substitution |
| Seasonal Berry Domes | Raspberries → strawberries, blueberries, or blackberries | Summer entertaining, farmers market finds | Same — adjust sugar to taste |
Chocolate-Hazelnut Domes
For a decadent twist on these cheesecake domes, swap the pistachio paste for a high-quality chocolate-hazelnut spread like Nutella or a artisanal hazelnut praline paste. Replace the raspberry surprise center with a small ball of dark chocolate ganache — mix 2 oz melted dark chocolate with 2 tablespoons heavy cream and chill until firm. The combination of creamy hazelnut cheesecake, rich chocolate center, and white chocolate shell is absolutely divine. This variation reminds me of the chocolate-hazelnut pastries I discovered during my training in Paris, where every patisserie had its own take on the classic praline flavor.
Gluten-Free Domes
Making these pistachio cheesecake domes gluten-free is as simple as swapping the digestive biscuits. Use gluten-free graham crackers or make a base with 1 cup almond flour, 2 tablespoons melted butter, and 1 tablespoon maple syrup — press into the molds and chill as directed. The almond flour base adds a lovely nutty flavor that complements the pistachio filling beautifully. I’ve tested this version for my gluten-sensitive friends in NYC, and they couldn’t tell the difference. The texture is slightly more delicate, so handle the domes gently when unmolding, but the flavor is every bit as wonderful.
Seasonal Berry Domes
When I visit the Union Square Greenmarket in summer, I often swap the raspberries for whatever berries are at their peak — strawberries, blueberries, blackberries, or even a mix. For strawberries, hull and dice them small, then cook with sugar and lemon juice as directed. Blueberries and blackberries can be used whole or lightly crushed. Each berry brings its own personality: strawberries offer a classic sweetness, blueberries add a mild honeyed note, and blackberries contribute a deeper, earthier tartness. Adjust the sugar based on the sweetness of your berries — for very sweet strawberries, reduce the sugar to 1 tablespoon; for tart blackberries, keep it at 2 tablespoons or add an extra teaspoon. This seasonal flexibility makes these cheesecake domes a year-round favorite in my kitchen.
How do you make a raspberry surprise center for pistachio cheesecake domes without it sinking?
The key to keeping the raspberry surprise center suspended in the middle of your pistachio cheesecake domes is twofold: first, make sure the raspberry compote is completely cold before you add it to the filling — if it’s even slightly warm, it will melt the surrounding cheesecake mixture and sink to the bottom. Second, use a thickened raspberry compote rather than fresh berries alone. Cooking the raspberries with sugar and lemon juice for 3-4 minutes until jammy creates a thick consistency that stays put. I also recommend filling the dome halfway with pistachio filling, adding a small spoonful of the cooled raspberry mixture, then gently covering it with more filling — this sandwiches the raspberry center in place. Avoid pressing down on the raspberry filling; let the pistachio cheesecake filling flow naturally around it.
Can you use frozen raspberries for the surprise inside pistachio cheesecake domes?
Absolutely — frozen raspberries work beautifully for the raspberry surprise center, and I often use them when fresh berries are out of season. The key is to thaw the frozen raspberries first and drain off any excess liquid before cooking them with sugar and lemon juice. Frozen berries release more water than fresh, so you may need to cook the mixture for an extra minute or two to achieve the same jammy consistency. I also recommend pressing the thawed berries through a fine-mesh sieve before cooking if you prefer a seedless center — this step is optional but gives a smoother texture. Once cooked and cooled, the frozen-berry compote performs exactly like fresh, and the flavor is just as bright and delicious in these mini cheesecake domes.
How long do you need to chill pistachio cheesecake domes before unmolding?
Pistachio cheesecake domes need at least 2 hours in the freezer to set firmly enough for clean unmolding. For the best results, I recommend freezing them for 4-6 hours or even overnight — the longer freeze time ensures the white chocolate shell is fully set and the pistachio cheesecake filling is solid throughout. If you try to unmold the domes too early, the filling can be soft and the dome may collapse or lose its shape. To unmold, gently peel the silicone mold away from the edges first, then press on the bottom of the mold to release the dome. If the dome sticks, let it sit at room temperature for 30 seconds to slightly soften the shell, but don’t wait longer than 1 minute or the filling will start to thaw.
What is the best substitute for pistachios in a pistachio cheesecake dome recipe?
If you can’t find pistachio paste or need to avoid pistachios, the best substitute is high-quality almond paste or marzipan — it has a similar sweet, nutty profile and creamy texture that works beautifully in no-bake cheesecake fillings. Use 1/2 cup almond paste (grated or broken into small pieces) and beat it with the cream cheese as directed. For a different flavor direction, try hazelnut spread like Nutella or a pecan praline paste — both pair wonderfully with the raspberry surprise center. Keep in mind that almond paste is sweeter than pistachio paste, so you may want to reduce the powdered sugar to 1/4 cup. If you’re making your own substitute, blend 1 cup of any shelled nut (almonds, cashews, or macadamia nuts) with 2 tablespoons of neutral oil until smooth, then proceed with the recipe.
Can I make pistachio cheesecake domes without a silicone mold?
While silicone dome molds are ideal for this recipe because they release the domes cleanly without sticking, you can absolutely make these cheesecake domes without them. Use a standard 12-cup muffin tin lined with paper liners — the liners will give you a similar dome shape when peeled away. Alternatively, use small glass bowls or ramekins lined with plastic wrap for easy removal. The presentation will be slightly different — more like a classic cheesecake bite than a smooth dome — but the flavor and texture will be identical. If using a muffin tin, the white chocolate shell step requires careful brushing up the sides of the liner, and you’ll need to freeze the domes for at least 4 hours to ensure clean removal. I’ve tested both methods in my NYC kitchen, and they both deliver delicious results.
How do you prevent white chocolate shell from cracking when unmolding cheesecake domes?
The number one cause of cracked white chocolate shells is making the shell too thick. Apply the melted white chocolate in a thin, even layer — about 1/8-inch thick — using a small pastry brush or the back of a spoon. A thick shell is rigid and brittle, while a thin shell has some flexibility. Adding 1 teaspoon of coconut oil to the white chocolate helps it flow more easily and sets with a slightly softer, more pliable texture that resists cracking. When unmolding, always peel the silicone away from the chocolate rather than pulling the dome out — this gentle pressure releases the shell without stress. If a crack does occur, don’t worry: you can patch it with a tiny dab of melted white chocolate and smooth it with your finger before the patch sets. The garnish of crushed pistachios and raspberries will hide any minor imperfections beautifully.
Can I use white chocolate chips instead of white chocolate bars for the shell?
Yes, you can use white chocolate chips, but not all white chocolate chips are created equal. Look for chips that list cocoa butter as an ingredient — brands like Ghirardelli, Guittard, or Callebaut make white chocolate chips with a high cocoa butter content that melts smoothly and sets with a glossy finish. Avoid white baking chips or morsels that contain palm oil or hydrogenated fats, as these won’t melt to a fluid consistency and will set with a dull, streaky appearance. If you’re using standard grocery store white chocolate chips, add an extra 1/2 teaspoon of coconut oil to help thin the melt and improve the gloss. I’ve tested both bar and chip versions in my kitchen, and while bars give a slightly more professional result, chips work perfectly for home cooks who want convenience without sacrificing quality.
How do you get a smooth, glossy white chocolate shell on cheesecake domes?
The secret to a perfectly smooth and glossy white chocolate shell lies in three things: tempering the chocolate properly, adding a touch of coconut oil, and working at the right temperature. First, finely chop your white chocolate and melt it gently — either over a double boiler or in short microwave bursts — until it reaches 110°F to 115°F. Stir in 1 teaspoon of coconut oil, which lowers the melting point and gives the shell extra sheen. Let the chocolate cool slightly to around 95°F before brushing it into the molds, which helps it set with a mirror-like gloss. Use a soft silicone pastry brush to apply the chocolate in thin, even strokes, working from the center outward to the edges. After brushing, tap the mold gently on the counter to release any air bubbles. Refrigerate the molds for at least 15 minutes to set the chocolate completely before adding the cheesecake filling. This method gives you a professional-quality shell every time.
Can I use a different nut instead of pistachios in cheesecake domes?
Absolutely — pistachio cheesecake domes are a wonderful base recipe for experimenting with other nuts. Almonds are the most versatile substitute: use 1/2 cup almond paste or make a homemade almond butter by blending 1 cup blanched almonds with 2 tablespoons honey and 1 tablespoon oil until smooth. The flavor will be milder and sweeter than pistachio, with a delicate marzipan-like quality. For a richer, more decadent dome, try hazelnut praline paste — it pairs beautifully with the raspberry surprise center and white chocolate shell, creating a flavor combination reminiscent of a classic French dessert. Pecans and walnuts also work, though they have a more assertive flavor that can stand up to the white chocolate. Whichever nut you choose, the technique remains the same: blend it into a smooth paste or butter, then proceed with the recipe as written.
How far in advance can I make pistachio cheesecake domes for a party?
You can make pistachio cheesecake domes up to 2 months in advance — they freeze beautifully and actually benefit from time in the freezer, which allows the flavors to meld and the texture to become perfectly creamy. For a dinner party or special occasion, I recommend making the domes 2-3 days ahead: assemble them completely, freeze them in the silicone molds, then unmold and store them in an airtight container in the freezer. On the day of your event, simply transfer the frozen domes to a serving tray and garnish with crushed pistachios, fresh raspberries, and freeze-dried raspberry powder about 30 minutes before serving. If you want a softer texture, let them sit in the refrigerator for 1-2 hours before serving. This make-ahead approach takes all the stress out of party prep — you get a stunning, professional dessert with minimal last-minute effort.
Share Your Version!
I absolutely love hearing how these pistachio cheesecake domes turn out in your kitchen! Whether you made them for a birthday party, a holiday gathering, or just because you were craving something beautiful and delicious, I want to know all about it. Leave a star rating and comment below — tell me how the raspberry surprise center worked for you, whether you tried any of the variations, or if you discovered your own twist on this recipe. Your feedback helps me create better recipes and helps other readers feel confident trying these domes themselves.
If you share a photo on Instagram or Pinterest, tag me @leosfoods and use the hashtag #PistachioCheesecakeDomes so I can see your creations — I love scrolling through your beautiful plates and sharing them with our community. And if you have a specific question about the recipe, like how to adapt it for a different mold size or what to do if your white chocolate shell isn’t setting properly, drop it in the comments. I answer every question personally, drawing on my years of experience in NYC kitchens and my training in Paris. From my Moroccan heritage to your table — these pistachio cheesecake domes with raspberry surprise are made to bring joy, one elegant dome at a time.
From my NYC kitchen to yours — I hope this recipe brings as much warmth to your table as it does to mine. — Stella 🧡
Love This Recipe? Save It to Pinterest!
If you enjoyed this Pistachio Cheesecake Domes with Raspberry Surprise recipe, don’t let it get lost in your browser tabs! 😄 Pin it now so you can find it again anytime — and explore hundreds more tried-and-tested recipes waiting for you on my Pinterest boards.
👉 Follow Stella on Pinterest @stellarecipeblog
📌 Pin this recipe · 🔁 Re-pin your favorites · 💬 Tag me when you make it — I love seeing your creations!
⭐ Loved this recipe? Share the love!
If these Pistachio Cheesecake Domes made your day, please leave a 5-star rating below and tell us about your experience. Your review helps other readers discover this recipe — and I read every single one!
💬 Drop a comment with your twist on the recipe or tag me on Instagram @leosfoods — I can’t wait to see your beautiful domes!
“`
Print
Pistachio Cheesecake Domes with Raspberry Surprise
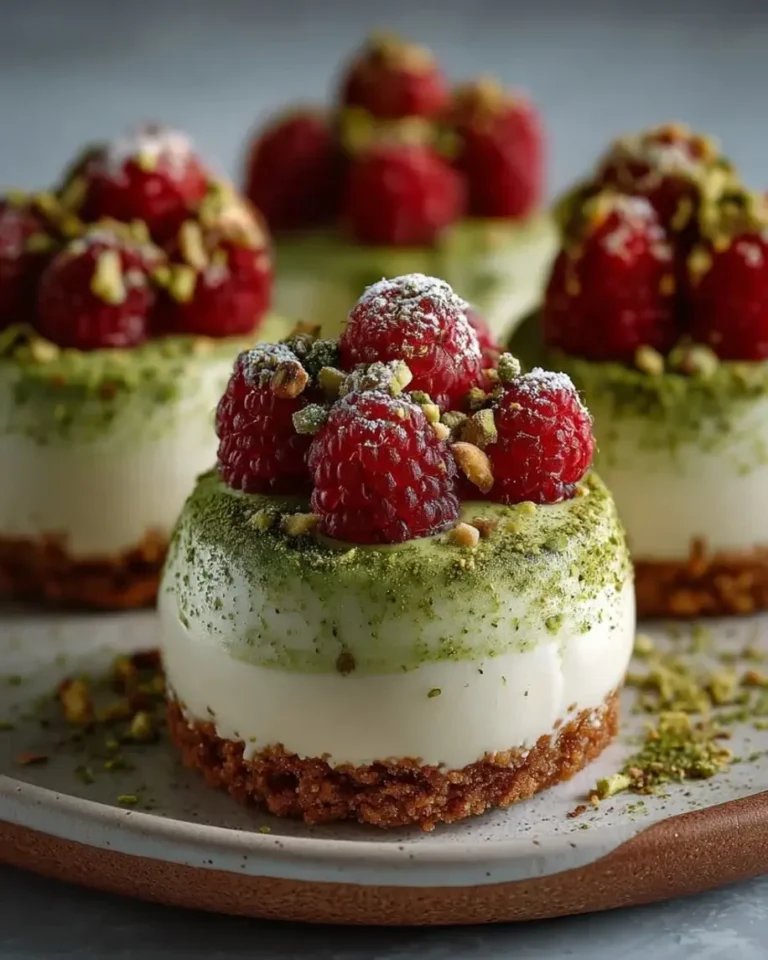
Elegant domed cheesecakes with a pistachio filling, a raspberry surprise center, a biscuit base, and a white chocolate shell, garnished with pistachios and raspberries.
- Yield: 8 1x
Ingredients
- For the Pistachio Cheesecake Filling:
- 8 oz (225 g) cream cheese, softened
- 1/3 cup powdered sugar
- 1/2 cup pistachio paste
- 1 tsp vanilla extract
- 1 cup heavy whipping cream, chilled
- For the Raspberry Surprise Center:
- 1 cup fresh raspberries
- 2 tbsp granulated sugar
- 1 tsp lemon juice
- For the Biscuit Base:
- 1 cup digestive biscuit crumbs
- 3 tbsp unsalted butter, melted
- For the White Chocolate Shell:
- 10 oz (280 g) white chocolate, melted
- 1 tsp coconut oil
- For Garnish (optional):
- Crushed pistachios
- Fresh raspberries
- Freeze-dried raspberry powder
Instructions
- Mix digestive biscuit crumbs with melted butter and press into silicone dome molds to form the base. Chill for 15 minutes.
- In a saucepan, cook raspberries with sugar and lemon juice for 3–4 minutes until slightly jammy. Cool completely.
- In a bowl, beat cream cheese, powdered sugar, pistachio paste, and vanilla until smooth.
- Whip heavy cream separately until soft peaks form, then fold into the pistachio mixture.
- Brush or spoon melted white chocolate mixed with coconut oil into silicone molds and chill until set to form shells.
- Fill each shell halfway with pistachio cheesecake filling.
- Add a small spoon of raspberry filling in the center.
- Cover with more pistachio filling and smooth the top.
- Freeze for at least 2 hours until fully set.
- Carefully unmold and place on a tray.
- Garnish with crushed pistachios, fresh raspberries, and freeze-dried raspberry powder if desired.
- Serve chilled.
Nutrition
- Calories: 340
- Sugar: 19 g
- Fat: 24 g
- Carbohydrates: 26 g
- Protein: 5 g
Tried This Recipe? Leave a Comment!
Did you make this recipe? I’d love to hear how it turned out! Please leave a comment and a rating below. Your feedback helps other home cooks and supports cheerychop.com!
For more delicious inspiration, follow me on Pinterest!