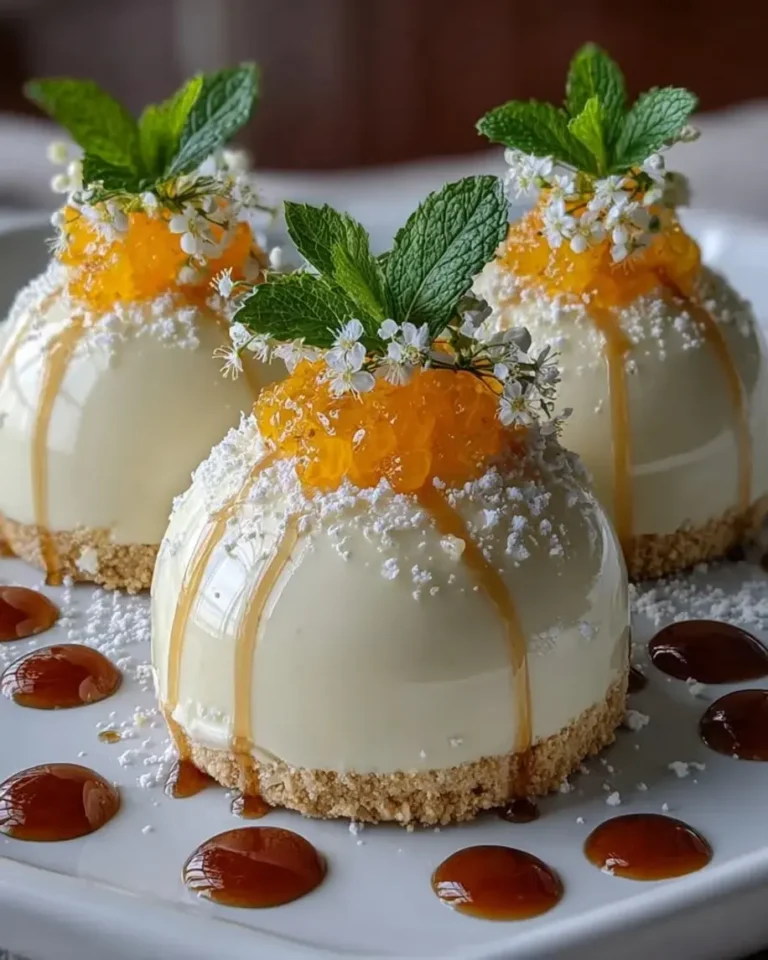
Easy Tropical Coconut Lime Dessert Bombs with Mirror Glaze
“`html
Table of Contents
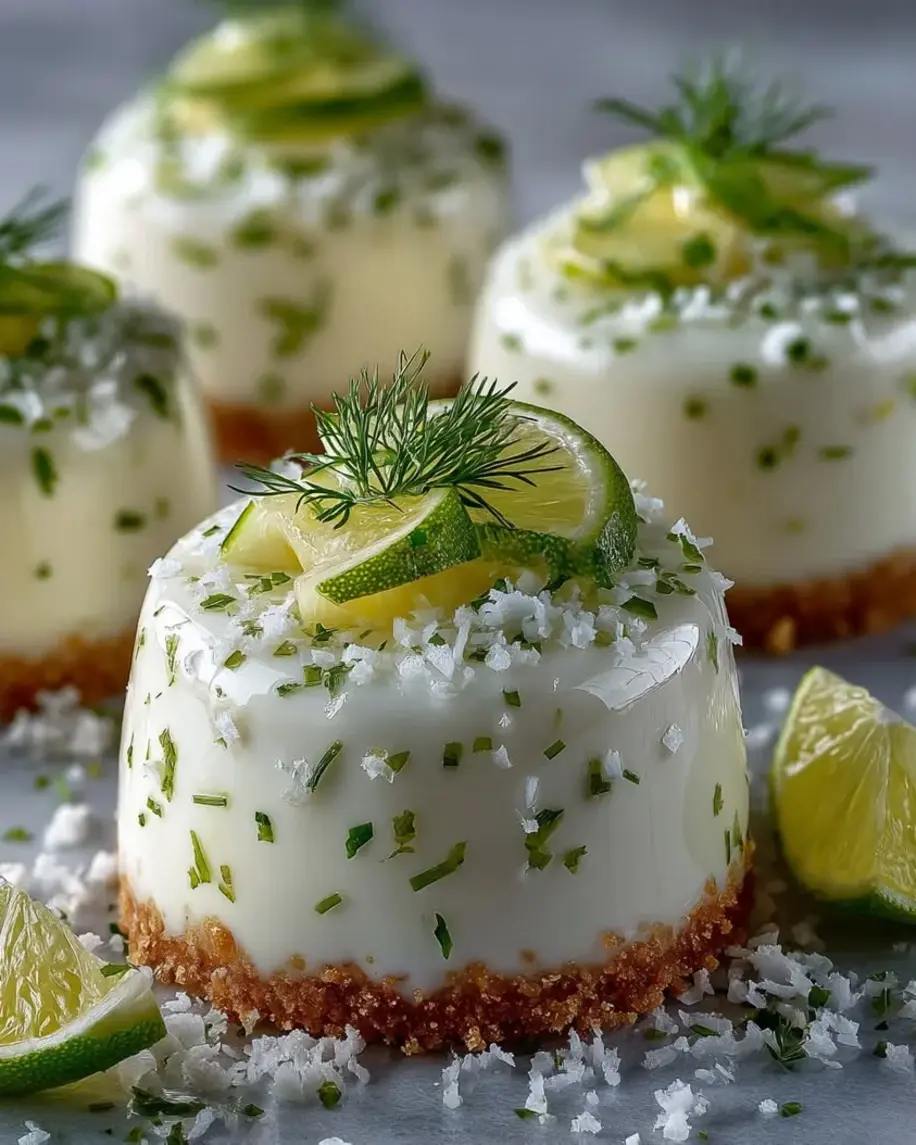
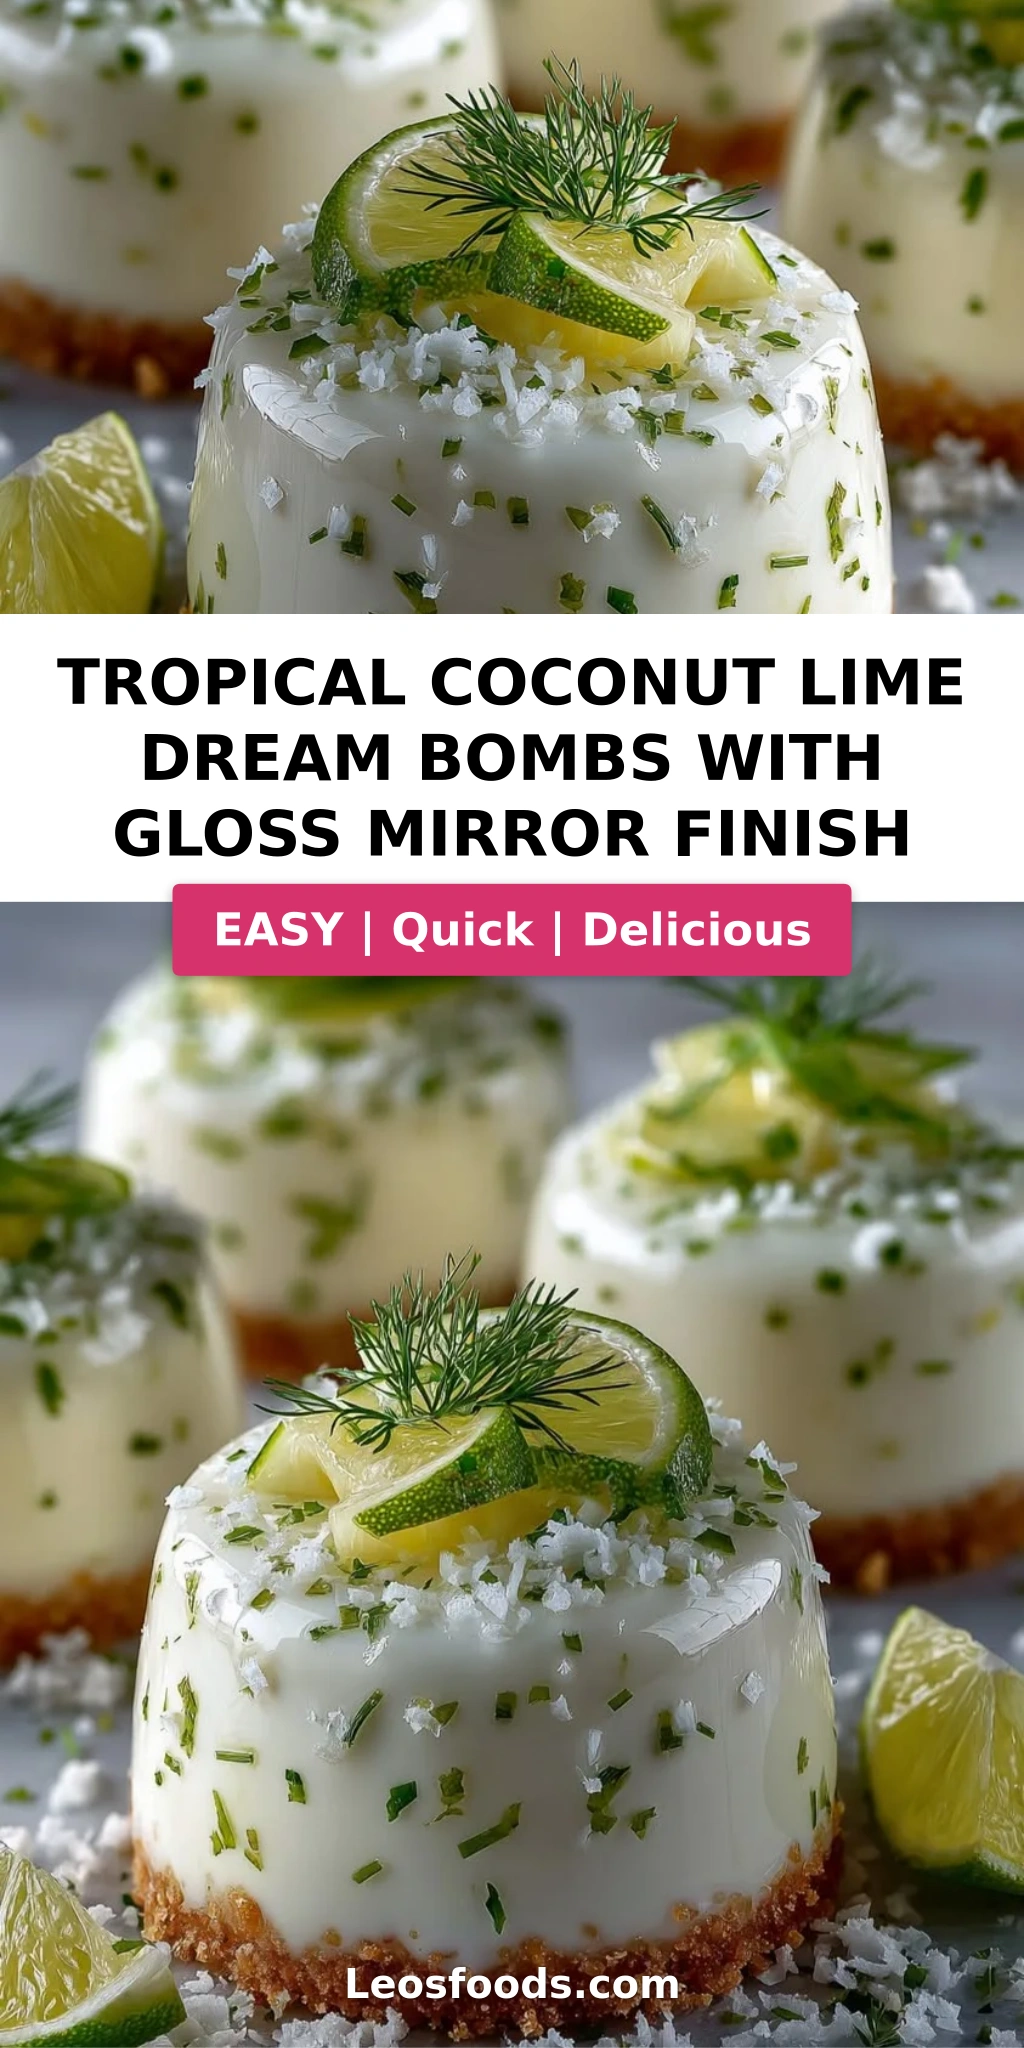
Tropical Coconut Lime Dream Bombs with Gloss Mirror Finish – A Show-Stopping No-Bake Dessert
I still remember the first time I tasted a perfect mirror glaze — it was during my pastry training in Paris, and the chef pulled a gleaming dome out of the freezer that looked like polished marble. I gasped. That moment stayed with me, and years later, here in my New York City kitchen, I’ve channeled that same magic into these coconut lime dessert bombs. The bright, tropical tang of lime meets the creamy depth of coconut, all wrapped in a glossy white chocolate mirror finish that shatters ever so slightly when you tap it with a spoon. This mirror glaze dessert recipe is my love letter to summer — no oven required.
Imagine breaking through that shimmering shell into a cloud-light tropical coconut mousse, then discovering a sweet-tart pineapple center that tastes like sunshine. The lime zest cuts through the richness, while the coconut cream keeps everything silky and lush. It’s the kind of dessert that looks like you spent all day in a Michelin-starred kitchen — but between you and me, it’s an easy no-bake dessert that comes together in stages, each one simpler than the last. The first time I made these for a dinner party, my guests literally stopped talking mid-bite. That’s the power of a great dessert.
What sets my version apart is a trick I learned from a pastry chef in Lyon: adding a touch of edible pearl luster dust to the white chocolate mirror glaze gives it that luminous, gem-like shine without any artificial coloring. I’ve also dialed in the perfect balance of lime and coconut — not too sweet, not too tart — so every bite feels bright and balanced. In this post, I’ll walk you through every step, share my best pro tips for a flawless mirror finish, and point out the one mistake I see home bakers make most often. Let’s make something beautiful together.
Why This Coconut Lime Dessert Bombs Recipe Is the Best
The Flavor Secret: Growing up in Morocco, my mother would make a fragrant lime and coconut cake for special occasions — the zest always came from the tiny, intensely aromatic limes at the souk. That memory inspired these dream bombs. I use both lime juice and zest in the mousse for a double hit of brightness, plus coconut cream (not milk) for that luxurious, full-fat richness that makes the texture sing. The pineapple center adds a natural sweetness that balances the tangy lime perfectly.
Perfected Texture: The magic of a great mousse lies in the fold — and I learned that the hard way during my Paris training. Over-folding deflates everything; under-folding leaves streaks. I use a technique called “figure-eight folding” that gently incorporates the whipped cream into the cream cheese mixture while keeping every air bubble intact. The result is a mousse that’s light as a cloud but stable enough to hold its shape under a heavy mirror glaze.
Foolproof & Fast: Despite the fancy finish, this is genuinely an easy no-bake dessert. No eggs to temper, no gelatin to bloom, no oven to watch. The hardest part is waiting for the freezing time — and that’s just patience, not skill. I’ve tested this recipe with home bakers of all levels, and the mirror glaze has never failed anyone who followed the temperature tips. If you can stir and pour, you can make these dream bombs.
Coconut Lime Dessert Bombs Ingredients
I source my ingredients from the Union Square Greenmarket and a few specialty shops around NYC. The key is using high-quality coconut cream — I love the one from Thai Kitchen — and fresh, unwaxed limes. When I close my eyes and smell lime zest, I’m instantly back in my mother’s kitchen in Marrakech. These ingredients deserve the best you can find.
Ingredients List
- For the Coconut Lime Mousse:
- 8 oz (225 g) cream cheese, softened
- 1 cup heavy whipping cream, chilled
- 1/3 cup powdered sugar
- 1/2 cup coconut cream
- 2 tbsp fresh lime juice
- 1 tbsp lime zest
- 1 tsp vanilla extract
- For the Tropical Center:
- 1 cup pineapple, finely diced
- 2 tbsp honey
- 1 tsp lime juice
- 1/4 tsp salt
- For the Biscuit Base:
- 1 cup graham cracker crumbs
- 3 tbsp unsalted butter, melted
- For the Gloss Mirror Finish:
- 10 oz (280 g) white chocolate, melted
- 2 tbsp sweetened condensed milk
- 1 tbsp coconut oil
- 1 tsp edible pearl luster dust
- 1/2 tsp coconut extract
- For Garnish (optional):
- Toasted coconut flakes
- Lime zest curls
Ingredient Spotlight
Coconut Cream: This is the thick, rich layer that separates from coconut milk in a can. Don’t confuse it with cream of coconut (which is sweetened) or coconut milk (which is thinner). I recommend Thai Kitchen or Aroy-D brands. If you can only find coconut milk, refrigerate the can overnight and scoop the solid top layer — that’s your coconut cream. Substituting with coconut milk will make the mousse too loose.
White Chocolate: For the mirror glaze, quality matters. Use a good white chocolate like Ghirardelli or Valrhona — one that contains real cocoa butter. Avoid white “morsels” or candy melts, which contain oils that prevent a smooth, glossy finish. The cocoa butter is what gives the glaze that beautiful sheen and clean snap.
Edible Pearl Luster Dust: This is the secret weapon for a truly glossy mirror finish. It’s a fine, shimmering powder made from mica and titanium dioxide. You can find it at craft stores or online. It’s completely safe to eat and adds a luminous, pearl-like quality to the glaze without any artificial taste. A little goes a long way — one teaspoon is plenty for this batch.
Limes: Fresh, unwaxed limes are non-negotiable here. The zest provides essential oils that flavor the mousse in a way bottled juice never can. Look for limes that feel heavy for their size — they’ll be juicier. If you can only find waxed limes, give them a good scrub under hot water before zesting.
| Original Ingredient | Best Substitution | Flavor / Texture Impact |
|---|---|---|
| Coconut cream | Full-fat coconut milk (solid top layer only) | Slightly thinner mousse, still good |
| White chocolate | High-quality white chocolate chips (not morsels) | Slightly less glossy, but works |
| Edible pearl luster dust | Omit, glaze will still be glossy but less luminous | Less shimmer, still beautiful |
| Fresh lime juice | Bottled lime juice + extra zest | Less bright, slightly flat flavor |
How to Make Coconut Lime Dessert Bombs — Step-by-Step
Trust me when I say this: you don’t need to be a pastry chef to nail this. I’ve broken it down into simple stages, and if you follow the visual cues I’ve described, you’ll be rewarded with dessert bombs that look professionally made.
Step 1: Make the Biscuit Base
Mix the graham cracker crumbs with melted butter until every crumb is moistened and the mixture holds together when pressed. Press a thin, even layer into the bottom of each silicone dome mold — about 1/8-inch thick. Use a small measuring spoon or your fingertips to compact it firmly. Pop the molds into the fridge for 15 minutes to set.
💡 Stella’s Pro Tip: Wet your fingertips with a drop of water before pressing the crumbs — the butter won’t stick to your fingers, and you’ll get a perfectly smooth, even base.
Step 2: Cook the Pineapple Center
In a small saucepan over medium heat, combine the finely diced pineapple, honey, lime juice, and salt. Cook for 3–4 minutes, stirring occasionally, until the pineapple softens and the juices thicken slightly. The mixture should look glossy and the pineapple pieces should be tender but still hold their shape. Remove from heat and cool completely — you can speed this up by spreading it on a plate in the fridge.
⚠️ Common Mistake to Avoid: Don’t overcook the pineapple! It should soften but not turn into jam. You want little bursts of texture inside the mousse, not a mushy paste.
Step 3: Make the Coconut Lime Mousse
In a large bowl, beat the softened cream cheese with powdered sugar, coconut cream, lime juice, lime zest, and vanilla extract until completely smooth — no lumps. In a separate chilled bowl, whip the heavy cream to soft peaks (the cream should hold a gentle curl when you lift the whisk). Gently fold the whipped cream into the cream cheese mixture using a figure-eight motion, turning the bowl as you go. Stop as soon as no white streaks remain.
💡 Stella’s Pro Tip: Chill your mixing bowl and whisk for 10 minutes before whipping the cream. Cold cream whips faster and holds its structure longer — a trick I picked up in a Paris patisserie.
Step 4: Assemble the Domes
Fill each mold halfway with the mousse. Drop a spoonful (about 1 teaspoon) of the cooled pineapple center into the middle, then cover with more mousse until the mold is full. Smooth the tops with a small offset spatula or the back of a spoon. Freeze for at least 3 hours — overnight is even better. The domes must be frozen solid before glazing.
⚠️ Common Mistake to Avoid: Don’t rush the freezing time. If the domes aren’t fully frozen, the mirror glaze will warm them too quickly and slide right off. Three hours minimum — check by pressing gently; they should feel rock-solid.
Step 5: Make the Mirror Glaze
Melt the white chocolate in a double boiler or in the microwave in 30-second bursts, stirring between each until smooth. Whisk in the sweetened condensed milk, coconut oil, edible pearl luster dust, and coconut extract until completely glossy and streak-free. The glaze should be thin enough to pour smoothly — if it seems thick, add 1/2 teaspoon more coconut oil. Let it cool to about 90°F (32°C) — it should feel warm to the touch but not hot.
💡 Stella’s Pro Tip: The perfect pouring temperature is key. Too hot, and it will melt the mousse. Too cool, and it will thicken before you get a smooth coat. Aim for that 90°F sweet spot — I use an instant-read thermometer for precision.
Step 6: Glaze and Garnish
Unmold the frozen domes and place them on a wire rack set over a baking sheet (to catch drips). Pour the mirror glaze evenly over each dome, starting from the top and letting it flow naturally down the sides. Work quickly — the cold dome will set the glaze almost instantly. Before the glaze fully sets, sprinkle with toasted coconut flakes and add a few lime zest curls. Chill for 20 minutes to let the glaze firm up completely, then serve.
⚠️ Common Mistake to Avoid: Don’t touch the glaze once it’s poured! The mirror finish is delicate and any fingerprint will be permanent. If you need to adjust a drip, use a small spatula very gently.
| Step | Action | Duration | Key Visual Cue |
|---|---|---|---|
| 1 | Press graham base into molds | 15 mins chill | Firm, compacted crumb layer |
| 2 | Cook pineapple center | 3–4 mins | Pineapple softened, juices thickened |
| 3 | Make mousse | 10 mins | Smooth, no lumps, soft peaks |
| 4 | Fill and freeze domes | 3+ hrs freeze | Rock-solid, no give when pressed |
| 5 | Make mirror glaze | 10 mins | Glossy, smooth, 90°F |
| 6 | Glaze and garnish | 20 mins chill | Shiny, set, no fingerprints |
Serving & Presentation
These dream bombs are made for center-stage moments. I love serving them on a simple white platter — the glossy domes look like jewels against the clean backdrop. If you want to gild the lily, drizzle a little extra mirror glaze on the plate and drag a toothpick through it for a marbled effect. A scattering of toasted coconut flakes and a few lime zest curls on top adds color and texture.
For a truly Moroccan-inspired touch, I sometimes serve these with a side of mint tea — the contrast between the sweet, cold dessert and the hot, herbaceous tea is stunning. Or, if I’m feeling Parisian, I’ll plate them with a dollop of crème fraîche on the side. In my NYC dinner parties, these always get the loudest applause. The key is to let them sit at room temperature for 2–3 minutes after chilling — the mousse softens slightly, making the texture even more luscious.
| Pairing Type | Suggestions | Why It Works |
|---|---|---|
| Side Dish | Fresh mango slices, passion fruit pulp | Extra tropical fruit complements the lime-coconut profile |
| Sauce / Dip | Raspberry coulis, salted caramel | Tart berry or salty-sweet contrast cuts richness |
| Beverage | Moroccan mint tea, sparkling wine, iced coffee | Tea complements tropical notes; wine/coffee balance sweetness |
| Garnish | Toasted coconut, lime zest curls, edible flowers | Adds visual height, texture, and aromatic lift |
Make-Ahead, Storage & Reheating
I’m a big fan of make-ahead desserts — especially when I’m hosting. In my NYC kitchen, time is always tight, so I often make these dream bombs over two days. The mousse-filled domes freeze beautifully for up to two weeks, and the mirror glaze can be made fresh the day you serve. Here’s everything you need to know about storing and prepping ahead.
| Method | Container | Duration | Reheating Tip |
|---|---|---|---|
| Refrigerator | Airtight container, single layer | 2–3 days | Serve cold; no reheating needed |
| Freezer | Freezer-safe container, layers separated by parchment | Up to 2 weeks | Thaw in fridge 2 hours before glazing |
| Make-Ahead | Freeze unglazed domes; glaze day of serving | Up to 2 weeks ahead | Glaze directly from freezer — no thawing needed |
The most important storage rule: never refrigerate the glazed bombs uncovered — the glaze can absorb moisture from the fridge and lose its shine. Always store them in an airtight container. If you’re freezing unglazed domes, wrap each mold tightly in plastic wrap, then place in a freezer bag. When you’re ready to serve, simply unmold and glaze straight from the freezer — the cold surface helps the mirror finish set instantly.
One more thing from my experience: if you’re making these for a party, glaze them no more than 3–4 hours before serving. The mirror finish is at its most spectacular within the first few hours. After that, it can start to soften slightly — still delicious, but not as jaw-droppingly glossy.
Variations & Easy Swaps
| Variation | Key Change | Best For | Difficulty Impact |
|---|---|---|---|
| Mango-Passion Fruit Swap | Replace pineapple with mango; add passion fruit seeds | Bolder tropical flavor | Easy |
| Dairy-Free Version | Use dairy-free cream cheese and coconut whipped cream | Dairy-sensitive guests | Medium |
| Spiced Chai Twist | Add 1 tsp chai masala to mousse | Fall/winter entertaining | Easy |
Mango-Passion Fruit Swap
This is my go-to variation when I find gorgeous mangoes at the Union Square market. Replace the pineapple with finely diced ripe mango, and fold in the seeds of one passion fruit into the center mixture. The passion fruit adds a tangy, aromatic pop that pairs beautifully with the lime. It’s still an easy no-bake dessert, but the flavor shifts from classic tropical to something more exotic and complex.
Dairy-Free Version
For my friends who avoid dairy, I’ve tested this swap extensively. Use a high-quality dairy-free cream cheese (I like Kite Hill or Violife) and replace the heavy cream with full-fat coconut whipped cream (chill a can of coconut cream overnight, scoop the solid top, and whip until fluffy). The texture is slightly less stable but still gorgeous. The mirror glaze naturally contains dairy from the white chocolate, so use a dairy-free white chocolate like Enjoy Life or Pascha.
Spiced Chai Twist
This variation is pure comfort — inspired by the chai wallahs I met during a trip to London. Add 1 teaspoon of chai masala (or a mix of cinnamon, cardamom, ginger, and cloves) to the mousse mixture. The warm spices play beautifully against the cool lime and coconut. It’s a wonderful fall-winter adaptation that still feels bright and festive. I served this at a holiday party last December, and it disappeared in minutes.
What ingredients are needed to make the mirror glaze for tropical coconut lime dream bombs?
The mirror glaze requires just five ingredients: 10 oz (280 g) white chocolate (melted), 2 tablespoons sweetened condensed milk, 1 tablespoon coconut oil, 1 teaspoon edible pearl luster dust, and 1/2 teaspoon coconut extract. The white chocolate provides the base and shine, the condensed milk adds sweetness and viscosity, the coconut oil ensures a fluid consistency, the luster dust gives that luminous pearl effect, and the coconut extract reinforces the tropical flavor. All ingredients are easy to find at most US grocery stores or online.
Can I use lime zest or lime extract instead of fresh lime juice in this recipe?
Yes, but with adjustments. Lime zest is actually ideal for the mousse — it provides essential oils and intense lime flavor without adding extra liquid that could thin the texture. I use both zest and juice in my coconut lime dessert bombs. If you’re substituting fresh lime juice with lime extract, I’d recommend using 1/4 teaspoon of extract plus enough water or coconut cream to match the 2 tablespoons of juice called for. Bottled lime juice works in a pinch, but the flavor will be less bright than freshly squeezed. For the mirror glaze, stick with the coconut extract specified — lime extract would compete with the coconut flavor.
How long does it take to set the mirror finish on these coconut lime dream bombs?
The mirror finish sets almost instantly when it hits the frozen dome — usually within 30–60 seconds. The extreme cold of the frozen mousse causes the white chocolate glaze to solidify on contact. However, I recommend chilling the glazed bombs for 20 minutes in the refrigerator before serving. This allows the glaze to fully firm up so it holds its shape when you plate or transport it. If you’re serving immediately, 5–10 minutes in the fridge is enough. The glaze will continue to set as it sits, but the 20-minute chill guarantees that beautiful, fingerprint-free mirror surface.
What is the best way to store tropical coconut lime dream bombs to keep the glaze glossy?
To keep the mirror glaze glossy, store the glazed bombs in an airtight container in the refrigerator for up to 2–3 days. The most important thing is to avoid any moisture touching the glaze — even condensation from the fridge can dull the shine. Place a paper towel at the bottom of the container to absorb any excess humidity, and make sure the lid seals tightly. If you’re storing unglazed domes, freeze them in a single layer in a freezer-safe container for up to 2 weeks, then glaze them fresh the day you plan to serve. The glaze is at its most spectacular within 3–4 hours of application.
Can I make these coconut lime dessert bombs without a silicone dome mold?
Absolutely. While silicone dome molds give you that classic hemisphere shape, you can also use a standard muffin tin (greased well) or even small glass bowls. If using a muffin tin, line each cup with plastic wrap for easy removal. Another option is to shape the mousse into free-form domes using a spoon and your hands — just work quickly while the mousse is still cold. The biscuit base can be pressed into the bottom of any mold. Keep in mind that the mirror glaze pours best over rounded surfaces, so even a simple dome shape will work beautifully.
Why did my mirror glaze crack or look dull?
Cracked or dull mirror glaze usually comes down to temperature issues. If the glaze is too hot when poured (above 95°F), it can melt the frozen mousse and create an uneven surface that cracks as it resets. If the glaze is too cool (below 85°F), it will thicken and pour unevenly, resulting in a dull, streaky finish. Always use an instant-read thermometer to hit that 90°F sweet spot. Dullness can also happen if the white chocolate wasn’t fully melted or if the luster dust wasn’t whisked in thoroughly. Make sure your white chocolate is smooth and glossy before adding the other ingredients.
Is this tropical coconut mousse recipe suitable for a gluten-free diet?
Yes, this tropical coconut mousse recipe can easily be made gluten-free. The mousse itself contains no gluten — cream cheese, cream, coconut cream, lime, and vanilla are all naturally gluten-free. The only source of gluten is the graham cracker crust. Simply substitute with gluten-free graham cracker crumbs or crushed gluten-free cookies (like gluten-free vanilla wafers or shortbread). You can also use crushed nuts (almonds or pecans) mixed with melted butter for a grain-free, gluten-free base that adds wonderful flavor. Always check the labels on your white chocolate and luster dust to ensure they’re certified gluten-free.
Can I use dark chocolate or milk chocolate for the mirror glaze instead of white chocolate?
You can, but the results will be different. Dark chocolate mirror glaze will have a deeper, more bittersweet flavor that could overpower the delicate lime and coconut notes. It will also be darker in color, hiding the pearl luster dust effect. Milk chocolate would be a middle ground — sweeter and less intense than dark, but still not as neutral as white chocolate. For the brightest, most versatile glaze that shows off the luster dust and allows the tropical flavors to shine, white chocolate is my top recommendation. If you do experiment, adjust the coconut oil slightly — dark chocolate may need an extra teaspoon to stay fluid.
How far in advance can I make the pineapple center for these dream bombs?
The pineapple center can be made up to 3 days in advance and stored in an airtight container in the refrigerator. In fact, making it ahead allows the flavors of honey, lime, and pineapple to meld together beautifully. Just make sure it’s completely cooled before you use it in the mousse — warm pineapple will melt the cream cheese mixture. If you’ve stored it in the fridge, let it sit at room temperature for 15 minutes before using so it’s not too stiff. The cooked pineapple also freezes well for up to 1 month in a sealed container.
What can I use instead of edible pearl luster dust for the mirror glaze?
If you don’t have edible pearl luster dust, you can still make a beautiful mirror glaze without it. The glaze will still be glossy thanks to the white chocolate and coconut oil — the luster dust simply adds that extra luminous, pearl-like shimmer. For a subtle sparkle, you can sprinkle a tiny pinch of edible glitter on top after glazing. Alternatively, a drop of white food coloring can make the glaze appear brighter and more opaque. If you’re looking for a natural option, a pinch of finely ground mica powder (food-grade) works well.
Share Your Version!
I absolutely love hearing how these coconut lime dessert bombs turn out in your kitchen. Did you try the spiced chai twist? Or maybe you went all-in with the mango-passion fruit swap? Drop a comment below and let me know — your questions and stories help me create better recipes for this community. If you snap a photo, tag me on Instagram or Pinterest @stellarecipeblog — I feature my favorites in my stories every month.
From my NYC kitchen to yours — I hope this recipe brings as much warmth to your table as it does to mine. — Stella 🧡
Love This Recipe? Save It to Pinterest!
If you enjoyed this Tropical Coconut Lime Dream Bombs recipe, don’t let it get lost in your browser tabs! 😄 Pin it now so you can find it again anytime — and explore hundreds more tried-and-tested recipes waiting for you on my Pinterest boards.
👉 Follow Stella on Pinterest @stellarecipeblog
📌 Pin this recipe · 🔁 Re-pin your favorites · 💬 Tag me when you make it — I love seeing your creations!
💬 What’s Your Favorite Tropical Dessert?
I’d love to hear from you! Leave a star rating ⭐, share your twist on this recipe, or ask me a question in the comments below. Your feedback makes this community so special.
👇 Scroll down to the comments — I reply to every single one! 👇
“`
Print

Tropical Coconut Lime Dream Bombs with Gloss Mirror Finish
- Yield: 8 1x
Ingredients
- For the Coconut Lime Mousse:
- 8 oz (225 g) cream cheese, softened
- 1 cup heavy whipping cream, chilled
- 1/3 cup powdered sugar
- 1/2 cup coconut cream
- 2 tbsp fresh lime juice
- 1 tbsp lime zest
- 1 tsp vanilla extract
- For the Tropical Center:
- 1 cup pineapple, finely diced
- 2 tbsp honey
- 1 tsp lime juice
- 1/4 tsp salt
- For the Biscuit Base:
- 1 cup graham cracker crumbs
- 3 tbsp unsalted butter, melted
- For the Gloss Mirror Finish:
- 10 oz (280 g) white chocolate, melted
- 2 tbsp sweetened condensed milk
- 1 tbsp coconut oil
- 1 tsp edible pearl luster dust
- 1/2 tsp coconut extract
- For Garnish (optional):
- Toasted coconut flakes
- Lime zest curls
Instructions
- Mix graham cracker crumbs with melted butter until evenly combined.
- Press into silicone dome molds to form a thin base layer and chill for 15 minutes.
- In a small saucepan, combine pineapple, honey, lime juice, and salt. Cook for 3–4 minutes until slightly softened. Cool completely.
- Beat cream cheese, powdered sugar, coconut cream, lime juice, lime zest, and vanilla until smooth.
- Whip heavy cream to soft peaks, then gently fold into the coconut lime mixture to create a light mousse.
- Fill each mold halfway with mousse.
- Add a spoonful of pineapple center into the middle.
- Cover with more mousse and smooth the tops.
- Freeze for at least 3 hours until fully set.
- Combine melted white chocolate, condensed milk, coconut oil, luster dust, and coconut extract until glossy and smooth.
- Unmold the frozen domes and place on a wire rack.
- Pour the mirror finish glaze evenly over each dome, allowing it to drip naturally.
- Garnish with toasted coconut flakes and lime zest curls if desired.
- Chill for 20 minutes before serving.
Nutrition
- Calories: 335
- Sugar: 23 g
- Fat: 24 g
- Carbohydrates: 28 g
- Protein: 4 g
Tried This Recipe? Leave a Comment!
Did you make this recipe? I’d love to hear how it turned out! Please leave a comment and a rating below. Your feedback helps other home cooks and supports cheerychop.com!
For more delicious inspiration, follow me on Pinterest!