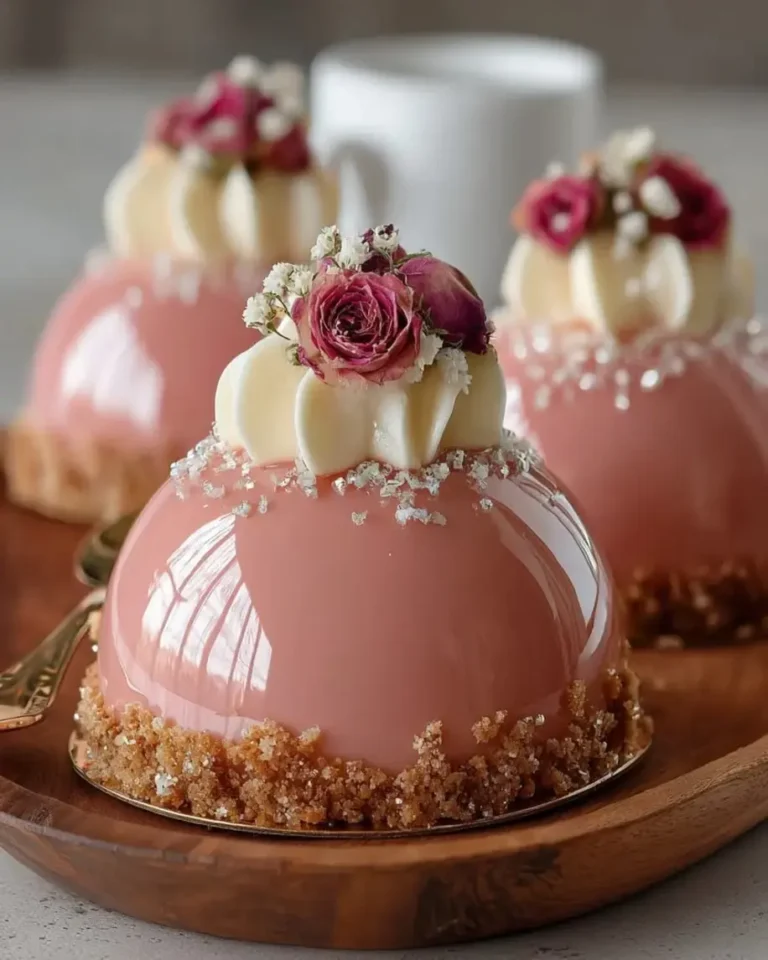
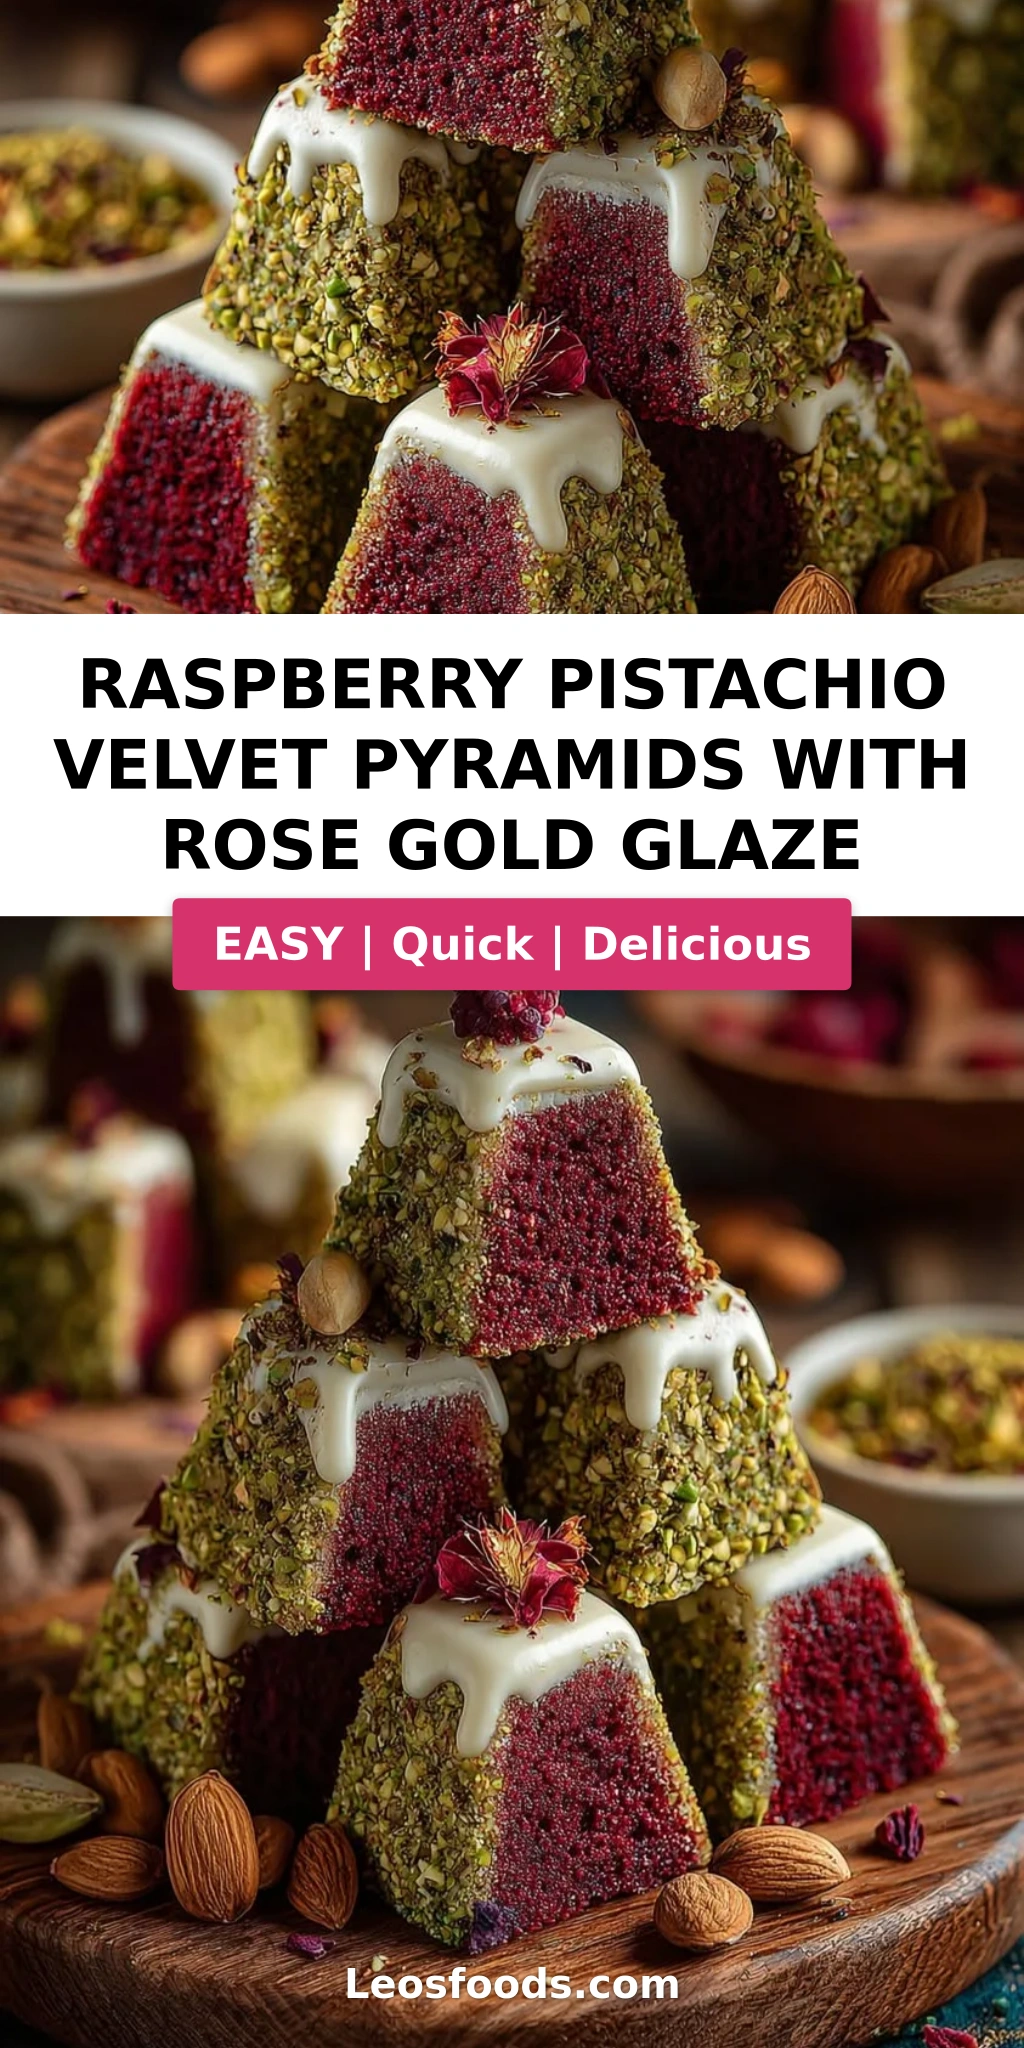
Raspberry Pistachio Velvet Pyramids with Rose Gold Glaze
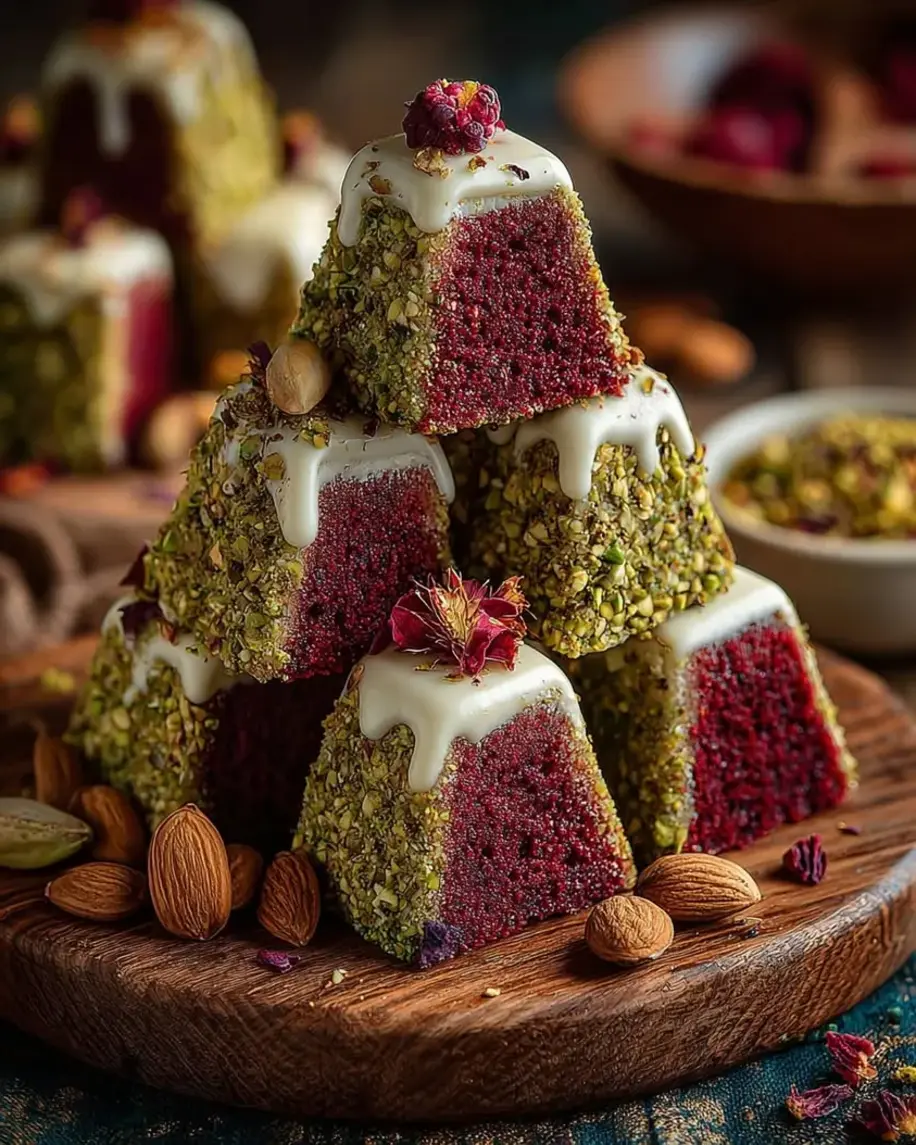
Table of Contents
Raspberry Pistachio Velvet Pyramids with Rose Gold Glaze – A Geometric Dessert That Tastes as Stunning as It Looks
Growing up in Morocco, my mother’s kitchen was a symphony of crushed almonds, rose water, and honey-soaked pastries that shimmered like jewels. Years later, after training at Le Cordon Bleu in Paris and settling into my NYC apartment with its tiny but fiercely loved oven, I found myself craving that same blend of elegance and warmth. These Raspberry Pistachio Velvet Pyramids with Rose Gold Glaze are the dessert I make when I want to feel like a pastry chef in my own home — and I want you to feel that way too. This raspberry pistachio velvet pyramids recipe brings together the nutty richness of pistachios, the bright tartness of raspberries, and a rose gold glaze that catches the light like liquid jewelry. It’s a geometric cake recipe that looks like it belongs in a French patisserie window, but I promise it’s absolutely doable in your own kitchen.
When you cut into one of these pyramids, the crumb is impossibly tender — almost velvet-soft — with bursts of raspberry that stain the cake a deep, jewel-like pink. The pistachio cream filling is light and cloud-like, with a subtle nuttiness that doesn’t overpower the fruit. And then there’s the rose gold glaze: glossy, smooth, with just a whisper of rose water that transports you straight to a Moroccan garden. The combination of textures — the tender cake, the creamy filling, the crackly shell of the glaze — is nothing short of magical. Every bite has a little crunch from chopped pistachios and a burst of freshness from the raspberries. It’s the kind of edible rose gold dessert that makes people stop mid-conversation and say, “Wait — you made this?”
What sets my version apart is how I approach the geometry. I’ve tested this recipe more times than I can count to make sure the pyramids hold their shape perfectly without drying out. The trick is in the crumb structure — finely ground pistachios in the batter add stability without making the cake dense. I’ll show you exactly how to cut and assemble the layers so you get clean, sharp edges every time. And the rose gold glaze? That was a happy accident during a late-night test in my NYC kitchen, and now I can’t imagine these pyramids without it. 💡 Stella’s Pro Tip: Use a serrated knife and chill the cake for 20 minutes before cutting — it makes all the difference for those clean geometric lines. Let me walk you through every step, from crushing pistachios to that final shimmering pour.
Why This Raspberry Pistachio Velvet Pyramids Recipe Is the Best
The Flavor Secret. The pistachios in this cake aren’t just a garnish — they’re ground into the flour mixture, which means every single bite carries that warm, slightly sweet nuttiness. I learned this technique from a pastry chef in Paris who insisted that nuts should be treated as a structural ingredient, not an afterthought. The raspberries are folded in whole so they burst during baking, creating little pockets of tartness that balance the richness of the pistachio cream. This pistachio raspberry dessert has a depth of flavor that most quick-cakes just don’t have, and it all comes from treating each ingredient with a little extra care.
Perfected Texture. The velvet crumb comes from a precise ratio of butter to milk and the addition of finely ground pistachios, which absorb just enough moisture to keep the cake tender without making it heavy. I spent four test batches getting this right — the first was too dry, the second fell apart when I tried to cut the pyramids, the third was perfect. The key is to not overmix the batter once the dry ingredients go in, and to fold the raspberries in with a light hand. The pistachio cream filling is stabilized with just enough powdered sugar to hold its shape without being stiff, so it pipes beautifully and stays put between the layers.
Foolproof & Fast for a Showstopper. Despite how impressive these pyramids look, the actual hands-on time is about 30 minutes. The cake comes together in one bowl (plus the dry ingredient whisk), the filling whips up in under 5 minutes, and the glaze takes only 3 minutes on the stove. I’ve had friends who say they “can’t bake” make these for dinner parties and get standing ovations. The geometric cake recipe might look advanced, but the techniques are all beginner-friendly — you just need a good serrated knife and a little patience for the glaze to set. From my NYC kitchen to yours, this is the recipe that will make you feel like a pro.
Raspberry Pistachio Velvet Pyramids Ingredients
I buy my pistachios from a little shop in Brooklyn that imports them directly from Sicily — they’re brighter green and sweeter than any I’ve found at the supermarket. The raspberries I get from the Union Square Greenmarket when they’re in season, but I’ve tested this with frozen ones too and they work beautifully. And the rose water? That’s a staple in my pantry, a gift from my mother’s kitchen in Morocco. Here’s everything you’ll need to make these shimmering pyramids.
Ingredients List
- For the Raspberry Pistachio Cake:
- 1 1/2 cups all-purpose flour
- 1/2 cup finely ground pistachios
- 1 tsp baking powder
- 1/4 tsp salt
- 1/2 cup unsalted butter, softened
- 3/4 cup granulated sugar
- 2 large eggs
- 1 tsp vanilla extract
- 1/2 cup whole milk
- 3/4 cup fresh raspberries (or frozen, not thawed)
- For the Pistachio Cream Filling:
- 1 cup heavy cream
- 1/4 cup pistachio paste
- 2 tbsp powdered sugar
- 1/2 tsp vanilla extract
- For the Rose Gold Glaze:
- 1 cup white chocolate, finely chopped
- 1/3 cup heavy cream
- 1 tsp rose water
- Edible rose gold luster dust, as needed
- For Garnish (optional):
- 2 tbsp chopped pistachios
- Fresh raspberries
- Dried rose petals
Ingredient Spotlight
Pistachios (ground and paste): The backbone of this recipe. For the ground pistachios, buy raw shelled pistachios and pulse them in a food processor with a tablespoon of the flour from the recipe to prevent them from turning into butter. You want a fine meal, not a paste — this gives the cake its tender crumb. Pistachio paste is available at specialty stores or online; if you can’t find it, make your own by blending 1/2 cup of pistachios with 2 tablespoons of neutral oil until smooth. The paste adds concentrated flavor and richness to the cream filling.
Raspberries: Fresh are ideal because they hold their shape during folding and create beautiful pockets of tartness. If using frozen, do not thaw them first — add them straight to the batter to prevent excess moisture from making the cake soggy. Frozen raspberries will bleed a little more into the batter, giving the cake a lovely pink swirl, but the flavor is just as bright.
Rose water and edible rose gold luster dust: Rose water should be food-grade and not too concentrated — taste a drop before using; it should be floral but not soapy. The luster dust is what gives the glaze that stunning metallic shimmer. Use a brand that’s labeled “edible” and “food-grade” — Wilton and CK Products both make reliable versions. A little goes a long way; start with 1/4 teaspoon and add more until the glaze looks like liquid gold.
White chocolate: Use a high-quality brand like Ghirardelli or Valrhona for the smoothest glaze. Avoid white chocolate chips, which often contain stabilizers that prevent smooth melting. Finely chop the chocolate from a bar so it melts evenly when you pour the hot cream over it.
| Original Ingredient | Best Substitution | Flavor / Texture Impact |
|---|---|---|
| Finely ground pistachios | Finely ground almonds or almond flour | Slightly milder nut flavor; cake will be a bit more tender but less green |
| Pistachio paste | Homemade pistachio butter or 1/4 cup Nutella (for chocolate version) | Homemade paste is less sweet; Nutella adds chocolate flavor and changes the color |
| Fresh raspberries | Frozen raspberries (not thawed) or fresh blueberries | Frozen raspberries bleed more — prettier swirl but slightly softer crumb; blueberries give a different tartness |
| Rose water | 1/2 tsp orange blossom water or 1 tsp vanilla extract | Orange blossom is more floral-honeyed; vanilla is warmer and less perfumed |
| Edible rose gold luster dust | Gold food coloring + clear edible glitter (skip luster dust) | Less metallic sheen; will be more golden than rose gold; still beautiful but different finish |
How to Make Raspberry Pistachio Velvet Pyramids — Step-by-Step
I’ve broken this down into clear, manageable steps so you can bake with confidence. Take your time with the cutting and assembly — that’s where the magic really happens.
Step 1: Prepare the Oven and Pan
Preheat your oven to 350°F (175°C). Grease a 9×9-inch square baking pan with butter or nonstick spray, then line it with parchment paper, leaving a 2-inch overhang on two opposite sides — this makes lifting the cake out so much easier. The pan needs to be fully lined so the cake doesn’t stick when you’re cutting the pyramids later.
💡 Stella’s Pro Tip: Use a metal or glass pan, not a dark nonstick one, for even browning. Dark pans can cause the edges to overbake before the center is done.
Step 2: Mix the Dry Ingredients
In a medium bowl, whisk together 1 1/2 cups all-purpose flour, 1/2 cup finely ground pistachios, 1 tsp baking powder, and 1/4 tsp salt. Make sure the ground pistachios are evenly distributed — they tend to clump together. Whisking thoroughly ensures every bite of cake has that nutty flavor.
⚠️ Common Mistake to Avoid: Don’t skip whisking the dry ingredients. If the baking powder isn’t evenly distributed, your cake will rise unevenly and the pyramids won’t have a uniform crumb.
Step 3: Cream the Butter and Sugar
In a large bowl, beat 1/2 cup softened unsalted butter with 3/4 cup granulated sugar using a hand mixer or stand mixer on medium speed until light, pale, and fluffy — about 3 minutes. Scrape down the bowl once or twice. Add the 2 large eggs one at a time, beating well after each addition, then mix in 1 tsp vanilla extract. The mixture should look smooth and slightly aerated.
💡 Stella’s Pro Tip: Make sure your butter is truly softened — room temperature, about 65°F. If it’s too cold, it won’t cream properly; if it’s too warm, the batter will be greasy. Leave it on the counter for about 45 minutes before starting.
Step 4: Alternate Dry Ingredients and Milk
With the mixer on low speed, add the dry ingredients in three additions, alternating with the 1/2 cup whole milk in two additions, starting and ending with the dry ingredients. Mix just until combined after each addition — stop as soon as you no longer see streaks of flour. Overmixing at this stage will develop gluten and make the cake tough.
Step 5: Fold in the Raspberries
Gently fold in 3/4 cup fresh raspberries using a rubber spatula. Be very gentle — you want the raspberries to stay mostly whole so they create those beautiful burst pockets in the baked cake. If some break apart, that’s fine; they’ll swirl into the batter and create a lovely pink marbling.
⚠️ Common Mistake to Avoid: Don’t overfold! Fold just until the raspberries are distributed — about 5 to 6 folds. Overfolding can crush the raspberries and turn the batter pink, which is pretty but you’ll lose those distinct fruit pockets.
Step 6: Bake and Cool
Pour the batter into the prepared pan and spread it evenly. Bake for 25 to 30 minutes, until the top is golden and a toothpick inserted in the center comes out clean or with just a few moist crumbs. Cool the cake in the pan on a wire rack for 10 minutes, then use the parchment overhang to lift it out and cool completely on the rack. This is crucial — if the cake is even slightly warm when you cut it, the pyramids will crumble.
💡 Stella’s Pro Tip: After the cake is completely cool, wrap it in plastic wrap and refrigerate it for 20 minutes before cutting. A chilled cake slices much more cleanly, giving you those crisp geometric edges.
Step 7: Make the Pistachio Cream Filling
In a chilled bowl, combine 1 cup heavy cream, 1/4 cup pistachio paste, 2 tbsp powdered sugar, and 1/2 tsp vanilla extract. Whip on medium-high speed until medium peaks form — about 2 to 3 minutes. The cream should be smooth, fluffy, and hold its shape when you lift the whisk. Don’t overwhip or it will turn into butter.
Step 8: Cut and Assemble the Pyramids
Using a sharp serrated knife, trim the edges of the cake to create clean sides. Cut the cake into 8 equal rectangles (about 2.25 x 4.5 inches each). For each pyramid, slice each rectangle diagonally from corner to corner to create two triangles. Spread or pipe a layer of pistachio cream onto one triangle, then press the second triangle on top to form a pyramid shape. Repeat with all 8 pyramids.
⚠️ Common Mistake to Avoid: Don’t trim too much off the edges — you need enough height for the pyramid to look substantial. Save the trimmings for snacking (chef’s privilege!).
Step 9: Make the Rose Gold Glaze
Place 1 cup finely chopped white chocolate in a heatproof bowl. Heat 1/3 cup heavy cream in a small saucepan until it just begins to steam — small bubbles around the edge, but not boiling. Pour the hot cream over the white chocolate and let it sit for 30 seconds, then stir until smooth. Mix in 1 tsp rose water and edible rose gold luster dust, starting with 1/4 tsp and adding more until the glaze has a shimmering, metallic rose gold color.
💡 Stella’s Pro Tip: If the glaze is too thick, add warm cream 1 teaspoon at a time. If it’s too thin, let it cool for a few minutes — it will thicken as it cools. The perfect consistency is like thick honey: it should coat the back of a spoon but still pour smoothly.
Step 10: Glaze the Pyramids
Place the assembled pyramids on a wire rack set over a baking sheet. Pour the rose gold glaze evenly over each pyramid, letting it cascade down the sides. Use a small offset spatula to gently encourage the glaze to cover any bare spots. Allow the glaze to set for 15 to 20 minutes at room temperature, or until it’s firm to the touch.
Step 11: Garnish and Serve
While the glaze is still slightly tacky, garnish with chopped pistachios, fresh raspberries, and dried rose petals. The garnishes will stick to the glaze and create a stunning presentation. Serve at room temperature for the best texture and flavor.
| Step | Action | Duration | Key Visual Cue |
|---|---|---|---|
| 1 | Prepare pan | 5 min | Parchment overhang on two sides |
| 2 | Whisk dry ingredients | 2 min | Pistachios evenly distributed, no clumps |
| 3 | Cream butter and sugar | 3 min | Pale, fluffy, lightened color |
| 4 | Alternate dry + milk | 2 min | Smooth batter, no flour streaks |
| 5 | Fold in raspberries | 1 min | Berries mostly whole, evenly distributed |
| 6 | Bake cake | 25–30 min | Toothpick clean, golden top |
| 7 | Whip pistachio cream | 2–3 min | Medium peaks, smooth and fluffy |
| 8 | Cut and assemble pyramids | 10 min | Clean diagonal cuts, neat triangles |
| 9 | Make rose gold glaze | 5 min | Smooth, glossy, rose gold color |
| 10 | Glaze pyramids | 5 min + 15–20 min set | Glaze coats evenly, sets firm |
| 11 | Garnish and serve | 5 min | Garnishes stick to tacky glaze |
Serving & Presentation
These pyramids are designed to be the centerpiece of your dessert table. I like to serve them on a simple white platter so the rose gold glaze really pops. Arrange them in a single layer with the points facing up, and scatter a few extra fresh raspberries and pistachios around the plate for a finishing touch. If you’re feeling extra elegant, add a few dried rose petals — they look like confetti from a Moroccan wedding.
The pistachio cream filling is rich but light, so these pair beautifully with a cup of mint tea (a nod to my Moroccan roots) or a strong espresso. They’re also wonderful with a dollop of lightly sweetened crème fraîche if you want to cut through the sweetness. For a truly stunning dessert board, serve them alongside fresh figs, honeycomb, and a stack of delicate butter cookies.
When I make these for dinner parties in my NYC apartment, I always plate them just before serving so the glaze stays glossy and the garnishes look fresh. If you’re serving them after a meal, let them sit at room temperature for about 10 minutes so the cake softens slightly and the filling warms up — the flavors are much more pronounced that way.
| Pairing Type | Suggestions | Why It Works |
|---|---|---|
| Side Dish | Fresh figs, honeycomb, butter cookies | Adds texture variety and natural sweetness that complements the rose gold glaze |
| Sauce / Dip | Crème fraîche, whipped cream, raspberry coulis | The tanginess cuts through the sweetness of the glaze and richness of the cream |
| Beverage | Mint tea, espresso, rosé Champagne | Mint tea echoes the rose and pistachio notes; espresso balances sweetness; rosé adds elegance |
| Garnish | Chopped pistachios, fresh raspberries, dried rose petals | Adds crunch, color contrast, and a floral finish that ties the whole dessert together |
Make-Ahead, Storage & Reheating
Living in NYC means my schedule is always full, so I love recipes that let me get ahead without sacrificing quality. These pyramids are perfect for that — you can prep almost everything in advance and assemble just before serving. Here’s exactly how I manage it in my own kitchen.
| Method | Container | Duration | Reheating Tip |
|---|---|---|---|
| Refrigerator | Airtight container in single layer | Up to 3 days | Let sit at room temp 20 min before serving |
| Freezer (un-glazed cake only) | Wrap tightly in plastic then foil | Up to 2 months | Thaw overnight in fridge, then cut and glaze fresh |
| Make-Ahead (assembled) | On serving platter, cover loosely with plastic | Up to 24 hours in advance | Glaze fully set before covering; add garnishes just before serving |
I don’t recommend freezing assembled, glazed pyramids — the glaze can lose its shine and the cream filling may separate when thawed. Instead, bake the cake up to 2 days ahead, wrap it well, and keep it at room temperature. The day of serving, cut and assemble the pyramids, make the glaze fresh, and pour it on. The pistachio cream filling can be whipped up to 4 hours in advance and refrigerated — just give it a quick whisk to revive the texture before piping or spreading.
If you’re storing leftovers in the fridge, place them in a single layer in an airtight container to prevent the garnish from getting crushed. They’ll keep for up to 3 days, but honestly, they’re at their absolute best within the first 24 hours. The cake stays moist and the glaze remains beautifully glossy.
Variations & Easy Swaps
| Variation | Key Change | Best For | Difficulty Impact |
|---|---|---|---|
| Chocolate-Hazelnut Pyramids | Replace pistachios with hazelnuts; use Nutella in the cream | Chocolate lovers, kids’ parties | Same — easy swap |
| Lemon-Blueberry Velvet Pyramids | Replace raspberries with blueberries; add 1 tbsp lemon zest; use white chocolate glaze with lemon juice instead of rose water | Spring brunches, citrus fans | Same — easy swap |
| Vegan / Dairy-Free Version | Use vegan butter, oat milk, coconut cream, and dairy-free white chocolate | Dairy-free diets, vegan entertaining | Slightly harder — glaze consistency can be tricky |
Chocolate-Hazelnut Pyramids
This variation is inspired by the Italian gianduja tradition I studied in Paris. Swap the ground pistachios for finely ground toasted hazelnuts in the cake batter, and use Nutella in place of pistachio paste in the cream filling. The rose gold glaze works beautifully with hazelnut — the floral notes in the rose water complement the chocolate. Garnish with chopped hazelnuts and a dusting of cocoa powder for a truly decadent twist.
Lemon-Blueberry Velvet Pyramids
For a bright, citrusy version that screams spring, substitute blueberries for the raspberries and add 1 tablespoon of fresh lemon zest to the batter. In the glaze, replace rose water with 2 teaspoons of fresh lemon juice and skip the rose gold luster dust for a clean white finish. The lemon adds a lovely acidity that cuts through the richness of the pistachio cream. I made this for a baby shower last spring and it was the first thing to disappear from the table.
Vegan / Dairy-Free Version
I tested this for a friend who’s dairy-free, and it works surprisingly well. Use a high-quality vegan butter stick (not margarine) and oat milk in the cake. For the cream filling, chill a can of full-fat coconut cream overnight, scoop off the solid top, and whip it with the pistachio paste and powdered sugar. The glaze requires dairy-free white chocolate — I like the brand “Moo Free” — and use canned coconut cream instead of heavy cream. The glaze will be slightly softer, so chill the pyramids for 10 minutes after glazing to help it set. The texture is a bit more delicate, but the flavor is still outstanding.
What is the best way to crush pistachios for a Raspberry Pistachio Velvet cake without turning them into paste?
The best way to crush pistachios for this cake is to use a food processor in short pulses, and always add a tablespoon of the flour from the recipe to the bowl before you start. The flour acts as a buffer and absorbs the oils as they release, preventing the nuts from turning into a paste or butter. Start with raw shelled pistachios — unsalted and unroasted — and pulse in 2-second bursts until you have a fine meal that looks like coarse sand. Stop the moment you no longer see large pieces; if you keep going, you’ll get pistachio butter. Alternatively, you can buy pre-ground pistachio flour online, but grinding them fresh gives you a much more vibrant flavor and color.
Can I substitute fresh raspberries with frozen ones in the Raspberry Pistachio Velvet Pyramids recipe?
Yes, you can absolutely use frozen raspberries — I do it all the time when fresh ones are out of season. The key is to not thaw them before adding to the batter. Add them straight from the freezer and fold them in very gently. Frozen berries will bleed a little more than fresh, giving the batter a pretty pink swirl, but the cake will still bake up tender and delicious. You may need to add 2 to 3 extra minutes to the bake time since the frozen berries lower the batter temperature. One note: frozen raspberries are slightly more fragile when frozen, so you might get more broken pieces — that’s totally fine and actually creates a lovely marbled effect throughout the cake.
How do I achieve a smooth rose gold glaze for the Raspberry Pistachio Velvet Pyramids without streaks?
A smooth, streak-free rose gold glaze comes down to three things: finely chopped white chocolate, properly heated cream, and the right technique. First, chop your white chocolate into very small, uniform pieces — about the size of rice grains — so they melt evenly. Heat the heavy cream just until small bubbles appear around the edges (about 180°F), then pour it over the chocolate and let it sit for 30 seconds before stirring. Stir slowly in one direction until the mixture is completely smooth. When adding the rose gold luster dust, dissolve it in a teaspoon of warm cream first before mixing it into the glaze — this prevents clumps. Strain the glaze through a fine-mesh sieve if you see any tiny lumps. Finally, pour the glaze at room temperature over chilled pyramids for the smoothest finish.
How far in advance can I assemble the Raspberry Pistachio Velvet Pyramids before serving?
You can assemble the pyramids up to 24 hours in advance, and I actually recommend doing it this way for the best results. Bake the cake up to 2 days ahead and store it tightly wrapped at room temperature. On the day before serving, cut and assemble the pyramids with the pistachio cream filling, arrange them on your serving platter, and pour the rose gold glaze over them. Let the glaze set completely (about 20 minutes), then loosely cover the platter with plastic wrap — don’t let the plastic touch the glaze or it will stick. Refrigerate overnight. About 30 minutes before serving, add the fresh garnishes so they stay vibrant. The cake actually becomes more moist and the flavors meld beautifully after a day in the fridge.
Can I make the Raspberry Pistachio Velvet Pyramids gluten-free?
Yes, and it’s easier than you might think. Replace the all-purpose flour with a high-quality gluten-free all-purpose flour blend that contains xanthan gum — I recommend Bob’s Red Mill 1-to-1 or Cup4Cup. The ground pistachios already provide structure and moisture, which helps compensate for the lack of gluten. Whisk the gluten-free flour with the ground pistachios and leavening agents thoroughly before adding to the wet ingredients. The batter will be slightly thicker than the original, so be careful not to overmix. Bake at the same temperature but check doneness at 25 minutes — gluten-free cakes can dry out quickly if overbaked. The pistachio cream filling and glaze are naturally gluten-free, so only the cake needs modification. The texture is still wonderfully tender and the pyramids hold their shape beautifully.
What can I use instead of rose water in the glaze for the Raspberry Pistachio Velvet Pyramids?
If you’re not a fan of floral flavors or don’t have rose water on hand, there are several excellent substitutes. Vanilla extract is the simplest swap — use 1 teaspoon for the same amount of rose water called for in the recipe. The glaze will be less perfumed but still delicious. Orange blossom water is my second choice; it’s also floral but slightly sweeter and more honey-like, and it pairs beautifully with pistachio. For a completely different direction, try 1 teaspoon of almond extract — it will reinforce the nuttiness of the pistachios and give the glaze a marzipan-like quality. If you want to keep the rose gold color without the rose flavor, simply omit the rose water and add an extra 1/2 teaspoon of vanilla. The glaze will still be stunningly beautiful.
How do I get clean, sharp edges when cutting the cake into pyramids?
Clean edges come from a properly chilled cake and the right knife. After the cake has cooled completely, wrap it in plastic and refrigerate it for at least 20 minutes — this firms up the butter in the crumb so the cake slices cleanly instead of crumbling. Use a long, sharp serrated knife with a thin blade; a bread knife works beautifully. Dip the knife in hot water and dry it between cuts for the cleanest slices. When cutting the rectangles, use a gentle sawing motion rather than pressing down. For the diagonal cuts that create the pyramid triangles, measure carefully so all pieces are the same size. If any edges look ragged, you can trim them with a sharp paring knife after the first cut. Once the pyramids are assembled and glazed, any small imperfections will be hidden by the glaze and garnishes.
Can I use a different shape instead of pyramids for this Raspberry Pistachio Velvet recipe?
Absolutely — the geometry is part of the fun, but the recipe is versatile. You can cut the cake into rectangular bars for a simpler presentation that’s just as delicious. For a round version, bake the cake in two 6-inch round pans and stack them with the pistachio cream in between, then pour the glaze over the top and let it drip down the sides. You can also use a geometric cookie cutter — triangles, diamonds, or hexagons — to stamp out shapes from the chilled cake. If you want to go full showstopper, cut the cake into cubes and glaze each one individually for a “petit four” style presentation. The key is to keep the pieces roughly the same size so they bake evenly and the glaze covers them uniformly. The raspberry pistachio velvet flavor works beautifully in any shape.
Why did my rose gold glaze turn out streaky or grainy?
Streaky or grainy glaze is usually caused by one of three things: the white chocolate seized, the cream was too hot, or the luster dust wasn’t fully dissolved. White chocolate is sensitive to heat — if the cream is too hot (above 190°F), it can cause the chocolate to separate and become grainy. Always heat the cream just until steaming, never boiling. If the glaze does seize, you can sometimes rescue it by whisking in a tablespoon of warm cream or a teaspoon of neutral oil like grapeseed. For streaks related to the luster dust, always mix the dust with a small amount of warm cream first to create a paste before adding it to the glaze — this ensures even distribution. Strain the finished glaze through a fine-mesh sieve before pouring to catch any tiny lumps. The glaze should be smooth, glossy, and pour like thick honey.
How many calories are in one Raspberry Pistachio Velvet Pyramid?
Based on the recipe as written, each Raspberry Pistachio Velvet Pyramid (1 of 8 servings) contains approximately 410 calories, 27 grams of fat, 37 grams of carbohydrates, 24 grams of sugar, and 6 grams of protein. This is an estimate and can vary depending on the exact brands of ingredients you use — especially the white chocolate and pistachio paste, which can vary in fat content. If you’re looking to reduce calories, you can use a lower-fat milk (though the cake will be slightly less tender) or reduce the amount of glaze by about half. You can also use a sugar substitute in the cake batter, but keep in mind that this will affect the texture and browning. For the most accurate nutritional information, I recommend plugging the exact ingredients into a nutrition calculator with the brands you use.
Share Your Version!
I absolutely love seeing these Raspberry Pistachio Velvet Pyramids come to life in different kitchens. When you make them — and I hope you do — take a photo and share it with me on Instagram or Pinterest. Tag @leosfoods so I can see your geometric creations, your rose gold drizzle, and your beautiful garnishes. Leave a star rating and a comment below to let me know how it went — I read every single one and I answer questions personally.
I’d love to know: did you stick with the classic raspberry and pistachio, or did you try one of the variations? Did you discover a tip of your own for getting those pyramid edges extra sharp? Drop a note in the comments and let’s keep the conversation going. From my NYC kitchen to yours — I hope this recipe brings as much warmth to your table as it does to mine. — Stella 🧡
Love This Recipe? Save It to Pinterest!
If you enjoyed this Raspberry Pistachio Velvet Pyramids with Rose Gold Glaze recipe, don’t let it get lost in your browser tabs! 😄 Pin it now so you can find it again anytime — and explore hundreds more tried-and-tested recipes waiting for you on my Pinterest boards.
👉 Follow Stella on Pinterest @stellarecipeblog
📌 Pin this recipe · 🔁 Re-pin your favorites · 💬 Tag me when you make it — I love seeing your creations!
⭐ Did you make this recipe? I’d love to hear how it turned out! Leave a star rating below and share your photos with @leosfoods. Your feedback helps me create better recipes for our community. — Stella 🧡

Raspberry Pistachio Velvet Pyramids with Rose Gold Glaze
Raspberry Pistachio Velvet Pyramids with Rose Gold Glaze
- Yield: 8 1x
Ingredients
- For the Raspberry Pistachio Cake:
- 1 1/2 cups all-purpose flour
- 1/2 cup finely ground pistachios
- 1 tsp baking powder
- 1/4 tsp salt
- 1/2 cup unsalted butter, softened
- 3/4 cup granulated sugar
- 2 large eggs
- 1 tsp vanilla extract
- 1/2 cup whole milk
- 3/4 cup fresh raspberries
- For the Pistachio Cream Filling:
- 1 cup heavy cream
- 1/4 cup pistachio paste
- 2 tbsp powdered sugar
- 1/2 tsp vanilla extract
- For the Rose Gold Glaze:
- 1 cup white chocolate, finely chopped
- 1/3 cup heavy cream
- 1 tsp rose water
- Edible rose gold luster dust, as needed
- For Garnish (optional):
- 2 tbsp chopped pistachios
- Fresh raspberries
- Dried rose petals
Instructions
- Preheat the oven to 350°F (175°C). Grease and line a baking pan.
- Whisk together flour, ground pistachios, baking powder, and salt.
- Beat butter and sugar until light and fluffy. Mix in eggs one at a time, then add vanilla.
- Alternate adding the dry ingredients and milk until a smooth batter forms.
- Fold in the raspberries gently.
- Bake for 25–30 minutes or until a toothpick comes out clean. Cool completely.
- Whip the heavy cream, powdered sugar, vanilla, and pistachio paste until medium peaks form.
- Cut the cooled cake into pyramid-shaped portions or trim into geometric layers and fill with pistachio cream.
- Heat the cream for the glaze until steaming. Pour over the white chocolate and stir until smooth.
- Mix in the rose water and edible rose gold luster dust until glossy.
- Place the pyramids on a rack and pour the glaze evenly over each piece.
- Allow the glaze to set for 15–20 minutes.
- Garnish with chopped pistachios, raspberries, and dried rose petals before serving.
Nutrition
- Calories: 410
- Sugar: 24 g
- Fat: 27 g
- Carbohydrates: 37 g
- Protein: 6 g
Tried This Recipe? Leave a Comment!
Did you make this recipe? I’d love to hear how it turned out! Please leave a comment and a rating below. Your feedback helps other home cooks and supports cheerychop.com!
For more delicious inspiration, follow me on Pinterest!