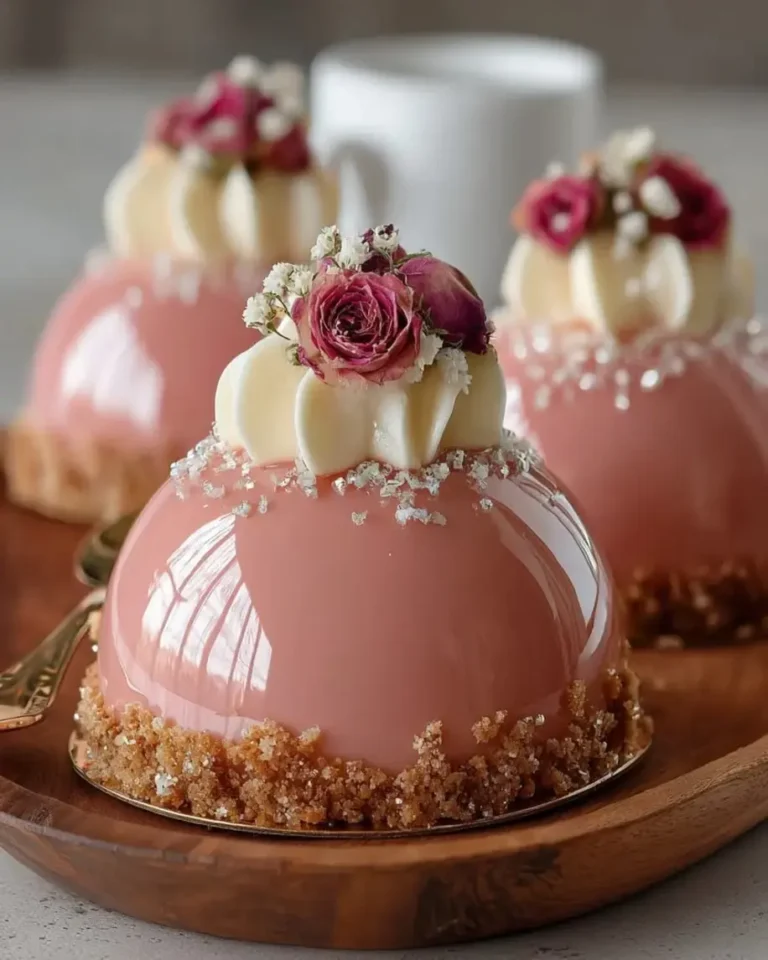
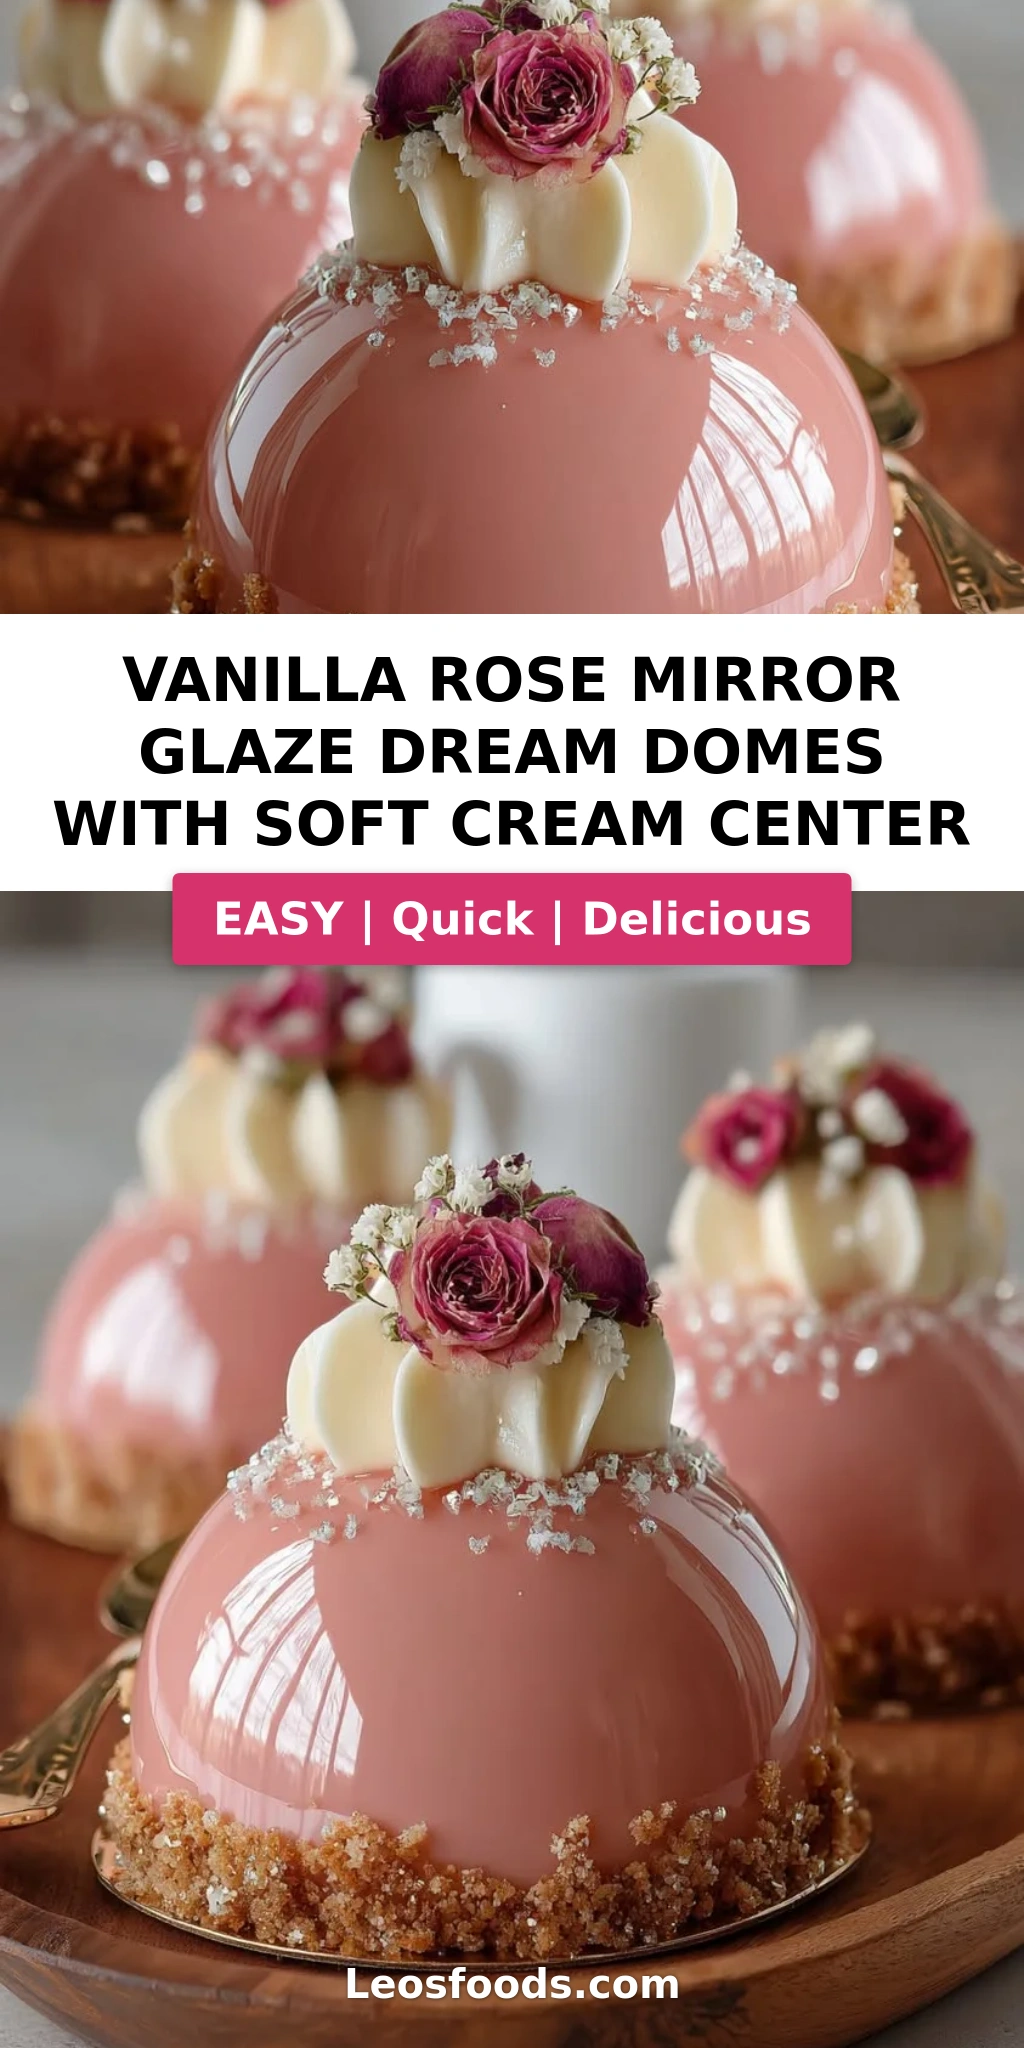
Stunning Vanilla Rose Mirror Glaze Dream Domes Recipe

Table of Contents
Vanilla Rose Mirror Glaze Dream Domes Recipe – A Stunning Dessert with a Soft Surprise Inside
I still remember the first time I made a mirror glaze in Paris — I was twenty-three, standing in a tiny pastry lab near the 11th arrondissement, watching a chef coax a glossy pink mirror out of sugar, cream, and white chocolate. It felt like alchemy. Now, decades later, I bring that same precision and wonder into my NYC kitchen with these Vanilla Rose Mirror Glaze Dream Domes with Soft Cream Center. This vanilla rose mirror glaze dream domes recipe is the kind of dessert that stops conversations. Inside each dome is a hidden soft cream center that spills out ever so slightly when you cut into it — a little surprise that makes every bite feel like a discovery.
The flavor is delicate and layered: the floral sweetness of rosewater mingles with rich vanilla and the tang of cream cheese in the mousse, while the mirror glaze adds a silky, almost liquid-like coating that gleams under any light. The soft cream center — made from mascarpone and a whisper of vanilla — stays luxuriously creamy even after hours in the freezer, creating a beautiful contrast with the airy mousse and the buttery biscuit base. Every spoonful brings a different texture: crunchy, creamy, silky, and oh-so-smooth. This isn’t just a dessert; it’s an experience, and one that looks far more complicated than it actually is.
What sets my version apart is the soft cream center — a trick I picked up from a pastry chef in Lyon who taught me how to balance freezing times so the interior stays luscious while the mousse sets perfectly. I’ve also streamlined the mirror glaze technique to eliminate bubbles and ensure a flawless finish every time. Whether you’re a seasoned baker or a confident beginner looking to impress, I’ll walk you through each step with the exact temperatures, timings, and visual cues you need. One common mistake I see is pouring the glaze too hot — it’ll slide right off and leave bare patches. I’ll show you exactly how to avoid that. Let’s make some magic.
Why This Vanilla Rose Mirror Glaze Dream Domes Recipe Is the Best
The Flavor Secret — I learned early in my career that rosewater can easily overpower a dessert if you’re not careful. In this vanilla rose mirror glaze dream domes recipe, I use just one teaspoon in the mousse and one in the glaze — enough to perfume the dessert without making it taste like soap. The cream cheese mousse provides a tangy backbone that keeps the sweetness in check, while the mascarpone center adds a milky richness that rounds everything out. It’s a balance I’ve refined over years of testing, and it works beautifully.
Perfected Texture — The magic of this dessert is the three distinct textures in every bite. The biscuit base stays crunchy thanks to a precise butter-to-crumb ratio. The mousse is light and airy because I whip the cream to soft peaks and fold it in gently — no deflating. And the soft cream center remains luscious because I freeze it separately before embedding it in the mousse. This technique, which I learned during my Paris training, ensures that the center doesn’t freeze rock-solid but stays spoon-soft, even after the domes spend hours in the freezer.
Foolproof & Fast — Despite its impressive appearance, this recipe is surprisingly doable for a home baker. I’ve broken down every step with clear temperatures and visual cues. The mirror glaze, which intimidates many bakers, is actually one of the easiest parts — as long as you cool it to exactly 90°F (32°C) before pouring. I’ve also included a quick-reference table below so you can check your progress at a glance. Trust me: if you can make Jell-O, you can make this glaze. And the results? Absolutely stunning.
Vanilla Rose Mirror Glaze Dream Domes Recipe Ingredients
Every ingredient in this recipe has a job, and I want you to know exactly what to look for. I source my rosewater from a little Middle Eastern market on Atlantic Avenue in Brooklyn — it’s the real deal, with a floral aroma that’s potent but never artificial. The mascarpone I get from Eataly in the Flatiron District, because their imported Italian tubs have a creamier texture than most domestic brands. And the white chocolate for the glaze? I use Valrhona Ivoire, which melts into a silky, mirror-like finish. Here’s everything you’ll need:
Ingredients List
- For the Vanilla Rose Mousse: 8 oz cream cheese, softened; 1 cup heavy cream; 1/2 cup granulated sugar; 1 tsp vanilla extract; 1 tsp rosewater; 2 tsp powdered gelatin; 3 tbsp cold water
- For the Soft Cream Center: 3/4 cup mascarpone cheese; 2 tbsp powdered sugar; 1 tsp vanilla extract
- For the Biscuit Base: 1 cup digestive biscuits, finely crushed; 3 tbsp melted butter
- For the Vanilla Rose Mirror Glaze: 1 cup granulated sugar; 1/2 cup water; 1/2 cup sweetened condensed milk; 1 cup white chocolate, finely chopped; 1 tbsp powdered gelatin; 3 tbsp cold water; 1 tsp vanilla extract; 1 tsp rosewater; 1–2 drops pink food coloring (optional)
- For Garnish (optional): Dried rose petals; white chocolate curls; edible silver flakes
Ingredient Spotlight
Cream Cheese (Mousse): Use full-fat block cream cheese, not the whipped or spreadable kind. The fat content is essential for a stable mousse that holds its shape when frozen. Let it soften to room temperature before beating to avoid lumps. Substitution: You can use Neufchâtel cheese for a slightly lower-fat version — the mousse will be a touch less firm but still delicious.
Rosewater: This is the star flavor, so quality matters. Look for rosewater that lists only rose petals and water as ingredients — avoid anything with added sugar or artificial rose flavor. I love Cortas brand, which I find at Middle Eastern grocers or online. Substitution: Orange blossom water is a gorgeous alternative, or you can use 1/2 tsp of almond extract for a nutty, floral twist.
White Chocolate (Glaze): The quality of your white chocolate directly affects the shine and texture of your mirror glaze. Use a couverture or high-quality baking bar with at least 30% cocoa butter. Avoid white chips, which contain stabilizers that prevent smooth melting. Substitution: For a dairy-free version, use a high-quality vegan white chocolate made with cocoa butter and rice milk powder — the glaze will be slightly less glossy but still beautiful.
Mascarpone (Center): This Italian cream cheese has a higher fat content than American cream cheese, which is what gives the soft cream center its luscious texture. It should be at room temperature when you mix it. Substitution: You can use an equal amount of full-fat cream cheese blended with 2 tablespoons of heavy cream — the texture will be slightly tangier and less silky, but still very good.
| Original Ingredient | Best Substitution | Flavor / Texture Impact |
|---|---|---|
| Cream cheese (mousse) | Neufchâtel cheese | Less firm mousse, slightly lower fat |
| Rosewater | Orange blossom water or 1/2 tsp almond extract | Different floral profile; almond adds nutty warmth |
| White chocolate (glaze) | High-quality vegan white chocolate | Slightly less glossy, dairy-free |
| Mascarpone (center) | Full-fat cream cheese + 2 tbsp heavy cream | Tangier, less silky but still creamy |
How to Make Vanilla Rose Mirror Glaze Dream Domes — Step-by-Step
I’ve organized these steps so you can work through them in a logical flow — from the biscuit base to the soft center to the mousse to the glaze. Take your time, and read through each step before you start. You’ve got this.
Step 1: Prepare the Biscuit Base
Pulse the digestive biscuits in a food processor until they become fine crumbs — you should have about 1 cup. Transfer to a bowl and pour in the melted butter. Stir with a fork until every crumb is moistened. Divide the mixture evenly among your dome molds (I use 3-inch silicone hemisphere molds) and press firmly using the back of a small spoon or a flat-bottomed shot glass. You want a compact, even layer about 1/4-inch thick. Place the molds in the fridge to chill for 15 minutes while you prepare the filling.
💡 Stella’s Pro Tip: For a cleaner press, place a small square of parchment paper over the crumbs before pressing — the crumbs won’t stick to your spoon.
Step 2: Make the Soft Cream Center
In a small bowl, combine the mascarpone, powdered sugar, and vanilla extract. Stir with a rubber spatula until smooth and homogenous — don’t overmix, or the mascarpone can become grainy. Spoon the mixture into small silicone ice cube trays or mini hemisphere molds (about 1 tablespoon per piece). Tap the tray gently on the counter to level the tops. Freeze for at least 2 hours, until completely firm.
⚠️ Common Mistake to Avoid: Don’t use softened mascarpone straight from the fridge — it won’t blend smoothly. Let it sit at room temperature for 15 minutes before mixing.
Step 3: Bloom Gelatin for the Mousse
Sprinkle the 2 teaspoons of powdered gelatin over 3 tablespoons of cold water in a small bowl. Let it sit undisturbed for 5 minutes. The gelatin will absorb the water and form a firm, jiggly mass — that’s exactly what you want. Don’t stir it during blooming, or you’ll introduce air bubbles.
💡 Stella’s Pro Tip: Always use cold water for blooming gelatin. Warm water will dissolve the granules too quickly and can create lumps that won’t incorporate smoothly into your mousse.
Step 4: Beat the Cream Cheese Mixture
In a large bowl, beat the softened cream cheese with an electric mixer on medium speed until completely smooth, about 2 minutes. Add the sugar, vanilla extract, and rosewater and beat for another minute until light and fluffy. Scrape down the sides and bottom of the bowl with a spatula to ensure everything is evenly mixed.
Step 5: Dissolve Gelatin into the Mousse
Warm about 1/4 cup of the heavy cream in a small saucepan over low heat — just until it’s steaming, not boiling. Remove from heat and add the bloomed gelatin. Whisk until the gelatin is completely dissolved and the mixture is smooth. Let it cool for 1 minute, then pour it into the cream cheese mixture while beating on low speed. Scrape the bowl and beat for another 30 seconds.
⚠️ Common Mistake to Avoid: If the gelatin mixture is too hot when you add it to the cream cheese, it can shock the fat and cause the mousse to separate. Let it cool for a full minute before incorporating.
Step 6: Whip and Fold the Cream
Pour the remaining heavy cream (about 3/4 cup) into a cold metal bowl and whip with a clean whisk or electric mixer until soft peaks form — the cream should hold its shape but still droop slightly when you lift the whisk. Add one-third of the whipped cream to the cream cheese mixture and fold gently with a rubber spatula to lighten the base. Then add the remaining whipped cream and fold until just combined — no streaks of white remaining. Be gentle; you want the mousse to stay airy.
Step 7: Assemble the Domes
Remove the dome molds from the fridge. Using a piping bag (or a zip-top bag with a corner snipped off), pipe the mousse into each mold until it’s about halfway full. Take a frozen soft cream center and press it gently into the center of the mousse — it should be fully surrounded by mousse. Pipe the remaining mousse over the top, filling the mold completely. Use an offset spatula to smooth the tops flush with the rim of the mold. Freeze for at least 6 hours, or overnight for best results.
💡 Stella’s Pro Tip: To get perfectly smooth tops, pipe the mousse slightly above the rim, then scrape across with a bench scraper or the flat side of a knife. This ensures no gaps when you unmold.
Step 8: Make the Mirror Glaze
Bloom the 1 tablespoon of powdered gelatin in 3 tablespoons of cold water for 5 minutes. In a small saucepan, combine the sugar, water, and sweetened condensed milk. Heat over medium heat, stirring occasionally, until the mixture is steaming and the sugar has dissolved — about 3 minutes. Do not let it boil vigorously. Remove from heat and add the bloomed gelatin and the finely chopped white chocolate. Let it sit for 2 minutes, then whisk gently until smooth. Add the vanilla extract, rosewater, and food coloring (if using). Use an immersion blender to blend the glaze until completely smooth and glossy — this is the key to a bubble-free finish.
⚠️ Common Mistake to Avoid: Do not whisk the glaze vigorously — you’ll incorporate air bubbles that will ruin the mirror finish. Use an immersion blender at a low angle to pull the glaze into a vortex and eliminate bubbles naturally.
Step 9: Apply the Glaze
Cool the glaze to exactly 90°F (32°C). You can test it with a kitchen thermometer — this temperature is crucial. Unmold the frozen domes from their silicone molds and place them on a wire rack set over a baking sheet to catch drips. Working one dome at a time, pour the glaze evenly over the dome, starting from the center and allowing it to flow down the sides. Let the excess drip off for about 10 seconds, then carefully transfer the dome to a serving plate using an offset spatula. Refrigerate for at least 30 minutes to set the glaze before serving.
💡 Stella’s Pro Tip: For a cleaner drip pattern, make sure the domes are completely frozen — any thawing on the surface will cause the glaze to slide off in patches.
Step 10: Garnish and Serve
Once the glaze has set in the fridge, garnish your domes with dried rose petals, white chocolate curls, and a sprinkle of edible silver flakes. These garnishes add texture and visual contrast against the glossy pink mirror. Serve the domes chilled — they should be soft but still hold their shape when you cut into them with a warm knife.
| Step | Action | Duration | Key Visual Cue |
|---|---|---|---|
| 1 | Press biscuit base into molds | 15 min chill | Firm, compact crumb layer |
| 2 | Freeze mascarpone centers | 2 hrs freeze | Solid but not rock-hard |
| 3 | Bloom gelatin for mousse | 5 min | Firm, jiggly mass |
| 4 | Beat cream cheese mixture | 3 min | Smooth, fluffy, no lumps |
| 5 | Dissolve gelatin into cream | 1–2 min | Fully dissolved, no granules |
| 6 | Whip cream to soft peaks | 2–3 min | Soft droopy peaks |
| 7 | Fill molds and freeze | 6+ hrs freeze | Completely frozen solid |
| 8 | Blend mirror glaze | 5 min | Glossy, smooth, no bubbles |
| 9 | Pour glaze over domes | 30 min set in fridge | Even coating, glossy finish |
| 10 | Garnish and serve | 5 min | Beautifully decorated domes |
Serving & Presentation
These dream domes are showstoppers on any table. I love serving them on simple white plates so the pink mirror glaze really pops. Before plating, run a butter knife under hot water, wipe it dry, and slice through the dome gently — the warm knife will glide through the frozen mousse and reveal the soft cream center in all its glory. A light dusting of dried rose petals and a few silver flakes catch the light beautifully, especially for dinner parties or holiday gatherings.
In my home, I often serve these after a Moroccan-inspired meal — maybe a lamb tagine with apricots and saffron — because the floral notes of the rosewater tie everything together. The contrast of the cold, creamy dome against a warm dessert wine or a mint tea is absolutely divine. If you’re serving a crowd, you can plate the domes on a large wooden board with fresh strawberries and edible flowers scattered around for a rustic-meets-elegant vibe.
For the full NYC experience, pair these domes with a strong espresso from a local roastery — I love the beans from Sey Coffee in Bushwick. The bitterness of the coffee cuts through the sweetness of the glaze and mousse, making each bite feel balanced and intentional. If you’re feeling extra decadent, a drizzle of salted caramel sauce on the plate adds a savory contrast that my Parisian chef-instructor would have applauded.
| Pairing Type | Suggestions | Why It Works |
|---|---|---|
| Side Dish | Fresh berries, honey-drizzled figs, pistachio biscotti | Fruit acidity cuts the richness; biscotti adds crunch |
| Sauce / Dip | Salted caramel, raspberry coulis, dark chocolate ganache | Adds depth and contrast to the floral mousse |
| Beverage | Strong espresso, mint tea, late-harvest Riesling | Bitterness or acidity balances the sweetness |
| Garnish | Dried rose petals, white chocolate curls, edible silver flakes | Adds visual contrast and textural variety |
Make-Ahead, Storage & Reheating
Between my recipe development, teaching, and family life in NYC, I’m a huge fan of make-ahead desserts. These domes are perfect for that — you can prepare them almost entirely in advance and simply glaze them a few hours before serving. The soft cream center and mousse actually benefit from a full overnight freeze, as the flavors meld and the texture stabilizes. Here’s my storage cheat sheet:
| Method | Container | Duration | Reheating Tip |
|---|---|---|---|
| Refrigerator | Airtight container, glazed domes | Up to 3 days | Serve chilled; no reheating needed |
| Freezer | Wrap each unglazed dome in plastic wrap, then foil | Up to 2 months | Glaze directly from frozen; no thawing needed |
| Make-Ahead | Assemble and freeze unglazed domes in molds | Up to 1 week in molds | Unmold and glaze day of serving — best fresh |
If you’re glazing a dome that’s been frozen for more than a day or two, wipe the surface gently with a paper towel to remove any frost before pouring the glaze. Frost can create tiny craters in the mirror finish, dulling that perfect shine. And here’s a little trick I learned from a pastry chef at Le Bernardin: if your glaze sets too firmly in the fridge, you can warm a knife under hot water and slice the dome cleanly — the heat melts through the glaze without cracking it.
Variations & Easy Swaps
One of the things I love most about this recipe is how adaptable it is. Over the years, I’ve tested countless variations — some inspired by my Moroccan roots, others by the seasonal produce I find at the Union Square Greenmarket. Here’s a quick overview, followed by deeper dives into my three favorite twists:
| Variation | Key Change | Best For | Difficulty Impact |
|---|---|---|---|
| Orange Blossom & Honey | Substitute rosewater with orange blossom water; add 2 tbsp honey to mousse | North African flair, spring gatherings | Same |
| Gluten-Free | Use gluten-free digestive biscuits or crushed almonds + butter | Celiac-friendly entertaining | Same — just swap base |
| Chocolate Mirror Glaze | Replace white chocolate with dark chocolate; omit rosewater in glaze | Chocolate lovers, winter holidays | Same |
Orange Blossom & Honey Variation
This is my personal favorite — a nod to the flavors of my Moroccan childhood. Substitute the rosewater with orange blossom water (same amount, 1 tsp in the mousse and 1 tsp in the glaze) and add 2 tablespoons of honey to the cream cheese mixture when beating. The honey adds a floral depth that pairs beautifully with the orange blossom, and it rounds out the tang of the cream cheese. My mother used to drizzle orange blossom honey over fresh cheese in the summer, and this variation brings me right back to her kitchen in Marrakech.
Gluten-Free Variation
This is so simple it almost feels like cheating. Instead of digestive biscuits, use your favorite gluten-free graham crackers or shortbread cookies. Or skip the biscuits entirely and use 1 cup of finely ground blanched almonds mixed with 3 tablespoons of melted butter and 1 tablespoon of sugar — press into the molds as usual. The almond base adds a lovely nutty flavor that complements the rosewater beautifully. I’ve tested this with my gluten-sensitive friends in NYC and they always ask for seconds.
Chocolate Mirror Glaze Variation
For the chocoholics out there, replace the white chocolate in the mirror glaze with an equal amount of high-quality dark chocolate (70% cocoa). Omit the rosewater from the glaze and add 1/2 teaspoon of vanilla extract instead. Keep the mousse as-is, or swap the rosewater for 1 tablespoon of coffee liqueur for a mocha twist. The dark chocolate glaze has a deeper, more dramatic color — it looks stunning against the white mousse and cream center, especially when you add gold leaf instead of silver flakes. I serve this version at my winter holiday parties and it disappears immediately.
Share Your Version!
I absolutely love seeing how you make this recipe your own. Whether you stick with the classic vanilla rose mirror glaze dream domes recipe or try one of my variations — or dream up something entirely new — please drop a star rating and a comment below to let me know how it went. Your feedback helps me improve and inspires other bakers in our community.
If you share a photo on Instagram or Pinterest, be sure to tag @leosfoods — I scroll through every single one and often feature my favorites in my stories. And here’s a question I’d love for you to answer in the comments: what flavor combination would you try as a soft cream center? Raspberry? Chocolate hazelnut? Lavender honey? I’m always looking for new ideas, and you might just inspire my next recipe!
From my NYC kitchen to yours — I hope this recipe brings as much warmth to your table as it does to mine. — Stella 🧡
⭐️ Loved this recipe? Share the love!
Tag @leosfoods on Instagram or Pinterest with your creation — I can’t wait to see your dream domes! 🌸
Can I make the vanilla rose mirror glaze without gelatin for a vegetarian version?
Yes, you can substitute the gelatin with a plant-based alternative like agar-agar powder. For the mousse, use 1½ teaspoons of agar-agar powder bloomed in 3 tablespoons of water — heat it to a boil for 2 minutes before adding to the cream cheese mixture. For the mirror glaze, use 2 teaspoons of agar-agar powder bloomed in the same amount of water, and boil for 2 minutes before adding to the sugar mixture. Note that agar-agar sets more firmly than gelatin, so the texture of both the mousse and the glaze will be slightly firmer and less silky. The glaze may also lose a bit of its mirror-like shine, but it will still be beautiful. I’ve tested this version with my vegetarian friends in NYC and it works wonderfully — just be sure to stir the glaze gently to avoid bubbles, as agar-agar can foam more than gelatin.
How do I get a perfectly smooth mirror glaze without bubbles on my dream domes?
The secret to a bubble-free mirror glaze is threefold: blending, temperature, and pouring technique. First, after you whisk together the glaze ingredients, use an immersion blender to blend the glaze for a full 60 seconds — hold the blender at a slight angle so it creates a vortex that pulls bubbles down and eliminates them. Second, cool the glaze to exactly 90°F (32°C) before pouring; if it’s too hot, it will slide off the dome and create bare patches, and if it’s too cool, it will thicken and trap any existing bubbles. Third, pour the glaze in a steady stream from the center of the dome, letting it flow naturally over the sides — don’t spread it with a spatula, as that introduces bubbles. If you see any bubbles on the surface of the warm glaze, you can gently touch them with a toothpick or spray the surface with a quick burst of alcohol from a spray bottle to pop them instantly.
What can I use instead of rose water or extract if I want a different flavor for the glaze?
There are so many wonderful alternatives! For a floral twist, orange blossom water is my top recommendation — it has a similar perfume profile but lighter and slightly honeyed. For a citrusy note, add 1 teaspoon of lemon or orange zest to the glaze along with 1 tablespoon of fresh juice (reduce the water in the glaze by 1 tablespoon to compensate). For a warm, nutty flavor, substitute the rosewater with 1 teaspoon of almond extract — this pairs beautifully with the vanilla and white chocolate. For a boozy adult version, replace the rosewater with 1 tablespoon of rose- or raspberry-flavored liqueur like Chambord or St-Germain. If you want to go completely floral-free, simply increase the vanilla extract to 2 teaspoons and add a pinch of cinnamon — the result is a warm, comforting vanilla-cinnamon glaze that’s perfect for fall and winter holidays.
How far in advance can I prepare the soft cream center and assemble the domes?
You can prepare the soft cream center up to 2 weeks in advance — simply freeze the mascarpone inserts in an airtight container or zip-top bag, separating layers with parchment paper to prevent sticking. The fully assembled domes (with mousse and center, but without glaze) can be frozen in their molds for up to 1 month. Wrap the molds tightly in plastic wrap and then foil to prevent freezer burn and odor absorption. When you’re ready to serve, you can unmold and glaze the domes directly from the freezer — no thawing needed. The mirror glaze itself should be made fresh on the day you plan to serve, as it sets and loses its shine after about 24 hours in the fridge. So my recommended timeline is: make the centers up to 2 weeks ahead, assemble the domes up to 1 week ahead, freeze, and then glaze 1–2 hours before serving. This makes it an incredibly stress-free dessert for entertaining!
Why did my mirror glaze crack or not stick to the dome?
This usually happens for one of two reasons: temperature mismatch or surface moisture. First, the glaze must be poured at exactly 90°F (32°C) and the domes must be completely frozen — if the dome is too warm, the glaze will slide off in patches; if the glaze is too cool, it will thicken and crack as it sets. Use an instant-read thermometer to check the glaze temperature before pouring. Second, moisture on the surface of the frozen dome can cause the glaze to bead up and slide off. Before glazing, wipe each frozen dome with a clean, dry paper towel to remove any frost or ice crystals. If your freezer tends to be humid, let the domes sit at room temperature for 30 seconds before glazing — this allows any surface moisture to evaporate. If the glaze does crack, you can often save the dome by letting the glaze warm up slightly (to about 95°F) and pouring a second thin layer over the crack, then smoothing gently with a warmed offset spatula.
Can I use a different type of biscuit for the base besides digestive biscuits?
Absolutely! Digestive biscuits are my go-to because they have a mild, slightly malty flavor that doesn’t compete with the rose and vanilla, but many other cookies work beautifully. Graham crackers are an excellent substitute — they’re slightly sweeter and have a honey note that complements the floral flavors. Shortbread cookies make a buttery, crumbly base that’s absolutely delicious, though they can be a bit richer. For a chocolate twist, use chocolate wafer cookies or crushed Oreos (filling removed) — the chocolate adds a lovely depth that pairs surprisingly well with rosewater. If you’re using a sweeter cookie, you may want to reduce the sugar in the mousse by 1–2 tablespoons to keep the overall sweetness balanced. For a nutty gluten-free option, use crushed almond biscotti or gluten-free graham crackers — both are readily available at most US grocery stores and add wonderful texture.
How do I know when the mousse has set enough before adding the glaze?
The mousse needs to be completely frozen solid before you unmold and glaze it. This typically takes at least 6 hours in a standard home freezer, but overnight is even better. To test if it’s ready, press gently on the top of the mousse through the silicone mold — it should feel rock-hard with no give whatsoever. If you unmold a dome and it starts to soften or sag at room temperature within 1 minute, it’s not frozen enough and should go back in the freezer for another 2–3 hours. A properly frozen dome will hold its shape perfectly when unmolded and will remain firm for at least 5–10 minutes at room temperature, giving you plenty of time to glaze it. One important note: don’t let the domes sit at room temperature for more than a couple of minutes before glazing, or the surface can develop condensation that will cause the glaze to slide off.
Can I make this recipe without an immersion blender for the mirror glaze?
While an immersion blender gives the smoothest, most bubble-free glaze, you can absolutely make it without one. After adding the white chocolate and gelatin to the hot sugar mixture, let it sit for 2 minutes to allow the chocolate to melt fully, then whisk very gently in one direction — not vigorously, as that introduces air bubbles. Once the mixture looks smooth, pour it through a fine-mesh strainer lined with cheesecloth into a clean bowl to catch any undissolved chocolate bits or gelatin lumps. This straining step is crucial if you’re not using an immersion blender, as it removes any imperfections that would show up on your glaze. The glaze may not be quite as mirror-like as a blended version, but it will still be glossy and beautiful. I actually made mirror glazes this way for years during my early pastry training in Paris — the French call it “passer au chinois” — and the results were always stunning.
What if I don’t have dome molds — can I use a different shape?
Of course! While hemisphere silicone molds are ideal for this recipe, you have plenty of other options. You can use any small, round silicone mold or even a muffin tin lined with silicone muffin cups — the shape will be more like a tall dome or a cupcake shape, which is still beautiful. If you want to get creative, you can use small glass bowls (about 3–4 inches in diameter) lined with plastic wrap — fill them with the mousse and center, then fold the excess plastic wrap over the top and freeze. When you’re ready to glaze, simply lift the domes out by the plastic wrap and peel it off. The surface won’t be as perfectly smooth as a silicone mold, but the glaze will hide most imperfections. You can also pour the mousse into a standard loaf pan lined with plastic wrap, layer in the frozen centers, and freeze — then cut the frozen mousse into individual squares or rectangles before glazing. Each shape has its own charm, and the soft cream center will still be the star!
How do I store leftover glazed domes and keep the mirror finish intact?
Leftover glazed domes can be stored in the refrigerator for up to 3 days, but the mirror finish is delicate and can be easily damaged by moisture or contact with other surfaces. Place each glazed dome on a small square of parchment paper or a silicone mat inside an airtight container, making sure the domes don’t touch each other or the sides of the container. If you need to stack them, separate layers with parchment paper and be very gentle. Avoid covering the domes directly with plastic wrap, as the wrap will stick to the glaze and ruin the finish. When you’re ready to serve, let the domes sit at room temperature for 5–10 minutes to take the chill off — this also helps the glaze regain its full shine. If the glaze looks a bit dull after refrigeration, you can use a hair dryer on the lowest setting to gently warm the surface for 2–3 seconds — this will restore the glossy finish beautifully. I do this all the time for my dinner parties!
Love This Recipe? Save It to Pinterest!
If you enjoyed this Vanilla Rose Mirror Glaze Dream Domes with Soft Cream Center recipe, don’t let it get lost in your browser tabs! 😄 Pin it now so you can find it again anytime — and explore hundreds more tried-and-tested recipes waiting for you on my Pinterest boards.
👉 Follow Stella on Pinterest @stellarecipeblog
📌 Pin this recipe · 🔁 Re-pin your favorites · 💬 Tag me when you make it — I love seeing your creations!
Vanilla Rose Mirror Glaze Dream Domes with Soft Cream Center
Vanilla Rose Mirror Glaze Dream Domes with Soft Cream Center
Ingredients
- For the Vanilla Rose Mousse:
- 8 oz cream cheese, softened
- 1 cup heavy cream
- 1/2 cup granulated sugar
- 1 tsp vanilla extract
- 1 tsp rosewater
- 2 tsp powdered gelatin
- 3 tbsp cold water
- For the Soft Cream Center:
- 3/4 cup mascarpone cheese
- 2 tbsp powdered sugar
- 1 tsp vanilla extract
- For the Biscuit Base:
- 1 cup digestive biscuits, finely crushed
- 3 tbsp melted butter
- For the Vanilla Rose Mirror Glaze:
- 1 cup granulated sugar
- 1/2 cup water
- 1/2 cup sweetened condensed milk
- 1 cup white chocolate, finely chopped
- 1 tbsp powdered gelatin
- 3 tbsp cold water
- 1 tsp vanilla extract
- 1 tsp rosewater
- 1–2 drops pink food coloring (optional)
- For Garnish (optional):
- Dried rose petals
- White chocolate curls
- Edible silver flakes
Instructions
- 1. Mix crushed biscuits with melted butter and press into dome molds as a base layer. Chill for 15 minutes.
- 2. Combine mascarpone, powdered sugar, and vanilla extract. Spoon into small silicone inserts and freeze until firm.
- 3. Bloom gelatin for the mousse in cold water for 5 minutes.
- 4. Beat cream cheese, sugar, vanilla extract, and rosewater until smooth.
- 5. Warm a small portion of the cream and dissolve the gelatin, then mix into the cream cheese mixture.
- 6. Whip the remaining cream to soft peaks and fold into the mixture.
- 7. Fill dome molds halfway with mousse.
- 8. Place a frozen soft cream center into each mold.
- 9. Cover with remaining mousse and smooth the tops.
- 10. Freeze for at least 6 hours or until completely firm.
- 11. Bloom gelatin for the mirror glaze in cold water.
- 12. Heat sugar, water, and condensed milk until steaming.
- 13. Remove from heat and stir in gelatin and white chocolate until smooth.
- 14. Add vanilla extract, rosewater, and optional food coloring, then blend until glossy.
- 15. Cool the glaze to about 90°F (32°C).
- 16. Unmold frozen domes and place on a wire rack.
- 17. Pour the mirror glaze evenly over each dome until fully coated.
- 18. Refrigerate for 30 minutes before serving.
- 19. Garnish with dried rose petals, white chocolate curls, and silver flakes.
Nutrition
- Calories: 340
- Sugar: 32 g
- Fat: 19 g
- Carbohydrates: 37 g
- Protein: 4 g
Tried This Recipe? Leave a Comment!
Did you make this recipe? I’d love to hear how it turned out! Please leave a comment and a rating below. Your feedback helps other home cooks and supports cheerychop.com!
For more delicious inspiration, follow me on Pinterest!