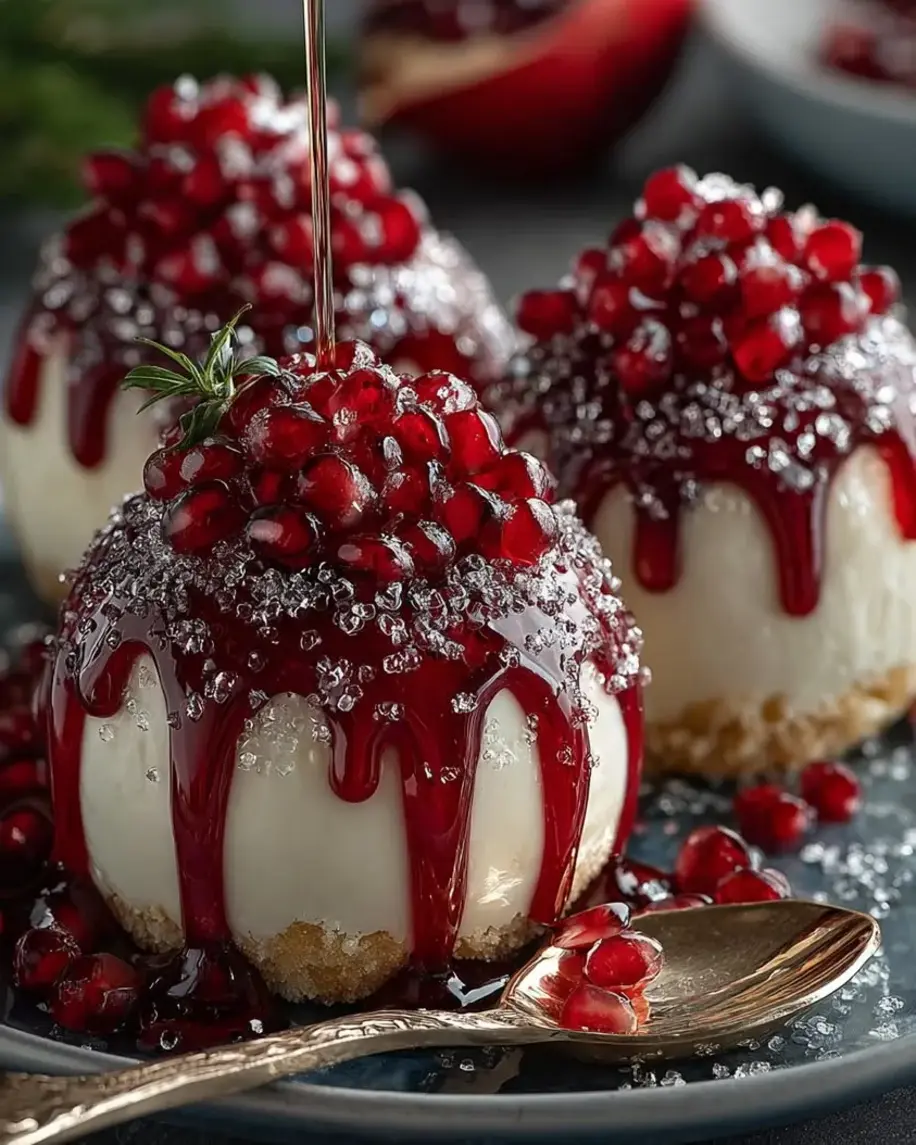
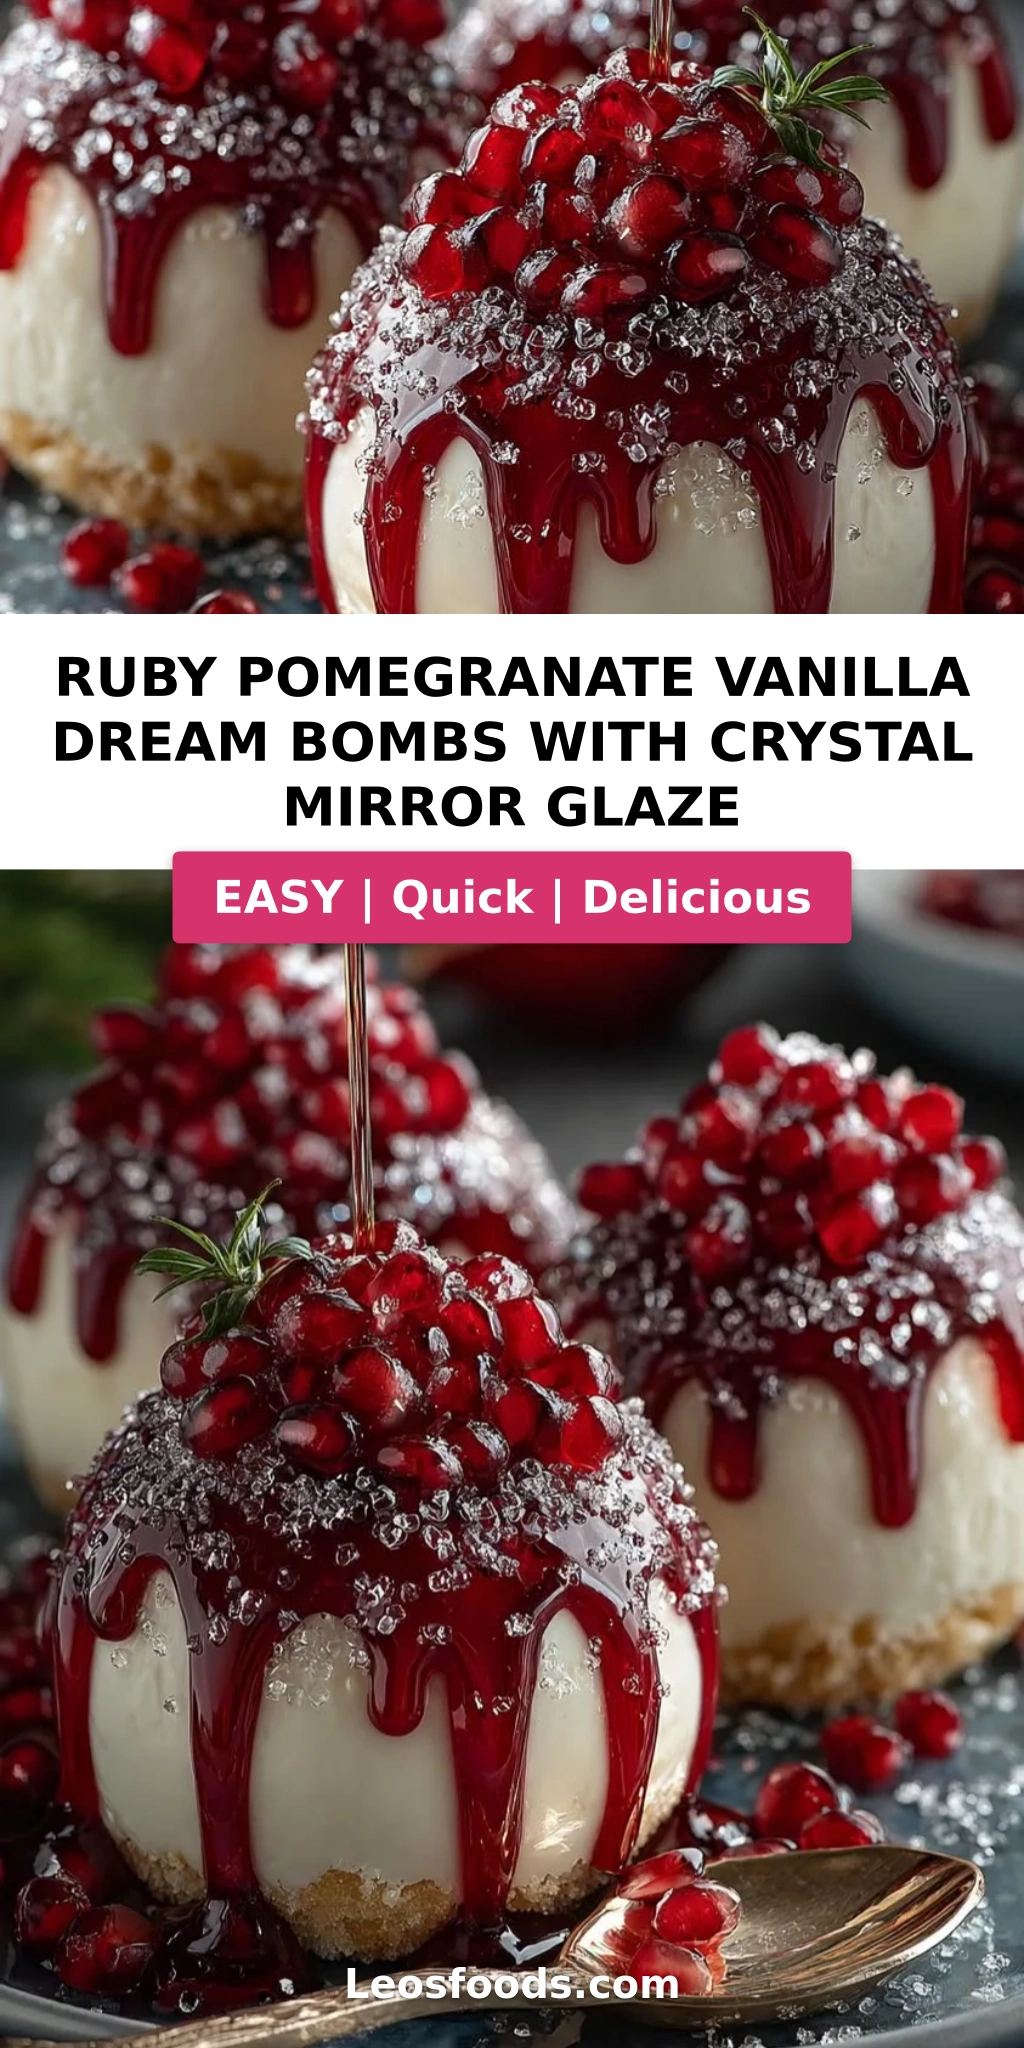
Ruby Pomegranate Vanilla Dream Bombs with Stunning Mirror Glaze
“`html
Table of Contents
Ruby Pomegranate Vanilla Dream Bombs with Crystal Mirror Glaze – The Ultimate Showstopper Dessert
I still remember the first time I made these Ruby Pomegranate Vanilla Dream Bombs with Crystal Mirror Glaze. It was a chilly December afternoon in my tiny Parisian kitchen, and I was determined to create a dessert that captured the jewel-toned brilliance of the pomegranates my mother would bring home from the Marrakech souk. That moment — when I unmolded my first glossy, mirror-like dome and saw the kitchen lights reflecting off its ruby surface — I knew I had stumbled onto something magical. These ruby pomegranate vanilla dream bombs are the culmination of years of pastry training in France, the warm hospitality of my Moroccan upbringing, and the bold, creative energy I now find in my New York City kitchen.
Imagine breaking through a flawless crystal mirror glaze to reveal a cloud-like vanilla mousse, then discovering a burst of tangy pomegranate jewels at its heart. The contrast is breathtaking: the sweet, creamy vanilla against the tart, juicy pop of pomegranate arils, all wrapped in a glossy shell that shatters like stained glass. I use a special technique I learned from a pastry chef in Lyon to keep the glaze perfectly bubble-free, and I add a pinch of Moroccan orange blossom water to the mousse for a subtle floral note that elevates the entire experience. Every spoonful is a journey from the Atlas Mountains to the Seine to the Hudson River.
What makes my version truly stand out is the triple-texture experience — a buttery cookie base, an airy mousse, and that show-stopping glaze — plus my foolproof method for achieving a crystal-clear mirror finish without any special equipment. I’ve tested this pomegranate mirror glaze recipe more times than I can count, and I’m sharing every trick I’ve learned so you can create your own stunning homemade mirror glaze bombs. Whether you’re planning a Galentine’s Day party, a birthday dinner, or just want to impress someone you love (including yourself!), these dream bombs deliver pure edible art. 💡 Stella’s Pro Tip: Don’t skip the freezing step — it’s the secret to a flawless glaze application!
Why This Ruby Pomegranate Vanilla Dream Bombs Recipe Is the Best
The flavor secret lies in the balance. I use a high-quality vanilla extract — the kind with real vanilla bean specks — and pair it with pomegranate juice that I reduce until it’s intensely fruity and almost syrupy. Growing up in Morocco, my mother taught me that the best desserts aren’t overly sweet; they let the natural ingredients shine. That philosophy guides every element here, from the tangy cream cheese in the mousse to the barely-sweet cookie base that grounds each bite. The pomegranate center is cooked with a touch of cornstarch to create a jammy texture that doesn’t seep into the mousse, keeping every layer distinct.
Perfected texture is what makes these bombs feel professional. The vanilla mousse is stabilized with gelatin and whipped to soft peaks before folding, which gives it a luscious, airy mouthfeel that holds its shape even under the weight of the glaze. I spent three weeks testing different ratios of cream cheese to heavy cream until I found the one that delivers both richness and lift. The cookie base stays crisp because I bake it briefly before pressing it into rings — a trick I learned at Le Cordon Bleu that prevents sogginess. Every layer has a purpose, and every texture has been refined.
Foolproof and fast doesn’t have to be an oxymoron, even with a recipe that looks this fancy. I’ve streamlined the process so you can make the components over two days: prepare the filling and cookie bases one afternoon, then assemble and glaze the next day. The active work time is only about 45 minutes, and the results look like you spent all week. I’ve also included my best tips for avoiding air bubbles in the mirror glaze — a common frustration — so you can skip the trial and error and go straight to the wow factor. This is the recipe I make for holiday parties, and it never fails to draw gasps.
Ruby Pomegranate Vanilla Dream Bombs Ingredients
I source my pomegranate juice from the farmers market at Union Square in Manhattan — the fresh-pressed kind in glass bottles has a depth of flavor that cartons just can’t match. When pomegranates aren’t in season, I use a high-quality organic bottled juice like Pom Wonderful or Lakewood. For the vanilla, I always reach for Madagascar Bourbon vanilla extract; it’s floral and creamy without being overly perfumed. The white chocolate for the glaze must be real cocoa butter — never compound chocolate — for that crystal-clear finish. Here’s everything you’ll need:
Ingredients List
- For the Vanilla Dream Mousse:
- 8 oz cream cheese, softened
- 1/2 cup powdered sugar
- 1 cup heavy cream
- 1 tsp vanilla extract
- 1 tbsp gelatin powder
- 3 tbsp warm water
- For the Pomegranate Center:
- 1 cup pomegranate juice
- 1/2 cup pomegranate arils
- 2 tbsp granulated sugar
- 1 tsp cornstarch
- 1 tbsp water
- For the Crystal Mirror Glaze:
- 1 cup white chocolate, finely chopped
- 1/2 cup sweetened condensed milk
- 1 tbsp gelatin powder
- 3 tbsp warm water
- Ruby red food coloring, as needed
- For the Cookie Base:
- 1 cup vanilla cookie crumbs
- 3 tbsp melted butter
- 1 tbsp granulated sugar
- Pinch of salt
- For Garnish (optional):
- Pomegranate arils
- White chocolate curls
- Edible shimmer dust
Ingredient Spotlight
Pomegranate juice is the heart of this recipe’s flavor. Look for 100% pure pomegranate juice with no added sugar — the tartness balances the sweet vanilla mousse. If you’re using fresh pomegranates, juice them yourself by rolling the fruit on the counter to loosen the seeds, then cutting and pressing through a sieve. I tested this with fresh juice and it works beautifully, giving the filling a brighter, more complex flavor. Store-bought is perfectly fine for convenience.
White chocolate for the mirror glaze must be a high-quality couverture chocolate with at least 30% cocoa butter. Brands like Valrhona, Callebaut, or Ghirardelli work well. Don’t use white chips or melts — they contain additives that prevent the glaze from achieving that crystal-clear, glass-like finish. The cocoa butter is what gives the glaze its fluidity and shine, so this is not a place to skimp.
Gelatin is the structural backbone of both the mousse and the glaze. I use powdered gelatin (like Knox) and always bloom it in cold or warm water before dissolving. For a vegan alternative, you can use agar-agar, but the texture will be firmer and less creamy. More on that in the FAQ below. The gelatin must be fully dissolved and lump-free for a smooth glaze — I gently warm it over a double boiler if needed.
Cream cheese gives the mousse its richness and stability. Use full-fat block cream cheese, not the spreadable kind from a tub. Let it soften fully to room temperature before beating so you don’t end up with lumps. I recommend Philadelphia or a store-brand equivalent with at least 33% milk fat. The tang of the cream cheese is what cuts through the sweetness of the white chocolate glaze.
| Original Ingredient | Best Substitution | Flavor / Texture Impact |
|---|---|---|
| Pomegranate juice (store-bought) | Fresh-squeezed pomegranate juice | Brighter, more tart flavor; slightly thinner consistency |
| White chocolate (couverture) | High-quality white chocolate chips (e.g., Ghirardelli) | Slightly less glossy finish; may need more straining |
| Gelatin powder | Agar-agar powder (vegan option) | Firmer, less creamy mousse; glaze sets more firmly |
| Cream cheese (full-fat block) | Neufchâtel cheese (lower fat) | Less tangy, slightly less stable mousse; still workable |
| Vanilla cookie crumbs | Graham cracker crumbs + 1/2 tsp vanilla | Slightly more honey-like flavor; still crisp |
How to Make Ruby Pomegranate Vanilla Dream Bombs — Step-by-Step
Trust me, if you can make a boxed cake mix, you can absolutely create these stunning ruby pomegranate vanilla dream bombs. I’ve broken everything down into clear, manageable steps with visual cues so you know exactly what to look for. Take it step by step, and you’ll be rewarded with the most gorgeous dessert you’ve ever made — I promise!
Step 1: Bloom the Gelatin
Start by blooming both portions of gelatin separately. In two small bowls, sprinkle 1 tablespoon gelatin powder over 3 tablespoons warm water each. Let them sit undisturbed for 5 minutes until the gelatin absorbs the liquid and becomes a firm, jiggly mass. This process, called blooming, ensures the gelatin dissolves evenly without lumps when heated. Do not skip this — unbloomed gelatin will leave grainy spots in your mousse and glaze.
⚠️ Common Mistake to Avoid: Adding gelatin directly to hot liquid without blooming first. This creates clumps that never fully dissolve, ruining the smooth texture of both the mousse and the glaze. Always bloom first!
Step 2: Make the Pomegranate Center
In a small saucepan, whisk together 1 cup pomegranate juice, 2 tablespoons granulated sugar, 1 teaspoon cornstarch, and 1 tablespoon water until smooth. Cook over medium heat, stirring constantly, until the mixture thickens and coats the back of a spoon — about 3 to 4 minutes. Remove from heat and stir in 1/2 cup pomegranate arils. Let the mixture cool completely to room temperature. The cornstarch slurry prevents the filling from being too runny, so it stays neatly inside the mousse dome.
💡 Stella’s Pro Tip: For an extra flavor boost, add a tiny pinch of rose water or orange blossom water to the pomegranate mixture while it cools. It’s a subtle touch that my mother taught me — it makes the fruit flavor sing!
Step 3: Prepare the Vanilla Mousse
In a large bowl, beat 8 ounces softened cream cheese, 1/2 cup powdered sugar, and 1 teaspoon vanilla extract with an electric mixer until smooth and creamy, about 2 minutes. In a separate chilled bowl, whip 1 cup heavy cream to soft peaks — when you lift the whisk, the cream should form a soft, droopy peak that barely holds its shape. Gently fold the whipped cream into the cream cheese mixture using a rubber spatula. Then, warm the first bowl of bloomed gelatin (the one not reserved for the glaze) by placing it in a small pan of warm water or microwaving for 5 seconds. Stir the dissolved gelatin into the mousse until fully incorporated.
⚠️ Common Mistake to Avoid: Overwhipping the cream to stiff peaks. This makes the mousse grainy and stiff instead of light and airy. Stop at soft peaks — the folding process will tighten it slightly.
Step 4: Assemble and Freeze
Fill silicone dome molds (about 3-inch diameter) halfway with the vanilla mousse. Drop a spoonful of the cooled pomegranate filling into the center of each mold — about 1 to 2 teaspoons per bomb. Cover the filling with the remaining mousse, smoothing the tops with an offset spatula. Tap the molds gently on the counter to release air bubbles. Freeze for at least 4 hours, or overnight, until the bombs are completely solid. This step is non-negotiable: the bombs must be fully frozen to hold their shape when glazed.
💡 Stella’s Pro Tip: Place the filled molds on a baking sheet before freezing — this keeps them flat and stable, and makes transferring to the wire rack much easier later.
Step 5: Make the Crystal Mirror Glaze
Finely chop 1 cup white chocolate and place it in a heatproof bowl. In a small saucepan, heat 1/2 cup sweetened condensed milk and the second bowl of bloomed gelatin over low heat, stirring until the gelatin dissolves and the mixture is warm — do not boil. Pour the warm condensed milk mixture over the chopped white chocolate and let it sit for 1 minute, then stir gently until smooth. Add ruby red food coloring drop by drop until you achieve a deep jewel-red hue. Strain the glaze through a fine-mesh sieve into a clean bowl to remove any lumps. Let the glaze cool to 90°F to 95°F before using — it should be thick but pourable.
⚠️ Common Mistake to Avoid: Using the glaze when it’s too hot (above 100°F) or too cool (below 85°F). Too hot and it slides off the frozen bomb leaving a thin, uneven coat. Too cool and it sets in thick, gloppy patches. Use an instant-read thermometer for accuracy.
Step 6: Glaze the Bombs
Unmold the frozen bombs and place them on a wire rack set over a baking sheet (to catch drips). Working quickly, pour the crystal mirror glaze evenly over each bomb, covering the entire dome in one continuous motion. Do not go back and touch the glaze — let gravity do the work. Tap the rack gently to encourage any excess glaze to run off. Let the bombs sit on the rack for 2 to 3 minutes, then transfer them to a parchment-lined baking sheet.
💡 Stella’s Pro Tip: For a perfectly smooth glaze, make sure the frozen bombs are completely dry — any condensation will create spots in the glaze. Pat them gently with a paper towel if needed before glazing.
Step 7: Prepare the Cookie Base
In a small bowl, mix 1 cup vanilla cookie crumbs, 3 tablespoons melted butter, 1 tablespoon granulated sugar, and a pinch of salt until the mixture resembles wet sand. Press about 2 tablespoons of the mixture into small round rings (or use a round cookie cutter) on a parchment-lined baking sheet to form 8 bases. Bake at 350°F for 8 minutes, then let cool completely on the sheet. The baked bases stay crisp and provide a sturdy landing for the glazed bombs.
⚠️ Common Mistake to Avoid: Not baking the cookie bases. Unbaked crumbs will become soggy from the moisture of the mousse. A brief bake sets the butter and sugar, creating a crisp, stable foundation.
Step 8: Assemble and Garnish
Place each glazed bomb gently onto a cooled cookie base. While the glaze is still slightly tacky (within 3 to 5 minutes), garnish with pomegranate arils, white chocolate curls, and a dusting of edible shimmer dust. The shimmer dust adds a subtle sparkle that makes the bombs look like precious gems. Chill the assembled bombs for 15 minutes before serving to allow the glaze to set fully and the mousse to soften slightly.
💡 Stella’s Pro Tip: If you don’t have white chocolate curls, use a vegetable peeler to shave curls from a block of high-quality white chocolate. Hold the block with a paper towel to avoid fingerprints and heat from your hands.
| Step | Action | Duration | Key Visual Cue |
|---|---|---|---|
| 1 | Bloom both portions of gelatin | 5 minutes | Gelatin becomes firm, jiggly mass |
| 2 | Cook pomegranate filling | 4 minutes | Mixture coats back of spoon |
| 3 | Prepare vanilla mousse | 8 minutes | Soft peaks when lifting whisk |
| 4 | Fill molds and freeze | 4+ hours | Bombs are rock-solid to touch |
| 5 | Make mirror glaze | 10 minutes | Glaze is smooth, glossy, 90°F |
| 6 | Glaze each bomb | 3 minutes | Even, drippy coat; no bare spots |
| 7 | Bake cookie bases | 8 minutes + cooling | Golden edges, firm to touch |
| 8 | Assemble and garnish | 15 minutes chill | Glaze is set, garnish sticks |
Serving & Presentation
These ruby pomegranate vanilla dream bombs are meant to be the centerpiece of your table. I love serving them on a simple white cake stand or a marble platter — the contrast of the deep ruby glaze against a neutral surface is absolutely stunning. For a dinner party, I arrange them in a circle with fresh pomegranate arils scattered around and a few sprigs of fresh mint for a pop of green. The mirror glaze catches the light beautifully, so dim the overhead lights and let the candles do the work.
In terms of pairings, these bombs are rich and satisfying on their own, but they’re even better with a cup of strong Moroccan mint tea or a small espresso. The bitterness of the tea or coffee cuts the sweetness of the white chocolate glaze perfectly. If you’re serving them at a brunch, a glass of dry sparkling wine or a pomegranate mimosa would be a dream pairing. I also love to serve them with a dollop of lightly sweetened crème fraîche or a scoop of vanilla bean ice cream for extra indulgence.
| Pairing Type | Suggestions | Why It Works |
|---|---|---|
| Side Dish | Fresh berries, citrus segments | Bright acidity balances the rich mousse and glaze |
| Sauce / Dip | Crème fraîche, vanilla custard | Adds creamy tang that contrasts the sweet glaze |
| Beverage | Moroccan mint tea, espresso, pomegranate mimosa | Bitterness or tartness cuts sugar, refreshes palate |
| Garnish | Edible flowers, mint sprigs, gold leaf | Elevates visual appeal; adds freshness or luxury |
Make-Ahead, Storage & Reheating
Living in NYC, I’m all about smart meal prep, and these dream bombs are actually perfect for making ahead. I usually prepare the pomegranate filling and cookie bases two days before, then make the mousse and assemble the bombs the day before I plan to serve them. The glazed bombs will hold beautifully in the refrigerator for up to 24 hours after assembly. Just keep them uncovered for the first hour so the glaze sets properly, then loosely tent with plastic wrap to prevent condensation.
| Method | Container | Duration | Reheating Tip |
|---|---|---|---|
| Refrigerator | Covered container, single layer | Up to 24 hours | Serve cold; let sit 5 min at room temp before plating |
| Freezer (unglazed) | Airtight container, separated by parchment | Up to 2 weeks | Glaze directly from frozen — no thawing needed |
| Make-Ahead (partial) | Filling: sealed container; Bases: airtight tin | Filling 3 days; Bases 5 days | Assemble and glaze the day before serving |
One thing to keep in mind: once glazed, these bombs are best enjoyed within 24 hours. The mirror glaze will start to absorb moisture from the fridge and lose its brilliant shine after that. If you need to store them longer, keep the mousse bombs unglazed in the freezer for up to 2 weeks, then make the glaze fresh before serving. I’ve tested this method multiple times and the results are just as gorgeous. To serve from the refrigerator, let the bombs sit at room temperature for 10 minutes — this softens the mousse to that perfect creamy texture while keeping the glaze intact.
Variations & Easy Swaps
One of the things I love most about this base recipe is how adaptable it is. Whether you’re catering to dietary needs or just craving a different flavor profile, these swaps will keep the magic alive. I’ve tested every single one in my New York kitchen, so you can substitute with confidence.
| Variation | Key Change | Best For | Difficulty Impact |
|---|---|---|---|
| Citrus Burst | Substitute pomegranate with blood orange or grapefruit | Winter brunch, Valentine’s Day | Same — direct swap |
| Vegan Dream | Use coconut cream, vegan cream cheese, and agar-agar | Dairy-free guests, plant-based diets | Medium — requires precise agar ratios |
| Chocolate Lover’s Twist | Add 2 oz melted dark chocolate to mousse; use dark chocolate glaze | Chocolate enthusiasts, holiday tables | Same — chocolate adds richness |
Citrus Burst Variation
This is my favorite seasonal twist. Swap the pomegranate juice and arils for fresh blood orange or ruby grapefruit — both have that same jewel-toned beauty. The citrus version is slightly more tart and floral, and it pairs beautifully with the vanilla mousse. I like to add a teaspoon of orange zest to the cookie base for extra brightness. You’ll need to adjust the sugar in the filling slightly: blood oranges are sweeter than pomegranates, so reduce the sugar to 1 tablespoon. This variation is especially stunning for a winter Galentine’s Day gathering.
Vegan Dream Variation
For a dairy-free version, I’ve tested this with great results. Use full-fat coconut cream (the thick part from a chilled can of coconut milk) instead of heavy cream, and a high-quality vegan cream cheese like Miyoko’s or Violife. For the gelatin, use agar-agar powder: 1 teaspoon agar-agar mixed with 3 tablespoons water for the mousse, and 1 teaspoon agar-agar with 3 tablespoons water for the glaze. The texture is slightly firmer than the original, but the flavor is still luscious and the glaze sets beautifully. The cookie base can be made with vegan butter and vegan vanilla cookies. This version has become a staple for my friends with dairy allergies.
Chocolate Lover’s Twist Variation
If you’re a chocolate lover like my husband, this variation is for you. Melt 2 ounces of high-quality dark chocolate (70% cacao) and fold it into the cream cheese mixture before adding the whipped cream. For the glaze, use dark chocolate instead of white chocolate — the technique is identical, but the flavor is deeper and more intense. The pomegranate center is still a beautiful contrast against the dark chocolate. This version feels more decadent and is perfect for a holiday dessert table. I reduce the powdered sugar in the mousse to 1/3 cup to balance the bitterness of the dark chocolate.
Share Your Version!
There’s something truly special about creating a dessert that looks like it belongs in a pastry shop window — and I know you can do it! These Ruby Pomegranate Vanilla Dream Bombs with Crystal Mirror Glaze have become one of my most-requested recipes, and I love hearing how they turn out in your kitchen. Did you try the citrus twist? Did your glaze come out perfectly glossy? Did your kids help you pop the pomegranate arils? I want to hear all about it!
Please leave a star rating and a comment below — your feedback helps other home cooks feel confident enough to try this recipe. And if you share a photo on Instagram or Pinterest, tag @leosfoods so I can see your beautiful creations. I personally read every comment and love answering your questions. So tell me: which step are you most excited to try? And what occasion are you planning to make these dream bombs for? From my NYC kitchen to yours — I hope this recipe brings as much warmth to your table as it does to mine. — Stella 🧡
Love This Recipe? Save It to Pinterest!
If you enjoyed this Ruby Pomegranate Vanilla Dream Bombs recipe, don’t let it get lost in your browser tabs! 😄 Pin it now so you can find it again anytime — and explore hundreds more tried-and-tested recipes waiting for you on my Pinterest boards.
👉 Follow Stella on Pinterest @stellarecipeblog
📌 Pin this recipe · 🔁 Re-pin your favorites · 💬 Tag me when you make it — I love seeing your creations!
What is the best way to make a crystal mirror glaze without air bubbles?
The key to a flawless, bubble-free mirror glaze is all in the technique. First, make sure your gelatin is fully bloomed and dissolved — any undissolved gelatin granules can create nucleation points for bubbles. When you combine the warm condensed milk mixture with the chopped white chocolate, stir gently in one direction with a spatula, not a whisk, to avoid incorporating air. After the glaze is smooth, pour it through a fine-mesh sieve into a clean bowl; this catches any lumps and bursts existing bubbles. Then, let the glaze cool undisturbed to 90–95°F without stirring — stirring reintroduces bubbles. Finally, when you pour the glaze over the frozen bombs, use a continuous, even stream rather than multiple small pours, and don’t go back to touch it. If you still see tiny bubbles on the surface, a quick pass with a kitchen torch held 6 inches away will pop them instantly. I’ve been making mirror glazes for years and this method has never let me down.
Can I use fresh pomegranate juice instead of store-bought for the vanilla dream bomb filling?
Absolutely — fresh pomegranate juice is actually my first choice when pomegranates are in season! The flavor is brighter, more floral, and slightly more tart than most store-bought juices, which gives the filling a wonderful complexity. To make fresh juice, roll the pomegranates firmly on the counter to loosen the seeds, cut them in half, and press through a citrus juicer or a fine-mesh sieve. You’ll need about 2 large pomegranates to get 1 cup of juice. Keep in mind that fresh juice can vary in sweetness, so you may need to adjust the sugar slightly. If your juice is very tart, add an extra tablespoon of sugar; if it’s naturally sweet, reduce the sugar by half a tablespoon. The cornstarch slurry will still work perfectly to thicken fresh juice. I love using fresh juice when I spot beautiful pomegranates at the Union Square Greenmarket in the fall — it really elevates the filling to something special.
How long do I need to freeze the pomegranate vanilla bombs before applying the mirror glaze?
You need to freeze the assembled bombs for a minimum of 4 hours, but overnight is even better. The bombs must be completely frozen solid — not just firm — for the mirror glaze to adhere properly. When you pour the glaze over a partially frozen bomb, the mousse can start to thaw and slide off, creating a messy, uneven finish. I always freeze mine overnight (about 8 to 12 hours) to be absolutely certain. You’ll know they’re ready when you unmold them and they feel rock-hard to the touch, with no give when you press gently. If you’re making these for a party, I recommend freezing the bombs up to 2 weeks in advance (unglazed) and then glazing them the day you plan to serve. Just wrap the frozen, unmolded bombs individually in plastic wrap and store them in an airtight container in the freezer until you’re ready to glaze. This make-ahead approach makes party prep so much smoother!
What can I substitute for gelatin in the crystal mirror glaze to keep it vegan?
Yes, you can absolutely make this recipe vegan by substituting the gelatin with agar-agar powder, which is derived from seaweed and works as a plant-based gelling agent. For the mirror glaze, use 1 teaspoon of agar-agar powder bloomed in 3 tablespoons of cold water for 10 minutes, then dissolve it in the condensed milk mixture over medium heat, bringing it to a gentle boil for 1 to 2 minutes to activate the agar. For the mousse, use another 1 teaspoon of agar-agar bloomed in 3 tablespoons water and dissolved the same way. A few important notes: agar-agar sets at room temperature and creates a firmer, less creamy gel than gelatin, so the texture will be slightly different — more like a panna cotta than a mousse. Also, agar-agar doesn’t soften as much when thawed, so the bombs need to be served within 6 hours of glazing for the best texture. I’ve tested this with my vegan friends and while it’s not identical to the original, it’s still absolutely delicious and the glaze looks just as stunning.
Can I use a different fruit instead of pomegranate in these dream bombs?
Definitely! This recipe is wonderfully adaptable to other fruits. Some of my favorite variations include raspberry (use seedless raspberry jam mixed with fresh raspberries), passion fruit (use passion fruit pulp with a bit of sugar), or cherry (use cherry preserves with chopped fresh cherries). The key is to maintain the same texture: the filling should be thick and jammy, not runny. If you’re using a fruit with higher water content, like strawberries, you may need to cook the juice with a little extra cornstarch to achieve the right consistency. One thing to keep in mind is that the color of your glaze should complement the filling. For example, a raspberry filling looks gorgeous under a pink-tinted mirror glaze, while passion fruit works beautifully with a yellow or clear glaze. Just adjust your food coloring accordingly. I love experimenting with seasonal fruits from the farmers market — it keeps this recipe exciting all year round!
Why did my mirror glaze turn out cloudy instead of clear?
Cloudy mirror glaze is usually caused by one of three things: using low-quality white chocolate, incorporating too much air, or temperature issues. First, make sure you’re using real white chocolate with cocoa butter — not white candy melts or coating chocolate, which contain vegetable oils that make the glaze cloudy. Second, avoid using a whisk when mixing the glaze; a whisk incorporates air bubbles that scatter light and create a hazy appearance. Stir gently with a spatula. Third, temperature is crucial: if the glaze is too hot when poured (above 95°F), it can melt the surface of the frozen bomb and create a cloudy, uneven finish. If it’s too cool (below 85°F), it becomes too thick and doesn’t flow smoothly, creating a textured, matte surface. Finally, make sure your gelatin is fully dissolved — undissolved gelatin particles look like white specks. If your glaze is already cloudy, you can try reheating it gently to 90°F and straining it again, but in my experience prevention is the best cure. I always use a digital thermometer and high-quality chocolate for guaranteed clarity.
Can I make these dream bombs without a silicone dome mold?
Yes, you can totally make this recipe even if you don’t have silicone dome molds! The easiest alternative is to use a standard muffin tin lined with plastic wrap. Press the plastic wrap firmly into each cup, leaving overhang on the sides. Fill the cups with the mousse and pomegranate center as directed, then gather the plastic wrap over the top to seal. Freeze until solid, then peel off the plastic to reveal a domed shape — it won’t be perfectly round, but it will still look beautiful glazed. Another option is to use small glass or ceramic bowls (like ramekins) lined with plastic wrap, though you’ll get a wider, shallower dome. If you want a more uniform shape, you can buy affordable silicone dome molds online or at a kitchen supply store — that’s what I use and they’re totally worth the investment for the professional look. No matter what mold you use, the most important thing is that the bombs are fully frozen before glazing.
How do I store leftover mirror glaze, and can I reuse it?
You can store leftover mirror glaze in an airtight container in the refrigerator for up to 5 days, and yes, you can absolutely reuse it! To reuse, gently reheat the glaze in a double boiler or in short bursts in the microwave (10-second intervals at 50% power), stirring gently between each burst until it reaches 90°F. You may need to add a tablespoon of warm water or milk to thin it back to the correct consistency. The glaze may not be as brilliantly clear on the second use because some cocoa butter can separate, but it will still be beautiful and delicious. I often make a double batch of glaze and keep the extra in the fridge for last-minute glazing projects — it’s great for cakes, donuts, or even just drizzling over ice cream. One tip: don’t microwave the glaze directly on high heat, as this can cause the white chocolate to seize. Low and slow is the way to go. If the glaze separates or looks grainy, a quick blitz with an immersion blender can often bring it back together.
Can I use this recipe to make a cake instead of individual bombs?
Absolutely! This recipe works beautifully as a single-layer cake. Prepare the mousse and pomegranate filling as directed, then line an 8-inch springform pan with plastic wrap. Spread half of the mousse into the pan, spoon the pomegranate filling in an even layer over the top (stay 1/2 inch from the edge), then cover with the remaining mousse. Freeze for at least 8 hours or overnight. For the glaze, you’ll need to make a 1.5x batch to cover the entire cake. Unmold the frozen cake onto a wire rack and pour the glaze over the center, letting it flow down the sides. Use an offset spatula if needed to encourage the glaze to cover evenly. The cookie base can be made as a single 8-inch round — simply press the crumb mixture into the bottom of the springform pan before adding the mousse. This cake version is perfect for birthdays or larger gatherings, and it’s even more dramatic than the individual bombs. Just make sure your cake is level and fully frozen before glazing for the best results.
What type of food coloring works best for the crystal mirror glaze?
For the most brilliant, jewel-toned results, I highly recommend using gel or paste food coloring rather than liquid drops. Liquid food coloring can thin out the glaze and make it harder to achieve that deep, rich ruby color. My go-to brands are Americolor Soft Gel Paste or Chefmaster Liqua-Gel — they’re concentrated, so you only need a few drops to get a vibrant shade, and they won’t affect the glaze consistency. Start with 2 to 3 drops of ruby red, mix well, and add more until you reach your desired color. Keep in mind that the color will deepen slightly as the glaze sets, so aim for a shade that’s just a touch lighter than what you want. If you’re aiming for natural coloring, you can use a beet powder slurry (1 teaspoon beet powder mixed with 1 tablespoon water) or a drop of natural red food coloring made from vegetables. Natural colors tend to be less vibrant and can fade over time, so use them the same day if possible. For the most dramatic presentation, go with gel coloring — it’s what the pros use!
“`
Print

Ruby Pomegranate Vanilla Dream Bombs with Crystal Mirror Glaze
- Yield: 8 1x
Ingredients
- For the Vanilla Dream Mousse:
- 8 oz cream cheese, softened
- 1/2 cup powdered sugar
- 1 cup heavy cream
- 1 tsp vanilla extract
- 1 tbsp gelatin powder
- 3 tbsp warm water
- For the Pomegranate Center:
- 1 cup pomegranate juice
- 1/2 cup pomegranate arils
- 2 tbsp granulated sugar
- 1 tsp cornstarch
- 1 tbsp water
- For the Crystal Mirror Glaze:
- 1 cup white chocolate, finely chopped
- 1/2 cup sweetened condensed milk
- 1 tbsp gelatin powder
- 3 tbsp warm water
- Ruby red food coloring, as needed
- For the Cookie Base:
- 1 cup vanilla cookie crumbs
- 3 tbsp melted butter
- 1 tbsp granulated sugar
- Pinch of salt
- For Garnish (optional):
- Pomegranate arils
- White chocolate curls
- Edible shimmer dust
Instructions
- Bloom gelatin in warm water and set aside for 5 minutes.
- In a saucepan, combine pomegranate juice, sugar, cornstarch, and water.
- Cook over medium heat until thickened, then stir in pomegranate arils and cool completely.
- Beat cream cheese, powdered sugar, and vanilla until smooth.
- Whip heavy cream to soft peaks and fold into the cream cheese mixture.
- Stir in dissolved gelatin until fully incorporated.
- Fill silicone dome molds halfway with the vanilla mousse.
- Add a spoonful of the pomegranate filling to the center of each mold.
- Cover with remaining mousse and freeze until completely firm.
- Mix white chocolate, condensed milk, dissolved gelatin, and red coloring until smooth and glossy.
- Unmold the frozen bombs and place on a wire rack.
- Pour the crystal mirror glaze evenly over each bomb.
- Combine cookie crumbs, melted butter, sugar, and salt, then press into small round bases.
- Place each glazed bomb on a cookie base.
- Garnish with pomegranate arils, white chocolate curls, and edible shimmer dust.
- Chill for 15 minutes before serving.
Nutrition
- Calories: 415
- Sugar: 31 g
- Fat: 28 g
- Carbohydrates: 37 g
- Protein: 5 g
Tried This Recipe? Leave a Comment!
Did you make this recipe? I’d love to hear how it turned out! Please leave a comment and a rating below. Your feedback helps other home cooks and supports cheerychop.com!
For more delicious inspiration, follow me on Pinterest!