Irresistible Pink Dragon Fruit Mirror Dome Dessert
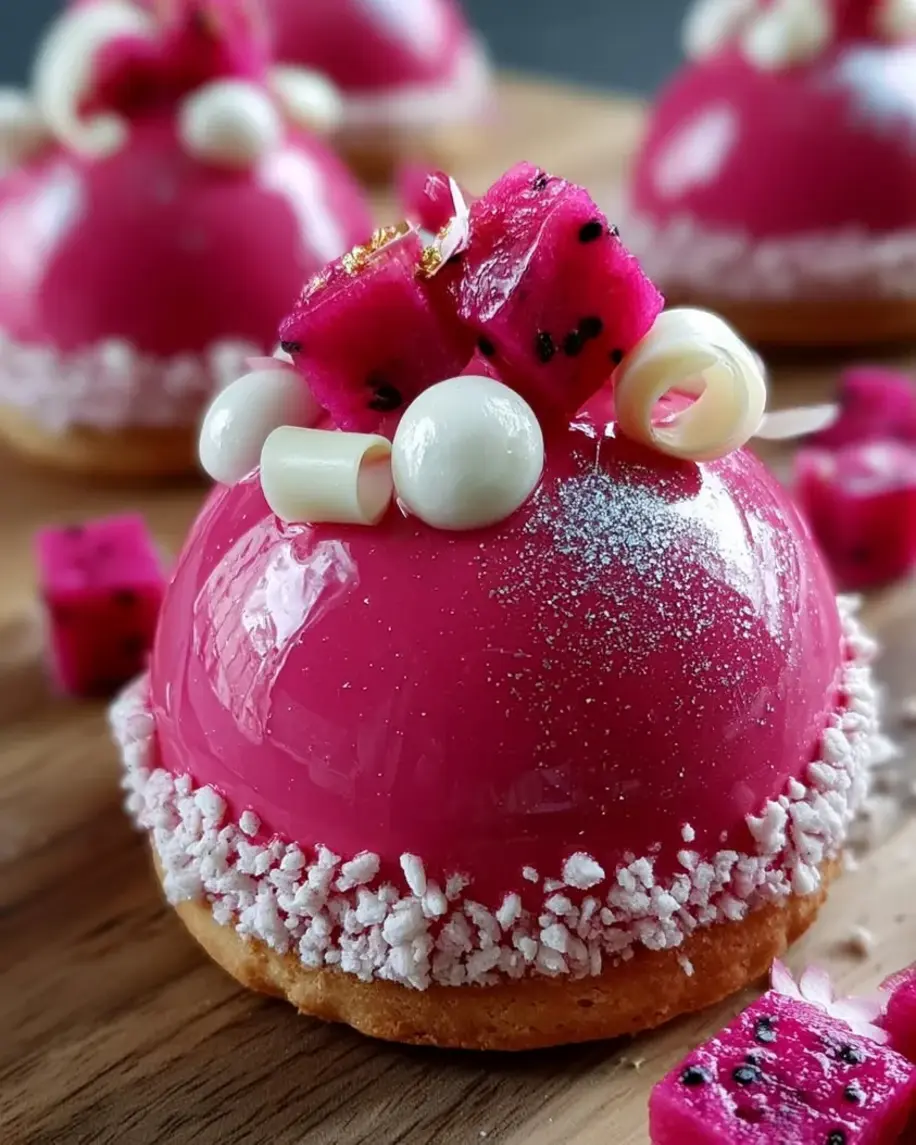
Table of Contents
Pink Dragon Fruit Vanilla Mirror Domes – Double Cream Cheese Mousse with a Surprise Center
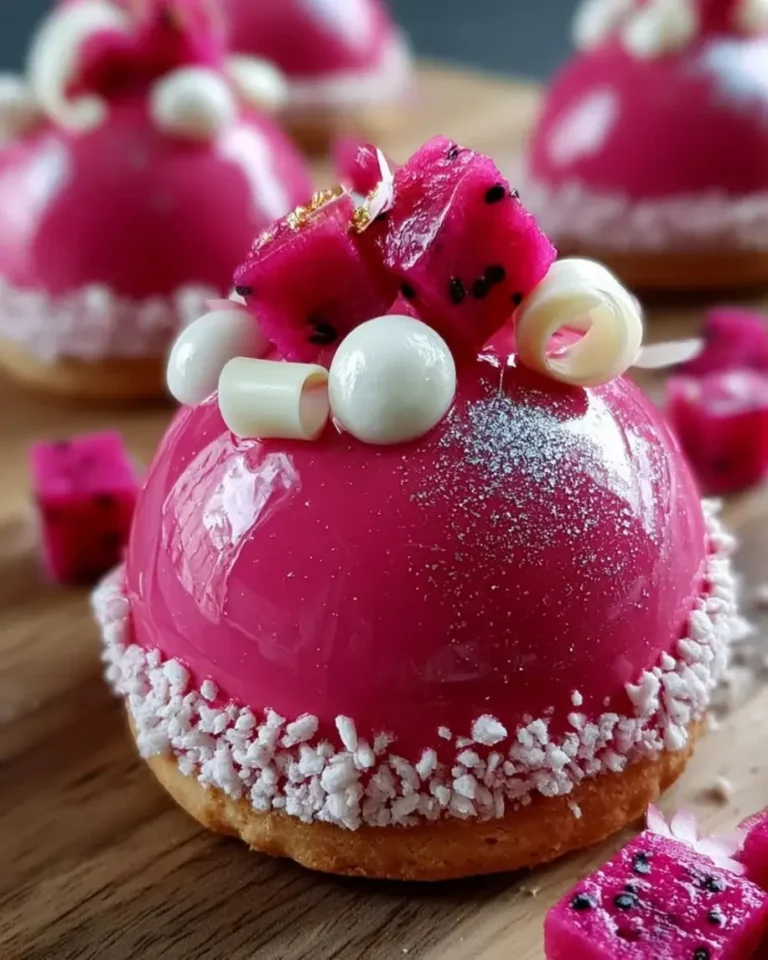
I still remember the first time I saw a mirror-glazed dome in a Parisian pâtisserie window — that flawless, lacquered surface catching the afternoon light like a jewel. It felt untouchable, something only a Michelin-starred chef could create. But after years of training in French technique and countless late-night experiments back in my New York City kitchen, I am here to tell you that this pink dragon fruit mirror dome recipe is absolutely within your reach. Inspired by the vibrant magenta of Moroccan rose gardens and the creamy desserts my mother used to make in our small kitchen in Marrakech, this dragon fruit vanilla mousse dessert brings together the best of my two worlds — bold North African color and Parisian elegance.
The first spoonful cracks through that glossy, fuchsia mirror glaze to reveal an impossibly creamy cream cheese dome cake layered with a hidden cream center. The pink mirror glaze dessert itself tastes subtly of white chocolate and vanilla, with the gentle sweetness of dragon fruit woven through the mousse. The cream core — a velvety, frozen cream cheese filling — stays cool and luscious at the center, creating a beautiful contrast in both texture and temperature. I love serving these at dinner parties in my Brooklyn brownstone; the moment you cut into one at the table, the surprise inside draws gasps every single time.
What sets this pink dragon fruit vanilla mirror dome recipe apart from others you will find online is the double cream cheese approach. Many versions use a simple fruit mousse, but I developed a two-part cream cheese base — one for the outer mousse, one for the frozen core — that gives the dessert a richness and tangy depth that balances the sweetness of the mirror glaze beautifully. In the instructions below, I will share my Paris-trained technique for a flawless mirror finish every time, plus the one mistake that can cause your glaze to crack. Whether you are new to mirror glazes or a seasoned baker looking for a reliable easy mirror glaze cake, this recipe will guide you through each step with confidence.
Why This Pink Dragon Fruit Mirror Dome Recipe Is the Best
The Flavor Secret: By using both cream cheese and vanilla in the mousse and the core, this dessert delivers a creamy, tangy, and subtly floral profile that pairs beautifully with the tropical pink dragon fruit. The fruit itself is mild — more about color and gentle sweetness than punch — so the cream cheese wakes it up. I learned this balance while adapting French fromage blanc mousses to the bolder ingredients I grew up with in Morocco.
Perfected Texture: The frozen cream core is the heart of this dessert. By freezing it separately before placing it inside the mousse, you create a distinct, velvety center that stays cold even after the outer layers have thawed slightly on the plate. The mirror glaze, when poured at exactly the right temperature (92°F / 33°C, measured with a thermometer), sets into a glass-smooth shell that snaps cleanly with a spoon.
Foolproof & Fast: Despite its showstopping appearance, this easy mirror glaze cake — or rather, dome — comes together with no baking and no complicated equipment. If you can bloom gelatin and whip cream, you can make these. I have tested this recipe six times in my NYC kitchen to ensure the ratios work perfectly for home bakers, with clear visual cues at every stage so you never have to guess.
Pink Dragon Fruit Mirror Dome Recipe Ingredients
I source my pink dragon fruit puree from the Mexican grocery on 9th Avenue in Manhattan — it is frozen, vibrant, and reliably sweet. For the cream cheese, I recommend full-fat Philadelphia for the creamiest, most stable mousse. On weekends, I take a walk through the Union Square Greenmarket and think of the souks in Marrakech, where dried rose petals and vanilla beans fill the air. These ingredients feel luxurious, but they are all available at your local supermarket.
Ingredients List
- For the Dragon Fruit Vanilla Mousse:
- 1 cup pink dragon fruit puree (fresh or frozen, thawed)
- 8 oz cream cheese, softened to room temperature
- 1/2 cup powdered sugar
- 1 cup heavy cream, cold
- 1 tsp vanilla extract
- 1 tbsp gelatin powder (unflavored)
- 3 tbsp warm water (for blooming gelatin)
- For the Cream Core:
- 4 oz cream cheese, softened
- 1/4 cup powdered sugar
- 1/4 cup heavy cream, cold
- 1 tsp vanilla extract
- For the Pink Mirror Glaze:
- 1 cup white chocolate, finely chopped
- 1/2 cup sweetened condensed milk
- 1 tbsp gelatin powder
- 3 tbsp warm water
- Pink food coloring, as needed (I use gel for intensity)
- For the Cookie Base:
- 1 cup vanilla cookie crumbs (about 18 cookies, such as vanilla wafers)
- 3 tbsp melted butter
- 1 tbsp granulated sugar
- Pinch of salt
- For Garnish (optional):
- Dragon fruit cubes (fresh)
- White chocolate curls
- Edible shimmer dust (pink or gold)
Ingredient Spotlight
Pink Dragon Fruit Puree: The star of this show. Pink dragon fruit (also called pitaya) has a mild, slightly sweet flavor and a brilliant magenta hue that gives the dome its signature color. I prefer frozen puree because it is consistent, but fresh dragon fruit blended until smooth works beautifully. If using fresh, strain out the black seeds for a smoother mousse — or keep them for a speckled effect.
Cream Cheese: Do not use reduced-fat or spreadable cream cheese in a tub. Full-fat block cream cheese (I use Philadelphia) has the structure and fat content needed to create a stable mousse that sets properly and does not weep. Let it soften fully before mixing — this takes about an hour on the counter.
White Chocolate for the Glaze: Use a high-quality white chocolate that contains real cocoa butter (look for at least 28% cocoa butter on the label). Compound white chocolate (coating wafers) will not produce the same glossy, snappable mirror finish. Callebaut or Ghirardelli white chocolate bars work excellently in my tests.
Gelatin: This is what gives the mousse and glaze their structure. I use Knox unflavored gelatin powder. If you prefer a plant-based option, agar-agar can be substituted in the mousse (use 1 tsp agar-agar dissolved in 3 tbsp water, bring to a boil, then cool slightly before adding), but the glaze is trickier to adapt — gelatin gives the mirror shine that agar cannot replicate as reliably.
| Original Ingredient | Best Substitution | Flavor / Texture Impact |
|---|---|---|
| Pink dragon fruit puree | Frozen raspberry puree (strained) | More tart, deeper red color, slightly thinner mousse |
| Full-fat cream cheese | Mascarpone cheese | Richer, less tangy, slightly softer mousse |
| White chocolate | High-quality white candy melts (for coating) | Slightly less glossy, sweeter, still works for glaze |
| Heavy cream (whipping) | Canned full-fat coconut cream (chilled) | Coconut flavor, slightly less stable peaks, dairy-free option |
How to Make Pink Dragon Fruit Vanilla Mirror Domes — Step-by-Step
I have broken this down into manageable stages so you can work through it without rushing. The key to a gorgeous pink dragon fruit mirror dome recipe is patience with the freezing steps — trust the process, and you will be rewarded with a dessert that looks like it came from a high-end NYC pastry shop.
Step 1: Bloom the Gelatin
In a small bowl, sprinkle 1 tablespoon gelatin powder over 3 tablespoons warm water. Do not stir — just let it sit for 5 minutes until the gelatin absorbs the water and becomes a firm, jiggly mass. This process, called blooming, ensures the gelatin dissolves smoothly into your mousse without lumps.
💡 Stella’s Pro Tip: Use warm water — about 100°F / 38°C, or the temperature of a comfortable bath. Hot water will weaken the gelatin, and cold water will not dissolve it properly.
Step 2: Make the Dragon Fruit Mousse Base
In a large bowl, beat 8 oz softened cream cheese and 1/2 cup powdered sugar with an electric mixer until completely smooth and fluffy — about 2 minutes. Add 1 cup pink dragon fruit puree and 1 tsp vanilla extract, and mix until uniform. The color at this stage will be a vivid, almost neon pink. In a separate bowl, whip 1 cup cold heavy cream to soft peaks — when you lift the whisk, the cream should form gentle, droopy peaks that hold for a moment before settling. Gently fold the whipped cream into the dragon fruit mixture using a rubber spatula, being careful not to deflate the air you have incorporated.
⚠️ Common Mistake to Avoid: Over-whipping the cream leads to a grainy, butter-like texture. Stop as soon as you see soft peaks — the mixture should still look luscious and slightly billowy.
Step 3: Incorporate the Gelatin
Microwave the bloomed gelatin in 5-second bursts, stirring between each, until it becomes a clear, liquid (about 10–15 seconds total). Do not let it boil. Pour the liquid gelatin into the mousse mixture while whisking constantly. Work quickly — the gelatin will start to set as it cools. Once fully incorporated, the mousse should be smooth, thick, and pourable.
💡 Stella’s Pro Tip: If you see any streaks of gelatin in the mousse, keep whisking. Undissolved gelatin can create chewy pockets in the final dome.
Step 4: Make the Cream Core
In a small bowl, beat 4 oz softened cream cheese, 1/4 cup powdered sugar, 1/4 cup heavy cream, and 1 tsp vanilla extract until smooth and thick. This mixture should be stiff enough to pipe — if it is too soft, chill it for 10 minutes. Transfer to a piping bag and pipe small balls (about 1 tablespoon each) into a silicone mini-mold or onto a parchment-lined tray. Freeze for at least 2 hours, until rock-solid.
⚠️ Common Mistake to Avoid: If the cream core is not frozen solid, it will sink into the mousse and disappear. Freeze for the full 2 hours — or overnight — to get a distinct, creamy center.
Step 5: Assemble the Domes
Fill silicone dome molds (each about 3 inches in diameter) halfway with the dragon fruit mousse. Place a frozen cream core into the center of each mold, pressing it gently into the mousse. Cover with the remaining mousse, spreading it level with the top of the mold. Tap the mold gently on the counter to release air bubbles. Freeze for at least 4 hours, or overnight, until the domes are completely firm to the touch.
💡 Stella’s Pro Tip: Place the silicone mold on a baking sheet before filling — it will be easier to transfer in and out of the freezer without upsetting the domes.
Step 6: Make the Mirror Glaze
Bloom 1 tablespoon gelatin in 3 tablespoons warm water as before. In a heatproof bowl, place 1 cup finely chopped white chocolate and 1/2 cup sweetened condensed milk. Microwave in 20-second bursts, stirring between each, until the chocolate is fully melted and smooth. Stir in the liquid gelatin and add pink food coloring drop by drop until you achieve a vibrant fuchsia. For best results, use an immersion blender to remove any air bubbles — this is the secret to that flawless mirror finish.
⚠️ Common Mistake to Avoid: Air bubbles in the glaze will show on the dome surface. Blend gently and do not whip air into the mixture — use a stick blender at an angle to pull bubbles to the surface.
Step 7: Glaze the Domes
Unmold the frozen domes by gently peeling away the silicone. Place each dome on a wire rack set over a baking sheet to catch drips. Warm the glaze to 92°F / 33°C (use a kitchen thermometer — this is critical). Pour the glaze steadily and evenly over each dome, starting from the top and letting it flow down the sides. Work one dome at a time. Let the excess drip off for about 30 seconds, then transfer the glazed dome to a parchment-lined tray.
💡 Stella’s Pro Tip: If the glaze is too thick, it will not self-level. If it is too thin, it will run off completely. 92°F is the sweet spot where the glaze sets into a perfect, shiny shell within seconds.
Step 8: Prepare the Cookie Base
In a bowl, combine 1 cup vanilla cookie crumbs, 3 tbsp melted butter, 1 tbsp granulated sugar, and a pinch of salt. Mix until the crumbs are evenly moistened. Press the mixture into small round discs — about 2 inches in diameter and 1/4 inch thick — using a measuring spoon or a small ring mold. Place each base on a serving plate or tray.
Step 9: Assemble and Garnish
Carefully place each glazed dome onto a cookie base, pressing gently so it adheres. Garnish with fresh dragon fruit cubes, white chocolate curls, and a light dusting of edible shimmer dust. Chill the assembled domes for 15 minutes to let the glaze fully set before serving. This resting time also allows the mousse to soften slightly for the ideal creamy texture.
⚠️ Common Mistake to Avoid: Do not skip the 15-minute chill. If you serve the domes straight from the glaze step, the mousse will be too frozen and the glaze may crack when you cut into it.
| Step | Action | Duration | Key Visual Cue |
|---|---|---|---|
| 1 | Bloom gelatin | 5 min | Gelatin becomes a firm, jiggly mass |
| 2 | Make mousse base | 5 min | Vibrant pink, smooth, no lumps |
| 3 | Incorporate gelatin | 1 min | No streaks, mixture thickens slightly |
| 4 | Make cream core | 5 min + 2 hr freeze | Core is rock-solid, holds shape |
| 5 | Assemble domes | 10 min + 4 hr freeze | Domes are firm, release cleanly from mold |
| 6 | Make mirror glaze | 10 min | Smooth, shiny, no air bubbles |
| 7 | Glaze domes | 10 min | Glaze coats evenly, drips cleanly |
| 8 | Make cookie base | 5 min | Crumbs hold together when pressed |
| 9 | Assemble & garnish | 10 min + 15 min chill | Glaze is set, mousse is creamy |
Serving & Presentation
These pink dragon fruit mirror dome desserts are designed to be the centerpiece of any celebration. I serve them on simple white porcelain plates so the vibrant fuchsia glaze takes center stage. A small quenelle of whipped cream or a drizzle of passion fruit coulis on the side adds a bright, tropical contrast that echoes the dragon fruit notes.
For garnishes, fresh dragon fruit cubes add a pop of matching color and a gentle crunch from the seeds. White chocolate curls — made by shaving a room-temperature bar with a vegetable peeler — add elegance and reinforce the vanilla flavor. A light dusting of edible shimmer dust (pink or gold) catches the light and makes the domes look even more like gems. I often finish with a tiny sprig of mint for a fresh, green accent — my Parisian pâtisserie instructor taught me that the smallest touch of green makes pink look even more vibrant.
In my NYC kitchen, I have served these at birthday dinners, bridal showers, and even a casual Sunday gathering where they stole the show. The look on everyone’s face when you cut into the dome and reveal the creamy center is pure magic. For an extra-special touch, serve alongside a glass of chilled rosé or a floral gin and tonic with rose petals — the combination feels like a celebration.
| Pairing Type | Suggestions | Why It Works |
|---|---|---|
| Side Dish | Fresh berry salad, mango slices | Bright fruit complements the creamy, sweet dome |
| Sauce / Dip | Passion fruit coulis, salted caramel | Tart or salty contrasts balance the sweetness |
| Beverage | Chilled rosé, floral gin cocktail, mint tea | Light, floral drinks mirror the vanilla and fruit notes |
| Garnish | Dragon fruit cubes, white chocolate curls, mint | Adds color, texture, and a professional finish |
Make-Ahead, Storage & Reheating
One of the things I love most about this pink dragon fruit vanilla mirror domes with cream core recipe is how make-ahead friendly it is. As a busy NYC food blogger, I often prepare the components over two days — the domes freeze beautifully, and the glaze can be made fresh the day you plan to serve. Here is exactly how I store and plan ahead in my own kitchen.
| Method | Container | Duration | Reheating Tip |
|---|---|---|---|
| Refrigerator | Airtight container, single layer | Up to 2 days | Serve cold, straight from fridge |
| Freezer | Sealed container, parchment between layers | Up to 1 month | Thaw in fridge 2 hrs before serving |
| Make-Ahead | Freeze unglazed domes; glaze on day of serving | Up to 1 week in advance | Glaze directly from frozen — no need to thaw |
The best make-ahead strategy is to prepare the domes through Step 5 and freeze them unglazed. They will keep happily in the freezer for up to a month. On the day you want to serve, make the mirror glaze fresh, pour it over the frozen domes, and let them chill for 15 minutes. The glaze sets instantly on the frozen surface, so you get that perfect glossy shell every time. I have done this for dinner parties when I knew I would be short on time — it takes the stress out of entertaining.
If you have leftover glazed domes, store them in the refrigerator (not the freezer — the glaze can sweat and lose its shine). They will stay beautiful for up to two days, though the cookie base will soften slightly. I personally think they are best within 24 hours of glazing, when the texture contrast between the creamy mousse and the snappy glaze is at its peak.
Variations & Easy Swaps
Over the years, I have played with many variations of this easy mirror glaze cake concept in my NYC kitchen — some inspired by Moroccan flavors, others by seasonal produce from the Union Square market. Here are three of my favorite twists that keep the technique the same but change up the flavor profile completely.
| Variation | Key Change | Best For | Difficulty Impact |
|---|---|---|---|
| Moroccan Rose & Pistachio | Replace dragon fruit with rose water + beet powder for color; add crushed pistachios to the base | Elegant dinner parties, floral lovers | Same — easy swap |
| Dairy-Free / Vegan | Use coconut cream for mousse, vegan cream cheese, and coconut milk condensed | Dairy-free guests, lighter dessert | Medium — coconut cream whips differently |
| Chocolate Hazelnut Core | Replace cream core with a frozen Nutella ganache center; use milk chocolate in the glaze | Kids, chocolate lovers, holiday tables | Same — easy swap |
Moroccan Rose & Pistachio Domes
This variation takes me straight back to my mother’s kitchen in Marrakech. Replace the dragon fruit puree with 1/2 cup rose water (yes, really — it is floral and aromatic) and add enough beet powder or pink gel food coloring to achieve a soft rose hue. The cream core stays the same, but I add 1/4 cup finely crushed pistachios to the cookie base. The result is a dome that tastes like a rose garden — elegant, unexpected, and deeply connected to my North African roots. The French trained me to balance floral flavors with dairy, and the cream cheese does exactly that here.
Dairy-Free / Vegan Mirror Domes
For my friends with dairy sensitivities, I have tested a version using full-fat canned coconut cream (chilled overnight) whipped to soft peaks in place of the heavy cream, vegan cream cheese (Miyoko’s or Kite Hill work best), and sweetened condensed coconut milk for the glaze. The coconut flavor is subtle but present, pairing beautifully with the dragon fruit. One important note: coconut cream whips best when the can has been refrigerated for at least 12 hours — scoop only the solid cream from the top and leave the watery liquid behind. The texture is slightly softer than the dairy version, so I recommend freezing the domes for the full 4 hours before glazing.
Chocolate Hazelnut Core Domes
This one is pure indulgence and a huge hit with kids. Replace the cream core with a frozen Nutella ganache: warm 1/2 cup heavy cream and pour it over 1/2 cup dark chocolate chips and 1/4 cup Nutella, stir until smooth, then freeze in small balls. For the glaze, use milk chocolate instead of white chocolate (omit the pink food coloring — it will be a rich brown). The dragon fruit mousse stays the same, creating a surprising pink-and-chocolate combination that tastes like a fancy candy bar. I debuted this at a Brooklyn birthday party, and it disappeared in minutes.
How do you achieve a vibrant pink color for the dragon fruit mirror glaze?
The key to a truly vibrant pink mirror glaze is using a combination of pink dragon fruit puree and a high-quality pink gel food coloring. Dragon fruit puree alone gives a beautiful natural pink, but it is quite subtle — more of a soft blush — and can look slightly muted once mixed with the white chocolate and condensed milk. I always add 3 to 4 drops of pink gel food coloring (I use Americolor Deep Pink or Wilton Rose) to push the color into a vivid, showstopping fuchsia. For the cleanest result, use an immersion blender to incorporate the color evenly and eliminate any air bubbles. A word of caution: avoid liquid food coloring, as it can thin the glaze and make it less glossy.
Can you substitute fresh dragon fruit for frozen puree in the mirror dome recipe?
Yes, absolutely. Fresh pink dragon fruit can be used in place of frozen puree with excellent results. To substitute, peel one large pink dragon fruit (or two small ones) and blend the flesh in a food processor or blender until completely smooth. You will need about 1 cup of puree, which typically comes from one medium fruit. Strain the puree through a fine-mesh sieve if you prefer a seedless mousse — the black seeds are edible and crunchy, but some people prefer the smoother texture. One thing to note: fresh dragon fruit is slightly more watery than some frozen purees, so you may need to add an extra 1/2 teaspoon of gelatin to ensure the mousse sets firmly. I have made this swap many times, especially in the summer when fresh dragon fruit is abundant at NYC farmers markets.
What is the best way to create a creamy center core for a mirror dome dessert?
The best way to create a distinct, creamy center core is to freeze it completely solid before placing it inside the mousse. I use a mixture of cream cheese, powdered sugar, heavy cream, and vanilla extract — beaten until smooth and thick — then pipe it into small silicone molds or onto a parchment-lined tray in tablespoon-sized balls. Freeze these for at least 2 hours, until they are rock-solid. When you nestle the frozen core into the partially filled dome mold and cover it with the remaining mousse, the core stays put and creates a beautiful, distinct inner layer. If the core is not frozen solid, it will sink into the mousse and blend in, which is still delicious but loses that dramatic surprise when you cut into the dome. For a professional touch, use a round ice cube tray or a mini sphere mold to get perfectly spherical cores every time.
How far in advance can you make pink dragon fruit mirror domes before serving?
You can make the unglazed domes up to 1 month in advance and store them in the freezer. This is actually my preferred method for entertaining — I prepare the domes through the freezing stage, keep them well wrapped in the freezer, and then make the mirror glaze fresh on the day of serving. The glaze only takes about 10 minutes to prepare and pour, so it is very manageable. If you want to glaze the domes ahead as well, they will hold beautifully in the refrigerator for up to 2 days. However, I find the glaze looks glossiest and most flawless within the first 24 hours. For best results, plan your timeline like this: make and freeze the domes up to 1 week ahead, glaze them no more than 24 hours before serving, and garnish just before you bring them to the table.
Why did my mirror glaze crack or have a dull finish?
A cracked or dull mirror glaze is usually the result of temperature issues. The most common cause is pouring the glaze when it is too cold or too hot. The ideal temperature for pouring is 92°F / 33°C — use a digital kitchen thermometer for accuracy. If the glaze is too hot, it will slide off the dome and pool at the base, leaving a thin, patchy coating. If it is too cold, it will be too thick to self-level and may set with a mottled, uneven surface. Another culprit is the temperature of the dome itself: the dome must be frozen solid (not just chilled) when you pour the glaze. The shock of cold causes the glaze to set instantly into that gorgeous, glass-like shell. Finally, air bubbles in the glaze can create tiny craters on the surface — always use an immersion blender at a low angle to gently remove bubbles before pouring.
Can I make this recipe without gelatin for a vegetarian version?
Yes, you can make a vegetarian version using agar-agar powder instead of gelatin, but the texture will be slightly different. For the mousse, substitute 1 teaspoon of agar-agar powder for the 1 tablespoon of gelatin. Dissolve the agar in 3 tablespoons of water, bring it to a full boil for 2 minutes (agar requires boiling to activate, unlike gelatin), then let it cool for 2 minutes before whisking it into the mousse base. The mousse will set more firmly and have a slightly more delicate, almost jelly-like texture compared to gelatin. For the mirror glaze, agar is trickier — it can create a firmer, less stretchy glaze that may crack more easily. I recommend using gelatin for the glaze if possible, even if you use agar for the mousse. If you need both to be vegetarian, test the glaze on a small scale first, as results vary between brands of agar.
How do I prevent the cookie base from becoming soggy under the glazed dome?
Preventing a soggy cookie base is all about managing moisture. First, make sure your cookie base is well baked or pressed firmly so it is dense and dry — I use vanilla wafer crumbs mixed with melted butter and a touch of sugar, pressed into thin discs and then refrigerated for 15 minutes to set. Second, assemble the domes onto the base just before serving, or at most 2 to 3 hours ahead. The glaze itself is sealed and does not release moisture, but the condensation from the cold dome can soften the base over time. If you are serving at a party, I recommend placing each dome on its base no more than 1 hour before serving. For a firmer barrier, you can dip the bottom of each glazed dome in a thin layer of melted white chocolate and let it set before placing it on the cookie base — this creates a moisture-proof seal that keeps the base crisp for hours.
What type of silicone mold works best for these domes?
I recommend using a round silicone dome mold with a cavity diameter of about 3 inches and a depth of about 1.5 inches — this size yields a generous single-serving dome that fits perfectly on a dessert plate. The silicone must be flexible enough to unmold easily without tearing the mousse. Look for a mold made from food-grade platinum silicone, which is non-stick and has no chemical smell. I have used both the Silikomart brand (available on Amazon) and a generic set from a New York baking supply store — both work well. The most important factor is that the mold is completely dry and clean before you fill it. If your mold has a textured or matte finish, the domes will come out with a slightly matte surface, which is fine because the glossy glaze will cover it completely. Avoid rigid plastic molds — they are nearly impossible to unmold without damaging the dome.
Can I use store-bought vanilla cookie crumbs for the base?
Absolutely, store-bought vanilla cookie crumbs work perfectly and save time. I often use Nilla Wafer crumbs or a box of Annie’s vanilla wafer crumbs when I am short on time. One cup of crumbs is about 18 vanilla wafers if you are crushing them yourself — simply place them in a sealed zip-top bag and crush with a rolling pin, or pulse them in a food processor until fine. If you want a slightly more buttery flavor, you can substitute graham cracker crumbs or shortbread cookie crumbs. The key is to add enough melted butter (3 tablespoons for 1 cup of crumbs) so the mixture holds together when pressed. If your crumbs are very dry, add an extra teaspoon of butter. Press the mixture firmly into the mold or using a measuring spoon — I use the bottom of a shot glass to compact them into perfect discs. Refrigerate the bases for 15 minutes before assembling to help them stay firm.
How do I store leftover mirror glaze for future use?
Leftover mirror glaze can be stored in an airtight container in the refrigerator for up to 2 weeks. When you are ready to use it again, warm it gently in the microwave in 10-second bursts, stirring between each, until it reaches 92°F / 33°C. You may need to add a teaspoon of warm water if the glaze has thickened too much during storage. Be careful not to overheat it, as this can cause the gelatin to break down and the glaze to lose its shine. If you have leftover glaze from glazing your domes, pour it into a small jar and refrigerate immediately — it will solidify into a firm gel, but it will melt back to a pourable state when rewarmed. I have reused mirror glaze up to three times with good results, though the shine becomes slightly less brilliant with each reheat. For best results, use leftover glaze within 1 week and always strain it through a fine-mesh sieve before reheating to remove any skin or debris.
Share Your Version!
I absolutely love hearing how these pink dragon fruit mirror domes turn out in your kitchen. Whether you stuck faithfully to the recipe or tried one of the variations — Moroccan rose, dairy-free, or chocolate hazelnut — I want to see your beautiful creations. Leave a star rating and a comment below telling me which version you made and how it went. Your feedback not only helps me improve my recipes but also inspires other home bakers in our community.
Snap a photo of your glazed domes and share it on Instagram or Pinterest — tag me @leosfoods so I can see and share your work. I always love spotting your photos and hearing about the special occasions you are celebrating. And if you have a question about a particular step or substitution, just ask below — I read every comment and reply personally. From my NYC kitchen to yours — I hope this recipe brings as much warmth to your table as it does to mine. — Stella 🧡
Love This Recipe? Save It to Pinterest!
If you enjoyed this Pink Dragon Fruit Vanilla Mirror Domes with Cream Core recipe, don’t let it get lost in your browser tabs! 😄 Pin it now so you can find it again anytime — and explore hundreds more tried-and-tested recipes waiting for you on my Pinterest boards.
👉 Follow Stella on Pinterest @stellarecipeblog
📌 Pin this recipe · 🔁 Re-pin your favorites · 💬 Tag me when you make it — I love seeing your creations!
Did you make this recipe?
I’d love to hear how it went! ⭐ Leave a star rating and share your experience in the comments below — your feedback helps other bakers too.
💬 Which variation will you try first — the classic pink, Moroccan rose, or chocolate hazelnut?
Pink Dragon Fruit Vanilla Mirror Domes with Cream Core
Pink Dragon Fruit Vanilla Mirror Domes with Cream Core
Ingredients
- For the Dragon Fruit Vanilla Mousse:
- 1 cup pink dragon fruit puree
- 8 oz cream cheese, softened
- 1/2 cup powdered sugar
- 1 cup heavy cream
- 1 tsp vanilla extract
- 1 tbsp gelatin powder
- 3 tbsp warm water
- For the Cream Core:
- 4 oz cream cheese, softened
- 1/4 cup powdered sugar
- 1/4 cup heavy cream
- 1 tsp vanilla extract
- For the Pink Mirror Glaze:
- 1 cup white chocolate, finely chopped
- 1/2 cup sweetened condensed milk
- 1 tbsp gelatin powder
- 3 tbsp warm water
- Pink food coloring, as needed
- For the Cookie Base:
- 1 cup vanilla cookie crumbs
- 3 tbsp melted butter
- 1 tbsp granulated sugar
- Pinch of salt
- For Garnish (optional):
- Dragon fruit cubes
- White chocolate curls
- Edible shimmer dust
Instructions
- 1. Bloom gelatin in warm water and let stand for 5 minutes.
- 2. Beat cream cheese and powdered sugar until smooth.
- 3. Mix in dragon fruit puree and vanilla extract.
- 4. Whip heavy cream to soft peaks and fold into the dragon fruit mixture.
- 5. Stir in dissolved gelatin until fully incorporated.
- 6. In a separate bowl, beat cream cheese, powdered sugar, heavy cream, and vanilla until smooth for the cream core.
- 7. Pipe the cream mixture into small molds and freeze until firm.
- 8. Fill silicone dome molds halfway with the dragon fruit mousse.
- 9. Place a frozen cream core into the center of each mold.
- 10. Cover with remaining mousse and freeze until completely firm.
- 11. Combine white chocolate, condensed milk, dissolved gelatin, and pink food coloring until smooth and glossy.
- 12. Unmold the frozen domes and place on a wire rack.
- 13. Pour the mirror glaze evenly over each dome.
- 14. Mix cookie crumbs, melted butter, sugar, and salt, then press into small round bases.
- 15. Place each glazed dome onto a prepared base.
- 16. Garnish with dragon fruit cubes, white chocolate curls, and edible shimmer dust.
- 17. Chill for 15 minutes before serving.
Nutrition
- Calories: 425
- Sugar: 31 g
- Fat: 29 g
- Carbohydrates: 37 g
- Protein: 6 g

Tried This Recipe? Leave a Comment!
Did you make this recipe? I’d love to hear how it turned out! Please leave a comment and a rating below. Your feedback helps other home cooks and supports cheerychop.com!
For more delicious inspiration, follow me on Pinterest!