Caramel Gold Cheesecake Bombs with Molten Center
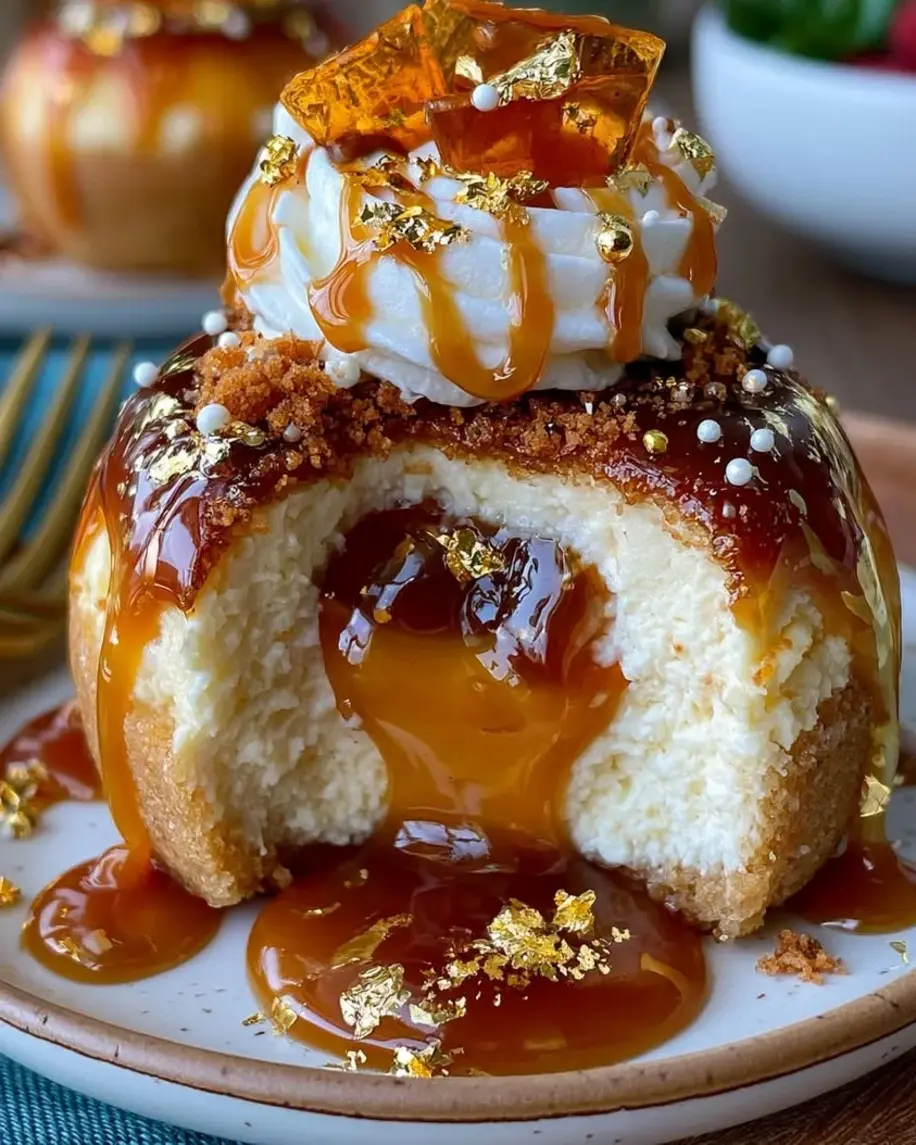
Table of Contents
Caramel Gold Cheesecake Bombs with Molten Center – A Stunning Gold-Coated Dessert
I’ll never forget the first time I made these caramel gold cheesecake bombs with molten center. I was standing in my tiny but beloved NYC kitchen, the late afternoon light streaming through the window, and I had just finished a call with my mother in Morocco. She was telling me about the honey-drenched pastries she used to make for Eid — and I felt that familiar pull to create something that felt both luxurious and deeply comforting. That’s when these little golden bombs were born. They combine everything I love: the creamy richness of French-style cheesecake, the deep caramel warmth I grew up with in North Africa, and a showstopping gold mirror glaze that makes them look like edible jewels. The caramel gold cheesecake bombs are my way of bringing together two worlds — and the molten center is the surprise that makes every bite unforgettable.
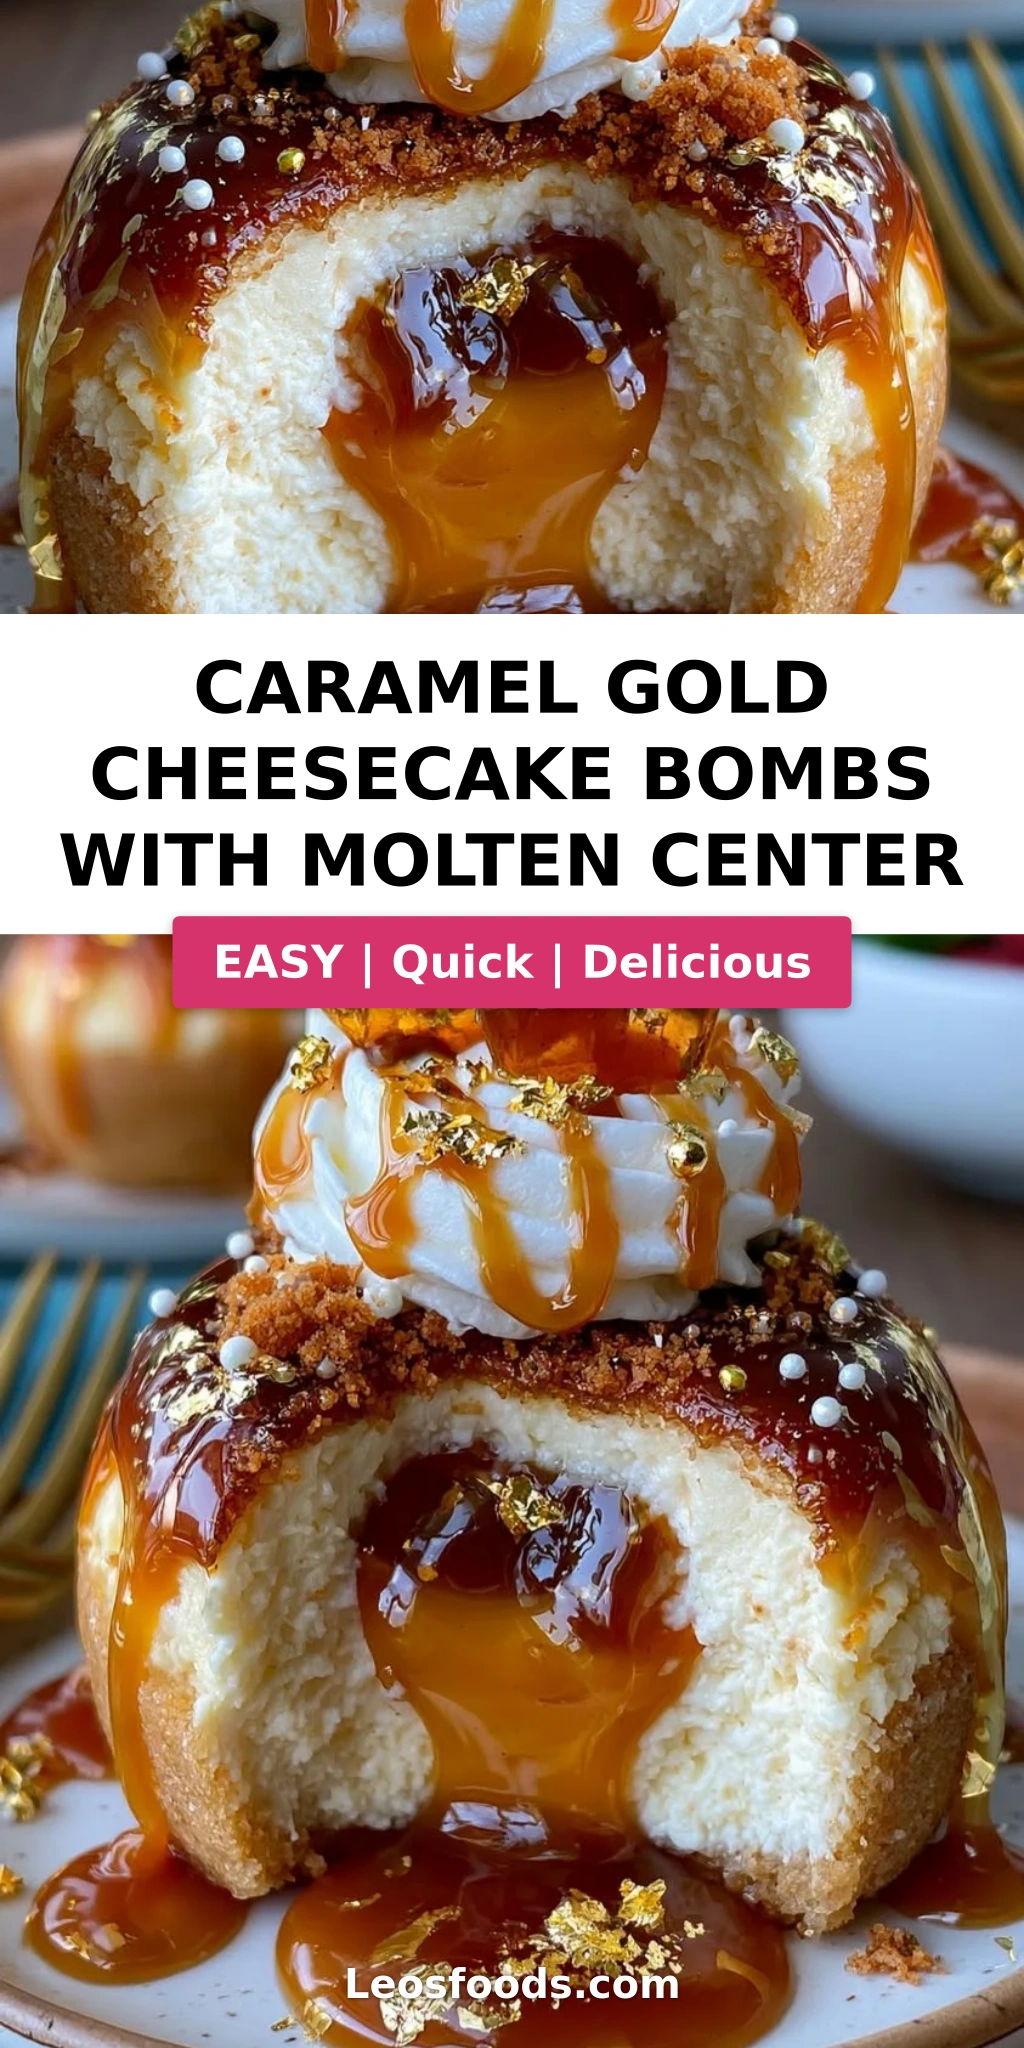
Imagine cracking through a perfectly smooth, mirror-like golden shell with the back of your spoon. Beneath that glossy surface lies a velvety cheesecake filling that’s just firm enough to hold its shape but impossibly creamy on your tongue. And then — right in the center — a warm, slow-spilling river of salted caramel that practically glows amber against the white cheesecake. The contrast of textures and temperatures is pure magic: the cool, silky cheesecake, the thick, molten caramel, and the delicate crunch of caramel shards and white chocolate curls on top. Every element is designed to surprise and delight, from the faint hint of sea salt that cuts through the sweetness to the subtle shimmer of edible gold luster dust that catches the light with every movement.
I’ve tested this recipe more times than I can count — first in my Paris pastry school days, then for friends at dinner parties here in New York, and finally as the star dessert at a small catering event I did last fall. What I’ve landed on is a version that’s both approachable for home bakers and impressive enough for a special occasion. The trick is all in the technique: blooming the gelatin properly, freezing the caramel centers until they’re rock solid, and getting the mirror glaze to just the right temperature before pouring. I’m going to walk you through every step, share the exact pro tips that make this work, and point out the one mistake most people make so you can avoid it. Trust me — when you slice into one of these and that molten caramel flows out, you’ll feel like a pastry chef.
Why This Caramel Gold Cheesecake Bombs Recipe Is the Best
The flavor secret here is the way I layer the caramel. Most recipes use one type of caramel throughout, but I use two: a thick, luxurious caramel sauce folded right into the cheesecake base for subtle sweetness, and a separate, saltier caramel center that stays gloriously molten even after freezing. This dual-caramel approach comes straight from my French training — we call it “garniture en deux temps” — and it gives you that depth of flavor that makes people close their eyes when they take a bite. I also add a small amount of mascarpone to the cream cheese mixture, a trick I picked up at a patisserie in the 11th arrondissement. It makes the texture silkier and less dense than a standard cheesecake, which is exactly what you want in a frozen bomb.
Perfected texture is the name of the game with frozen cheesecake desserts. I’ve spent years fine-tuning the ratio of gelatin to cream cheese to ensure these bombs are firm enough to unmold cleanly and hold their shape under the heavy mirror glaze, but still luscious and melt-in-your-mouth when you eat them. The key is blooming the gelatin in cold water and then dissolving it into a small warmed portion of the cheesecake mixture before folding it back in. This prevents any lumps or rubbery spots. And the freezing time — at least 4 hours, but overnight is better — ensures the caramel center is completely solid before glazing. That’s what prevents the dreaded caramel leak before you actually want it to leak.
What makes this recipe foolproof even for beginners is the detailed visual cues I’ve built into every step. I’ll tell you exactly what the cheesecake mixture should look like — smooth and thick but still spoonable — and when the glaze is at the perfect temperature for dipping. The gold mirror glaze itself is surprisingly forgiving as long as you follow the temperature cues: it should be slightly thickened but still pourable, like warm honey. I’ve also included my tested substitution guide so you can adapt based on what you have in your pantry. Whether you’re making these for a holiday party, a birthday, or just because you want to feel like a pastry chef in your own kitchen, this recipe is designed to work beautifully the first time.
Caramel Gold Cheesecake Bombs Ingredients
The first time I made these, I walked down to the Union Square farmers market in the crisp fall air to pick up fresh cream cheese and heavy cream from a local dairy. There’s something about using high-quality dairy in a recipe this simple — every ingredient really shines. For the caramel, I use a thick, high-quality jarred caramel sauce from a little shop in SoHo, but I’ll tell you my favorite brands and substitutions below. And the edible gold luster dust? I order mine online from a specialty baking supplier, but you can find it at most well-stocked craft stores or baking shops. Let me walk you through everything you’ll need.
Ingredients List
- For the Caramel Cheesecake Bombs: 12 oz cream cheese, softened; 1/2 cup mascarpone cheese; 1/2 cup heavy cream; 1/3 cup granulated sugar; 1/3 cup caramel sauce; 1 tsp vanilla extract; 2 tsp gelatin powder; 2 tbsp cold water; Pinch of salt
- For the Molten Caramel Center: 1/2 cup thick caramel sauce; 1 tbsp heavy cream; 1/4 tsp sea salt
- For the Gold Mirror Glaze: 1 cup white chocolate, finely chopped; 1/2 cup sweetened condensed milk; 1/4 cup water; 1 tbsp gelatin powder; 3 tbsp cold water; 1 tsp vanilla extract; 1/2 tsp edible gold luster dust; 1/4 tsp edible pearl luster dust
- For Garnish (optional): 2 tbsp caramel shards; 1 tbsp white chocolate curls; Edible gold flakes
Ingredient Spotlight
Cream Cheese (12 oz, softened): This is the backbone of your cheesecake bombs. Use full-fat, block-style cream cheese — not the spreadable kind in a tub. Full-fat gives you the rich texture and stability you need. Let it come to room temperature for at least an hour before starting; cold cream cheese will leave lumps that are almost impossible to smooth out. Philadelphia is my go-to brand for consistent results. If you’re in a pinch, you can substitute with an equal amount of Neufchâtel cheese — it has about a third less fat and will produce a slightly less rich but still lovely texture.
Mascarpone Cheese (1/2 cup): This is my secret weapon for silky, luxurious cheesecake bombs. Mascarpone has a higher fat content than cream cheese and a delicate, almost buttery flavor that softens the tanginess of the cream cheese. It also helps the mixture freeze more smoothly without becoming icy. You can find mascarpone in most US grocery stores in the specialty cheese section near the cream cheese. If you can’t find it, you can substitute with an equal amount of cream cheese plus 1 tablespoon of heavy cream, but the texture will be slightly less velvety.
Caramel Sauce (1/3 cup for the cheesecake + 1/2 cup for the center): Quality matters enormously here. Use a thick, premium caramel sauce — not the thin, runny kind you’d use for coffee. I love Stonewall Kitchen’s Sea Salt Caramel Sauce or Trader Joe’s Fleur de Sel Caramel Sauce. For the molten center, you need an especially thick caramel so it stays distinct from the cheesecake even after freezing. If your caramel sauce is thin, simmer it on the stovetop for 3–4 minutes until it thickens to a fudge-like consistency. You can also make your own caramel from scratch — I use a dry caramel method I learned in Paris — but a high-quality jarred version saves time and works beautifully.
White Chocolate (1 cup, finely chopped for the glaze): The gold mirror glaze gets its silky texture and sweetness from white chocolate. Use a good-quality white chocolate that contains real cocoa butter — Ghirardelli, Lindt, or Callebaut are reliable choices. Avoid white baking chips or morsels, which often contain added stabilizers that prevent them from melting smoothly. The chocolate needs to be finely chopped so it melts evenly when you pour the hot condensed milk mixture over it. If you need a dairy-free version, use a high-quality vegan white chocolate — just note that the glaze may be slightly less glossy.
| Original Ingredient | Best Substitution | Flavor / Texture Impact |
|---|---|---|
| Cream cheese (full-fat block) | Neufchâtel cheese (1:1) | Slightly less rich, slightly less firm; still creamy but with a softer set |
| Mascarpone | Cream cheese + 1 tbsp heavy cream | Less velvety, slightly tangier; texture is still good but not as luxurious |
| Thick caramel sauce | Homemade dry-method caramel | Deeper caramel flavor, more control over sweetness; slightly more work |
| White chocolate (cocoa butter based) | High-quality vegan white chocolate | Slightly less glossy glaze, subtle flavor difference; works well for dairy-free |
| Gelatin powder (standard) | Agar-agar powder (use 1 tsp, follow package) | Firmer, slightly more brittle texture; set at room temperature; different working time |
How to Make Caramel Gold Cheesecake Bombs — Step-by-Step
I’ve broken this down into clear, manageable steps with visual cues that’ll let you know you’re on the right track. Take your time with the gelatin — it’s the unsung hero of this recipe — and don’t rush the freezing. Trust me, every minute of chill time pays off when you pour that glossy gold glaze over perfectly firm bombs.
Step 1: Bloom the Gelatin
In a small bowl, sprinkle 2 teaspoons of gelatin powder over 2 tablespoons of cold water. Stir gently with a fork to make sure all the gelatin is moistened. Let it sit for 5 minutes until it becomes a firm, jiggly mass. This process, called blooming, hydrates the gelatin so it dissolves smoothly into the cheesecake mixture without any lumps. If you’re using sheet gelatin instead of powder, bloom 4 sheets in a bowl of ice water for about 5 minutes, then squeeze out the excess water before using.
💡 Stella’s Pro Tip: Use cold water — not warm — for blooming gelatin. Warm water will partially dissolve the gelatin unevenly and can cause streaks in your cheesecake. And once the gelatin is bloomed, use it right away; it shouldn’t sit for more than 10 minutes.
Step 2: Make the Cheesecake Base
In a large mixing bowl, beat the softened cream cheese and mascarpone together with an electric mixer on medium speed until completely smooth and fluffy — about 2 minutes. Add the heavy cream, granulated sugar, caramel sauce, vanilla extract, and a pinch of salt. Continue beating for another 2–3 minutes until the mixture is silky and well combined. It should be thick enough to hold a soft peak when you lift the beaters. Scrape down the sides and bottom of the bowl at least once to ensure everything is evenly incorporated.
⚠️ Common Mistake to Avoid: Overmixing after adding the cream can cause the mixture to become too thin and grainy. Mix just until smooth — stop as soon as everything is combined and the texture looks like thick, creamy yogurt.
Step 3: Incorporate the Gelatin
Take about 1/4 cup of the cheesecake mixture and transfer it to a small microwave-safe bowl. Warm it in the microwave for about 10–15 seconds until it’s just slightly warm to the touch — not hot. Add the bloomed gelatin to this warmed portion and stir until the gelatin is completely dissolved and smooth. Then, fold this mixture back into the main cheesecake bowl, stirring gently but thoroughly until everything is uniform. This technique — tempering the gelatin into a small amount of the base first — prevents any jelly-like streaks from forming.
Step 4: Assemble the Bombs
Lightly grease your silicone bomb molds with a tiny bit of neutral oil (like coconut or grapeseed) to ensure easy unmolding later. Fill each cavity about halfway with the cheesecake mixture, using a small spatula or a piping bag for neatness. Place the filled molds in the freezer while you prepare the caramel centers. In a small bowl, mix the 1/2 cup of thick caramel sauce with 1 tablespoon of heavy cream and 1/4 teaspoon of sea salt. Spoon small teaspoon-sized portions of this mixture onto a parchment-lined tray and freeze for at least 30 minutes until they’re firm enough to handle.
💡 Stella’s Pro Tip: Freeze the caramel centers on a tray that fits flat in your freezer. Once they’re solid, you can pop them off the parchment and drop them directly into the cheesecake-filled molds. Keep your hands clean — the caramel can get sticky — and work quickly so the caramel centers stay frozen.
Step 5: Freeze Completely
Place one frozen caramel center into each mold, pressing it gently into the cheesecake layer. Cover with the remaining cheesecake mixture, spreading it smooth and level to the top of the mold. Tap the mold gently on the counter to release any air bubbles. Freeze the bombs for at least 4 hours — overnight is even better. The bombs need to be completely solid to hold their shape during glazing. To test, gently press the surface of a bomb; it should feel rock hard with no give at all.
⚠️ Common Mistake to Avoid: Rushing the freezing time. If the bombs aren’t frozen all the way through, they’ll soften when you pour the warm glaze over them, and you’ll end up with a melty, misshapen mess. Set a timer for 4 hours minimum, and don’t skip this step — your patience will be rewarded.
Step 6: Make the Gold Mirror Glaze
While the bombs freeze, prepare the glaze. In a small bowl, bloom 1 tablespoon of gelatin powder in 3 tablespoons of cold water for 5 minutes. In a small saucepan, combine 1/4 cup of water and 1/2 cup of sweetened condensed milk. Heat over medium heat until the mixture is steaming but not boiling — about 2-3 minutes. Remove from heat and add the bloomed gelatin, stirring until it dissolves completely. Place the finely chopped white chocolate in a heatproof bowl and pour the hot condensed milk mixture over it. Let it sit for 1 minute, then whisk gently until the chocolate is completely melted and the glaze is smooth and glossy.
💡 Stella’s Pro Tip: If your glaze has small bubbles after whisking, let it sit for a minute or two and then gently tap the bowl on the counter to release them. Or, for a perfectly smooth finish, strain the glaze through a fine-mesh sieve before adding the luster dust.
Step 7: Glaze and Garnish
Stir in 1 teaspoon of vanilla extract, 1/2 teaspoon of edible gold luster dust, and 1/4 teaspoon of edible pearl luster dust until the glaze is a uniform shimmering gold. Allow the glaze to cool for 5–10 minutes until it thickens slightly — it should coat the back of a spoon but still drip off in a smooth ribbon. Unmold the frozen cheesecake bombs and place them on a wire rack set over a baking sheet. Pour the glaze evenly over each bomb, letting the excess drip away. Let the coating set for 10 minutes, then finish with caramel shards, white chocolate curls, and edible gold flakes.
⚠️ Common Mistake to Avoid: The glaze temperature is critical. If it’s too warm, it will run right off the frozen bombs and pool on the tray. If it’s too cool, it will thicken unevenly and won’t self-level into a smooth mirror finish. Aim for a consistency where the glaze drips in a steady stream but holds its shape slightly on the surface — like warm maple syrup.
| Step | Action | Duration | Key Visual Cue |
|---|---|---|---|
| 1 | Bloom gelatin | 5 mins | Gelatin becomes a firm, jiggly mass |
| 2 | Beat cheesecake base | 5 mins | Smooth, fluffy, holds soft peaks |
| 3 | Incorporate gelatin | 5 mins | No streaks, mixture is uniform |
| 4 | Fill molds + caramel centers | 10 mins | Caramel centers are firm, molds are filled evenly |
| 5 | Freeze bombs | 4+ hours | Rock hard, no give when pressed |
| 6 | Prepare mirror glaze | 10 mins | Glossy, smooth, golden shimmer |
| 7 | Glaze + garnish | 10 mins | Smooth gold coating, no drips; garnishes set |
Serving & Presentation
These caramel gold cheesecake bombs are at their dramatic best when served chilled — not frozen solid, but cold enough that the cheesecake is firm and the caramel center is still thick and molten. I like to take them out of the freezer about 5–10 minutes before serving to let them soften just slightly. Place each bomb on a small dessert plate or a fancy appetizer spoon for a stunning single-bite presentation. The gold mirror glaze catches the light beautifully, especially if you place them near a window or under soft candlelight. Slice one open at the table for the full wow factor — that golden shell giving way to creamy cheesecake and a river of salted caramel is a showstopper moment every time.
For garnishes, I keep it elegant: a few caramel shards propped against the bomb, a curl of white chocolate on top, and a sprinkle of edible gold flakes that look like tiny flecks of treasure. If I’m serving these at a dinner party, I sometimes add a small dollop of lightly whipped crème fraîche on the side — the tanginess balances the sweetness of the caramel. A tiny pinch of flaky sea salt on top of each bomb right before serving elevates the flavor even more. These bombs also pair beautifully with a strong espresso or a dark-roast coffee, which cuts through the richness.
When I think about serving these, I’m reminded of the afternoon tea spreads my mother used to prepare for guests in Morocco — little plates of delicate pastries, always with something sweet and golden. These bombs are my NYC version of that hospitality: a little bit fancy, a little bit nostalgic, and entirely made with love. They’re perfect for holiday tables, birthday celebrations, or anytime you want to serve something that feels truly special.
| Pairing Type | Suggestions | Why It Works |
|---|---|---|
| Side Dish | Lightly whipped crème fraîche, fresh berries | Tangy crème fraîche cuts sweetness; berries add brightness and acidity |
| Sauce / Dip | Extra caramel sauce, warm chocolate sauce | Reinforces the caramel flavor; chocolate adds depth |
| Beverage | Espresso, dark-roast coffee, black tea, cold brew | Bitter notes balance the sweetness; coffee complements caramel |
| Garnish | Edible gold flakes, caramel shards, white chocolate curls, flaky sea salt | Adds texture, visual appeal, and a savory-sweet contrast |
Make-Ahead, Storage & Reheating
One of the things I love most about these caramel gold cheesecake bombs is how well they work for make-ahead entertaining. I often prepare the bombs up to the point of glazing — leaving them frozen and unglazed — and then finish the glaze and garnish the day I plan to serve them. This makes them a dream for holiday hosting or busy weekends. Here’s exactly how to store them at every stage so they stay perfect.
| Method | Container | Duration | Reheating Tip |
|---|---|---|---|
| Refrigerator (glazed) | Airtight container, single layer | Up to 3 days | Serve cold — no reheating needed. Let sit 5 min at room temp before serving. |
| Freezer (unglazed) | Freezer-safe bag or container, parchment between layers | Up to 2 months | Glaze directly from frozen — no need to thaw. Add 2–3 min to glaze setting time. |
| Make-Ahead (full assembled, glazed) | Airtight container in freezer | Up to 2 weeks | Thaw in refrigerator overnight. Glaze may soften slightly — best to glaze fresh. |
If you’ve glazed the bombs and stored them in the refrigerator, they’re best enjoyed within 3 days. The glaze will stay glossy and smooth for about 24 hours, then it may start to dull slightly after that — but it will still look beautiful and taste wonderful. For longer storage, keep the unglazed frozen bombs in a sealed freezer bag for up to 2 months. When you’re ready to serve, make a fresh batch of gold mirror glaze and pour it directly over the frozen bombs. The thermal shock of the warm glaze hitting the frozen bomb creates that perfect mirror finish — one of my favorite tricks from pastry school.
One thing to note: do not microwave these bombs to soften them. The caramel center will overheat and burst, and the glaze can become sticky and weepy. Instead, if they’re fully frozen, let them sit in the refrigerator for 30 minutes before serving, or at room temperature for 5–8 minutes. This gentle softening keeps the texture perfectly creamy and the caramel molten without compromising the structure.
Variations & Easy Swaps
Over the years, I’ve played around with all kinds of flavor combinations — some inspired by my Moroccan roots, others by what I find at the Union Square farmers market. Here are my favorite variations that still deliver that wow factor.
| Variation | Key Change | Best For | Difficulty Impact |
|---|---|---|---|
| Moroccan Honey & Orange Blossom | Replace caramel sauce with honey + 1 tsp orange blossom water; use honey in center | A nod to North African flavors; floral and aromatic | Easy — same technique, different ingredients |
| Chocolate-Hazelnut | Add 2 tbsp cocoa powder to cheesecake base; use Nutella or chocolate-hazelnut spread for center | Chocolate lovers; richer, more indulgent | Easy — cocoa powder blends in easily |
| Vegan / Dairy-Free | Use vegan cream cheese, mascarpone, heavy cream, and white chocolate; use agar-agar instead of gelatin | Dairy-free and plant-based diets | Medium — agar-agar sets differently; requires careful timing |
Variation: Moroccan Honey & Orange Blossom
This variation takes me straight back to my mother’s kitchen in Morocco. Replace the 1/3 cup of caramel sauce in the cheesecake base with 1/3 cup of runny honey (I love orange blossom honey from a Middle Eastern grocer — it’s floral and delicate). Add 1 teaspoon of orange blossom water to the cheesecake mixture along with the vanilla. For the molten center, use a thick honey mixed with a pinch of cinnamon and a drop of orange blossom water instead of the caramel. The result is a lighter, more aromatic dessert that’s still incredibly decadent. The gold mirror glaze works beautifully with this version — the floral notes complement the sweet white chocolate perfectly.
Variation: Gluten-Free & Dairy-Free Version
To make these completely dairy-free, substitute the cream cheese with a high-quality vegan cream cheese (I like Kite Hill or Violife), use coconut cream instead of heavy cream, and replace the mascarpone with an additional 1/2 cup of vegan cream cheese. For the white chocolate, use a vegan white chocolate made with cocoa butter alternatives — brands like Enjoy Life or Pascha work well. The biggest change is replacing gelatin with agar-agar powder. Use 1 teaspoon of agar-agar powder bloomed in 2 tablespoons of water, then heat it gently until dissolved before adding to the cheesecake base. Agar-agar sets at room temperature, so the texture will be slightly firmer and more delicate. The glaze can also be made with vegan white chocolate and plant-based condensed milk.
Variation: Chocolate-Hazelnut
For an extra-decadent twist, sift 2 tablespoons of unsweetened cocoa powder into the cream cheese mixture along with the sugar. The cocoa adds a deep chocolate note that pairs beautifully with caramel. For the molten center, use a thick chocolate-hazelnut spread like Nutella mixed with a tablespoon of heavy cream and a pinch of sea salt. Freeze the Nutella centers just like the caramel ones. The gold mirror glaze still works here — the combination of gold exterior, chocolate hazelnut center, and creamy chocolate cheesecake is absolutely irresistible. This version reminds me of the chocolate-hazelnut croissants I used to get at a little patisserie in Paris, but elevated into something truly special.
How do you create a molten center in caramel gold cheesecake bombs?
The key to a perfect molten center is starting with a frozen core. Prepare a thick caramel sauce by mixing 1/2 cup of high-quality thick caramel with 1 tablespoon of heavy cream and 1/4 teaspoon of sea salt. Spoon small portions — about a teaspoon each — onto a parchment-lined tray and freeze them until they are completely solid, at least 30 minutes. Meanwhile, fill your silicone bomb molds halfway with the cheesecake mixture, then press one frozen caramel center into each mold before covering with the remaining cheesecake mixture. The bombs need to freeze for at least 4 hours, ideally overnight, so the caramel center stays completely solid. When you serve the bombs chilled, the center remains thick and molten while the cheesecake stays creamy. The texture contrast is what makes these bombs so special — the cold, silky cheesecake giving way to a warm, flowing caramel river.
What is the best type of caramel to use for the filling in cheesecake bombs?
For the filling, you want a thick, premium caramel sauce — not the thin, runny kind used for coffee or ice cream toppings. The caramel needs to be dense enough to hold its shape when frozen but still soft and flowing when served. I highly recommend Stonewall Kitchen Sea Salt Caramel Sauce or Trader Joe’s Fleur de Sel Caramel Sauce for their thick consistency and balanced sweetness. If your caramel sauce is too thin, you can simmer it on the stovetop over low heat for 3–4 minutes, stirring constantly, until it reduces and thickens to a fudge-like texture. For the caramel folded into the cheesecake base itself, a slightly thinner caramel works well — it disperses more evenly. Homemade dry-method caramel, which I learned in Paris, gives you the deepest flavor and most control over sweetness, but a high-quality jarred version saves time and delivers excellent results.
Can you make caramel gold cheesecake bombs with a gluten-free crust?
Yes, absolutely — but please note that this particular recipe does not use a crust at all. The cheesecake bombs are crustless by design, which makes them naturally gluten-free. The structure comes from the cream cheese, mascarpone, and gelatin setting into a firm, creamy bite, not from a graham cracker or cookie base. If you’d like to add a crust, you can press a small amount of gluten-free cookie crumbs — like crushed gluten-free shortbread or gluten-free graham crackers mixed with a little melted butter — into the bottom of each mold before adding the cheesecake mixture. Just be sure to press the crumbs firmly and freeze them briefly before adding the cheesecake. This will add a lovely textural contrast and make the bombs feel even more like a traditional cheesecake. All the other ingredients in this recipe are naturally gluten-free, so you’re good to go.
How long should you freeze cheesecake bombs before coating or dipping them?
You need to freeze the assembled cheesecake bombs for a minimum of 4 hours, but overnight is truly ideal. The bombs must be completely solid — rock hard with absolutely no give when you press them gently — before you attempt to glaze or coat them. This is critical for two reasons. First, the warm gold mirror glaze (which is poured at around 90-95°F) will immediately start to melt the surface of the cheesecake if it’s not frozen solid enough, causing the bomb to lose its shape and the glaze to slide off in uneven patches. Second, the caramel center needs to be fully frozen so it stays contained inside the bomb during glazing and only becomes molten when you serve it. If you’re in a hurry, you can freeze the bombs in a single layer on a metal tray in the coldest part of your freezer to speed things up, but don’t reduce the time below 4 hours — patience is non-negotiable here.
Can I make these cheesecake bombs ahead of time for a party?
Yes, these are ideal make-ahead desserts. I often prepare the bombs up to 2 months in advance, stopping before the glazing step. Freeze the unglazed bombs in a single layer on a baking sheet, then transfer them to an airtight container or freezer bag with parchment paper between layers. On the day of your party, make the gold mirror glaze fresh, pour it over the frozen bombs, and let them set for 10 minutes before garnishing. The glaze is best when made fresh, as it can lose some of its mirror shine after a day in the refrigerator. If you need to glaze them the day before, store the glazed bombs in an airtight container in the refrigerator, and expect the glaze to be slightly less glossy by the next day. Let them sit at room temperature for 5–8 minutes before serving for the perfect texture.
What is the best way to achieve a smooth gold mirror glaze?
The secret to a flawless mirror glaze is temperature control and proper preparation. First, make sure your white chocolate is finely chopped — even melting is much easier with small, uniform pieces. When you pour the hot sweetened condensed milk mixture over the chocolate, let it sit undisturbed for about 1 minute before whisking gently to avoid incorporating air bubbles. If you do see bubbles, let the glaze rest for a couple of minutes and tap the bowl lightly on the counter to release them, or strain it through a fine-mesh sieve. The glaze should be poured when it’s slightly thickened but still pourable — around 90-95°F, similar to the consistency of warm honey. Test it on the back of a spoon: it should coat the spoon in a smooth, even layer and drip off in a steady ribbon. The frozen bomb needs to be completely solid so the warm glaze sets instantly into a mirror finish.
Can I use a different glaze instead of gold mirror glaze?
Absolutely — this recipe is versatile, and you can customize the exterior in many ways. A dark chocolate mirror glaze is a stunning alternative: simply replace the white chocolate with dark chocolate (around 60-70% cocoa) and omit the luster dust. For a simpler option, you can dip the frozen cheesecake bombs in melted dark or milk chocolate mixed with a little coconut oil for a smooth, snappy shell. You could also coat them in crushed cookies, toasted coconut, or chopped nuts for a textured finish. If you want a colorful look, use white chocolate and add food coloring to the glaze along with the luster dust. For a more rustic presentation, dust the bombs with cocoa powder or powdered sugar just before serving. Each method gives the bombs a completely different personality.
How do I store leftover caramel gold cheesecake bombs?
Store leftover glazed cheesecake bombs in an airtight container in the refrigerator for up to 3 days. Place them in a single layer to prevent the glaze from sticking to the lid or other bombs. If you need to stack them, use a sheet of parchment paper between layers. The glaze will stay glossy for about 24 hours; after that, it may develop a slightly matte finish but will still taste wonderful. For longer storage, keep them unglazed in the freezer for up to 2 months. When you’re ready to enjoy them, glaze them directly from frozen — no need to thaw. If you have leftover bombs that are already glazed, you can freeze them for up to 2 weeks, but the glaze may lose its mirror shine. Let frozen glazed bombs thaw in the refrigerator for about 30 minutes before serving.
Can I use gelatin sheets instead of powder for this recipe?
Yes, you can substitute gelatin sheets for powder in both the cheesecake base and the mirror glaze. For the cheesecake base, you’ll need 4 sheets of gelatin (each sheet is about 2 grams, and the recipe calls for 2 teaspoons of powder, which is roughly 8 grams). Bloom the sheets in a bowl of ice water for about 5 minutes until they are soft and pliable. Squeeze out the excess water, then dissolve the sheets into the warmed portion of the cheesecake mixture just as you would with the powder. For the glaze, use 6 sheets of gelatin instead of 1 tablespoon of powder. Sheet gelatin tends to produce a slightly clearer, more translucent set, which can make the mirror glaze look even more luminous. The technique is the same: bloom in cold water, squeeze, and dissolve into the warm liquid.
Why did my gold mirror glaze turn out cloudy or streaky?
Cloudy or streaky mirror glaze is usually caused by one of three issues. First, the glaze might have been too cool when poured — if it’s below 85°F, it can thicken unevenly and lose its mirror quality. Keep the glaze between 90-95°F for the best results. Second, air bubbles from over-whisking can create tiny craters that scatter light and appear as streaks. Whisk gently, and let the glaze rest for a minute before pouring to let bubbles rise. Third, if the white chocolate wasn’t finely chopped or didn’t melt completely, you’ll get lumps that disrupt the smooth surface. Make sure your chocolate is very finely chopped and that the hot liquid is steaming (not boiling) when you pour it over the chocolate. Straining the glaze through a fine-mesh sieve before using it will catch any remaining bits and ensure a perfectly smooth, mirror-like finish.
Share Your Version!
I absolutely love seeing how these caramel gold cheesecake bombs turn out in other people’s kitchens. There’s something so special about knowing that a recipe I developed in my tiny NYC kitchen is being made for birthday parties, holiday gatherings, and quiet nights in across the country. If you make these, please come back and leave a star rating below — it helps other readers know the recipe works beautifully and it means the world to me. Drop a comment and let me know which variation you tried, or if you came up with your own twist. Did you go with the classic caramel, the Moroccan honey and orange blossom, or the chocolate-hazelnut version?
And I’d love to see your photos! Tag @leosfoods on Instagram or Pinterest when you share your creation — I try to repost every single one I see. Whether your glaze turns out perfectly mirror-smooth or you’re still perfecting your technique, I want to cheer you on. Cooking and baking are all about practice, curiosity, and sharing what you make with the people you love. So snap a picture, tag me, and tell your story. From my NYC kitchen to yours — I hope this recipe brings as much warmth to your table as it does to mine. — Stella 🧡
Love This Recipe? Save It to Pinterest!
If you enjoyed this Caramel Gold Cheesecake Bombs with Molten Center recipe, don’t let it get lost in your browser tabs! 😄 Pin it now so you can find it again anytime — and explore hundreds more tried-and-tested recipes waiting for you on my Pinterest boards.
👉 Follow Stella on Pinterest @stellarecipeblog
📌 Pin this recipe · 🔁 Re-pin your favorites · 💬 Tag me when you make it — I love seeing your creations!
⭐ Did you make this recipe? I’d love to hear from you! ⭐
Tap a star to rate it below, and leave a comment to tell me how it went — your feedback helps me make every recipe better for you!

Caramel Gold Cheesecake Bombs with Molten Center
Decadent cheesecake bombs with a molten caramel center, coated in a shimmering gold mirror glaze.
- Yield: 6 1x
Ingredients
- For the Caramel Cheesecake Bombs:
- 12 oz cream cheese, softened
- 1/2 cup mascarpone cheese
- 1/2 cup heavy cream
- 1/3 cup granulated sugar
- 1/3 cup caramel sauce
- 1 tsp vanilla extract
- 2 tsp gelatin powder
- 2 tbsp cold water
- Pinch of salt
- For the Molten Caramel Center:
- 1/2 cup thick caramel sauce
- 1 tbsp heavy cream
- 1/4 tsp sea salt
- For the Gold Mirror Glaze:
- 1 cup white chocolate, finely chopped
- 1/2 cup sweetened condensed milk
- 1/4 cup water
- 1 tbsp gelatin powder
- 3 tbsp cold water
- 1 tsp vanilla extract
- 1/2 tsp edible gold luster dust
- 1/4 tsp edible pearl luster dust
- For Garnish (optional):
- 2 tbsp caramel shards
- 1 tbsp white chocolate curls
- Edible gold flakes
Instructions
- Bloom gelatin in cold water for 5 minutes.
- Mix caramel sauce, cream cheese, mascarpone, heavy cream, sugar, vanilla extract, and salt until smooth and creamy.
- Warm a small portion of the cheesecake mixture and dissolve the bloomed gelatin. Fold it back into the remaining mixture until fully incorporated.
- Fill silicone bomb molds halfway with the cheesecake mixture.
- Freeze small portions of the caramel sauce mixed with heavy cream and sea salt until firm, then place one frozen caramel center into each mold.
- Cover with the remaining cheesecake mixture and smooth the tops.
- Freeze for at least 4 hours until completely firm.
- For the gold glaze, bloom gelatin in cold water for 5 minutes.
- Heat water and sweetened condensed milk until steaming. Remove from heat and stir in gelatin until dissolved.
- Pour over white chocolate and whisk until smooth and glossy. Add vanilla extract, gold luster dust, and pearl luster dust.
- Allow the glaze to cool until slightly thickened but still pourable.
- Unmold the frozen cheesecake bombs and place on a wire rack.
- Pour the gold glaze evenly over each bomb, allowing excess glaze to drip away.
- Let the coating set for 10 minutes.
- Finish with caramel shards, white chocolate curls, and edible gold flakes.
- Slice open to reveal the molten caramel center and serve chilled.
Nutrition
- Calories: 485
- Sugar: 37g
- Fat: 33g
- Carbohydrates: 42g
- Protein: 6g
Tried This Recipe? Leave a Comment!
Did you make this recipe? I’d love to hear how it turned out! Please leave a comment and a rating below. Your feedback helps other home cooks and supports cheerychop.com!
For more delicious inspiration, follow me on Pinterest!