Citrus Burst Diamond Cheesecake Domes with Mirror Glaze
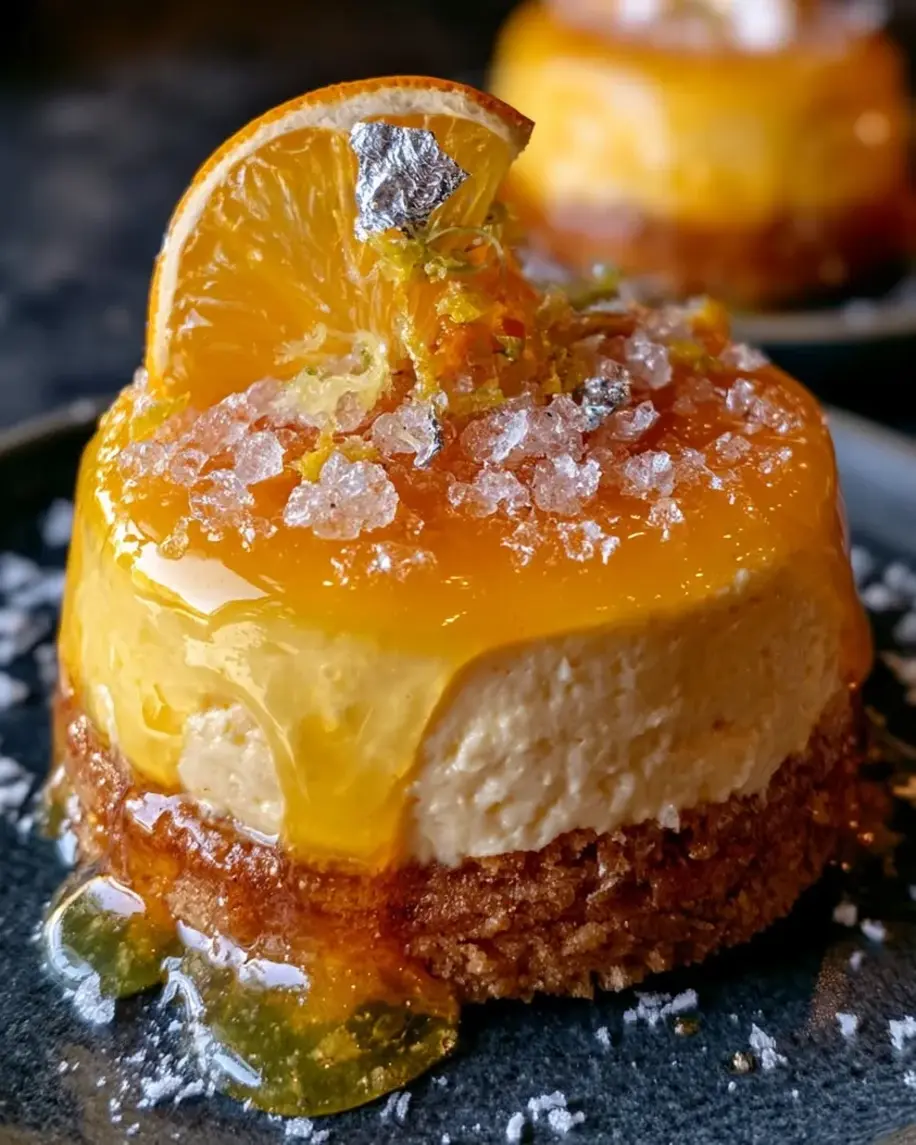
Table of Contents
Citrus Burst Diamond Cheesecake Domes with Crystal Mirror Glaze — A Show-Stopping Dessert That Sparkles Like a Gem
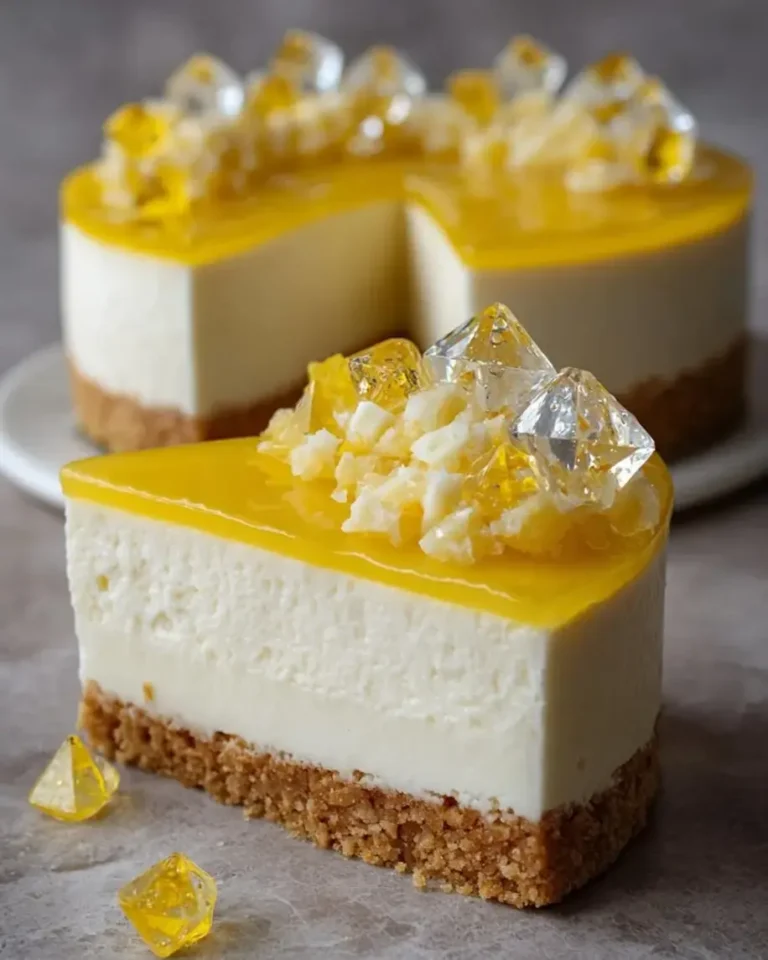
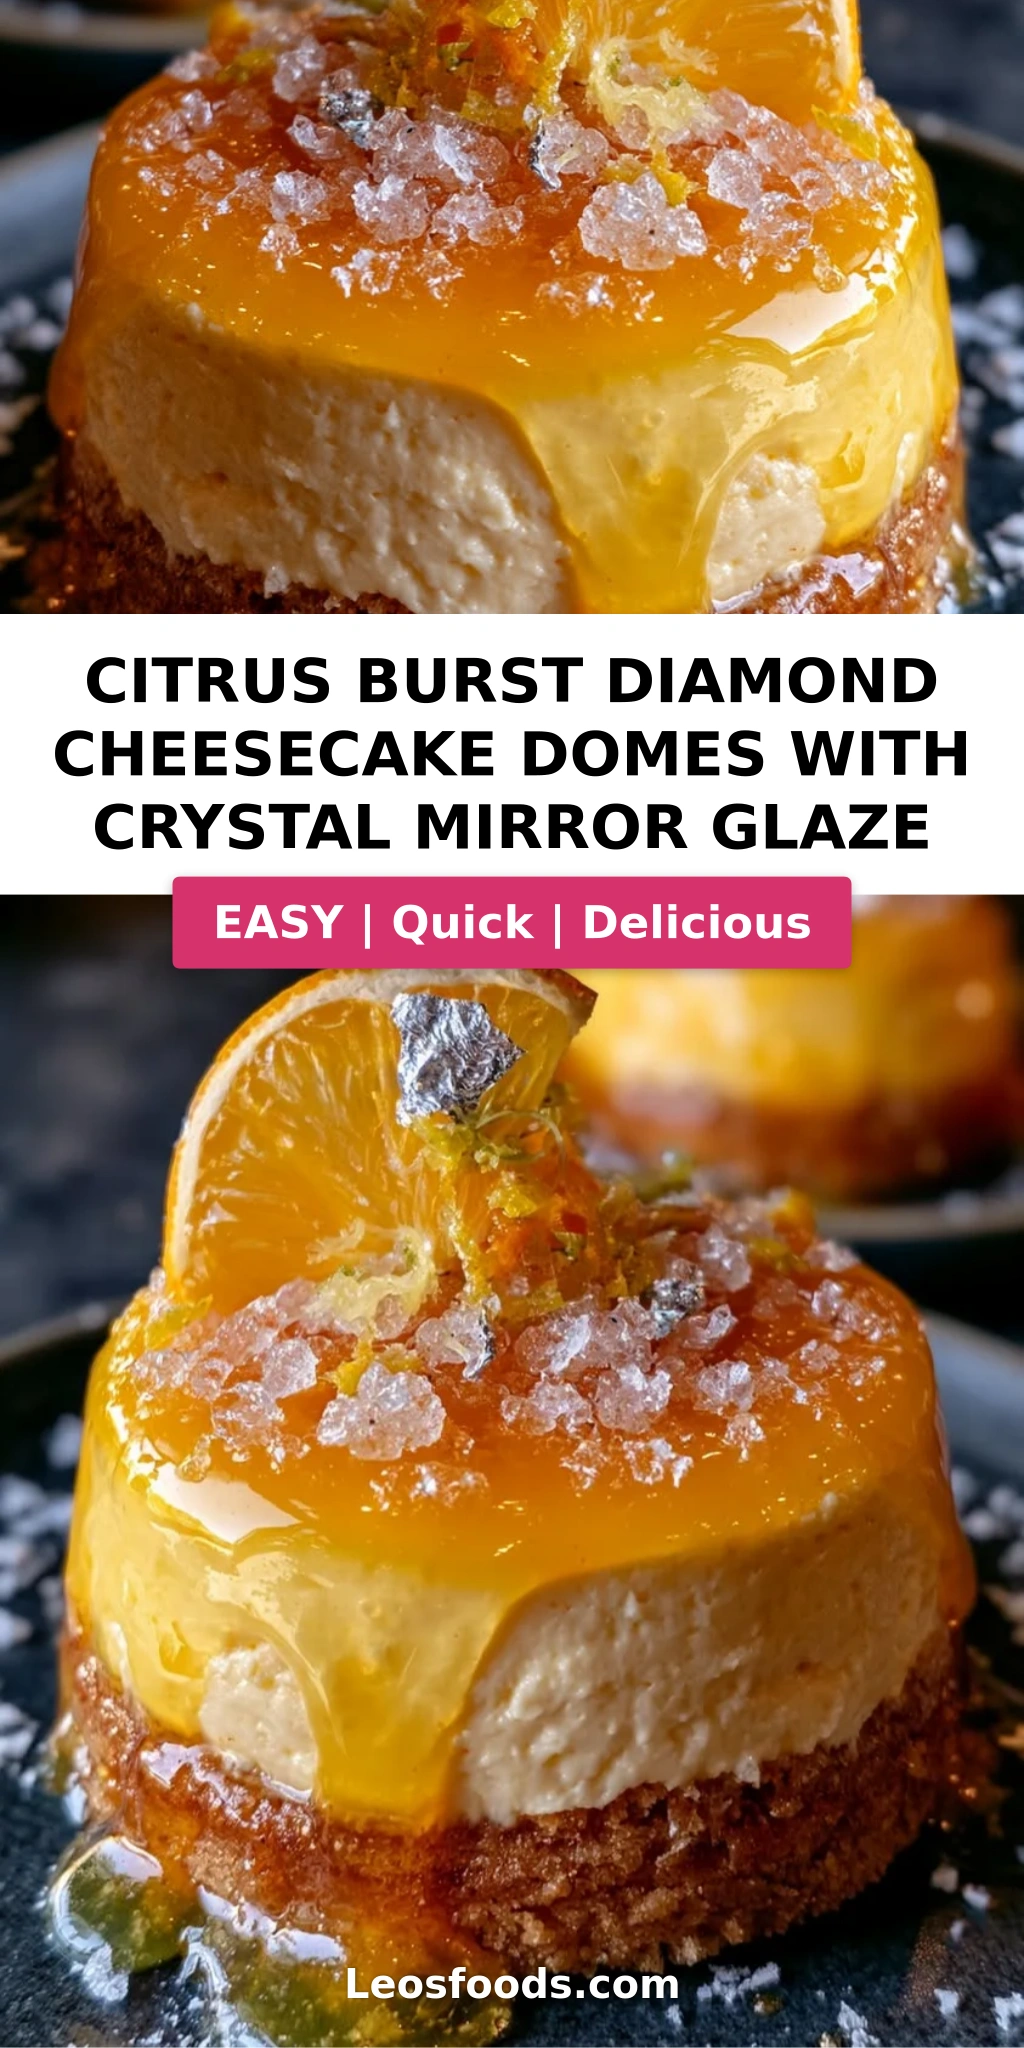
In my mother’s kitchen in Marrakech, citrus was never just an ingredient — it was the soul of our home. The scent of orange blossom water drifted through the courtyard, and every Friday she’d press fresh lemons into her famous honey pastries. That memory came flooding back the first time I tested these citrus burst diamond cheesecake domes with crystal mirror glaze in my New York City kitchen. I wanted to capture the sun-drenched warmth of those Moroccan mornings and merge it with the refined French pastry techniques I learned in Paris. The result? A jewel-like dessert that’s as beautiful to behold as it is delicious to eat. The diamond silhouette gives it a glamorous, architectural feel, while the glossy crystal mirror glaze makes every dome shimmer like cut glass.
The first spoonful is pure poetry. The crystal mirror glaze cracks ever so gently beneath your fork, revealing a cloud-soft cheesecake filling that bursts with bright, fresh orange and lemon. The vanilla biscuit base provides a buttery, crisp anchor, while the creaminess of the filling melts on your tongue like silk. Visually, these diamond shaped cheesecake domes look like gemstones on a plate — each one glistening, each surface reflecting the light with that signature mirror finish. The aroma is just as intoxicating: sweet cream, warm vanilla bean, and the unmistakable zing of freshly grated citrus zest. It’s a dessert that turns an ordinary weeknight into a celebration.
I’ve spent years obsessing over the perfect mirror glaze cheesecake dome — from my pastry school days in Paris, where my chef de cuisine demanded flawless temperature control, to my own kitchen here in New York, where I’ve streamlined every step for home cooks. This recipe is the version I serve at my own dinner parties, and the one my readers make again and again. The secret? It all comes down to temperature: your glaze should sit at 90°F (32°C) and your cheesecake domes must be completely frozen. In this post, I’ll walk you through each stage, share my Stella’s Pro Tip for achieving that glass-like shine, and point out the most common mistake I see — pouring the glaze when it’s too thick or too warm.
Why This Citrus Burst Diamond Cheesecake Domes Recipe Is the Best
The Flavor Secret: The “burst” in these citrus cheesecake domes comes from a double dose of citrus energy: freshly squeezed orange and lemon juice in the filling, plus both zests. Most cheesecake recipes lean on extracts, which taste flat next to the real thing. My version also pairs the citrus with vanilla bean paste, whose tiny seeds add a warm, floral depth that rounds out the acidity. It’s a trick I borrowed from my mother’s Moroccan cooking — always balance brightness with something earthy and sweet.
Perfected Texture: In pastry school, I learned that the best mousse-style cheesecakes have a precise balance: equal parts cream cheese and softly whipped cream. Folding the whipped cream gently — rather than beating it in — keeps the filling light, airy, and cloud-like. The gelatin stabilizes the structure, so the dome holds its shape long enough for the glaze to set perfectly. The vanilla biscuit base adds just enough crunch to contrast with that silky filling, creating a textural experience that’s undeniably elegant.
Foolproof & Fast: While this dessert looks like it belongs in a high-end patisserie, the process is surprisingly beginner-friendly. The silicone diamond molds do the heavy lifting — you simply press in the crust, pour in the filling, and let the freezer work its magic. The mirror glaze comes together in about 15 minutes, and as long as you follow the temperature guidelines, it will perform beautifully every time. I’ve tested this recipe with home bakers of every skill level, and the results are consistently spectacular.
Citrus Burst Diamond Cheesecake Domes Ingredients
When citrus is the star, quality matters. I pick up my oranges and lemons at the Union Square Greenmarket, where the fruit is fragrant and deeply flavorful — a world away from the waxed, tasteless supermarket versions. For the white chocolate, I reach for a high-quality brand like Callebaut or Ghirardelli, because the chocolate is the backbone of the crystal mirror glaze. And when I want to feel close to home, I’ll add a splash of orange flower water, just like my mother used to do.
Ingredients List
- For the Citrus Cheesecake Filling:
- 16 oz (450 g) cream cheese, softened
- 1/2 cup powdered sugar
- 1 tsp vanilla bean paste
- 2 tbsp fresh orange juice
- 1 tbsp fresh lemon juice
- 1 tsp orange zest
- 1 tsp lemon zest
- 1 cup heavy cream, whipped to soft peaks
- 2 tsp unflavored gelatin
- 2 tbsp cold water
- For the Vanilla Biscuit Base:
- 1 1/2 cups vanilla biscuit crumbs
- 5 tbsp unsalted butter, melted
- 1 tbsp granulated sugar
- Pinch of sea salt
- For the Crystal Mirror Glaze:
- 1/2 cup sweetened condensed milk
- 1/4 cup water
- 2 tsp unflavored gelatin
- 2 tbsp cold water
- 7 oz (200 g) white chocolate, finely chopped
- 1 tsp light corn syrup
- Clear mirror glaze gel
- 1/2 tsp edible pearl luster dust
- For Garnish (optional):
- Candied orange peel
- Finely grated lemon zest
- Edible silver leaf
Ingredient Spotlight
Cream Cheese: The heart of this citrus cheesecake recipe. Use full-fat block cream cheese — not the spreadable kind in a tub, which contains too much water and will make your filling loose. Bring it to room temperature before beating, so it blends into a perfectly smooth, silky base. Philadelphia is my go-to, but any full-fat block cream cheese works.
Fresh Citrus: Freshly squeezed juice and freshly grated zest are non-negotiable here. The natural oils in the zest carry the true citrus essence, and fresh juice makes the filling taste vibrant rather than sour. When you’re picking oranges, go for heavy ones — they’re juicier. And use a microplane for the zest, avoiding the white pith, which can turn the filling bitter.
White Chocolate: Use a good-quality white chocolate with at least 28–30% cocoa butter. This matters more than you think — cheap white chocolate is waxy and doesn’t flow well. Callebaut, Valrhona Ivoire, or Ghirardelli are excellent choices available at most US grocery stores. The white chocolate is what gives the mirror glaze its glossy, glass-like finish, so don’t skimp here.
Unflavored Gelatin: Gelatin is the structural secret behind these mirror glaze cheesecake domes. It’s what allows the filling to set firmly enough to unmold cleanly while still staying silky. You’ll find Knox gelatin in most supermarkets — the pink box in the baking aisle. Always “bloom” it in cold water, then dissolve it into warm liquid; this step prevents lumps and ensures even setting.
| Original Ingredient | Best Substitution | Flavor / Texture Impact |
|---|---|---|
| Cream cheese | Full-fat mascarpone | Richer and slightly looser filling; reduce sugar by 1 tbsp |
| Fresh orange/lemon juice | Good-quality bottled juice in a pinch | Slightly less bright; add an extra pinch of zest to compensate |
| White chocolate | Dairy-free white chocolate (e.g., King David) | Works well; add 1 tsp coconut oil for smoother flow |
| Unflavored gelatin | Agar-agar (1/2 tsp filling, 3/4 tsp glaze) | More brittle set; not recommended for the glaze if you want a flawless mirror finish |
How to Make Citrus Burst Diamond Cheesecake Domes — Step-by-Step
Making these crystal mirror glaze cheesecake domes is easier than it looks — as long as you follow the steps in order and give yourself plenty of freezer time. Let’s get started!
Step 1: Prepare the Vanilla Biscuit Base
Combine 1 1/2 cups vanilla biscuit crumbs, 5 tablespoons melted unsalted butter, 1 tablespoon granulated sugar, and a pinch of sea salt in a small bowl. Stir with a fork until every crumb is evenly moistened. Press the mixture firmly into the bottoms of the diamond-shaped silicone molds, creating a thin, even layer. I use the back of a small measuring spoon or a flat-bottomed glass to compact it. Chill the molds for 15 minutes while you prepare the filling. The crust should feel like wet sand — if it’s too dry, add half a tablespoon more melted butter.
💡 Stella’s Pro Tip: Press the crust in as thin as possible — about 1/8 inch. A thick crust will overpower the delicate cheesecake filling and make the domes harder to unmold.
Step 2: Bloom the Gelatin and Prepare the Citrus
In a small bowl, sprinkle 2 teaspoons of unflavored gelatin over 2 tablespoons of cold water. Let it stand for 5 minutes — this is called “blooming.” Meanwhile, warm 2 tablespoons of fresh orange juice in a small saucepan over low heat until steaming. Remove from the heat and stir in the bloomed gelatin until fully dissolved. The mixture should be completely clear, with no grains remaining. Set it aside to cool slightly while you make the filling.
⚠️ Common Mistake: Don’t skip the bloom! Adding dry gelatin straight into the filling will result in lumps. And never boil the orange juice — high heat destroys gelatin’s setting power.
Step 3: Make the Citrus Cheesecake Filling
In a large bowl, beat 16 oz of softened cream cheese, 1/2 cup powdered sugar, 1 teaspoon vanilla bean paste, the orange juice-gelatin mixture, 1 tablespoon fresh lemon juice, 1 teaspoon orange zest, and 1 teaspoon lemon zest together with an electric mixer on medium speed until smooth and lump-free. Stop and scrape down the bowl. Now, take your 1 cup of heavy cream that’s been whipped to soft, trailing peaks and fold it into the cream cheese mixture in two additions. Use a rubber spatula, cutting through the center and around the edges, until no white streaks remain. The filling should be mousse-like: light, airy, and glossy.
💡 Stella’s Pro Tip: Make sure the cream cheese is truly at room temperature before you begin. Cold cream cheese creates a lumpy filling that never smooths out. Give it 45–60 minutes on the counter.
Step 4: Fill and Freeze the Diamond Molds
Spoon or pipe the cheesecake filling into the chilled diamond molds, filling each cavity right to the top. Tap the molds gently on the counter a few times to release any trapped air bubbles. Smooth the tops with an offset spatula, scraping off any excess. Place the filled molds on a flat baking sheet and freeze for at least 6 hours, or overnight. The filling must be completely solid before you attempt to unmold and glaze — this step is non-negotiable for a perfect mirror finish.
⚠️ Common Mistake: Filling the molds too full! Leave a tiny 1/8-inch gap at the top to accommodate the crust. And don’t rush the freeze — a partially frozen dome will crack and sag when you pour the glaze over it.
Step 5: Make the Crystal Mirror Glaze
Bloom 2 teaspoons of gelatin in 2 tablespoons cold water for 5 minutes. In a small saucepan, heat 1/2 cup sweetened condensed milk and 1/4 cup water until steaming. Stir in the bloomed gelatin until completely dissolved. Pour the hot mixture over 7 oz of finely chopped white chocolate and let it stand for 1 minute. Slowly stir until smooth, then mix in 1 teaspoon light corn syrup, 1–2 tablespoons clear mirror glaze gel, and 1/2 teaspoon edible pearl luster dust. For the most flawless result, use an immersion blender to remove any tiny bubbles, then strain through a fine-mesh sieve. Cool to 90°F (32°C).
💡 Stella’s Pro Tip: An immersion blender is your best friend for mirror glaze. Hold it at the bottom of the bowl to avoid incorporating air, and blend for just 10–15 seconds. This gives you that glass-like, bubble-free shine every time.
Step 6: Glaze the Frozen Domes
Remove the frozen cheesecake domes from the molds by gently flexing the silicone. Place them on a wire rack set over a baking tray to catch the excess glaze. Give your cooled glaze one more gentle stir, then pour it in a steady, continuous stream over each dome, starting at the top and letting it flow down over the sides. The key is to cover the entire dome in one confident motion. Let the excess drip off for a minute or two. If you notice any bare spots, pour a tiny bit of glaze directly over the spot.
⚠️ Common Mistake: Pouring too slowly! A hesitant pour creates uneven streaks on the surface. Be bold and pour generously over the top — the extra glaze will be caught by the tray, and the dome will be perfectly coated.
Step 7: Transfer, Set, and Garnish
Use a small offset spatula or your fingers to carefully lift each glazed dome off the wire rack. Transfer to serving plates or a parchment-lined tray. Refrigerate the glazed domes for 20–30 minutes to let the glaze set — this gives it that brilliant, jewel-like shine. Just before serving, garnish with candied orange peel, a delicate dusting of finely grated lemon zest, and tiny shards of edible silver leaf. I like to serve these on a white or mirrored plate to let the diamonds truly sparkle.
💡 Stella’s Pro Tip: Use long tweezers or a clean paintbrush to place the edible silver leaf — it’s incredibly delicate and will tear at the touch. And always add the silver leaf after the glaze has fully set, so it stays crisp and shiny.
| Step | Action | Duration | Key Visual Cue |
|---|---|---|---|
| 1 | Press biscuit crust into molds | 10 mins + 15 min chill | Crust feels like wet sand |
| 2 | Bloom gelatin, warm citrus | 5–7 mins | Gelatin is clear, no lumps |
| 3 | Beat filling, fold cream | 10 mins | Filling is light and mousse-like |
| 4 | Fill molds, freeze | 6 hrs minimum | Domes are rock solid |
| 5 | Cook and cool the glaze | 15 mins | Glaze coats spoon at 90°F |
| 6 | Pour glaze over domes | 5 mins | Domes fully coated, shiny |
| 7 | Set and garnish | 20–30 mins | Glaze is set and glossy |
Serving & Presentation
These citrus burst diamond cheesecake domes are an event in themselves. I like to plate them on chilled white porcelain plates with a small swoosh of berry coulis or a spoonful of lightly sweetened crème fraîche. If I’m feeling particularly festive — say, for a New Year’s Eve dinner or a bridal shower — I’ll dust the plate with a pinch of crushed freeze-dried raspberries for a pop of color against the white glaze.
Growing up, my mother always served her citrus desserts with a pot of hot mint tea at the table, and I’ve kept that tradition: these domes pair beautifully with Moroccan mint tea or a crisp glass of Champagne. In the summer, I’ve served them after a backyard barbecue with a bowl of fresh berries on the side, and they were the talk of the party.
| Pairing Type | Suggestions | Why It Works |
|---|---|---|
| Side Dish | Fresh berry salad, almond biscotti, buttery shortbread | Bright berries echo the citrus notes; crisp cookies add texture contrast |
| Sauce / Dip | Warm raspberry coulis, dark chocolate ganache, honey-yogurt sauce | Tartness of raspberries or richness of chocolate balances the sweet creaminess of the cheesecake |
| Beverage | Champagne, Moroccan mint tea, orange blossom latte | Bubbles and floral notes elevate the citrus; mint tea nods to Stella’s Moroccan roots |
| Garnish | Candied orange peel, edible flowers (violas or rose petals), gold leaf | Adds a polished, high-end finish and makes the dessert feel truly celebratory |
Make-Ahead, Storage & Reheating
I’m a big fan of make-ahead desserts, especially during the busy New York holiday season when my schedule is a whirlwind of markets and dinner parties. The great news is that these crystal mirror glaze cheesecake domes were designed for advance prep. You can make and freeze the unglazed domes weeks ahead, then simply whip up the glaze an hour before serving. The glazed domes also keep beautifully in the fridge for a few days — if they last that long.
| Method | Container | Duration | Reheating Tip |
|---|---|---|---|
| Refrigerator | Airtight container, single layer | Up to 3 days | Serve directly from the fridge — do not reheat |
| Freezer (unglazed) | Plastic wrap + airtight container | Up to 2 months | Thaw overnight in the refrigerator before glazing |
| Freezer (glazed) | Not recommended — condensation dulls the glaze | Up to 1 day if absolutely necessary | Refresh with a light dusting of luster dust |
| Make-Ahead | Unmolded frozen domes, unglazed | Up to 2 weeks before glazing | Remove from freezer, let sit 1–2 minutes, then glaze immediately |
One thing I will say: don’t ever reheat these domes in the microwave. They’re meant to be enjoyed cold, like a luxurious icebox cake. The glaze stays glossy at refrigerator temperature, and the cheesecake filling becomes beautifully firm yet silky. If you’re serving a crowd, remove the domes from the fridge about 10 minutes before serving — just enough time to take the chill off without losing the glaze’s crisp sheen.
Variations & Easy Swaps
This recipe is wonderfully versatile. Whether you’re accommodating dietary needs or simply craving a new flavor adventure, here are some of my favorite twists.
| Variation | Key Change | Best For | Difficulty Impact |
|---|---|---|---|
| Blood Orange & Orange Blossom | Substitute blood orange juice, add 1 tsp orange blossom water | A floral, Moroccan-inspired twist | Easy |
| Gluten-Free & Dairy-Free | Use gluten-free biscuit crumbs, dairy-free cream cheese, dairy-free white chocolate | Guests with dietary restrictions | Moderate |
| Passion Fruit & Coconut | Replace lemon juice with passion fruit pulp, add 1/4 cup toasted coconut to crust | A tropical summer favorite | Easy |
Variation 1: Blood Orange & Orange Blossom
This is my love letter to Morocco. Replace the regular orange juice with blood orange juice, and whisk a teaspoon of orange blossom water into the cream cheese filling. You’ll get that jewel-toned citrus flavor with a soft floral perfume that reminds me of my mother’s courtyard in Marrakech. For the glaze, add a tiny drop of pink food coloring to give the mirror a blush crystal color, and garnish with dried rose petals for extra romance.
Variation 2: Gluten-Free & Dairy-Free
This recipe adapts beautifully for dietary restrictions. Swap the vanilla biscuit crumbs for gluten-free vanilla cookies or gluten-free graham crackers, and use a dairy-free cream cheese (I like Miyoko’s or Violife) plus full-fat coconut cream in place of the heavy cream. For the glaze, choose a dairy-free white chocolate like King David or Pascha, and add one teaspoon of coconut oil to help it flow. The texture will be slightly softer than the classic version, so freeze the domes for a full 8 hours before glazing.
Variation 3: Passion Fruit & Coconut
When I’m missing the tropics during a grey New York winter, I make this version. Swap the lemon juice for 3 tablespoons of fresh passion fruit pulp, fold 1/2 cup of toasted coconut into the biscuit base, and garnish with a curl of dehydrated citrus. The passion fruit adds a gorgeous tropical tang that plays beautifully against the creamy white chocolate glaze. I’ve also drizzled a little warm passion fruit coulis over the plate before serving — it’s dazzling.
Frequently Asked Questions
What is the best way to get a perfectly smooth crystal mirror glaze for the cheesecake domes?
The best way to get a perfectly smooth crystal mirror glaze is to pass it through a fine-mesh sieve right before pouring, and to use an immersion blender to eliminate any air bubbles. Your glaze should be at 90°F (32°C) and your cheesecake dome must be completely frozen. Pour the glaze in a steady, continuous stream over the dome, making sure it covers the entire surface in one motion.
Can I use a different citrus fruit, like lime or grapefruit, instead of orange or lemon in the cheesecake filling?
Absolutely! Lime and grapefruit both work beautifully in this citrus cheesecake recipe. If using lime, substitute an equal amount of lime juice and add 1 teaspoon of lime zest. Grapefruit is a little more delicate and bitter — use 3 tablespoons of grapefruit juice and just 1 teaspoon of zest, and consider adding 1 extra tablespoon of powdered sugar to balance the bitterness. Keep the same gelatin proportion and the results will be just as glossy and delicious.
How far in advance can I make and freeze the cheesecake domes before adding the mirror glaze?
You can make and freeze the cheesecake domes up to 2 weeks before adding the mirror glaze. Once the filled molds are completely frozen for at least 6 hours, remove them from the molds and wrap each dome tightly in plastic wrap, then store them in an airtight container in the freezer. When you’re ready to glaze, unwrap the domes, place them on a wire rack, and pour the glaze directly over the frozen domes — they need to be frozen solid to achieve that flawless mirror finish.
What is the ideal temperature to heat the glaze to, and how do I know when it’s ready to pour over the domes?
The ideal temperature is 90°F (32°C) for this crystal mirror glaze cheesecake recipe. If you don’t have a thermometer, test the glaze on the back of a chilled spoon — it should coat the spoon in a thin, even layer and run off slowly. If the glaze is above 95°F, it will be too thin and melt the cheesecake; below 85°F, it will be too thick and won’t self-level. Keep the glaze warm by setting the bowl over a pot of warm water while you work.
Do I need a diamond-shaped mold, or can I use regular dome molds?
You don’t need a diamond-shaped mold — this recipe works beautifully with any silicone dome mold or even muffin tins lined with plastic wrap. However, the diamond shape is what gives these domes their signature “crystal” look, so if you want the full effect, look for diamond-shaped silicone molds online or at specialty baking stores. They’re usually sold in sets of 6 or 8 and are surprisingly affordable. The geometric shape reflects light beautifully once the mirror glaze is poured over it.
Why is my mirror glaze not glossy, or why does it have air bubbles?
Air bubbles are the most common enemy of a perfectly smooth mirror glaze on cheesecake domes. To prevent them, use an immersion blender to gently blend the glaze after adding the white chocolate, pushing the blender to the bottom to avoid incorporating air. Then, pour the glaze through a fine-mesh strainer before cooling. If bubbles still form on top of your poured glaze, burst them with a toothpick immediately, or give the tray a few gentle taps to release them.
Can I use store-bought mirror glaze instead of making it from scratch?
Yes, you can use a store-bought mirror glaze gel in a pinch — look for clear glaze gels in the baking aisle, and stir in 1/2 teaspoon of edible pearl luster dust for that crystal shine. That said, making the glaze from scratch in this citrus burst diamond cheesecake domes recipe gives you far better flavor and control over the consistency. The homemade version uses white chocolate, condensed milk, and gelatin, which create a richer, more stable glaze that clings beautifully to the frozen domes.
How do I remove the cheesecake domes from the mold without breaking them?
Use a gentle, patient approach: after the 6 hours of freezing, run the diamond molds under warm water for just 3–4 seconds — not longer, or the edges will begin to melt. Gently flex the silicone mold and apply light pressure to the base of each dome to pop it out. If it resists, return it to the freezer for 10 minutes and try again. Always handle the domes by their base, not your fingertips, so you don’t leave fingerprints in the finished surface.
Share Your Version!
I’d love to see how your citrus burst diamond cheesecake domes turn out! If you try this recipe, leave a star rating and a comment below — your feedback not only helps me grow this blog, it helps other home bakers find the confidence to try something spectacular. Snap a photo and tag @leosfoods on Instagram or Pinterest, and let me know: what’s the boldest dessert you’ve ever made for a special occasion? 🧡
From my NYC kitchen to yours — I hope this recipe brings as much warmth to your table as it does to mine. — Stella 🧡
Love This Recipe? Save It to Pinterest!
If you enjoyed this Citrus Burst Diamond Cheesecake Domes recipe, don’t let it get lost in your browser tabs! 😄 Pin it now so you can find it again anytime — and explore hundreds more tried-and-tested recipes waiting for you on my Pinterest boards.
👉 Follow Stella on Pinterest @stellarecipeblog
📌 Pin this recipe · 🔁 Re-pin your favorites · 💬 Tag me when you make it — I love seeing your creations!
⭐ Loved this recipe? Pin it to your dessert board, share it with a friend who loves baking, and join the leosfoods family for more dazzling creations every week! 📌✨
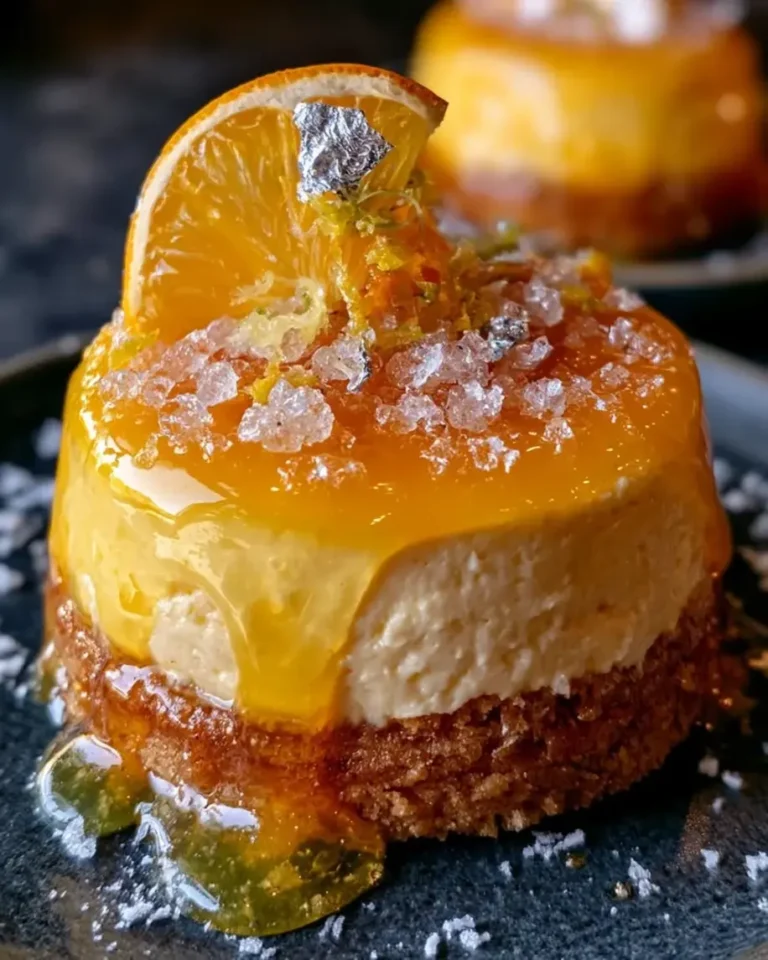
Citrus Burst Diamond Cheesecake Domes with Crystal Mirror Glaze
A stunning dessert featuring creamy citrus cheesecake domes with a vanilla biscuit base, coated in a glossy crystal mirror glaze.
- Yield: 8 1x
Ingredients
- For the Citrus Cheesecake Filling:
- 16 oz (450 g) cream cheese, softened
- 1/2 cup powdered sugar
- 1 tsp vanilla bean paste
- 2 tbsp fresh orange juice
- 1 tbsp fresh lemon juice
- 1 tsp orange zest
- 1 tsp lemon zest
- 1 cup heavy cream, whipped to soft peaks
- 2 tsp unflavored gelatin
- 2 tbsp cold water
- For the Vanilla Biscuit Base:
- 1 1/2 cups vanilla biscuit crumbs
- 5 tbsp unsalted butter, melted
- 1 tbsp granulated sugar
- Pinch of sea salt
- For the Crystal Mirror Glaze:
- 1/2 cup sweetened condensed milk
- 1/4 cup water
- 2 tsp unflavored gelatin
- 2 tbsp cold water
- 7 oz (200 g) white chocolate, finely chopped
- 1 tsp light corn syrup
- Clear mirror glaze gel
- 1/2 tsp edible pearl luster dust
- For Garnish (optional):
- Candied orange peel
- Finely grated lemon zest
- Edible silver leaf
Instructions
- Combine the vanilla biscuit crumbs, melted butter, sugar, and sea salt until evenly moistened.
- Press the crumb mixture into the bottoms of diamond-shaped silicone molds to create a thin base. Chill for 15 minutes.
- Bloom the gelatin for the filling in the cold water for 5 minutes.
- Warm the orange juice and dissolve the bloomed gelatin into it.
- Beat the cream cheese, powdered sugar, vanilla bean paste, orange juice mixture, lemon juice, orange zest, and lemon zest until smooth.
- Gently fold the whipped cream into the cheesecake mixture until light and airy.
- Fill the diamond molds, smooth the tops, and freeze for at least 6 hours or until completely firm.
- Bloom the gelatin for the glaze in the cold water for 5 minutes.
- Heat the condensed milk and water until steaming. Stir in the gelatin until dissolved.
- Pour the hot mixture over the white chocolate and let stand for 1 minute. Stir until smooth, then mix in the corn syrup, clear mirror glaze gel, and edible pearl luster dust. Cool the glaze to about 90°F (32°C).
- Remove the frozen cheesecake domes from the molds and place them on a wire rack over a baking tray.
- Pour the crystal mirror glaze evenly over each dome until fully coated.
- Transfer to serving plates and refrigerate for 20–30 minutes before serving.
- Garnish with candied orange peel, finely grated lemon zest, and edible silver leaf.
Nutrition
- Calories: 400
- Sugar: 24 g
- Fat: 29 g
- Carbohydrates: 31 g
- Protein: 6 g
Tried This Recipe? Leave a Comment!
Did you make this recipe? I’d love to hear how it turned out! Please leave a comment and a rating below. Your feedback helps other home cooks and supports cheerychop.com!
For more delicious inspiration, follow me on Pinterest!