Crème Brûlée
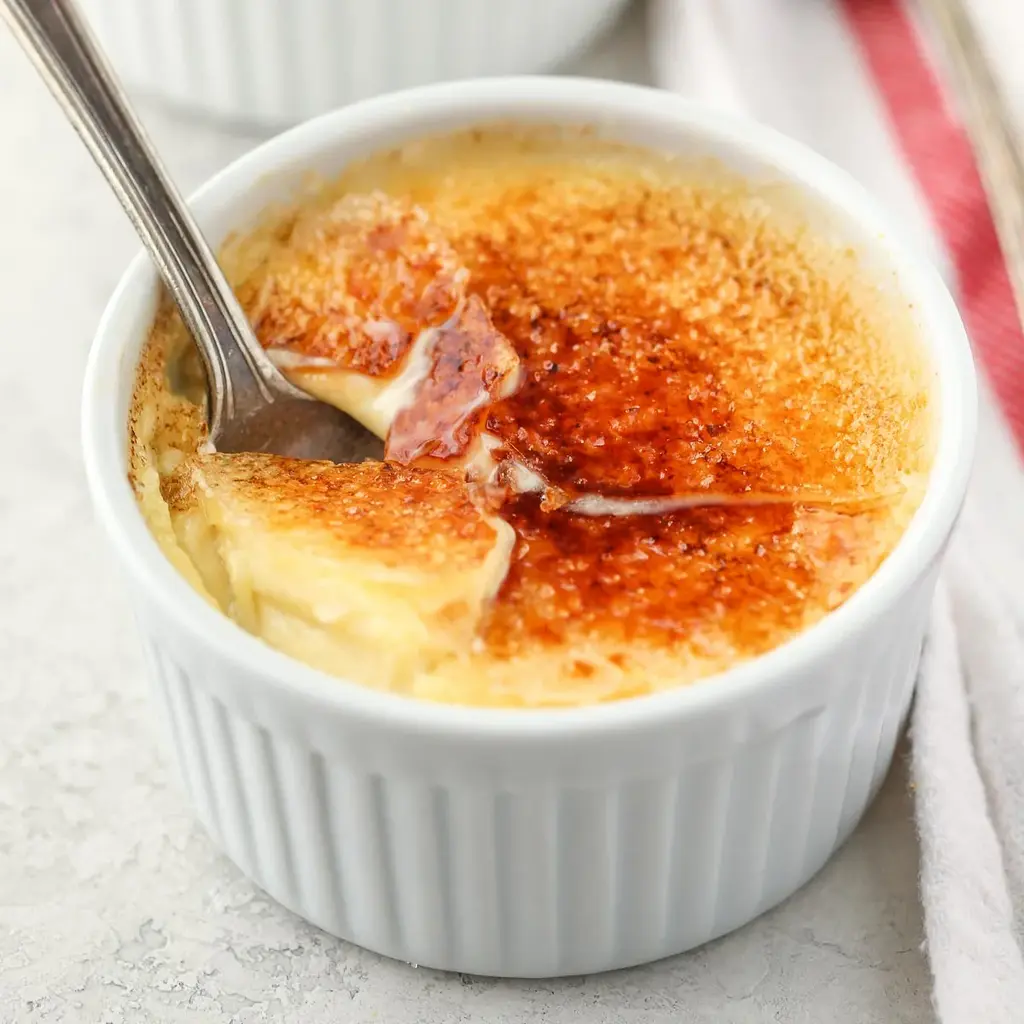
Table of Contents
Crème Brûlée – Easy 4-Ingredient Recipe – Perfectly Silky Custard with Crispy Caramel
This easy Crème Brûlée recipe takes me straight back to my Parisian culinary school days, where mastering a silky custard was the first true test of a pastry chef. Made with just four simple ingredients — egg yolks, sugar, cream, and vanilla — this classic French dessert is deceptively simple but demands patience. The magic happens when you crack through that perfectly caramelized sugar shell to reach the cool, velvety custard beneath. I still remember my mother’s kitchen in Morocco, where she taught me that the best desserts balance rich creaminess with a touch of sweetness — exactly what this crème brûlée delivers.
Imagine a dessert that shatters with the first gentle tap of your spoon — a brittle layer of amber caramel that gives way to a cool, satin-smooth custard that tastes like pure vanilla cream. This Crème Brûlée is all about contrast: the satisfying crack of the caramel against the silent, luscious custard underneath. The aroma of vanilla infused cream fills your kitchen as it bakes, and the finishing touch — torching the sugar — creates that unmistakable, slightly smoky scent that makes this dessert so iconic.
I’ve tested this recipe countless times to ensure it’s foolproof for home cooks. The secret lies in gently tempering the eggs with warm cream and baking in a water bath to guarantee a silky texture. I’ll guide you through each step, share my personal pro tip for a perfect custard that isn’t overcooked, and reveal a common mistake that can turn your creamy dream into scrambled eggs. With my Parisian technique and North African patience, this crème brûlée is the one you’ll make again and again.
Why This Crème Brûlée Recipe Is the Best
The Flavor Secret: This crème brûlée relies on just a few ingredients, so each one must shine. I use pure vanilla extract — never imitation — to give the custard a deep, floral sweetness that complements the rich cream. My training in Paris taught me that patience with heat is the real magic: whisk the egg yolks and sugar until they just lighten, never skip straining, and your custard will be luxuriously smooth, not eggy.
Perfected Texture: The water bath technique is non-negotiable for a perfect, even bake. Pouring boiling water around the ramekins insulates the custard, preventing the edges from setting too quickly while the center catches up. I’ve fine-tuned the baking time to exactly 35 to 45 minutes — the edges will be set but the center should still have a gentle jiggle. This is the sweet spot where creamy meets firm.
Foolproof & Fast: Despite its fancy reputation, this crème brûlée is incredibly beginner-friendly. With only four main ingredients and a few simple techniques, you can create a show-stopping dessert. I’ll show you how to avoid curdling the eggs and how to get that perfect caramel crust without a torch on hand. Whether you’re a novice or a seasoned baker, this recipe delivers restaurant-quality results in your own kitchen.
Crème Brûlée Ingredients
I pick up my heavy cream from the Union Square Greenmarket in NYC — the freshness makes all the difference. Using farm-fresh eggs from local vendors ensures the yolks are rich and golden, which gives the custard its natural color and luxurious texture. This is a dessert rooted in simplicity, but the quality of each ingredient matters deeply.
Ingredients List
- 6 large egg yolks
- 1/3 cup (70 grams) granulated sugar
- 2 cups (480 ml) heavy whipping cream
- 1 and 1/2 teaspoons pure vanilla extract
- 2 tablespoons (25 grams) granulated sugar (for the topping)
Ingredient Spotlight
Egg yolks are the heart of this crème brûlée — they provide the structure and richness. Look for large, bright orange yolks from pasture-raised chickens for the best flavor and color. A fresh egg yolk stands tall and doesn’t break easily; this ensures your custard emulsifies properly.
Heavy whipping cream (at least 36% milk fat) is essential for that velvety mouthfeel. I never substitute half-and-half or milk — the fat content is crucial for a silky texture. If you want a lighter version, you can try a blend of cream and whole milk, but the custard will be less rich.
Pure vanilla extract is mandatory here. I prefer Madagascar vanilla for its bold, creamy flavor, but you can also use a vanilla bean — just split and scrape the seeds into the cream as it heats. Imitation vanilla will leave a chemical aftertaste that mars this simple dessert.
| Original Ingredient | Best Substitution | Flavor / Texture Impact |
|---|---|---|
| Heavy whipping cream | Coconut cream (full fat) | Dairy-free, adds subtle coconut flavor; texture is slightly less rich |
| Pure vanilla extract | 1 vanilla bean (split and scraped) | More intense vanilla aroma with visible seeds; richer flavor |
| Granulated sugar | Coconut sugar (for topping) | Darker caramel with a hint of molasses flavor; works well for dairy-free version |
| Large egg yolks | 5 extra-large egg yolks | Slightly richer custard; minimize whisking to avoid air bubbles |
How to Make Crème Brûlée — Step-by-Step
Trust me, you can do this. I’ve broken down every step with the visual cues I learned at Le Cordon Bleu, plus my own pro tips from years of teaching home cooks.
Step 1: Prepare Oven and Water Bath
Preheat your oven to 325°F (163°C). Place a large pot of water on the stove to boil. You’ll need this hot water for the bain-marie later. Meanwhile, arrange four 6-ounce ramekins in an 8-inch square baking dish (or any larger pan that fits them comfortably).
💡 Stella’s Pro Tip: Use a deep baking dish so you can add enough water to come halfway up the sides of the ramekins. A shallow dish won’t insulate properly.
Step 2: Whisk Egg Yolks and Sugar
In a large mixing bowl, whisk together the 6 egg yolks and 1/3 cup sugar until well blended and it just starts to lighten in color — about 30 seconds of vigorous whisking. Do not over-whisk; you don’t want to incorporate too much air, which can create bubbles in the final custard.
⚠️ Common Mistake to Avoid: Whisking until the mixture becomes pale and thick creates foam that will leave an unappealing bubbly top on your custard. Stop as soon as the color changes slightly.
Step 3: Heat Cream with Vanilla
Pour the 2 cups of heavy whipping cream into a medium-sized saucepan and heat over medium heat. Stir occasionally until the cream is warm and bubbling around the edges — this takes about 4 to 5 minutes. Do not let it boil. Remove from heat and stir in the 1 and 1/2 teaspoons of pure vanilla extract.
💡 Stella’s Pro Tip: Heating the cream just to the point where tiny bubbles appear around the rim ensures the custard bakes evenly. If the cream is too hot, it’ll scramble the eggs.
Step 4: Temper the Egg Mixture
Slowly pour about 1/2 cup of the warm cream into the egg and sugar mixture, whisking constantly as you pour. This step — tempering — gradually raises the temperature of the eggs so they don’t curdle. Then, slowly pour in the remaining cream while whisking continuously until fully combined. If you see a thin layer of foam on top, skim it off with a spoon.
⚠️ Common Mistake to Avoid: Pouring the hot cream in all at once will cook the eggs instantly, giving you a lumpy custard. Always add the first 1/2 cup slowly while whisking rapidly.
Step 5: Strain and Fill Ramekins
Strain the mixture through a fine-mesh strainer into a clean bowl or large liquid measuring cup. This removes any cooked egg bits or sugar granules, guaranteeing a silky texture. Divide the custard evenly among your four ramekins, filling them nearly to the top.
💡 Stella’s Pro Tip: Straining isn’t optional — it’s the difference between a professional custard and a home-style one. Don’t skip it even if the mixture looks smooth.
Step 6: Create the Bain-Marie
Pour the boiling water from your pot into the baking pan, filling it about 1/3 of the way full. Carefully place the filled ramekins into the water bath. The water should reach halfway up the sides of the ramekins — add a little more boiling water if needed.
⚠️ Common Mistake to Avoid: Pouring water directly onto the ramekins can splash into the custard. Use a measuring cup to gently add water to the pan, not over the ramekins.
Step 7: Bake Until Set
Carefully place the baking dish in the oven. Bake at 325°F (163°C) for 35 to 45 minutes. The edges should be set, and the center should jiggle slightly when gently shaken — like a wobbly Jell-O. Remove pan from the oven and use tongs or pot holders to lift ramekins out. Cool completely on a wire rack, then cover tightly and refrigerate for at least 4 hours, or overnight.
💡 Stella’s Pro Tip: The custard continues to set as it cools. Don’t overbake — if the center is completely firm when you take it out, it will be rubbery after chilling. Look for that gentle jiggle.
Step 8: Caramelize the Topping
Just before serving, blot the tops of each custard with a paper towel to remove any condensation. Sprinkle 1 and 1/2 teaspoons of sugar evenly over each surface. Shake the ramekin gently to create an even layer. Using a small kitchen torch, caramelize the sugar by moving the flame in a circular pattern until it turns deep amber. Let the sugar harden for 1 to 2 minutes before serving.
⚠️ Common Mistake to Avoid: Holding the torch too close or in one spot will burn the sugar. Keep the flame moving and stop when it’s a light golden color — it will continue to darken as it cools.
| Step | Action | Duration | Key Visual Cue |
|---|---|---|---|
| 1 | Preheat oven & boil water | 10–15 mins | Oven at 325°F; water at a rolling boil |
| 2 | Whisk yolks & sugar | 30 secs | Mixture just lightens in color |
| 3 | Heat cream & vanilla | 4–5 mins | Bubbles form around edges; not boiling |
| 4 | Temper eggs with cream | 2 mins | Smooth, fully combined liquid |
| 5 | Strain & fill ramekins | 5 mins | No lumps or foam in liquid |
| 6 | Bain-marie | 2 mins | Water reaches halfway up ramekins |
| 7 | Bake | 35–45 mins | Edges set; center jiggly |
| 8 | Cool, chill, then caramelize | 4+ hrs chill + 2 mins torch | Sugar turns deep amber; hardens |
Serving & Presentation
The magic of crème brûlée is in its presentation. I like to serve these ramekins on a small plate, often with a few fresh berries on the side for a pop of color and acidity that cuts through the richness. A sprig of mint adds a lovely green contrast. In Paris, we’d finish with a delicate tuile cookie or a simple chocolate curl — but honestly, the custard and caramel are the stars here.
For a Moroccan twist, I sometimes sprinkle a pinch of cinnamon on the berries or add a drop of orange blossom water to the custard base. The floral notes remind me of my mother’s pastries in Tangier. Pair this with a strong espresso or a glass of dessert wine like Sauternes — the sweetness of the custard and the bitterness of the coffee or wine create a perfect balance.
| Pairing Type | Suggestions | Why It Works |
|---|---|---|
| Side Dish | Fresh berries (raspberries, strawberries), shortbread cookies, tuile | Fruit adds acidity to cut richness; cookies provide texture contrast |
| Sauce / Dip | Berry coulis, caramel sauce, chocolate sauce | Extra layer of flavor and decadence |
Similar Posts |