Showstopping Dark Chocolate Orange Mirror Domes
“`html
Table of Contents
Dark Chocolate Orange Mirror Domes Recipe – The Ultimate French-Pastry-Meets-Moroccan-Flavor Showstopper
I still remember the first time I tasted a perfect chocolate-orange pairing. I was a little girl in my mother’s kitchen in Marrakech, watching her grate fresh orange zest into a pot of melted dark chocolate for a family celebration. The aroma — bright, citrusy, and deeply chocolatey — filled every corner of our home. Now, decades later and trained at Le Cordon Bleu in Paris, I’ve taken that childhood memory and wrapped it in a French mirror glaze to create these dark chocolate orange mirror domes. This chocolate orange mousse recipe is the dessert I turn to when I want to impress guests at my NYC dinner parties without spending all day in the kitchen. The combination of a silky dark chocolate mousse, a bright orange marmalade center, and a glossy mirror glaze is pure elegance on a plate. Every spoonful delivers a little piece of my story — from Morocco to Paris to New York.
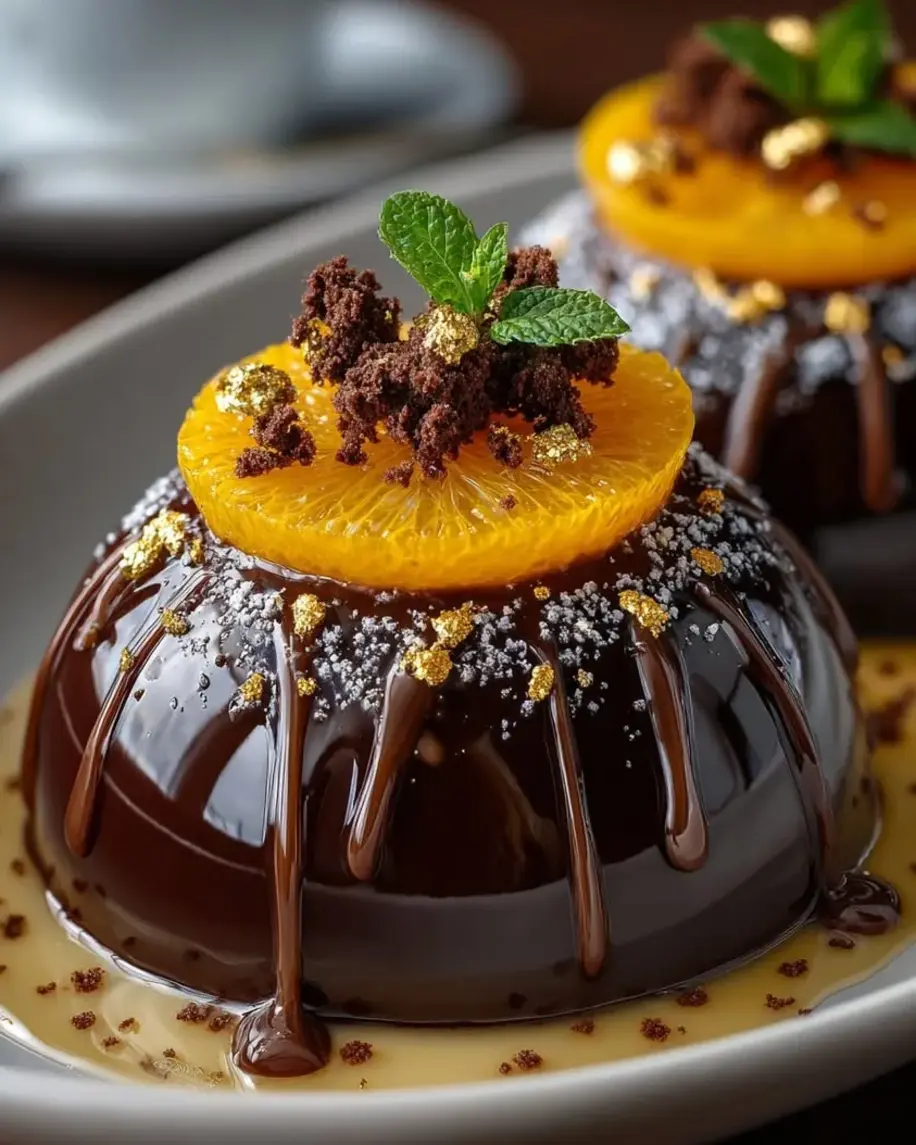
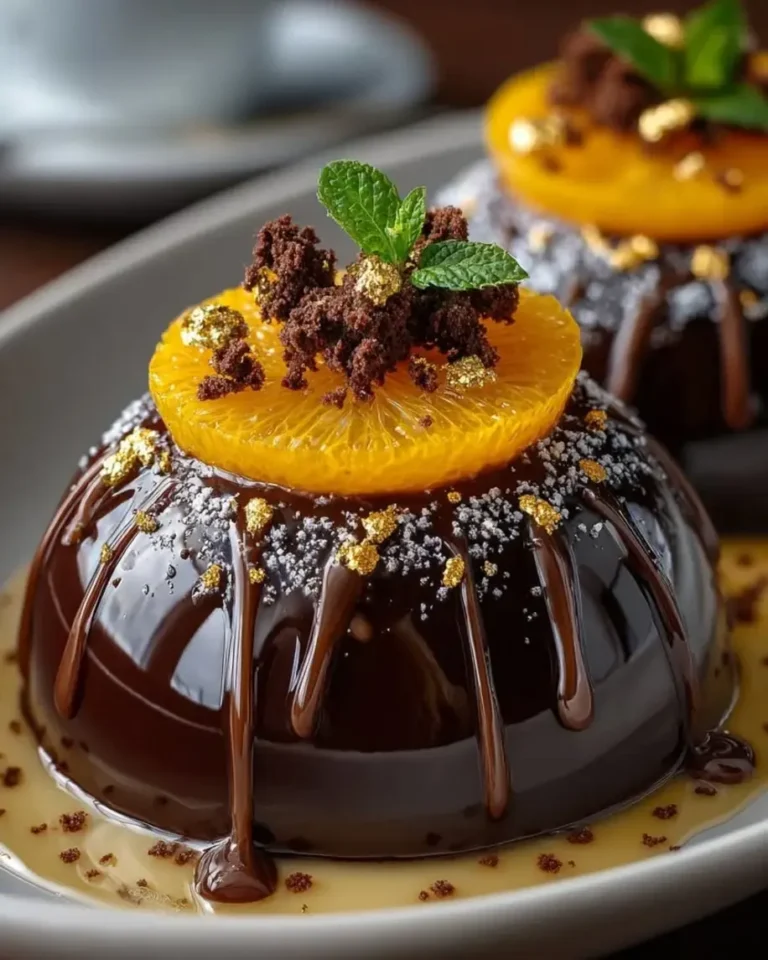
Let me paint you a picture of what you’re about to create. The moment your spoon cracks through that perfect, shiny mirror glaze — it shatters with a delicate crispness — you’ll find a cloud-like dark chocolate mousse that melts on your tongue. It’s rich and velvety, with deep cocoa notes from the 70% dark chocolate, but never heavy. Then comes the surprise: a bright, tangy orange marmalade center that cuts through the richness like a beam of Moroccan sunshine. The mirror glaze itself is a thing of beauty — smooth as glass, deep and dark, with a subtle sheen that catches the light. I love to finish each dome with a curl of candied orange peel, a few dark chocolate shavings, and a whisper of edible gold flakes. It’s the kind of dessert that makes people stop mid-conversation and just stare before they take that first bite.
What makes my version of this mirror glaze chocolate cake style dessert different from others you’ll find online? I’ve spent years perfecting the technique, and I’m going to share every trick I learned in Paris pastry school and from testing in my own NYC kitchen. The key to a flawless mirror glaze is temperature control — I’ll show you exactly how to get it to that perfect pourable consistency. I’m also giving you my tested method for the orange center, which stays bright and jammy even after freezing. One common mistake I see home bakers make is overheating the gelatin, which ruins the glaze’s shine. I’ll show you how to avoid that. Whether you’re making these for a birthday, a holiday gathering, or just because you deserve something beautiful, this easy mirror glaze recipe will make you feel like a pastry chef in your own home.
Why This Dark Chocolate Orange Mirror Dome Recipe Is the Best
The Flavor Secret: The magic of this recipe lies in the quality of the chocolate and the freshness of the orange. I use a 70% dark chocolate — not too bitter, not too sweet — and pair it with freshly grated orange zest and juice. The orange isn’t just a background note; it’s a bold, bright companion to the chocolate. Growing up in Morocco, I learned that orange and dark chocolate are a match made in heaven. My mother would always say, “The orange doesn’t hide the chocolate — it lifts it up.” That philosophy is at the heart of this recipe. The marmalade center adds another layer of citrus intensity, creating a beautiful contrast of textures and temperatures.
Perfected Texture: The texture of the mousse is where my French training really shines. The key is folding the whipped cream into the chocolate base at exactly the right temperature — if the chocolate is too warm, the cream deflates; if it’s too cold, the mixture seizes. I’ll walk you through the exact visual cues so you get a mousse that’s light, airy, and luxuriously creamy every single time. The mirror glaze, meanwhile, is all about precision. I learned in Paris that the glaze must cool to exactly 90°F (32°C) before pouring — any warmer and it runs off too thin, any cooler and it sets before you get that perfect even coat. This easy mirror glaze recipe is designed to be foolproof, even for first-timers.
Foolproof & Fast: I know what you’re thinking — “Mirror domes look complicated!” But I’ve broken this down into simple, manageable steps that anyone can follow. The prep is straightforward, and the freezing does most of the work for you. You can make the mousse and assemble the domes in about 45 minutes of active time, then let the freezer handle the rest. I’ve tested this chocolate orange mousse recipe with home bakers of all skill levels, and the feedback is always the same: “I can’t believe I made this!” Whether you’re a seasoned baker or trying your first mirror glaze, you’ve got this.
Dark Chocolate Orange Mirror Dome Recipe Ingredients
I source my ingredients from a mix of places here in New York City. The dark chocolate I buy from a shop in Chelsea Market that imports single-origin bars from South America and West Africa. The oranges I get from the Union Square Greenmarket — they’re so fragrant and juicy, nothing like the waxed ones at the supermarket. For the marmalade, I actually prefer a good-quality store-bought one (Bonne Maman is my go-to), but you can use homemade if you have it. Here’s everything you’ll need for this orange chocolate dessert domes recipe:
Ingredients List
- For the Chocolate Orange Mousse:
- 7 oz (200 g) dark chocolate (70%), finely chopped
- 1 1/2 cups heavy whipping cream, divided
- 2 tsp unflavored gelatin
- 2 tbsp cold water
- 2 tbsp granulated sugar
- 1 tsp vanilla extract
- 1 tbsp fresh orange zest
- 2 tbsp fresh orange juice
- For the Orange Center:
- 1/2 cup orange marmalade
- 1 tsp fresh orange zest
- 1 tsp lemon juice
- For the Mirror Glaze:
- 1/2 cup granulated sugar
- 1/3 cup water
- 1/3 cup sweetened condensed milk
- 5 oz (140 g) dark chocolate, finely chopped
- 2 tsp unflavored gelatin
- 2 tbsp cold water
- For Garnish (optional):
- Candied orange peel
- Dark chocolate curls
- Edible gold flakes
Ingredient Spotlight
Dark Chocolate (70% cacao): This is the backbone of the entire dessert. I recommend a high-quality bar — Valrhona, Callebaut, or Ghirardelli are all excellent choices. The 70% cocoa content gives you a deep, complex chocolate flavor that isn’t overly bitter. If you use a chocolate with a lower percentage, your mousse will be sweeter and less intense. For a dairy-free version, you can use a high-quality vegan dark chocolate, but avoid anything with fillers or artificial flavors.
Heavy Whipping Cream: This provides the structure and lightness for the mousse. It must be cold when you whip it — warm cream won’t hold soft peaks. Look for cream with at least 36% milk fat for the best results. If you need a dairy-free option, full-fat coconut cream (chilled and whipped) works, though the flavor will be slightly different.
Fresh Oranges: I can’t stress this enough — use fresh oranges for the zest and juice. The oils in fresh zest are what give this dessert its bright, aromatic quality. Bottled orange juice and dried zest just won’t deliver the same result. I like to use navel oranges or Cara Caras when they’re in season. When you’re grating, only take the orange part of the peel — the white pith is bitter.
Unflavored Gelatin: This is what gives both the mousse and the mirror glaze their structure. I use Knox brand, which is widely available in US grocery stores. The gelatin must be “bloomed” in cold water for 5 minutes before use — this step is non-negotiable. For a vegetarian option, you can use agar-agar, but the proportions are different, and the texture won’t be exactly the same.
| Original Ingredient | Best Substitution | Flavor / Texture Impact |
|---|---|---|
| Dark chocolate 70% | Dark chocolate 60% or 85% | 60% = sweeter, less intense; 85% = more bitter, deeper flavor |
| Heavy whipping cream | Full-fat coconut cream (chilled) | Slightly coconut flavor, less stable peaks |
| Orange marmalade | Orange curd or apricot preserves | Curd is creamier; preserves are less tangy |
| Unflavored gelatin | Agar-agar (vegan) | Firmer set, different melting point; not recommended for mirror glaze |
How to Make Dark Chocolate Orange Mirror Domes — Step-by-Step
Trust me when I say: if you can make a boxed brownie mix, you can absolutely nail these domes. The process is methodical but not difficult, and I’m going to walk you through each step with the exact visual cues I use in my own kitchen. Let’s do this together.
Step 1: Bloom the Gelatin for the Mousse
In a small bowl, sprinkle 2 teaspoons of unflavored gelatin over 2 tablespoons of cold water. Let it sit undisturbed for 5 minutes. The gelatin will absorb the water and turn into a firm, jiggly mass — this is called “blooming.” Don’t rush this step! The gelatin needs time to fully hydrate so it dissolves evenly into the mousse later.
⚠️ Common Mistake to Avoid: Don’t use warm or hot water to bloom the gelatin — it will dissolve unevenly and create lumps in your mousse. Always use cold water.
Step 2: Make the Chocolate Base
Warm 1/2 cup of the heavy cream in a small saucepan until it’s steaming but not boiling — you should see small bubbles forming around the edges. Pour the hot cream over the 7 oz of finely chopped dark chocolate in a heatproof bowl. Let it sit for 2 minutes, then stir gently in circles until the chocolate is completely melted and the mixture is smooth and glossy. This is called a ganache base.
💡 Stella’s Pro Tip: If the chocolate doesn’t fully melt, place the bowl over a pot of simmering water for 30 seconds at a time, stirring gently. Avoid microwaving — it can overheat the chocolate and cause it to seize.
Step 3: Whip and Fold the Cream
In a separate bowl, whip the remaining 1 cup of heavy cream with the 2 tablespoons of sugar until soft peaks form. You’re looking for peaks that hold their shape but droop slightly at the tips. Be careful not to overwhip — if the cream turns grainy, it won’t fold smoothly into the chocolate.
⚠️ Common Mistake to Avoid: Adding the cream to the chocolate while it’s still warm will deflate it. Wait until the chocolate mixture is at room temperature — about 75°F — before folding.
Step 4: Prepare the Orange Center
In a small bowl, stir together the orange marmalade, fresh orange zest, and lemon juice. The lemon juice brightens the flavor and balances the sweetness. Set this aside at room temperature — it will be easier to spoon into the mousse later.
💡 Stella’s Pro Tip: If your marmalade is very chunky, give it a quick chop with a knife so it’s easier to portion into the center of each dome.
Step 5: Assemble and Freeze the Domes
Fill silicone dome molds halfway with the chocolate mousse. Spoon about 1 teaspoon of the orange marmalade mixture into the center of each, then cover with more mousse until the mold is full. Smooth the tops with an offset spatula so they’re level. Freeze for at least 6 hours, but overnight is ideal — the domes need to be completely solid for the glaze to stick properly.
⚠️ Common Mistake to Avoid: Don’t overfill the molds — leave a tiny bit of space at the top so the mousse doesn’t bulge out when it freezes. Smooth, level tops make for better-glazed domes.
Step 6: Make the Mirror Glaze
Bloom the gelatin for the glaze in cold water for 5 minutes. In a saucepan, combine the sugar and water and bring to a gentle simmer, stirring until the sugar dissolves. Stir in the sweetened condensed milk. Remove from heat and add the chopped dark chocolate. Stir until smooth, then mix in the melted gelatin. Let the glaze cool to 90°F (32°C) — it should be glossy and pourable, like thick syrup.
💡 Stella’s Pro Tip: Use an instant-read thermometer for accuracy. If the glaze is too hot, it will run off the domes. If it’s too cool, it will set before you get a smooth finish. 90°F is the sweet spot.
Step 7: Glaze and Garnish
Unmold the frozen domes and place them on a wire rack set over a baking tray. Pour the mirror glaze evenly over each dome, starting from the center and letting it flow over the edges. Work quickly — the glaze sets fast on the frozen surface. Let the excess drip off, then transfer the glazed domes to serving plates. Garnish with candied orange peel, dark chocolate curls, and a sprinkle of edible gold flakes.
💡 Stella’s Pro Tip: If the glaze starts to thicken as you work, gently warm it over a double boiler for a few seconds. But remember: never above 90°F!
| Step | Action | Duration | Key Visual Cue |
|---|---|---|---|
| 1 | Bloom gelatin | 5 minutes | Gelatin becomes firm and jiggly |
| 2 | Make ganache base | 5 minutes | Smooth, glossy, no streaks |
| 3 | Whip cream to soft peaks | 3–5 minutes | Peaks hold shape but droop slightly |
| 4 | Prepare orange center | 2 minutes | Well combined, bright orange color |
| 5 | Fill molds and freeze | 6+ hours | Domes are rock solid |
| 6 | Make mirror glaze | 10 minutes | Glaze is 90°F, glossy, pourable |
| 7 | Glaze and garnish | 5 minutes | Even coating, shiny finish |
Serving & Presentation
These dark chocolate orange mirror domes are made for moments that call for something spectacular. I love serving them at my Hanukkah dinners, holiday parties, or any time I want to remind my friends that they’re worth a little extra effort. The way the light catches the glaze, the way the orange center surprises everyone on the first bite — it’s pure theater on a plate.
For plating, I like to set each dome on a simple white plate with a small swoosh of extra mirror glaze or a dusting of cocoa powder. A few candied orange peel curls placed on top, a sprinkle of dark chocolate shavings, and a tiny pinch of edible gold flakes make it look like it came from a high-end pastry shop. In true NYC fashion, I sometimes serve these with a dollop of lightly sweetened crème fraîche to cut through the richness. For a Moroccan twist, a pinch of ground cinnamon in the whipped cream is beautiful — it’s how my mother would have served them.
Pairing these domes with the right beverage takes them to another level. A strong espresso or a small glass of Pedro Ximénez sherry is classic. For non-alcoholic options, I love a Moroccan mint tea — the freshness of the mint against the dark chocolate and orange is a combination I grew up with. If you’re serving these as part of a dessert spread, they pair beautifully with fresh berries or a light citrus salad.
| Pairing Type | Suggestions | Why It Works |
|---|---|---|
| Side Dish | Fresh raspberries, orange segments, mint leaves | Fresh fruit brightens the rich chocolate |
| Sauce / Dip | Crème fraîche, whipped cream, extra mirror glaze | Creamy elements balance the intensity |
| Beverage | Espresso, Moroccan mint tea, Pedro Ximénez sherry | Bitter or herbal notes complement the sweet-tart profile |
| Garnish | Candied orange peel, chocolate curls, gold leaf | Adds visual drama and textural contrast |
Make-Ahead, Storage & Reheating
One of the best things about this dessert — besides how stunning it looks — is how perfectly it fits into a busy schedule. As someone who’s constantly juggling recipe testing, writing, and life in New York City, I rely on make-ahead desserts that actually get better with time. These domes are a dream: you can prepare them days in advance and glaze them the day you serve.
| Method | Container | Duration | Reheating Tip |
|---|---|---|---|
| Refrigerator | Airtight container in single layer | Up to 2 days (glazed) | Serve cold — no reheating needed |
| Freezer | Wrapped tightly in plastic, then foil | Up to 1 month (unglazed) | Thaw 20 min at room temp before glazing |
| Make-Ahead | Freeze mousse domes, glaze day of serving | Up to 3 days in advance | Glaze straight from freezer for best shine |
A few storage notes from my experience: If you’ve already glazed the domes, keep them in the refrigerator in a single layer in an airtight container — don’t stack them or the glaze will smudge. They’ll stay beautiful for up to two days. If you’re freezing unglazed domes, wrap each one individually in plastic wrap and then foil. When you’re ready to serve, unwrap them straight from the freezer and pour the glaze right over — the temperature shock is what gives you that flawless, glass-like finish. Never microwave these to soften them — the mousse will collapse and the glaze will turn into a sticky mess.
Variations & Easy Swaps
One of the things I love most about this recipe is how versatile it is. I’ve played with countless variations in my kitchen, and here are three of my favorites that keep the spirit of the original while offering something new. Whether you’re feeding a crowd with different tastes or just want to experiment, these swaps are all tested and approved by Stella.
| Variation | Key Change | Best For | Difficulty Impact |
|---|---|---|---|
| Raspberry Chocolate | Replace orange zest with raspberry purée in mousse and center | Valentine’s Day, romantic dinners | Same as original |
| Vegan Coconut Chocolate | Use coconut cream, dairy-free chocolate, agar-agar | Vegan guests, dairy-free diets | Slightly higher — agar sets differently |
| Pistachio Cardamom | Add ground cardamom to mousse, pistachio paste in center | Middle Eastern-inspired dessert table | Same as original |
Raspberry Chocolate Variation
This is my go-to for Valentine’s Day or any romantic occasion. Instead of orange zest and juice, add 1/4 cup of raspberry purée (strained to remove seeds) to the chocolate mixture. For the center, use a seedless raspberry jam in place of the orange marmalade. The tartness of the raspberries cuts through the dark chocolate just as beautifully as the orange does, and the color contrast — deep dark chocolate with a ruby-red center — is absolutely stunning. The technique is exactly the same, so you don’t need to adjust any steps or times.
Vegan Coconut Chocolate Variation
I developed this version for a friend who’s vegan, and it’s become a crowd favorite. Replace the heavy cream with full-fat coconut cream — chill the cans overnight and scoop the solid cream off the top. Use a high-quality dairy-free dark chocolate (I like Enjoy Life or Hu Kitchen). For the gelatin, substitute with agar-agar: use 1 1/2 teaspoons of agar powder bloomed in 2 tablespoons of water for both the mousse and the glaze. The texture is slightly firmer than the original, but the coconut adds a lovely subtle sweetness that pairs beautifully with the orange. The mirror glaze is trickier with agar — you need to bring it to a boil for 2 minutes to activate the agar — but the result is still gorgeous and shiny.
Pistachio Cardamom Variation
This variation is inspired by the flavors I grew up with in Morocco. Add 1/2 teaspoon of ground cardamom to the chocolate mousse mixture — cardamom and chocolate are a match made in heaven. For the center, use a pistachio paste or a good-quality pistachio cream (you can find it at Middle Eastern markets or online) mixed with a little honey. The green of the pistachio center peeking out from the dark chocolate when you cut into the dome is gorgeous. Top with crushed pistachios and a dusting of gold flakes for a truly show-stopping presentation. I serve this at my holiday parties and it always gets rave reviews.
How do you make the mirror glaze smooth and shiny for dark chocolate orange domes?
The key to a smooth, shiny mirror glaze is all about temperature and technique. First, make sure your gelatin is fully bloomed in cold water before melting it into the glaze. Second, and most importantly, let the glaze cool to exactly 90°F (32°C) before pouring — use an instant-read thermometer for accuracy. If it’s too hot, it will be thin and run off the domes without coating them evenly. If it’s too cool, it will set in streaks. When you pour, work quickly and confidently: start from the center of the dome and let the glaze flow naturally over the edges. The frozen surface of the dome helps the glaze set instantly, creating that flawless, glass-like finish. Finally, never stir the glaze vigorously once it’s cooling — you’ll introduce air bubbles that will ruin the shine. Gently stir only until smooth.
Can I substitute fresh orange juice with orange extract in the dark chocolate filling?
I strongly recommend against using orange extract in place of fresh orange juice. The flavor of fresh orange juice is bright, complex, and natural — it brings a subtle acidity that balances the richness of the dark chocolate. Orange extract, on the other hand, is often artificial and can taste harsh or perfumey. It also lacks the acidity and liquid content that the recipe needs for texture. If you absolutely don’t have fresh oranges, you can use a good-quality bottled orange juice (not from concentrate), but the flavor won’t be as vibrant. For the best results, always use fresh oranges — the zest is just as important as the juice, and bottled juice won’t give you the aromatic oils you need. A medium orange will give you both the zest and juice you need for this recipe.
How far in advance can I prepare dark chocolate orange mirror domes for a party?
You can prepare these dark chocolate orange mirror domes up to 3 days in advance if you’re strategic about it. Here’s my tested schedule: Make the mousse and assemble the domes in the silicone molds up to 3 days before your party. Freeze them solid — they need at least 6 hours in the freezer, but overnight is ideal. On the day of your event, make the mirror glaze and pour it over the frozen domes. Once glazed, the domes can sit in the refrigerator for up to 2 hours before serving — any longer and the glaze may start to soften or weep. For the best presentation, I recommend glazing them no more than 1-2 hours before serving. If you want to get even more ahead, you can freeze the unglazed domes for up to 1 month. Just wrap them tightly in plastic wrap and foil.
What is the best way to achieve a clean, even dome shape for these mirror glaze cakes?
A perfect dome shape starts with the right mold. I use silicone half-sphere molds that are 3 inches in diameter — they release the frozen mousse easily without sticking. Before you fill the molds, make sure they’re clean and completely dry. When you fill them, don’t overfill — leave about 1/8 inch of space at the top so the mousse doesn’t bulge out as it freezes. Use an offset spatula to smooth the tops so they’re completely level with the rim of the mold. After freezing for at least 6 hours (overnight is better), the domes should pop out cleanly. If they stick, let them sit at room temperature for 2-3 minutes to soften the exterior slightly. Once unmolded, place them on a wire rack for glazing — the wire allows the excess glaze to drip away cleanly, giving you that perfect smooth finish.
Can I use milk chocolate instead of dark chocolate in this recipe?
You can substitute milk chocolate for dark chocolate, but the results will be quite different. Milk chocolate has a higher sugar content and lower cocoa solids, which means the mousse will be significantly sweeter and less intense. It will also be softer and less stable, so the domes may not hold their shape as well after freezing. If you do use milk chocolate, I recommend using a high-quality brand like Valrhona Jivara or Callebaut — they have a higher cocoa content than most supermarket milk chocolates. You may also want to reduce the sugar in the whipped cream by half to balance the extra sweetness. The mirror glaze can also be made with milk chocolate, but the color will be lighter and the shine slightly less dramatic. For the classic mirror dome experience, I recommend sticking with 70% dark chocolate.
How do I prevent the mirror glaze from cracking or peeling off the dome?
Cracking or peeling mirror glaze is usually caused by one of two issues: the glaze is too thick when poured, or the dome isn’t frozen solid enough. First, make sure your glaze is at the correct temperature — 90°F (32°C) — and that it’s pourable but not runny. If it’s too thick, gently warm it over a double boiler. Second, the domes must be completely frozen — at least 6 hours, but overnight is best. A partially frozen dome will be too warm and the glaze will set unevenly, leading to cracks as the dome continues to freeze. Third, make sure the domes are dry before glazing — any condensation or ice crystals on the surface will cause the glaze to slide off. If you see condensation, gently pat the domes with a paper towel before pouring. Finally, work in a cool room — if your kitchen is very warm, the glaze may set too slowly and slide off.
Can I make these dark chocolate orange mirror domes without gelatin?
Yes, you can make these domes without gelatin, but you’ll need to adjust the recipe and expect a different texture. For the mousse, you can skip the gelatin entirely — the mousse will be lighter and airier, more like a classic French chocolate mousse. However, it won’t be as stable and may not hold its dome shape as well after freezing. For the mirror glaze, gelatin is harder to replace because it provides the structure and shine that make the glaze work. A good alternative is agar-agar, a plant-based gelling agent derived from seaweed. Use 1 1/2 teaspoons of agar powder bloomed in 2 tablespoons of water for the glaze. Unlike gelatin, agar-agar needs to be brought to a full boil for 2 minutes to activate. The texture will be firmer and less silky than a gelatin-based glaze, and the shine won’t be as glass-like. For the most reliable results, I recommend using gelatin if you can.
What size silicone dome molds should I use for this recipe?
For this recipe, I recommend using 3-inch diameter half-sphere silicone molds. This size gives you a generous individual dessert that’s large enough to be satisfying but not overwhelming. A 3-inch dome yields about 1/2 cup of mousse per serving, which is the perfect portion for a rich dessert like this. You can find these molds at any kitchen supply store, on Amazon, or at baking specialty shops. If you only have smaller molds (2 inches), the domes will be more bite-sized and you’ll get more servings — about 12-14 instead of 8. Just reduce the freezing time slightly since smaller domes freeze faster. For larger molds (4 inches), you’ll get about 4-5 servings, and you’ll need to freeze them for at least 8 hours. The recipe scales easily, so don’t worry about adjusting ingredient amounts — just portion accordingly.
Share Your Version!
I absolutely love seeing how you make these dark chocolate orange mirror domes your own. Whether you stick with the classic version or try one of my variations — raspberry, vegan coconut, or pistachio cardamom — I want to know how it turns out! Drop a star rating and a comment below to let me know what you thought. Did the glaze come out perfectly shiny? Did your guests gasp when they saw the orange center? Tell me everything!
And don’t forget to share a photo on Instagram or Pinterest and tag @leosfoods — I love nothing more than scrolling through my feed and seeing your beautiful creations. If you have a question about a specific step or a substitution you’re considering, ask away in the comments. I read every single one and I’ll do my best to help you nail this recipe. From my NYC kitchen to yours — I hope this recipe brings as much warmth to your table as it does to mine. — Stella 🧡
Love This Recipe? Save It to Pinterest!
If you enjoyed this Dark Chocolate Orange Mirror Domes recipe, don’t let it get lost in your browser tabs! 😄 Pin it now so you can find it again anytime — and explore hundreds more tried-and-tested recipes waiting for you on my Pinterest boards.
👉 Follow Stella on Pinterest @stellarecipeblog
📌 Pin this recipe · 🔁 Re-pin your favorites · 💬 Tag me when you make it — I love seeing your creations!
“`
Print
Dark Chocolate Orange Mirror Domes
- Yield: 8 1x
Ingredients
- For the Chocolate Orange Mousse:
- 7 oz (200 g) dark chocolate (70%), finely chopped
- 1 1/2 cups heavy whipping cream, divided
- 2 tsp unflavored gelatin
- 2 tbsp cold water
- 2 tbsp granulated sugar
- 1 tsp vanilla extract
- 1 tbsp fresh orange zest
- 2 tbsp fresh orange juice
- For the Orange Center:
- 1/2 cup orange marmalade
- 1 tsp fresh orange zest
- 1 tsp lemon juice
- For the Mirror Glaze:
- 1/2 cup granulated sugar
- 1/3 cup water
- 1/3 cup sweetened condensed milk
- 5 oz (140 g) dark chocolate, finely chopped
- 2 tsp unflavored gelatin
- 2 tbsp cold water
- For Garnish (optional):
- Candied orange peel
- Dark chocolate curls
- Edible gold flakes
Instructions
- 1. Bloom the gelatin for the mousse in the cold water for 5 minutes.
- 2. Heat 1/2 cup of the heavy cream until steaming, then pour it over the chopped dark chocolate. Let stand for 2 minutes and stir until smooth.
- 3. Melt the bloomed gelatin and whisk it into the chocolate mixture along with the orange zest, orange juice, and vanilla extract. Let cool to room temperature.
- 4. Whip the remaining 1 cup heavy cream with the sugar until soft peaks form, then gently fold it into the cooled chocolate mixture.
- 5. Stir together the orange marmalade, orange zest, and lemon juice.
- 6. Fill silicone dome molds halfway with the chocolate mousse, add a spoonful of the orange filling to the center, then cover with more mousse. Smooth the tops and freeze for at least 6 hours or overnight.
- 7. Bloom the gelatin for the mirror glaze in the cold water for 5 minutes.
- 8. In a saucepan, combine the sugar and water and bring to a gentle simmer. Stir in the sweetened condensed milk.
- 9. Remove from the heat and add the chopped dark chocolate. Stir until smooth, then mix in the melted gelatin.
- 10. Let the glaze cool to about 90°F (32°C) until glossy and pourable.
- 11. Unmold the frozen domes and place them on a wire rack over a baking tray.
- 12. Pour the mirror glaze evenly over each dome, allowing the excess to drip away.
- 13. Transfer the glazed domes to serving plates and garnish with candied orange peel, dark chocolate curls, and edible gold flakes.
Nutrition
- Calories: 385
- Sugar: 24 g
- Fat: 29 g
- Carbohydrates: 29 g
- Protein: 5 g

Tried This Recipe? Leave a Comment!
Did you make this recipe? I’d love to hear how it turned out! Please leave a comment and a rating below. Your feedback helps other home cooks and supports cheerychop.com!
For more delicious inspiration, follow me on Pinterest!