Stunning Diamond Crystallized Coconut Pineapple Pyramids
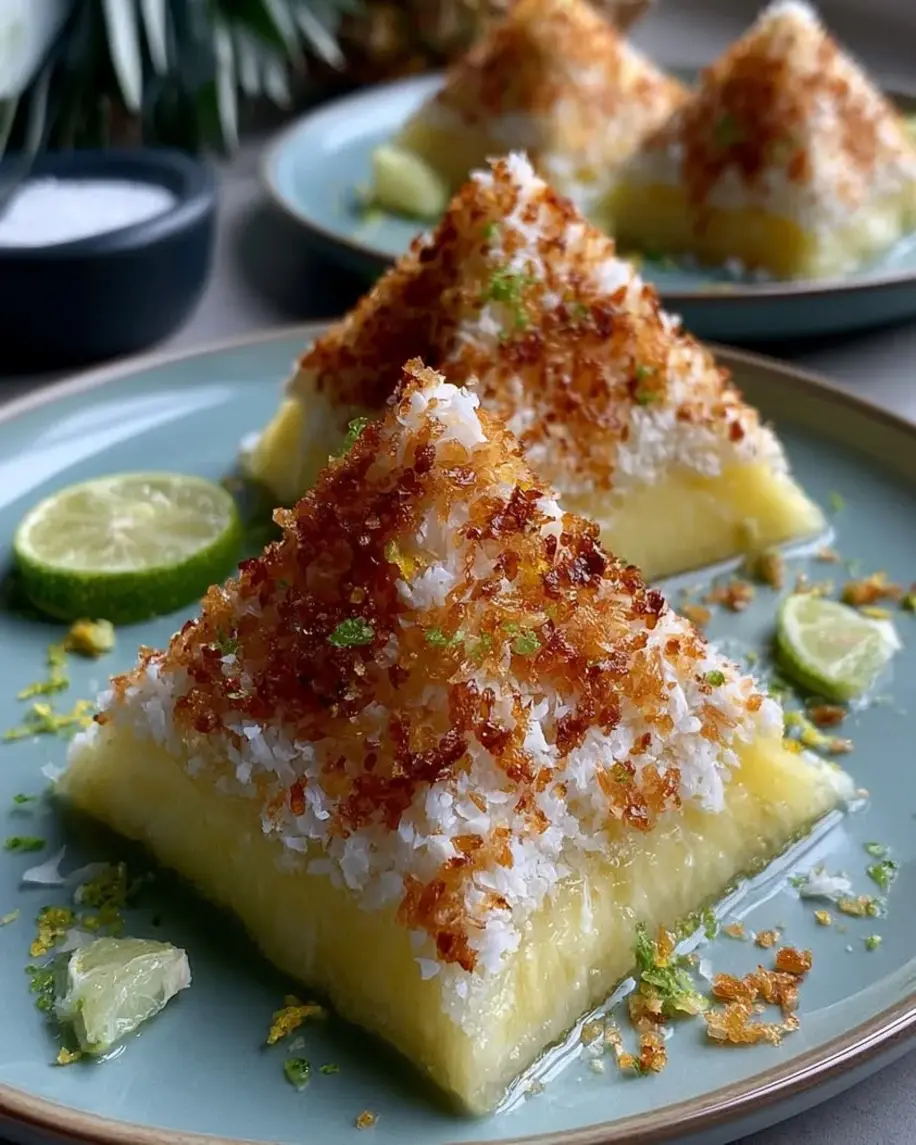
Table of Contents
Diamond Crystallized Coconut Pineapple Pyramids – A Gem of a Dessert
I still remember the first time I bit into a Diamond Crystallized Coconut Pineapple Pyramid — I was standing in my tiny Parisian kitchen, fresh out of culinary school, trying to marry the sunny flavors of my Moroccan childhood with the refined techniques I had just learned. The result was this little jewel of a dessert: a tender, tangy pineapple center wrapped in a sweet, chewy coconut crust, finished with a glaze that shatters ever so slightly when you bite into it. These pineapple coconut pyramid dessert bites are exactly what I reach for when I want something that feels special but isn’t fussy — a little taste of the tropics with a French-polished edge.
Imagine this: the first layer is a bright, jammy pineapple filling that tastes like sunshine reduced into pure gold — sweet-tart with a whisper of lime and vanilla. Then comes the coconut coating: chewy, tender, and lightly crystallized from honey and sugar, with a subtle saltiness that makes every flavor pop. And finally, the diamond glaze — a silky white chocolate shell with a hint of coconut oil that sets into a glossy, firm finish. When you cut into one, it almost sparkles. The texture contrast is everything — soft, chewy, then crisp — and the flavor is pure tropical indulgence.
What sets my version apart is the way I build each layer. I learned in Paris that great pastry is about precision — but in Morocco, I learned that it’s also about heart. So I cook the pineapple down slowly until it’s thick and concentrated, I use full-fat coconut milk to give the coating real richness, and I add a tiny pinch of salt to the glaze to keep it from being cloying. 💡 Stella’s Pro Tip: Don’t rush the chilling steps — they’re what give these pyramids their clean, professional shape. One common mistake is overworking the coconut mixture when wrapping — just press gently and let the chill do the work.
Why This Diamond Crystallized Coconut Pineapple Pyramids Recipe Is the Best
The Flavor Secret: I combine the floral sweetness of fresh pineapple with the nutty depth of toasted coconut, then brighten everything with lime and a touch of sea salt. It’s a trick I picked up in my mother’s kitchen in Morocco — she always balanced sweet with something sharp or salty. The honey in both the base and the coating adds a complex, floral sweetness that granulated sugar alone can’t match.
Perfected Texture: The key is in the double-set method. First, the pineapple base is chilled until firm enough to cut into clean pyramids. Then each pyramid is wrapped in the coconut mixture and frozen briefly before glazing. This ensures the layers stay distinct and the final texture is perfectly layered — soft interior, chewy middle, crisp shell. It’s a technique I use in my NYC cooking classes and it works every time.
Foolproof & Fast: Despite the elegant result, this recipe is surprisingly forgiving. The components are simple, the steps are clear, and the only real requirement is patience for the chilling stages. I’ve taught this to absolute beginners in my workshops and they’ve all walked away with beautiful pyramids. If you can stir a saucepan and press a mixture into a mold, you can make these.
Diamond Crystallized Coconut Pineapple Pyramids Ingredients
I source my pineapple from the farmers market at Union Square in NYC — the extra sweetness is worth it. But honestly, good grocery store pineapple works beautifully too. The coconut I buy in bulk from a little spice shop in Brooklyn that reminds me of the souk in Marrakech. Here’s everything you’ll need:
Ingredients List
- For the Pineapple Base: 2 cups fresh pineapple, finely diced; 2 tbsp honey; 1 tsp lime juice; 1 tsp cornstarch; 1/2 tsp vanilla extract
- For the Coconut Crystallized Coating: 1 1/2 cups shredded coconut (unsweetened); 1/2 cup coconut milk; 1/3 cup granulated sugar; 1 tbsp honey; 1/2 tsp salt
- For the Diamond Glaze: 1/2 cup white chocolate, melted; 1 tsp coconut oil; 1 tbsp powdered sugar
- For Garnish (optional): Toasted coconut flakes; Lime zest
Ingredient Spotlight
Fresh Pineapple: The star of the show. Fresh pineapple gives you that bright, tangy-sweet flavor and the right texture for cooking down into a jammy base. Canned pineapple is too soft and sweet — it won’t reduce properly and will make the pyramids mushy.
Unsweetened Shredded Coconut: This is the backbone of the crystallized coating. Unsweetened lets you control the sweetness. Look for fine or medium shred — not the large flaked kind, which won’t compact as well. Toast it lightly for extra depth if you like.
White Chocolate: For the diamond glaze, use a good-quality white chocolate — not candy melts. Lindt, Ghirardelli, or even a store-brand couverture work beautifully. The coconut oil helps it set with a glossy, snappy finish.
| Original Ingredient | Best Substitution | Flavor / Texture Impact |
|---|---|---|
| Fresh pineapple | Frozen pineapple, thawed & drained | Slightly softer texture; drain excess liquid before cooking |
| Honey | Maple syrup or agave | Different floral notes; maple adds a subtle woodsy sweetness |
| Coconut milk (full-fat) | Lite coconut milk + 1 tsp coconut oil | Less rich; coating may be slightly less tender |
| White chocolate | Coconut butter + 2 tbsp powdered sugar | Dairy-free; slightly less sweet, more coconut flavor |
How to Make Diamond Crystallized Coconut Pineapple Pyramids — Step-by-Step
Trust me — each step is simple, and the result is stunning. I’ll walk you through every detail so your pyramids turn out picture-perfect.
Step 1: Cook the Pineapple Base
In a medium saucepan, combine 2 cups finely diced fresh pineapple, 2 tbsp honey, 1 tsp lime juice, 1 tsp cornstarch, and 1/2 tsp vanilla extract. Cook over medium heat, stirring frequently, for 8–10 minutes until the mixture thickens to a jam-like consistency. The pineapple should be very soft and the liquid should be mostly evaporated.
💡 Stella’s Pro Tip: Dice the pineapple uniformly — about 1/4-inch pieces — so they cook evenly. If some pieces are larger, they won’t break down at the same rate.
Step 2: Chill the Pineapple Base
Spread the cooked pineapple mixture into a parchment-lined 8×8-inch tray, smoothing it to an even layer about 1/2-inch thick. Refrigerate for at least 1 hour, or until fully firm and set. The mixture should feel solid to the touch and hold its shape when pressed.
⚠️ Common Mistake to Avoid: Don’t skip the full chilling time. If the base isn’t firm enough, you won’t be able to cut clean pyramid shapes — it will squish and stick.
Step 3: Cut into Pyramid Shapes
Once chilled, lift the parchment and transfer the pineapple slab to a cutting board. Use a sharp knife to cut into small triangles or diamond shapes — about 1.5 inches per side. Then gently shape each piece into a pyramid by pressing and tapering the sides with your fingers. Work quickly so they stay cold.
💡 Stella’s Pro Tip: Dip your knife in hot water and wipe it dry between cuts for the cleanest edges. This prevents sticking and gives you professional-looking shapes.
Step 4: Make the Coconut Coating
In a clean saucepan, combine 1/2 cup coconut milk, 1/3 cup granulated sugar, 1 tbsp honey, and 1/2 tsp salt. Heat over medium heat, stirring, until the sugar dissolves and the mixture thickens slightly — about 3–4 minutes. Remove from heat and stir in 1 1/2 cups shredded coconut until a thick, moldable mixture forms. Let it cool for 5 minutes.
⚠️ Common Mistake to Avoid: Don’t let the coconut mixture dry out. If it’s too crumbly to mold, add a tablespoon more coconut milk. If it’s too wet, add a tablespoon more shredded coconut.
Step 5: Wrap the Pyramids
Take a small handful of the coconut mixture (about 1 1/2 tablespoons) and flatten it into a disc. Place a pineapple pyramid in the center and gently wrap the coconut mixture around it, pressing to seal evenly. Smooth the surface with your palms to form a neat pyramid shape. Repeat with all pieces.
💡 Stella’s Pro Tip: If the mixture sticks to your hands, lightly wet your palms with a little cold water. This helps you shape them cleanly without sticking.
Step 6: Freeze to Firm
Place the wrapped pyramids on a parchment-lined tray and freeze for 20 minutes. This firms them up so they hold their shape perfectly when you apply the glaze. Don’t skip this step — it’s what gives the pyramids their clean, sharp edges.
⚠️ Common Mistake to Avoid: Don’t freeze longer than 30 minutes — the coconut coating can become too hard and the texture will be less pleasant. 20 minutes is the sweet spot.
Step 7: Prepare the Diamond Glaze
In a small heatproof bowl, melt 1/2 cup white chocolate with 1 tsp coconut oil in the microwave in 20-second bursts, stirring between each, until smooth. Stir in 1 tbsp powdered sugar until fully dissolved. The glaze should be thin enough to drizzle but thick enough to coat — add a tiny drop more coconut oil if needed.
💡 Stella’s Pro Tip: For the most brilliant “diamond” finish, let the glaze cool to about 85°F before coating. Too hot and it will run off; too cool and it will clump.
Step 8: Coat and Drizzle
Remove the pyramids from the freezer. Dip each one into the glaze, or use a spoon to drizzle the glaze over the tops, letting it cascade down the sides. Place each coated pyramid back on the parchment-lined tray. Work quickly — the cold pyramids will help the glaze set almost instantly.
⚠️ Common Mistake to Avoid: Don’t double-dip — once a pyramid is coated, let it set. Dipping again can create a cloudy, uneven finish.
Step 9: Let Set
Allow the glazed pyramids to set at room temperature for 10–15 minutes, until the glaze is glossy and firm to the touch. If your kitchen is warm, pop them in the fridge for 5 minutes. The finish should be smooth, shiny, and slightly crisp — like crystallized gems.
Step 10: Garnish and Serve
Once the glaze is set, garnish each pyramid with a sprinkle of toasted coconut flakes and a tiny pinch of lime zest. The green and white against the golden glaze is absolutely stunning. Serve immediately or store as directed below.
💡 Stella’s Pro Tip: For a truly dazzling presentation, arrange the pyramids on a white platter with a dusting of powdered sugar around the base — it looks like snow-capped tropical gems.
| Step | Action | Duration | Key Visual Cue |
|---|---|---|---|
| 1 | Cook pineapple base | 8–10 min | Thick, jam-like, no excess liquid |
| 2 | Chill base | 1 hr (or more) | Firm, holds shape when pressed |
| 3 | Cut into pyramids | 5 min | Clean edges, uniform shapes |
| 4 | Make coconut coating | 5–7 min | Thick, moldable, not crumbly |
| 5 | Wrap pyramids | 5–7 min | Smooth, sealed, neat shapes |
| 6 | Freeze | 20 min | Firm to the touch, holds shape |
| 7 | Prepare glaze | 3–5 min | Smooth, glossy, pourable |
| 8 | Coat/drizzle | 5 min | Even coverage, glossy sheen |
| 9 | Set glaze | 10–15 min | Glossy, firm, not sticky |
| 10 | Garnish & serve | 2 min | Beautiful, vibrant, ready to serve |
Serving & Presentation
These Diamond Crystallized Coconut Pineapple Pyramids are a showstopper on any dessert table. I love serving them on a simple white ceramic platter — the contrast makes the golden glaze and coconut flakes pop. For a touch of drama, dust the plate with a little powdered sugar and arrange the pyramids in a tight cluster, like a pile of precious gems. A few edible flowers or mint leaves add a lovely tropical touch.
In my NYC apartment, I often serve these after a dinner party with Moroccan mint tea or a strong espresso — the sweetness of the pyramids balances beautifully with the bitterness of the coffee. They also make a wonderful gift: pack them in a small box lined with parchment paper and tie with a ribbon. Your friends will think you bought them from a fancy patisserie.
For a truly memorable presentation, try serving them on a bed of toasted coconut flakes with a side of fresh mango slices or a dollop of coconut cream. The combination of textures and temperatures is absolutely divine. I learned this plating trick from a pastry chef in Paris who always said, “The eyes eat first.”
| Pairing Type | Suggestions | Why It Works |
|---|---|---|
| Side Dish | Fresh mango slices, grilled pineapple, coconut rice | Reinforces the tropical theme; adds freshness and texture |
| Sauce / Dip | Coconut cream drizzle, passion fruit coulis, lime caramel | Adds moisture and a tangy or rich contrast to the sweet pyramid |
| Beverage | Moroccan mint tea, espresso, coconut rum cocktail | Mint tea cuts sweetness; espresso balances richness; rum doubles the tropical vibe |
| Garnish | Toasted coconut flakes, lime zest, edible flowers, mint leaves | Adds color, aroma, and a professional finishing touch |
Make-Ahead, Storage & Reheating
One of the things I love most about these crystallized coconut pyramids is how well they keep. In my busy NYC schedule, I often make the pineapple base and coconut coating a day ahead, then assemble and glaze the day I plan to serve them. They’re incredibly forgiving and actually taste better after a day or two as the flavors meld together.
| Method | Container | Duration | Reheating Tip |
|---|---|---|---|
| Refrigerator | Airtight container, parchment between layers | Up to 5 days | Serve cold or at room temp — no reheating needed |
| Freezer | Freezer-safe container, parchment layers | Up to 2 months | Thaw in fridge overnight; bring to room temp before serving |
| Make-Ahead | Base + coating separate, assemble later | Up to 2 days in advance | Assemble, freeze 20 min, then glaze fresh for best shine |
A quick tip from my experience: if you’re storing assembled pyramids in the fridge, let them sit at room temperature for 10 minutes before serving so the glaze softens slightly and the texture is at its best. If you freeze them, thaw them in the refrigerator overnight — never at room temperature, as condensation can make the glaze cloudy.
Variations & Easy Swaps
Over the years, I’ve played with this recipe in so many ways — it’s wonderfully adaptable. Here are my favorite variations, each one tested and tweaked to perfection.
| Variation | Key Change | Best For | Difficulty Impact |
|---|---|---|---|
| Mango-Coconut Pyramids | Substitute mango for pineapple | Summer parties, mango lovers | Easy — same method, slightly softer texture |
| Dark Chocolate Diamond Glaze | Use dark chocolate + coconut oil | Chocolate lovers, holiday gifting | Easy — just melt and drizzle |
| Spiced Moroccan Version | Add 1/2 tsp cinnamon + pinch of saffron to base | Fall gatherings, unique flavor twist | Easy — adds warmth without extra work |
Mango-Coconut Pyramids
This is my go-to summer variation. Simply swap the pineapple for the same amount of finely diced ripe mango. Mango breaks down faster than pineapple, so reduce the cooking time to 6–7 minutes. The flavor is sweeter and more floral, with a softer texture that melts in your mouth. I love adding a tiny pinch of cardamom to the mango base — it’s a trick my mother used in Morocco and it’s absolutely magical.
Dark Chocolate Diamond Glaze
For a more sophisticated, less sweet finish, substitute the white chocolate with 1/2 cup dark chocolate (70% cocoa is my favorite) and 1 tsp coconut oil. Omit the powdered sugar — dark chocolate is already sweet enough. The bitterness of the dark chocolate contrasts beautifully with the sweet coconut and pineapple. This version is always a hit at my holiday cookie exchanges in NYC.
Spiced Moroccan Version
This is the variation that takes me straight back to my childhood. Add 1/2 teaspoon of cinnamon and a small pinch of saffron threads (crushed) to the pineapple mixture as it cooks. The saffron adds a subtle floral note and a beautiful golden color, while the cinnamon warms the whole flavor profile. I also like to add a tablespoon of orange flower water to the coconut coating for an extra layer of Moroccan authenticity.
💡 Stella’s Pro Tip: For the spiced version, toast the coconut coating in a dry pan for 2 minutes before adding the liquid — it deepens the flavor and adds a wonderful nuttiness that pairs perfectly with the saffron and cinnamon.
How do you make diamond crystallized coconut pineapple pyramids without them becoming too sticky?
The key to avoiding stickiness is careful moisture management at every stage. First, cook the pineapple base until it’s truly thick and jam-like — the mixture should hold its shape when you drag a spoon through it, with no excess liquid pooling. Second, use the full amount of shredded coconut specified; the coconut absorbs excess moisture from the pineapple and helps the coating hold its structure. Third, don’t skip the freezing step before glazing — 20 minutes in the freezer firms up the coconut coating so it doesn’t become soggy when you apply the glaze. Finally, if your kitchen is very humid, work quickly and keep the pyramids chilled until you’re ready to serve. I also recommend using unsweetened shredded coconut, as sweetened varieties often contain added moisture that can contribute to stickiness.
What is the best type of coconut to use for crystallized coconut pineapple pyramids?
For the very best results, I recommend using fine or medium-shred unsweetened coconut. The fine shred packs together more densely, creating a smooth, cohesive coating that holds its shape beautifully when you wrap it around the pineapple base. Large flaked coconut (the kind you might use for garnishing cakes) is too bulky and won’t compress into a neat layer — it will look messy and fall apart more easily. Unsweetened is crucial because it lets you control the sweetness and prevents the coating from becoming cloying. If you can only find sweetened shredded coconut, reduce the sugar in the coating by 2 tablespoons to compensate. I buy my coconut from a bulk spice shop in Brooklyn, but good-quality unsweetened shredded coconut is widely available at Whole Foods, Trader Joe’s, and most grocery stores.
Can you substitute fresh pineapple with canned pineapple in diamond crystallized coconut pineapple pyramids?
You can substitute canned pineapple, but I strongly recommend using fresh for the best results. Canned pineapple is typically packed in heavy syrup and has been heat-processed, which means it’s softer, sweeter, and higher in moisture than fresh pineapple. If you do use canned, drain it very thoroughly and pat it dry with paper towels before dicing. You’ll also need to cook the mixture longer — about 12–15 minutes — to evaporate the extra liquid. The flavor will be less bright and tangy than fresh pineapple, so I suggest adding an extra teaspoon of lime juice to brighten it up. For the most vibrant, tropical flavor and the best texture, fresh pineapple is absolutely worth the extra few minutes of prep. I buy mine at the Union Square farmers market when it’s in season, but any fresh pineapple will outshine canned in this recipe.
How long do diamond crystallized coconut pineapple pyramids need to set before serving?
The pyramids need two separate setting stages. First, after you wrap each pyramid in the coconut coating, freeze them for 20 minutes — this firms the coating so it holds its shape and doesn’t deform when you apply the glaze. Second, after glazing, let them set at room temperature for 10–15 minutes until the glaze is glossy and firm to the touch. If your kitchen is warm (above 75°F), you can pop them in the refrigerator for 5–7 minutes instead. The total setting time from assembly to serving is about 30–35 minutes, plus the initial chilling of the pineapple base (1 hour minimum). I often make the base and coating a day ahead, then assemble, freeze, glaze, and set on the day I plan to serve them. The pyramids are best enjoyed within 24 hours of glazing, when the glaze is at its most brilliant and crisp.
Can I make diamond crystallized coconut pineapple pyramids vegan or dairy-free?
Absolutely — this recipe is easy to adapt for vegan or dairy-free diets. For the pineapple base and coconut coating, you’re already vegan as long as you use a plant-based honey substitute like maple syrup or agave. The only non-vegan ingredient is the white chocolate in the diamond glaze. To make it vegan, substitute the white chocolate with 1/2 cup coconut butter (also called coconut manna) plus 2 tablespoons powdered sugar and a pinch of salt. Coconut butter creates a naturally glossy, firm finish that’s even more coconut-forward than white chocolate. For a completely dairy-free option, use a high-quality dairy-free white chocolate (many brands now make them). The rest of the ingredients — pineapple, coconut milk, shredded coconut, honey/maple syrup — are naturally dairy-free. So with one simple swap, you have a fully vegan, dairy-free tropical dessert that’s every bit as delicious as the original.
How do I store diamond crystallized coconut pineapple pyramids and how long do they last?
Store your finished pyramids in an airtight container in the refrigerator, with parchment paper between layers to prevent sticking. They will keep beautifully for up to 5 days — in fact, the flavors actually deepen and meld after a day or two. For longer storage, you can freeze them for up to 2 months. To freeze, arrange the glazed pyramids in a single layer on a parchment-lined tray and freeze until solid (about 1 hour), then transfer to a freezer-safe container with parchment between layers. Thaw frozen pyramids in the refrigerator overnight and bring to room temperature for 10 minutes before serving. I don’t recommend storing them at room temperature because the glaze can soften and the coconut coating can dry out. One important note: if your kitchen is humid, condensation can form on the glaze when you take them out of the fridge — simply pat them gently with a paper towel just before serving to restore their shine.
Can I use frozen pineapple instead of fresh for this recipe?
Yes, you can use frozen pineapple, but you’ll need to adjust your technique slightly. Thaw the frozen pineapple completely and drain off any excess liquid — frozen pineapple releases more water than fresh as it thaws. Pat the pineapple dry with paper towels before dicing and cooking. You may need to cook the base for a few extra minutes (10–12 minutes total instead of 8–10) to evaporate the additional moisture. The flavor will still be good, but fresh pineapple has a brighter, more complex flavor that really shines in this recipe. If you’re using frozen pineapple out of convenience, I recommend adding an extra 1/2 teaspoon of lime juice to brighten the flavor. I’ve tested this with both fresh and frozen, and while fresh is my top recommendation, frozen works perfectly well — especially when fresh pineapple isn’t in season.
What is the diamond glaze made of and can I use something else?
The diamond glaze is a simple mixture of melted white chocolate, coconut oil, and powdered sugar. The white chocolate provides the base and sweetness, the coconut oil helps it set with a glossy, snappy finish, and the powdered sugar adds stability and a smooth texture. If you want to use something else, you have several great options. For a dairy-free version, use coconut butter (coconut manna) instead of white chocolate — it sets beautifully and adds even more coconut flavor. For a darker, less sweet finish, use dark chocolate (70% cocoa) with the same amount of coconut oil and omit the powdered sugar. For a pure vegan glaze, combine 1/2 cup cocoa butter with 2 tablespoons powdered sugar and 1 teaspoon vanilla extract — this creates a beautiful, shiny finish similar to white chocolate. Whatever you choose, the glaze is what gives these pyramids their signature “diamond” look, so choose a glaze that sets firmly and has a glossy finish.
Why did my coconut coating crack when I tried to wrap the pyramids?
Cracking in the coconut coating usually happens when the mixture is too dry or too cold. If your coconut coating is cracking as you try to wrap it, it likely needs more moisture. Add a tablespoon of coconut milk at a time and mix until the coating comes together into a pliable, moldable dough — it should feel like soft Play-Doh, not crumbly or stiff. Another common cause is working with the coating when it’s too cold; if you’ve refrigerated it, let it sit at room temperature for 5–10 minutes before wrapping. If the coating is sticking to your hands instead of cracking, wet your palms lightly with cold water — this helps you shape it smoothly. Finally, be gentle when wrapping: press the coating around the pyramid rather than squeezing or kneading it. If a pyramid does crack, simply press the coating back together with your fingers — the freeze step and glaze will cover any minor imperfections.
Can I add alcohol to these diamond crystallized coconut pineapple pyramids?
Yes, you can absolutely add a splash of alcohol to elevate these pyramids for an adult dessert. I love adding 1 tablespoon of dark rum or coconut rum to the pineapple base while it cooks — it adds a rich, warm depth that pairs beautifully with the tropical flavors. For a more sophisticated twist, add 1 teaspoon of dark rum or bourbon to the diamond glaze after melting the white chocolate. You can also soak the diced pineapple in rum for 30 minutes before cooking, then drain and proceed with the recipe. If you’re serving these at a party, a tiny drop of coconut rum brushed onto each pyramid just before serving adds a lovely fragrance. Just keep in mind that alcohol can affect the setting time of the glaze, so add it sparingly and allow a few extra minutes for the glaze to firm up. These are fantastic for holiday gatherings or dinner parties where you want to impress your guests with something truly unique.
Share Your Version!
I absolutely love hearing how these Diamond Crystallized Coconut Pineapple Pyramids turn out in your kitchen! Did you try the spiced Moroccan version with saffron and cinnamon? Or maybe you went all-in with the dark chocolate glaze? Drop a comment below and let me know — your feedback helps other readers decide which variation to try first, and I personally read every single comment.
If you share a photo on Instagram or Pinterest, tag me @stellarecipeblog so I can see your beautiful creations. I feature my favorites in my stories every week! And if you found this recipe helpful, give it a star rating — it means the world to me and helps more people discover these little tropical gems. From my NYC kitchen to yours — I hope this recipe brings as much warmth to your table as it does to mine. — Stella 🧡
Love This Recipe? Save It to Pinterest!
If you enjoyed this Diamond Crystallized Coconut Pineapple Pyramids recipe, don’t let it get lost in your browser tabs! 😄 Pin it now so you can find it again anytime — and explore hundreds more tried-and-tested recipes waiting for you on my Pinterest boards.
👉 Follow Stella on Pinterest @stellarecipeblog
📌 Pin this recipe · 🔁 Re-pin your favorites · 💬 Tag me when you make it — I love seeing your creations!
⭐ Did you make this recipe? ⭐
Leave a star rating and comment below — I read every single one and it helps other readers find this recipe too!

Diamond Crystallized Coconut Pineapple Pyramids
- Yield: 8 1x
Ingredients
- For the Pineapple Base:
- 2 cups fresh pineapple, finely diced
- 2 tbsp honey
- 1 tsp lime juice
- 1 tsp cornstarch
- 1/2 tsp vanilla extract
- For the Coconut Crystallized Coating:
- 1 1/2 cups shredded coconut (unsweetened)
- 1/2 cup coconut milk
- 1/3 cup granulated sugar
- 1 tbsp honey
- 1/2 tsp salt
- For the Diamond Glaze:
- 1/2 cup white chocolate, melted
- 1 tsp coconut oil
- 1 tbsp powdered sugar
- For Garnish (optional):
- Toasted coconut flakes
- Lime zest
Instructions
- 1. Cook pineapple with honey, lime juice, cornstarch, and vanilla in a saucepan until thick and jam-like.
- 2. Spread into a lined tray and chill until fully set.
- 3. Cut the chilled mixture into small pyramid shapes.
- 4. In a pan, heat coconut milk, sugar, honey, and salt until slightly thickened.
- 5. Stir in shredded coconut until a thick, moldable mixture forms.
- 6. Wrap each pineapple pyramid with the coconut mixture, pressing to seal evenly.
- 7. Freeze for 20 minutes to firm up.
- 8. Mix melted white chocolate, coconut oil, and powdered sugar until smooth.
- 9. Coat or drizzle each pyramid to create a crystallized finish.
- 10. Let set until glossy and firm.
- 11. Garnish with toasted coconut flakes and lime zest.
Nutrition
- Calories: 260
- Sugar: 24 g
- Fat: 13 g
- Carbohydrates: 34 g
- Protein: 2 g
Tried This Recipe? Leave a Comment!
Did you make this recipe? I’d love to hear how it turned out! Please leave a comment and a rating below. Your feedback helps other home cooks and supports cheerychop.com!
For more delicious inspiration, follow me on Pinterest!