Easy S’mores Bars
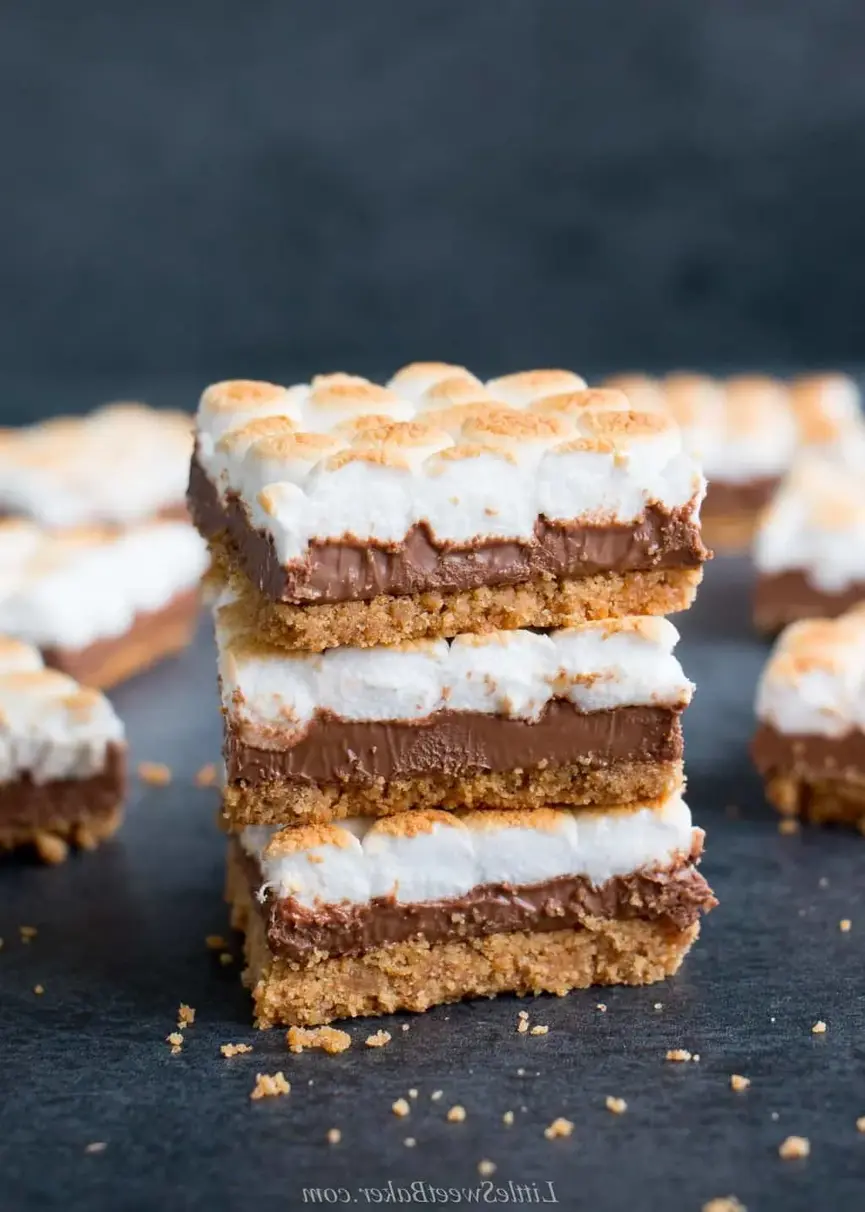
Table of Contents
S’mores Bars – One-Bowl, No Fuss Delight – A Classic Treat with a Moroccan Cinnamon Twist
Growing up in Marrakesh, the smell of toasted almonds and cinnamon would fill my mother’s kitchen. When I first tasted a classic American s’more at a New York City rooftop bar, I was hooked. I thought, why not fuse that sweet, gooey nostalgia with a hint of Moroccan warmth? This recipe marries buttery graham cracker crumbs, silky milk chocolate, and golden marshmallows with a whisper of cinnamon—creating a treat that feels both familiar and adventurous.
Picture a golden crust that crackles just enough to give way to a cascade of melted chocolate, then the fluffy, caramelized marshmallows that melt into a velvety spread. The chocolate’s milky richness is balanced by the slight nuttiness of the graham crackers and the subtle spice of cinnamon, creating layers of flavor that dance on the tongue. The aroma of toasted marshmallows mingles with sweet chocolate and warm spice, making the kitchen feel like a cozy Parisian café in the middle of a New York winter.
What sets this version apart is the simplicity of the one-bowl approach and the careful timing to keep the marshmallows golden without burning. A common mistake I’ve seen is letting the marshmallows sit too long under the broiler, turning them black. I’ll share a quick pro tip to monitor color changes and a secret technique that keeps the chocolate from seeping out of the bottom of the pan. Stick around and you’ll learn how to make these bars look like a professional bakery’s confection while still being a breeze to assemble.
Why This S’mores Bars Recipe Is the Best
The Flavor Secret is the delicate balance of sweet, salty, and spiced elements—thanks to the subtle cinnamon infusion that I learned from my grandmother’s tagine. It turns a classic s’more into a multidimensional dessert that still feels like childhood comfort.
Perfected Texture comes from the precise ratio of graham crumbs to butter, which creates a firm yet tender base that holds up to the molten chocolate. The quick broil step ensures the marshmallows caramelize on the outside while remaining gooey inside, delivering that signature s’more bite.
Foolproof & Fast—this recipe requires only one pan and minimal cleanup. Even a novice can replicate the technique by following the step-by-step instructions and the pro tips I’ve sprinkled throughout.
S’mores Bars Ingredients
I always shop for these ingredients at the Union Square Greenmarket or the gourmet section of Whole Foods. The fresh graham crackers have a buttery crunch that elevates the base, while the mini marshmallows are perfect for an even melt.
Ingredients List
- 2 cups graham cracker crumbs (about 230 g)
- 1/2 cup melted butter (125 ml) (plus 1‑2 Tbsp more if needed)
- 6 extra‑large Hershey’s milk chocolate bars (100‑124 g each)
- 4 cups mini marshmallows (200 g)
Ingredient Spotlight
Graham cracker crumbs are the backbone of the crust. Look for a lightly toasted variety for extra flavor, or use a dark, whole‑grain graham for a healthier twist. If you’re gluten‑free, substitute with almond flour for a nutty base.
Melted butter is essential for moisture. I recommend using clarified butter for a higher smoke point, especially if you plan to bake at a higher temperature. For a dairy‑free version, coconut oil works beautifully and adds a subtle tropical note.
Hershey’s milk chocolate bars give a classic taste, but I’ve found that dark chocolate bars with 30% cacao create a richer bite. If you want a caramelized flavor, try a chocolate bar with sea salt swirls.
Mini marshmallows are the star of the show. Look for those that hold shape when melted—they’re less likely to spill over. As a substitution, use small marshmallow fluff or homemade marshmallow pieces for a chewy texture.
| Original Ingredient | Best Substitution | Flavor / Texture Impact |
|---|---|---|
| Graham cracker crumbs | Almond flour | Nutty, slightly sweet, gluten‑free |
| Melted butter | Coconut oil | Tropical flavor, dairy‑free |
| Hershey’s milk chocolate | Dark chocolate 30% cacao | Rich, slightly bitter, complex |
| Mini marshmallows | Marshmallow fluff | Chewy, softer, melts quickly |
How to Make S’mores Bars — Step-by-Step
Let’s dive into the steps that will make your kitchen smell like a sweet summer campfire.
Step 1: Preheat Oven
Preheat your oven to 350°F (175°C). Line a 9×13‑inch pan with foil and spray the foil with non‑stick cooking spray. Set the pan aside while you prepare the base.
💡 Stella’s Pro Tip: Use a silicone mat on the foil to keep the bars from sticking even after you remove the foil.
Step 2: Mix Crumbs
In a large bowl, combine the graham cracker crumbs and melted butter until the mixture is uniformly moist. If it still feels dry, add 1‑2 Tbsp more melted butter and stir until the crumbs clump together.
⚠️ Common Mistake to Avoid: Over‑mixing the crumbs can make the crust too dense; mix just until combined.
Step 3: Press into Pan
Evenly press the crumb mixture into the bottom of the prepared pan, making sure to firm it down with the back of a spoon or a flat glass. A well‑pressed base ensures the bars stay together.
💡 Stella’s Pro Tip: Press the crust firmly and hold it for 30 seconds to let the butter set before adding chocolate.
Step 4: Bake Crust
Bake the crust for 8‑10 minutes, just until the edges turn a light golden brown. Turn off the oven and let the crust rest; it will firm up further as it cools.
⚠️ Common Mistake to Avoid: Overbaking the crust can make it brittle; stop at the first hint of golden edges.
Step 5: Add Chocolate
Lay the Hershey’s chocolate bars on top of the warm crust, breaking them into even pieces if needed. Return the pan to the oven for 1 minute to let the chocolate start melting.
💡 Stella’s Pro Tip: Use a pre‑heated oven so the chocolate melts instantly, preventing it from sliding off the base.
Step 6: Add Marshmallows
Nestle the mini marshmallows into neat rows, ensuring they cover all melted chocolate. The arrangement will influence how the bars separate later.
⚠️ Common Mistake to Avoid: Clumping marshmallows can cause uneven melting and make cutting messy.
Step 7: Broil Marshmallows
Place the pan in the oven and broil for 1‑2 minutes, watching carefully until the marshmallows are golden brown on top. Remove immediately to avoid burning.
💡 Stella’s Pro Tip: Keep a small glass of water nearby to dab any excess heat on the pan’s edge—this prevents scorching.
Step 8: Cool and Cut
Let the bars cool completely at room temperature, then refrigerate for 15 minutes to firm up. Use a sharp knife to cut into squares; a chilled knife reduces smearing.
💡 Stella’s Pro Tip: Slice on a lightly greased cutting board to keep the bars from sticking.
| Step | Action | Duration | Key Visual Cue |
|---|---|---|---|
| 1 | Preheat oven, line pan | 5 min | Foil shiny, spray coated |
| 2 | Mix crumbs & butter | 2 min | Moist crumb clumps |
| 3 | Press into pan | 30 sec | Even, firm base |
| 4 | Bake crust | 8‑10 min | Light golden edges |
| 5 | Add chocolate | 1 min | Chocolate slightly melted |
| 6 | Add marshmallows | 0 min | Even rows, full coverage |
| 7 | Broil marshmallows | 1‑2 min | Golden tops, caramelized edges |
| 8 | Cool & cut | Cool 30 min, cut 5 min | Sharp knife, chilled surface |
Serving & Presentation
Arrange the bars on a rustic wooden board and drizzle a light chocolate glaze made from melted chocolate and a splash of milk. A dusting of sea salt or a sprinkle of ground cinnamon will add a surprising pop of flavor that ties back to the Moroccan twist.
For a quick garnish, scatter a few toasted pecan halves or candied ginger pieces on top—both are staples I pick up during my weekend trips to the Brooklyn farmer’s market. Serve the bars at room temperature; they’re perfect for a summer picnic or a cozy night in.
Pair them with a latte from a local café, a glass of sparkling water with a splash of lemon, or even a cup of spiced chai that I love from a Moroccan tea shop.
| Pairing Type | Suggestions | Why It Works |
|---|---|---|
| Side Dish | Fresh fruit salad, vanilla ice cream | Sweet contrast and cooling texture |
| Sauce / Dip | Chocolate ganache, caramel sauce | Adds depth of flavor and richness |
| Beverage | Espresso, milkshake, sparkling water | Balances sweetness and offers refreshment |
| Garnish | Toasted almond slivers, pistachio dust | Enhances aroma and adds crunch |
Make-Ahead, Storage & Reheating
When I’m juggling a studio apartment, I often bake a tray in advance and keep it in the refrigerator for a quick snack later in the week. The bars stay fresh and the chocolate holds its integrity.
| Method | Container | Duration | Reheating Tip |
|---|---|---|---|
| Refrigerator | Cling film or airtight container | 3‑4 days | Reheat at 300°F for 5 min to soften |
| Freezer | Wax paper & freezer bag | 2‑3 months | Thaw 30 min at room temp; warm briefly |
| Make‑Ahead | Paper tray or parchment paper | 5‑7 days in fridge | Reheat in oven 350°F for 8 min |
If you’re preparing for a party, I recommend assembling the bars a day before and then refrigerating. The bars will hold their shape, and you can simply reheat each bar in a toaster oven or microwave for a few seconds before serving.
Variations & Easy Swaps
| Variation | Key Change | Best For | Difficulty Impact |
|---|---|---|---|
| Almond Delight | Replace graham crumbs with almond flour; add a splash of almond extract | Nut lovers, gluten-free | Easy |
| Chocolate‑Malt Twist | Add a tablespoon of malt powder to the chocolate layer | Chocolate purists | Easy |
| Coconut & Lime | Replace butter with coconut oil; zest a lime into the crust | Summer, tropical theme | Medium |
Almond Delight
Using almond flour gives the bars a subtle nutty flavor and a lighter texture. I add a teaspoon of almond extract to the butter before mixing, which elevates the taste and pairs beautifully with a drizzle of honey on top.
Chocolate‑Malt Twist
A tablespoon of malt powder in the chocolate layer creates a caramel‑like richness that surprises the palate. The bars taste like a chocolate malt milkshake with a crunchy base—perfect for a cozy night in.
Coconut & Lime
Swapping butter for coconut oil and zesting a lime into the crust gives a bright, tropical flavor. The lime’s acidity balances the sweetness, making these bars refreshing on a hot day or as a unique dessert at a garden party.
Share Your Version!
If you try this recipe, rate it, comment below, and let me know how it turned out. Feel free to post a photo on Instagram or Pinterest and tag @leosfoods. I’d love to hear what variation you added or how you tweaked the spice level.
From my NYC kitchen to yours — I hope this recipe brings as much warmth to your table as it does to mine. — Stella 🧡
Love This Recipe? Save It to Pinterest!
If you enjoyed this S’mores Bars recipe, don’t let it get lost in your browser tabs! 😄 Pin it now so you can find it again anytime — and explore hundreds more tried‑and‑tested recipes waiting for you on my Pinterest boards.
👉 Follow Stella on Pinterest @chefrecipes2
📌 Pin this recipe · 🔁 Re-pin your favorites · 💬 Tag me when you make it — I love seeing your creations!

S’mores Bars
These easy s’mores bars are the perfect ratio of buttery graham cracker, creamy milk chocolate, and toasted gooey marshmallow in every bite!
Ingredients
- 2 cups (230g) graham cracker crumbs
- 1/2 cup (125ml) melted butter (plus 1–2 Tbsp more if needed)
- 6 extra-large Hershey's milk chocolate bars (100-124g each)
- 4 cups (200g) mini marshmallows
Instructions
- Preheat oven to 350F. Line a 9×13" pan with foil and spray with non-stick cooking spray. Set aside.
- Mix the graham cracker crumbs and melted butter together until all is moistened. Add 1-2 tbsp more butter if the mixture still seems dry. Evenly and firmly pat the mixture into the bottom of the prepared pan.
- Bake for 8-10 minutes just until the edges are lightly browned. Turn off the oven.
- Lay the Hershey's chocolate bars on top of the graham cracker crust and put the pan back into the warm oven for 1 minute.
- Nestle the marshmallows into neat rows, covering all of the melted chocolate.
- Put back in the oven and broil for 1-2 minutes until the marshmallows are golden brown. Do not step away from the oven. Keep a close eye the whole time and remove the pan from the oven as soon as it turns golden on top.
- Let cool completely before cutting into squares with a sharp knife. You can place it on the fridge after it has cooled on the counter for 15 minutes to speed up the process. See tip below on how to cut.**