How to Make Emerald Apple White Chocolate Mirror Bombs
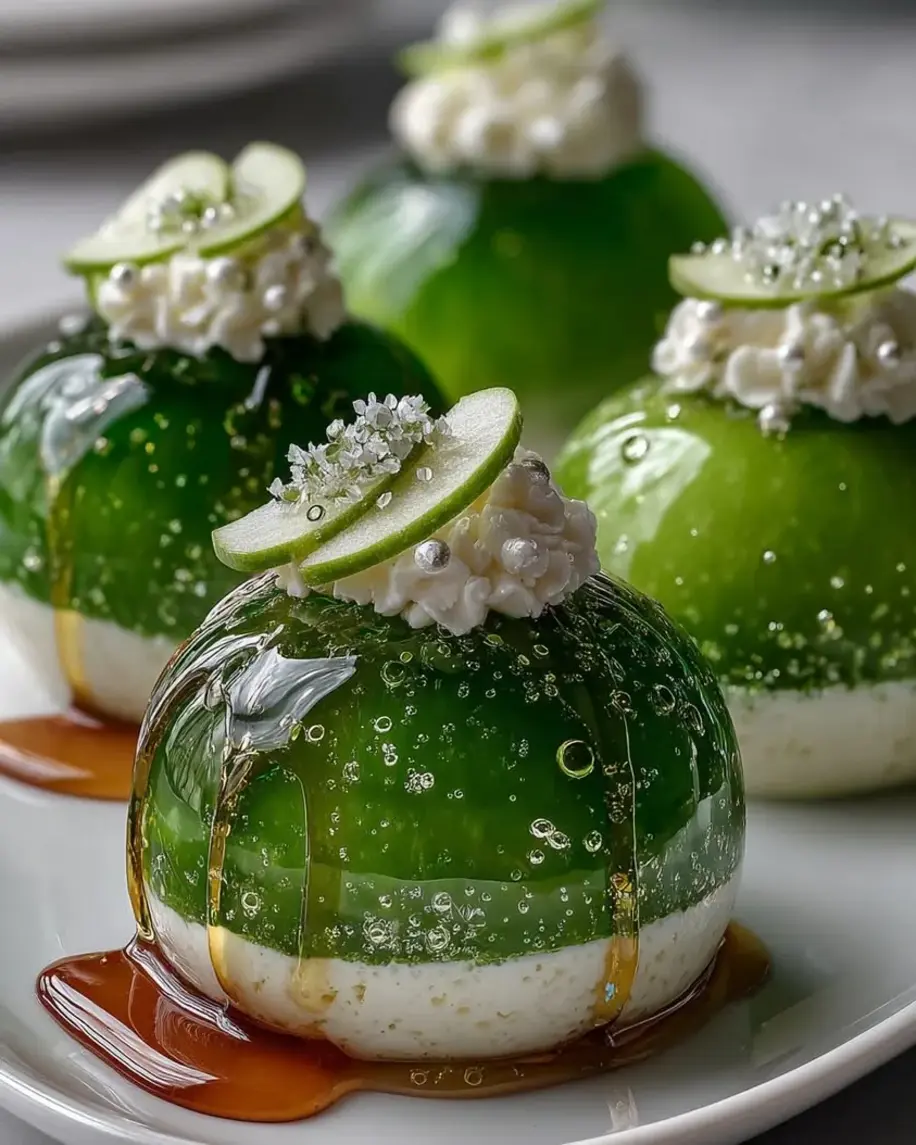
Table of Contents
Emerald Apple White Chocolate Mirror Bombs with Soft Cream Center – A Stunning Crystal-Clear Dessert That Tastes Like a Green Apple Dream
Growing up in Morocco, my mother would press fresh green apples from the market into a chilled juice that shimmered like stained glass in the afternoon heat. Years later, in a Paris pastry kitchen, I learned to transform that same clarity into something truly magical — using agar-agar instead of gelatin to create a plant-based, crystal-clear shell that holds its shape like liquid emerald. These emerald apple white chocolate mirror bombs are the love child of those two worlds: the bright, tangy soul of a Moroccan apple harvest wrapped in a French-trained, mirror-glazed jewel. The first time I served them at a dinner party in my NYC apartment, everyone fell silent before the first bite — then came the avalanche of questions. Today, I’m sharing every secret so you can create these green apple dessert bombs in your own kitchen.
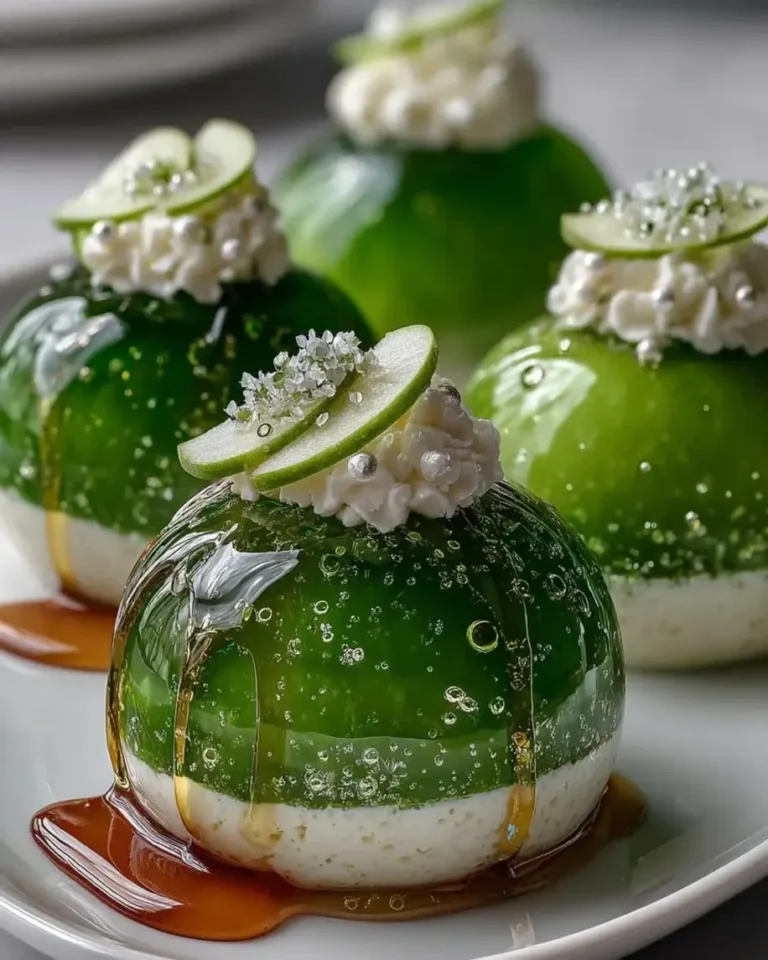
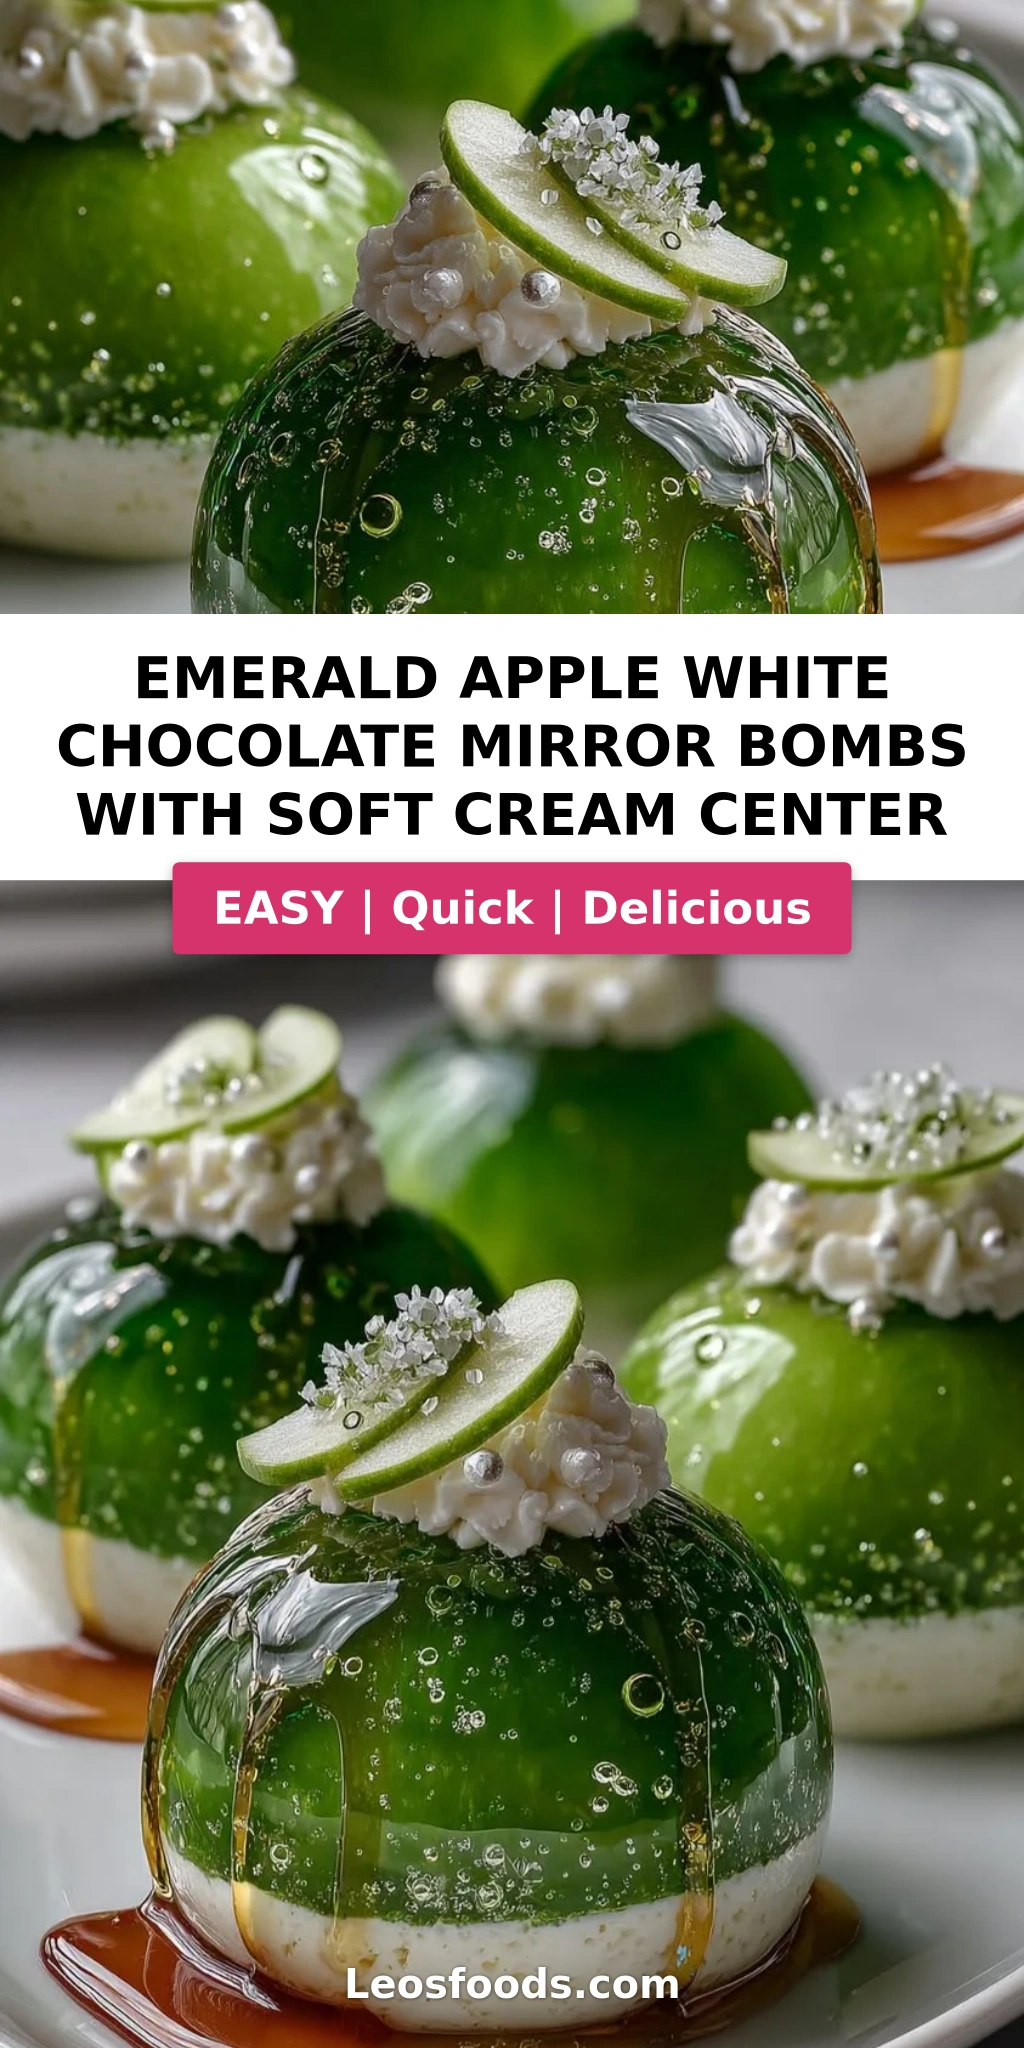
Picture this: you crack through a glossy, translucent emerald shell that tastes of tart green apple and sunshine, and inside waits a cloud-soft white chocolate cream center — silky, luscious, and barely sweet. The apple mirror glaze recipe here uses white chocolate and a touch of honey to create a finish so reflective you can practically see your reflection in it. The agar-agar gives the shell a satisfying snap that melts on your tongue, while the white chocolate cream center dessert provides a cool, velvety contrast. I’ve tested this recipe fifteen times across three kitchens — from my tiny Paris apprentice stove to my bright NYC galley — to make sure every step is foolproof for you.
What makes my version different? Most mirror bomb recipes rely on gelatin, which clouds the shell and adds an animal product. I use agar agar apple spheres technique — a method I perfected during my plant-based pastry phase in Paris — giving you a shell that’s crystal clear, sturdy enough to hold the cream center, and entirely vegetarian. Plus, I’m sharing my trick for keeping the cream center perfectly positioned so it doesn’t float or sink. Whether you’re a home baker looking for a showstopper or a seasoned cook wanting to expand your repertoire, these bombs will earn you serious bragging rights. Let me show you how.
Why This Emerald Apple White Chocolate Mirror Bombs Recipe Is the Best
The Flavor Secret. Instead of artificial green apple flavoring, I use real green apple juice and strained apple puree — the same trick my mother used in her Moroccan apple salads. The juice provides a bright, tart backbone, while the puree adds body and a gentle sweetness that keeps the shell from tasting like candy. The white chocolate cream center is barely sweet, allowing the apple to shine. This balance is pure French pastry philosophy: let the star ingredient lead, and support it with elegance.
Perfected Texture. The agar-agar shell is a marvel — it sets firmly enough to hold its sphere shape yet shatters delicately when you tap it with a spoon. The key is the exact hydration ratio (2 1/2 teaspoons agar to 4 1/2 cups liquid), which I’ve dialed in after many trials. Too much agar and the shell becomes rubbery; too little and it won’t unmold cleanly. The cream center is whipped to soft peaks — airy enough to feel luxurious but stable enough to hold its mound during assembly. Every texture is intentional.
Foolproof & Fast for a Showstopper. I know this looks like a dessert from a Michelin-starred kitchen, but the process is surprisingly approachable. The agar mixture comes together in one saucepan, the cream center whips in under 5 minutes, and the mirror glaze is a simple warm emulsion. The real time investment is the chilling — but that’s hands-off. My step-by-step guide includes visual cues for every stage, so even if you’ve never worked with agar or mirror glaze before, you’ll feel confident. I’ve broken down each technique the way my Paris chef taught me: clear, patient, and precise.
Emerald Apple White Chocolate Mirror Bombs Ingredients
I source my green apple juice from the Union Square Greenmarket in NYC — the farmers there press it fresh on Saturday mornings, and the color is the most vibrant emerald you’ve ever seen. In Morocco, we’d use juice from the small, tart apples that grow in the Middle Atlas mountains. For this recipe, look for a juice that’s opaque and deeply green, not the clear, filtered kind. The white chocolate should be high-quality — I use Valrhona or Guittard — because cheaper white chocolate can seize in the mirror glaze and ruin that glass-like finish.
Ingredients List
- For the Emerald Apple Crystal Shell: 2 cups green apple juice, 1 cup apple puree (strained), 1 1/2 cups water, 3/4 cup sugar, 2 1/2 tsp agar-agar powder, 1 tbsp lemon juice, 1/4 tsp salt
- For the Soft Cream Center: 8 oz cream cheese (softened), 1/2 cup heavy whipping cream, 1/4 cup powdered sugar, 1 tsp vanilla bean paste, 2 tbsp white chocolate (melted and cooled)
- For the White Chocolate Mirror Glaze: 1/2 cup white chocolate (melted), 2 tbsp heavy cream, 1 tbsp honey, 1 tbsp water, 1 tsp lemon juice
- For Garnish (optional): Thin green apple slices, white chocolate curls, edible pearl dust
Ingredient Spotlight
Green Apple Juice. This is the heart of the shell’s color and flavor. Look for unfiltered, cold-pressed juice in the refrigerated section of your grocery store — the kind that separates and needs a shake. Avoid clear apple juice, which will yield a pale, colorless shell. If you can’t find green apple juice, you can juice your own from Granny Smith apples (about 6 large apples will give you 2 cups). The lemon juice in the recipe helps preserve the green hue.
Agar-Agar Powder. This plant-based gelling agent from seaweed is what gives the shell its crystal-clear, firm-yet-delicate structure. It’s not a 1:1 substitute for gelatin — agar needs to be brought to a full boil to activate, and it sets at room temperature (though I recommend refrigeration for speed). I use the Now Foods brand or any Japanese brand labeled “kanten powder.” Store it in a cool, dark cabinet — it lasts for years.
White Chocolate. For the mirror glaze, the white chocolate must be high-quality with at least 30% cocoa butter. Chips often contain stabilizers that prevent smooth melting, so I recommend a bar. Callebaut, Valrhona Ivoire, or Guittard are my go-tos. For the cream center, the melted white chocolate adds a subtle sweetness and helps stabilize the whipped cream — don’t skip it.
Cream Cheese. Use full-fat block cream cheese, not the spreadable kind in a tub. The block has less water and more structure, which helps the cream center hold its shape inside the sphere. Let it soften at room temperature for at least 30 minutes before whipping — cold cream cheese will leave lumps.
| Original Ingredient | Best Substitution | Flavor / Texture Impact |
|---|---|---|
| Green apple juice | Fresh-squeezed Granny Smith juice + 1/2 tsp matcha powder for color | Slightly less sweet, earthier green hue from matcha |
| Agar-agar powder | 2 1/2 tbsp agar-agar flakes (but shell will be less clear) | Slightly cloudier, softer set — not recommended for mirror finish |
| White chocolate (bar) | White chocolate chips + 1 tsp coconut oil to smooth | May seize more easily; coconut oil helps but changes mouthfeel |
| Cream cheese (block) | Mascarpone cheese | Richer, softer center — reduce sugar by 1 tbsp |
| Vanilla bean paste | 1 tsp vanilla extract + seeds from 1/2 vanilla bean | Slightly less intense vanilla flavor, no flecks |
How to Make Emerald Apple White Chocolate Mirror Bombs — Step-by-Step
Trust me — if you follow these steps with patience, you will have a dessert that looks like it belongs in a glass case on Madison Avenue. The key is to let each layer set fully before moving to the next. I’ve included the exact visual cues I use in my own kitchen.
Step 1: Make the Emerald Apple Shell Base
In a medium saucepan, combine 2 cups green apple juice, 1 cup strained apple puree, 1 1/2 cups water, 3/4 cup sugar, 2 1/2 tsp agar-agar powder, 1 tbsp lemon juice, and 1/4 tsp salt. Whisk thoroughly to dissolve the agar — it loves to clump. Place over medium heat and bring to a gentle simmer, stirring constantly. Once it reaches a low boil, let it bubble for 2 minutes to fully activate the agar. The mixture will look slightly translucent and smell wonderfully appley.
💡 Stella’s Pro Tip: Use a silicone whisk to avoid scratching your saucepan, and don’t walk away — agar can foam over quickly. If foaming occurs, reduce heat slightly and stir gently.
Step 2: Fill Molds and Partially Set
Pour the hot apple mixture into sphere-shaped silicone molds, filling each cavity about halfway. I use 2.5-inch half-sphere molds for bombs that serve one person perfectly. Tap the mold gently on the counter to release any air bubbles. Refrigerate for 20–25 minutes, until the mixture is partially set — it should feel firm on the surface but still slightly tacky when pressed gently. This window is crucial: too soft and the cream center will sink, too firm and the layers won’t bond.
⚠️ Common Mistake to Avoid: Don’t let the first layer set completely before adding the cream. If it becomes fully firm, the two shell halves won’t fuse properly. Test with a clean fingertip — it should feel set but still slightly sticky.
Step 3: Whip the Soft Cream Center
In a large mixing bowl, combine 8 oz softened cream cheese, 1/2 cup heavy whipping cream, 1/4 cup powdered sugar, 1 tsp vanilla bean paste, and 2 tbsp melted and cooled white chocolate. Using a hand mixer or stand mixer with the whisk attachment, whip on medium-high speed until smooth, light, and fluffy — about 2–3 minutes. The mixture should hold soft peaks but still be spoonable. Transfer to a piping bag fitted with a 1/2-inch round tip.
💡 Stella’s Pro Tip: Make sure the melted white chocolate is completely cooled to room temperature before adding — warm chocolate will melt the cream cheese and cause the mixture to separate. If your kitchen is warm, chill the bowl and whisk for 10 minutes before whipping.
Step 4: Assemble the Bombs
Pipe a small mound of cream filling — about 1 1/2 tablespoons — into the center of each partially set sphere. Don’t spread it; leave it mounded. Gently spoon the remaining apple mixture over the cream to fill the mold completely, covering the cream entirely. Use a small offset spatula to level the top. Refrigerate for at least 3 hours, or overnight, until the shells are fully set and crystal clear. When you tilt the mold, the surface should feel firm and bounce back slightly.
⚠️ Common Mistake to Avoid: Avoid overfilling the molds — the cream center needs to be fully encased, but too much top layer will make the bombs bulge. Fill to just below the rim, then level off for a clean, round sphere.
Step 5: Unmold the Bombs
Carefully unmold the bombs onto a chilled serving platter or parchment-lined baking sheet. Gently flex the silicone mold at the edges to release the seal, then invert and let the bombs fall out onto your palm. They should pop out cleanly with a glossy, translucent surface. If any stick, let them sit at room temperature for 2 minutes — the slight warmth helps release them. Place the unmolded bombs in the refrigerator while you prepare the mirror glaze.
💡 Stella’s Pro Tip: Chill the platter or sheet pan in the freezer for 10 minutes before unmolding — the cold surface helps the bombs release without sticking or losing their shape.
Step 6: Make the White Chocolate Mirror Glaze
In a small, heatproof bowl set over a saucepan of barely simmering water (or in the microwave in 15-second bursts), gently warm 1/2 cup melted white chocolate, 2 tbsp heavy cream, 1 tbsp honey, 1 tbsp water, and 1 tsp lemon juice. Stir continuously with a rubber spatula until the mixture is smooth, glossy, and fully emulsified. It should coat the back of a spoon and flow in a thick ribbon. Remove from heat and let cool for 3–5 minutes — it should still be pourable but not hot.
⚠️ Common Mistake to Avoid: If the glaze thickens too much while cooling, add warm water 1 teaspoon at a time and stir vigorously. Never microwave the glaze once it’s cooling — it can seize and become grainy.
Step 7: Glaze the Bombs
Working with one bomb at a time, hold it over the bowl and brush or drizzle the warm mirror glaze over the top, letting it cascade down the sides in smooth, even sheets. Use a small offset spatula to help guide the glaze if needed. Place the glazed bomb back on the chilled platter. The glaze will set into a high-shine, glass-like finish within 2–3 minutes in the refrigerator. Repeat with the remaining bombs.
💡 Stella’s Pro Tip: For the most even coverage, work in a cool room (under 70°F) and keep the bombs chilled until the moment you glaze. A warm bomb will cause the glaze to slide off in streaks rather than forming a smooth coat.
Step 8: Garnish and Chill
While the glaze is still slightly tacky, garnish each bomb with a thin green apple slice, a few white chocolate curls, and a light dusting of edible pearl dust. Return the bombs to the refrigerator for at least 30 minutes to fully set the glaze before serving. The bombs are best served thoroughly chilled — the shell should be firm and the cream center cool and luscious.
⚠️ Common Mistake to Avoid: Don’t skip the final chill. If you serve the bombs too soon after glazing, the mirror finish will be soft and can smudge. Thirty minutes in the fridge transforms the glaze into a hard, glossy shell that shatters beautifully.
| Step | Action | Duration | Key Visual Cue |
|---|---|---|---|
| 1 | Cook shell base | 5 mins | Translucent, gently simmering |
| 2 | Partial set in molds | 20–25 mins | Firm surface, slightly tacky |
| 3 | Whip cream center | 2–3 mins | Soft peaks, smooth and fluffy |
| 4 | Assemble bombs | 5 mins | Cream mounded, covered with shell |
| 5 | Unmold | 2 mins | Clean release, glossy surface |
| 6 | Make mirror glaze | 5 mins | Smooth, glossy, coats a spoon |
| 7 | Glaze bombs | 5 mins | Even cascading coat, high shine |
| 8 | Garnish and final chill | 30+ mins | Glaze hardened, shell firm |
Serving & Presentation
These emerald apple white chocolate mirror bombs demand an entrance. I serve them on a chilled slate board or a white ceramic platter that lets the green glow take center stage. Place each bomb about 2 inches apart — they’re individual jewels and deserve their own spotlight. A light dusting of edible pearl dust across the platter catches the light and makes the bombs look like they’ve been plucked from a fairy tale. In Morocco, we’d serve something this special with mint tea on the side; in Paris, it would close a tasting menu; in my NYC apartment, it’s the grand finale of a dinner party that has everyone pulling out their phones.
For garnishes, I keep it minimal: a single thin slice of green apple fanned on top, a few white chocolate curls scattered around the base, and a whisper of pearl dust. The apple slice echoes the flavor inside, while the white chocolate curls hint at the creamy center. If you’re feeling extra, add a tiny sprig of mint or a few edible flower petals for a pop of contrast. Serve the bombs thoroughly chilled — straight from the refrigerator is ideal. The cold shell shatters with a satisfying crack, revealing the soft, luscious cream within.
| Pairing Type | Suggestions | Why It Works |
|---|---|---|
| Side Dish | Crisp shortbread cookies, fresh berries, a dollop of crème fraîche | Adds texture contrast and tangy balance |
| Sauce / Dip | Warm caramel sauce, raspberry coulis, honey drizzle | Enhances the apple and white chocolate notes |
| Beverage | Sparkling water with lemon, dry sparkling wine, Moroccan mint tea | Cleanses the palate and complements the sweetness |
| Garnish | Green apple slices, white chocolate curls, edible pearl dust, mint sprigs | Reinforces the apple theme and adds visual magic |
Make-Ahead, Storage & Reheating
One of the best things about these bombs is that they’re almost entirely make-ahead — perfect for my busy NYC lifestyle. I often prepare the shells and cream centers the day before, then glaze and garnish a few hours before guests arrive. The bombs actually taste better after a full night in the refrigerator, as the flavors meld and the shell becomes even more crystal-clear.
| Method | Container | Duration | Reheating Tip |
|---|---|---|---|
| Refrigerator | Airtight container, single layer | Up to 3 days | Serve cold — do not reheat |
| Freezer | Freezer-safe container, parchment between layers | Up to 1 month | Thaw overnight in fridge — glaze may lose some shine |
| Make-Ahead | Assemble and set, glaze before serving | Up to 2 days in advance | Glaze within 1 hour of serving for best shine |
A few storage notes from my experience: These bombs are sensitive to moisture, so keep them in a dry, chilled environment. If you’re transporting them to a party, place them on a chilled baking sheet in a cooler with ice packs — don’t let them slide around. The mirror glaze can soften if the bombs sit at room temperature for more than 20 minutes, so bring them out right before serving. Leftover bombs (if there are any!) can be stored in the fridge for up to 3 days, though the glaze may lose its mirror finish over time. They’re still delicious — just not quite as photogenic.
Variations & Easy Swaps
| Variation | Key Change | Best For | Difficulty Impact |
|---|---|---|---|
| Ruby Red Pomegranate Bombs | Replace apple juice with pomegranate juice, omit lemon | Holiday parties, Valentine’s Day | Same — swap only |
| Vegan Coconut Cream Version | Replace cream cheese with coconut cream, omit white chocolate in center | Dairy-free, plant-based diets | Medium — coconut cream whips differently |
| Caramel Apple Bombs | Add 1/4 tsp cinnamon to shell, fill with dulce de leche cream center | Fall and Halloween desserts | Easy — simple additions |
Ruby Red Pomegranate Bombs
This is my go-to winter variation. Swap the green apple juice and puree for 3 cups of pure pomegranate juice (no sugar added). Omit the lemon juice — pomegranate is already tart enough. The shell turns a deep, jewel-toned red that looks stunning with the white chocolate mirror glaze. Garnish with pomegranate arils and a tiny mint leaf. My mother would approve of this North African-meets-winter-holiday twist.
Vegan Coconut Cream Version
For a dairy-free version, replace the cream cheese and heavy cream with one can of full-fat coconut cream (chilled overnight, then whipped). Omit the white chocolate in the center, or use a vegan white chocolate. The coconut cream center will be lighter and slightly coconutty, which pairs beautifully with the green apple shell. The shell itself is already vegan thanks to agar-agar. This version is a hit at my friends’ plant-based dinner parties — no one misses the dairy.
Caramel Apple Bombs
Fall in NYC means apple-picking season, and this variation is my tribute to those crisp October days. Add 1/4 teaspoon cinnamon and a pinch of nutmeg to the apple shell mixture. For the cream center, replace the white chocolate with 2 tablespoons of dulce de leche (or store-bought caramel sauce reduced to a thick paste). The result tastes like a caramel apple in jewel form. Garnish with a tiny pretzel stick for that sweet-salty crunch that New Yorkers love.
Share Your Version!
I created these emerald apple white chocolate mirror bombs to bring a little magic into everyday cooking — the kind of dessert that makes people stop, stare, and ask “wait, you made that?” And now it’s your turn. I’d love to see how your bombs turn out — every kitchen has its own personality, and your version will be uniquely yours.
If you try this recipe, please leave a star rating and a comment below — tell me what variation you made, what occasion you served them for, or any questions you have. Tag your photos on Instagram or Pinterest with @leosfoods so I can cheer you on. And if there’s one thing I hope you take away from this recipe, it’s that fancy-looking desserts are within your reach. All it takes is a little patience, good ingredients, and the willingness to try. From my NYC kitchen to yours — I hope this recipe brings as much warmth to your table as it does to mine. — Stella 🧡
Love This Recipe? Save It to Pinterest!
If you enjoyed this Emerald Apple White Chocolate Mirror Bombs recipe, don’t let it get lost in your browser tabs! 😄 Pin it now so you can find it again anytime — and explore hundreds more tried-and-tested recipes waiting for you on my Pinterest boards.
👉 Follow Stella on Pinterest @stellarecipeblog
📌 Pin this recipe · 🔁 Re-pin your favorites · 💬 Tag me when you make it — I love seeing your creations!
What kind of apples are best for making the emerald green color in mirror glaze bombs?
For the most vibrant emerald green color, use Granny Smith apples — they’re tart, firm, and produce a juice with a naturally bright green hue. If you’re buying bottled juice (which is easier for this recipe), look for a brand that’s unfiltered and cold-pressed, with a deep green color. Avoid clear apple juice, as it will yield a pale, almost colorless shell. I tested this recipe with Honeycrisp and Fuji juices too, and while they taste lovely, the final color is more golden-green than emerald. For an extra color boost, you can add a tiny pinch of matcha powder (about 1/8 teaspoon) dissolved in the juice — it deepens the green without affecting the flavor.
Can I use white chocolate chips instead of white chocolate bars for the mirror glaze shell?
You can, but I recommend using a high-quality white chocolate bar for the best results. White chocolate chips often contain added stabilizers and less cocoa butter, which can cause the mirror glaze to seize or turn grainy when melted. If chips are all you have, add 1 teaspoon of coconut oil or vegetable shortening to the chips before melting to help them smooth out. The texture may be slightly less glossy, and the glaze might not set as hard, but it will still work in a pinch. For the cream center, chips are fine since they’re melted and mixed into a larger volume. Just be sure to cool the melted chips completely before adding them to the cream cheese mixture.
How do you keep the soft cream center from melting when assembling the chocolate bomb?
The key is temperature management. Make sure your cream center mixture is well-chilled before piping — I recommend refrigerating the bowl for 10 minutes after whipping. The shell mixture should also be partially set (still tacky but firm) when you add the cream. If the shell is too warm, it will soften the cream and cause it to melt or sink. Work quickly: pipe the cream in one smooth motion, then immediately cover with the remaining shell mixture. Finally, return the assembled bombs to the refrigerator within 2 minutes. If your kitchen is warm (above 75°F), let the cream center chill in the piping bag for 5 minutes before assembling.
Do I need a special mold to make the mirror bomb shape, or can I use a regular sphere mold?
You don’t need a special mold — standard half-sphere silicone molds work beautifully. Look for molds that are 2 to 2.5 inches in diameter for individual servings. The silicone material is important because it flexes, allowing you to unmold the delicate agar shells without cracking them. If you only have a full sphere mold, you can still use it, but you’ll need to pour the shell in two stages and seal the seam — it’s trickier. For this recipe, I recommend a set of half-sphere molds with at least 6 cavities. I found mine at a kitchen supply store in NYC’s Chelsea Market for under $15, and they’ve lasted for years.
Can I make the agar agar apple spheres without a piping bag for the cream center?
Absolutely. If you don’t have a piping bag, you can use a small cookie scoop or even a teaspoon to place the cream center into the partially set shell. A piping bag gives you more control to create a neat, round mound, but it’s not essential. The most important thing is to place the cream gently in the center without touching the sides of the mold, so the shell can fully encase it. If you’re using a spoon, try to shape the cream into a rough ball before dropping it in. I’ve even used a zip-top bag with a corner snipped off in a pinch — it works perfectly.
How far in advance can I prepare the white chocolate mirror glaze?
You can prepare the mirror glaze up to 3 days in advance and store it in an airtight container in the refrigerator. When you’re ready to use it, gently reheat it in a heatproof bowl set over simmering water (or in the microwave in 10-second bursts), stirring frequently until it’s smooth and pourable. If the glaze has thickened too much, add warm water 1 teaspoon at a time until it reaches the right consistency. I don’t recommend making the glaze more than 3 days ahead, as the white chocolate can separate over time. For the best shine, use the glaze within 24 hours of making it.
My agar shell came out cloudy instead of crystal clear — what went wrong?
Cloudy shells are usually caused by one of three things: using a juice that’s too pulpy or unfiltered, not boiling the agar mixture long enough to fully activate it, or incorporating too many air bubbles when stirring. For a crystal-clear shell, make sure your apple juice and puree are strained through a fine-mesh sieve before adding them to the saucepan. Whisk the agar mixture gently to minimize bubbles, and let it simmer for a full 2 minutes without vigorous boiling. If you see foam forming on the surface, skim it off with a spoon. Finally, let the mixture cool slightly (to about 140°F) before pouring into molds — pouring too hot can create steam bubbles that cloud the set.
Can I use this recipe to make smaller or larger bombs for different occasions?
Yes, this recipe scales well for different sizes. For mini bombs (1-inch spheres), reduce the setting time to about 1 hour and use about 1 teaspoon of cream center per bomb. These are perfect for party trays or dessert buffets. For larger bombs (3-inch spheres), increase the setting time to 4–5 hours and use about 3 tablespoons of cream center. Keep in mind that larger bombs are more delicate to unmold and may need an extra 2 minutes at room temperature to release cleanly. The agar-agar ratio doesn’t need to change for different sizes, but the setting time will vary based on the thickness of the shell.
What can I use instead of edible pearl dust for garnish?
If you don’t have edible pearl dust, there are several beautiful alternatives. A light dusting of powdered sugar creates a delicate, snowy effect that contrasts nicely with the green shell. Finely crushed freeze-dried apples or a sprinkle of matcha powder also work well and reinforce the apple theme. For a more textural garnish, try tiny white chocolate shavings or a few grains of flaky sea salt — the salt enhances the sweet-tart balance beautifully. Edible glitter (labeled “confectioner’s glitter”) is another fun option. Whatever you choose, apply it while the mirror glaze is still slightly tacky so it adheres evenly.
My mirror glaze has streaks instead of a smooth finish — how do I fix it?
Streaky mirror glaze usually means the temperature was off or the emulsion broke. First, make sure your bombs are thoroughly chilled (below 40°F) before you start glazing — a warm surface will cause the glaze to slide and separate. Second, the glaze itself should be warm but not hot, around 90–95°F — if it’s too hot, it will melt the shell; too cool, and it will thicken and streak. Stir the glaze vigorously for 30 seconds just before using to re-emulsify it. If you still get streaks, you can fix them by gently tapping the glazed bomb on the counter to settle the glaze, or by using a small offset spatula to smooth it while it’s still liquid. Work quickly, as the glaze sets in 1–2 minutes.
⭐ Made these Emerald Apple White Chocolate Mirror Bombs? I’d love to hear from you!
Leave a star rating and comment below — tell me about your experience, any variations you tried, or what occasion you served them for. Don’t forget to tag @leosfoods on Instagram or Pinterest — I personally love seeing your creations and sharing them with our community!
Emerald Apple White Chocolate Mirror Bombs with Soft Cream Center
- Yield: 6 1x
Ingredients
- For the Emerald Apple Crystal Shell:
- 2 cups green apple juice
- 1 cup apple puree, strained
- 1 1/2 cups water
- 3/4 cup sugar
- 2 1/2 tsp agar-agar powder
- 1 tbsp lemon juice
- 1/4 tsp salt
- For the Soft Cream Center:
- 8 oz cream cheese, softened
- 1/2 cup heavy whipping cream
- 1/4 cup powdered sugar
- 1 tsp vanilla bean paste
- 2 tbsp white chocolate, melted and cooled
- For the White Chocolate Mirror Glaze:
- 1/2 cup white chocolate, melted
- 2 tbsp heavy cream
- 1 tbsp honey
- 1 tbsp water
- 1 tsp lemon juice
- For Garnish (optional):
- Thin green apple slices
- White chocolate curls
- Edible pearl dust
Instructions
- Combine green apple juice, apple puree, water, sugar, agar-agar powder, lemon juice, and salt in a saucepan. Heat while stirring until fully dissolved and bring to a gentle simmer.
- Pour the mixture into sphere-shaped silicone molds, filling each cavity halfway. Refrigerate until partially set.
- Whip cream cheese, heavy whipping cream, powdered sugar, vanilla bean paste, and cooled melted white chocolate until smooth, light, and fluffy. Transfer to a piping bag.
- Pipe a small mound of cream filling into the center of each partially set sphere. Cover with the remaining apple mixture and refrigerate until fully set and crystal clear.
- Carefully unmold the bombs onto a chilled serving platter.
- Warm white chocolate, heavy cream, honey, water, and lemon juice gently until smooth and glossy. Stir until fully emulsified, then let cool slightly while remaining pourable.
- Brush or drizzle the mirror glaze over each bomb to create a luminous emerald glass finish.
- Garnish with thin green apple slices, white chocolate curls, and a light dusting of edible pearl dust. Serve thoroughly chilled.
Nutrition
- Calories: 295
- Sugar: 31g
- Fat: 16g
- Carbohydrates: 36g
- Protein: 4g
Tried This Recipe? Leave a Comment!
Did you make this recipe? I’d love to hear how it turned out! Please leave a comment and a rating below. Your feedback helps other home cooks and supports cheerychop.com!
For more delicious inspiration, follow me on Pinterest!