Emerald Kiwi Lime Cheesecake Gems with Glass Mirror Glaze
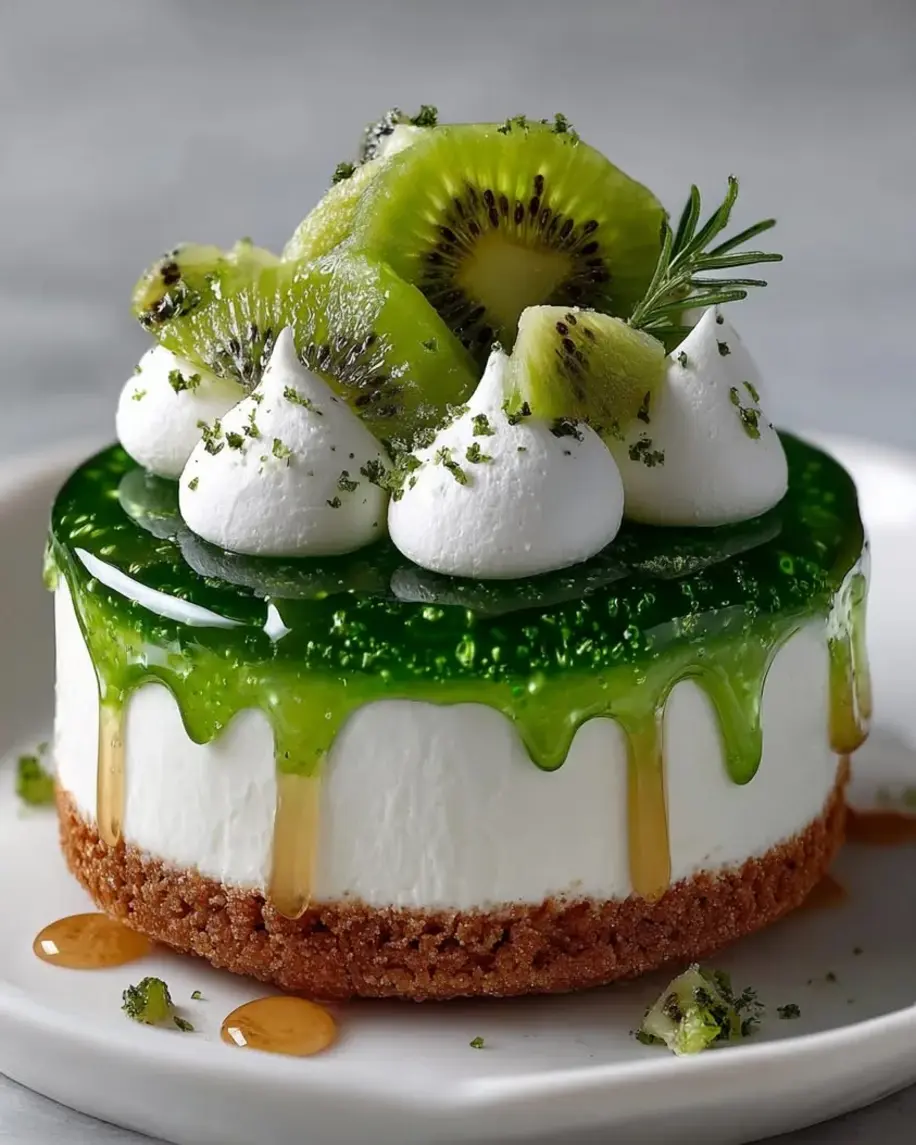
Table of Contents
Emerald Kiwi Lime Cheesecake Gems with Glass Mirror Finish – A Stunning Dessert That Steals the Show
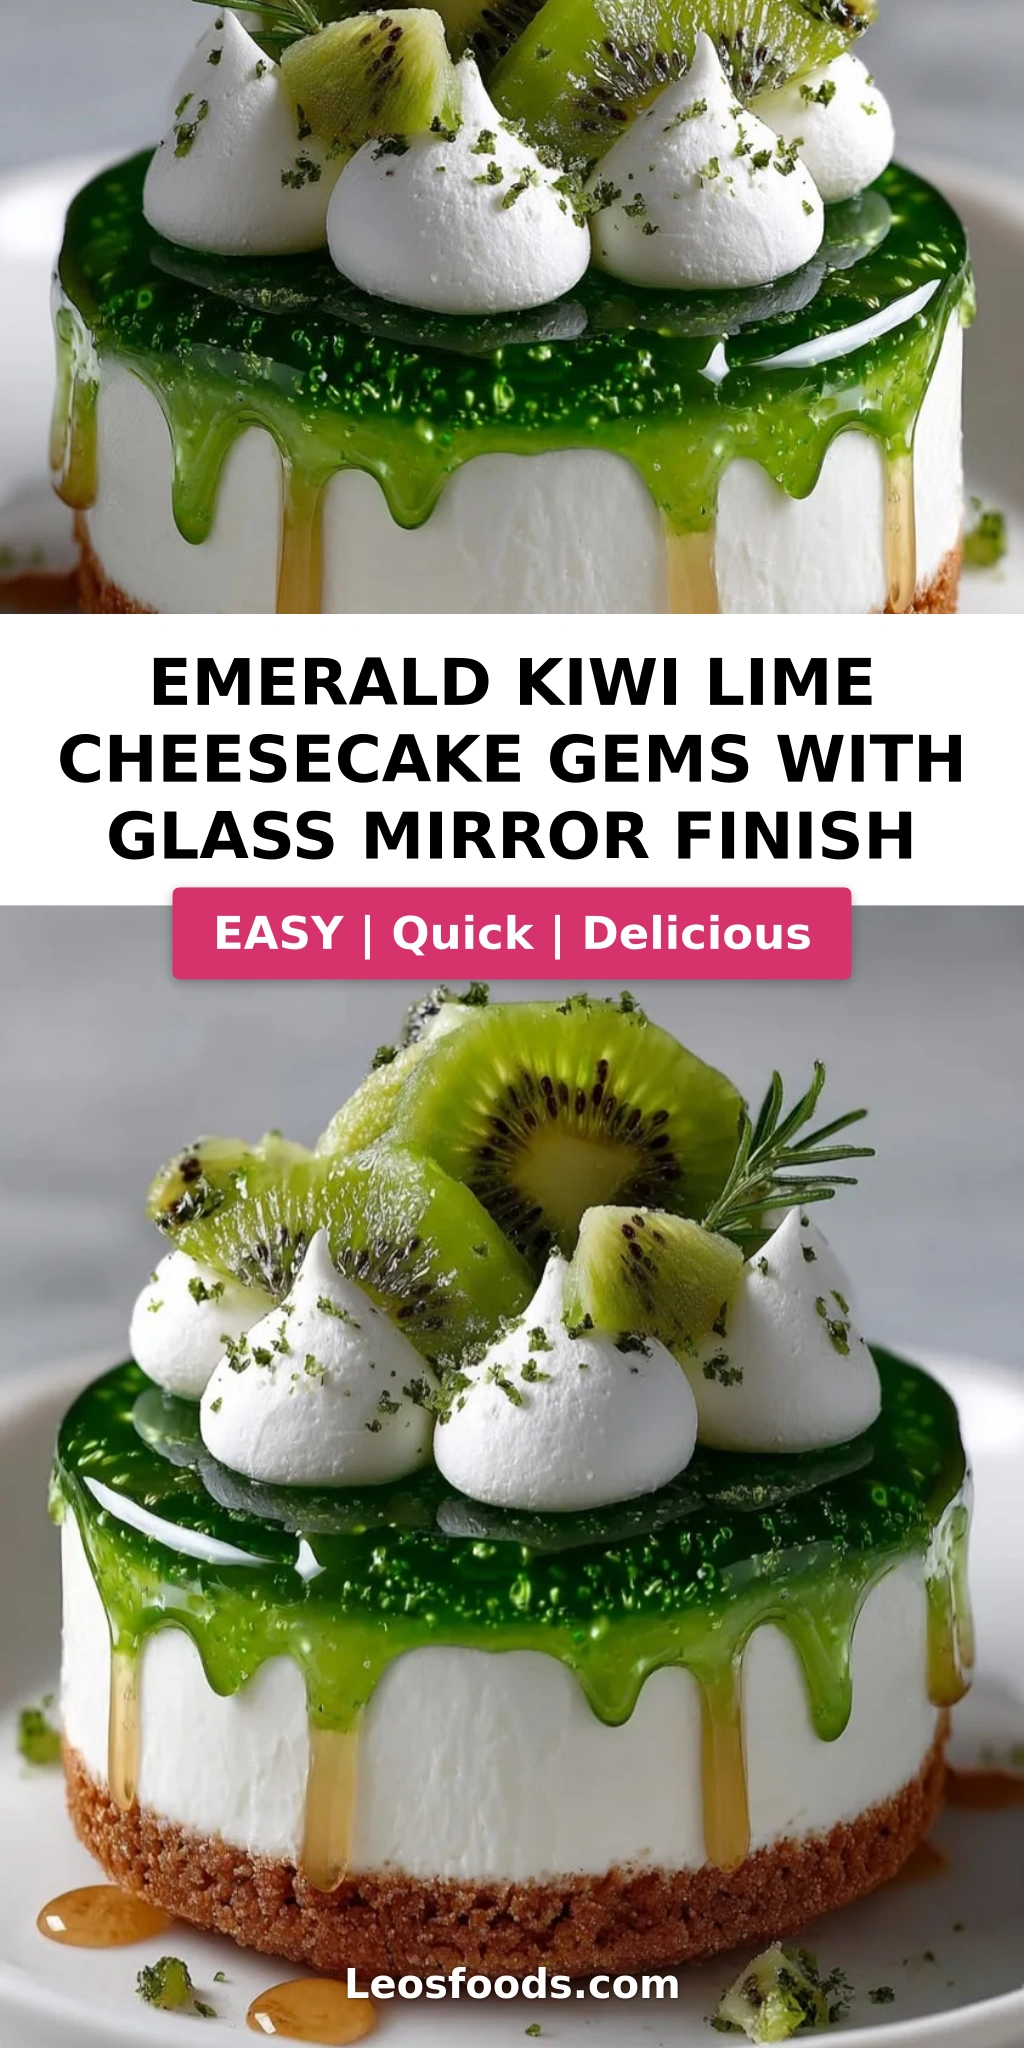
I still remember the first time I saw a mirror glaze cake in a Parisian patisserie window — it was like looking into a polished gemstone, and I knew I had to bring that magic home. These Emerald Kiwi Lime Cheesecake Gems are my love letter to that moment, blending the bright, tangy soul of North African citrus with the precision of French pastry technique. Born from my mother’s instinct to pair kiwi with lime in her Moroccan fruit salads, and refined during my years at culinary school in Paris, this glass mirror finish cake recipe delivers jewel-like individual cheesecakes that taste as stunning as they look.
Imagine slicing into a dome of brilliant emerald green, the mirror-like surface catching the light like polished jade. Beneath that glossy shell lies a cloud-light kiwi lime cheesecake mousse, wrapped around a creamy lime cheesecake center that bursts with zesty brightness. The first bite offers a gentle resistance from the glass mirror finish, then gives way to the silkiest, most refreshing mousse you’ve ever tasted — all anchored by a buttery vanilla cookie base. The kiwi brings a sweet-tart tropical note, while the lime adds a fragrant lift that dances on your palate. It’s the kind of dessert that makes everyone at the table stop and stare before they even pick up a fork.
What sets these mirror glaze cheesecake gems apart is the triple-layer technique I developed in my NYC kitchen: a frozen lime center that stays perfectly distinct within the kiwi mousse, topped with a glass mirror finish that sets with a flawless, streak-free shine. I’ve tested this recipe more times than I can count — through humid summer days and dry winter afternoons — to make sure it works reliably in a home kitchen. In this post, I’ll walk you through every step, share my chef-tested tips for achieving that elusive glass mirror finish, and show you how to avoid the most common pitfalls. From my Moroccan roots to Parisian pastry precision to the bustling farmers markets of New York — these emerald green dessert gems are the culmination of a lifetime of flavor.
Why This Emerald Kiwi Lime Cheesecake Gems Recipe Is the Best
The flavor secret lies in the balance of sweet and tart — I use just-ripe kiwi puree that’s naturally sweet, then heighten it with fresh lime juice and zest for a brightness that cuts through the richness of the cream cheese. In my mother’s kitchen in Morocco, we’d often combine tart fruits with creamy textures, a lesson I carried with me to Paris and now to New York. This recipe captures that North African instinct to layer bright, fresh flavors with indulgent creaminess, creating a dessert that feels both elegant and comforting.
The texture is where French technique really shines. The kiwi mousse uses bloomed gelatin for a stable, aerated structure that holds its shape beautifully when frozen and glazed. The lime cheesecake center is frozen solid before assembly, which keeps it from blending into the mousse — so every bite has a distinct, creamy core. And the glass mirror finish, made with white chocolate and condensed milk, sets to a glossy sheen that stays mirror-bright for hours when applied at the right temperature. I’ve calibrated the exact pouring temperature of 90°F to ensure a smooth, bubble-free surface every time.
This recipe is also surprisingly foolproof for home cooks. Despite its showstopping appearance, the components are straightforward: a no-bake mousse, a simple cookie base, and a mirror glaze that comes together in minutes. The most advanced skill is patience — waiting for each layer to freeze properly. I’ve broken down every step with visual cues and my personal tips so you can create professional-looking mirror glaze cheesecake gems right in your own kitchen. No special equipment needed beyond basic silicone molds and an instant-read thermometer.
Emerald Kiwi Lime Cheesecake Gems Ingredients
I source my kiwi from the greenmarkets in Union Square when they’re in season — the SunGold variety, with their golden flesh and honeyed sweetness, are perfection here. For the lime, I look for firm, glossy-skinned Persian limes that feel heavy for their size. White chocolate for the glaze should be high-quality cocoa butter-based, with no vegetable oils — I use Valrhona Ivoire or Guittard. Let’s talk through every ingredient so you know exactly what to look for on your next grocery run.
Ingredients List
For the Kiwi Lime Cheesecake Mousse:
- 1 cup kiwi puree (from about 4–5 ripe kiwis, blitzed smooth and strained)
- 2 tbsp fresh lime juice
- 8 oz cream cheese, softened to room temperature
- 1/2 cup powdered sugar
- 1 cup heavy cream, cold
- 1 tsp vanilla extract
- 1 tbsp gelatin powder (unflavored)
- 3 tbsp warm water (for blooming gelatin)
For the Lime Cheesecake Center:
- 4 oz cream cheese, softened
- 1/4 cup powdered sugar
- 1 tbsp fresh lime juice
- 1/4 cup heavy cream, cold
- 1/2 tsp vanilla extract
For the Glass Mirror Finish:
- 1 cup white chocolate, finely chopped
- 1/2 cup sweetened condensed milk
- 1 tbsp gelatin powder
- 3 tbsp warm water
- Emerald green food coloring, as needed (gel-based for best results)
For the Cookie Base:
- 1 cup vanilla cookie crumbs (about 12–14 vanilla wafers or shortbread cookies)
- 3 tbsp melted butter
- 1 tbsp granulated sugar
- Pinch of salt
For Garnish (optional but stunning):
- Kiwi slices, halved
- Lime zest curls
- White chocolate shards
Ingredient Spotlight
Kiwi puree is the backbone of this dessert’s bright emerald color and tropical flavor. For the best results, choose kiwis that yield slightly to gentle pressure — not rock-hard, not mushy. Peel them, blitz in a blender until smooth, then strain through a fine-mesh sieve to remove the seeds. The strain step is non-negotiable: seeds will create bumps in your mousse and disrupt the mirror finish. If fresh kiwi is out of season, thawed frozen kiwi puree works beautifully — just drain any excess liquid before measuring.
White chocolate for the glaze must be real white chocolate containing cocoa butter, not white confectionery coating (which contains palm oil). Check the ingredients list: cocoa butter should be listed first. Real white chocolate melts smoothly, sets with a glossy sheen, and emulsifies perfectly with the condensed milk. Confectionery coating can seize or turn streaky. I recommend Valrhona Ivoire, Callebaut, or Guittard for reliable results. If you’re dairy-free, there are excellent plant-based white chocolates made with rice or oat milk powder — just be sure they contain cocoa butter.
Gelatin is the key to both the mousse structure and the mirror glaze stability. Use unflavored powdered gelatin like Knox — it’s widely available in US grocery stores. Bloom it in cold or warm water (not hot!) for exactly 5 minutes until it becomes spongy, then dissolve it gently. Never boil gelatin, as that destroys its setting power. For a vegetarian option, you can substitute agar agar, but the ratios and setting times differ significantly — see the variations section for guidance.
Lime provides the bright, citrusy contrast that makes these gems sing. Always use fresh lime juice — bottled juice has a flat, metallic taste that won’t lift the mousse the same way. I use Persian limes for their tart, floral juice and abundant zest. One medium lime yields about 2 tablespoons of juice and 1 teaspoon of zest. For the most vibrant citrus flavor, add the zest directly to the mousse alongside the juice; the volatile oils in the zest carry the true essence of lime.
| Original Ingredient | Best Substitution | Flavor / Texture Impact |
|---|---|---|
| Kiwi puree | Passion fruit puree or mango puree | More tropical tang (passion fruit) or sweeter, less tart (mango); adjust sugar accordingly |
| White chocolate (glaze) | High-quality dairy-free white chocolate (cocoa butter based) | Slightly less creamy but still glossy; use same technique |
| Gelatin powder | Agar agar (use 1 tsp agar agar + 1 cup liquid, boiled 2 min) | Firmer, less creamy mousse; glaze sets at room temperature faster |
| Heavy cream | Coconut cream (chilled, solid part only) | Coconut flavor adds tropical note; whip to soft peaks as usual |
How to Make Emerald Kiwi Lime Cheesecake Gems — Step-by-Step
I’ll guide you through each component in order — start with the mousse and center, then the base, and finish with the glaze. Work through the steps sequentially, and you’ll have perfect mirror glaze cheesecake gems every time.
Step 1: Bloom the Gelatin
In a small bowl, sprinkle 1 tablespoon gelatin powder over 3 tablespoons warm water (about 110°F — it should feel like warm bath water). Stir gently and let stand for 5 minutes without disturbing. The gelatin will absorb the water and become a firm, jiggly mass — this is called blooming. It’s essential for evenly dispersing gelatin into your mousse and glaze without lumps.
💡 Stella’s Pro Tip: If your gelatin doesn’t bloom fully, your water may be too hot or too cold. Aim for water that feels warm but not hot on your wrist. If you see any undissolved granules after 5 minutes, microwave in 5-second bursts until just dissolved, stirring between each burst.
Step 2: Make the Kiwi Cheesecake Mousse
In a large mixing bowl, beat the softened cream cheese and powdered sugar with an electric mixer on medium speed until completely smooth and fluffy, about 2 minutes. There should be no lumps — if you see any, keep beating. Add the kiwi puree, lime juice, and vanilla extract, and mix on low until just combined, scraping down the sides. In a separate bowl, whip the cold heavy cream to soft peaks — you should see gentle, droopy peaks that hold their shape briefly. Fold the whipped cream into the kiwi mixture in three additions using a silicone spatula, cutting through the center and lifting gently. Finally, warm the bloomed gelatin in the microwave for 10 seconds until it becomes liquid, let it cool for 1 minute, then drizzle it into the mousse while folding continuously. Work quickly but gently — you want a smooth, airy mousse.
⚠️ Common Mistake to Avoid: Over-whipping the cream or folding too vigorously will deflate the mousse and make it dense. Stop whipping the moment you see soft peaks — they should droop slightly when you lift the whisk. Fold with a light hand, using a cutting-and-turning motion rather than circular stirring.
Step 3: Prepare the Lime Cheesecake Center
In a medium bowl, beat the softened cream cheese and powdered sugar until smooth and creamy. Add the lime juice, heavy cream, and vanilla extract, then beat on medium-high for about 1 minute until the mixture is thick, smooth, and holds its shape. Transfer this mixture to a piping bag fitted with a small round tip (or a zip-top bag with a corner snipped). Pipe small dollops — each about 1 tablespoon — into a separate small silicone mold or onto a parchment-lined tray. Freeze for at least 2 hours, until the centers are solid. These frozen centers will keep their shape when embedded in the mousse.
💡 Stella’s Pro Tip: For perfectly round centers, use a mini hemisphere silicone mold. If you don’t have one, pipe the mixture into small mounds and freeze. Once solid, roll them gently between your palms to shape them into rough spheres — your hands will warm them just enough to be pliable.
Step 4: Assemble the Gems
Take your gem-shaped silicone molds (6-cavity molds work beautifully) and fill each cavity just over halfway with the kiwi cheesecake mousse. Press one frozen lime cheesecake center into the middle of each cavity, pushing it down gently so it’s completely surrounded by mousse. Cover with the remaining mousse, filling each cavity to the top. Smooth the surface with an offset spatula. Tap the mold gently on the counter to release any trapped air bubbles. Freeze for at least 4 hours, preferably overnight, until the gems are solid enough to unmold cleanly.
⚠️ Common Mistake to Avoid: If your mousse is too cold when you add the frozen center, it may start to set before the center is fully encased. Make sure your mousse is at room temperature (about 70°F) when filling the molds. If it’s too stiff, scoop it into a piping bag for easier, more controlled filling.
Step 5: Make the Glass Mirror Finish
Bloom another 1 tablespoon gelatin in 3 tablespoons warm water for 5 minutes. In a heatproof bowl set over a saucepan of simmering water (or in the microwave in 20-second bursts), gently melt the finely chopped white chocolate with the sweetened condensed milk, stirring frequently until completely smooth. Remove from heat and add the bloomed gelatin, stirring until fully dissolved. Add emerald green food coloring drop by drop — I use about 6–8 drops of gel coloring for a deep jewel tone — and stir until the color is even. Pass the glaze through a fine-mesh strainer into a clean bowl to remove any lumps. Let it cool to 90°F on a kitchen thermometer before using. This temperature is critical: too hot, and it will melt the frozen gems; too cold, and it will thicken and lose its mirror shine.
💡 Stella’s Pro Tip: To test if your glaze is at the right temperature, dip a spoon and let the excess drip off. It should coat the spoon in a thin, even layer that flows like warm honey. If it’s too thick, gently rewarm it; if too thin, let it cool a few more minutes. The ideal pouring consistency is when it runs off the spoon in a steady stream without breaking into droplets.
Step 6: Glaze the Gems
Remove the frozen gems from their molds and place them on a wire rack set over a baking sheet to catch the drips. Working quickly, pour the glass mirror finish evenly over each gem, starting from the top and letting it cascade down the sides. Use a small offset spatula to gently nudge the glaze over any bare spots — but avoid over-brushing, which can disturb the smooth finish. Let the excess drip off for about 30 seconds, then use a thin spatula to lift each glazed gem and transfer it to a clean parchment-lined tray.
⚠️ Common Mistake to Avoid: Never touch the glaze after it’s been poured — fingerprints will ruin the mirror effect. If you see a thin spot, pour a second, smaller amount of glaze directly onto that area and let it naturally flow and even out. The glaze should be about 1/8-inch thick for the perfect glass-like appearance.
Step 7: Make the Cookie Base
While the glaze sets, make the base. Combine vanilla cookie crumbs, melted butter, granulated sugar, and a pinch of salt in a small bowl. Mix with a fork until the crumbs are evenly moistened and hold together when pressed. Press about 2 tablespoons of the mixture into the bottom of each gem-shaped cavity of a separate mold, or free-form small discs on a parchment-lined tray. Freeze for 15 minutes to firm up. Once set, place each glazed gem on top of a cookie base, pressing very gently to adhere.
💡 Stella’s Pro Tip: I like to freeze the cookie base in the same gem-shaped cavities I used for the mousse — they fit perfectly. If you don’t have extra molds, press the crumb mixture into small ring molds or even the lid of a water bottle for perfectly round bases.
Step 8: Garnish and Serve
Garnish each gem with a thin kiwi slice, a delicate curl of lime zest, and a white chocolate shard for that professional patisserie look. Refrigerate for at least 15 minutes to allow the glaze to fully set and the gems to soften slightly to a mousse-like consistency. Serve cold — these are best enjoyed within 24 hours of glazing, when the mirror finish is at its most dramatic.
⚠️ Common Mistake to Avoid: Don’t skip the final chill in the refrigerator. The gems need that time to soften from frozen to mousse texture. If you serve them straight from the freezer, they’ll be too hard and the glaze may crack when you cut into them. The 15-minute chill is the sweet spot.
| Step | Action | Duration | Key Visual Cue |
|---|---|---|---|
| 1 | Bloom gelatin | 5 min | Gelatin becomes a firm, jiggly mass |
| 2 | Make kiwi mousse | 10 min | Smooth, pale green, holds soft peaks |
| 3 | Make lime center | 5 min + 2 hr freeze | Thick, pipeable, holds shape when frozen |
| 4 | Assemble gems | 10 min + 4 hr freeze | Gems unmold cleanly, feel solid |
| 5 | Make mirror glaze | 15 min | Smooth, glossy, coats spoon evenly at 90°F |
| 6 | Glaze gems | 5 min | Even, shiny coating with no bare spots |
| 7 | Make cookie base | 5 min + 15 min freeze | Firm crumb base holds together |
| 8 | Garnish and serve | 15 min chill | Glaze is set, mousse is soft but holds shape |
Serving & Presentation
These Emerald Kiwi Lime Cheesecake Gems are designed to be served as individual showstoppers — perfect for dinner parties, bridal showers, or any occasion that calls for a dessert that photographs like a dream. Place each gem on a small dessert plate with the kiwi slice and white chocolate shard arranged artfully beside it. I love to add a tiny dollop of lightly sweetened whipped cream on the side, dusted with a hint of lime zest for contrast. The emerald green glaze against the white plate is stunningly dramatic.
For a Moroccan-inspired touch, I sometimes serve these alongside a small glass of mint tea — the floral, slightly sweet tea is a beautiful counterpoint to the tangy lime and kiwi. In my NYC dinner parties, I’ve paired them with a chilled glass of Moscato d’Asti or a lime-basil spritzer for a non-alcoholic option that matches the citrus vibrancy. The gems are rich enough to stand alone, but the contrast of a light, bubbly drink elevates the whole experience.
When presenting a full spread, I arrange the gems on a mirrored or marble serving board — the reflection doubles the visual impact. Add a few fresh kiwis, whole limes, and a scatter of white chocolate curls around the board for a lush, almost edible landscape effect. Your guests will photograph the table before they take a bite, I promise you that.
| Pairing Type | Suggestions | Why It Works |
|---|---|---|
| Side Dish | Lightly sweetened whipped cream, fresh berries, edible flowers | Adds freshness and a creamy counterpoint to the glaze |
| Sauce / Dip | Passion fruit coulis, raspberry sauce, lime caramel | Adds another layer of fruit acidity or caramel depth |
| Beverage | Moscato d’Asti, lime-basil spritzer, mint tea | Light effervescence or floral notes complement citrus without overwhelming |
| Garnish | Kiwi slices, lime zest curls, white chocolate shards, edible gold leaf | Reinforces the kiwi-lime flavor and adds visual elegance |
Make-Ahead, Storage & Reheating
As a busy NYC home cook who’s also running a food blog, I rely on make-ahead strategies that keep the dessert at its peak. These Emerald Kiwi Lime Cheesecake Gems are actually at their best when assembled over two days — the flavors meld and mature beautifully. Here’s how I manage it in my own kitchen, plus the best ways to store them so that glass mirror finish stays flawless.
| Method | Container | Duration | Reheating Tip |
|---|---|---|---|
| Refrigerator | Airtight container, single layer, parchment between gems | Up to 3 days | Serve cold, straight from fridge; no reheating needed |
| Freezer | Airtight freezer container, wrapped individually in plastic wrap then foil | Up to 1 month | Thaw in refrigerator overnight before serving |
| Make-Ahead | Un-glazed frozen gems in a zip-top bag | Make mousse and centers up to 1 week ahead, glaze day of serving | Glaze should be poured onto frozen gems immediately before serving for best shine |
The most important thing to remember is that the glass mirror finish is at its absolute best within the first 24 hours. Over time, the glaze can absorb moisture from the refrigerator and lose some of its high-shine gloss. If you need to store them longer, keep the gems un-glazed and frozen, then prepare the glaze fresh on the day you plan to serve them. I often prep the mousse and centers over the weekend, then assemble and glaze on a weeknight for dinner guests — it takes under 30 minutes once the components are ready. Never reheat these gems in a microwave or oven — they’re meant to be enjoyed cold, with the mousse soft and creamy, not warm.
If the glaze does develop condensation after refrigeration (a few tiny water droplets on the surface), gently blot them with a paper towel just before serving. The shine will still be beautiful, but for that flawless glass mirror effect, serve the gems within a few hours of glazing. This is the secret to the most stunning presentation — and one of the reasons I love making these for special occasions where they’ll be devoured quickly.
Variations & Easy Swaps
| Variation | Key Change | Best For | Difficulty Impact |
|---|---|---|---|
| Tropical Passion Fruit | Replace kiwi puree with passion fruit puree + 1 extra tbsp sugar | A more intense tropical tang; stunning yellow-orange glaze | Same — just swap the fruit puree |
| Gluten-Free / Dairy-Free | Use certified GF vanilla cookies + dairy-free cream cheese and white chocolate | Dietary restrictions without sacrificing flavor or texture | Moderate — dairy-free white chocolate can be finicky to melt |
| Raspberry Rose Seasonal | Replace kiwi puree with raspberry puree + 1 tsp rose water in mousse | Romantic occasions like Valentine’s Day or bridal showers | Same — rose water adds floral note without changing technique |
Tropical Passion Fruit Variation
This version is a nod to the North African love for passion fruit — my mother would buy them from a street vendor in Marrakech, and the sweet-tart aroma still transports me. Swap the kiwi puree for an equal amount of passion fruit puree (fresh or thawed frozen). Passion fruit is more tart than kiwi, so increase the powdered sugar in the mousse to 3/4 cup. For the glaze, use a golden yellow food coloring or leave it uncolored for a natural pale gold mirror finish. The passion fruit seeds can be used as a garnish — they add a delightful pop of texture. This variation is slightly tangier and more aromatic, with a complexity that pairs beautifully with the lime center.
Gluten-Free / Dairy-Free Variation
I tested this version for a friend with celiac disease and lactose intolerance, and it turned out beautifully. Use certified gluten-free vanilla wafer cookies for the base — brands like Goodie Girl or Pamela’s work perfectly. For the cream cheese, Kite Hill makes an excellent plant-based cream cheese that behaves very similarly to dairy cream cheese when softened. The white chocolate needs to be dairy-free and cocoa butter-based; I recommend Pascha 55% Dark or iGourmet. The texture of the mousse will be slightly less creamy but still light and luscious. For the glaze, dairy-free white chocolate can be more sensitive to overheating — melt it gently at 50% power in the microwave, stirring every 15 seconds, until just smooth. The mirror finish will still be glossy, though it may set a bit faster, so work quickly.
Raspberry Rose Seasonal Twist
For a romantic variation perfect for spring weddings or Valentine’s Day, replace the kiwi puree with an equal amount of raspberry puree (strained to remove seeds). Add 1 teaspoon of rose water to the mousse along with the vanilla extract — start with 1/2 teaspoon and taste before adding more, as rose water can be potent. The color will shift to a deep pink, which you can enhance with a drop of red or pink food coloring in the glaze. Garnish with fresh raspberries, edible rose petals, and a dusting of freeze-dried raspberry powder. This version is a favorite at my NYC dinner parties — it’s delicate, floral, and utterly romantic. The lime center remains a constant, its citrus brightness cutting through the floral sweetness just as it does with the kiwi.
What is the secret to achieving a perfect glass mirror finish on a cheesecake gem?
The secret lies in three key factors: temperature, straining, and technique. First, your mirror glaze must be cooled to exactly 90°F before pouring — too hot and it will melt the frozen cheesecake, too cold and it will thicken and lose its mirror shine. Second, always strain the glaze through a fine-mesh sieve after mixing to remove any undissolved gelatin or lumps of white chocolate. Third, pour the glaze in one continuous motion over the frozen gem from about 6 inches above, letting it cascade naturally. Never brush or spread it, as that creates streaks and bubbles. Testing the glaze on a spoon first is a great way to check consistency: it should coat the spoon in a smooth, even layer that flows like warm honey.
Can I substitute the kiwi and lime with other fruits in this recipe?
Absolutely! This recipe is designed to be adaptable to other fruit pairings. Mango and passion fruit make an excellent tropical substitution — replace the kiwi puree with mango puree and the lime with passion fruit juice for a golden emerald variation. Raspberry and lemon is another classic pairing — use raspberry puree in the mousse and lemon juice in the center. The key is to maintain the same acidity balance: if your replacement fruit is sweeter (like mango), reduce the sugar a little; if it’s more tart (like passion fruit), increase the powdered sugar slightly. For berry-based substitutions, always strain the puree to remove seeds, which can disrupt the smooth texture of the mousse and the mirror finish.
How long does it take to set the glass mirror glaze on these mini cheesecakes?
The glass mirror glaze itself sets very quickly — it will begin to firm up within 10 to 15 minutes at room temperature, forming a thin, shiny skin. However, I recommend chilling the glazed gems in the refrigerator for at least 15 minutes before serving. This allows the glaze to fully set to a touchable, non-sticky finish while also allowing the frozen mousse to soften slightly to a creamy, mousse-like texture. If you’re serving them at a party, you can glaze them up to 2 hours ahead and keep them in the refrigerator. Beyond that, the glaze may start to absorb moisture and lose some of its high-gloss shine, so for the most dramatic mirror effect, glaze them as close to serving time as possible.
What is the best way to store Emerald Kiwi Lime Cheesecake Gems to keep the mirror finish intact?
To preserve that stunning glass mirror finish, store the gems in an airtight container in a single layer with parchment paper between each one to prevent the glaze from sticking or smudging. Place them in the refrigerator for up to 3 days, but be aware that the glaze may lose some of its high-shine gloss over time due to moisture in the fridge. For the longest storage with the best results, keep the cheesecake gems un-glazed and frozen for up to 1 month. When you’re ready to serve, prepare the mirror glaze fresh, pour it over the frozen gems, and let them thaw in the refrigerator for about 30 minutes. This method ensures the glaze is at its absolute brightest and most reflective.
Can I use a different type of mold if I don’t have gem-shaped silicone molds?
Yes, you can use any small silicone mold — hemisphere, dome, square, or even cupcake liners (though the mirror glaze effect is best on smooth, curved surfaces). The key is that the mold must be flexible silicone so you can unmold the frozen gems cleanly without cracking or breaking the mousse. If using hemisphere molds, you’ll create mini domes that look like polished gemstones. For a more modern look, try small rectangular or cubic molds. Just make sure the volume of each cavity is about 1/4 to 1/3 cup so that the gems are a single-serving size. Silicone is essential because the mousse needs to be frozen solid before unmolding, and only silicone will release cleanly without sticking.
Why did my glass mirror finish turn streaky or cloudy?
Streaky or cloudy mirror glaze is usually caused by one of three issues. First, the glaze was too cold when poured — if it’s below 85°F, it will thicken unevenly and create streaks. Second, the glaze wasn’t strained properly, leaving small lumps of undissolved gelatin or chocolate that mar the smooth surface. Third, the frozen gems may have been slightly wet or had condensation on the surface when you poured the glaze, which causes the glaze to slide off or turn cloudy. To fix this, make sure your glaze is at the correct temperature, strain it twice if needed, and pat the frozen gems dry with a paper towel before glazing if they have any frost or condensation. Also, avoid opening and closing the freezer door frequently while they’re freezing, as temperature fluctuations cause more condensation.
Can I make these cheesecake gems without gelatin?
Yes, you can substitute agar agar for gelatin, but the technique and texture will change. For the mousse, use 1 teaspoon of agar agar powder dissolved in 1 cup of liquid (the kiwi puree plus lime juice) — bring it to a full boil for 2 minutes while stirring, then let it cool slightly before folding into the cream cheese mixture. The mousse will set more quickly (within 15-20 minutes at room temperature) and have a firmer, more jelly-like texture compared to the silky, creamy texture of gelatin-set mousse. For the mirror glaze, use 1 teaspoon of agar agar instead of gelatin, dissolved in the condensed milk before adding the white chocolate. Agar agar sets at room temperature, so you need to work quickly and pour the glaze while it’s still warm. The finish will be slightly less glossy but still quite beautiful.
How do I prevent air bubbles in my mirror glaze?
Air bubbles are the enemy of a flawless glass mirror finish, but they’re easy to prevent. First, when you whisk the glaze, do it gently and slowly — vigorous whisking incorporates air. Use a spatula for stirring rather than a whisk when possible. Second, after the glaze is mixed, let it rest for 2-3 minutes before pouring; this allows any tiny bubbles to rise to the surface and pop. You can also run a kitchen torch or even a lighter quickly over the surface of the glaze in the bowl to pop any remaining bubbles. Third, when pouring over the frozen gems, pour from a height of about 6 inches in a thin, steady stream — this helps the glaze flow smoothly without trapping air. Finally, make sure your frozen gems are perfectly smooth and free of frost, as rough surfaces can cause air pockets when the glaze flows over them.
Can I use frozen kiwi to make the puree for this recipe?
Yes, frozen kiwi works beautifully for making the puree, and it’s actually a great option when fresh kiwis are out of season. Thaw the frozen kiwi completely in a colander set over a bowl to catch any excess liquid — you want to use the fruit solids, not the watery juice that separates during thawing. Blitz the thawed kiwi in a blender until smooth, then strain through a fine-mesh sieve to remove the seeds. The puree may be slightly thinner than fresh kiwi puree, so you might need to reduce it slightly on the stovetop to concentrate the flavor if it seems watery. Frozen kiwi is just as nutritious and flavorful as fresh, and it’s often more affordable. Look for bags of frozen kiwi chunks in the freezer aisle, or freeze your own ripe kiwis in season.
What type of food coloring works best for achieving a vibrant emerald green mirror glaze?
For the most vibrant, jewel-toned emerald green, I highly recommend gel-based food coloring rather than liquid drops. Gel colors are concentrated, so you only need a small amount, and they don’t thin out the glaze. Start with 4 to 6 drops of emerald green gel, stir thoroughly, then add more drop by drop until you reach your desired shade. For a deeper, more dramatic emerald that photographs beautifully, combine equal parts emerald green and a tiny drop of leaf green or forest green gel — this creates a rich, multi-dimensional color that looks like a cut gemstone. Avoid using too much coloring, as it can affect the taste and texture of the glaze. If you prefer natural coloring, matcha powder mixed with a little white chocolate will give a soft, earthy green, though it won’t be as bright. Spirulina powder also yields a beautiful emerald tone, but it needs to be very finely sifted to avoid specks.
Share Your Version!
Now it’s your turn — I can’t wait to see how these Emerald Kiwi Lime Cheesecake Gems turn out in your kitchen. Did you try the classic kiwi-lime version or one of the variations? Did your glass mirror finish come out perfectly on the first try, or did you learn something new along the way? Drop a star rating below and leave a comment sharing your experience — I read every single one, and your feedback helps other home cooks know what to expect. Tag @leosfoods on Instagram or Pinterest when you share your photos — I love seeing your creations and often feature my favorites in my stories.
If you’re feeling adventurous, I’d love to hear which variation you’re most excited to try. Are you drawn to the tropical passion fruit twist, the romantic raspberry rose version, or do you have a new fruit combination in mind? Ask your questions in the comments too — I answer every single one and I’m always happy to troubleshoot a tricky glaze or suggest substitutions for what you have on hand. From my NYC kitchen to yours — I hope this recipe brings as much warmth to your table as it does to mine. — Stella 🧡
Love This Recipe? Save It to Pinterest!
If you enjoyed this Emerald Kiwi Lime Cheesecake Gems recipe, don’t let it get lost in your browser tabs! 😄 Pin it now so you can find it again anytime — and explore hundreds more tried-and-tested recipes waiting for you on my Pinterest boards.
👉 Follow Stella on Pinterest @stellarecipeblog
📌 Pin this recipe · 🔁 Re-pin your favorites · 💬 Tag me when you make it — I love seeing your creations!
Did you make these Emerald Kiwi Lime Cheesecake Gems? 🌿 I’d love to hear how your mirror finish turned out! Leave a star rating and comment below — your feedback helps fellow bakers and makes my day. ❤️
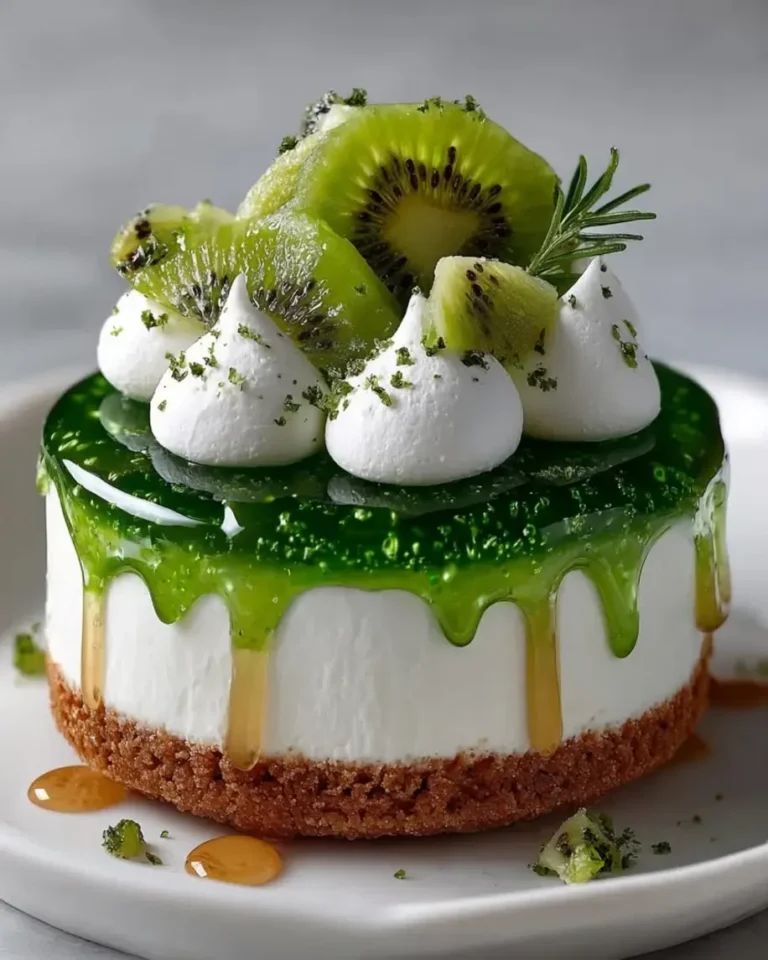
Emerald Kiwi Lime Cheesecake Gems with Glass Mirror Finish
- Yield: 8 1x
Ingredients
- For the Kiwi Lime Cheesecake Mousse:
- 1 cup kiwi puree
- 2 tbsp fresh lime juice
- 8 oz cream cheese, softened
- 1/2 cup powdered sugar
- 1 cup heavy cream
- 1 tsp vanilla extract
- 1 tbsp gelatin powder
- 3 tbsp warm water
- For the Lime Cheesecake Center:
- 4 oz cream cheese, softened
- 1/4 cup powdered sugar
- 1 tbsp lime juice
- 1/4 cup heavy cream
- 1/2 tsp vanilla extract
- For the Glass Mirror Finish:
- 1 cup white chocolate, finely chopped
- 1/2 cup sweetened condensed milk
- 1 tbsp gelatin powder
- 3 tbsp warm water
- Emerald green food coloring, as needed
- For the Cookie Base:
- 1 cup vanilla cookie crumbs
- 3 tbsp melted butter
- 1 tbsp granulated sugar
- Pinch of salt
- For Garnish (optional):
- Kiwi slices
- Lime zest curls
- White chocolate shards
Instructions
- Bloom gelatin in warm water and let stand for 5 minutes.
- Beat cream cheese and powdered sugar until smooth.
- Mix in kiwi puree, lime juice, and vanilla extract.
- Whip heavy cream to soft peaks and fold into the kiwi mixture.
- Stir in dissolved gelatin until fully incorporated.
- In a separate bowl, beat cream cheese, powdered sugar, lime juice, heavy cream, and vanilla until smooth.
- Pipe the lime cheesecake mixture into small molds and freeze until firm.
- Fill gem-shaped silicone molds halfway with the kiwi cheesecake mousse.
- Place a frozen lime cheesecake center into each mold.
- Cover with remaining mousse and freeze until completely firm.
- Combine white chocolate, condensed milk, dissolved gelatin, and emerald green coloring until smooth and glossy.
- Unmold the frozen gems and place on a wire rack.
- Pour the glass mirror finish evenly over each gem.
- Mix cookie crumbs, melted butter, sugar, and salt, then press into small gem-shaped bases.
- Place each glazed gem onto a prepared base.
- Garnish with kiwi slices, lime zest curls, and white chocolate shards.
- Chill for 15 minutes before serving.
Nutrition
- Calories: 425
- Sugar: 31 g
- Fat: 29 g
- Carbohydrates: 37 g
- Protein: 6 g
Tried This Recipe? Leave a Comment!
Did you make this recipe? I’d love to hear how it turned out! Please leave a comment and a rating below. Your feedback helps other home cooks and supports cheerychop.com!
For more delicious inspiration, follow me on Pinterest!