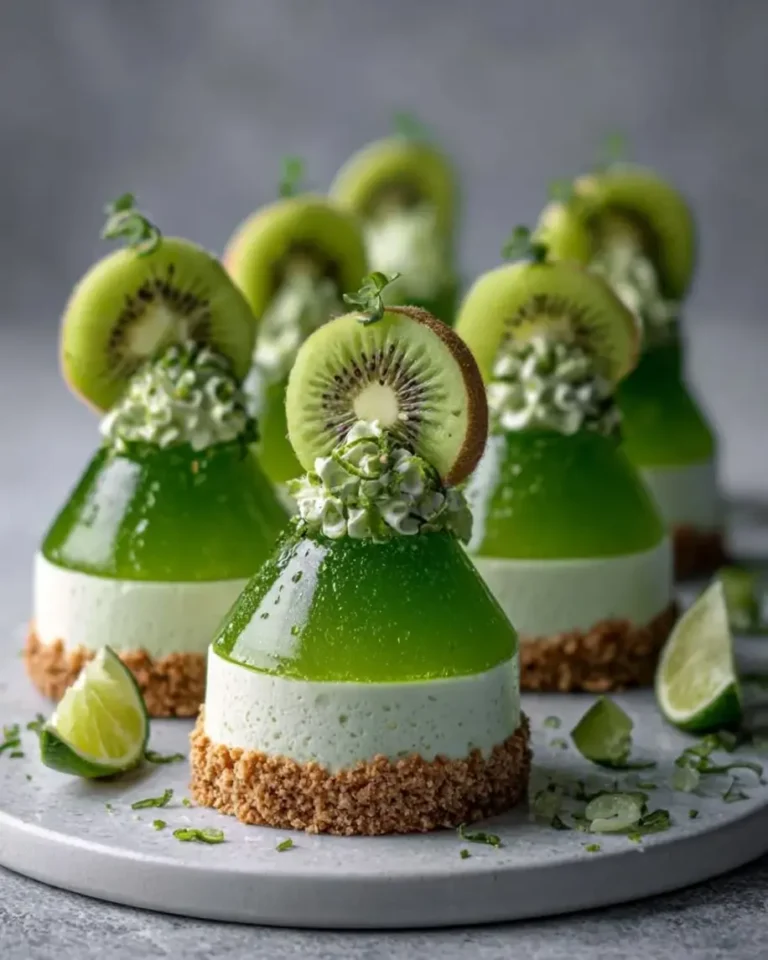
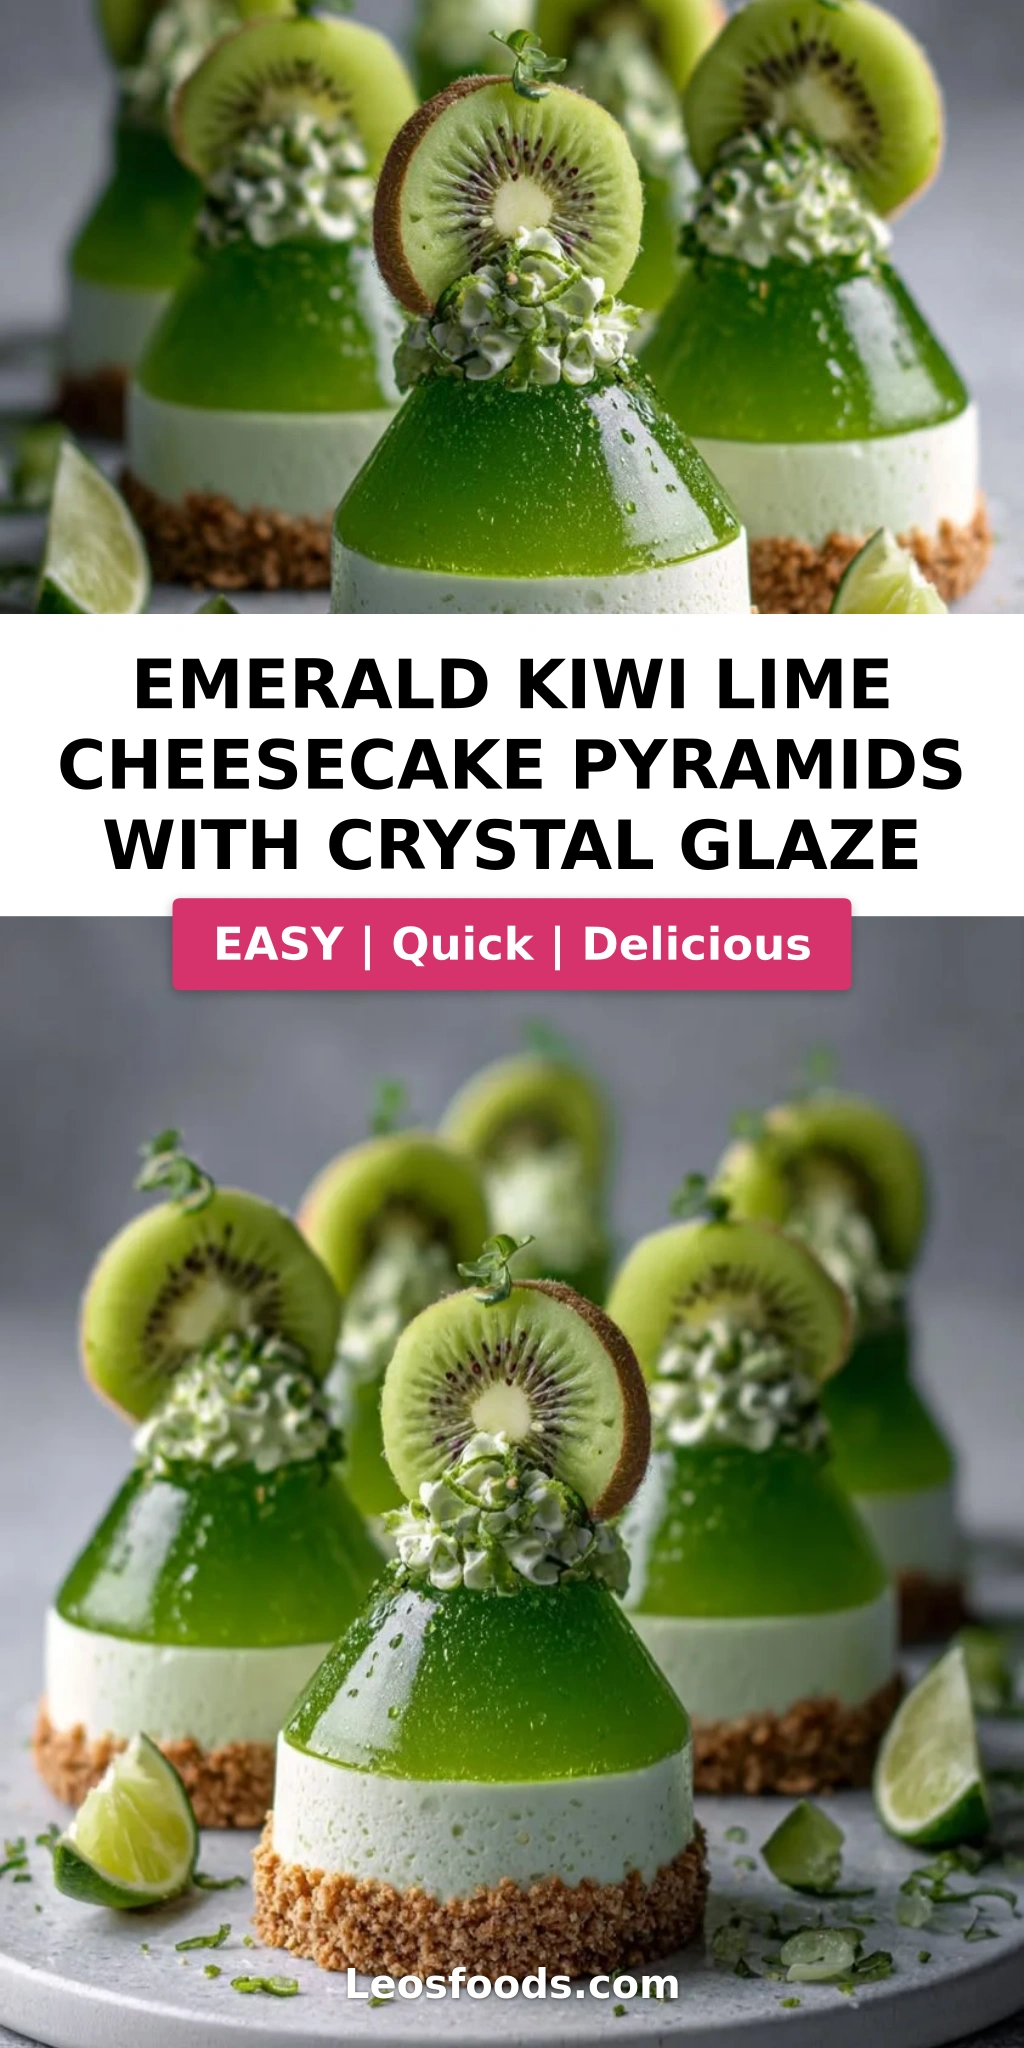
Emerald Kiwi Lime Cheesecake Pyramids with Crystal Glaze

“`html
Table of Contents
Emerald Kiwi Lime Cheesecake Pyramids with Crystal Glaze – A Stunning Green Dessert
I still remember the first time I saw a pyramid-shaped dessert in a little patisserie window near the Place de la Concorde in Paris. It was glazed in a shimmering emerald green, catching the afternoon light like a jewel. I knew right then that I had to create my own version — and these Emerald Kiwi Lime Cheesecake Pyramids with Crystal Glaze are the result of that inspiration. This kiwi lime cheesecake recipe combines the bright, tangy flavor of fresh kiwi and lime with a creamy no-bake cheesecake filling, all encased in a glossy crystal-clear green glaze that crackles ever so slightly when you tap it with a spoon. The pyramid shape makes it a showstopper on any dessert table, and the sweet-tart kiwi center hidden inside is a delightful surprise. I’ve tested this recipe over a dozen times to make sure the gelatin structure holds perfectly, so you can confidently unmold these beauties at your next dinner party or holiday gathering.
The flavor of these cheesecake pyramids is a beautiful balancing act. The cream cheese provides a rich, velvety base that tames the bright acidity of fresh lime juice and zest, while the pureed kiwi adds a tropical sweetness and a gorgeous pale green hue to the filling. The kiwi center, cooked down with honey and lime into a jammy compote, offers little pockets of concentrated fruit flavor that burst against the smooth cheesecake. And that emerald crystal glaze — made with white chocolate, condensed milk, and just a touch of green food coloring — sets to a mirror-like finish that crackles with the slightest pressure. The crunchy vanilla cookie base adds a buttery, salty counterpoint that keeps every bite interesting. It’s a dessert that engages all your senses: the visual drama of the pyramid, the aroma of lime and vanilla, the silky texture of the cheesecake, and the bright, clean finish that makes you reach for another bite.
What I love most about this recipe is that it looks incredibly complex but is actually quite approachable for a home cook. I’ve streamlined the process so that the gelatin work is forgiving, the glaze sets reliably, and the pyramid molds do most of the shaping work for you. My training at Le Cordon Bleu taught me that the best desserts are built on precision and good technique — but also on smart shortcuts. I’ll show you exactly how to temper the gelatin so it doesn’t clump, how to unmold the pyramids without breaking them, and how to get that crystal-clear glaze that looks like stained glass. One common mistake I see home bakers make is not blooming the gelatin properly, which leads to a weepy cheesecake. I’ll walk you through every step so you get perfect results on your first try. Whether you’re an experienced baker or a confident beginner, these emerald kiwi lime cheesecake pyramids will make you feel like a pastry chef.
Why This Emerald Kiwi Lime Cheesecake Pyramids Recipe Is the Best
The flavor secret here is the combination of fresh kiwi puree and lime zest in the cheesecake filling. Most recipes rely on artificial flavorings or too much sugar, but I use real fruit and fresh citrus to create a bright, clean taste that feels like summer on a plate. Growing up in Morocco, my mother would make fresh fruit salads with lime and mint, and that bright, zesty profile has always stayed with me. In this recipe, the lime does more than just add flavor — it also helps balance the richness of the cream cheese and white chocolate glaze, so the dessert feels light and refreshing even though it’s quite decadent. The kiwi provides natural sweetness and a beautiful color, while the gelatin gives the cheesecake a stable, sliceable texture that holds its pyramid shape perfectly. This isn’t just a pretty dessert; it’s one that tastes as good as it looks.
The texture is where this recipe really shines. The cheesecake filling is whipped with heavy cream to create an airy, mousse-like consistency that melts on your tongue. The kiwi center adds a soft, jammy contrast, and the crunchy cookie base provides the perfect amount of resistance when you cut into it. The crystal glaze sets to a firm, shiny shell that shatters slightly when you bite through it — like a high-end mirror glaze but made simpler for home kitchens. I spent weeks perfecting the gelatin ratios so the glaze is sturdy enough to hold its shape on the pyramid but still tender enough to eat easily. The key is using just the right amount of bloomed gelatin and letting the glaze cool to the perfect temperature before pouring. When you get it right, the glaze will coat the pyramid in a smooth, even layer that looks like liquid jade.
This recipe is also foolproof because it uses a no-bake method, which means there’s no risk of over-baking or cracking your cheesecake. The pyramid silicone molds do all the heavy lifting when it comes to shaping, and the freezing step ensures the pyramids are solid enough to unmold cleanly and hold their geometric edges. I’ve designed the instructions so that even if you’ve never worked with gelatin before, you’ll get reliable results. The glaze is forgiving — if it thickens too much as it cools, you can gently reheat it in the microwave for a few seconds. And the cookie base comes together in minutes with no baking required. This is the kind of recipe that looks like you spent all day in the kitchen but actually comes together in under an hour of active work, plus some freezer time. It’s perfect for holiday entertaining, birthdays, or any occasion where you want to impress without the stress.
Emerald Kiwi Lime Cheesecake Pyramids Ingredients
When I make these cheesecake pyramids, I head straight to the farmers market at Union Square to pick up ripe kiwis and fresh limes. The quality of the fruit really matters here since it’s the star of the show. I look for kiwis that yield slightly to gentle pressure — they should be sweet and juicy, not sour or hard. For the limes, I prefer organic ones since I’m using the zest, and organic citrus tends to have more fragrant, flavorful oils in the peel. The cream cheese should be full-fat for the best texture; I use Philadelphia brand because it’s consistently smooth and creamy. And for the white chocolate, I recommend a good-quality brand like Ghirardelli or Lindt — the better the chocolate, the more luscious and shiny your glaze will be. Let me walk you through every ingredient you’ll need.
Ingredients List
For the Kiwi Lime Cheesecake Filling:
- 12 oz cream cheese, softened
- 1/2 cup powdered sugar
- 1/2 cup heavy cream
- 2 tbsp fresh lime juice
- 1 tsp lime zest
- 2 ripe kiwis, pureed
- 1 tsp vanilla extract
- 1 tbsp gelatin powder
- 3 tbsp warm water
For the Kiwi Center:
- 2 kiwis, finely diced
- 1 tbsp honey
- 1 tsp lime juice
- 1 tsp cornstarch
- 1 tbsp water
For the Emerald Crystal Glaze:
- 1 cup white chocolate, melted
- 1/2 cup sweetened condensed milk
- 1 tbsp gelatin powder
- 3 tbsp warm water
- Green natural food coloring, as needed
For the Crunch Base:
- 1 cup vanilla cookie crumbs
- 3 tbsp melted butter
- 1 tbsp granulated sugar
- Pinch of salt
For Garnish (optional):
- Kiwi slices
- Lime zest curls
- Sugar crystal shards
Ingredient Spotlight
Kiwi: The star of this dessert. Choose kiwis that are fragrant and yield slightly when pressed — they should be sweet, not tart. Overripe kiwis will make the filling too watery, so aim for firm-ripe. If you can’t find fresh kiwis, frozen pureed kiwi works in a pinch, but thaw and drain any excess liquid before using. The kiwi provides natural sweetness, a beautiful green color, and a tropical flavor that pairs perfectly with lime.
Lime: Fresh lime juice and zest are non-negotiable here. Bottled lime juice lacks the bright, aromatic oils that make this dessert sing. I use about 2 tablespoons of juice and 1 teaspoon of zest for the filling, plus a little extra juice in the kiwi center. The acidity of the lime cuts through the richness of the cream cheese and white chocolate, creating a balanced, refreshing flavor. If you want a milder lime flavor, you can use half lime and half lemon.
Gelatin: This is what gives the cheesecake its structure and the glaze its crystal-clear finish. I use powdered gelatin (Knox is a reliable brand) and bloom it in warm water for 5 minutes before dissolving it. The key is to use the right ratio — too little gelatin and the cheesecake won’t hold its shape; too much and it becomes rubbery. I’ve tested this recipe with agar agar as a vegetarian substitute, and while it works, the texture is slightly more firm and less silky. If you use agar agar, follow the package directions for the equivalent strength.
White Chocolate: The base of the crystal glaze. Choose a high-quality white chocolate that contains cocoa butter (at least 30%) for the best shine and flavor. White chocolate melts smoothly and creates a glossy, tender shell that complements the tangy cheesecake. Avoid white chocolate chips that contain stabilizers — they can seize or turn grainy when melted. If you’re dairy-free, you can use a good-quality dairy-free white chocolate, but the glaze may be slightly less shiny.
| Original Ingredient | Best Substitution | Flavor / Texture Impact |
|---|---|---|
| Fresh kiwi (pureed) | Frozen pureed kiwi, thawed and drained | Slightly less vibrant color; texture may be thinner |
| Fresh lime juice | Bottled lime juice (not recommended) | Less bright; may taste slightly flat |
| Gelatin powder | Agar agar powder (vegan) | Firmer, less silky texture; follow package ratios |
| White chocolate | Dairy-free white chocolate | Slightly less glossy; still delicious |
| Vanilla cookie crumbs | Graham cracker crumbs or shortbread crumbs | Slightly different sweetness; still crunchy |
How to Make Emerald Kiwi Lime Cheesecake Pyramids — Step-by-Step
I promise this recipe is easier than it looks. You’ll make the kiwi center first, then the cheesecake filling, assemble the pyramids, freeze them, and finish with the glaze and base. Work through each step methodically, and you’ll have a stunning dessert that looks like it came from a high-end patisserie.
Step 1: Bloom the Gelatin
In a small bowl, sprinkle 1 tablespoon of gelatin powder over 3 tablespoons of warm water. Do not stir — let it sit undisturbed for 5 minutes. The gelatin will absorb the water and become a firm, jiggly mass. This process is called blooming, and it’s essential for activating the gelatin so it dissolves evenly into your cheesecake mixture without forming lumps.
💡 Stella’s Pro Tip: Use warm water (about 110°F / 43°C), not hot. Water that’s too hot can weaken the gelatin and prevent it from setting properly. If your kitchen is cold, set the bowl in a pan of warm water to keep it at the right temperature while you prep other ingredients.
Step 2: Make the Kiwi Center
In a small saucepan, combine 2 finely diced kiwis, 1 tablespoon of honey, 1 teaspoon of lime juice, 1 teaspoon of cornstarch, and 1 tablespoon of water. Cook over medium heat, stirring constantly, for 3–4 minutes until the mixture thickens and becomes translucent. The cornstarch will help the center set into a soft, jammy consistency that won’t run out of the pyramids. Remove from heat and let it cool completely to room temperature.
⚠️ Common Mistake to Avoid: Don’t skip the cornstarch. Without it, the kiwi center will be too watery and may leak out of the cheesecake filling or make the pyramids soggy. Also, let the center cool completely before adding it to the molds — warm filling can melt the cheesecake mixture.
Step 3: Make the Cheesecake Filling
In a large mixing bowl, beat 12 oz of softened cream cheese with 1/2 cup of powdered sugar until smooth and fluffy. Add 2 ripe kiwis that have been pureed, 2 tablespoons of fresh lime juice, 1 teaspoon of lime zest, and 1 teaspoon of vanilla extract. Beat until everything is well combined and the mixture is a pale, creamy green. In a separate bowl, whip 1/2 cup of heavy cream to soft peaks — this means the cream holds its shape but still droops slightly when you lift the whisk. Gently fold the whipped cream into the cream cheese mixture until no streaks remain. Finally, microwave the bloomed gelatin for 10–15 seconds until it becomes liquid, then stir it into the cheesecake mixture until fully incorporated.
💡 Stella’s Pro Tip: Make sure your cream cheese is truly at room temperature. Cold cream cheese will create lumps that are impossible to beat out. Take it out of the fridge at least 2 hours before starting, or microwave it in 10-second bursts until it’s soft but not warm. The filling should be smooth and silky before you add the gelatin.
Step 4: Assemble the Pyramids
Fill pyramid silicone molds about halfway with the cheesecake mixture. Use a small spoon or a piping bag for precision. Add a spoonful of the cooled kiwi center to the middle of each mold — about 1/2 to 1 teaspoon depending on the size of your molds. Then cover with the remaining cheesecake mixture, making sure the kiwi center is completely encased. Smooth the tops with an offset spatula so they’re flat and even. Tap the molds gently on the counter to release any air bubbles.
⚠️ Common Mistake to Avoid: Don’t overfill the molds. Leave about 1/8 inch of space at the top so the pyramids have room to expand slightly as they freeze. Overfilled molds can cause the pyramids to bulge or crack when unmolded. Also, make sure the kiwi center is fully sealed inside — any exposed filling can freeze and create weak spots in the cheesecake.
Step 5: Freeze the Pyramids
Place the filled molds on a baking sheet and freeze for at least 4 hours, or overnight for best results. The pyramids need to be completely frozen solid to unmold cleanly and hold their shape during glazing. If you’re in a hurry, you can freeze them for 2–3 hours, but they’ll be more fragile when unmolding. Once frozen, carefully pop the pyramids out of the silicone molds — the silicone should flex easily, and the pyramids should release without sticking.
💡 Stella’s Pro Tip: If the pyramids don’t release easily, dip the bottom of the mold in warm water for 5–10 seconds. This will loosen the edges without melting the cheesecake. Work quickly when unmolding — the pyramids start to soften as soon as they’re out of the freezer. Place them on a parchment-lined baking sheet and return to the freezer while you prepare the glaze.
Step 6: Make the Emerald Crystal Glaze
In a medium bowl, combine 1 cup of melted white chocolate and 1/2 cup of sweetened condensed milk. In a separate small bowl, bloom 1 tablespoon of gelatin powder in 3 tablespoons of warm water for 5 minutes, then microwave for 10–15 seconds until liquid. Stir the dissolved gelatin into the white chocolate mixture until smooth. Add green natural food coloring a few drops at a time until you reach a vibrant emerald shade. The glaze should be smooth, glossy, and thick enough to coat the back of a spoon but still pourable.
⚠️ Common Mistake to Avoid: Don’t let the glaze thicken too much. If it becomes too thick to pour evenly, gently reheat it in the microwave for 5–10 seconds and stir. But don’t overheat or the white chocolate can seize. The ideal pouring temperature is around 85–90°F (29–32°C) — it should feel warm to the touch but not hot. If the glaze is too warm, it will melt the frozen cheesecake and create a messy finish.
Step 7: Glaze the Pyramids
Remove the frozen pyramids from the freezer and place them on a wire rack set over a baking sheet. Pour the emerald glaze evenly over each pyramid, making sure to cover all sides. Start at the top and let the glaze flow down the sides — the frozen surface will help the glaze set quickly into a smooth, even layer. Use a small offset spatula to gently guide the glaze if needed, but try not to touch the surface too much or you’ll leave marks.
💡 Stella’s Pro Tip: Work with one pyramid at a time and keep the others in the freezer until you’re ready to glaze them. The colder the pyramids are, the faster the glaze will set, which gives you a thicker, more even coat. If the glaze pools at the bottom, you can scrape it off with a small knife after it sets, or trim the base before placing it on the cookie crumb base.
Step 8: Make the Crunch Base
In a small bowl, combine 1 cup of vanilla cookie crumbs, 3 tablespoons of melted butter, 1 tablespoon of granulated sugar, and a pinch of salt. Mix until the crumbs are evenly moistened and hold together when pressed. Press the mixture into small, pyramid-sized rounds — you can use a small cookie cutter or a ring mold to shape them, or simply form them by hand. You want the bases to be slightly larger than the bottom of each pyramid so they provide a stable foundation.
⚠️ Common Mistake to Avoid: Don’t press the crumbs too firmly or they’ll be rock-hard and difficult to cut through. Press just firmly enough that they hold their shape when you pick them up. If the mixture seems too dry, add a teaspoon more melted butter; if too wet, add a tablespoon more cookie crumbs. The texture should be like wet sand.
Step 9: Assemble and Garnish
Place each glazed pyramid on a prepared cookie base. If the glaze has pooled at the bottom, simply trim it with a small knife before placing the pyramid on the base. Garnish with kiwi slices, lime zest curls, and sugar crystal shards for a beautiful finishing touch. The sugar crystals add sparkle and a subtle crunch that complements the smooth glaze.
💡 Stella’s Pro Tip: To make lime zest curls, use a channel knife or a citrus zester to peel long, thin strips of zest from a fresh lime. Curl them around a skewer or your finger and let them sit for a few minutes to hold their shape. Sugar crystal shards can be made by spreading a thin layer of melted sugar on a parchment-lined baking sheet, letting it harden, and breaking it into shards. Or simply use store-bought edible glitter or sanding sugar for an easier option.
Step 10: Chill and Serve
Chill the assembled pyramids in the refrigerator for 15 minutes before serving. This allows the cheesecake to soften slightly from its frozen state to a creamy, mousse-like texture while keeping the glaze firm and glossy. Serve cold, with extra kiwi slices or a dollop of whipped cream if desired. These pyramids are best enjoyed within a few hours of assembly, but they can be stored in the refrigerator for up to 24 hours.
💡 Stella’s Pro Tip: For the cleanest slices, use a sharp knife dipped in hot water and wiped dry between cuts. This will give you neat, professional-looking portions. If you’re serving these at a party, arrange them on a platter with fresh mint leaves and edible flowers for a stunning centerpiece.
| Step | Action | Duration | Key Visual Cue |
|---|---|---|---|
| 1 | Bloom gelatin | 5 minutes | Gelatin becomes firm and jiggly |
| 2 | Cook kiwi center | 3–4 minutes | Mixture thickens and turns translucent |
| 3 | Make cheesecake filling | 10 minutes | Smooth, creamy, pale green |
| 4 | Assemble pyramids | 10 minutes | Molds filled, tops smooth |
| 5 | Freeze pyramids | 4+ hours | Solid to the touch |
| 6 | Make crystal glaze | 10 minutes | Smooth, glossy, emerald green |
| 7 | Glaze pyramids | 5 minutes | Even, shiny coating |
| 8 | Make crunch base | 5 minutes | Crumbs hold together when pressed |
| 9 | Assemble and garnish | 10 minutes | Pyramids on bases, garnished |
| 10 | Chill and serve | 15 minutes | Glaze firm, cheesecake creamy |
Serving & Presentation
These emerald kiwi lime cheesecake pyramids are made for dramatic presentation. I like to serve them on a large white platter or individual dessert plates, with a small pool of extra kiwi coulis or a drizzle of lime syrup on the plate for color contrast. The green glaze pops beautifully against a white or black plate, and the sugar crystal shards catch the light like little diamonds. For a touch of elegance, I sometimes add a tiny edible orchid or a sprig of mint next to each pyramid — it reminds me of the beautiful plating I learned in Paris, where every element on the plate has a purpose.
These pyramids pair wonderfully with a variety of accompaniments. A dollop of lightly sweetened whipped cream or coconut cream balances the tangy lime and rich glaze. For a lighter option, serve them with a fresh fruit salad of kiwi, mango, and berries — the tropical flavors echo the kiwi in the cheesecake. If you’re serving these after a heavy meal, a small glass of limoncello or a light sparkling wine like Prosecco cuts through the richness and cleanses the palate. And for a Moroccan-inspired touch, I sometimes sprinkle a tiny pinch of ground cardamom or cinnamon over the plate — it adds a warm, aromatic note that my mother used in her fruit desserts back home.
When I make these for dinner parties in my NYC apartment, I arrange them in a geometric pattern on a marble slab or wooden board. The contrast between the sleek, modern pyramids and the natural materials creates a beautiful tablescape. I also like to serve them with a small bowl of extra sugar crystal shards on the side so guests can add their own sparkle. These pyramids are conversation starters — everyone wants to know how you got that incredible glaze and perfect shape. Don’t be surprised if your guests ask for the recipe before they even take a bite!
| Pairing Type | Suggestions | Why It Works |
|---|---|---|
| Side Dish | Fresh fruit salad, coconut sorbet | Bright, tropical flavors complement the kiwi-lime profile |
| Sauce / Dip | Kiwi coulis, lime syrup, whipped cream | Adds moisture and extra flavor dimension |
| Beverage | Prosecco, limoncello, green tea | Cleanses palate; citrus notes harmonize |
| Garnish | Kiwi slices, lime zest curls, sugar crystals, mint, edible flowers | Adds visual appeal, texture, and aromatic contrast |
Make-Ahead, Storage & Reheating
One of the best things about this emerald kiwi lime cheesecake pyramids recipe is how well it works for entertaining. I often make the components ahead of time for my busy NYC lifestyle — you can prepare the cheesecake filling and kiwi center a day in advance, assemble the pyramids, and freeze them for up to two weeks before glazing. The glaze can also be made ahead and stored in the refrigerator for up to 5 days; just reheat it gently in the microwave before using. This make-ahead flexibility makes these pyramids perfect for holiday parties, birthdays, or any occasion where you want to minimize stress on the day of the event.
| Method | Container | Duration | Reheating Tip |
|---|---|---|---|
| Refrigerator | Airtight container, single layer | Up to 3 days | Serve cold straight from the fridge |
| Freezer | Freezer-safe container, parchment between layers | Up to 2 months | Thaw in fridge 2 hours before serving |
| Make-Ahead | Unbaked filling in fridge; glaze in separate container | Fill and freeze up to 2 weeks before glazing | Assemble and glaze on serving day for best appearance |
For the best texture, I recommend glazing and assembling the pyramids on the day you plan to serve them. The glaze is at its shiniest and most dramatic within the first 24 hours. If you have leftovers (which is rare in my house!), store them in an airtight container in the refrigerator for up to 3 days. The glaze may soften slightly over time, but the flavor will still be delicious. To restore some shine, you can gently warm the pyramids with a hair dryer on low heat for a few seconds — this trick works beautifully to refresh the glaze. For frozen pyramids that are already glazed, thaw them in the refrigerator for about 2 hours before serving. I do not recommend microwaving these pyramids, as the heat will melt the glaze and make the cheesecake weepy.
Variations & Easy Swaps
One of the things I love most about this recipe is how versatile it is. You can change the fruit, the glaze color, or the base to create entirely different desserts while keeping the same stunning pyramid shape. Here are some of my favorite variations that I’ve tested in my own kitchen.
| Variation | Key Change | Best For | Difficulty Impact |
|---|---|---|---|
| Mango Passion Fruit Pyramids | Substitute kiwi with mango puree and passion fruit juice | Summer parties, tropical themes | Same difficulty |
| Vegan Coconut-Lime Pyramids | Use vegan cream cheese, coconut cream, and agar agar | Dairy-free guests | Slightly more complex |
| Chocolate-Hazelnut Pyramids | Replace kiwi with hazelnut spread, use chocolate glaze | Chocolate lovers, winter holidays | Same difficulty |
Mango Passion Fruit Pyramids
This tropical twist is one of my favorites. Replace the kiwi puree in the cheesecake filling with mango puree, and use passion fruit juice instead of lime juice for a floral, tangy flavor. The kiwi center can be swapped for a diced mango and passion fruit compote. The glaze can be made with yellow or orange food coloring for a sunny finish. I love this version for summer barbecues and pool parties — it’s bright, refreshing, and always gets rave reviews. The mango adds a creamy sweetness that pairs beautifully with the tangy passion fruit, creating a flavor combination that tastes like a tropical vacation.
Vegan Coconut-Lime Pyramids
For a dairy-free version, use a high-quality vegan cream cheese (like Miyoko’s or Violife) and replace the heavy cream with full-fat coconut cream. The coconut adds a subtle tropical flavor that works wonderfully with lime. Instead of gelatin, use agar agar powder — I recommend following the package directions for the equivalent strength, as different brands vary. The glaze can be made with dairy-free white chocolate and condensed coconut milk. The texture will be slightly firmer and less silky than the original, but the flavor is absolutely delicious. I’ve served this version at dinner parties where half the guests are dairy-free, and everyone loved it.
Chocolate-Hazelnut Pyramids
For a decadent, winter-friendly variation, replace the kiwi puree with 1/2 cup of chocolate-hazelnut spread (like Nutella) and use orange zest instead of lime. The kiwi center can be replaced with a dollop of hazelnut spread or a chocolate truffle. For the glaze, use dark or milk chocolate instead of white chocolate, and skip the food coloring. The cookie base can be made with chocolate wafer crumbs for an extra dose of chocolate flavor. This version is rich, indulgent, and perfect for holiday gatherings. I like to garnish it with chopped toasted hazelnuts and a dusting of powdered sugar for a snowy effect.
Can I use a different fruit juice instead of lime for the glaze on the Emerald Kiwi Lime Cheesecake Pyramids?
Yes, you can absolutely use a different fruit juice, but keep in mind that the acidity and sugar content will affect the glaze’s flavor and setting behavior. I’ve tested this glaze with lemon juice, passion fruit juice, and orange juice. Lemon is the easiest swap since it has a similar acidity to lime — use the same amount and add a few drops of yellow food coloring if you want a different color. Passion fruit juice creates a more tropical flavor and pairs beautifully with kiwi, but it’s slightly thicker, so you may need to reduce the condensed milk by a tablespoon. Orange juice is sweeter and less acidic, so the glaze will be less tangy and slightly softer; add 1/2 teaspoon more gelatin to compensate. Avoid using pineapple or papaya juice, as they contain enzymes that can break down the gelatin and prevent the glaze from setting properly.
How do I get the cheesecake pyramids to hold their shape without collapsing?
The key to getting perfect pyramid shapes that don’t collapse is a combination of three things: proper gelatin ratio, thorough freezing, and careful unmolding. First, make sure you use exactly 1 tablespoon of gelatin for the cheesecake filling — this provides enough structure to hold the pyramid shape without making it rubbery. Second, freeze the pyramids for at least 4 hours, ideally overnight. The filling needs to be completely solid so it doesn’t sag or lose its shape when you unmold it. Third, when unmolding, flex the silicone mold gently in all directions to release the pyramid evenly. If it sticks, dip the mold in warm water for 5–10 seconds. Once unmolded, keep the pyramids frozen until you’re ready to glaze — the cold surface helps the glaze set instantly and adds extra stability. The cookie base also helps by providing a flat, stable foundation.
What is the best way to crystallize the glaze for a shiny finish on these cheesecake pyramids?
The term “crystallize” can be a bit misleading here — the emerald crystal glaze gets its shiny, jewel-like finish from the combination of white chocolate, condensed milk, and gelatin, not from actual sugar crystals. To achieve that mirror-like gloss, make sure your glaze is smooth and free of lumps when you pour it. Strain the glaze through a fine-mesh sieve before using if you see any undissolved gelatin or chocolate bits. The temperature of the glaze is critical: it should be around 85–90°F (29–32°C), warm to the touch but not hot. If it’s too warm, it will melt the frozen cheesecake and become dull; if too cool, it will be thick and uneven. Pour the glaze over the frozen pyramids in one smooth motion, starting at the top and letting it flow down naturally. The glaze will set almost instantly on the frozen surface, creating a smooth, shiny shell. For extra sparkle, you can sprinkle sugar crystal shards or edible glitter on the glaze immediately after pouring, while it’s still tacky.
How far in advance can I make kiwi lime cheesecake pyramids before serving?
You can make these emerald kiwi lime cheesecake pyramids several days in advance, and they’re actually a great make-ahead dessert for entertaining. I recommend assembling the pyramids (without the glaze and base) and freezing them up to 2 weeks ahead of time. Keep them in an airtight container or wrapped tightly in plastic wrap to prevent freezer burn. The glaze can be made up to 5 days in advance and stored in the refrigerator in a sealed container; reheat it gently in the microwave in 5-second bursts, stirring between each, until it’s smooth and pourable. On the day you plan to serve, glaze the frozen pyramids, attach the cookie bases, and garnish. For the best texture and appearance, serve within 24 hours of glazing. If you’ve already glazed and assembled the pyramids, they’ll keep in the refrigerator for up to 3 days — the glaze will soften slightly but still look beautiful.
Can I use frozen kiwi instead of fresh for this cheesecake pyramid recipe?
Yes, you can use frozen kiwi, but there are a few things to keep in mind. Frozen kiwi tends to release more water when thawed, which can make the cheesecake filling thinner and potentially affect the set. To use frozen kiwi, thaw it completely in the refrigerator, then drain off any excess liquid. I recommend measuring the puree after draining so you’re using the same amount as called for in the recipe. You may also need to add an extra 1/2 teaspoon of gelatin to compensate for the extra moisture. The flavor will still be good, especially if the frozen kiwi was picked at peak ripeness. However, fresh kiwi gives a brighter, more vibrant color and a cleaner flavor. If you’re making this for a special occasion, I recommend using fresh kiwi from the farmers market for the best results. For the kiwi center, frozen diced kiwi works well — just cook it with the honey and lime juice as directed.
What type of silicone mold is best for making pyramid-shaped cheesecakes?
For these emerald kiwi lime cheesecake pyramids, I recommend using a high-quality silicone pyramid mold with smooth, non-stick surfaces. Look for molds that are made of food-grade silicone (platinum silicone is best) and have a sturdy, self-supporting structure. The mold should have individual cavities — I prefer ones with 4 to 6 cavities per mold so they’re easy to handle and fill. The size of the cavities matters: each cavity should hold about 1/4 to 1/3 cup of filling, which yields a generous individual serving. I’ve tested molds from brands like Silikomart, FreshTec, and KITCHCUISINE, and they all work well. Avoid molds that are too flexible or flimsy, as they can distort the pyramid shape when you move them. If you don’t have a pyramid mold, you can also use other geometric shapes like diamonds, cubes, or even small bundt molds — just adjust the filling amount and freezing time accordingly.
Can I make this kiwi lime cheesecake recipe without gelatin?
Yes, you can make a gelatin-free version of this recipe, but the texture and stability will be different. Gelatin is what gives the cheesecake filling its firm, sliceable structure and allows the pyramids to hold their shape. Without it, the filling will be softer and more like a mousse — still delicious, but it won’t hold its pyramid shape as well, especially when glazed. If you want to skip gelatin, I recommend serving the cheesecake mixture in small jars or glasses as a no-bake dessert, or using agar agar as a vegetarian alternative. Agar agar creates a firmer, more brittle texture that’s different from gelatin but still works for molded desserts. Use about 1 tablespoon of agar agar powder for every 1 tablespoon of gelatin, but follow the package directions for blooming and dissolving, as agar agar requires boiling to activate. The glaze can also be made without gelatin by using a starch-based thickener, but it won’t have the same crystal-clear shine.
How do I prevent the kiwi center from leaking out of the cheesecake pyramids during freezing?
This is a common concern, but it’s easy to prevent with two simple techniques. First, make sure the kiwi center is fully cooled before you add it to the molds. Warm filling will melt the cheesecake mixture and create gaps that allow the center to leak. Second, when you add the kiwi center to the molds, make sure it’s completely encased by the cheesecake filling — don’t let it touch the sides of the mold. I like to pipe a thin layer of cheesecake filling into the bottom of each mold, add the kiwi center in the middle, then pipe more filling on top. This creates a sealed pocket that prevents leaking. Third, the cornstarch in the kiwi center is essential — it thickens the mixture so it becomes jammy rather than watery. If your kiwi center still seems too liquid after cooking, cook it for an additional minute or two until it thickens further. Finally, freeze the pyramids for at least 4 hours before unmolding to ensure the filling is solid enough to hold the center in place.
What can I use instead of white chocolate for the crystal glaze?
If you’re not a fan of white chocolate or don’t have it on hand, there are several alternatives you can use for the crystal glaze. The white chocolate provides sweetness, creaminess, and a smooth, glossy finish, but you can substitute it with high-quality white candy melts or almond bark — both have a similar texture and melting behavior. For a less sweet option, you can use a combination of 1/2 cup of heavy cream and 1/4 cup of powdered sugar melted together, but this will produce a thinner, less opaque glaze that won’t have the same crystal effect. For a dairy-free version, use a good-quality dairy-free white chocolate made with cocoa butter (I like the brand Pascha). If you want to skip the chocolate altogether, you can make a clear gelatin-based glaze with sugar, water, and flavoring — but this will be transparent rather than creamy and won’t have the same rich texture. Keep in mind that any substitution will change the flavor and appearance of the final dessert, so I recommend testing it first.
Can I use a different type of cookie for the crunch base of these cheesecake pyramids?
Absolutely! The vanilla cookie base is delicious, but it’s also a great canvas for customization. I’ve tested this recipe with graham cracker crumbs, shortbread cookies, speculoos (Biscoff), and even chocolate wafer cookies. Graham crackers give a more rustic, honeyed flavor that pairs nicely with the lime. Shortbread provides a buttery, delicate base that doesn’t overpower the dessert. Speculoos adds a warm, spiced note (cinnamon, nutmeg, cloves) that’s especially lovely in the fall and winter. Chocolate wafer cookies create a more decadent, dark contrast to the green cheesecake — this is my go-to for dinner parties when I want something extra indulgent. If you’re using a sweet cookie, you may want to reduce the added sugar by half a tablespoon. If you’re using a savory or salty cookie (like salted butter crackers), omit the added salt. The key ratio is 1 cup of cookie crumbs to 3 tablespoons of melted butter, which gives a firm but tender base that’s easy to cut through.
Share Your Version!
I absolutely love hearing from you — whether you made these Emerald Kiwi Lime Cheesecake Pyramids for a birthday, a holiday dinner, or just because you felt like something beautiful. Did you try one of the variations? Use a different fruit? Add your own special touch? Drop a comment below and let me know how it went. I read every single comment and I try my best to answer your questions, especially about gelatin work and glazing techniques. Your feedback helps me create better recipes for you, and your photos always inspire me to keep experimenting in the kitchen.
If you share a photo on Instagram or Pinterest, make sure to tag @leosfoods so I can see your creation. I love reposting your beautiful desserts in my stories — there’s nothing that makes me happier than seeing one of my recipes come to life in your kitchen. And if this recipe made you feel like a pastry chef for the day, please consider leaving a 5-star rating below. It helps other home cooks find this recipe and gives them the confidence to try something new. I’m curious to know — did you serve these with any special side dish or drink? I’m always looking for new pairing ideas to share with the community.
From my NYC kitchen to yours — I hope this recipe brings as much warmth to your table as it does to mine. — Stella 🧡
Love This Recipe? Save It to Pinterest!
If you enjoyed this Emerald Kiwi Lime Cheesecake Pyramids with Crystal Glaze recipe, don’t let it get lost in your browser tabs! 😄 Pin it now so you can find it again anytime — and explore hundreds more tried-and-tested recipes waiting for you on my Pinterest boards.
👉 Follow Stella on Pinterest @stellarecipeblog
📌 Pin this recipe · 🔁 Re-pin your favorites · 💬 Tag me when you make it — I love seeing your creations!
“`
Print
Emerald Kiwi Lime Cheesecake Pyramids with Crystal Glaze
A stunning dessert featuring creamy kiwi-lime cheesecake in pyramid form, with a sweet kiwi center and emerald crystal glaze on a crunchy cookie base.
- Yield: 8 1x
Ingredients
- For the Kiwi Lime Cheesecake Filling:
- 12 oz cream cheese, softened
- 1/2 cup powdered sugar
- 1/2 cup heavy cream
- 2 tbsp fresh lime juice
- 1 tsp lime zest
- 2 ripe kiwis, pureed
- 1 tsp vanilla extract
- 1 tbsp gelatin powder
- 3 tbsp warm water
- For the Kiwi Center:
- 2 kiwis, finely diced
- 1 tbsp honey
- 1 tsp lime juice
- 1 tsp cornstarch
- 1 tbsp water
- For the Emerald Crystal Glaze:
- 1 cup white chocolate, melted
- 1/2 cup sweetened condensed milk
- 1 tbsp gelatin powder
- 3 tbsp warm water
- Green natural food coloring, as needed
- For the Crunch Base:
- 1 cup vanilla cookie crumbs
- 3 tbsp melted butter
- 1 tbsp granulated sugar
- Pinch of salt
- For Garnish (optional):
- Kiwi slices
- Lime zest curls
- Sugar crystal shards
Instructions
- 1. Bloom gelatin in warm water and let stand for 5 minutes.
- 2. Cook diced kiwi, honey, lime juice, cornstarch, and water for 3–4 minutes until slightly thickened. Cool completely.
- 3. Beat cream cheese, powdered sugar, kiwi puree, lime juice, lime zest, and vanilla until smooth.
- 4. Whip heavy cream to soft peaks and fold into the cheesecake mixture.
- 5. Stir in dissolved gelatin until fully combined.
- 6. Fill pyramid silicone molds halfway with the cheesecake mixture.
- 7. Add a spoonful of kiwi center to each mold.
- 8. Cover with remaining cheesecake mixture and freeze until firm.
- 9. Mix melted white chocolate, condensed milk, dissolved gelatin, and green coloring until smooth and glossy.
- 10. Unmold the frozen pyramids and place on a wire rack.
- 11. Pour the emerald glaze evenly over each pyramid.
- 12. Combine cookie crumbs, butter, sugar, and salt, then press into pyramid-sized bases.
- 13. Place each glazed pyramid on a prepared base.
- 14. Garnish with kiwi slices, lime zest curls, and sugar crystal shards.
- 15. Chill for 15 minutes before serving.
Nutrition
- Calories: 395
- Sugar: 28 g
- Fat: 26 g
- Carbohydrates: 35 g
- Protein: 6 g
Tried This Recipe? Leave a Comment!
Did you make this recipe? I’d love to hear how it turned out! Please leave a comment and a rating below. Your feedback helps other home cooks and supports cheerychop.com!
For more delicious inspiration, follow me on Pinterest!