Emerald Pear Pistachio Dream Hearts with Gold Core
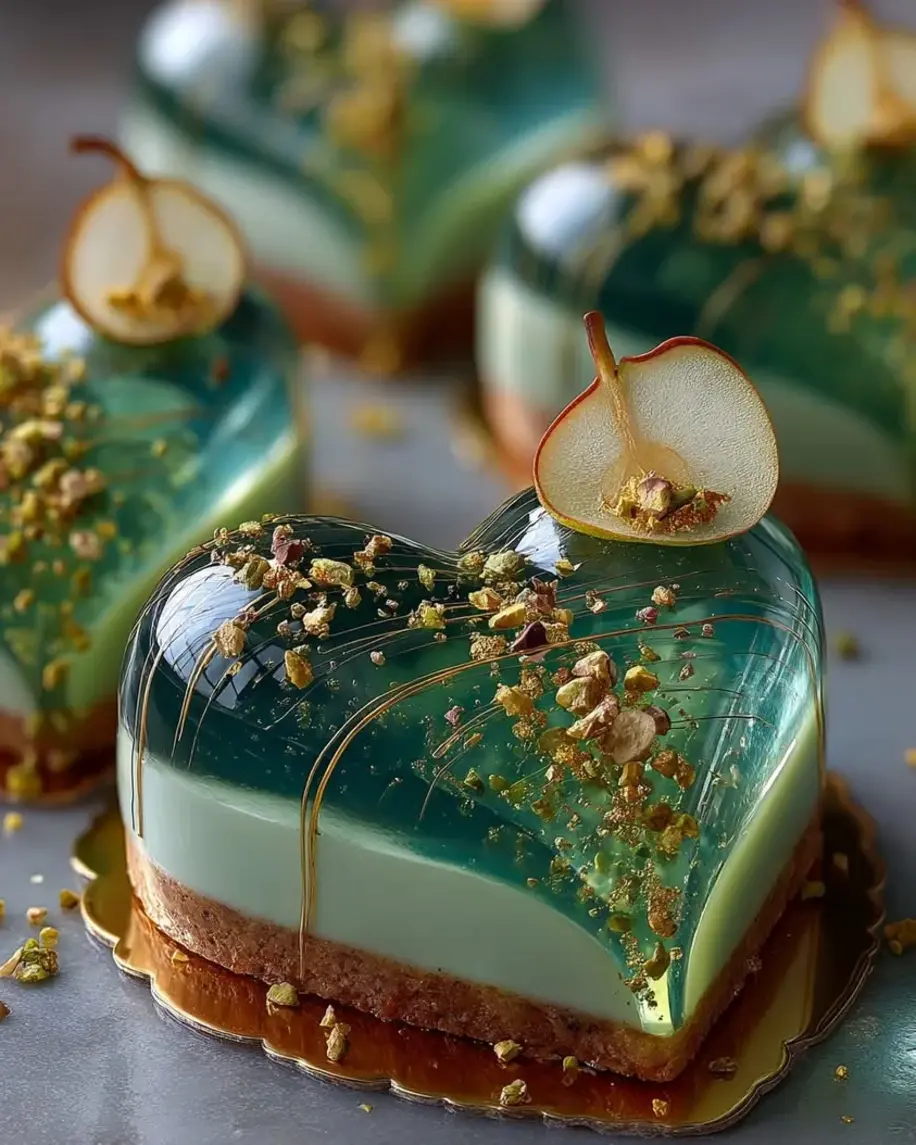
Table of Contents
Emerald Pear Pistachio Dream Hearts with Gold Drizzle Core – A Stunning Pear Pistachio Dessert with a Golden Heart
I still remember the first time I made these Emerald Pear Pistachio Dream Hearts—it was for a small Valentine’s dinner at my apartment in New York City, and I wanted something that felt both elegant and deeply personal. Growing up in Morocco, my mother always used agar-agar for her crystal-clear fruit desserts, and in Paris I learned how to layer flavors with precision. This pear pistachio dessert is the perfect marriage of those worlds: a jewel-like emerald pear heart with a creamy pistachio mascarpone filling and a golden honey-drizzle core, all finished with a whisper of edible gold dust. The key to its mesmerizing clarity is using the right pear variety and a gentle hand with the agar-agar—it’s easier than it looks, and the result is pure magic.
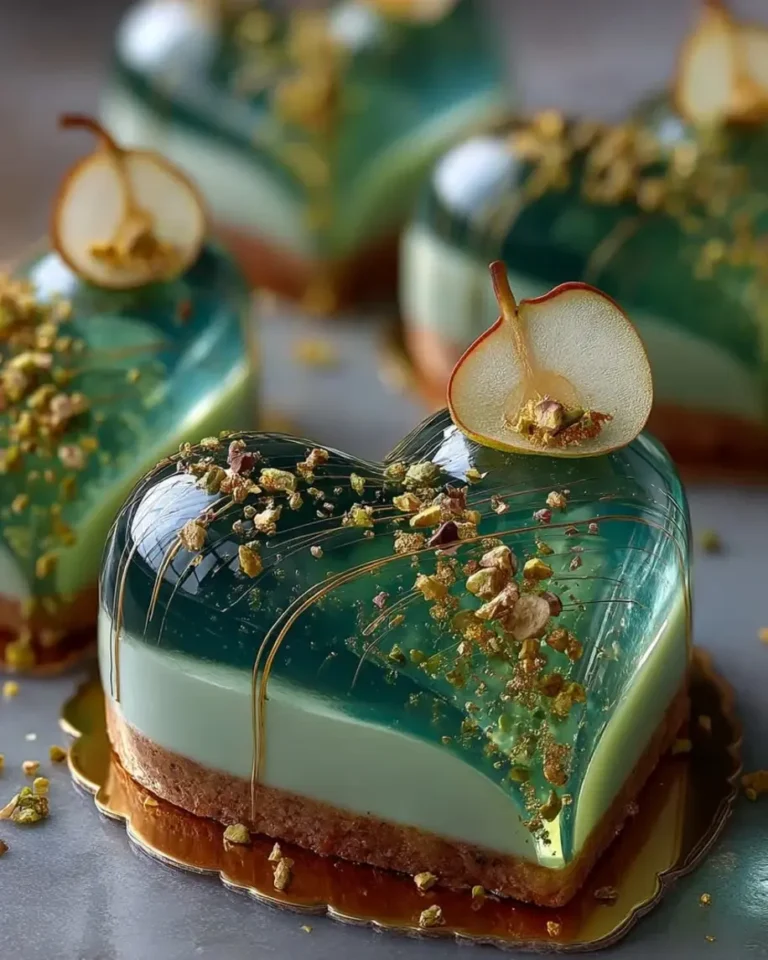
When you slice into one of these hearts, you get three distinct layers: the translucent pear gel that catches the light like stained glass, the nutty-sweet pistachio cream, and the rich, golden honey core that oozes slightly when you bite into it. The texture is a delightful contrast between the firm, jelly-like pear shell and the luscious, airy filling. The flavor is delicate but not shy—pear nectar and puree give a gentle sweetness, while the pistachios add a toasty depth. And that gold drizzle? It’s a simple mix of honey and sweetened condensed milk, but it tastes like liquid luxury.
I’ve tested this recipe a dozen times to make sure it’s foolproof for home cooks. The trick is to let the pear mixture set just until it’s slightly firm but still tacky—like a half-set Jell-O—before piping in the filling. That way, the filling stays suspended in the center. I’ll walk you through every step, share my favorite tips from the Le Cordon Bleu pastry kitchen, and point out the one common mistake that can turn your clear hearts cloudy. Trust me, you’ll be making these for every celebration once you taste them.
Why This Emerald Pear Pistachio Dream Hearts Recipe Is the Best
The flavor secret here is the combination of Bosc or Comice pears—they have a honeyed floral note that works beautifully with pistachios. I learned this pairing during a stage at a Parisian pâtisserie, where the chef would brush pistachio cream over poached pears. That memory inspired the pistachio mascarpone filling. The agar-agar gives a clean, firm set without any gelatine taste, which is critical for the emerald color to shine through.
Perfected texture comes from a technique I call “double-setting.” You first partially set the pear base, then pipe in the filling and gold core, and finally pour the remaining pear liquid on top. This keeps the core suspended in the exact center. Many recipes skip this step and end up with the filling sinking to the bottom—not here. The result is a perfect cross-section every time.
Foolproof and fast? Yes—despite the elegant look, you don’t need a pastry degree. The prep is straightforward, and the active cooking time is only 10 minutes. The hardest part is waiting for the gel to set, but that’s just fridge time. I’ve made these in my tiny NYC kitchen with a hand whisk and a saucepan, and they turned out stunning. Plus, the recipe scales easily for parties.
Pear Pistachio Dessert Ingredients
I pick up fresh pears at the Union Square Greenmarket—Bosc are my favorite for this recipe because they hold their shape when pureed and have a subtle spiciness. The pistachios I get from a Middle Eastern grocer in Brooklyn; they’re always brighter green and more flavorful. And the agar-agar? I order it online because it’s the only way to guarantee a clear, vegan-friendly set.
Ingredients List
- For the Emerald Pear Crystal Hearts:
- 2 cups pear puree, strained
- 1 cup pear nectar
- 1 1/2 cups water
- 3/4 cup sugar
- 2 1/2 tsp agar-agar powder
- 1 tbsp lemon juice
- 1/4 tsp salt
- For the Pistachio Dream Filling:
- 8 oz mascarpone cheese
- 1/2 cup heavy whipping cream
- 1/4 cup powdered sugar
- 1 tsp vanilla bean paste
- 1/4 cup finely ground pistachios
- For the Gold Drizzle Core:
- 3 tbsp honey
- 1 tbsp sweetened condensed milk
- 1 tsp lemon juice
- For Garnish (optional):
- Crushed pistachios
- Thin pear slices
- Edible gold dust
Ingredient Spotlight
Pears: Bosc or Comice are ideal for their dense flesh and aromatic sweetness. If you use Bartlett, the puree may be too watery—drain it slightly. Anjou works too but will yield a paler green. Tested substitution: 2 cups canned pear halves in juice (drained and pureed) in a pinch, but the flavor won’t be as bright.
Agar-agar powder: This seaweed-derived thickener is not interchangeable with gelatin—agar needs to boil to activate and sets at room temperature. It gives a firmer, more brittle gel than gelatin. Tested substitution: If you don’t have agar, use 4 tsp of gelatin (bloomed in cold water), but the hearts will be jelly-like and not as clear.
Pistachios: Look for raw, unsalted pistachios with a vibrant green hue. Toast them lightly in a dry pan to bring out the oils before grinding. Tested substitution: Almonds or cashews can replace pistachios, but you’ll lose the distinct green color and nutty pistachio flavor. For a nut-free version, use sunflower seeds (grind fine).
Mascarpone: Full-fat mascarpone is essential for the creamy, stable filling. Low-fat versions will be too runny. Tested substitution: In a dairy-free version, use a thick coconut cream (chilled and whipped) mixed with 2 tbsp cornstarch to stabilize.
| Original Ingredient | Best Substitution | Flavor / Texture Impact |
|---|---|---|
| Bosc or Comice pears | Anjou pears (drain puree if watery) | Less aromatic, slightly thinner set |
| Agar-agar powder | Gelatin (bloomed, 4 tsp) | Softer gel, less transparency, not vegan |
| Raw pistachios | Almonds or cashews (plus green food coloring for emerald look) | Nutty but less pistachio flavor, color change |
| Mascarpone | Coconut cream (chilled) + cornstarch | Dairy-free, lighter texture, coconut undertone |
How to Make Emerald Pear Pistachio Dream Hearts — Step-by-Step
Don’t be intimidated by the layering — once you get the rhythm, it’s actually quite meditative. I promise you’ll feel like a pastry chef.
Step 1: Prepare the Pear Crystal Base
In a medium saucepan, combine 2 cups strained pear puree, 1 cup pear nectar, 1 1/2 cups water, 3/4 cup sugar, 2 1/2 tsp agar-agar powder, 1 tbsp lemon juice, and 1/4 tsp salt. Whisk constantly as you heat over medium-high. Once it reaches a gentle simmer, continue whisking for exactly 2 minutes — this ensures the agar is fully dissolved. Remove from heat. The mixture will look slightly translucent.
💡 Stella’s Pro Tip: Don’t let the mixture boil vigorously — it can create bubbles that mar the clarity. A gentle simmer is all you need.
Step 2: Partial Set and Prep Filling
Pour the hot pear mixture into heart-shaped silicone molds, filling each cavity about halfway. Place the molds on a baking sheet and refrigerate for 20–25 minutes, until the surface is firm to the touch but the center is still soft — like a half-set pudding. While that chills, make the filling.
⚠️ Common Mistake to Avoid: If you let the pear base set completely (like hard Jell-O), the filling won’t sink in later. It should be slightly tacky, not fully firm.
Step 3: Make Pistachio Mascarpone Filling
In a large bowl, beat 8 oz mascarpone cheese, 1/2 cup heavy whipping cream, 1/4 cup powdered sugar, 1 tsp vanilla bean paste, and 1/4 cup finely ground pistachios. Use a hand mixer or stand mixer on medium speed. Whip until the mixture is smooth, thick, and holds soft peaks — about 2–3 minutes. Do not overwhip or it may curdle. Transfer to a piping bag fitted with a plain round tip (or a zip-top bag with a corner snipped).
💡 Stella’s Pro Tip: For an even green filling, add a drop of leaf-green gel food coloring. It’s optional but gives a beautiful contrast against the gold core.
Step 4: Create the Gold Drizzle Core
In a small bowl, stir together 3 tbsp honey, 1 tbsp sweetened condensed milk, and 1 tsp lemon juice until smooth. The mixture should be thick but pourable. Set aside at room temperature. If it crystallizes, warm it gently in the microwave for 5 seconds.
⚠️ Common Mistake to Avoid: Don’t make the gold core too thin by adding extra liquid — it will sink and bleed into the filling. It should be syrupy, not watery.
Step 5: Layer the Hearts
Take the partially set molds out of the fridge. Pipe a small amount of pistachio filling (about 1 tsp) into the center of each heart. Then spoon about 1/2 tsp of the gold drizzle core into the middle of that filling. Cover the gold core with another small dollop of pistachio filling, completely encasing it. Don’t overfill — leave about 1/4 inch of space at the top for the final pear layer.
💡 Stella’s Pro Tip: Pipe the filling in a ring around the center, then drop the gold core in the middle — it helps keep the gold from touching the pear gel directly.
Step 6: Top with Remaining Pear Mixture
If the pear mixture has thickened or formed a skin, gently reheat it over low heat for a minute, stirring until smooth. Let it cool slightly until it’s warm but not hot (110°F max). Carefully pour the remaining pear liquid over the filling, completely covering it. Fill each mold to the very top. Tap the baking sheet gently on the counter to release any air bubbles. Refrigerate for at least 2 hours, or until fully set and crystal clear.
⚠️ Common Mistake to Avoid: Pouring hot liquid over the filling can melt the mascarpone and cause the layers to mix. Always let the pear mixture cool to warm before pouring.
Step 7: Unmold and Garnish
Once fully set (the surface should feel firm and slightly springy), remove the hearts from the molds by gently flexing the silicone. If they stick, run a thin knife around the edges. Transfer to a chilled serving platter. Garnish with crushed pistachios, thin pear slices arranged like petals, and a light dusting of edible gold dust. Serve immediately — these are best enjoyed thoroughly chilled.
💡 Stella’s Pro Tip: For a dramatic presentation, place a heart on a mirror or slate board and add a few gold sugar pearls around it. It catches the light beautifully.
| Step | Action | Duration | Key Visual Cue |
|---|---|---|---|
| 1 | Cook pear mixture with agar | 5 mins | Slightly translucent, no grains |
| 2 | Partial set in molds | 20–25 mins | Surface firm, center jiggly |
| 3 | Whip mascarpone filling | 2–3 mins | Soft peaks, no lumps |
| 4 | Make gold drizzle core | 1 min | Thick syrupy consistency |
| 5 | Layer filling + gold core | 5 mins | Filling stays centered |
| 6 | Top with pear mixture | 2 mins | Mold filled to brim |
| 7 | Chill fully | 2 hours | Clear, firm gel |
| 8 | Unmold and garnish | 5 mins | Hearts release cleanly |
Serving & Presentation
Place the chilled hearts on individual dessert plates or a large sharing board. I like to arrange them on a dark slate to make the emerald color pop. For a Moroccan-inspired touch, sprinkle a pinch of cinnamon on the plate and add a few fresh mint leaves. In Paris, we’d serve these with a light almond tuile on the side. In my NYC kitchen, I often pair them with a dollop of crème fraîche flavored with a drop of orange blossom water — it cuts the sweetness beautifully.
The edible gold dust is non-negotiable in my book — it adds that magical “wow” factor. For a family-friendly version, skip the gold and use crushed freeze-dried raspberries for color. These hearts also look spectacular when you cut one in half to reveal the layers — the gold core glistens like a secret treasure.
| Pairing Type | Suggestions | Why It Works |
|---|---|---|
| Side Dish | Almond tuile, cinnamon-sugar dusting | Adds crunch and warmth |
| Sauce / Dip | Crème fraîche + orange blossom water, or vanilla yogurt | Brightens and balances sweetness |
| Beverage | Sparkling elderflower cordial, Earl Grey tea, or a light Prosecco | Floral notes complement pear and pistachio |
| Garnish | Crushed pistachios, pear fan, edible gold dust, fresh mint | Enhances visual appeal and texture contrast |
Make-Ahead, Storage & Reheating
These hearts are a perfect make-ahead dessert for busy hosts. I often prepare them a day before a dinner party — the flavors actually meld and improve overnight. In my NYC life, that means less stress and more time with guests.
| Method | Container | Duration | Reheating Tip |
|---|---|---|---|
| Refrigerator | Airtight container, hearts on a plate covered with plastic wrap | Up to 5 days | Serve directly from fridge — do not reheat. |
| Freezer | Flash-freeze on tray, then transfer to freezer bag | Up to 1 month | Thaw in fridge overnight. Texture may soften slightly. |
| Make-Ahead | Mold in fridge, unassembled — keep base and filling separate | Up to 2 days in advance | Assemble and set final layer the day of serving. |
If you freeze these, expect the pear gel to become slightly softer after thawing — still delicious but less crisp. I recommend making them fresh up to two days ahead and keeping them in the molds until you’re ready to unmold. To prevent the gold core from seeping, always store them upright. Never leave them at room temperature for more than 30 minutes; the mascarpone filling is perishable.
Variations & Easy Swaps
One of the things I love most about this recipe is how easily it adapts to different seasons and dietary needs. My mother in Morocco would swap the pistachios for almonds and add a pinch of saffron to the pear base — the result was a golden-orange heart with a totally different personality. Here are three ways to make it your own.
| Variation | Key Change | Best For | Difficulty Impact |
|---|---|---|---|
| Saffron Almond Dream Hearts | Replace pistachios with ground almonds; add pinch of saffron to pear base | Elegant Moroccan-inspired twist | Easy |
| Dairy-Free / Vegan Version | Use coconut cream + cornstarch for filling; sweetened condensed coconut milk for gold core | Dairy-free or vegan guests | Medium (texture needs care) |
| Raspberry Rose Hearts | Add 1/2 cup raspberry puree to pear base; use rosewater in filling and gold core | Romantic, floral red-pink hearts | Easy |
Saffron Almond Dream Hearts
This variation is a direct nod to my Moroccan childhood. Replace the pistachios with finely ground toasted almonds and steep a generous pinch of saffron threads in the hot pear nectar for 10 minutes before mixing. The pear base takes on a gorgeous golden hue, and the almond filling is subtly sweet. I like to garnish with sliced almonds and a dusting of cinnamon instead of gold — it feels like a warm hug from my mother’s kitchen.
Dairy-Free / Vegan Version
For the filling, chill a can of full-fat coconut cream overnight, then scoop out the solid top. Whip it with the powdered sugar, vanilla, and ground pistachios (or almonds) until light. Instead of mascarpone, this version is lighter and more tropical. For the gold core, use sweetened condensed coconut milk — it’s available in most US grocery stores. The pear base is already vegan thanks to agar-agar. The texture will be less rich but still delicious. Serve within 24 hours for best consistency.
Raspberry Rose Hearts
On my last trip to the Union Square farmers market, I bought a basket of fresh raspberries and thought: why not add them to the pear base? Swirl in 1/2 cup of raspberry puree (strained) after cooking the pear mixture — it creates a beautiful marbled effect. Replace the vanilla in the filling with 1 tsp rosewater, and add a drop of rosewater to the gold core too. The result is a romantic pink-and-gold heart with floral notes that pair perfectly with the pistachio. Garnish with fresh raspberries and edible rose petals.
FAQ
What are the best types of pears to use for Emerald Pear Pistachio Dream Hearts to ensure the right texture?
For the clearest, most stable gel, I recommend Bosc or Comice pears. Bosc pears are firm and less watery, giving a denser puree that results in a firmer set. Comice pears are incredibly sweet and have a smooth texture. Avoid overly ripe Bartlett pears — they can be too watery and make the gel cloudy. If you only have Anjou pears, be sure to drain the puree in a fine-mesh sieve for 15 minutes to remove excess liquid. The key is to start with a thick, silky puree; the agar-agar will do the rest.
Can I substitute pistachios with another nut in this recipe for the Emerald Pear Pistachio Dream Hearts?
Absolutely! Almonds are my top alternative — they grind into a fine meal and have a mellow flavor that doesn’t overpower the pear. Toast them lightly first for extra depth. Cashews also work, especially if you want a creamier filling (soak them for 2 hours in hot water, then blend with a splash of milk before adding to the mascarpone). Keep in mind that the signature green color of pistachios will be lost; you can add a drop of green food coloring if you want to maintain the emerald theme. For nut-free versions, sunflower seeds are a surprising but tasty choice.
How do you make the gold drizzle core for the Emerald Pear Pistachio Dream Hearts without it seizing up?
The gold drizzle core is simply honey, sweetened condensed milk, and a touch of lemon juice. The key to preventing it from seizing or becoming too thick is to use room-temperature ingredients. If your honey is crystallized, warm it gently in a warm water bath (not microwave, which can overheat). Stir until smooth. The condensed milk should also be at room temperature. If the mixture stiffens as it sits, add a few drops of warm water and whisk vigorously. Never add cold liquid to a warm honey mixture — that can cause sugar crystallization.
How far in advance can I prepare Emerald Pear Pistachio Dream Hearts with Gold Drizzle Core for a party?
You can prepare the hearts up to two days in advance and keep them in the molds, covered, in the refrigerator. The gel stays firm and the filling remains fresh for that duration. For optimal presentation, unmold them the day of your party, no more than 4 hours before serving, and keep them chilled. The gold core may bleed slightly after a few days, so if you want a perfect cross-section, serve within 24 hours of assembly. You can also prepare the pear base and filling separately up to 3 days ahead, and do the final assembly the day before.
Can I make these hearts without silicone molds?
Yes, but silicone heart-shaped molds are ideal because they flex easily for unmolding without breaking the delicate gel. If you don’t have them, you can use small glass or ceramic heart-shaped ramekins lined with plastic wrap, or even a loaf pan to make a large terrine that you cut into heart shapes with a cookie cutter. Just note that the gel is firm enough to hold its shape, but unmolding from non-flexible containers is tricky. If using a loaf pan, spray it lightly with non-stick spray and line with plastic wrap for easier removal.
Why did my pear gel turn cloudy instead of clear?
Cloudy pear gel is usually caused by one of three things: using an overripe pear that released too much pectin, not straining the puree well enough, or boiling the agar mixture too vigorously. Always strain your pear puree through a fine-mesh sieve or cheesecloth to remove pulp. Use pears that are ripe but still firm. When cooking the agar mixture, stir gently and only bring it to a gentle simmer — a rolling boil incorporates too much air and creates a milky opacity. Also, avoid adding too much lemon juice, as high acidity can affect agar’s clarity.
Can I use gelatin instead of agar-agar in this recipe?
You can, but the texture and clarity will be different. Gelatin produces a softer, more melt-in-the-mouth jelly compared to agar’s firm, snappy gel. If you want to substitute, use 4 teaspoons of powdered gelatin (bloomed in 1/4 cup cold water for 5 minutes, then dissolved into the warm pear mixture). Note that gelatin requires refrigeration to set and will not hold its shape as well at room temperature. The hearts will be less transparent and more prone to weeping. However, the flavor will still be lovely, and it’s a good option if you can’t find agar-agar.
How do I prevent the gold core from sinking to the bottom of the heart?
The key is the partial setting technique. You must let the first layer of pear mixture set just until it’s firm on the surface but still soft underneath (about 20–25 minutes). Then, when you pipe in the pistachio filling and add the gold core, the filling will “grab” the semi-set pear layer and the gold core will stay suspended inside the filling. Also, make sure your gold drizzle core is thick enough — if it’s too runny, it will sink. The consistency should be like warm honey. And always pipe a little filling first, then drop the gold core, then cover with more filling before adding the final pear layer.
Can I use store-bought pear juice or nectar instead of making my own puree?
Yes, you can use store-bought pear nectar for convenience, but the flavor will be less intense and the color may be paler. For the puree, I recommend making your own from fresh pears to get that vibrant green tint. However, if you’re short on time, you can combine 2 cups of high-quality pear nectar (like Loóza or Kern’s) with 1 cup of water, and skip the puree entirely. The gel will still set nicely, but it will be more translucent and less flavorful. To boost the pear taste, add a teaspoon of pear extract if you have it. Avoid using pear juice from concentrate, which often has added sugar and a cooked flavor.
What can I use instead of edible gold dust for garnish?
If you don’t have edible gold dust, there are many beautiful alternatives. Crushed freeze-dried raspberries or strawberries give a vibrant red dust that contrasts beautifully with green. Finely grated white chocolate or coconut flakes add a snowy elegance. For a shimmer effect, you can brush a tiny amount of vegetable oil mixed with luster dust (gold or pearl) on the surface — just make sure it’s labeled edible. Even a sprinkle of finely crushed pistachios or a tiny pinch of turmeric mixed with sugar can mimic a golden hue. Presentation is about creativity, so use what you have!
Share Your Version!
I absolutely love hearing how these Emerald Pear Pistachio Dream Hearts turn out in your kitchen. Did you try the saffron almond twist? Or did you go all out with the gold dust? Let me know in the comments below — your feedback helps other readers, and I personally read every single comment. If you share a photo on Instagram or Pinterest, please tag @leosfoods so I can see your stunning creation. And if you have a question about a substitution or a technique I didn’t cover, just ask — I’m here to help you succeed.
From my NYC kitchen to yours — I hope this recipe brings as much warmth to your table as it does to mine. — Stella 🧡
Love This Recipe? Save It to Pinterest!
If you enjoyed this Emerald Pear Pistachio Dream Hearts with Gold Drizzle Core recipe, don’t let it get lost in your browser tabs! 😄 Pin it now so you can find it again anytime — and explore hundreds more tried-and-tested recipes waiting for you on my Pinterest boards.
👉 Follow Stella on Pinterest @stellarecipeblog
📌 Pin this recipe · 🔁 Re-pin your favorites · 💬 Tag me when you make it — I love seeing your creations!
Emerald Pear Pistachio Dream Hearts with Gold Drizzle Core
A stunning dessert of emerald green pear hearts with a creamy pistachio filling and a golden honey-drizzle core, finished with edible gold dust.
- Yield: 6 1x
Ingredients
- For the Emerald Pear Crystal Hearts:
- 2 cups pear puree, strained
- 1 cup pear nectar
- 1 1/2 cups water
- 3/4 cup sugar
- 2 1/2 tsp agar-agar powder
- 1 tbsp lemon juice
- 1/4 tsp salt
- For the Pistachio Dream Filling:
- 8 oz mascarpone cheese
- 1/2 cup heavy whipping cream
- 1/4 cup powdered sugar
- 1 tsp vanilla bean paste
- 1/4 cup finely ground pistachios
- For the Gold Drizzle Core:
- 3 tbsp honey
- 1 tbsp sweetened condensed milk
- 1 tsp lemon juice
- For Garnish (optional):
- Crushed pistachios
- Thin pear slices
- Edible gold dust
Instructions
- Combine pear puree, pear nectar, water, sugar, agar-agar powder, lemon juice, and salt in a saucepan. Heat while stirring until fully dissolved and bring to a gentle simmer.
- Pour the mixture into heart-shaped silicone molds, filling each cavity halfway. Refrigerate until slightly set.
- Whip mascarpone cheese, heavy whipping cream, powdered sugar, vanilla bean paste, and ground pistachios until smooth and fluffy. Transfer to a piping bag.
- Mix honey, sweetened condensed milk, and lemon juice until smooth to create the gold drizzle core.
- Pipe a small amount of pistachio filling into the center of each partially set heart. Add a small spoonful of the gold drizzle core, then cover with more pistachio filling.
- Pour the remaining pear mixture over the filling and refrigerate until fully set and crystal clear.
- Carefully unmold the dream hearts onto a chilled serving platter.
- Garnish with crushed pistachios, thin pear slices, and a light dusting of edible gold dust. Serve thoroughly chilled.
Nutrition
- Calories: 290
- Sugar: 29g
- Fat: 15g
- Carbohydrates: 35g
- Protein: 4g
Tried This Recipe? Leave a Comment!
Did you make this recipe? I’d love to hear how it turned out! Please leave a comment and a rating below. Your feedback helps other home cooks and supports cheerychop.com!
For more delicious inspiration, follow me on Pinterest!