Galaxy Mirror Glaze Domes with Hidden Cream Center
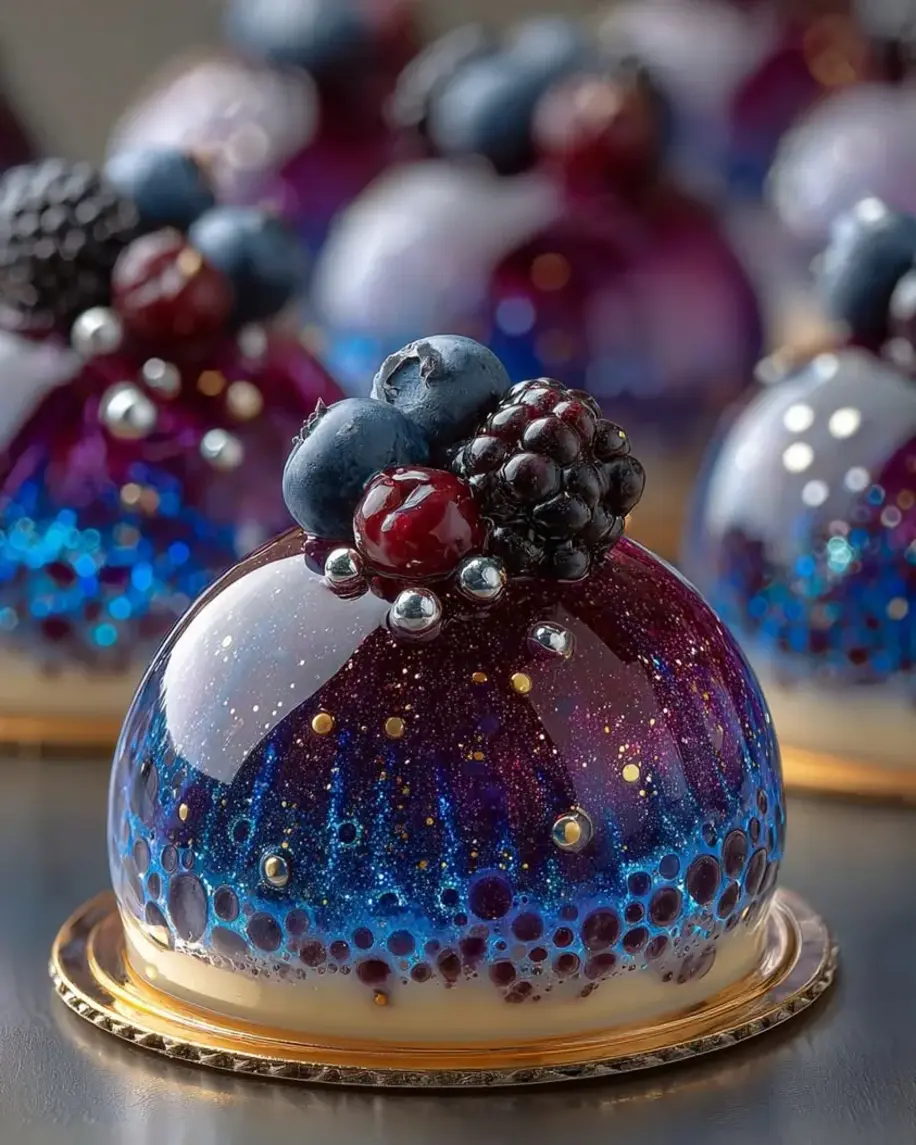
Table of Contents
Galaxy Berry Explosion Mirror Glaze Domes with Hidden Cream Core – A Stellar Dessert for Any Occasion
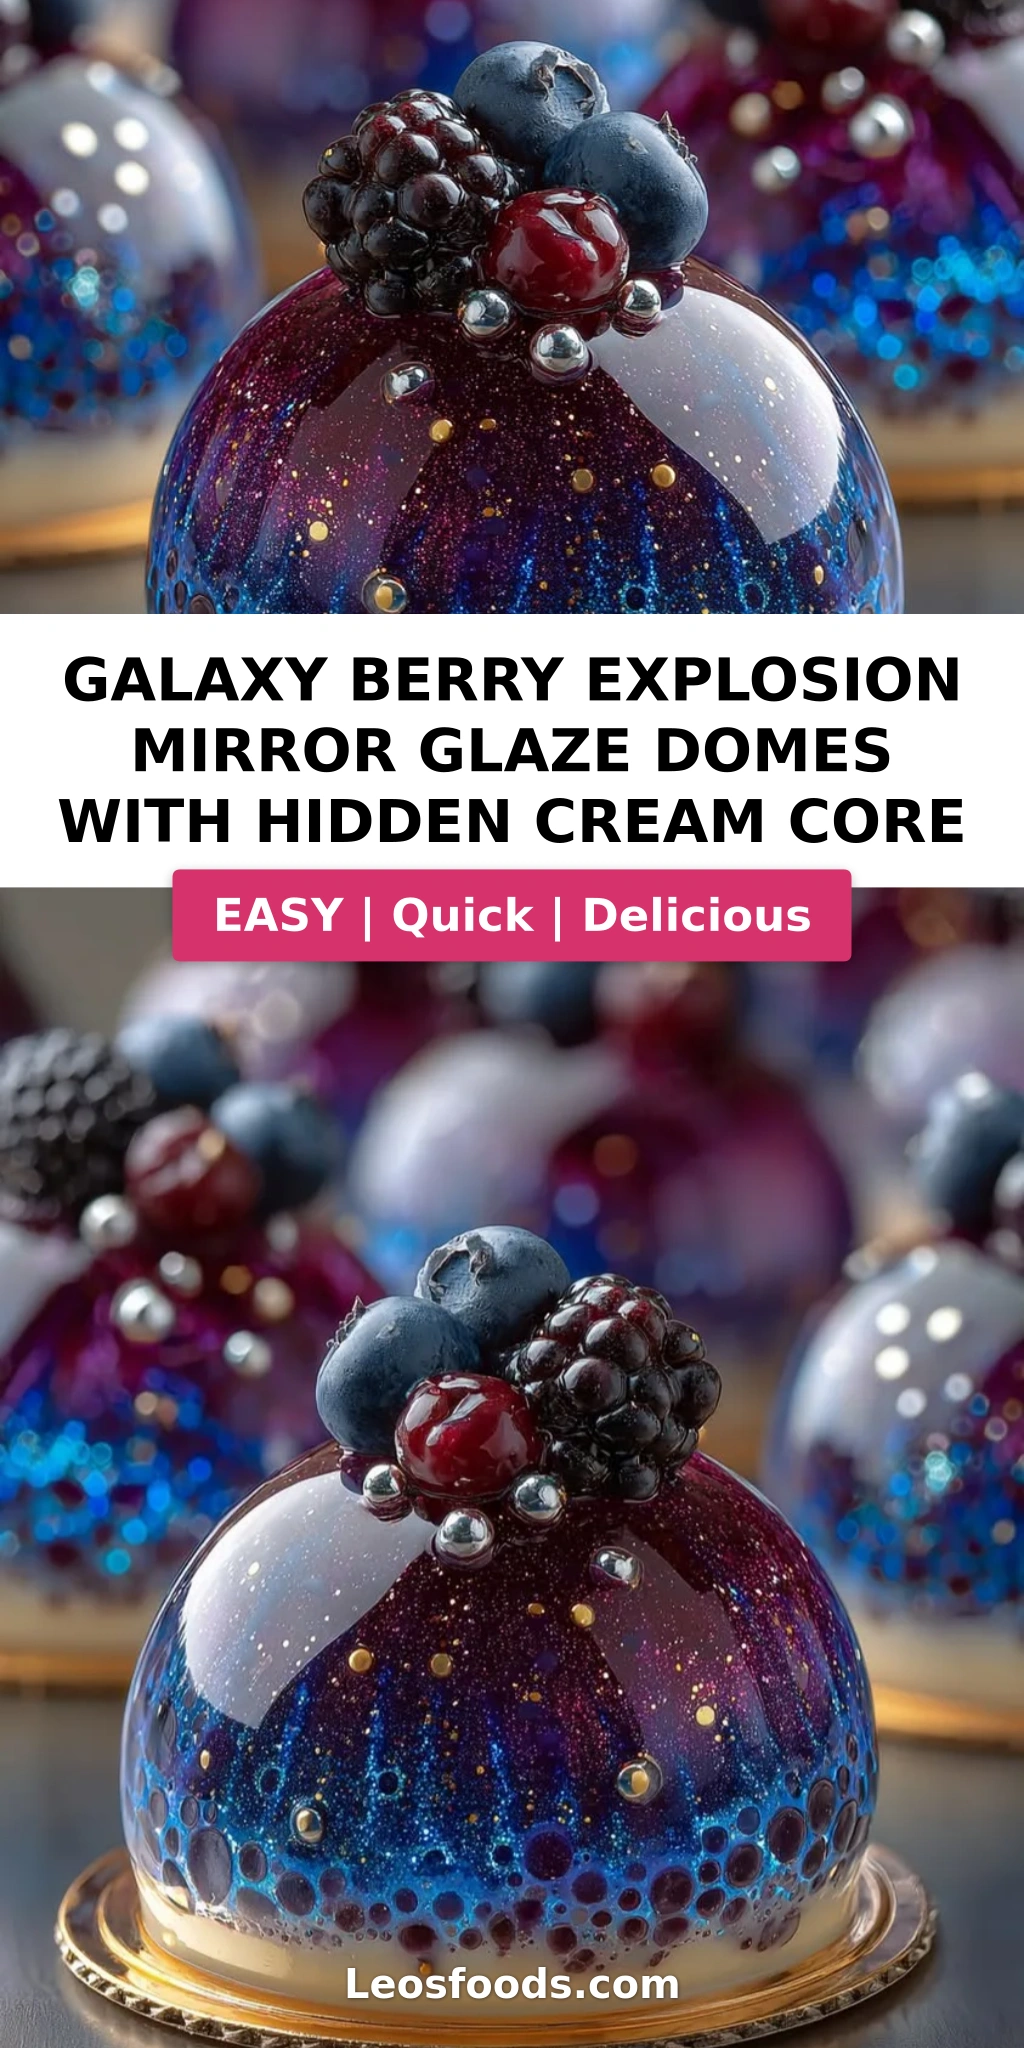
I still remember the first time I made a mirror glaze dome — it was during my pastry training in Paris, and my chef told me, “Stella, the galaxy is in your hands.” Back then, I never imagined I’d one day be creating my own version in my tiny NYC kitchen, blending the cosmic drama of a galaxy mirror glaze with the bold, sun-ripened berries I grew up eating in Morocco. This galaxy mirror glaze domes recipe is the dessert of my dreams: a deep purple-blue mirror glaze that swirls like a nebula, wrapped around a bright, tangy berry shell with a hidden cream core that spills out like a secret when you cut into it. The first time I served these at a dinner party, my guests actually gasped — and that’s the moment I knew this recipe was something special.
Imagine cracking through a glossy, mirror-like shell to reveal a vivid berry interior that tastes like summer in North Africa — blueberries, blackberries, and raspberries cooked down into an intense, jewel-toned puree. Then, right in the center, a velvety cream cheese and whipped cream core waits, cool and lush, balancing the tartness of the fruit. The mirror glaze itself is a marvel of French technique: a sweetened condensed milk and white chocolate blend, tinted in shades of violet, midnight blue, and black, then swirled into a cosmic pattern that looks like it belongs on a telescope image. It’s a galaxy berry mirror glaze that’s as beautiful as it is delicious.
I’ve tested this hidden cream center dessert more times than I can count, and I’ve learned exactly where things can go wrong — the glaze cracking, the cream core leaking, the berry shells not setting firmly enough. But I’ve also discovered the tricks that make it foolproof, and I’m sharing every single one with you here. From the exact temperature your glaze needs to be at pouring stage to the best way to seal those domes so the cream stays put, this guide will walk you through creating a mirror glaze domes with berries dessert that rivals anything you’d find in a Parisian patisserie. Let’s dive in, friend.
Why This Galaxy Mirror Glaze Domes Recipe Is the Best
The flavor secret here is the double berry punch. Most mirror glaze domes rely on a single fruit layer, but I use a concentrated mixed berry puree that’s reduced just enough to intensify the flavor without becoming syrupy. Growing up in Morocco, my mother would make a thick, tart berry compote with wild blackberries and a splash of orange blossom water — that memory inspired me to add a touch of lemon juice here, which brightens the whole dome and cuts through the richness of the cream core and the sweet glaze. It’s a balance I’ve honed over years of testing, and it works every single time.
The texture is where my French training really comes into play. The berry shell needs to be firm enough to hold its shape when unmolded, but still tender enough to yield to a spoon. I achieve this by using just the right ratio of gelatin to puree — too much and you get a rubbery texture, too little and the dome collapses. The hidden cream core, meanwhile, is stabilized with a light whipped cream and cream cheese blend that stays thick and luscious even when frozen, so it doesn’t weep or leak into the berry layer during assembly. It’s a technical detail that makes all the difference.
And here’s why even beginners can nail this galaxy mirror glaze domes recipe: I’ve broken it down into clear, manageable steps with visual cues at every stage. Whether you’re blooming gelatin for the first time or swirling food coloring into a mirror glaze, I’ll tell you exactly what to look for. Plus, I share my foolproof method for sealing the domes so the cream core stays hidden until serving — no leaks, no cracks, no stress. Just pure, stunning dessert magic.
Galaxy Mirror Glaze Domes Ingredients
Every Saturday morning, I walk to the Union Square Greenmarket with my canvas tote and load up on the ripest berries I can find — blueberries that pop with sweetness, blackberries that are almost jammy, and raspberries that smell like sunshine. That’s the foundation of this galaxy berry mirror glaze recipe. Here’s everything you’ll need.
Ingredients List
- For the Berry Dome Shells:
- 1 1/2 cups mixed berry puree (blueberries, blackberries, and raspberries)
- 1/2 cup water
- 1/3 cup granulated sugar
- 2 tsp gelatin powder
- 2 tbsp cold water (for blooming)
- 1 tsp lemon juice
- For the Hidden Cream Core:
- 1 cup cream cheese, softened
- 1/2 cup heavy whipping cream
- 2 tbsp powdered sugar
- 1 tsp vanilla extract
- For the Galaxy Mirror Glaze:
- 1/2 cup sweetened condensed milk
- 1 cup white chocolate, finely chopped
- 1/4 cup water
- 1 tbsp gelatin powder
- 3 tbsp cold water (for blooming)
- Purple food coloring, as needed
- Blue food coloring, as needed
- Black food coloring, as needed
- For Garnish (optional):
- 1 tbsp silver sugar pearls
- 1 tsp edible glitter
- Fresh blueberries
Ingredient Spotlight
Mixed Berry Puree: The star of the show. Use a combination of blueberries, blackberries, and raspberries for the deepest color and most complex flavor. If you’re using frozen berries (totally fine!), thaw them first and strain off any excess liquid before pureeing — otherwise your shell may be too watery to set properly. For a shortcut, you can use a high-quality store-bought unsweetened berry puree, but homemade tastes noticeably brighter.
Cream Cheese: This is what gives the hidden cream core its structure and tang. Use full-fat block cream cheese, not the spreadable kind in a tub — the lower water content helps the core stay firm when frozen. Let it come to room temperature before whipping, or you’ll end up with lumps. Mascarpone makes a lovely substitute if you want an even richer, more decadent core.
White Chocolate: For the mirror glaze, quality matters. Choose a white chocolate that contains cocoa butter (at least 20%) and has a smooth, creamy melt — brands like Valrhona or Callebaut are my go-tos. Avoid white chocolate chips that contain stabilizers; they can seize or turn grainy when combined with the hot liquid. If you need a dairy-free version, use a high-quality vegan white chocolate that melts smoothly.
Gelatin: This is the backbone of both the berry shells and the mirror glaze. Use powdered gelatin (like Knox) and always bloom it in cold water for exactly 5 minutes before heating. Never add gelatin directly to a hot liquid without blooming — it will clump and won’t dissolve evenly. For a vegetarian version, you can substitute agar-agar, but the setting properties are different; use 1 tsp agar powder per 1 tbsp gelatin, and boil it for 2 minutes to activate.
| Original Ingredient | Best Substitution | Flavor / Texture Impact |
|---|---|---|
| Mixed Berry Puree | Frozen berries (thawed & strained) | Slightly less intense flavor; strain excess liquid to avoid watery shells |
| Cream Cheese | Mascarpone | Richer, silkier core; less tangy, more buttery |
| White Chocolate | Vegan white chocolate (cocoa butter based) | Slightly different sweetness; ensure it melts smoothly without seizing |
| Gelatin Powder | Agar-agar powder (vegan) | Firmer, less elastic set; must be boiled for 2 mins; use 1 tsp per 1 tbsp gelatin |
| Heavy Whipping Cream | Full-fat coconut cream (chilled) | Subtle coconut note; whip until stiff peaks form; best for dairy-free version |
How to Make Galaxy Berry Explosion Mirror Glaze Domes — Step-by-Step
This is the part where we get our hands messy and create something truly spectacular. Don’t worry — I’ll walk you through every swirl, every chill, and every pour. You’ve got this.
Step 1: Bloom the Gelatin
In a small bowl, sprinkle 2 tsp gelatin powder over 2 tbsp cold water. Let it sit for 5 minutes until the gelatin becomes spongy and looks like firm jelly. This is called blooming, and it’s non-negotiable — skipping this step will leave you with lumpy, undissolved gelatin in your berry shells. While you wait, you can prep your berry puree.
💡 Stella’s Pro Tip: Always use cold water for blooming — hot water will cause the gelatin to dissolve unevenly and lose its setting power. If your kitchen is very warm, place the bowl in the fridge while it blooms.
Step 2: Prepare the Berry Mixture
In a small saucepan, combine 1 1/2 cups mixed berry puree, 1/2 cup water, 1/3 cup granulated sugar, and 1 tsp lemon juice. Warm over medium heat, stirring occasionally, until the sugar dissolves and the mixture is steaming but not boiling (about 3-4 minutes). Remove from heat and add the bloomed gelatin, stirring until completely dissolved. The mixture should be smooth and glossy.
⚠️ Common Mistake to Avoid: Don’t let the berry mixture boil — high heat can break down the gelatin and weaken its setting ability. Steam is your cue to pull it off the burner.
Step 3: Coat the Dome Molds
Pour a thin layer of the warm berry mixture into each dome mold (about 2 tablespoons per dome). Use a small spoon or pastry brush to coat the sides evenly, making sure there are no gaps. Tap the molds gently on the counter to release any air bubbles. Place the molds on a baking sheet and refrigerate for at least 20 minutes, until the berry layer is set and feels firm to the touch.
💡 Stella’s Pro Tip: For an even coating, chill the molds for 10 minutes first, then add a second thin layer. This builds a stronger shell that’s less likely to crack during unmolding.
Step 4: Make the Cream Core
While the shells set, prepare the hidden cream core. In a medium bowl, beat 1 cup softened cream cheese with a hand mixer until smooth and fluffy. Add 1/2 cup heavy whipping cream, 2 tbsp powdered sugar, and 1 tsp vanilla extract. Continue beating for 2-3 minutes until the mixture is thick, airy, and holds stiff peaks. Be careful not to over-whip — it should be smooth, not grainy.
💡 Stella’s Pro Tip: For the creamiest texture, make sure your cream cheese is truly at room temperature (about 70°F). Cold cream cheese will leave lumps that no amount of beating can fix.
Step 5: Fill and Seal the Domes
Spoon or pipe the cream mixture into each set berry shell, filling them about three-quarters full. Leave a small gap at the top — about 1/4 inch. Gently press a spoonful of the remaining warm berry mixture over the cream to seal each dome completely. Smooth the tops with a small offset spatula. Return the molds to the refrigerator and chill for at least 3 hours, or until the domes are completely firm. For best results, freeze them for 1 hour before glazing.
⚠️ Common Mistake to Avoid: The biggest leak risk is an incomplete seal. Make sure the top layer of berry mixture fully covers the cream and adheres to the berry shell edges. Any exposed cream will seep out during glazing.
Step 6: Prepare the Mirror Glaze
Bloom 1 tbsp gelatin powder in 3 tbsp cold water for 5 minutes. In a small saucepan, heat 1/4 cup water and 1/2 cup sweetened condensed milk over medium heat until steaming (do not boil). Remove from heat and stir in the bloomed gelatin until fully dissolved. Pour this hot mixture over 1 cup finely chopped white chocolate in a heatproof bowl. Let it sit for 1 minute, then stir gently until the chocolate is completely melted and the glaze is smooth and glossy.
💡 Stella’s Pro Tip: Strain the glaze through a fine-mesh sieve before adding color to remove any undissolved gelatin or chocolate bits. This ensures a perfectly smooth, mirror-like finish.
Step 7: Color the Glaze
Divide the glaze into three small bowls. Add purple food coloring to one, blue to another, and black to the third. Stir each until the color is evenly distributed. Let the glazes cool to about 90°F — they should feel warm to the touch but not hot. If they’re too warm, they’ll melt the domes; too cool, and they’ll set before you can swirl them. Pour the three colors into one larger bowl, then use a toothpick or skewer to gently swirl them together, creating a marbled, nebula-like pattern. Don’t over-mix — you want distinct ribbons of color.
⚠️ Common Mistake to Avoid: Over-swirling turns your galaxy into muddy brown. Stop after 3-4 gentle passes — the colors will continue to blend slightly as you pour, and that’s exactly what you want.
Step 8: Unmold and Glaze
Remove the frozen domes from the molds by gently flexing the silicone. Place each dome on a wire rack set over a baking sheet (to catch the drips). Working one at a time, hold a dome by its base and pour the galaxy mirror glaze evenly over the top, letting it flow down the sides. Allow the excess to drip off for a few seconds, then transfer the dome to a serving plate. Repeat with the remaining domes.
💡 Stella’s Pro Tip: For the most dramatic effect, chill the glazed domes for 10-15 minutes before serving. This sets the glaze to a shiny, mirror-like finish that won’t smudge when you pick it up.
Step 9: Garnish and Serve
Before the glaze fully sets (about 5 minutes after pouring), sprinkle each dome with silver sugar pearls and a pinch of edible glitter. Place a few fresh blueberries around the base of each dome for a pop of color. Serve immediately, or refrigerate for up to 2 hours. When you cut into the dome, the hidden cream core will spill out — a magical reveal every time.
| Step | Action | Duration | Key Visual Cue |
|---|---|---|---|
| 1 | Bloom gelatin for berry shells | 5 mins | Gelatin becomes spongy and jelly-like |
| 2 | Heat berry mixture | 3-4 mins | Steaming, sugar dissolved, glossy texture |
| 3 | Coat dome molds | 20 mins chill | Firm, even layer on sides of mold |
| 4 | Whip cream core | 2-3 mins | Stiff peaks, smooth and fluffy |
| 5 | Fill and seal domes | 3 hrs chill + 1 hr freeze | Domes are firm, top sealed with no gaps |
| 6 | Prepare mirror glaze | 5 mins | Smooth, glossy, no lumps |
| 7 | Color and swirl glaze | 2-3 mins | Marbled ribbons, not muddy |
| 8 | Unmold and glaze | 30 seconds per dome | Even coverage, drip-free base |
| 9 | Garnish and serve | 5 mins | Glitter and pearls set into glaze |
Serving & Presentation
When I serve these domes at dinner parties in my NYC apartment, I like to place each one on a small, dark plate — black slate or deep navy works beautifully — to make the galaxy colors pop. I scatter a few fresh blueberries and a tiny pinch of edible glitter around the plate, almost like stars around a planet. The moment of truth comes when your guest cuts into the dome: the glossy shell cracks, the berry layer parts, and the hidden cream core spills out like a creamy secret. It’s a showstopper every single time.
For a truly memorable dessert course, pair these domes with a small glass of chilled dessert wine like a late-harvest Riesling or a Moroccan mint tea for a non-alcoholic option that echoes my North African roots. The floral notes of the tea play beautifully against the tart berries, and the sweetness of the glaze finds a perfect counterpoint in the tea’s gentle bitterness. If you’re serving these at a celebration, add a tiny dollop of whipped cream on the side and a single mint leaf for color.
| Pairing Type | Suggestions | Why It Works |
|---|---|---|
| Side Dish | Light shortbread cookies, fresh berries on the side | Buttery crunch contrasts with the smooth dome texture |
| Sauce / Dip | raspberry coulis, vanilla anglaise | Adds extra berry punch or creamy contrast |
| Beverage | Late-harvest Riesling, Moroccan mint tea, sparkling water with lemon | Wine echoes the sweetness; tea cuts richness; sparkling water cleanses the palate |
| Garnish | Silver sugar pearls, edible glitter, fresh mint, gold leaf | Adds visual drama and a touch of elegance |
Make-Ahead, Storage & Reheating
Between my food blog, recipe testing, and navigating life in New York City, I’m all about smart make-ahead strategies. These galaxy mirror glaze domes are actually perfect for prepping in stages — here’s how I do it so I can enjoy my own dinner parties without spending the whole day in the kitchen.
| Method | Container | Duration | Reheating Tip |
|---|---|---|---|
| Refrigerator | Airtight container, single layer | Up to 2 days | Serve cold directly from fridge; glaze may soften slightly |
| Freezer | Individual wrap in plastic, then foil | Up to 1 month | Thaw in fridge overnight; glaze may lose some shine — re-glaze if desired |
| Make-Ahead | Assemble domes (un-glazed) in molds | Up to 3 days in advance | Glaze and garnish on serving day for best presentation |
Here’s my favorite make-ahead strategy: I prepare the filled domes (steps 1-5) up to three days before serving and keep them sealed in their molds in the refrigerator. On the day I’m serving, I unmold, glaze, and garnish — the whole process takes about 30 minutes, and the domes look and taste as fresh as if I’d made them that morning. If you’re freezing them, glaze after thawing, as the freeze-thaw cycle can dull the mirror finish slightly.
One thing I don’t recommend: refrigerating glazed domes for more than 24 hours. The moisture in the fridge can cause the glaze to weep and lose its mirror shine. For best results, glaze within 2-3 hours of serving and keep the domes at a cool room temperature or in the fridge for short periods only.
Variations & Easy Swaps
| Variation | Key Change | Best For | Difficulty Impact |
|---|---|---|---|
| Tropical Passion | Replace berry puree with mango-passion fruit puree | Summer celebrations, tropical-themed parties | Same difficulty |
| Dairy-Free Galaxy | Use coconut cream in core, vegan white chocolate in glaze | Dairy-free guests, vegan diets | Slightly more complex (coconut cream whips differently) |
| Chocolate Nebula | Add 2 tbsp cocoa powder to berry puree; use dark chocolate in glaze | Chocolate lovers, richer flavor profile | Same difficulty |
Tropical Passion
Swap the mixed berry puree for an equal amount of mango puree (about 1 1/2 cups) plus the pulp of 2 passion fruits. The tropical version reminds me of the vibrant fruit stalls in Marrakech — sunny, tart, and incredibly fragrant. Use yellow and orange food coloring in the mirror glaze instead of blue and purple, and garnish with toasted coconut flakes. The cream core stays the same, and the tropical tang pairs beautifully with the sweet glaze.
Dairy-Free Galaxy
For a dairy-free version, substitute the cream cheese and heavy cream in the core with full-fat coconut cream that’s been chilled overnight and whipped to stiff peaks. Use a high-quality vegan white chocolate for the mirror glaze (look for one with cocoa butter for the best melt). The texture will be slightly lighter and less rich, but still delicious. I’ve tested this with my dairy-free friends in NYC and it gets rave reviews — just be sure to whip the coconut cream thoroughly and keep everything well chilled.
Chocolate Nebula
Add 2 tablespoons of unsweetened cocoa powder to the berry puree mixture when you heat it, and whisk until smooth. For the mirror glaze, use dark chocolate (70% cacao) instead of white chocolate — the color will naturally be darker, so you can use a single deep purple or burgundy food coloring for a stunning “cosmic dust” effect. Garnish with cacao nibs and gold leaf for a truly opulent finish. This variation is perfect for winter holidays or when you want a deeper, more decadent flavor.
Share Your Version!
I absolutely love seeing how you make this recipe your own. Did you try the tropical variation? Did your galaxy swirl turn out even more stunning than you imagined? Drop a comment below with your star rating and any tweaks you made — your feedback helps other readers and inspires me to keep creating. And if you shared a photo on Instagram or Pinterest, tag @leosfoods so I can see your beautiful creations and feature them in my stories.
One question I’d love for you to answer: What’s the one dessert you’ve always been nervous to try, and what would help you feel confident enough to tackle it? I read every single comment, and your answers often spark my next recipe. Let’s keep cooking together, friend!
From my NYC kitchen to yours — I hope this recipe brings as much warmth to your table as it does to mine. — Stella 🧡
How do you achieve the galaxy swirl effect in a mirror glaze for these berry domes?
The key to a stunning galaxy swirl is in the temperature and technique. After preparing your mirror glaze base and dividing it into three portions (purple, blue, and black), let each portion cool to about 90°F — warm but not hot. Pour all three colors into one bowl in a random pattern, then use a toothpick or the tip of a skewer to make 3-4 gentle swirling motions. Don’t over-swirl, or the colors will blend into a muddy brown. When you pour the glaze over the frozen dome, the colors will continue to move slightly, creating that beautiful nebula effect. The contrast between the deep black and bright purple/blue ribbons is what gives it that galaxy look. For extra sparkle, stir a tiny pinch of edible glitter into the blue portion before swirling.
What is the best way to create a hidden cream core inside a mousse dome without it leaking?
The secret to a leak-proof hidden cream center is a proper seal. First, make sure your berry shell is completely set before adding the cream — at least 20 minutes in the fridge. When you pipe or spoon the cream into the shell, leave a 1/4-inch gap at the top. Then, gently press a layer of the warm (not hot) remaining berry mixture over the cream, making sure it spreads edge to edge and fully adheres to the set berry shell. Use a small offset spatula to smooth the top. The key is to make sure no cream is exposed — any gap will create a channel for the cream to escape during glazing. Refrigerate the sealed domes for at least 3 hours, or better yet, freeze them for 1 hour before glazing. The frozen cream core stays put and won’t budge when the warm glaze hits it.
Can I use frozen berries instead of fresh ones for the berry explosion filling?
Absolutely — frozen berries work beautifully in this galaxy mirror glaze domes recipe. In fact, I often use frozen berries when fresh ones are out of season or when I want a consistent flavor year-round. The key is to thaw the frozen berries completely first, then strain off any excess liquid before pureeing. Frozen berries release more water than fresh ones, and that extra liquid can make your berry shell too watery to set properly. After thawing and straining, proceed with the recipe exactly as written. You may need to add an extra teaspoon of gelatin if the puree seems very thin, but usually the standard amount works fine. I’ve tested this with frozen organic mixed berries from my local NYC grocery store and the results were just as stunning.
How far in advance can I make mirror glaze domes to keep them fresh for serving?
You can prepare these mirror glaze domes with berries several days in advance if you plan strategically. My preferred timeline is to make the filled, unglazed domes (steps 1-5) up to 3 days ahead and keep them sealed in their molds in the refrigerator. On the day you plan to serve, unmold them, prepare the glaze, and pour it over the domes within 2-3 hours of serving. The glazed domes can sit at cool room temperature for about 2 hours or in the fridge for up to 24 hours, but beyond that the glaze may start to weep and lose its mirror shine. If you need to freeze them, freeze the unglazed domes for up to 1 month, then thaw in the fridge overnight and glaze on serving day. The freeze-thaw cycle can slightly dull the mirror finish, so I recommend serving glazed domes within a few hours for that wow-factor brilliance.
What size dome mold do I need for this galaxy berry mirror glaze recipe?
For this recipe, I recommend using 3-inch diameter half-sphere silicone dome molds. This size gives you a generous single-serving dessert that’s large enough to showcase the layers and the hidden cream core, but not so big that it feels overwhelming. Six 3-inch domes fit perfectly on a standard baking sheet for glazing. If you use smaller molds (2-inch), you’ll get about 10-12 domes and the assembly will be more fiddly. If you use larger molds (4-inch), you’ll get about 4 domes and they’ll need a bit more chilling time. I found my silicone dome molds at a kitchen supply store in NYC’s Chelsea Market, but they’re widely available online. Silicone is essential — rigid molds won’t release the domes cleanly.
Can I use gel food coloring instead of liquid for the mirror glaze?
Yes, gel food coloring is actually my preferred choice for the galaxy mirror glaze. Gel colors are more concentrated than liquid drops, so you need less product to achieve vibrant shades, and they don’t add extra water that could thin out the glaze. When using gel coloring, dip a toothpick into the gel and stir it into the glaze portion — add a little at a time until you reach the desired intensity. For the black portion, you’ll need quite a bit of black gel to get a true deep black, so don’t be shy. I recommend using gel colors from brands like Americolor or Wilton, which are widely available at baking supply stores in the US. Avoid natural food colorings for the black — they tend to produce a gray or brown instead of a true cosmic black.
Why did my mirror glaze crack or not set properly?
Mirror glaze cracking or not setting usually comes down to one of three issues. First, temperature shock — if the dome is too cold (straight from the freezer) and the glaze is too hot, the sudden temperature change can cause the glaze to crack. Your domes should be frozen but not rock-hard, and your glaze should be around 90°F, not piping hot. Second, the gelatin ratio may be off — if your glaze doesn’t set, you may have under-bloomed the gelatin or used too little. Make sure you bloom 1 tbsp gelatin in exactly 3 tbsp cold water for a full 5 minutes. Third, over-mixing the glaze can incorporate air bubbles that weaken the structure. Stir gently and let the glaze rest for a minute before pouring. If your glaze cracks as it sets, it likely cooled too quickly — try glazing in a warmer room or at a slightly warmer glaze temperature next time.
Can I make these galaxy domes without a dome mold?
While a dome mold gives you that classic half-sphere shape, you can still create a stunning galaxy dessert without one. Use small glass bowls or ramekins as molds — line them with plastic wrap first so the domes release easily. The shape will be more like a rounded bowl than a perfect dome, but the flavor and visual impact will still be spectacular. Alternatively, you can pour the berry mixture into a small square or rectangular silicone ice cube tray for smaller, bite-sized domes. For a truly mold-free approach, set the berry mixture in a shallow dish as a single layer, cut out rounds with a cookie cutter, and assemble the domes by layering the cream core between two berry rounds. It’s a more rustic presentation, but the hidden cream center and galaxy glaze still deliver that wow factor.
Share Your Version!
I absolutely love seeing how you make this recipe your own. Did you try the tropical variation? Did your galaxy swirl turn out even more stunning than you imagined? Drop a comment below with your star rating and any tweaks you made — your feedback helps other readers and inspires me to keep creating. And if you shared a photo on Instagram or Pinterest, tag @leosfoods so I can see your beautiful creations and feature them in my stories.
One question I’d love for you to answer: What’s the one dessert you’ve always been nervous to try, and what would help you feel confident enough to tackle it? I read every single comment, and your answers often spark my next recipe. Let’s keep cooking together, friend!
From my NYC kitchen to yours — I hope this recipe brings as much warmth to your table as it does to mine. — Stella 🧡
Love This Recipe? Save It to Pinterest!
If you enjoyed this Galaxy Berry Explosion Mirror Glaze Domes with Hidden Cream Core recipe, don’t let it get lost in your browser tabs! 😄 Pin it now so you can find it again anytime — and explore hundreds more tried-and-tested recipes waiting for you on my Pinterest boards.
👉 Follow Stella on Pinterest @stellarecipeblog
📌 Pin this recipe · 🔁 Re-pin your favorites · 💬 Tag me when you make it — I love seeing your creations!
💬 What’s your biggest dessert challenge?
I read every comment — tell me what you’d love to master next, and I’ll create a recipe to help you nail it!
⬇️ Drop your answer below, then try this recipe and let me know how it went!
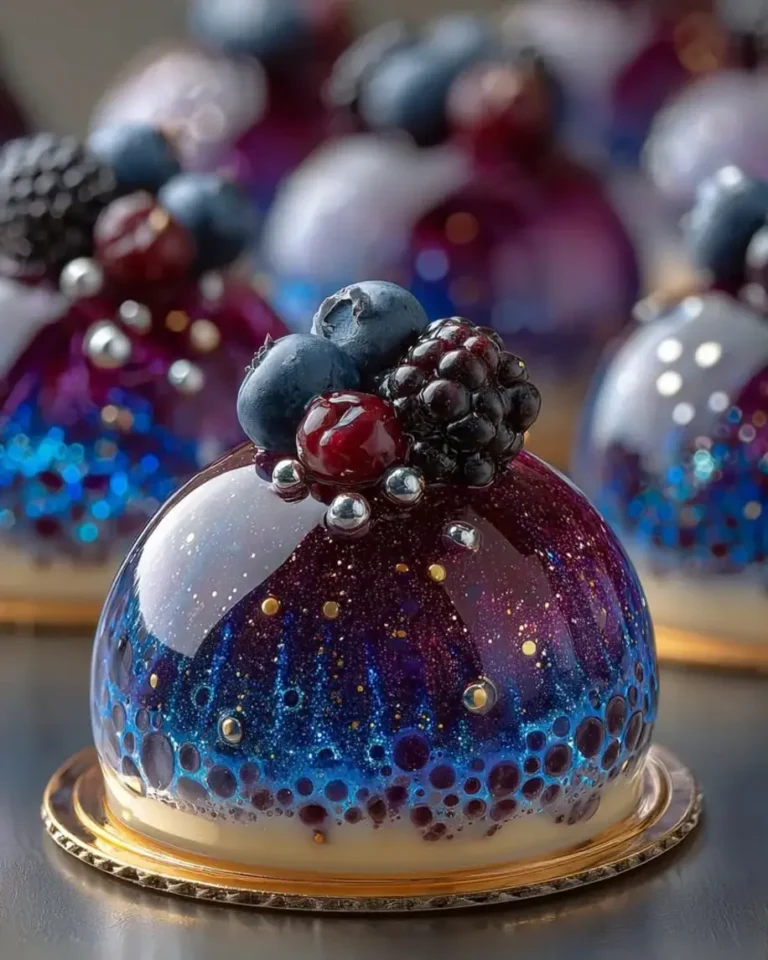
Galaxy Berry Explosion Mirror Glaze Domes with Hidden Cream Core
Stunning galaxy-themed mirror glaze domes with a hidden cream core, bursting with mixed berry flavor.
- Yield: 6 1x
Ingredients
- For the Berry Dome Shells:
- 1 1/2 cups mixed berry puree (blueberries, blackberries, and raspberries)
- 1/2 cup water
- 1/3 cup granulated sugar
- 2 tsp gelatin powder
- 2 tbsp cold water
- 1 tsp lemon juice
- For the Hidden Cream Core:
- 1 cup cream cheese, softened
- 1/2 cup heavy whipping cream
- 2 tbsp powdered sugar
- 1 tsp vanilla extract
- For the Galaxy Mirror Glaze:
- 1/2 cup sweetened condensed milk
- 1 cup white chocolate, finely chopped
- 1/4 cup water
- 1 tbsp gelatin powder
- 3 tbsp cold water
- Purple food coloring, as needed
- Blue food coloring, as needed
- Black food coloring, as needed
- For Garnish (optional):
- 1 tbsp silver sugar pearls
- 1 tsp edible glitter
- Fresh blueberries
Instructions
- Bloom 2 tsp gelatin in 2 tbsp cold water for 5 minutes.
- Heat berry puree, water, sugar, and lemon juice until warm. Stir in the bloomed gelatin until dissolved.
- Pour a thin layer of berry mixture into dome molds, coating the sides. Chill until set.
- Whip cream cheese, heavy cream, powdered sugar, and vanilla extract until smooth and fluffy.
- Fill each berry shell with the cream mixture, leaving a small space at the top.
- Seal with the remaining berry mixture and refrigerate until completely firm.
- For the mirror glaze, bloom 1 tbsp gelatin in 3 tbsp cold water. Heat water and condensed milk until steaming, then stir in gelatin.
- Pour the hot mixture over white chocolate and stir until smooth. Divide into portions and tint with purple, blue, and black coloring.
- Allow the glaze to cool slightly, then swirl the colors together without fully mixing.
- Unmold the frozen domes and place them on a rack. Pour the galaxy mirror glaze evenly over each dome.
- Let excess glaze drip away, then transfer to serving plates.
- Finish with silver sugar pearls, edible glitter, and fresh blueberries. Serve chilled.
Nutrition
- Calories: 390
- Sugar: 31g
- Fat: 26g
- Carbohydrates: 35g
- Protein: 5g
Tried This Recipe? Leave a Comment!
Did you make this recipe? I’d love to hear how it turned out! Please leave a comment and a rating below. Your feedback helps other home cooks and supports cheerychop.com!
For more delicious inspiration, follow me on Pinterest!