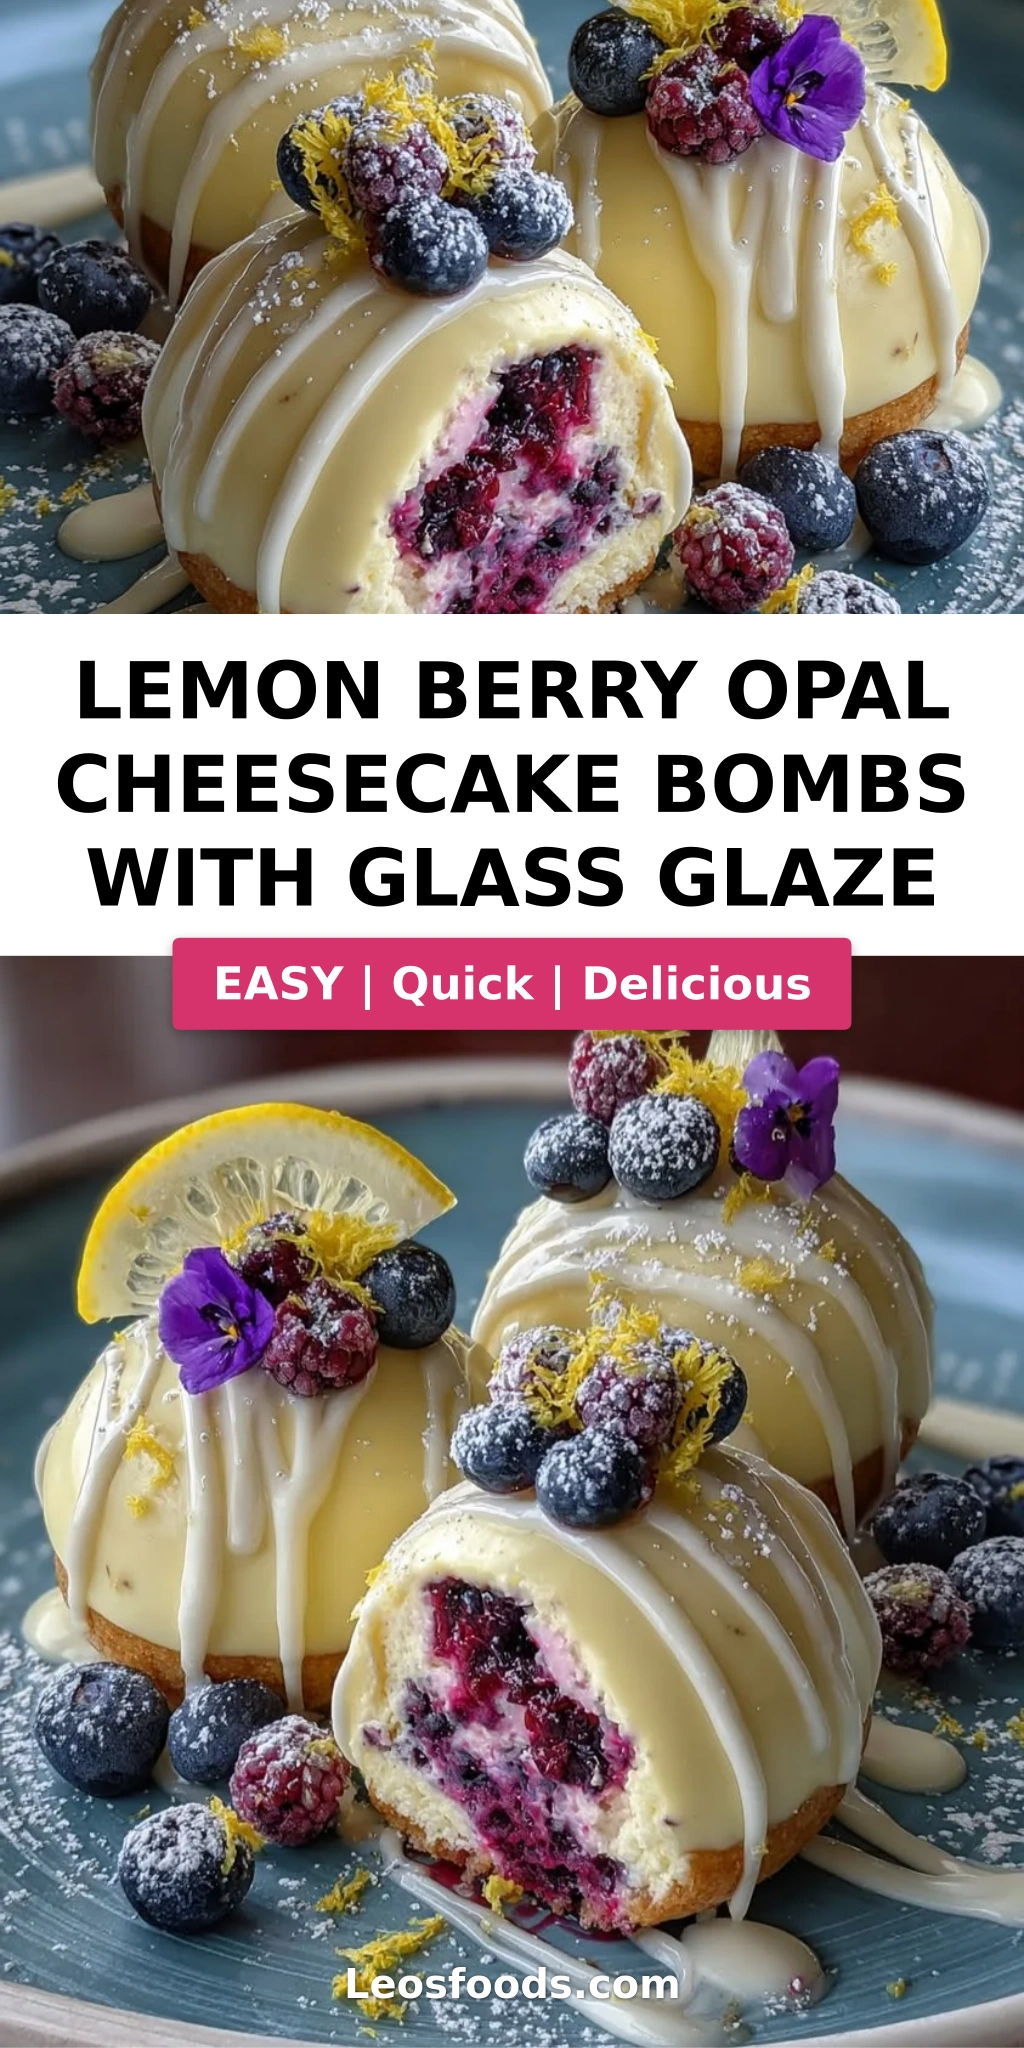
Lemon Berry Opal Cheesecake Bombs with Glass Glaze
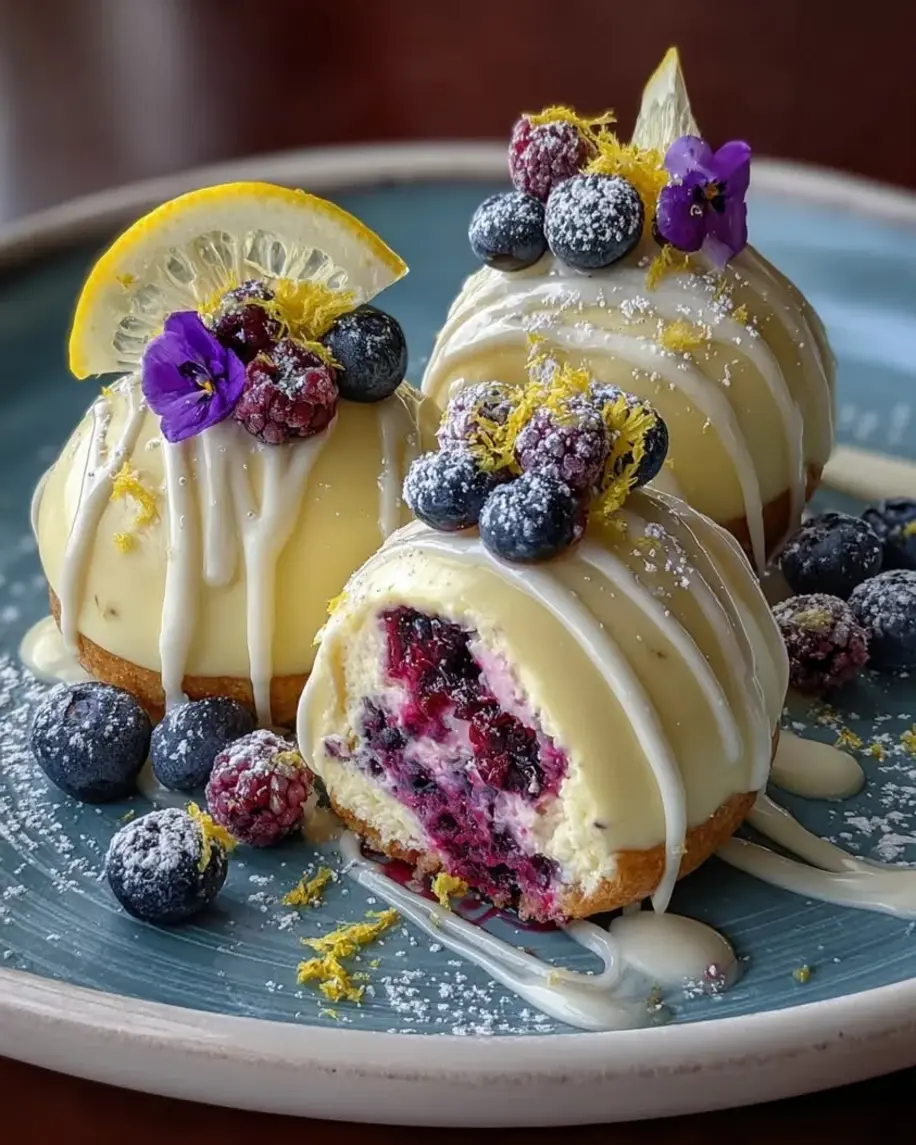
Table of Contents
Lemon Berry Opal Cheesecake Bombs with Glass Glaze – Shimmering Dessert Bombs with a Surprise Berry Core
Growing up in Morocco, my mother would make these little jewel-like fruit confections that shimmered like gems on a platter during special celebrations. Years later, while training at Le Cordon Bleu in Paris, I learned the art of mirror glazes and gelatin work — techniques that felt like coming home to those childhood memories. These Lemon Berry Opal Cheesecake Bombs are my love letter to both worlds: the bright, sun-warmed berries of North Africa and the polished elegance of French pastry. The glass glaze that coats each bomb catches the light like an opal, revealing a hidden core of tangy berry compote inside a luscious lemon cheesecake filling.
Imagine biting through a cool, mirror-smooth shell that shatters with the gentlest pressure, giving way to a cloud-like cheesecake mousse that tastes of fresh lemon zest and vanilla. Then comes the real surprise — a burst of concentrated mixed berry puree that floods your mouth with sweet-tart brightness. The texture journey alone is worth the effort: from the glossy, firm glaze to the airy cheesecake and finally that soft, jammy berry center. I add just a whisper of lemon zest to the filling, a trick I picked up from a pastry chef in the 6th arrondissement who insisted that citrus “wakes up” cream cheese like nothing else can.
What sets my version apart from other cheesecake bombs is the combination of a stabilized gelatin-based glass glaze with a frozen-from-the-inside-out assembly method. I’ve spent months perfecting the glaze temperature window — too warm and it runs off clear, too cool and it lumps — and I’m sharing every detail so you can nail it on your first try. This recipe is advanced, yes, but with patience and my pro tips, you’ll be creating dessert showstoppers that belong in a bakery window. One common mistake home bakers make is not freezing the bombs solid enough before glazing, which causes the glaze to slide right off — I’ll show you exactly how to avoid that.
Why This Lemon Berry Opal Cheesecake Bombs Recipe Is the Best
The Flavor Secret. The magic of these lemon berry dessert bombs lies in the contrast between the tangy lemon cheesecake and the intensely fruity berry core. I use a mixed berry puree that I simmer with a touch of lemon juice to brighten the natural sweetness — a technique I learned from watching my mother cook down figs and apricots in Marrakech. The cheesecake filling itself is lightened with whipped cream and stabilized with gelatin, so it stays silky even after freezing. Every component is designed to complement, not overwhelm, the delicate opal glaze that ties it all together.
Perfected Texture. The glass glaze is where French pastry training truly shines. I use a precise ratio of gelatin, white chocolate, and sweetened condensed milk to create a glaze that sets with a mirror-like sheen but remains thin enough to coat without pooling. The key is cooling the glaze to exactly 90°F — any hotter and it becomes translucent and runs off, any cooler and it thickens into a matte finish. I’ve tested this opal glaze recipe at least a dozen times, adjusting the gelatin bloom time and the chocolate chopping fineness to achieve that perfect, breakable shell.
Foolproof & Fast. Despite the advanced look, this recipe is surprisingly forgiving if you follow the freezing guidelines. The gelatin in both the filling and the glaze provides stability, so even if you’re new to working with cheesecake bombs with gelatin glaze, the structure holds. I’ve designed the steps so you can prepare the berry cores and cheesecake filling a day ahead, then glaze and serve the next day — perfect for busy home bakers who want to impress without last-minute panic. Plus, no special equipment beyond a sphere mold and a candy thermometer is required.
Lemon Berry Opal Cheesecake Bombs Ingredients
I source my berries from the Union Square Greenmarket when they’re in season, but frozen berries work beautifully year-round — just thaw and drain them before pureeing. The white chocolate for the glaze should be a good-quality brand like Callebaut or Ghirardelli, finely chopped so it melts smoothly into the glaze without seizing. For the gelatin, I use powdered gelatin from Knox or a professional brand like Silver Gelatin — just make sure it’s not flavored or colored. And the cream cheese? Always full-fat, always softened to room temperature, always from a block (not the spreadable tub).
Ingredients List
- For the Lemon Berry Cheesecake Filling: 8 oz cream cheese, softened; 1/2 cup granulated sugar; 1 cup heavy cream; 1/2 cup mixed berry puree; 1 tbsp lemon juice; 1 tsp lemon zest; 1 tsp vanilla extract; 2 tsp powdered gelatin; 3 tbsp cold water
- For the Berry Core: 3/4 cup mixed berry puree; 2 tbsp granulated sugar; 1 tsp lemon juice; 1 tsp powdered gelatin; 1 tbsp cold water
- For the Glass Glaze: 1 cup granulated sugar; 1/2 cup water; 1/2 cup sweetened condensed milk; 1 cup white chocolate, finely chopped; 1 tbsp powdered gelatin; 3 tbsp cold water; 1 tsp clear vanilla extract; 1 drop purple food coloring; 1 drop blue food coloring
- For Garnish (optional): Fresh berries; lemon zest curls; edible silver flakes
Ingredient Spotlight
Mixed Berry Puree. This is the heart of both the core and the filling. You can use fresh or frozen raspberries, blueberries, strawberries, and blackberries. Thaw frozen berries completely and drain off any excess liquid before pureeing to avoid a watery filling. A 12-ounce bag of frozen mixed berries yields about 1 cup of puree after straining.
White Chocolate for the Glaze. The quality of your white chocolate determines the gloss and texture of your glass glaze. Choose a couverture-style white chocolate with at least 30% cocoa butter for the smoothest melt and shiniest finish. Avoid white chocolate chips, which contain stabilizers that can make the glaze grainy.
Powdered Gelatin. This is the structural backbone of both the filling and the glaze. Always bloom the gelatin in cold water for at least 5 minutes before dissolving it into warm liquid. Never add gelatin directly to a hot mixture without blooming — it will create lumps that ruin the silky texture.
| Original Ingredient | Best Substitution | Flavor / Texture Impact |
|---|---|---|
| Cream cheese | Dairy-free cream cheese (e.g., Miyoko’s or Kite Hill) | Slightly less tangy, softer set — add 1 extra tsp gelatin |
| Heavy cream | Full-fat coconut cream (chilled) | Coconut flavor comes through; whip to stiff peaks |
| White chocolate | Dairy-free white chocolate (e.g., Enjoy Life) | Slightly less glossy; add 1 tsp coconut oil for shine |
| Mixed berry puree | Mango puree or passion fruit puree | Sweeter, tropical flavor; reduce sugar by 1 tbsp |
| Powdered gelatin | Agar-agar (vegan substitute) | Firmer, more brittle set; use 1 tsp agar with 1/4 cup water |
How to Make Lemon Berry Opal Cheesecake Bombs — Step-by-Step
This recipe has five main stages, and I promise that if you take it step by step — especially the freezing and glazing — you will end up with stunning, professional-quality dessert bombs. Let’s get started!
Step 1: Make the Berry Core
Bloom 1 teaspoon of powdered gelatin in 1 tablespoon of cold water for 5 minutes. In a small saucepan, warm 3/4 cup mixed berry puree with 2 tablespoons sugar and 1 teaspoon lemon juice over medium heat, stirring, until it’s steaming but not boiling. Remove from heat and stir in the bloomed gelatin until fully dissolved. Pour the mixture into small silicone hemisphere inserts (about 1-inch diameter) and freeze for at least 2 hours, until rock-solid.
💡 Stella’s Pro Tip: If you don’t have small silicone hemisphere molds, pour the berry mixture into a small parchment-lined loaf pan to a 1/2-inch depth, freeze, then cut into small cubes with a sharp knife.
Step 2: Prepare the Cheesecake Filling
Bloom 2 teaspoons of powdered gelatin in 3 tablespoons of cold water for 5 minutes. In a large bowl, beat 8 oz softened cream cheese, 1/2 cup sugar, 1/2 cup mixed berry puree, 1 tbsp lemon juice, 1 tsp lemon zest, and 1 tsp vanilla extract until smooth and creamy. In a small saucepan, warm about 2 tablespoons of the heavy cream until steaming, then stir in the bloomed gelatin until dissolved. Mix this gelatin-cream into the cream cheese mixture. In a separate bowl, whip the remaining heavy cream to soft peaks, then gently fold it into the cream cheese mixture in two additions.
⚠️ Common Mistake to Avoid: Over-folding the whipped cream will deflate the filling, making it dense instead of airy. Fold only until no white streaks remain — a few small lumps are better than a flat batter.
Step 3: Assemble and Freeze
Fill each cavity of a sphere mold (about 2-inch diameter) halfway with the cheesecake filling. Remove the frozen berry cores from their molds and press one gently into the center of each filling-filled cavity. Cover with more cheesecake filling until the mold is completely full, smoothing the top with an offset spatula. Freeze for at least 6 hours or overnight — the bombs must be completely solid before glazing.
💡 Stella’s Pro Tip: Place the filled sphere mold on a flat baking sheet in the freezer to prevent any wobbling that could displace the berry core. If the cores shift off-center, the bombs will still taste amazing, but the visual surprise won’t be as dramatic.
Step 4: Make the Glass Glaze
Bloom 1 tablespoon of powdered gelatin in 3 tablespoons of cold water for 5 minutes. In a medium saucepan, combine 1 cup sugar, 1/2 cup water, and 1/2 cup sweetened condensed milk. Heat over medium heat, stirring gently, until the mixture is steaming and the sugar is dissolved — do not boil. Remove from heat and stir in the bloomed gelatin and 1 cup finely chopped white chocolate until smooth and fully melted. Add 1 teaspoon clear vanilla extract, then 1 drop each of purple and blue food coloring, stirring until the glaze is a translucent opal hue. Allow the glaze to cool to exactly 90°F (32°C), checking with a candy thermometer.
⚠️ Common Mistake to Avoid: If the glaze is too hot (above 95°F), it will run off the frozen bombs in thin streaks. If too cold (below 85°F), it will thicken and create a matte, lumpy coating. Use a thermometer and be patient — this 5-degree window is crucial for that glass-like finish.
Step 5: Glaze and Garnish
Remove the frozen cheesecake bombs from the freezer and unmold them immediately. Place each bomb on a wire rack set over a baking sheet lined with parchment paper. Working quickly, pour the cooled glaze evenly over each bomb, coating the entire surface. Let the excess drip off, then transfer the glazed bombs to a clean parchment-lined tray. Refrigerate for 30 minutes to set the glaze. Garnish with fresh berries, lemon zest curls, and edible silver flakes just before serving.
💡 Stella’s Pro Tip: For the cleanest glaze application, hold each bomb by the top edge with your fingertips (wear disposable gloves if needed) and pour the glaze from a spouted measuring cup. Let it drip for 5 seconds before placing it on the rack — this prevents a thick “foot” from forming at the base.
| Step | Action | Duration | Key Visual Cue |
|---|---|---|---|
| 1 | Make berry core | 10 min active + 2 hr freeze | Gelatin dissolved, mixture glossy; cores are solid and release cleanly from mold |
| 2 | Prepare cheesecake filling | 15 min active | Cream cheese is smooth; whipped cream folded in evenly, no white streaks |
| 3 | Assemble and freeze bombs | 10 min active + 6 hr freeze | Molds filled to top, smooth surface; bombs are rock-solid with no give when pressed |
| 4 | Make glass glaze | 15 min active + 15 min cooling | Glaze is smooth, glossy, and translucent at 90°F; pours like warm honey |
| 5 | Glaze and garnish | 10 min active + 30 min set | Glaze coats evenly, sets to a mirror-like sheen; garnishes stick without sliding |
Serving & Presentation
These glass glaze cheesecake bombs are meant to be the centerpiece of a dessert table — they practically glow under any light. I like to serve them on a dark slate platter or a mirrored tray to amplify the opal shimmer. Arrange them in a loose cluster with fresh raspberries, blueberries, and tiny sprigs of mint scattered around for contrast. Each bomb should be served chilled but not frozen solid; about 5 minutes at room temperature after removing from the fridge allows the filling to soften slightly while the glaze stays firm.
For a dramatic presentation, dust the plate with a light sprinkle of edible silver dust or crushed freeze-dried raspberries before setting the bombs down. I sometimes add a tiny dollop of lemon curd or a smear of berry coulis on the plate as a colorful base. The combination of the cool, glossy glaze against the bright fruit puree is pure theater on a plate — a dessert that tastes as extraordinary as it looks.
In my NYC cooking classes, I always pair these bombs with a sparkling limoncello spritz or a chilled glass of Moscato d’Asti. The acidity cuts through the richness of the cheesecake and echoes the lemon in the filling. For a non-alcoholic option, a tall glass of sparkling water with a splash of elderflower cordial and a few frozen berries is absolutely perfect.
| Pairing Type | Suggestions | Why It Works |
|---|---|---|
| Side Dish | Shortbread cookies, fresh fruit salad, candied lemon slices | Buttery crunch contrasts the creamy bombs; fruit echoes the berry notes |
| Sauce / Dip | Lemon curd, warm berry coulis, honey-lavender drizzle | Adds brightness and a second layer of citrus or floral flavor |
| Beverage | Limoncello spritz, Moscato d’Asti, elderflower sparkler, mint tea | Acid and bubbles cut the richness; floral notes complement the opal theme |
| Garnish | Edible silver flakes, lemon zest curls, fresh mint, freeze-dried berry powder | Adds visual sparkle and a pop of color against the opal glaze |
Make-Ahead, Storage & Reheating
Living in NYC means my schedule is always full, so I design my recipes to work with real life. These Lemon Berry Opal Cheesecake Bombs are perfect for making ahead because the freezing and glazing steps can be staggered. I often prepare the berry cores and cheesecake filling on a Friday evening, assemble and freeze the bombs overnight, then glaze them on Saturday afternoon before a dinner party. The glaze sets beautifully and holds for up to 24 hours in the fridge, so you can even glaze them the morning of your event.
| Method | Container | Duration | Reheating Tip |
|---|---|---|---|
| Refrigerator | Airtight container in a single layer | Up to 2 days | Serve chilled; no reheating needed |
| Freezer (unglazed) | Wrapped individually in plastic, then in a freezer bag | Up to 1 month | Thaw 15 min at room temp, then glaze per recipe |
| Make-Ahead | Assemble in molds, freeze solid, then unmold and store in freezer bag | Up to 1 week before glazing | Glaze directly from frozen — no need to thaw |
If you have leftover glazed bombs, store them in the refrigerator in a single layer inside an airtight container — they’ll stay beautiful for up to 2 days. The glaze may soften slightly over time but will still look stunning. To restore some of the glass-like sheen, you can place them back in the fridge for 15 minutes before serving. Do not microwave or warm these bombs — the glaze will melt and the cheesecake filling will weep. These are meant to be enjoyed cold, straight from the chill of your refrigerator.
Variations & Easy Swaps
| Variation | Key Change | Best For | Difficulty Impact |
|---|---|---|---|
| Tropical Mango-Passion Fruit | Substitute mango puree for berries in core and filling; add passion fruit pulp to glaze | Summer parties, tropical-themed desserts | Same difficulty |
| Dairy-Free Coconut | Use dairy-free cream cheese, coconut cream, and dairy-free white chocolate | Vegan or lactose-intolerant guests | Slightly harder (coconut cream whips differently) |
| Autumn Spiced Apple Cider | Replace berry puree with apple cider reduction; add cinnamon and nutmeg to filling | Fall gatherings, Thanksgiving dessert table | Same difficulty (reduce cider to 1/3 cup) |
Tropical Mango-Passion Fruit Variation
This variation is a nod to the bright, sun-drenched flavors I grew up with in Morocco. Replace the mixed berry puree with an equal amount of mango puree (from fresh or frozen mangoes) in both the core and the filling. For the core, add 2 tablespoons of passion fruit pulp for that signature tangy pop. In the glaze, replace the vanilla with 1/2 teaspoon of passion fruit powder or an extra drop of yellow food coloring for a sunset hue. The resulting bombs taste like a tropical getaway — the mango sweetness balances the passion fruit acidity beautifully.
Dairy-Free Coconut Version
To make this recipe dairy-free, use a high-quality dairy-free cream cheese like Miyoko’s or Kite Hill, and replace the heavy cream with full-fat coconut cream that has been chilled overnight and whipped to stiff peaks. Use dairy-free white chocolate from Enjoy Life or another brand, and add 1 teaspoon of coconut oil to the glaze for extra shine. The coconut flavor pairs wonderfully with the lemon and berries — I tested this version for a friend’s birthday and it was a hit even among the non-vegan guests. Note that the filling will be slightly softer, so increase the gelatin by 1/2 teaspoon for stability.
Autumn Spiced Apple Cider Variation
When fall hits the NYC farmers markets, I swap the berries for apple cider. Reduce 1 cup of apple cider in a saucepan over medium heat until it thickens to about 1/3 cup — this concentrated cider becomes the base for both the core and the filling. Add 1/2 teaspoon of cinnamon and a pinch of nutmeg to the cheesecake filling, and use a tiny drop of amber food coloring in the glaze for a warm golden tone. The core gets a surprise cube of sautéed apple (tossed in butter and brown sugar before freezing) instead of the berry gel. Serve with a dusting of cinnamon — it tastes like autumn on a plate.
What is the best way to make a glass glaze that stays clear and shiny on cheesecake bombs?
The secret to a crystal-clear, mirror-shiny glass glaze lies in three things: the quality of your white chocolate, the temperature of the glaze when you pour it, and the freezing temperature of your bombs. Use a good-quality white chocolate couverture with at least 30% cocoa butter — it melts smoothly and creates a glossy finish. Cool the glaze to exactly 90°F (32°C) before pouring; any hotter and it will run off and turn translucent, any cooler and it will thicken into a matte coating. Your cheesecake bombs must be frozen solid — at least 6 hours in the freezer — so the cold surface instantly sets the glaze into a shiny shell. Adding a teaspoon of clear vanilla extract and a tiny drop of food coloring gives the glaze that opalescent shimmer without clouding it.
Can I use frozen mixed berries instead of fresh ones for the lemon berry filling?
Absolutely — in fact, I often use frozen mixed berries because they are picked at peak ripeness and flash-frozen, which gives you consistent flavor year-round. The key is to thaw the frozen berries completely and drain off any excess liquid before pureeing. If you skip the draining step, the extra water will thin out your cheesecake filling and could make the gelatin set too softly. For the berry core, you can puree the frozen berries straight from the bag and strain them to remove seeds — just be aware that frozen berries release more liquid during heating, so you may need to simmer the puree for an extra minute or two to concentrate the flavor.
How long do I need to freeze the cheesecake bombs before dipping them in the glass glaze?
You need to freeze the assembled cheesecake bombs for at least 6 hours, but overnight is even better. The bombs must be completely solid throughout — if there is any softness in the center, the warm glaze will melt the filling and create a messy, uneven coating. I recommend freezing them for a full 8 to 12 hours if you have the time. To test if they’re ready, press gently on the surface of one bomb; it should feel hard as a rock with absolutely no give. When you unmold them, they should slide out easily and hold their shape perfectly. Remember, a solidly frozen bomb is your best insurance for a flawless glass glaze finish.
What can I substitute for cream cheese to make this recipe dairy-free?
For a dairy-free version, I recommend using a plant-based cream cheese like Miyoko’s or Kite Hill — these have the best tang and texture for cheesecake-style desserts. Replace the heavy cream with full-fat coconut cream that has been chilled overnight; whip it to stiff peaks just like you would with dairy cream. For the glass glaze, use a dairy-free white chocolate such as Enjoy Life brand, and add 1 teaspoon of coconut oil to help the glaze remain glossy. Note that the dairy-free version will have a slightly softer set, so I recommend increasing the gelatin in the filling by 1/2 teaspoon. The coconut flavor pairs beautifully with the lemon and berries, adding a subtle tropical note that many people love.
Can I make these cheesecake bombs ahead of time for a party?
Yes, and I actually encourage it! These Lemon Berry Opal Cheesecake Bombs are perfect for make-ahead entertaining. You can prepare the berry cores and cheesecake filling up to 2 days in advance and store them separately in the refrigerator. Assemble and freeze the bombs up to one week before your event — just keep them in an airtight freezer bag until you’re ready to glaze. The glaze should be applied no more than 24 hours before serving for the best shine and texture. Once glazed, store the bombs in a single layer in an airtight container in the refrigerator. This staggered approach means you can spread the work across several days and avoid last-minute stress.
What kind of gelatin should I use for the glass glaze?
I recommend using powdered gelatin from Knox or a professional brand like Silver Gelatin for the glass glaze. Powdered gelatin is easy to find in any US grocery store and gives consistent results. Always bloom the gelatin in cold water for at least 5 minutes before dissolving it into the warm glaze mixture — this step is non-negotiable for a smooth, lump-free glaze. The ratio in this recipe is 1 tablespoon of powdered gelatin to 3 tablespoons of cold water, which creates a firm yet flexible set. If you prefer to use sheet gelatin, use 6 sheets of gold-strength gelatin (bloomed in ice water) for the same result.
How do I get that beautiful opal shimmer effect in the glaze?
The opal shimmer comes from a combination of white chocolate, sweetened condensed milk, and just a tiny drop of purple and blue food coloring. The white chocolate provides a naturally glossy base, while the condensed milk adds richness and depth. For the opal effect, use only one drop each of purple and blue gel food coloring — any more and the glaze will become opaque instead of translucent and shimmering. Stir the colors in gently until they swirl together without fully combining; this creates subtle color variations that catch the light like a real opal. For an extra-stunning effect, you can add a pinch of edible pearl dust or mica powder to the cooled glaze just before pouring.
Can I use a different fruit for the core instead of berries?
Absolutely — the berry core is flexible and you can use almost any fruit puree. Mango, passion fruit, peach, or even a concentrated cherry puree all work beautifully. The key is to make sure the puree is thick enough to hold its shape when frozen. If your chosen fruit is very watery (like watermelon or citrus), simmer it down to concentrate the flavor and reduce the liquid content. For the best texture, add the gelatin as directed and freeze the puree in small silicone molds. I’ve made a stunning version with roasted strawberry-balsamic puree that was absolutely divine — the balsamic vinegar adds a sophisticated tang that pairs perfectly with the lemon cheesecake.
Do I need a special mold to shape the cheesecake bombs?
You don’t need a professional sphere mold — though it does make the process easier. A 2-inch silicone hemisphere mold is ideal because it creates perfectly round bombs and releases them easily after freezing. If you don’t have one, you can use a regular muffin tin lined with plastic wrap, or even shape the cheesecake filling into balls by hand and freeze them on a parchment-lined tray. For the berry core, small silicone candy molds or even an ice cube tray with small cavities will work. The most important thing is that the mold allows the bomb to freeze in a round shape and release cleanly. I found my first set of molds at a NYC restaurant supply store for under $10.
How do I store leftover cheesecake bombs with the glass glaze?
Store leftover glazed cheesecake bombs in an airtight container in the refrigerator, arranged in a single layer so the glaze doesn’t get bumped or scratched. They will stay fresh and beautiful for up to 2 days, though the glaze may soften slightly over time. To restore some of the original sheen, simply place them back in the refrigerator uncovered for 15 minutes before serving — the cold air helps re-harden the glaze. Do not freeze glazed bombs, as the glaze can crack and the texture of the cheesecake filling will change. If you have unglazed bombs in the freezer, they can be stored for up to a month and glazed fresh whenever you’re ready to serve.
Share Your Version!
I absolutely love hearing how my recipes come to life in your kitchen — it’s the best part of being a food blogger in this amazing NYC community. If you make these Lemon Berry Opal Cheesecake Bombs, please leave a star rating and a comment below telling me how they turned out. Did you try one of the variations? Did the glass glaze shine like a dream? Your feedback helps me create better recipes and also helps other home bakers know what to expect.
Don’t forget to snap a photo and share it on Instagram or Pinterest — tag me @leosfoods so I can see your gorgeous creations. I have a special question for you: what flavor combination would you love to see inside a cheesecake bomb next? I’m thinking about a chocolate-hazelnut version with a salted caramel core, but I’d love to hear what you crave! From my NYC kitchen to yours — I hope this recipe brings as much warmth to your table as it does to mine. — Stella 🧡
💬 Did you make this recipe?
I’d love to hear how your Lemon Berry Opal Cheesecake Bombs turned out! Drop a comment below, rate the recipe, and share your photos on social media. Every bit of feedback helps our little community grow. 🧡
⭐ Rate it · 📝 Comment · 📸 Tag @leosfoods
Love This Recipe? Save It to Pinterest!
If you enjoyed this Lemon Berry Opal Cheesecake Bombs recipe, don’t let it get lost in your browser tabs! 😄 Pin it now so you can find it again anytime — and explore hundreds more tried-and-tested recipes waiting for you on my Pinterest boards.
👉 Follow Stella on Pinterest @stellarecipeblog
📌 Pin this recipe · 🔁 Re-pin your favorites · 💬 Tag me when you make it — I love seeing your creations!

Lemon Berry Opal Cheesecake Bombs with Glass Glaze
Luscious cheesecake bombs with a berry core, coated in a shimmering glass glaze.
- Yield: 8 1x
Ingredients
- For the Lemon Berry Cheesecake Filling:
- 8 oz cream cheese, softened
- 1/2 cup granulated sugar
- 1 cup heavy cream
- 1/2 cup mixed berry puree
- 1 tbsp lemon juice
- 1 tsp lemon zest
- 1 tsp vanilla extract
- 2 tsp powdered gelatin
- 3 tbsp cold water
- For the Berry Core:
- 3/4 cup mixed berry puree
- 2 tbsp granulated sugar
- 1 tsp lemon juice
- 1 tsp powdered gelatin
- 1 tbsp cold water
- For the Glass Glaze:
- 1 cup granulated sugar
- 1/2 cup water
- 1/2 cup sweetened condensed milk
- 1 cup white chocolate, finely chopped
- 1 tbsp powdered gelatin
- 3 tbsp cold water
- 1 tsp clear vanilla extract
- 1 drop purple food coloring
- 1 drop blue food coloring
- For Garnish (optional):
- Fresh berries
- Lemon zest curls
- Edible silver flakes
Instructions
- Bloom gelatin for the berry core in cold water for 5 minutes.
- Heat berry puree, sugar, and lemon juice until warm.
- Stir in the bloomed gelatin until dissolved.
- Pour into small silicone inserts and freeze until firm.
- Bloom gelatin for the cheesecake filling in cold water for 5 minutes.
- Beat cream cheese, sugar, berry puree, lemon juice, lemon zest, and vanilla until smooth.
- Warm a small portion of the cream and dissolve the gelatin, then mix into the cheesecake mixture.
- Whip the remaining cream to soft peaks and fold into the mixture.
- Fill sphere molds halfway with cheesecake filling.
- Place a frozen berry core in the center of each mold and cover with remaining filling.
- Freeze for at least 6 hours or until completely solid.
- Bloom gelatin for the glass glaze in cold water.
- Heat sugar, water, and condensed milk until steaming.
- Remove from heat and stir in the gelatin and white chocolate until smooth.
- Add vanilla extract and the food colorings, then blend until glossy and translucent.
- Cool the glaze to about 90°F (32°C).
- Unmold frozen cheesecake bombs and place on a wire rack.
- Pour the glass glaze evenly over each bomb until fully coated.
- Refrigerate for 30 minutes before serving.
- Garnish with fresh berries, lemon zest curls, and silver flakes.
Nutrition
- Calories: 340
- Sugar: 33 g
- Fat: 18 g
- Carbohydrates: 38 g
- Protein: 4 g
Tried This Recipe? Leave a Comment!
Did you make this recipe? I’d love to hear how it turned out! Please leave a comment and a rating below. Your feedback helps other home cooks and supports cheerychop.com!
For more delicious inspiration, follow me on Pinterest!