Mini Tater Tot Cheeseburgers – Perfect Game Day Snack
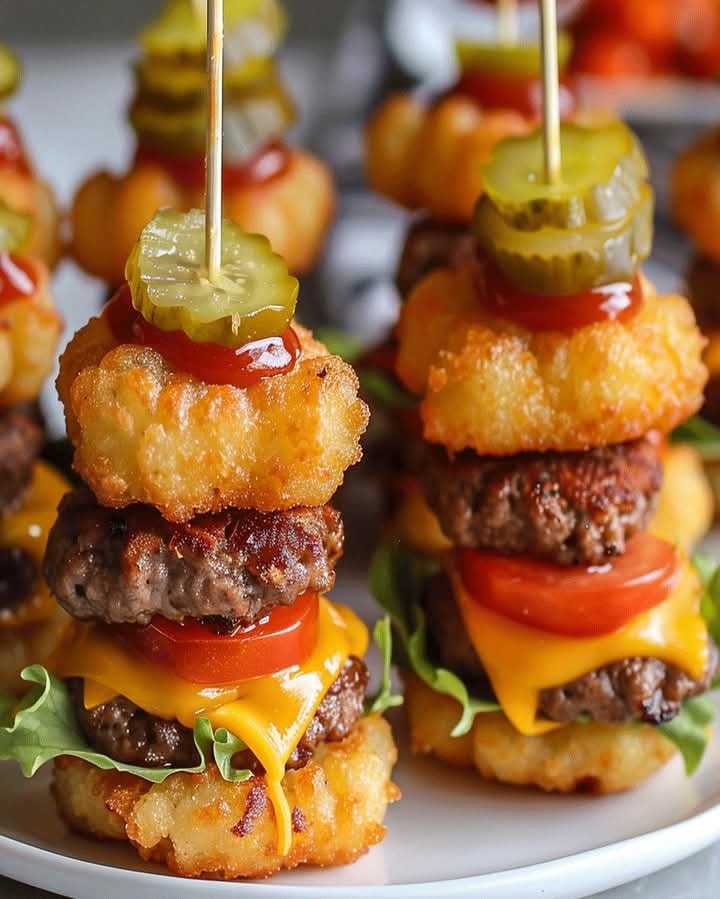
Mini Tater Tot Cheeseburgers: The Bite-Sized Joy Your Game Day Spread Needs
There’s something magical about the way game day brings people together—the laughter, the friendly rivalries, and of course, the food. I’ll never forget the first time I made these Mini Tater Tot Cheeseburgers for my husband and his friends during a football Sunday. The moment those golden, crispy tots came out of the oven, topped with melty cheese and all the classic burger fixings, the room fell silent (a rare occurrence when sports are involved). One bite, and they were hooked. Now, these little flavor bombs are a non-negotiable part of our game day tradition.
Ingredients You’ll Need
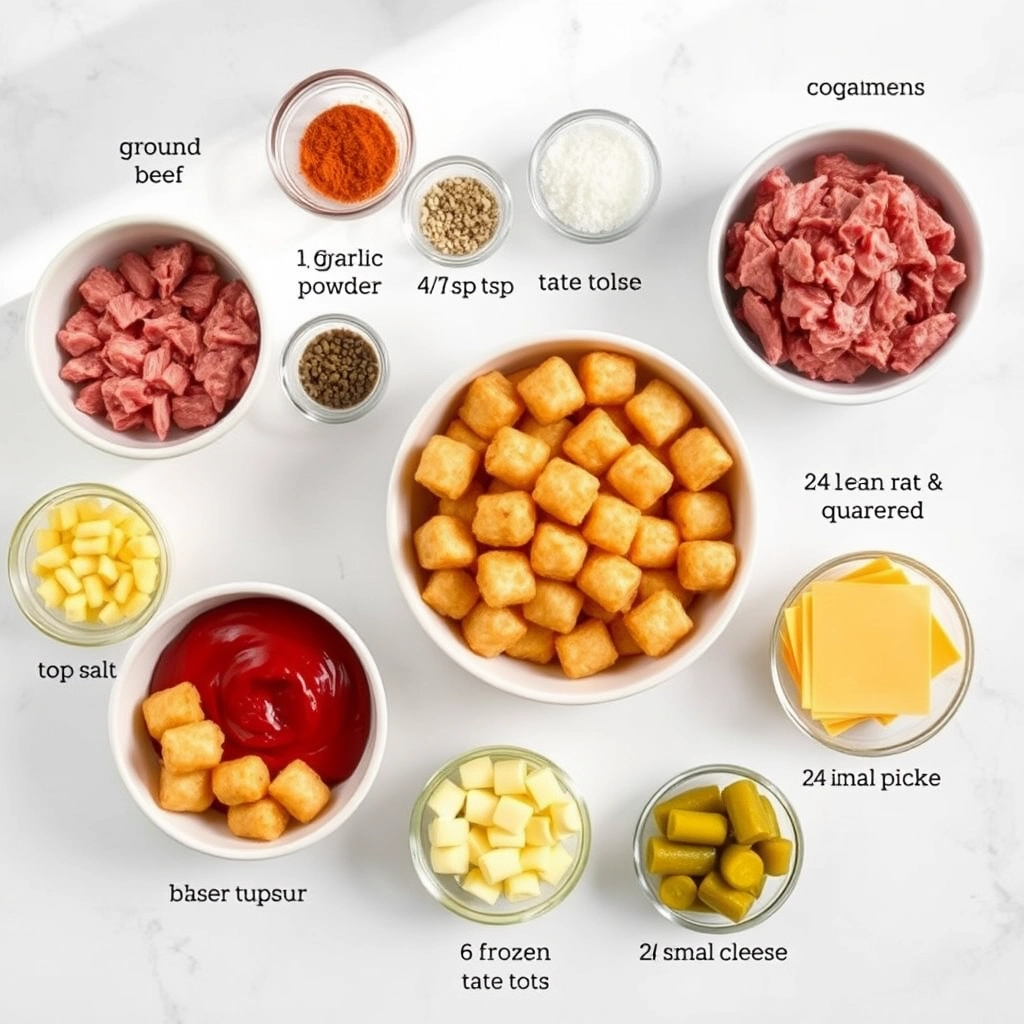
- 1 (32 oz) bag frozen tater tots – The star of the show! Opt for crispy, golden tots—no one likes a soggy tot.
- 1 lb ground beef (80/20 blend) – That bit of fat keeps the mini burgers juicy and flavorful.
- 1 tsp garlic powder – Because everything tastes better with garlic.
- 1 tsp onion powder – Adds a subtle depth that pairs perfectly with the beef.
- Salt and pepper – Don’t skimp! Season generously for maximum flavor.
- 1 cup shredded cheddar cheese – Sharp cheddar melts beautifully, but feel free to experiment with pepper jack for a kick.
- 24 small dill pickle slices – The tangy crunch that ties it all together.
- ¼ cup ketchup – Classic burger vibes.
- ¼ cup mustard – Yellow or Dijon, depending on your preference.
- 24 mini burger buns or slider buns – Soft and slightly sweet is the way to go here.
Let’s Get Cooking!
Preheat your oven to 425°F (220°C) and line a baking sheet with parchment paper. Trust me, the parchment is a lifesaver for easy cleanup—especially when you’re hosting a crowd.
- Bake those tots. Spread the tater tots in a single layer on the baking sheet and pop them in the oven for about 20-25 minutes, flipping halfway through. You want them golden and crispy—almost like they’re begging to be topped with deliciousness.
- Season the beef. While the tots bake, mix the ground beef with garlic powder, onion powder, salt, and pepper in a bowl. Don’t overwork the meat—just gently combine until the spices are evenly distributed.
- Form mini patties. Roll the beef into 24 small balls (about 1 tablespoon each) and flatten them into thin patties. Pro tip: Make them slightly smaller than your tater tots since they’ll shrink a bit while cooking.
At this point, your kitchen should smell like a mix of crispy potatoes and savory beef—aka pure happiness. Now comes the fun part: assembling these little bites of joy. But we’ll save that for the next steps—because every great game day snack deserves a dramatic pause before the grand finale!
Pro Tips, Variations, and Substitutions
These Mini Tater Tot Cheeseburgers are already a crowd-pleaser, but a few tweaks can make them even more irresistible! Here are some ideas to customize your game day snack:
- Cheese Swap: Try using pepper jack for a spicy kick or Swiss for a milder, nutty flavor.
- Meat Alternatives: Swap ground beef for ground turkey, chicken, or even plant-based crumbles for a lighter option.
- Extra Crunch: Double-bake the tater tots for an ultra-crispy base before assembling.
- Flavor Boost: Mix a teaspoon of Worcestershire sauce or smoked paprika into the meat for extra depth.
What to Serve With Mini Tater Tot Cheeseburgers
These bite-sized delights are perfect on their own, but pairing them with the right sides can take your game day spread to the next level. Here are a few favorites:
- A cold, creamy ranch or sriracha mayo dip for dunking.
- A big bowl of crispy onion rings or sweet potato fries.
- A refreshing coleslaw or cucumber salad to balance the richness.
- Ice-cold beer or soda for the ultimate game day combo!
Storage and Reheating Tips
If you somehow have leftovers (unlikely, but possible!), here’s how to keep them tasting fresh:
- Storage: Place cooled mini cheeseburgers in an airtight container in the fridge for up to 2 days.
- Reheating: Pop them in the oven at 350°F for 5–7 minutes to revive the crispiness. Avoid the microwave—it’ll make the tots soggy!
- Freezing: Assemble without toppings, freeze on a tray, then transfer to a freezer bag. Reheat from frozen in the oven at 375°F for 10–12 minutes.
Frequently Asked Questions
Can I make these ahead of time?
Yes! Prep the meat and shape the patties a day in advance, then assemble and bake just before serving.
Can I use frozen burger patties instead?
Absolutely! Just thaw and cut them into small pieces to fit the tater tots.
How do I keep the tots from getting soggy?
Bake them until extra crispy before adding the toppings, and serve immediately after assembling.
Can I make these gluten-free?
Yes! Use gluten-free tater tots and ensure your condiments are gluten-free as well.
Final Thoughts
There’s something magical about bite-sized comfort food that brings everyone together—especially on game day. These Mini Tater Tot Cheeseburgers are not just delicious; they’re fun to make and even more fun to eat. Whether you’re hosting a big crowd or just treating yourself, these little bites are sure to score big. Now, grab your favorite drink, gather your friends, and dig in!
Mini Tater Tot Cheeseburgers – Perfect Game Day Snack
Delicious bite-sized cheeseburgers with a crispy tater tot bun, perfect for game day or parties.
Ingredients
For the Crust:
- 1 lb ground beef
- 1/2 tsp garlic powder
- 1/2 tsp onion powder
- 1/2 tsp salt
- 1/4 tsp black pepper
- 24 frozen tater tots
- 6 slices American cheese, quartered
- 24 small pickle slices
- Ketchup and mustard for serving
Instructions
1. Prepare the Crust:
- Preheat oven to 425°F (220°C). Arrange tater tots on a baking sheet and bake for 20-25 minutes until crispy.
- In a bowl, mix ground beef with garlic powder, onion powder, salt, and pepper. Form into 24 small patties.
- Cook patties in a skillet over medium heat for 2-3 minutes per side until browned and cooked through.
- Place a quarter slice of cheese on each patty and let it melt slightly.
- Assemble by placing a cheeseburger patty between two tater tots. Secure with a toothpick and top with a pickle slice.
- Serve warm with ketchup and mustard for dipping.
Notes
You can customize the seasonings to taste.