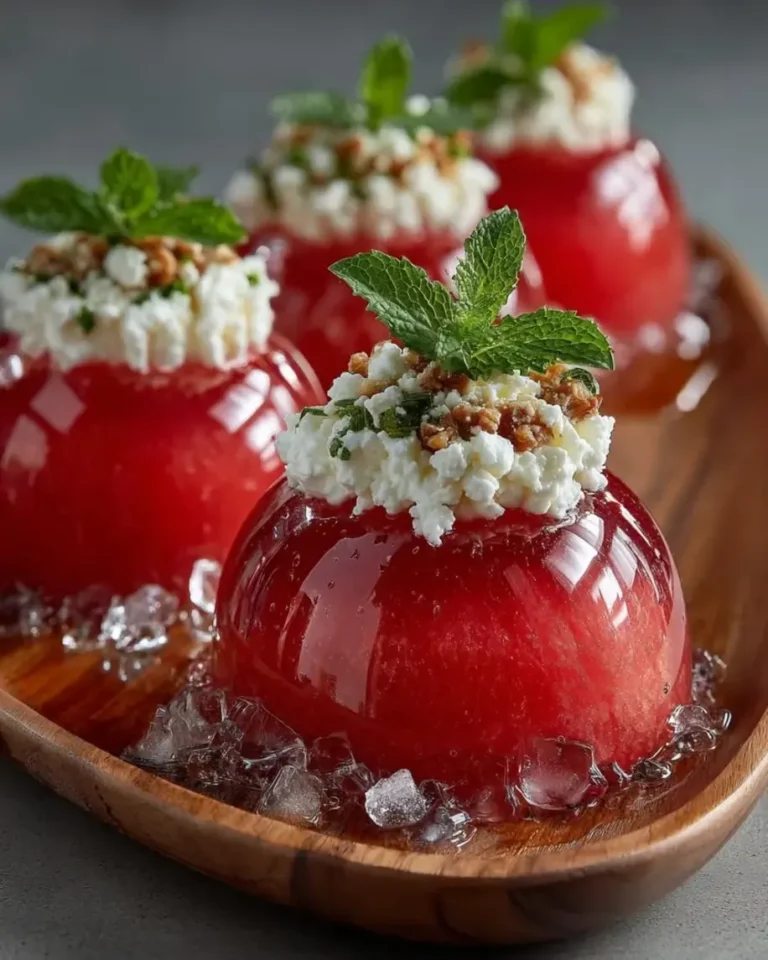
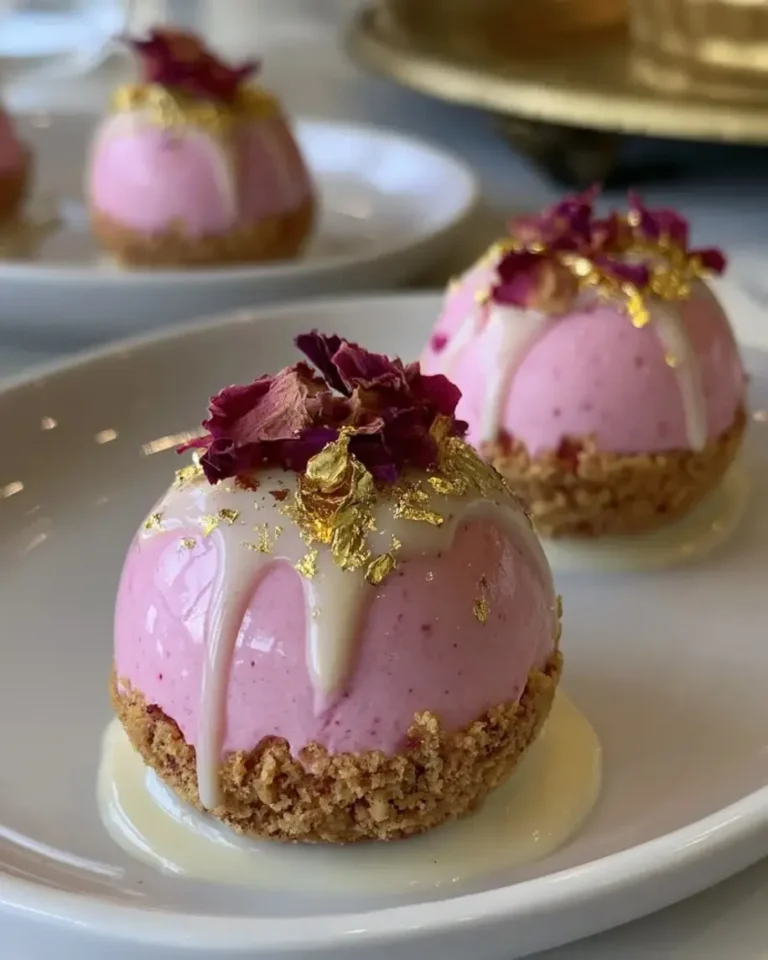
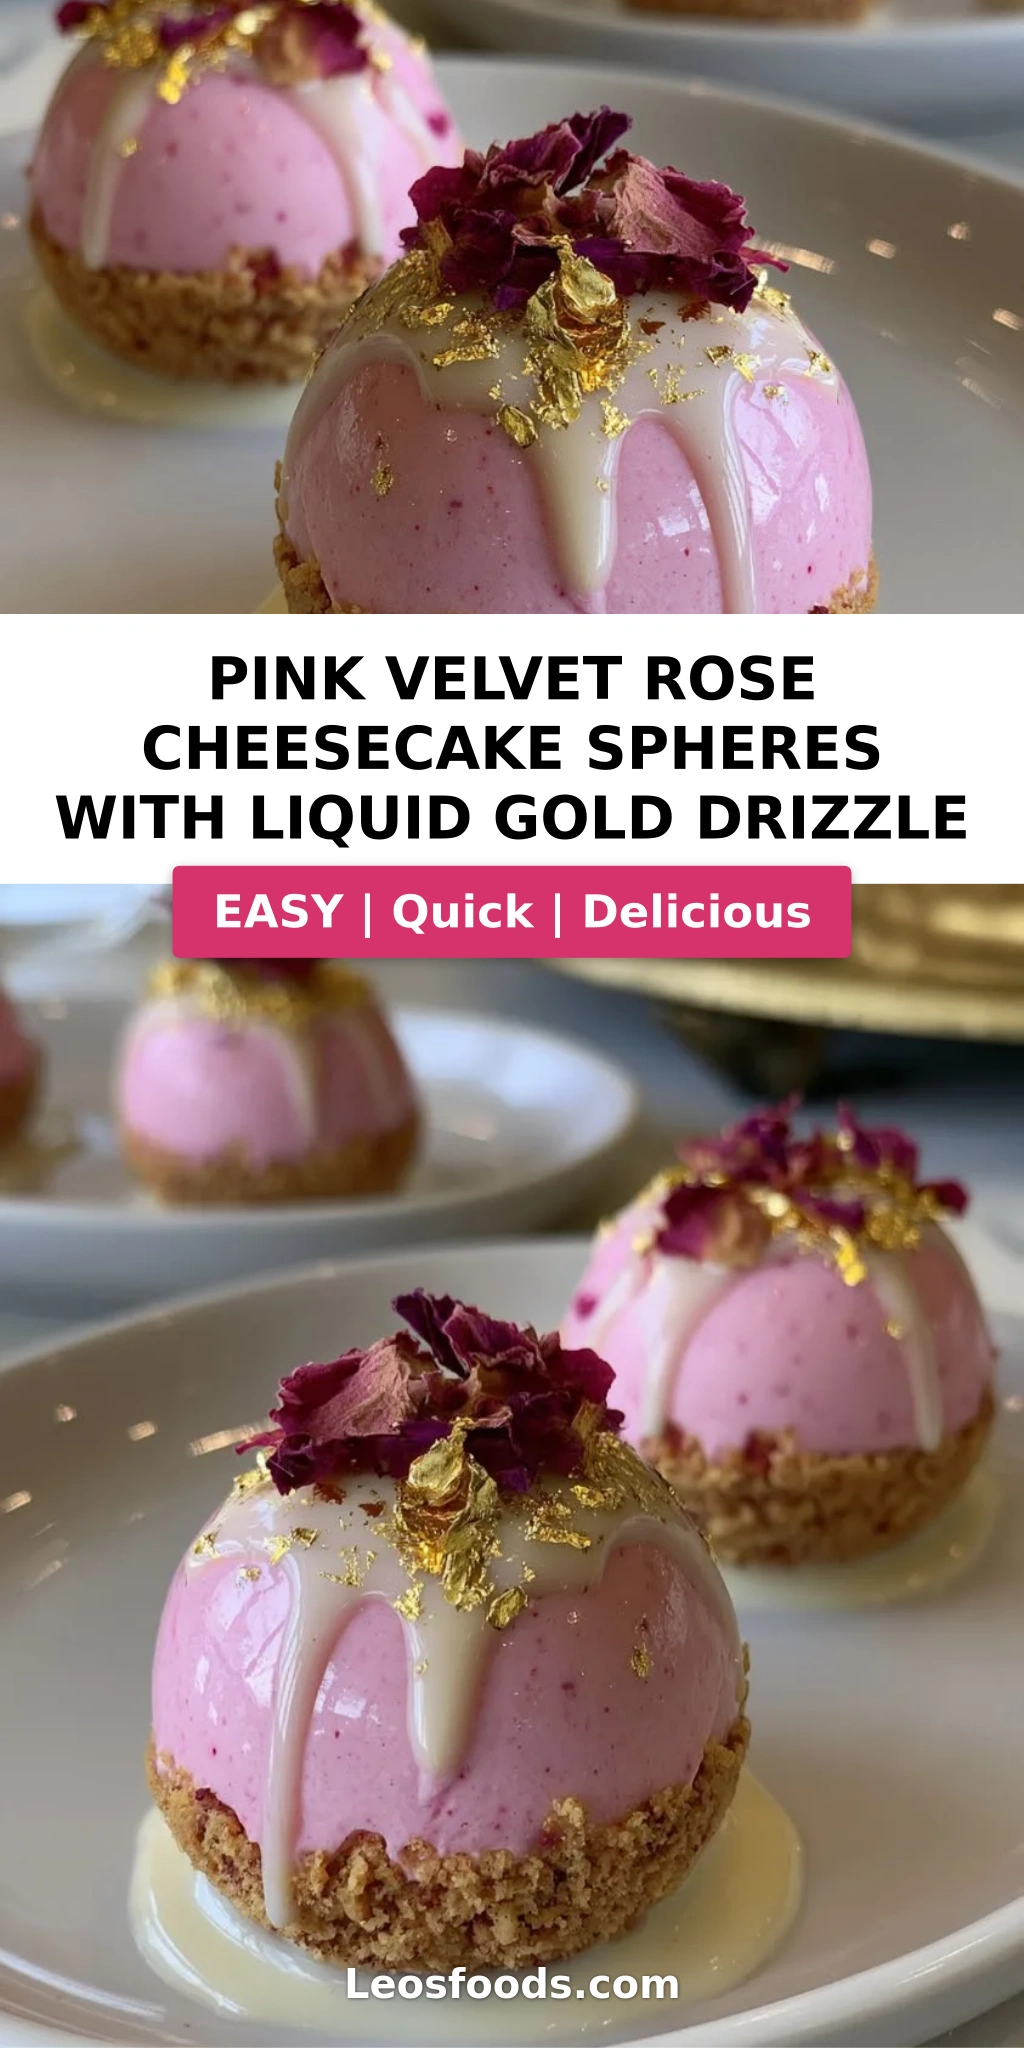
Pink Velvet Rose Cheesecake Spheres with Gold Drizzle

“`html
Table of Contents
Pink Velvet Rose Cheesecake Spheres with Liquid Gold Drizzle – A No-Bake Gem
I still remember the first time I tasted rose water in a dessert — I was standing in my mother’s kitchen in Marrakech, watching her drizzle fragrant syrup over a delicate semolina cake. The floral aroma filled every corner of the room, and I knew then that rose would always have a place in my cooking. Years later, after training at Le Cordon Bleu in Paris and settling into my NYC kitchen, I began experimenting with ways to bring that same elegance into a no-bake, party-ready dessert. That’s how these Pink Velvet Rose Cheesecake Spheres with Liquid Gold Drizzle were born — a dessert that feels like a couture jewel but comes together without turning on the oven.
Imagine this: a creamy, luscious cheesecake filling infused with rose water and hints of vanilla, wrapped around a delicate rose-crumb base, all formed into perfect little spheres. Then comes the crowning glory — a glossy, shimmering liquid gold drizzle made with honey, condensed milk, and edible gold luster dust. Each bite is a study in contrasts: the silky, melt-in-your-mouth texture of the cheesecake against the subtle crunch of the cookie-rose crumb base, with floral notes that dance on your palate. The pink hue, achieved with just a few drops of food coloring, makes these spheres as beautiful as they are delicious.
I’ve tested this rose cheesecake recipe more times than I can count to ensure it’s foolproof for home cooks. The key technique here is blooming the gelatin just right — it gives the spheres that perfect mousse-like structure that holds its shape but still feels luxuriously creamy on the tongue. One common mistake I see is over-whipping the cream, which can make the filling grainy instead of silky smooth. In this post, I’ll walk you through every detail so you can create these stunning no-bake cheesecake spheres with confidence. Whether you’re hosting a bridal shower, a birthday party, or just want to treat yourself to something spectacular, this liquid gold drizzle dessert is guaranteed to impress.
Why This Pink Velvet Rose Cheesecake Spheres Recipe Is the Best
The Flavor Secret — I’ve layered rose flavor in two ways: a pure rose water infusion in the cheesecake filling, plus finely crushed dried edible rose petals in the crumb base. This dual approach gives you a delicate floral note that never tastes like soap or perfume. Growing up in Morocco, I learned that rose water should whisper, not shout — a lesson I carry into every recipe I create. The liquid gold drizzle adds a honeyed sweetness that balances the floral notes beautifully, making this edible gold dessert feel both indulgent and refined.
Perfected Texture — The secret to achieving that cloud-like, creamy texture lies in how you handle the gelatin and the whipped cream. I bloom the gelatin in cold water for exactly 5 minutes, then melt it gently before incorporating it into the cream cheese mixture. This creates a stable emulsion that sets into a silky mousse. Then, I whip the heavy cream only to soft peaks — those gentle, droopy peaks that still have movement — and fold it in with a light hand. This technique, honed during my pastry training in Paris, ensures every sphere is luscious and airy, never dense or rubbery.
Foolproof & Fast — Unlike traditional cheesecake that requires baking, water baths, and cooling times, these no-bake cheesecake spheres come together in under 30 minutes of active work. The freezer does the heavy lifting. This makes them perfect for busy home cooks and party planners. I’ve designed this rose cheesecake recipe to be forgiving: if your spheres aren’t perfectly round, the gold drizzle and garnishes will hide any imperfections. Plus, you can make them up to two weeks in advance — a true lifesaver when you’re hosting a gathering in your NYC apartment.
Pink Velvet Rose Cheesecake Spheres Ingredients
When I’m sourcing ingredients for this recipe, I head straight to my favorite specialty shops. I pick up rose water at Kalustyan’s on Lexington Avenue — they carry a beautifully pure brand from Lebanon that’s worlds apart from the synthetic stuff. For edible gold luster dust, I order from a trusted online supplier based in Brooklyn. The dried edible rose petals I often buy at the Union Square farmers market from a woman who grows heirloom flowers upstate. Every ingredient in this edible gold dessert has been chosen with care to create something truly special.
Ingredients List
- For the Pink Velvet Rose Cheesecake Spheres:
- 8 oz cream cheese, softened to room temperature
- 1 cup heavy cream, cold
- 1/3 cup powdered sugar
- 1 tbsp rose water (food-grade, not cosmetic)
- 1 tsp vanilla extract
- 2 tsp unflavored gelatin (from a box of Knox or similar)
- 2 tbsp cold water (for blooming the gelatin)
- Pink food coloring, as needed (gel or liquid — I prefer gel for concentrated color)
- For the Liquid Gold Drizzle:
- 1/4 cup honey (use a mild, runny honey like clover or orange blossom)
- 2 tbsp sweetened condensed milk
- 1 tbsp white chocolate, melted
- 1/2 tsp edible gold luster dust
- For the Rose Crumb Base:
- 1 cup vanilla cookie crumbs (about 12–14 vanilla wafers or shortbread cookies, crushed)
- 3 tbsp unsalted butter, melted
- 1 tbsp dried edible rose petals, finely crushed
- For Garnish (optional but recommended):
- Dried rose petals, whole or crushed
- Edible gold flakes
Ingredient Spotlight
Rose Water — This is the soul of the recipe. Use food-grade rose water from a reputable brand (I like Cortas or Al Wadi). Avoid rose extracts that are artificially flavored. In American grocery stores, look in the international aisle or Middle Eastern section. The flavor should be floral and fragrant but not overpowering. If you can’t find rose water, you can substitute 1 tsp of rose extract, but reduce the amount by half and adjust to taste.
Edible Gold Luster Dust — This is what gives the drizzle its gorgeous liquid gold effect. It’s available at specialty baking stores, craft stores like Michaels, or online. Make sure it’s labeled “edible” — not all luster dusts are safe for consumption. A little goes a long way: 1/2 teaspoon will give you a beautiful shimmer. You can also use edible gold leaf flakes for an even more dramatic presentation.
Dried Edible Rose Petals — These add both flavor and visual beauty to the crumb base. Buy culinary-grade dried rose petals from spice shops or online. I love the ones from The Spice House — they’re fragrant and pesticide-free. To crush them, I use a mortar and pestle or simply crumble them between my fingers. If you can’t find edible rose petals, you can omit them from the crumb base and add an extra tablespoon of cookie crumbs instead.
| Original Ingredient | Best Substitution | Flavor / Texture Impact |
|---|---|---|
| Rose water | 1 tsp rose extract (reduce to 1/2 tsp first) | Slightly stronger, more perfumed flavor; adjust to taste |
| Edible gold luster dust | Edible gold leaf flakes or gold sprinkles | Visual impact changes — flakes are more dramatic, sprinkles are crunchier |
| Dried edible rose petals | Extra vanilla cookie crumbs + 1 drop rose water | Loses the floral note in the base, but still delicious |
| Vanilla cookie crumbs | Graham cracker crumbs or shortbread crumbs | Subtle flavor difference — graham adds honey notes, shortbread is butterier |
How to Make Pink Velvet Rose Cheesecake Spheres — Step-by-Step
Trust me when I say this: if you can whip cream and stir a bowl, you can make these stunning no-bake cheesecake spheres. The process is straightforward, but a few little tricks make all the difference. Let me walk you through each step with the same care I’d use teaching a friend in my own kitchen.
Step 1: Bloom the Gelatin
In a small bowl, sprinkle 2 teaspoons of unflavored gelatin over 2 tablespoons of cold water. Stir gently to combine, then let it sit undisturbed for 5 minutes. The gelatin will absorb the water and form a firm, jelly-like block — this is called “blooming.” Don’t skip this step or rush it; properly bloomed gelatin dissolves smoothly and creates that silky, stable texture we’re after.
💡 Stella’s Pro Tip: Use cold water, not warm, for blooming. Warm water will dissolve the gelatin unevenly and can lead to a grainy texture. I keep a small bowl of cold water from the tap ready before I start anything else.
Step 2: Make the Rose Crumb Base
In a medium bowl, combine 1 cup of vanilla cookie crumbs, 3 tablespoons of melted unsalted butter, and 1 tablespoon of finely crushed dried edible rose petals. Stir with a fork until the mixture looks like wet sand and holds together when pinched. Divide the mixture evenly among your silicone sphere molds, pressing it firmly into the bottom of each cavity to create a thin, even layer. Use the back of a small spoon or your fingers to compact it well.
⚠️ Common Mistake to Avoid: Don’t press the crumb base too thick — you want a thin layer, about 1/8 inch. If it’s too thick, the spheres will be crumb-heavy and might fall apart when unmolded. A thin base gives just enough crunch and flavor without overwhelming the delicate cheesecake.
Step 3: Make the Cheesecake Filling
In a large bowl, beat 8 oz of softened cream cheese with an electric mixer on medium speed until smooth and creamy, about 1 minute. Add 1/3 cup powdered sugar, 1 tablespoon of rose water, and 1 teaspoon of vanilla extract, and beat until well combined, scraping down the sides as needed. In a separate small bowl, melt the bloomed gelatin gently — you can microwave it in 5-second bursts or place the bowl in a pan of simmering water. Stir the melted gelatin into the cream cheese mixture until fully incorporated.
💡 Stella’s Pro Tip: Make sure your cream cheese is truly at room temperature — soft and spreadable. Cold cream cheese will create lumps that no amount of beating will fix. Leave it on the counter for at least 30 minutes before starting.
Step 4: Whip and Fold the Cream
In a clean, chilled bowl, whip 1 cup of cold heavy cream with an electric mixer on medium-high speed until soft peaks form. You’re looking for peaks that gently flop over when you lift the beater — not stiff or dry. Gently fold the whipped cream into the cream cheese mixture using a rubber spatula, using a slow, sweeping motion. Add a few drops of pink food coloring and fold until the color is evenly distributed. The mixture should be smooth, airy, and uniformly pink.
⚠️ Common Mistake to Avoid: Over-whipping the cream is the #1 texture killer. If you whip it to stiff peaks, the cream can separate when folded, leaving you with a grainy, curdled-looking filling. Stop at soft peaks — they should look like soft, droopy clouds.
Step 5: Fill and Freeze
Spoon or pipe the cheesecake mixture into the silicone sphere molds on top of the crumb base, filling each cavity to the top. Smooth the tops with an offset spatula or the back of a spoon. Place the molds on a baking sheet and freeze for at least 4 hours, or until completely firm. The spheres need to be solid enough to hold their shape when unmolded — overnight is even better.
💡 Stella’s Pro Tip: If you don’t have silicone sphere molds, you can use a mini muffin tin or even shape the mixture into balls by hand after it firms up in the fridge for 2 hours. Silicone molds make unmolding effortless — just gently flex the mold and the spheres pop right out.
Step 6: Make the Liquid Gold Drizzle
In a small bowl, whisk together 1/4 cup of honey, 2 tablespoons of sweetened condensed milk, 1 tablespoon of melted white chocolate, and 1/2 teaspoon of edible gold luster dust. Whisk vigorously until the luster dust is fully dissolved and the mixture is smooth, glossy, and shimmering. If the drizzle seems too thick, warm it gently in the microwave for 5–10 seconds. If it’s too thin, add a tiny bit more melted white chocolate.
💡 Stella’s Pro Tip: The liquid gold drizzle can be made up to a week in advance and stored in an airtight container in the fridge. Let it come to room temperature and whisk again before drizzling — it will be just as glossy and beautiful.
Step 7: Unmold, Drizzle, and Garnish
Remove the frozen spheres from the molds by gently flexing the silicone. Place them on a serving platter or individual dessert plates. Let them sit at room temperature for 5–10 minutes to soften slightly — this makes them creamy and luscious. Drizzle the liquid gold mixture over each sphere using a spoon or a squeeze bottle. Sprinkle with dried rose petals and edible gold flakes for a stunning finish. Serve immediately while still chilled.
⚠️ Common Mistake to Avoid: Don’t let the spheres thaw completely before serving. They should be served chilled, with a creamy but firm texture. If they sit out too long, they’ll become too soft and lose their beautiful sphere shape. Serve within 15 minutes of removing from the freezer.
| Step | Action | Duration | Key Visual Cue |
|---|---|---|---|
| 1 | Bloom gelatin in cold water | 5 minutes | Gelatin becomes a firm, wobbly block |
| 2 | Make and press crumb base into molds | 5 minutes | Mixture holds together like wet sand |
| 3 | Beat cream cheese, add sugar, rose water, vanilla, melted gelatin | 3 minutes | Smooth, creamy, no lumps |
| 4 | Whip cream to soft peaks, fold in, add color | 4 minutes | Soft, droopy peaks; uniform pink color |
| 5 | Fill molds, freeze | 4+ hours | Spheres are solid and hold shape when unmolded |
| 6 | Whisk together liquid gold drizzle | 3 minutes | Smooth, glossy, shimmering gold |
| 7 | Unmold, drizzle, garnish, serve | 10 minutes | Spheres are glossy, garnished, and beautifully presented |
Serving & Presentation
When I serve these Pink Velvet Rose Cheesecake Spheres at dinner parties in my NYC apartment, I like to place each sphere on a small dessert plate with a tiny pool of extra liquid gold drizzle beneath it. The contrast of the pink sphere against the gold sauce is absolutely breathtaking. I garnish with a few whole dried rose petals and a sprinkle of edible gold flakes — the light catches the gold and makes the whole plate sparkle. It’s the kind of presentation that makes people reach for their phones before they reach for their forks.
These edible gold dessert spheres are perfect for celebrations: Valentine’s Day, anniversaries, bridal showers, Mother’s Day, or New Year’s Eve. I once served them at a small wedding reception in Brooklyn, and guests literally gasped when I brought out the tray. The floral rose flavor pairs beautifully with a glass of Champagne or a light rosé. For a non-alcoholic option, try serving with sparkling water and a splash of pomegranate juice — the tartness cuts through the richness of the cheesecake perfectly.
In Morocco, we would serve something like this with mint tea — the fresh mint and floral rose are a match made in heaven. If you’re feeling adventurous, try pairing these spheres with a small cup of strong espresso. The bitterness of the coffee balances the sweetness of the gold drizzle and the creaminess of the cheesecake. However you serve them, these no-bake cheesecake spheres are guaranteed to be the star of the show.
| Pairing Type | Suggestions | Why It Works |
|---|---|---|
| Side Dish | Fresh berries (raspberries, strawberries), light shortbread cookies | Berries add tartness and color; shortbread adds buttery crunch |
| Sauce / Dip | Extra liquid gold drizzle, raspberry coulis, dark chocolate ganache | Adds moisture and complementary flavor layers |
| Beverage | Champagne, dry rosé, mint tea, espresso, sparkling water with pomegranate | Acidity and bubbles cut the richness; floral notes harmonize |
| Garnish | Dried rose petals, edible gold flakes, fresh mint sprigs, crystallized rose petals | Adds visual height, color contrast, and a touch of elegance |
Make-Ahead, Storage & Reheating
One of the things I love most about this rose cheesecake recipe is how incredibly make-ahead friendly it is. In my busy NYC life, I’m all about desserts that I can prep days in advance and pull out at the last minute. These spheres freeze beautifully, which means you can have a stunning dessert ready to go for any unexpected guests or last-minute celebrations. Here’s everything you need to know about storing and serving them at their best.
| Method | Container | Duration | Reheating Tip |
|---|---|---|---|
| Refrigerator | Airtight container, layered with parchment | 3–4 days | Serve chilled, directly from fridge. Let sit 5 mins at room temp before serving. |
| Freezer | Freezer-safe container, layers separated by wax paper | Up to 2 months | Thaw in fridge for 2 hours before serving. Do NOT microwave. |
| Make-Ahead | Prepare spheres fully, freeze without drizzle. Make drizzle separately. | Up to 2 weeks in advance | Drizzle and garnish just before serving for the best presentation. |
If you’re storing the spheres in the freezer, I recommend placing them on a baking sheet lined with parchment paper and freezing them solid for 1 hour before transferring to a container. This prevents them from sticking together. When you’re ready to serve, let them thaw in the refrigerator for about 2 hours (or overnight) — they’ll be perfectly creamy and ready to drizzle. Never microwave frozen cheesecake spheres, as the gelatin will break down and the texture will become watery. The liquid gold drizzle can be made ahead and stored in the fridge for up to a week — just whisk it well before using, and warm it slightly if it thickens.
Variations & Easy Swaps
| Variation | Key Change | Best For | Difficulty Impact |
|---|---|---|---|
| Orange Blossom & Saffron | Replace rose water with orange blossom water; add a pinch of saffron to the drizzle | A North African twist that feels exotic and elegant | Easy — same method, different flavors |
| Chocolate-Rose | Replace the crumb base with chocolate cookie crumbs; add 1 tbsp cocoa powder to the cheesecake filling | Chocolate + rose is a classic French pairing; great for Valentine’s Day | Easy — just swap the cookie crumbs and add cocoa |
| Vegan / Dairy-Free | Use vegan cream cheese, coconut cream (chilled, whipped), and agar-agar instead of gelatin | Dairy-sensitive or vegan guests | Medium — agar-agar sets differently; requires testing |
Orange Blossom & Saffron Variation
This variation is a nod to my Moroccan roots. Replace the rose water with 1 tablespoon of orange blossom water, and add a pinch of saffron threads to the liquid gold drizzle — steep the saffron in 1 teaspoon of warm honey for 10 minutes before mixing. The orange blossom adds a bright, citrusy floral note, while the saffron gives the drizzle a warm, amber color and an earthy depth. It’s a gorgeous twist that still feels luxurious and special. This works beautifully for Ramadan or Eid celebrations.
Gluten-Free / Dairy-Free Variation
For a gluten-free version, use gluten-free vanilla cookies or shortbread for the crumb base. For dairy-free, use a high-quality vegan cream cheese (I like Miyoko’s or Violife), and replace the heavy cream with full-fat coconut cream that’s been chilled and whipped until soft peaks form. Use agar-agar instead of gelatin: bloom 1 teaspoon of agar-agar powder in 2 tablespoons of water, then bring to a simmer for 1 minute before adding to the cream cheese mixture. The texture will be slightly firmer and less creamy than the original, but still delicious. The liquid gold drizzle can be made with dairy-free white chocolate and condensed coconut milk.
Seasonal Berry Swirl Variation
During the summer months, I love adding a berry swirl to these spheres. Take 1/2 cup of fresh raspberries or strawberries, simmer them with 1 tablespoon of sugar and 1 teaspoon of lemon juice for 5 minutes, then strain and cool. Before filling the molds, drop a small spoonful of the berry puree into each cavity and gently swirl it into the cheesecake mixture with a toothpick. The tart berries cut through the sweetness of the gold drizzle and add a beautiful ruby-red ribbon against the pink. I discovered this variation while shopping at the Union Square farmers market — it’s a lovely way to use peak-season fruit.
What is the best way to achieve a smooth, creamy texture for the cheesecake filling inside the spheres?
The key to a silky smooth texture lies in three things. First, make sure your cream cheese is fully softened to room temperature — cold cream cheese will create lumps that are impossible to remove. Second, bloom the gelatin properly in cold water for exactly 5 minutes, then melt it gently before incorporating it into the cream cheese mixture. This ensures the gelatin dissolves evenly and creates a stable, creamy emulsion. Third, whip the heavy cream only to soft peaks — those gentle, droopy peaks that still have movement. Over-whipped cream can separate and make the filling grainy. Fold the cream into the cream cheese mixture with a gentle, sweeping motion until just combined. Over-mixing can deflate the air and make the spheres dense instead of light and luscious.
Can I substitute the rose flavoring with another extract in Pink Velvet Rose Cheesecake Spheres?
Absolutely! While rose is the star of this recipe, you can easily swap it for other flavors. Orange blossom water is a wonderful substitute — use the same amount (1 tablespoon) and it will give you a bright, citrusy floral note that’s very common in North African and Middle Eastern desserts. You can also use 1 teaspoon of almond extract for a nutty, marzipan-like flavor, or 1 teaspoon of vanilla bean paste for a deeper, more classic vanilla profile. If using extracts, start with less — extracts are more concentrated than floral waters, so taste as you go. Keep in mind that swapping the rose flavor will change the character of the dessert, but the texture and overall structure will remain the same.
How far in advance can I make Pink Velvet Rose Cheesecake Spheres for a party?
These spheres are incredibly make-ahead friendly! You can prepare the spheres completely (including the crumb base and cheesecake filling) and freeze them for up to 2 months in an airtight container. I recommend making the liquid gold drizzle separately and storing it in the fridge for up to a week. On the day of your party, simply remove the spheres from the freezer, let them thaw in the refrigerator for about 2 hours, then drizzle and garnish just before serving. This method keeps the spheres perfectly creamy and the drizzle glossy and beautiful. For best results, I suggest making them at least 1–2 days in advance — the flavors meld and deepen over time, and you’ll have one less thing to worry about on party day.
What can I use instead of liquid gold drizzle to decorate these cheesecake spheres?
If you don’t have edible gold luster dust or prefer a different look, there are several beautiful alternatives. A raspberry coulis (simply simmer raspberries with a little sugar and strain) creates a stunning red sauce that contrasts beautifully with the pink spheres. A dark chocolate ganache (equal parts chocolate and cream, melted together) adds richness and pairs wonderfully with the rose flavor. You can also use a simple honey drizzle — just warm honey with a splash of lemon juice — for a more understated, natural look. For a truly elegant presentation, dust the spheres with powdered sugar and top with a single edible flower or crystallized rose petal. Each option creates a different mood, so choose what fits your occasion.
Why did my cheesecake spheres turn out grainy instead of smooth?
Grainy texture usually happens for one of three reasons. The most common culprit is over-whipped cream — if you whip the heavy cream to stiff peaks instead of soft peaks, the fat can separate and create a grainy, curdled-looking texture. Always stop at soft peaks that gently flop over. Second, if the cream cheese wasn’t fully softened, you’ll get lumps that persist even after beating. Let your cream cheese sit at room temperature for at least 30 minutes before starting. Third, improper gelatin handling can cause graininess. If the gelatin isn’t fully dissolved when you add it to the cream cheese mixture, or if you add it while it’s still too warm, it can seize and form tiny rubbery particles. Always melt the bloomed gelatin gently and stir it in thoroughly.
Can I use a different type of mold if I don’t have silicone sphere molds?
Yes, you have several options! If you don’t have silicone sphere molds, you can use a mini muffin tin (the spheres will be dome-shaped on top instead of perfectly round). Line the cavities with plastic wrap for easy removal. Another method is to form the mixture into balls by hand: after the cheesecake mixture has chilled in the fridge for about 2 hours and become firm but still pliable, scoop it into balls using a cookie scoop, then roll them gently between your palms. For this method, skip the crumb base in the mold and instead roll the finished balls in the crumb mixture like truffles. This creates a more rustic, truffle-like appearance that’s equally delicious. Just be sure to work quickly with cold hands so the mixture doesn’t soften too much.
Is this recipe suitable for beginners, or is it better for experienced bakers?
I’d rate this recipe as medium difficulty — it’s approachable for confident beginners but requires attention to a few key details. The techniques involved (blooming gelatin, whipping cream to soft peaks, folding) are all fundamental skills that any home cook can learn. I’ve taught this recipe to friends who are new to dessert-making, and they’ve had great success. The most important things are reading the recipe all the way through before starting, making sure your cream cheese is softened, and not over-whipping the cream. If you’re a beginner, I recommend watching a quick video on how to whip cream to soft peaks and how to fold ingredients together. Once you master those two skills, you can make these spheres with confidence. And remember — even if they’re not perfect, the gold drizzle and garnishes will make them look stunning!
Can I use frozen cheesecake spheres directly from the freezer or do I need to thaw them first?
You should thaw the spheres slightly before serving for the best texture. If you serve them directly from the freezer, they’ll be too hard and icy, and the flavor won’t fully come through. I recommend transferring the spheres from the freezer to the refrigerator about 2 hours before you plan to serve them. This allows them to soften to a creamy, mousse-like consistency while still being nicely chilled. If you’re short on time, you can let them sit at room temperature for 10–15 minutes, but keep an eye on them — you want them creamy, not melted. The liquid gold drizzle should be added just before serving, whether the spheres are chilled or at room temperature. Never microwave frozen cheesecake spheres, as the gelatin will break down and the texture will become watery.
What’s the best way to get the pink color vibrant but natural-looking?
I recommend using a gel food coloring rather than liquid, as gel colors are more concentrated and won’t thin out the cheesecake mixture. Start with just 1–2 drops of pink gel color and stir thoroughly, then assess the color before adding more. You’re looking for a soft, ballet-slipper pink — not neon or Barbie pink. If you prefer a natural color option, you can use a small amount of beet powder (about 1/2 teaspoon) mixed with a teaspoon of water to create a natural pink hue. Keep in mind that beet powder can add a slight earthy flavor, so it’s best to test it first. Another natural option is to use a few drops of natural red food coloring made from fruit and vegetable juices. Whatever you choose, remember that the color will appear slightly lighter once the mixture is frozen, so go a shade deeper than what you want in the final sphere.
Can I make these cheesecake spheres without gelatin for a vegetarian-friendly version?
Yes, you can substitute the gelatin with agar-agar powder, which is derived from seaweed and is suitable for vegetarians and vegans. Use 1 teaspoon of agar-agar powder in place of the 2 teaspoons of gelatin. Bloom it in 2 tablespoons of cold water, then bring it to a gentle simmer for 1–2 minutes while stirring to activate the gelling properties. Let it cool slightly before mixing into the cream cheese mixture. Note that agar-agar sets more firmly and at a higher temperature than gelatin, so the texture will be slightly different — the spheres will be a bit more firm and less creamy-mousse-like. I recommend testing this substitution in advance to see if you like the texture. For a truly vegetarian version, also make sure the vanilla cookies you use don’t contain animal-derived ingredients.
Share Your Version!
I absolutely love seeing how you make these Pink Velvet Rose Cheesecake Spheres your own. Whether you try the orange blossom variation, add a berry swirl, or go all out with extra gold flakes — every version tells a story. Tag me on Instagram @leosfoods or use the hashtag #StellasKitchen so I can see your beautiful creations. I read every comment and I’m always here to answer your questions. If you’re feeling generous, leave a star rating below — it helps other home cooks find this recipe and know it’s been tested and loved.
From my NYC kitchen to yours — I hope this recipe brings as much warmth to your table as it does to mine. — Stella 🧡
Love This Recipe? Save It to Pinterest!
If you enjoyed this Pink Velvet Rose Cheesecake Spheres with Liquid Gold Drizzle recipe, don’t let it get lost in your browser tabs! 😄 Pin it now so you can find it again anytime — and explore hundreds more tried-and-tested recipes waiting for you on my Pinterest boards.
👉 Follow Stella on Pinterest @stellarecipeblog
📌 Pin this recipe · 🔁 Re-pin your favorites · 💬 Tag me when you make it — I love seeing your creations!
💬 Did you make this recipe? I’d love to hear from you!
Leave a ⭐ star rating below, share a photo on Instagram tagging @leosfoods, or tell me — which variation will you try first? The orange blossom & saffron or the chocolate-rose?
👇 Scroll down to leave your comment and rating — your feedback helps me create more recipes you’ll love!
“`
Print
Pink Velvet Rose Cheesecake Spheres with Liquid Gold Drizzle
Ingredients
- For the Pink Velvet Rose Cheesecake Spheres:
- 8 oz cream cheese, softened
- 1 cup heavy cream
- 1/3 cup powdered sugar
- 1 tbsp rose water
- 1 tsp vanilla extract
- 2 tsp unflavored gelatin
- 2 tbsp cold water
- Pink food coloring, as needed
- For the Liquid Gold Drizzle:
- 1/4 cup honey
- 2 tbsp sweetened condensed milk
- 1 tbsp white chocolate, melted
- 1/2 tsp edible gold luster dust
- For the Rose Crumb Base:
- 1 cup vanilla cookie crumbs
- 3 tbsp unsalted butter, melted
- 1 tbsp dried edible rose petals, finely crushed
- For Garnish (optional):
- Dried rose petals
- Edible gold flakes
Instructions
- Mix gelatin and cold water in a small bowl and let bloom for 5 minutes.
- Combine cookie crumbs, melted butter, and crushed rose petals. Press into silicone sphere molds to create a thin base layer.
- Beat cream cheese, powdered sugar, rose water, and vanilla until smooth.
- Melt the bloomed gelatin and stir into the cream cheese mixture.
- Whip heavy cream to soft peaks and gently fold into the mixture.
- Add a few drops of pink food coloring and mix until evenly colored.
- Fill the sphere molds with the cheesecake mixture and smooth the tops.
- Freeze for at least 4 hours or until firm.
- In a small bowl, whisk together honey, condensed milk, melted white chocolate, and gold luster dust until smooth and glossy.
- Remove the spheres from the molds and place on a serving platter.
- Drizzle the liquid gold mixture over each sphere.
- Garnish with dried rose petals and edible gold flakes.
- Serve chilled.
Notes
Nutritional Info (per serving, serves 8)
Calories: 355
Protein: 4 g
Carbohydrates: 27 g
Fat: 25 g
Fiber: 0 g
Sugar: 22 g
Sodium: 145 mg
Nutrition
- Calories: 355
- Sugar: 22 g
- Fat: 25 g
- Carbohydrates: 27 g
- Protein: 4 g
Tried This Recipe? Leave a Comment!
Did you make this recipe? I’d love to hear how it turned out! Please leave a comment and a rating below. Your feedback helps other home cooks and supports cheerychop.com!
For more delicious inspiration, follow me on Pinterest!