Gold Mirror Glaze Rose Cheesecake Bombs Recipe
“`html
Table of Contents
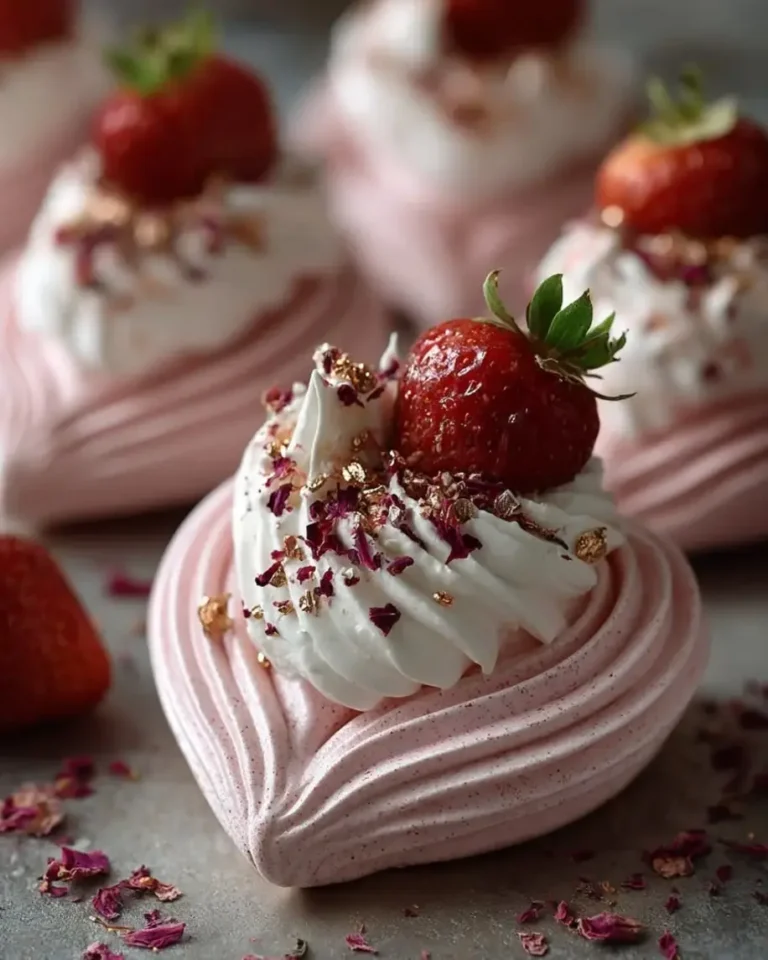
Velvet Vanilla Rose Cheesecake Bombs with Gold Mirror Glaze – Moroccan Meets French in a Show-Stopping Dessert
I still remember the first time I combined the floral warmth of Moroccan rose water with the precision of a French mirror glaze. It was a quiet Sunday in my NYC kitchen, and I was homesick for the scent of my mother’s rose petal jam simmering on the stove in Marrakech. That day, I set out to create something that honored my North African roots while celebrating the French pastry techniques I studied in Paris. These gold mirror glaze cheesecake bombs are the result — a dessert that feels both utterly luxurious and deeply personal. The creamy rose-infused cheesecake center, the buttery crunch of the biscuit base, and that impossibly shiny gold glaze all come together in one breathtaking bite. It’s the kind of dessert that makes people stop mid-conversation and just stare.
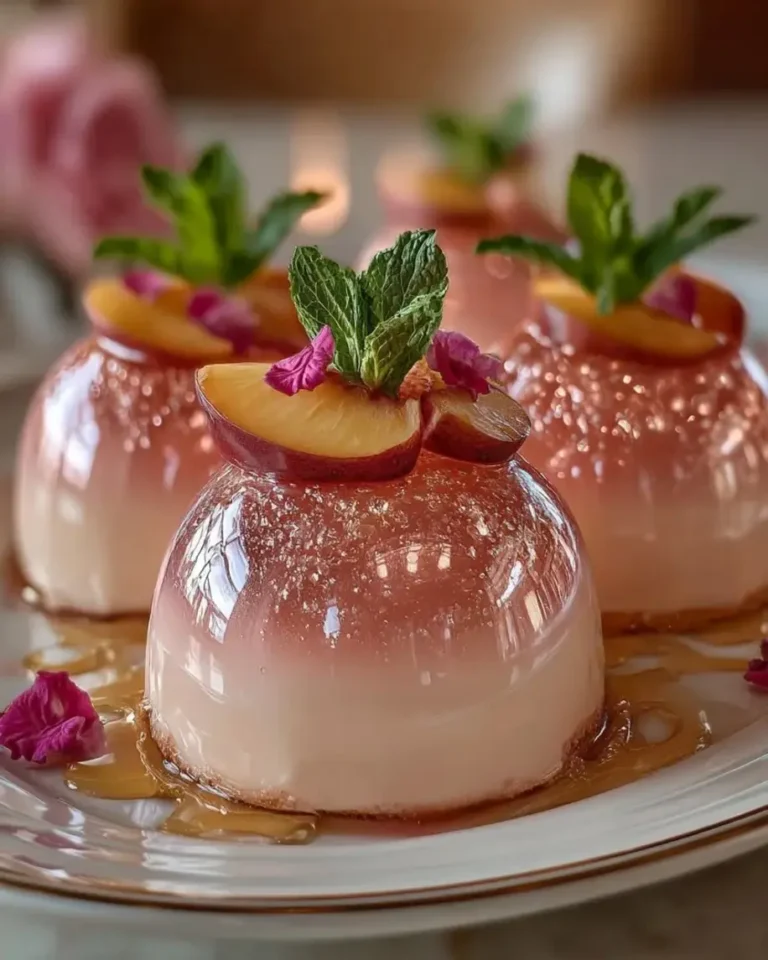
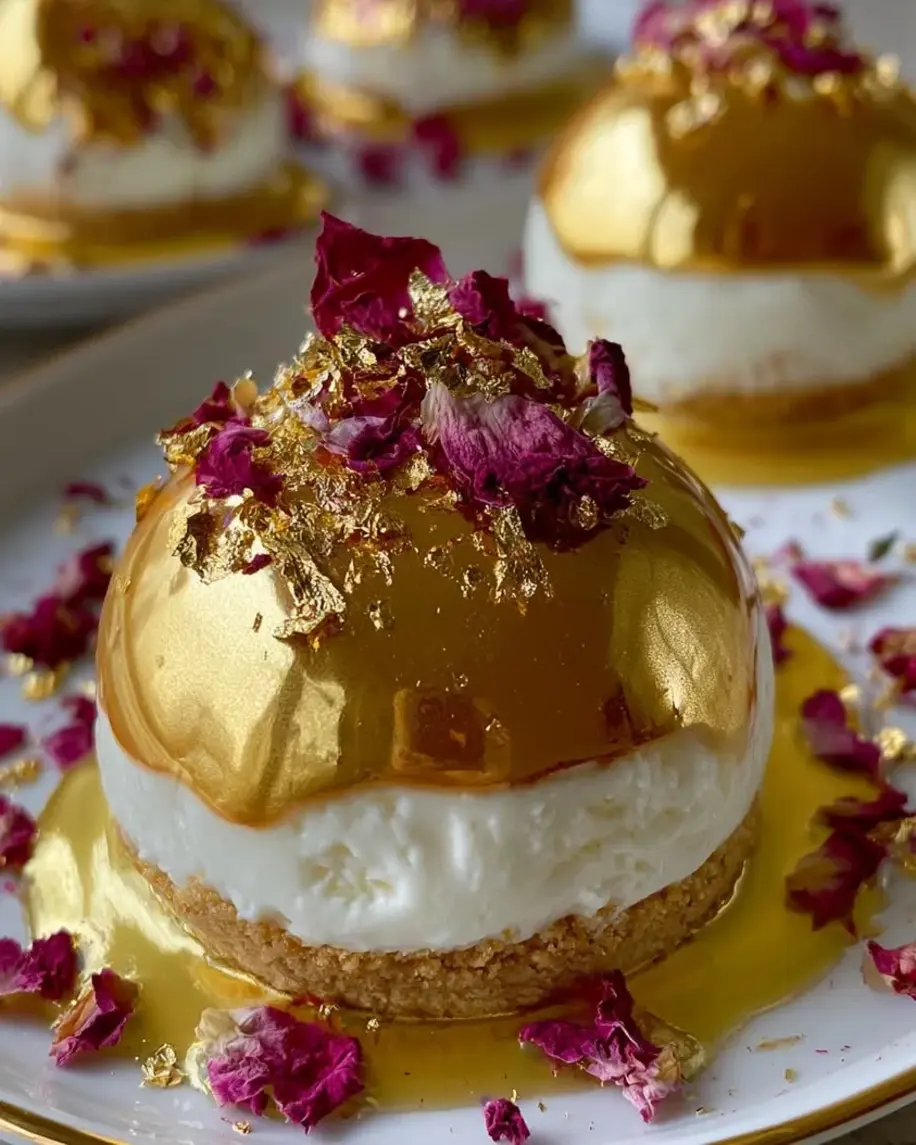
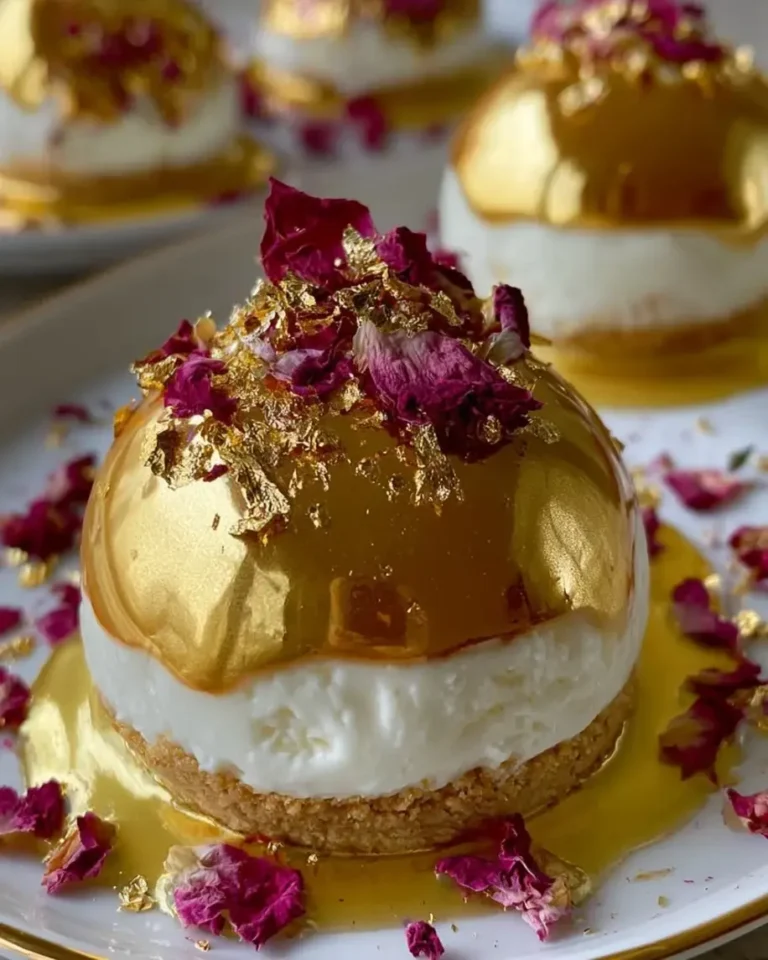
What I love most about this rose cheesecake recipe is how the flavors layer. The rose water is subtle — it whispers, it doesn’t shout. It wraps around the vanilla like an old friend, while the cream cheese keeps everything velvety and rich. The biscuit base adds that essential crunch, and then the glaze… oh, the glaze. It’s like pouring liquid gold over a cloud. When you cut into one of these bombs, the mirror glaze cracks just slightly, revealing the pale, creamy interior. The dried rose petals on top catch the light, and the edible gold flakes shimmer like little treasures. It’s a dessert that feels like a celebration — and honestly, it’s easier to pull off than it looks.
I’ve tested this recipe over a dozen times to make sure it works for home bakers, not just pastry chefs. I’ll walk you through every step, from blooming the gelatin to getting that glaze to the perfect pouring temperature. I’ll also share my biggest lesson learned — the one mistake that can make your mirror glaze crack (and exactly how to avoid it). Whether you’re making these for a birthday, a dinner party, or just because you deserve something beautiful, this edible gold dessert will deliver every time. Let’s get started.
Why This Velvet Vanilla Rose Cheesecake Bombs with Gold Mirror Glaze Recipe Is the Best
The Flavor Secret: Most rose water cheesecake recipes use rose extract, which can taste artificial or perfumey. I use high-quality rose water — the same kind my mother used in her kitchen in Morocco — and balance it with real vanilla bean paste and a touch of salt. The result is a floral note that feels natural and elegant, not like soap. This is the kind of flavor that lingers pleasantly, making people ask, “What is that beautiful taste?”
Perfected Texture: The key to these cheesecake bombs is the gelatin structure. I use just enough gelatin to make the filling firm enough to unmold cleanly but soft enough to feel luscious on the tongue. The mirror glaze is a separate gelatin-based layer that sets to a mirror-like shine without being rubbery. After years of testing glaze recipes in pastry kitchens, I’ve found the exact ratio that gives you that perfect, crack-free finish every time.
Foolproof & Fast: I know mirror glazes can be intimidating, but I’ve broken this down into clear, manageable steps. You don’t need a candy thermometer or any special equipment — just a saucepan, a blender, and a little patience. I’ll give you the visual cues to watch for, so you know exactly when the glaze is ready to pour. This velvet rose dessert is designed to impress without the stress.
Gold Mirror Glaze Cheesecake Bombs Ingredients
I source my cream cheese from a small dairy upstate that I discovered at the Union Square Greenmarket, and my rose water from a little spice shop in the East Village that imports directly from Morocco. But honestly, good-quality supermarket ingredients work beautifully here. The key is to use full-fat cream cheese and real rose water — not rose syrup or extract. Let me walk you through what you’ll need.
Ingredients List
- 16 oz (450 g) cream cheese, softened
- 1/2 cup granulated sugar
- 1 tsp vanilla extract
- 1 tsp rose water
- 1 cup heavy whipping cream
- 2 tsp unflavored gelatin
- 2 tbsp cold water
- 1 cup graham cracker crumbs
- 3 tbsp unsalted butter, melted
- 1 tbsp granulated sugar (for base)
- 1/2 cup sweetened condensed milk
- 1/2 cup white chocolate, finely chopped
- 1 tbsp unflavored gelatin (for glaze)
- 1/4 cup cold water (for glaze)
- 1/3 cup water (for glaze)
- 3/4 cup granulated sugar (for glaze)
- 1 tbsp edible gold luster dust
- Dried rose petals for garnish (optional)
- Edible gold flakes for garnish (optional)
Ingredient Spotlight
Rose Water: This is the heart of the flavor. Look for a brand that lists only rose petals and water as ingredients — no alcohol or artificial flavors. I recommend Cortas or Al Wadi, both available at Middle Eastern grocers or online. One teaspoon is enough; rose water is potent and you want it to complement, not overpower.
White Chocolate for the Glaze: Use a good-quality white chocolate that you’d actually eat. Callebaut or Ghirardelli work beautifully. Avoid white chocolate chips, which often contain stabilizers that can affect the glaze’s smoothness. Finely chop the chocolate so it melts evenly when you pour the hot liquid over it.
Edible Gold Luster Dust: This is what gives the glaze its mirror-shine and that luxurious golden hue. I buy mine from a baking supply store in Chelsea Market. Make sure it’s labeled “edible” and “luster dust” — not glitter, which isn’t food-safe. A tablespoon is plenty for that stunning metallic finish.
| Original Ingredient | Best Substitution | Flavor / Texture Impact |
|---|---|---|
| Rose water | 1/2 tsp rose extract + 1/2 tsp water | Slightly more intense, less floral complexity |
| Graham cracker crumbs | Shortbread cookie crumbs or crushed vanilla wafers | Sweeter, less sandy texture; equally crunchy |
| Heavy whipping cream | Full-fat coconut cream (chilled, whipped) | Slightly coconut flavor, less stable — use extra 1/2 tsp gelatin |
| White chocolate | High-quality white candy melts | Slightly less creamy, but glaze still shiny |
| Edible gold luster dust | Yellow food coloring + pearl dust (1:1 mix) | Less metallic shine, more pastel gold |
How to Make Velvet Vanilla Rose Cheesecake Bombs with Gold Mirror Glaze — Step-by-Step
Trust me — if you can make a boxed cheesecake, you can make these. The process is straightforward, and I’ll guide you through every temperature and texture cue. Let’s break it down into clear steps.
Step 1: Make the Biscuit Base
Combine 1 cup graham cracker crumbs, 3 tbsp melted unsalted butter, and 1 tbsp granulated sugar in a small bowl. Mix with a fork until the crumbs are evenly moistened and clump together when pressed. Divide the mixture evenly among 8 silicone half-sphere molds (about 1.5 tablespoons each) and press firmly with the back of a spoon or a small glass to form an even layer. Place the molds in the refrigerator to chill for at least 15 minutes while you prepare the cheesecake filling.
💡 Stella’s Pro Tip: For extra flavor, toast the graham cracker crumbs in a dry skillet over medium heat for 3-4 minutes, stirring constantly, until they smell nutty. Let them cool completely before mixing with the butter. This adds a deeper, almost caramelized note to the base.
Step 2: Bloom the Gelatin
In a small bowl, sprinkle 2 tsp unflavored gelatin over 2 tbsp cold water. Stir gently with a fork to ensure all the gelatin is wet. Let it sit undisturbed for 5-7 minutes. The gelatin will absorb the water and turn into a firm, jelly-like mass. This process — called blooming — is essential for smooth, lump-free incorporation.
⚠️ Common Mistake to Avoid: If you add gelatin directly to hot liquid without blooming it first, you’ll end up with grainy, stringy bits in your cheesecake filling. Always bloom in cold water first, then warm it gently to dissolve.
Step 3: Make the Cheesecake Filling
In a large bowl, beat 16 oz softened cream cheese, 1/2 cup granulated sugar, 1 tsp vanilla extract, and 1 tsp rose water together with a hand mixer or stand mixer fitted with the paddle attachment until smooth and fluffy — about 2-3 minutes. Scrape down the sides and bottom of the bowl at least once. In a small saucepan or microwave-safe bowl, gently warm the bloomed gelatin until it becomes liquid again (about 10-15 seconds in the microwave, or 30 seconds in a small saucepan over low heat). Pour the liquid gelatin into the cream cheese mixture and beat on medium speed until fully incorporated.
💡 Stella’s Pro Tip: Make sure your cream cheese is truly softened to room temperature — about 70°F. Cold cream cheese will create lumps that no amount of beating can fix. Leave it on the counter for at least an hour before starting.
Step 4: Whip and Fold the Cream
In a separate cold bowl, whip 1 cup heavy whipping cream to soft peaks — when you lift the whisk, the cream should form a gentle peak that droops slightly at the tip. Be careful not to overwhip; you want it airy and smooth, not stiff or buttery. Using a rubber spatula, fold the whipped cream into the cream cheese mixture in three additions. Fold gently but thoroughly, scraping from the bottom of the bowl to ensure no streaks remain.
⚠️ Common Mistake to Avoid: Overfolding will deflate the cream, making the cheesecake dense instead of light and velvety. Stop as soon as the mixture looks uniform — about 15-20 folds.
Step 5: Fill and Freeze
Remove the chilled molds from the refrigerator. Spoon or pipe the cheesecake filling into each mold, filling them to the top and smoothing the surface with an offset spatula. The filling should sit directly on top of the pressed biscuit base. Place the filled molds on a baking sheet and freeze for at least 4 hours, or overnight for best results. The bombs need to be completely solid to unmold cleanly and hold their shape under the glaze.
Step 6: Make the Gold Mirror Glaze
In a small bowl, bloom 1 tbsp unflavored gelatin with 1/4 cup cold water. Let it sit for 5 minutes. In a small saucepan, combine 1/3 cup water and 3/4 cup granulated sugar. Heat over medium heat, stirring occasionally, until the sugar is completely dissolved — about 3-4 minutes. Do not let it boil rapidly. Remove from heat and stir in 1/2 cup sweetened condensed milk and the bloomed gelatin. Stir until the gelatin is fully melted. In a heatproof bowl, place 1/2 cup finely chopped white chocolate. Pour the hot liquid over the chocolate and let it sit for 1 minute, then blend with an immersion blender until completely smooth. Mix in 1 tbsp edible gold luster dust until evenly distributed. Let the glaze cool to about 90-95°F — it should feel just warm to the touch but still fluid. If it thickens too much, gently reheat it in the microwave in 5-second bursts.
💡 Stella’s Pro Tip: The temperature of the glaze is the most critical factor for a crack-free mirror finish. If the glaze is too hot (above 100°F), it will melt the cheesecake bomb and create wrinkles. If it’s too cool (below 85°F), it will set too quickly and crack as it shrinks. I use an instant-read thermometer to check, but you can also test a small spoonful: if it flows like thick honey without pooling, it’s ready.
Step 7: Glaze and Garnish
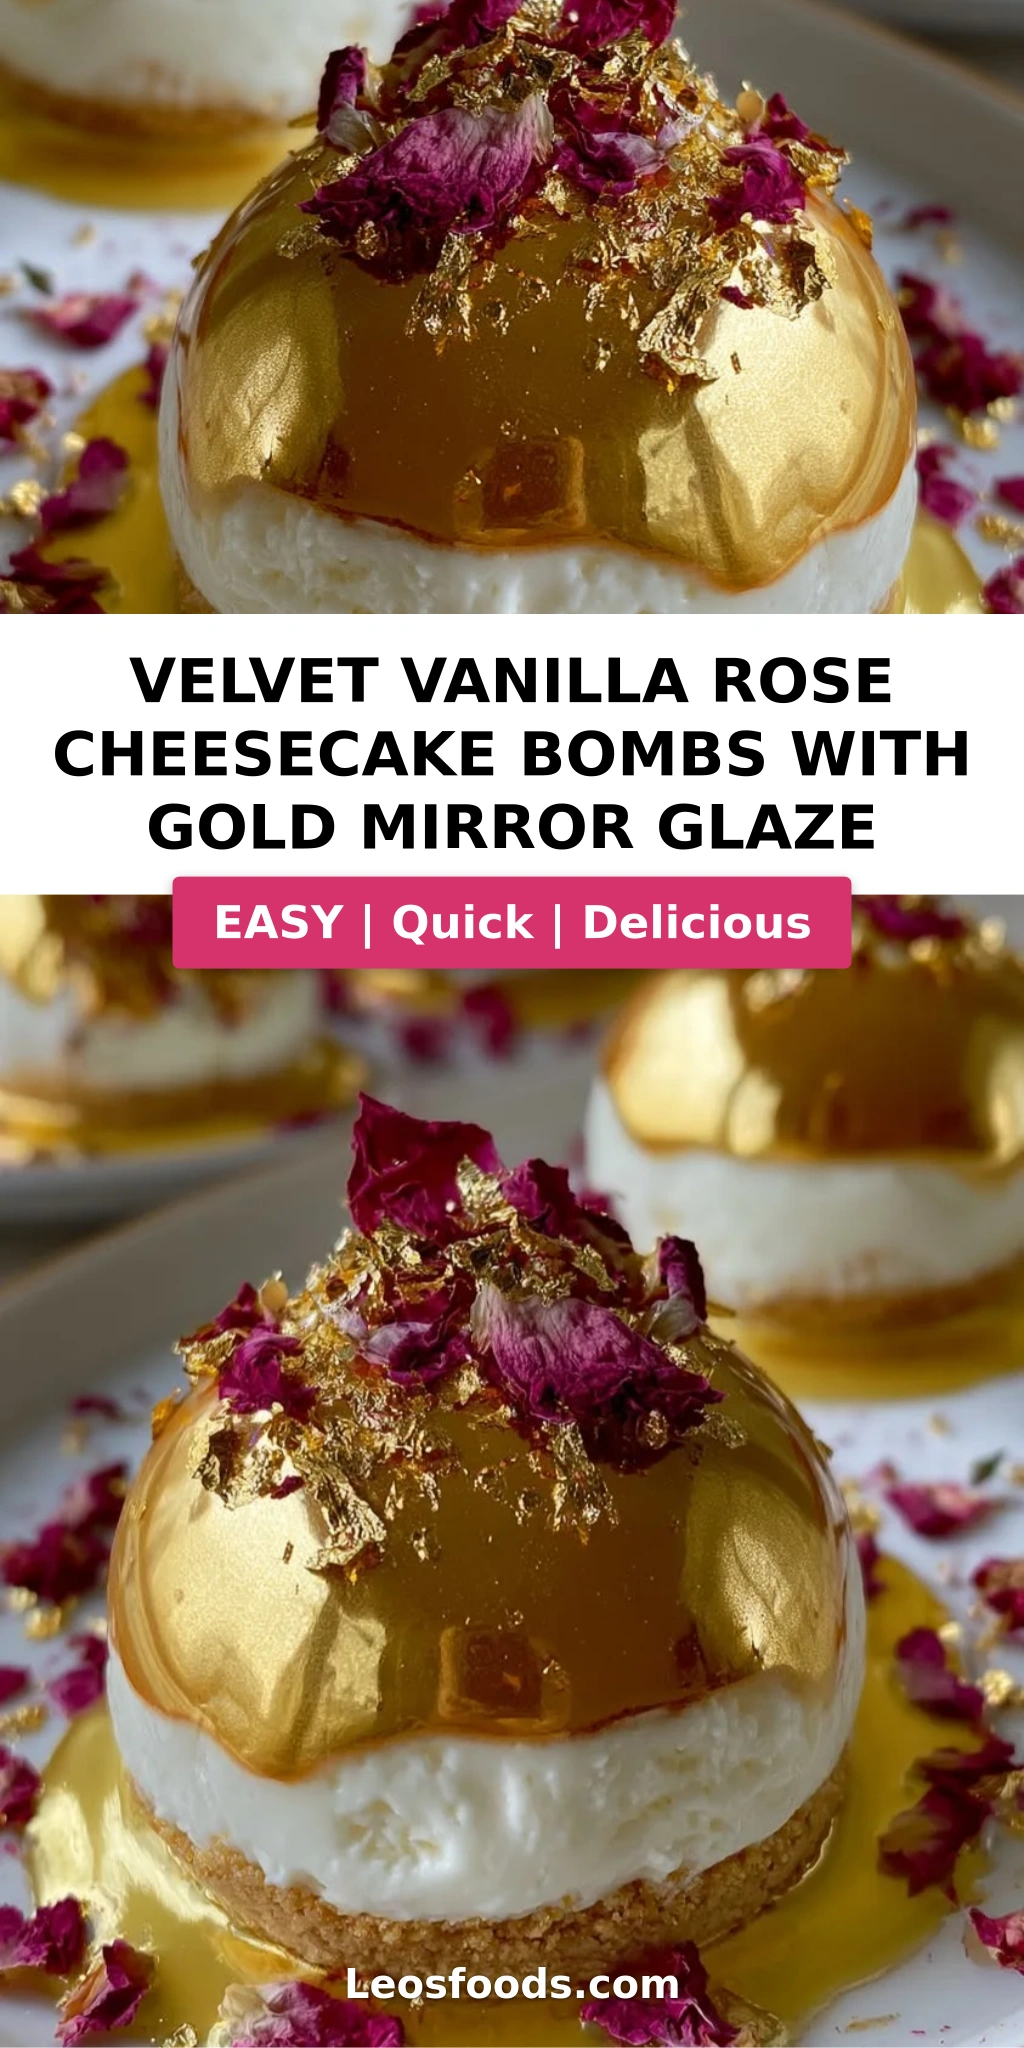
Remove the frozen cheesecake bombs from the molds. They should pop out easily — if they stick, let them sit at room temperature for 1-2 minutes to loosen. Place the bombs on a wire rack set over a rimmed baking sheet (to catch the excess glaze). Working one at a time, hold a bomb by the base and pour the gold mirror glaze over the top, letting it flow evenly down the sides. Use a small offset spatula to smooth the bottom edge if needed. Immediately transfer the glazed bomb to a serving plate or parchment-lined tray. Garnish with dried rose petals and edible gold flakes while the glaze is still tacky. Repeat with the remaining bombs. Refrigerate for at least 30 minutes before serving to allow the glaze to set fully.
⚠️ Common Mistake to Avoid: Do not touch the glazed surface with your fingers or any tool after pouring — the glaze is delicate and will show every fingerprint. If you need to adjust the drips, use a clean fingertip or the tip of a knife to gently guide them.
| Step | Action | Duration | Key Visual Cue |
|---|---|---|---|
| 1 | Make biscuit base | 5 mins + 15 mins chill | Crumbs clump when pressed |
| 2 | Bloom gelatin | 5 mins | Firm, jelly-like mass |
| 3 | Make cheesecake filling | 5 mins | Smooth, no lumps |
| 4 | Whip and fold cream | 5 mins | Soft peaks, no streaks |
| 5 | Fill and freeze | 4 hours minimum | Solid to the touch |
| 6 | Make gold mirror glaze | 15 mins + cooling | Smooth, warm, flows like honey |
| 7 | Glaze and garnish | 10 mins + 30 mins set | Glaze is smooth, shiny, no cracks |
Serving & Presentation
These cheesecake bombs are showstoppers on their own, but a little extra care takes them from beautiful to unforgettable. I like to serve them on a dark plate or a marble slab — the contrast makes the gold glaze pop even more. Place each bomb seam-side down (the flat side from the mold) so the domed top shows off the mirror finish. If you have edible flowers — like violas or borage blossoms — they look stunning scattered around the plate.
For a truly special presentation, serve these after a Moroccan-inspired meal: think lamb tagine with apricots, couscous with saffron, and mint tea. The floral notes in the cheesecake echo the rose and orange blossom often used in North African sweets. Or keep it simple and pair them with a strong espresso or a glass of dessert wine like a late-harvest Riesling. I’ve even served them at a brunch party alongside fresh berries and champagne — they disappear fast.
When I make these for friends in my NYC apartment, I often set up a little “glazing station” and let everyone pour their own glaze. It’s messy and fun and makes for great photos. But if you’re going for elegance, do the glazing yourself and arrange them on a tiered stand. Either way, watch people’s faces when they take that first bite — the crunch of the base, the silkiness of the cheesecake, and that ethereal rose flavor always earn a round of “wow.”
| Pairing Type | Suggestions | Why It Works |
|---|---|---|
| Side Dish | Fresh berries, honey-drizzled figs, pistachio brittle | Acidity and crunch balance the creamy richness |
| Sauce / Dip | Warm chocolate sauce, raspberry coulis, salted caramel | Adds contrast in temperature and flavor intensity |
| Beverage | Espresso, mint tea, late-harvest Riesling, champagne | Cuts sweetness, cleanses palate between bites |
| Garnish | Dried rose petals, edible gold flakes, fresh mint, candied violets | Enhances visual appeal and adds subtle flavor notes |
Make-Ahead, Storage & Reheating
I live by the make-ahead rule in my NYC kitchen — and these cheesecake bombs are a dream for advance prep. The components can be made separately and assembled when you’re ready to impress. Here’s what works best based on my experience testing this for parties and dinner gatherings.
| Method | Container | Duration | Reheating Tip |
|---|---|---|---|
| Refrigerator | Airtight container, single layer | Up to 3 days | Serve cold — no reheating needed |
| Freezer | Freezer-safe container, parchment between layers | Up to 2 months | Thaw overnight in fridge, then glaze |
| Make-Ahead | Frozen unmolded bombs, glaze in sealed jar | Up to 1 week in freezer, glaze 3 days fridge | Glaze day-of, warm gently to 90°F |
Here’s my favorite make-ahead strategy: I prepare the cheesecake bombs up through Step 5 (freezing them solid in the molds), then pop them out and store them in a freezer bag for up to two weeks. The day I plan to serve them, I make the gold mirror glaze fresh, cool it to the right temperature, and glaze them all in one go. This way, the glaze is at its shiniest and the cheesecake is perfectly frozen for that clean, smooth application.
If you have leftovers (unlikely, but possible!), store them in the refrigerator in a single layer in an airtight container. The glaze may soften slightly over 24 hours, but the flavor will still be lovely. Do not freeze once glazed — the condensation will ruin the mirror finish. And never microwave these to reheat; they’re meant to be enjoyed cold, straight from the fridge.
Variations & Easy Swaps
One of the things I love about this recipe is how adaptable it is. Whether you’re catering to dietary needs or just want to switch up the flavors, these variations have all been tested in my kitchen — and they’re all delicious in their own way.
| Variation | Key Change | Best For | Difficulty Impact |
|---|---|---|---|
| Orange Blossom & Pistachio | Replace rose water with orange blossom water; top with crushed pistachios | Middle Eastern flavor lovers | No change |
| Gluten-Free Version | Use gluten-free graham crackers or almond flour + butter base | Celiac or gluten-sensitive guests | Easy |
| Chocolate Swirl | Fold 1/4 cup melted dark chocolate into cheesecake before freezing | Chocolate + rose fans | Easy |
Orange Blossom & Pistachio Variation
This version is a direct nod to my Moroccan heritage. Swap the rose water for 1 tsp orange blossom water — you’ll find it next to the rose water at Middle Eastern grocers or online. The flavor is brighter, more citrusy, and pairs beautifully with crushed pistachios on top. I like to add a pinch of saffron threads to the biscuit base for an extra layer of earthy luxury. This variation is especially lovely in spring, when orange trees are blooming and the scent fills the air.
Gluten-Free / Dairy-Free Variation
For a gluten-free version, I use gluten-free graham crackers (like Kinnikinnick brand) or make a base from 1 cup almond flour, 2 tbsp melted coconut oil, and 1 tbsp maple syrup. Press it into the molds just like the original. For a dairy-free version, substitute the cream cheese with a high-quality plant-based cream cheese (Miyoko’s is my favorite — I find it at the Union Square Whole Foods) and use full-fat coconut cream in place of heavy whipping cream. Add an extra 1/2 tsp of gelatin to help the filling set firmly. The flavor will be slightly more coconut-forward, but still luscious and elegant.
Chocolate Rose Swirl Variation
Sometimes I crave chocolate with my rose — it’s a classic French pairing that never fails. To make a chocolate swirl version, melt 1/4 cup dark chocolate chips (I use 70% cacao from a little chocolate shop in Brooklyn) and let it cool to room temperature. After folding the whipped cream into the cheesecake batter, gently swirl in the melted chocolate with a knife, creating ribbons. Freeze as directed. The chocolate adds a deep, bitter note that contrasts beautifully with the floral rose water. I garnish these with a light dusting of cocoa powder alongside the rose petals for a truly show-stopping effect.
How do you make a gold mirror glaze that stays shiny without cracking?
The secret to a crack-free gold mirror glaze lies in three things: proper gelatin blooming, the right temperature when pouring, and not overworking the glaze. First, always bloom the gelatin in cold water for at least 5 minutes — this ensures it dissolves evenly. Second, the glaze must be poured at exactly 90–95°F. If it’s too hot, it will melt the frozen cheesecake and create wrinkles; if too cool, it will set too fast and crack. I use an instant-read thermometer, but you can also test a spoonful — it should flow like thick honey. Finally, blend the glaze gently with an immersion blender to avoid incorporating air bubbles, which can cause pitting and cloudy spots. Let the glazed bombs set in the refrigerator for at least 30 minutes, and never touch the surface once the glaze is poured.
What can I use instead of rose water or rose extract in this cheesecake recipe?
If you don’t have rose water or prefer a different flavor, you have several excellent options. Orange blossom water is the most natural substitution — it’s also a floral water used in Middle Eastern and North African cooking, and it pairs beautifully with vanilla and cream cheese. Use the same amount (1 tsp). For a non-floral option, try 1 tsp of good-quality vanilla bean paste or the seeds from half a vanilla bean — this will give you a deeper, more aromatic vanilla flavor without any floral notes. You can also use 1/2 tsp almond extract mixed with 1/2 tsp water, which adds a nutty, marzipan-like character that works wonderfully with the biscuit base. Avoid artificial rose syrup or rose-flavored coffee syrups, as they contain sugar and stabilizers that can affect the cheesecake’s texture.
How long do you need to freeze the cheesecake bombs before dipping them in the mirror glaze?
You need to freeze the cheesecake bombs for at least 4 hours, but overnight is ideal. The bombs must be completely solid — not just firm — before you dip them in the warm glaze. If they’re even slightly soft in the center, the heat from the glaze will melt the surface, causing the bomb to collapse or the glaze to slide off in uneven patches. I always freeze mine overnight (about 8-10 hours) to be safe. If you’re in a hurry, you can speed things up by freezing them on a metal baking sheet in the coldest part of your freezer, which conducts cold more efficiently. But don’t rush it — a properly frozen bomb is the foundation of that perfect mirror finish.
Can I make velvet vanilla rose cheesecake bombs ahead of time for a party, and how should I store them?
Absolutely — these are perfect for make-ahead party prep. Here’s my tested strategy: You can prepare the cheesecake bombs complete through freezing up to 2 weeks in advance. Once they’re solid, pop them out of the molds and store them in a freezer-safe container or zip-top bag with parchment paper between layers. On the day of your party, make the gold mirror glaze fresh, cool it to 90–95°F, and glaze the frozen bombs directly from the freezer. After glazing, refrigerate them for at least 30 minutes to set the glaze. You can glaze them up to 6 hours before serving — they’ll hold beautifully in the fridge. The key is to never freeze them after glazing, as condensation will ruin the shine. I’ve done this for several dinner parties, and it takes all the stress out of last-minute dessert prep.
Why did my mirror glaze crack after I poured it?
Mirror glaze cracks for one of three reasons. First, the glaze was too cold when you poured it — if it’s below 85°F, it sets too quickly and shrinks as it continues to cool, creating stress fractures. Second, the cheesecake bomb was not frozen solid — if the center is soft, the heat of the glaze causes uneven expansion and contraction. Third, the glaze was poured too thickly in one spot, which creates uneven tension as it sets. To avoid this, always check your glaze temperature with a thermometer, freeze your bombs overnight, and pour in a smooth, even stream rather than dumping it all at once. If your glaze does crack, you can sometimes salvage it by gently warming the surface with a hair dryer on low heat to re-melt and smooth out the cracks, then re-chill.
Can I use a different type of chocolate for the mirror glaze?
Yes, you can use milk chocolate or dark chocolate instead of white chocolate, but it will change the color and flavor profile significantly. For a milk chocolate mirror glaze, use the same amount (1/2 cup finely chopped milk chocolate) and skip the edible gold luster dust unless you want a golden-brown tone. For a dark chocolate version, use 1/2 cup dark chocolate (around 60-70% cacao) and omit the gold dust — the dark color is striking on its own. Note that darker chocolates have a thicker consistency when melted, so you may need to add an extra tablespoon of water to the glaze to keep it pourable. The white chocolate version gives the brightest, most mirror-like shine and is the best canvas for the gold luster dust to show its true color.
How do I get the gold mirror glaze to be perfectly smooth with no bubbles?
Bubbles in mirror glaze come from two main sources: the blending technique and pouring method. First, when you combine the hot liquid with the white chocolate, use an immersion blender at a low speed, keeping the blade submerged to avoid whipping in air. If you don’t have an immersion blender, you can use a regular blender — but pulse gently and scrape down the sides. Second, after blending, strain the glaze through a fine-mesh sieve into a clean bowl. This catches any undissolved gelatin or chocolate bits and also helps pop surface bubbles. Finally, when you’re ready to pour, let the glaze rest for 2-3 minutes so any remaining bubbles rise to the surface — you can gently tap the bowl on the counter to release them. Pour slowly and steadily from a height of about 6 inches; the stream should be thin enough to avoid trapping air.
What silicone mold size should I use for cheesecake bombs?
For this recipe, I recommend a 2.5-inch diameter half-sphere silicone mold — this size gives you a generous single-serving portion that’s big enough to be satisfying but small enough to feel elegant. Each cavity should hold about 3-4 tablespoons of filling total (including the biscuit base). If you use a smaller mold (like 1.5-inch), you’ll get about 12-14 smaller bombs — great for a party platter — but reduce the freezing time to 3 hours. If you use a larger mold (3-inch), you’ll get about 6 bombs, and you’ll need to freeze for at least 6 hours. Silicone is essential for easy release; never use metal or plastic molds without flexible sides, or the bombs will be impossible to unmold cleanly.
Can I skip the gelatin in the cheesecake filling?
I don’t recommend skipping the gelatin in the cheesecake filling for this specific recipe. The gelatin serves two critical purposes: it helps the cheesecake hold its shape when unmolded from the silicone molds, and it provides stability so the bombs don’t collapse when you pour the warm glaze over them. Without gelatin, the filling would be too soft to unmold cleanly and would likely melt or deform under the heat of the glaze. If you need a gelatin-free version, you can try using 2 tsp of agar-agar powder instead — bloom it the same way in cold water, but heat it to 120°F to fully activate it before mixing into the cream cheese. The texture will be slightly firmer and less creamy, but it will hold its shape. Note that agar-agar sets at room temperature, so you won’t need to freeze the bombs as long — 2 hours may be enough.
What’s the best way to transport these cheesecake bombs to a party?
Transporting these beauties requires some care, but it’s absolutely doable. My foolproof method: Freeze the unglazed bombs solid, then pack them in a hard-sided cooler with ice packs on the bottom and a layer of parchment paper between each bomb. Keep them frozen during transport. Bring the gold mirror glaze in a sealed jar or bottle in a separate cooler. Once you arrive, let the glaze come to the right temperature (90-95°F) and glaze the bombs on-site — this guarantees the shiniest finish and avoids any condensation or damage during transit. If you need to transport them already glazed, place each bomb in its own mini cupcake liner for stability, then arrange them in a single layer in a sturdy box with non-slip shelf liner on the bottom. Keep the box level at all times and refrigerate immediately upon arrival. I’ve transported glazed bombs on the NYC subway using this method — just go slow and hold the box with both hands!
Share Your Version!
I love seeing how you make these cheesecake bombs your own. Have you tried the orange blossom version? Did you add chocolate swirl? Or maybe you went all out with extra gold flakes and a full bouquet of dried roses on top — hey, I support that energy! Drop a comment below and let me know how it went. Your star rating helps other home bakers find this recipe, and your questions help me create better content for you.
If you share a photo on Instagram or Pinterest, tag @leosfoods so I can see your gorgeous creation — I always share my favorites in my stories. And if you have a specific question about this recipe that I didn’t cover, ask me in the comments. I read every single one and I’ll get back to you with an answer from my NYC kitchen. From my NYC kitchen to yours — I hope this recipe brings as much warmth to your table as it does to mine. — Stella 🧡
Love This Recipe? Save It to Pinterest!
If you enjoyed this Velvet Vanilla Rose Cheesecake Bombs with Gold Mirror Glaze recipe, don’t let it get lost in your browser tabs! 😄 Pin it now so you can find it again anytime — and explore hundreds more tried-and-tested recipes waiting for you on my Pinterest boards.
👉 Follow Stella on Pinterest @stellarecipeblog
📌 Pin this recipe · 🔁 Re-pin your favorites · 💬 Tag me when you make it — I love seeing your creations!
💬 I’d Love to Hear From You!
Rate this recipe ⭐⭐⭐⭐⭐, leave a comment with your twist, or tag @leosfoods on Instagram — your kitchen story makes my day!
👇 Scroll down to the comments section — I read every one!
“`
Print
Velvet Vanilla Rose Cheesecake Bombs with Gold Mirror Glaze
A decadent dessert featuring creamy rose-infused cheesecake bombs with a crunchy biscuit base and a stunning gold mirror glaze.
- Yield: 8 1x
Ingredients
- For the Cheesecake Bombs:
- 16 oz (450 g) cream cheese, softened
- 1/2 cup granulated sugar
- 1 tsp vanilla extract
- 1 tsp rose water
- 1 cup heavy whipping cream
- 2 tsp unflavored gelatin
- 2 tbsp cold water
- For the Biscuit Base:
- 1 cup graham cracker crumbs
- 3 tbsp unsalted butter, melted
- 1 tbsp granulated sugar
- For the Gold Mirror Glaze:
- 1/2 cup sweetened condensed milk
- 1/2 cup white chocolate, finely chopped
- 1 tbsp unflavored gelatin
- 1/4 cup cold water
- 1/3 cup water
- 3/4 cup granulated sugar
- 1 tbsp edible gold luster dust
- For Garnish (optional):
- Dried rose petals
- Edible gold flakes
Instructions
- Combine the graham cracker crumbs, melted butter, and sugar in a bowl.
- Press the mixture into silicone half-sphere molds and chill for 15 minutes.
- Bloom the gelatin with cold water and let stand for 5 minutes.
- Beat the cream cheese, sugar, vanilla extract, and rose water until smooth.
- Warm the gelatin until dissolved and mix into the cream cheese mixture.
- Whip the heavy cream to soft peaks and fold into the cheesecake mixture.
- Fill the molds over the biscuit base and freeze for at least 4 hours until firm.
- Bloom the gelatin for the glaze in cold water.
- Heat the water and sugar in a saucepan until dissolved.
- Remove from heat and stir in the condensed milk and bloomed gelatin.
- Pour over the white chocolate and blend until smooth.
- Mix in the edible gold luster dust and cool the glaze to a pourable consistency.
- Remove the frozen cheesecake bombs from the molds and place on a wire rack.
- Pour the gold mirror glaze evenly over each bomb.
- Garnish with dried rose petals and edible gold flakes.
- Refrigerate for 30 minutes before serving.
- Method: Dessert
Nutrition
- Calories: 410
- Sugar: 26 g
- Fat: 30 g
- Carbohydrates: 30 g
- Protein: 6 g
Tried This Recipe? Leave a Comment!
Did you make this recipe? I’d love to hear how it turned out! Please leave a comment and a rating below. Your feedback helps other home cooks and supports cheerychop.com!
For more delicious inspiration, follow me on Pinterest!