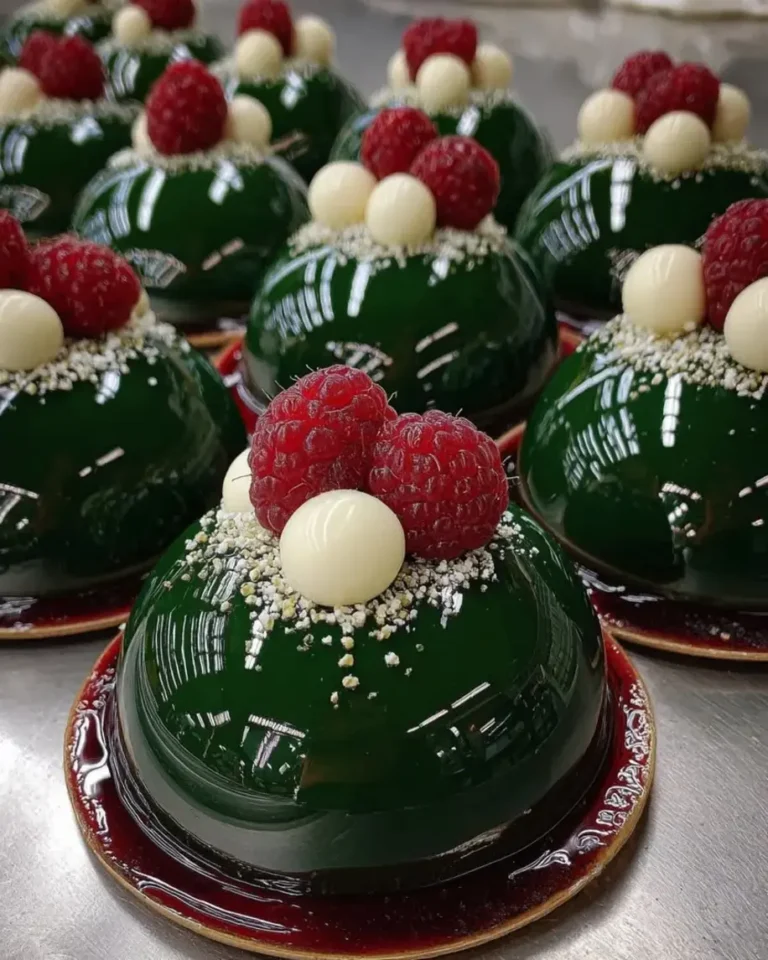
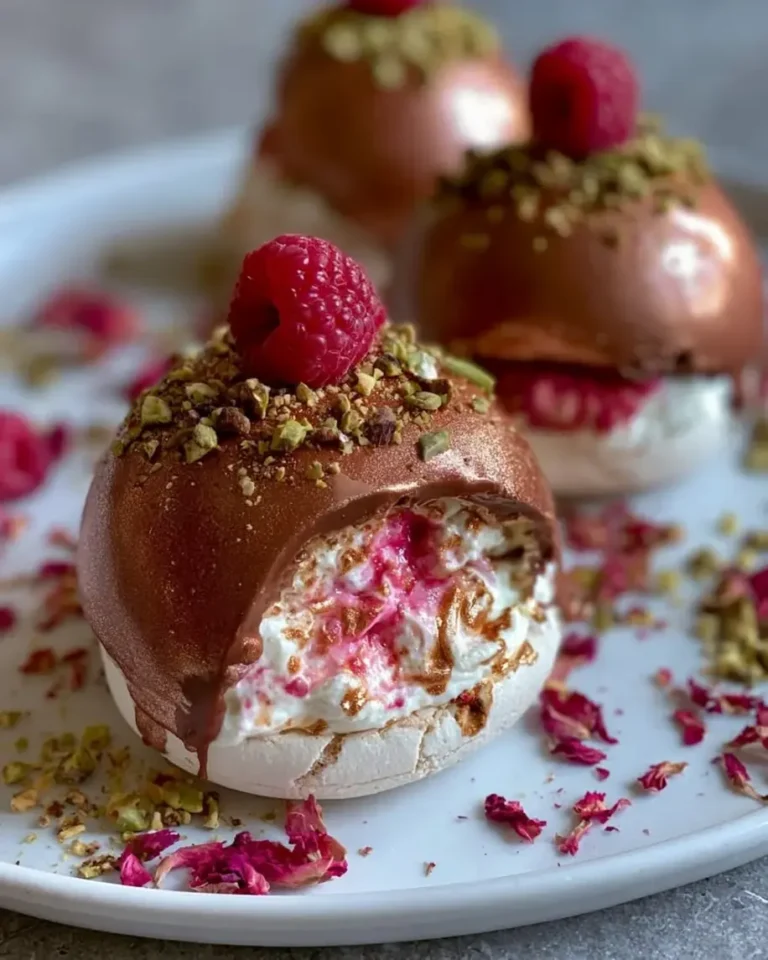
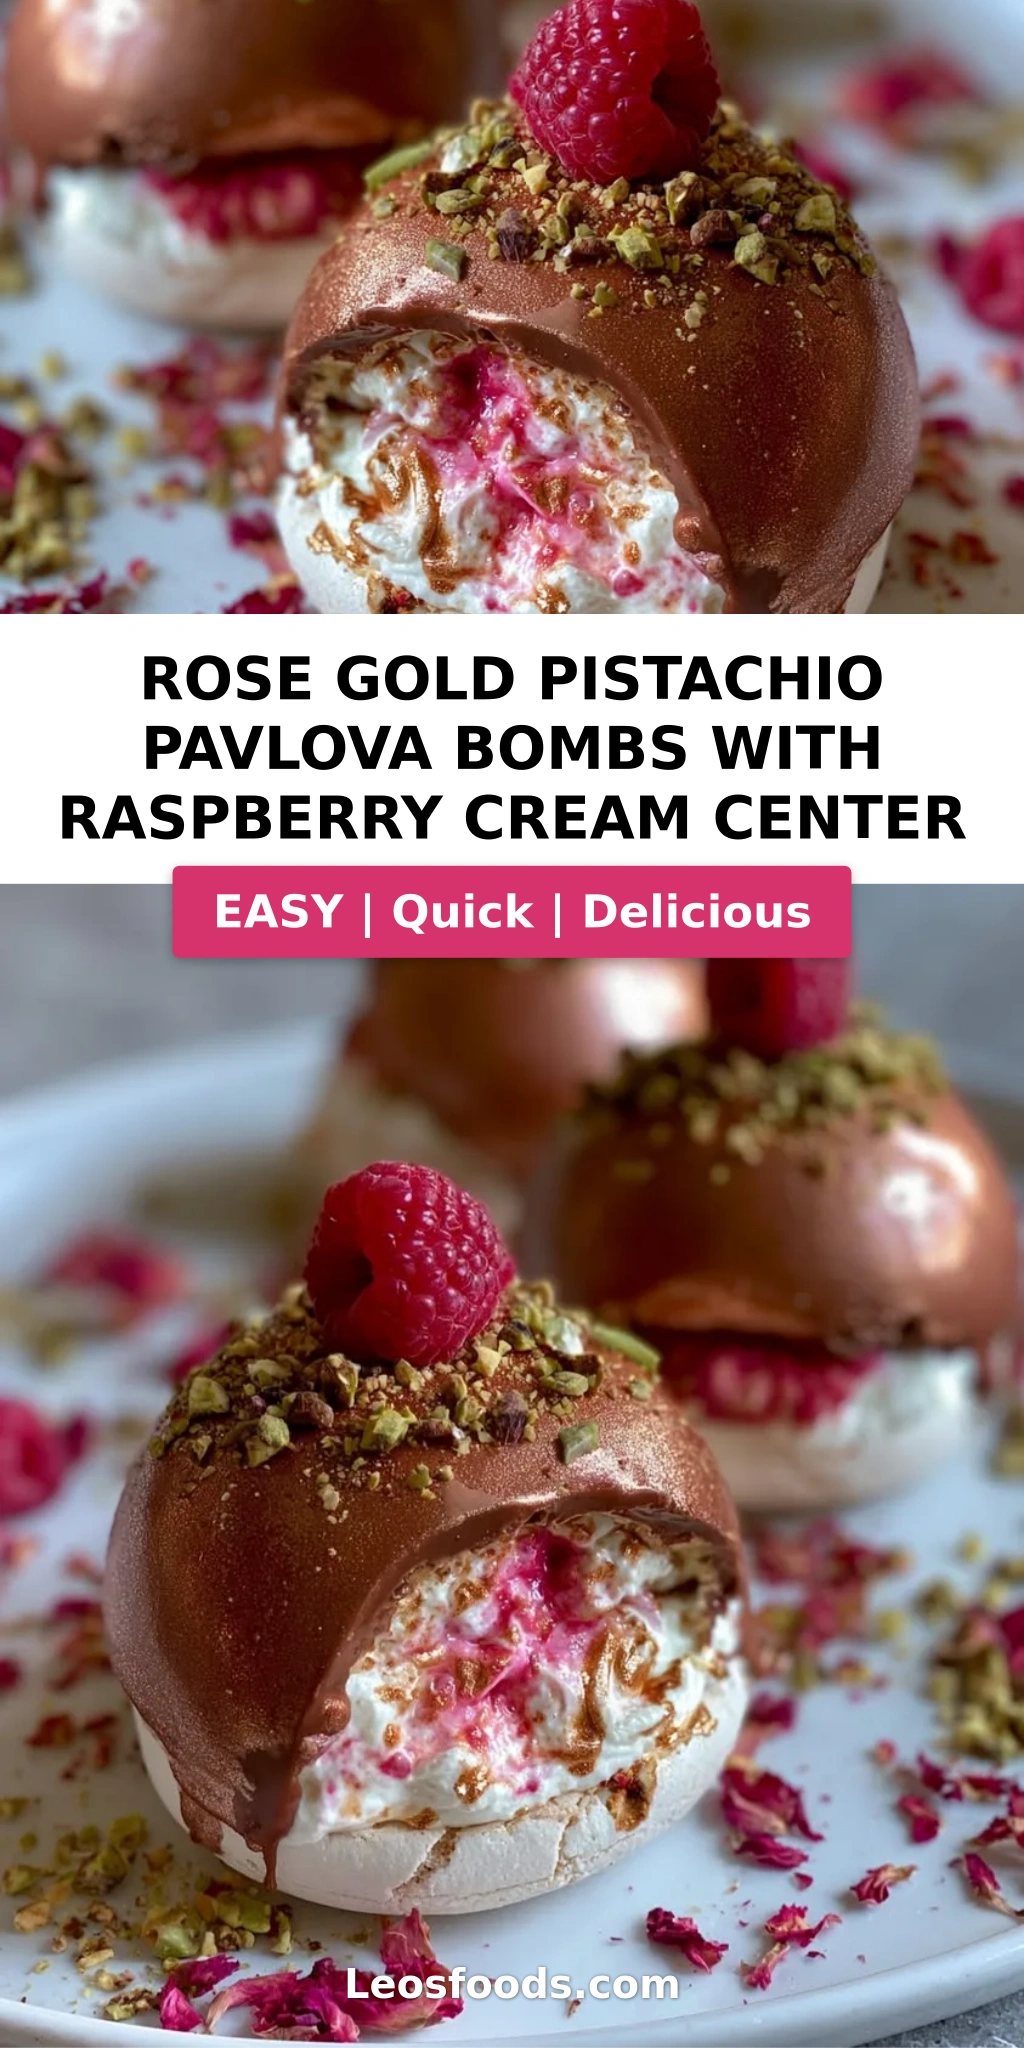
Rose Gold Pistachio Pavlova Bombs with Raspberry Cream

Table of Contents
Rose Gold Pistachio Pavlova Bombs with Raspberry Cream Center – A Stunning Dessert Showstopper
I still remember the first time I layered rose and pistachio together in a pastry kitchen — it was at a tiny patisserie near the Marché d’Aligre in Paris, where the chef taught me that the most elegant desserts are often the ones that balance a single bold floral note with a quiet, nutty earthiness. These rose gold pavlova bombs are the grown-up, show-stopping result of that lesson. A crisp meringue shell gives way to a cloud of raspberry cream, all wrapped in a shimmering rose gold pistachio coating that catches the light like stained glass. This pistachio pavlova recipe is my love letter to French technique, Moroccan tea-time memories, and the kind of dessert that makes people at a dinner party actually gasp.
The magic here is in the contrast: the pavlova shatters when you tap it with your fork, the raspberry cream center is cool, tangy, and luscious, and the white chocolate coating — kissed with rose water and real edible rose gold luster dust — adds a whisper of floral sweetness and an absolutely gorgeous metallic sheen. The pistachios, both ground into the meringue and chopped over the coating, bring a toasty, savory note that keeps every bite balanced. It’s the kind of raspberry cream pavlova that feels special enough for Valentine’s Day, a bridal shower, or a milestone birthday — but honestly, I’ve made these meringue dessert bombs on a random Tuesday just because I needed something beautiful in my kitchen.
I’ve tested this recipe over a dozen times to make sure the meringue stays crisp, the cream holds its shape, and the coating sets without turning sticky. My version uses a French-style meringue with a touch of cornstarch and vinegar for stability — a trick I learned from a pastry chef in Lyon — and a raspberry cream center that’s folded by hand so it stays light. One common mistake I see with pavlova bombs is overmixing the cream or skipping the cooling step inside the oven, which causes the shells to crack. I’ll show you exactly how to avoid both, and by the end, you’ll have eight perfect, jewel-like meringue dessert bombs that taste as incredible as they look.
Why This Rose Gold Pistachio Pavlova Bombs Recipe Is the Best
The Flavor Secret: Most pavlova recipes stop at fruit and cream — and that’s lovely, but I wanted something with more depth. The addition of finely ground pistachios in the meringue itself adds a subtle nuttiness and a pale pistachio-green hue that makes the dessert feel intentional from the inside out. The rose gold coating isn’t just for looks; the rose water and white chocolate melt into a silky shell that complements the raspberry cream beautifully. It’s a flavor combination that nods to my Moroccan heritage — where rose and pistachio appear in pastries like sellou and chebakia — but with a French pastry technique and a New York City love for bold presentation.
Perfected Texture: The key to a pavlova that’s crisp on the outside and slightly marshmallowy on the inside is low, slow baking — and I mean 250°F for a full hour with the oven door closed until everything cools completely. That gradual cooling prevents the dreaded cracking and ensures you get that perfect shatter-and-softness contrast. The raspberry cream is whipped to medium peaks and folded with fresh raspberries that are lightly crushed, so every bite has little pockets of tart fruit against the sweet meringue and creamy coating.
Foolproof & Fast: I know meringue can be intimidating, but I’ve broken down every step with visual cues and timings so you know exactly what to look for. The pavlova shells are piped as simple domes — no fussy shaping required — and the assembly is straightforward: hollow, fill, sandwich, coat, chill. If you’ve ever been nervous about making meringue dessert bombs, this recipe will give you the confidence to nail it on your first try. Plus, the rose gold pistachio coating hides any tiny imperfections in your shells, which is a chef’s secret I’m happy to share with you.
Rose Gold Pavlova Bombs Ingredients
I picked up most of these ingredients at the Union Square Greenmarket and a little spice shop in Brooklyn that carries edible luster dust. The pistachios I buy shelled and raw from a Middle Eastern market in Astoria — their flavor is noticeably richer than supermarket pistachios. For the rose water, look for a brand that lists only rose extract and water; avoid anything with added sugar or preservatives, which can throw off the coating’s texture.
Ingredients List
- For the Pavlova Shells:
- 4 large egg whites, at room temperature
- 1 cup granulated sugar
- 1 tsp cornstarch
- 1 tsp white vinegar
- 1/2 tsp vanilla extract
- 2 tbsp finely ground pistachios (from raw, unsalted pistachios)
- For the Raspberry Cream Center:
- 1 cup heavy whipping cream, cold
- 1/2 cup fresh raspberries (plus extra for garnish)
- 2 tbsp powdered sugar
- 1 tsp vanilla extract
- For the Rose Gold Pistachio Coating:
- 1 cup white chocolate, finely chopped (use a good melting brand like Guittard or Callebaut)
- 1/4 tsp rose water
- 1 tbsp edible rose gold luster dust
- 1/4 cup finely chopped pistachios (for sprinkling)
- For Garnish (optional):
- Crushed pistachios
- Fresh raspberries
- Dried rose petals (food-grade)
Ingredient Spotlight
Rose Water: This is the heart of the rose gold flavor. A little goes a long way — too much will make the coating taste like perfume. I use Lebanese-style rose water from a brand called Cortas, which is widely available in US grocery stores and online. If you only have orange blossom water, you can substitute it 1:1 for a different floral note, though the color and “rose gold” name won’t be as accurate.
Edible Rose Gold Luster Dust: This is what gives the coating its shimmering, metallic rose gold color without artificial food coloring. Look for a brand like The Sugar Art or Rainbow Dust, both available on Amazon or at baking supply stores. Make sure it says “edible” on the label. If you can’t find it, you can use a pinch of pink pearl dust mixed with a tiny amount of yellow luster dust to create a custom rose gold shade.
Pistachios: Raw, unsalted pistachios are essential here. Salted pistachios will throw off the sweetness balance of the meringue and the coating. I buy mine shelled from a bulk bin at Whole Foods or from Kalustyan’s in Manhattan. To grind them for the meringue, pulse them in a food processor with a teaspoon of the granulated sugar from the recipe — this prevents them from turning into paste.
| Original Ingredient | Best Substitution | Flavor / Texture Impact |
|---|---|---|
| Rose water | Orange blossom water (1:1) | Floral but lighter; less “rose” identity |
| Edible rose gold luster dust | Pink pearl + yellow luster dust (pinch each) | Custom shade; slightly less metallic sheen |
| Fresh raspberries | Frozen raspberries (thawed and drained) | Slightly more watery; need to drain well |
| White chocolate | Coconut butter (for dairy-free) | Coconut flavor; less sweet; thinner coating |
| Pistachios (in meringue) | Finely ground almonds or hazelnuts | Nutty but different identity; color change |
How to Make Rose Gold Pistachio Pavlova Bombs — Step-by-Step
Trust me: once you get the hang of this technique, you’ll be making these meringue dessert bombs for every celebration. I’ve broken everything down into clear stages so you can work through it with confidence.
Step 1: Prepare the Oven and Baking Sheet
Preheat your oven to 250°F (120°C) and line a large baking sheet with parchment paper. For best results, use a baking sheet with no dark coating — dark pans absorb more heat and can cause the meringues to brown. If you only have dark pans, place them on the middle rack and reduce the temperature by 10°F.
💡 Stella’s Pro Tip: Use a dab of meringue under each corner of the parchment to glue it down — this keeps the paper from sliding when you pipe.
Step 2: Make the Meringue
Place the 4 room-temperature egg whites in a clean, dry mixing bowl. Beat on medium speed with a whisk attachment until soft peaks form — the foam should hold a gentle curl when you lift the whisk. Gradually add the sugar, about 1 tablespoon at a time, while beating on high speed. Continue until the meringue is stiff, glossy, and holds a firm peak that doesn’t droop. This takes about 5–7 minutes in a stand mixer and about 8–10 minutes with a hand mixer.
⚠️ Common Mistake to Avoid: Even a trace of yolk or grease will prevent the whites from whipping properly. Wipe your bowl and whisk with a little lemon juice or white vinegar before starting to ensure they’re perfectly clean.
Step 3: Fold in the Flavorful Additions
Once the meringue is stiff, sprinkle the cornstarch, white vinegar, and vanilla extract over the surface. Use a rubber spatula to fold them in gently with 3–4 broad strokes. Then sprinkle the finely ground pistachios over the top and fold again with just 2–3 strokes — you want them evenly distributed but you don’t want to deflate the meringue.
💡 Stella’s Pro Tip: The vinegar and cornstarch are my secret weapons for a stable pavlova. The vinegar helps the egg whites hold their structure, and the cornstarch absorbs any excess moisture — this is the trick that prevents weeping.
Step 4: Pipe the Shells
Transfer the meringue to a piping bag fitted with a large round tip (about ½-inch diameter). Pipe 16 small dome-shaped mounds onto the prepared baking sheet, each about 2½ inches wide and 1½ inches high, spaced 2 inches apart. Alternatively, you can spoon the meringue into mounds and shape them with the back of a spoon. Try to make them fairly uniform so they pair up evenly later.
⚠️ Common Mistake to Avoid: Don’t make the domes too tall or too narrow — they need to be able to sit flat on the baking sheet and later be hollowed out. Aim for a gentle dome shape.
Step 5: Bake and Cool Completely
Place the baking sheet in the preheated oven and bake for 60 minutes. The meringues should be firm to the touch and easily lift off the parchment when done — they won’t be browned at all, just a pale pistachio-green. After 60 minutes, turn off the oven but leave the door closed. Let the pavlovas cool completely inside the oven for at least 2 hours, or overnight if you have the time. This gradual cooling is the single most important step for preventing cracks.
💡 Stella’s Pro Tip: Don’t open the oven door during baking or cooling — not even a crack. The sudden temperature change will cause the meringues to crack every time. I set a timer and literally walk away.
Step 6: Make the Raspberry Cream
In a cold mixing bowl, combine the heavy whipping cream, powdered sugar, and vanilla extract. Beat on medium-high speed until medium peaks form — the cream should hold its shape but still be soft and billowy. In a separate small bowl, gently mash the fresh raspberries with a fork until they’re broken up but still have some texture. Fold the mashed raspberries into the whipped cream with 3–4 strokes — you want ribbons of raspberry throughout, not a uniformly pink cream.
⚠️ Common Mistake to Avoid: Overwhipping the cream into stiff peaks will make it grainy and difficult to fold. Stop at medium peaks — the cream should look smooth and luscious, not curdled.
Step 7: Assemble the Bombs
Use a small spoon or a melon baller to carefully hollow out the center of each pavlova shell, creating a small well. Be gentle — the meringue is fragile. Spoon or pipe the raspberry cream into the hollow of 8 of the shells. Gently press a second shell on top of each filled one to create a round bomb shape. Don’t press too hard or the meringues will crumble; just let them nestle together.
💡 Stella’s Pro Tip: If a shell cracks during assembly, don’t worry. The white chocolate coating will seal everything together, and the cracks will be invisible once coated.
Step 8: Make the Rose Gold Pistachio Coating
Place the finely chopped white chocolate in a heatproof bowl. Melt it gently over a pot of simmering water (or in the microwave in 20-second bursts at 50% power). Once melted and smooth, stir in the rose water and the edible rose gold luster dust. Mix until the dust is fully dissolved and the chocolate is a uniform shimmering rose gold color. Let it cool for 2–3 minutes until it’s still fluid but not hot to the touch.
⚠️ Common Mistake to Avoid: If the white chocolate gets too hot, it will seize and become grainy. Never melt white chocolate above 110°F. If it starts to look thick or clumpy, add a teaspoon of coconut oil to smooth it out.
Step 9: Coat and Garnish
Place each assembled pavlova bomb on a wire rack set over a baking sheet (to catch drips). Spoon the rose gold chocolate mixture over each bomb, letting it flow over the sides. Use a small offset spatula to spread it evenly if needed. While the coating is still soft, immediately sprinkle with the finely chopped pistachios. Add optional garnishes — a few crushed pistachios, a fresh raspberry perched on top, and a pinch of dried rose petals.
💡 Stella’s Pro Tip: Work quickly on the coating — the white chocolate sets fast, and once it’s hard, the chopped pistachios won’t stick. Coat and garnish one bomb at a time for best results.
Step 10: Chill and Serve
Transfer the coated bombs to a parchment-lined tray and refrigerate for 15 minutes to allow the coating to set completely. Serve chilled or at room temperature. The shells stay crisp for about 4 hours after assembly, so I recommend serving these within a few hours of completing them for the best texture. If you’re making them ahead, see the storage section below.
⚠️ Common Mistake to Avoid: Don’t skip the chilling step — it sets the coating so it doesn’t smudge when you plate or serve. Fifteen minutes in the fridge is all it takes.
| Step | Action | Duration | Key Visual Cue |
|---|---|---|---|
| 1 | Preheat oven, line pan | 5 mins | Parchment glued down |
| 2 | Whip meringue to stiff peaks | 5–7 mins | Glossy, firm peak |
| 3 | Fold in dry ingredients | 1 min | Evenly distributed, not deflated |
| 4 | Pipe 16 domes | 5 mins | Uniform 2½-inch wide mounds |
| 5 | Bake at 250°F | 60 mins + 2 hrs cool | Firm, lifts off parchment |
| 6 | Whip raspberry cream | 3–4 mins | Medium peaks, ribbons of raspberry |
| 7 | Hollow, fill, sandwich | 10 mins | Round bombs, cream visible |
| 8 | Melt and color white chocolate | 3–5 mins | Smooth, rose gold sheen |
| 9 | Coat and garnish | 10 mins | Fully coated, pistachios stuck |
| 10 | Chill before serving | 15 mins | Coating set, firm to touch |
Serving & Presentation
These rose gold pavlova bombs are designed to be the centerpiece of your dessert table. I like to serve them on a simple white cake stand or a dark slate board that lets their metallic shimmer really pop. Place one bomb per plate — they’re substantial enough to feel generous but elegant enough for a fine-dining finish. A small spoonful of extra raspberry cream on the side and a sprinkle of crushed pistachios is all you need to make the plate feel intentional.
For a truly magical presentation, pair these with a glass of chilled Prosecco or a floral tea like Moroccan mint tea. In my home, I often serve them after a tagine dinner — the pistachio and rose notes echo North African flavors while the French meringue technique keeps things refined. If you’re serving them at a brunch, a dollop of mascarpone on the side and a cup of strong espresso coffee is a wonderful contrast.
| Pairing Type | Suggestions | Why It Works |
|---|---|---|
| Side Accompaniment | Extra fresh raspberries, a dusting of powdered sugar, mint leaves | Adds freshness and color contrast |
| Sauce / Dip | Warm dark chocolate ganache, passion fruit coulis, honey drizzle | Richness cuts through the sweet coating |
| Beverage | Prosecco, Moroccan mint tea, espresso, rosé wine | Floral and acidic notes complement the rose and raspberry |
| Garnish | Dried rose petals, crushed pistachios, edible rose gold glitter, fresh raspberries | Elevates visual appeal and adds texture |
Make-Ahead, Storage & Reheating
As a busy NYC cook who’s often testing recipes late into the night, I’ve figured out exactly how to work these into a busy schedule. The pavlova shells can be made up to 3 days ahead and stored airtight. The raspberry cream can be made 1 day ahead and kept chilled. The assembled, coated bombs are best within 4 hours, but I’ll give you the full breakdown below.
| Method | Container | Duration | Reheating Tip |
|---|---|---|---|
| Refrigerator | Airtight container, single layer | Up to 2 days | Serve cold; coating may soften slightly |
| Freezer | Freezer-safe container with wax paper between layers | Up to 1 month | Thaw in fridge 30 mins before serving |
| Make-Ahead | Shells: airtight at room temp; Cream: covered in fridge | Shells: 3 days; Cream: 1 day | Assemble and coat just before serving |
If you freeze the assembled bombs, I recommend freezing them on a tray for 1 hour before wrapping — this prevents the coating from sticking to the wrapper. When you’re ready to serve, let them thaw in the refrigerator for about 30 minutes. The meringue will lose a little bit of its initial crunch but will still be delicious. The raspberry cream center stays beautifully creamy even after freezing. I’ve done this for holiday parties and it’s a lifesaver when you’re juggling multiple dishes.
Variations & Easy Swaps
| Variation | Key Change | Best For | Difficulty Impact |
|---|---|---|---|
| Chocolate Rose | Replace white chocolate coating with dark chocolate + rose water | Richer flavor, less sweet | Same difficulty |
| Dairy-Free / Vegan | Use coconut cream + aquafaba meringue + dairy-free white chocolate | Dairy-free diet | Medium (requires technique) |
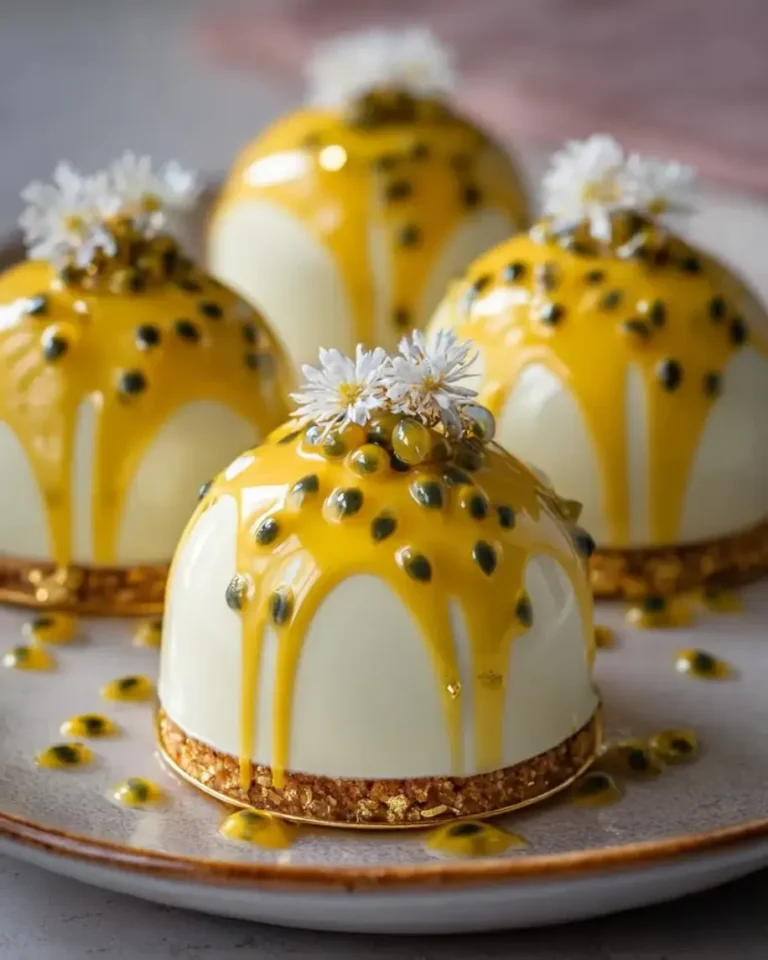
| Mango-Passionfruit | Replace raspberry cream with mango-passionfruit curd and cream | Tropical summer gatherings | Same difficulty |
Chocolate Rose Variation
If you love the rose-pistachio flavor combination but want a darker, more intense coating, swap the white chocolate for good-quality dark chocolate (70% cocoa is my sweet spot). Add the rose water and a pinch of the rose gold luster dust to the melted dark chocolate — the gold will show up as tiny metallic flecks against the dark background, which is honestly stunning. This version pairs beautifully with the raspberry cream center and feels slightly more sophisticated. I tested this for a dinner party in Brooklyn and it was the first thing to disappear.
Dairy-Free / Vegan Variation
I’ve developed this version for my dairy-free readers, and it works beautifully. For the meringue, use aquafaba (the liquid from a can of chickpeas) in place of egg whites — 3 tablespoons of aquafaba per egg white. Whip it with the sugar exactly as you would the egg whites; it takes a little longer (about 10 minutes) but yields a very similar texture. For the cream center, chill a can of full-fat coconut cream overnight, scoop off the solid layer, and whip it with powdered sugar and vanilla. For the coating, use a dairy-free white chocolate alternative or coconut butter mixed with a little maple syrup. The flavor is slightly coconut-forward but still lovely.
Mango-Passionfruit Tropical Variation
When summer hits and the Union Square market is overflowing with mangoes, I love swapping the raspberry cream for a mango-passionfruit filling. Make a quick curd by blending fresh mango pulp with passionfruit juice, a little sugar, and a touch of cornstarch, then fold it into whipped cream. The tropical acidity is a brilliant foil to the sweet rose gold coating. Replace the raspberry garnish with thin slices of fresh mango and a few passionfruit seeds. This version is lighter and brighter — perfect for outdoor celebrations.
How do you get a rose gold color on pavlova without using artificial food coloring?
The best way to achieve a natural rose gold color on pavlova is by using edible rose gold luster dust, which is made from food-grade mica and is completely free of artificial dyes. Simply mix 1 tablespoon of the luster dust into melted white chocolate along with ¼ teaspoon of rose water — the dust dissolves into the chocolate and creates a shimmering, metallic rose gold sheen. Another option is to use a combination of beet powder (for pink) and a tiny pinch of turmeric (for gold), but the luster dust gives a much more dramatic, mirror-like finish. I recommend brands like The Sugar Art or Rainbow Dust, both available in US baking supply stores and online.
Can you make pistachio pavlova bombs ahead of time and freeze them?
Yes, you can absolutely freeze these pistachio pavlova bombs! The best method is to assemble the bombs fully — including the coating and garnishes — then freeze them on a parchment-lined tray for about 1 hour until they’re firm. Once frozen solid, wrap each bomb individually in plastic wrap and transfer them to a freezer-safe container with layers of wax paper in between. They’ll keep for up to 1 month. When you’re ready to serve, let them thaw in the refrigerator for about 30 minutes. The meringue will lose a tiny bit of its initial crunch, but the texture is still lovely and the rose gold coating stays beautifully shiny. I recommend not freezing them for longer than a month for the best quality.
What can I substitute for raspberry cream center in a pavlova bomb recipe?
There are plenty of delicious substitutions for the raspberry cream center! For a strawberry version, use ½ cup of finely chopped fresh strawberries folded into whipped cream with a drop of vanilla. For a lemon-blueberry center, fold ¼ cup of blueberry compote or fresh blueberries into whipped cream with a teaspoon of lemon zest. If you want a tropical twist, use passionfruit curd (store-bought or homemade) folded into whipped coconut cream. Chocolate lovers can use a dark chocolate ganache folded with whipped cream for a decadent mousse-like center. For a dairy-free option, use whipped coconut cream with any of these fruit additions. Each substitution works 1:1 by volume and takes the recipe in a completely new direction.
How do you keep pavlova from cracking when shaping it into bombs?
The most important step to prevent cracking is cooling the baked meringues completely inside the oven with the door closed — I let mine cool for at least 2 hours, or sometimes overnight. This gradual cooling prevents the sudden temperature change that causes cracks. When hollowing out the shells, use a small spoon or melon baller with a gentle scooping motion rather than pressing down hard. If a shell does develop a small crack, don’t worry! The white chocolate coating acts as a glue that seals everything together, and you won’t see the crack once it’s coated. Also, make sure your meringue is whipped to stiff, glossy peaks before folding in the dry ingredients — a stable meringue structure is naturally more resistant to cracking.
Can I use frozen raspberries instead of fresh for the cream center?
Yes, you can use frozen raspberries, but you’ll need to thaw them completely and drain off any excess liquid before folding them into the whipped cream. Frozen raspberries release more water than fresh ones, and if you add that extra moisture to the cream, it can make the center watery and cause the pavlova shells to soften prematurely. To thaw, place the raspberries in a fine-mesh sieve over a bowl for about 30 minutes at room temperature, or microwave them on defrost for 30 seconds, then drain. Once drained, gently pat them dry with a paper towel before mashing and folding. The flavor will be just as bright as fresh, and this is a great option when raspberries are out of season.
What kind of white chocolate works best for the rose gold coating?
For the smoothest, most reliable rose gold coating, I recommend using a high-quality white chocolate that’s designed for melting and dipping. Brands like Guittard, Callebaut, and Ghirardelli melting wafers work beautifully because they contain cocoa butter that melts evenly and sets with a glossy finish. Avoid compound white chocolate wafers that use palm oil — they tend to be less shiny and can leave a waxy feel in your mouth. If you’re using a white chocolate bar, chop it finely so it melts uniformly. Never melt white chocolate above 110°F, as it can seize and become grainy. If you need a dairy-free option, look for a vegan white chocolate made with coconut milk or rice milk — it will have a slightly different flavor but still works well.
Can I make the pavlova shells without pistachios in the meringue?
Absolutely! If you have a nut allergy or simply prefer a plain meringue, you can omit the 2 tablespoons of ground pistachios from the shell recipe without making any other changes. The meringue will be pure white instead of pale green, and the flavor will be classic vanilla — the pistachio flavor will then come entirely from the chopped pistachios sprinkled on the coating. If you want to keep the nutty depth without using pistachios, you can substitute the ground pistachios with an equal amount of finely ground almond flour or even finely ground toasted sesame seeds. Both will add a different but complementary nutty note. Just note that the color of the meringue will change depending on what you use.
How far in advance can I assemble the full pavlova bombs?
I recommend assembling the full pavlova bombs no more than 4 to 6 hours before serving for the best texture. The meringue shells start to soften once they come into contact with the raspberry cream, and while the white chocolate coating helps seal them, they can lose their signature crunch if left assembled overnight in the fridge. If you need to work ahead, here’s a foolproof plan: bake the shells up to 3 days in advance and store them airtight at room temperature, make the raspberry cream 1 day ahead and keep it chilled, then assemble, coat, and garnish on the day you plan to serve. This way, all the prep is done and the final assembly takes just 20 minutes.
Why is my pavlova chewy instead of crispy?
A chewy pavlova is usually a sign of underbaking or high humidity. Pavlova needs to bake at a low temperature (250°F) for a full 60 minutes so the moisture slowly evaporates without browning the meringue. If your oven runs cool, add 5–10 minutes. After baking, leaving the pavlovas in the oven with the door closed as it cools allows them to continue drying out. Humidity is another culprit — don’t make pavlova on a rainy day if you can help it, as the moisture in the air gets absorbed into the meringue. A teaspoon of cornstarch in the recipe (which is included here) helps by absorbing excess moisture. Finally, make sure your egg whites are at room temperature before whipping — cold whites hold more moisture and take longer to dry out.
Can I use store-bought meringue shells instead of making my own?
Yes, you can use store-bought meringue shells as a shortcut, and the recipe will still be delicious! Look for good-quality meringue nests or shells in the dessert section of your grocery store — brands like Pavlova Magic or home-style bakery shells work well. The main difference will be texture and flavor: store-bought shells are often sweeter and more uniformly crisp, and they won’t have the pistachio flavor or pale green color of the homemade version. If using store-bought, skip Step 5 (the hollowing step) since they’re already shaped, and proceed with filling, assembling, coating, and garnishing. The assembly and coating instructions remain the same. This is a great option when you’re short on time but still want the stunning rose gold pistachio presentation.
Share Your Version!
I absolutely love hearing how these rose gold pavlova bombs turn out in your kitchen — and believe me, I read every single comment and tag. If you make them, please leave a star rating and a comment below sharing what you loved (or what you customized!). Did you try the mango-passionfruit variation? Did you use dark chocolate instead of white? Did your friends gasp when they saw that rose gold sheen? I want to know all the details.
Snap a photo of your creation and share it on Instagram or Pinterest with the hashtag #StellasPavlovaBombs and tag me @leosfoods so I can see your beautiful work. And if you have any questions about the recipe — whether it’s about meringue technique, substitutions, or serving sizes — just drop them in the comments. I answer every single one within 24 hours because that’s how I was taught in my mother’s kitchen in Morocco: when someone shares food, you honor that exchange with care.
From my NYC kitchen to yours — I hope this recipe brings as much warmth to your table as it does to mine. — Stella 🧡
Love This Recipe? Save It to Pinterest!
If you enjoyed this Rose Gold Pistachio Pavlova Bombs with Raspberry Cream Center recipe, don’t let it get lost in your browser tabs! 😄 Pin it now so you can find it again anytime — and explore hundreds more tried-and-tested recipes waiting for you on my Pinterest boards.
👉 Follow Stella on Pinterest @stellarecipeblog
📌 Pin this recipe · 🔁 Re-pin your favorites · 💬 Tag me when you make it — I love seeing your creations!
Rose Gold Pistachio Pavlova Bombs with Raspberry Cream Center
A stunning dessert combining pavlova shells, raspberry cream center, and a rose gold pistachio coating.
- Yield: 8 1x
Ingredients
- For the Pavlova Shells:
- 4 large egg whites
- 1 cup granulated sugar
- 1 tsp cornstarch
- 1 tsp white vinegar
- 1/2 tsp vanilla extract
- 2 tbsp finely ground pistachios
- For the Raspberry Cream Center:
- 1 cup heavy whipping cream
- 1/2 cup fresh raspberries
- 2 tbsp powdered sugar
- 1 tsp vanilla extract
- For the Rose Gold Pistachio Coating:
- 1 cup white chocolate, melted
- 1/4 tsp rose water
- 1 tbsp edible rose gold luster dust
- 1/4 cup finely chopped pistachios
- For Garnish (optional):
- Crushed pistachios
- Fresh raspberries
- Dried rose petals
Instructions
- 1. Preheat the oven to 250°F (120°C) and line a baking sheet with parchment paper.
- 2. Beat the egg whites until soft peaks form.
- 3. Gradually add the sugar, beating continuously until stiff, glossy peaks form.
- 4. Fold in the cornstarch, vinegar, vanilla extract, and ground pistachios.
- 5. Pipe or spoon small dome-shaped meringues onto the baking sheet.
- 6. Bake for 60 minutes, then turn off the oven and let the pavlovas cool completely inside the oven.
- 7. Whip the cream, powdered sugar, and vanilla until medium peaks form.
- 8. Gently fold in the raspberries, keeping some texture.
- 9. Hollow the center of each pavlova shell and fill with the raspberry cream.
- 10. Join two filled halves together to form round bombs.
- 11. Mix the rose water and rose gold luster dust into the melted white chocolate.
- 12. Coat each pavlova bomb with a thin layer of the rose gold chocolate mixture.
- 13. Sprinkle with chopped pistachios while the coating is still soft.
- 14. Garnish with additional pistachios, raspberries, and dried rose petals.
- 15. Chill for 15 minutes before serving.
Nutrition
- Calories: 285
- Sugar: 26 g
- Fat: 18 g
- Carbohydrates: 29 g
- Protein: 4 g
Tried This Recipe? Leave a Comment!
Did you make this recipe? I’d love to hear how it turned out! Please leave a comment and a rating below. Your feedback helps other home cooks and supports cheerychop.com!
For more delicious inspiration, follow me on Pinterest!