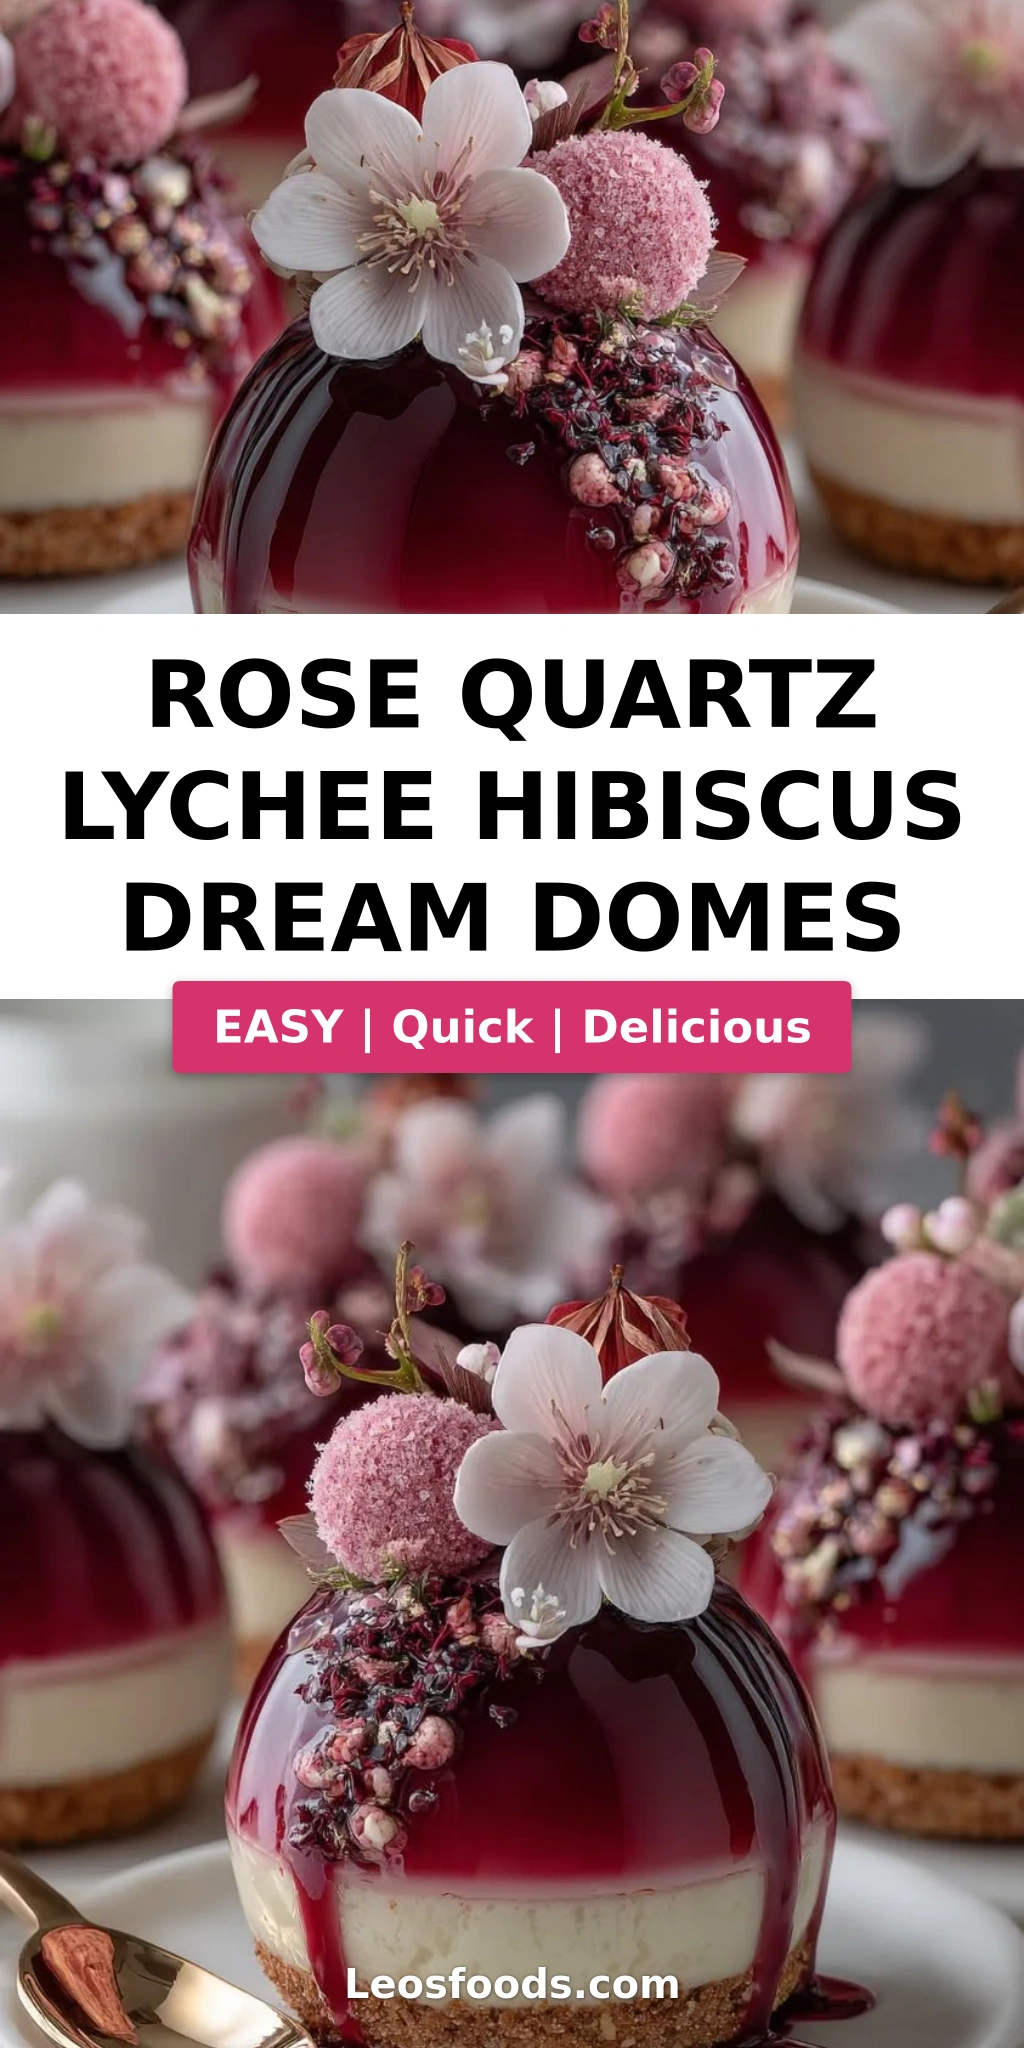
Stunning Rose Quartz Lychee Hibiscus Dream Domes
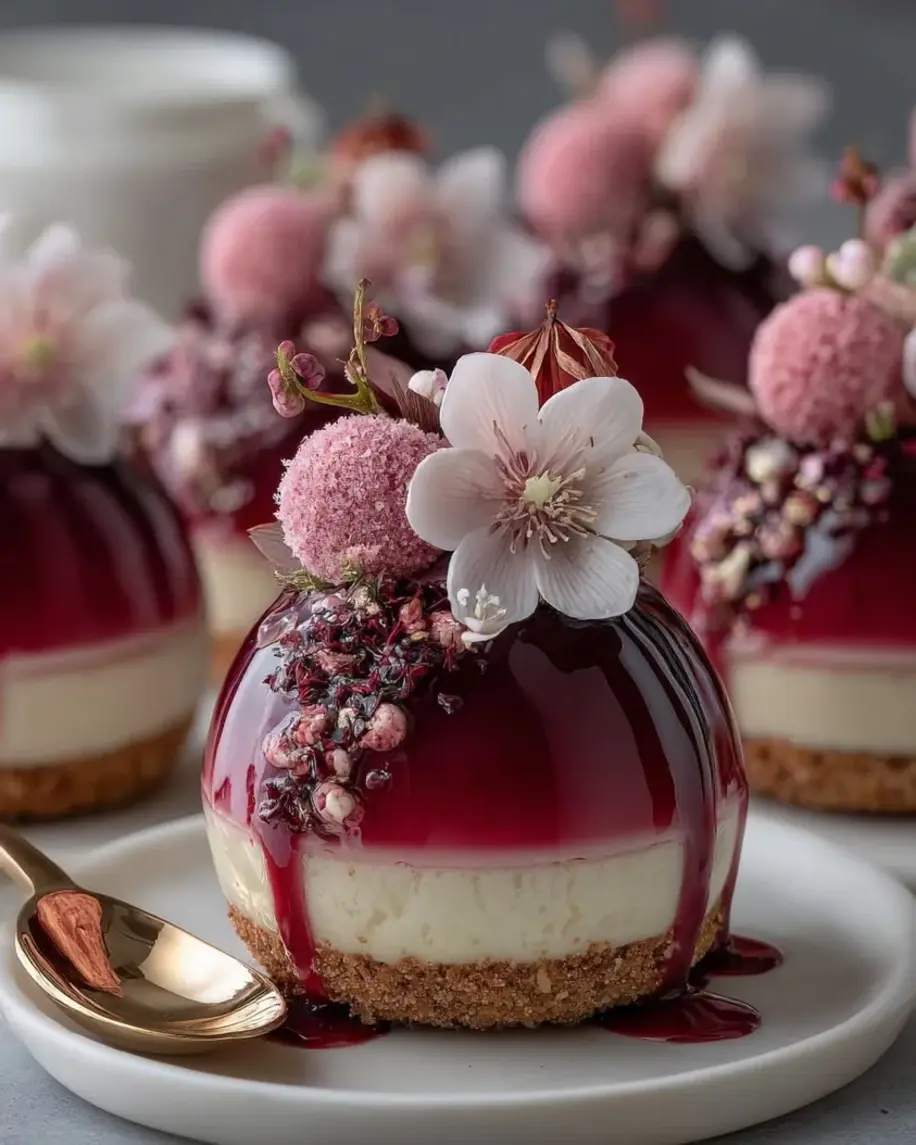
Table of Contents
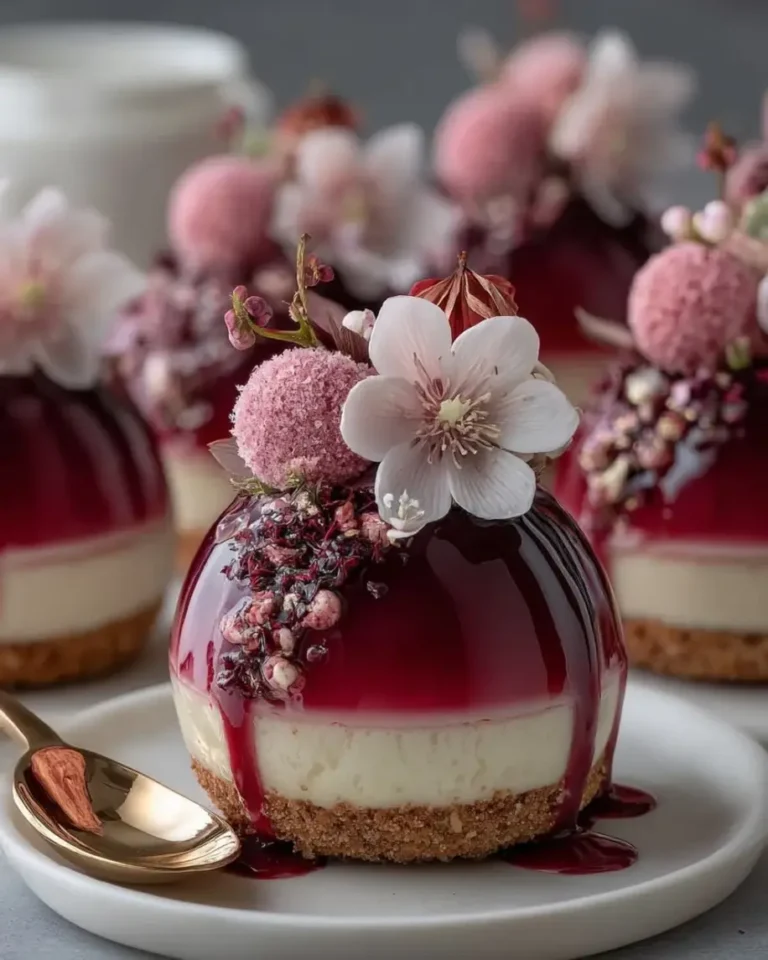
Rose Quartz Lychee Hibiscus Dream Domes – A Stunning Rose Quartz Mirror Glaze Dessert
I still remember the first time I tasted a rose quartz mirror glaze dessert in a Parisian pâtisserie — it was like holding a polished gemstone on a plate. That shimmer, that smoothness, that delicate flavor pairing of lychee and hibiscus… I knew I had to create my own version for you. This rose quartz lychee hibiscus dream domes recipe is the result of blending my Moroccan love for floral sweets with the technical precision I learned in French pastry school. The rose quartz mirror glaze is the star — a glossy, glass-like finish that makes each dome look like a precious jewel. Every spoonful reveals layers: a silky lychee hibiscus mousse, a tangy hibiscus syrup core, and a buttery biscuit base.
Close your eyes and imagine the first bite. The mirror glaze cracks gently under your spoon, giving way to a light-as-air mousse infused with the subtle sweetness of lychee and the deep, wine-like tang of hibiscus. Then comes the burst of the hibiscus syrup core — a concentrated floral punch that brightens the whole experience. The biscuit base adds a satisfying crunch and buttery foundation. It’s a dessert that looks like a work of art but tastes like pure comfort. The rosewater in the glaze ties everything together with a whisper of perfume that’s never overpowering.
I’ve tested this recipe dozens of times in my NYC kitchen to make sure it’s achievable for home cooks. The trickiest part is the mirror glaze, but I’ll guide you through every step — including my secret for avoiding bubbles and achieving that perfect pouring temperature. One mistake I see often is not freezing the domes long enough; trust me, 6 hours minimum is non-negotiable. But once you master these techniques, you’ll have a showstopper that rivals any bakery. 💡 Stella’s Pro Tip: For the smoothest glaze, strain it through a fine-mesh sieve before pouring.
Why This Rose Quartz Lychee Hibiscus Dream Domes Recipe Is the Best
The Flavor Secret – Lychee and hibiscus are a match made in dessert heaven. I steep dried hibiscus directly in cream for the mousse, which gives a deeper, more floral flavor than using pre-made syrup. The hibiscus syrup core adds a concentrated tart-sweet punch that cuts through the richness of the cream cheese mousse. Growing up in Morocco, my mother always used hibiscus (karkadeh) in teas and syrups — that memory inspired this elegant dessert.
Perfected Texture – The mousse is aerated with softly whipped cream folded into a cream cheese base, giving it a cloud-like consistency that still holds its shape. The mirror glaze is a white chocolate based gelée — I use a precise ratio of gelatin to avoid a rubbery texture. After testing 12 batches, I landed on the ideal balance: your glaze will set into a thin, shiny shell that slicks beautifully over the frozen dome without pooling.
Foolproof & Fast – While the recipe looks intricate, I’ve broken it into manageable stages. The domes freeze overnight, so you can prep the components a day ahead. The glaze itself takes only 15 minutes of active time. I’ve included detailed temperature cues and visuals (like “until the mixture coats the back of a spoon”) so you know exactly when each step is done. Even if you’ve never worked with mirror glaze before, you’ll be amazed at the results.
Rose Quartz Lychee Hibiscus Dream Domes Ingredients
I source my lychee puree from a specialty store in Chinatown, NYC — the flavor is so much brighter than canned. Dried hibiscus flowers I buy in bulk from a Middle Eastern market near my apartment; if you can’t find them, you can order online. For the white chocolate, use a good-quality brand like Valrhona or Callebaut for the smoothest melt. Let’s go through everything you’ll need.
Ingredients List
- For the Lychee Hibiscus Mousse:
- 2 cups lychee puree (fresh or high-quality canned, drained and puréed)
- 1 cup heavy cream
- 1/2 cup cream cheese, softened
- 1/3 cup granulated sugar
- 2 tbsp dried hibiscus flowers
- 1 tsp vanilla extract
- 2 tsp powdered gelatin
- 3 tbsp cold water
- For the Hibiscus Syrup Core:
- 1 cup water
- 2 tbsp dried hibiscus flowers
- 1/3 cup granulated sugar
- 1/2 cup lychee juice
- 1 tsp powdered gelatin
- 1 tbsp cold water
- For the Biscuit Base:
- 1 cup digestive biscuits, finely crushed
- 3 tbsp melted butter
- For the Rose Quartz Mirror Finish:
- 1 cup granulated sugar
- 1/2 cup water
- 1/2 cup sweetened condensed milk
- 1 cup white chocolate, finely chopped
- 1 tbsp powdered gelatin
- 3 tbsp cold water
- 1 tsp rosewater
- 1–2 drops pink food coloring (optional)
- For Garnish (optional):
- Fresh lychee halves
- Dried hibiscus petals
- Edible shimmer dust
Ingredient Spotlight
Lychee Puree: This is the flavor base of the mousse. Look for unsweetened puree in Asian grocery stores or online. If using canned lychees, drain them well and blend until smooth, then measure. The natural floral sweetness of lychee is delicate — do not skip it. 💡 Stella’s Pro Tip: For an even more intense lychee flavor, reduce the puree by simmering for 10 minutes before adding to the mousse.
Dried Hibiscus Flowers: Also called jamaica (Latin) or karkadeh (Middle Eastern), these tart petals infuse flavor into both the mousse and the core. I prefer to steep them in warm cream for the mousse — that way the flavor is gentle. For the core, simmering them in water extracts a stronger, more vibrant taste. They’re available at most health food stores or Latin markets.
White Chocolate: Crucial for the mirror glaze. Use a good-quality white chocolate with at least 30% cocoa butter for a smooth, glossy finish. Avoid white chips or compound coatings — they contain oils that can make the glaze grainy. I always chop the chocolate finely so it melts quickly into the hot cream mixture.
Gelatin: Powdered gelatin is used in three separate parts. Make sure you bloom it in cold water (never hot) for exactly 5 minutes. This step is non-negotiable for proper setting. If you need a vegetarian option, see the FAQ.
| Original Ingredient | Best Substitution | Flavor / Texture Impact |
|---|---|---|
| Lychee puree | 1 can (15 oz) lychees in syrup, drained and puréed | Slightly sweeter, less floral; reduce sugar by 1 tbsp |
| Heavy cream | Canned coconut cream (chilled) | Lighter, coconut flavor complements hibiscus |
| Cream cheese | Mascarpone cheese | Richer, less tangy; will set slightly softer |
| Dried hibiscus flowers | Hibiscus tea bags (use 4 bags) | Milder flavor; open bags and use leaves for steep |
| White chocolate | Quality white chocolate bar (not chips) | Ensure at least 30% cocoa butter; avoid compound |
How to Make Rose Quartz Lychee Hibiscus Dream Domes – Step-by-Step
Don’t be intimidated by the length of the ingredient list! I promise, if you work methodically, you’ll have a gorgeous batch of dream domes. Read through the entire recipe first, then set up your station. I’ll guide you with my tested tips and visuals.
Step 1: Prepare Biscuit Base
Mix the crushed digestive biscuits with melted butter until the texture resembles wet sand. Press a small amount (about 1–2 tablespoons) into the bottom of each dome mold — use the back of a spoon or a small glass to compact firmly. Chill in the refrigerator for at least 15 minutes while you prepare the next components.
💡 Stella’s Pro Tip: Use a flat-bottomed shot glass to press the crumbs evenly. If you don’t have dome molds, you can use a muffin tin lined with plastic wrap.
Step 2: Bloom Gelatin for Hibiscus Core
In a small bowl, sprinkle 1 teaspoon of powdered gelatin over 1 tablespoon of cold water. Let it sit undisturbed for 5 minutes. This step hydrates the gelatin so it dissolves evenly when heated.
⚠️ Common Mistake to Avoid: Do not add gelatin directly to hot liquid without blooming first — it will clump and leave lumps in your syrup core.
Step 3: Make Hibiscus Syrup Core
In a small saucepan, bring 1 cup of water and 2 tablespoons of dried hibiscus flowers to a simmer. Cook for 5 minutes, then strain through a fine-mesh sieve into a clean bowl. Discard the petals. Stir in 1/3 cup sugar until dissolved, then add 1/2 cup lychee juice. Microwave the bloomed gelatin for 10 seconds (or heat in a small pan) until liquid, then whisk into the syrup. Pour the syrup into silicone insert molds (or a small ice cube tray). Freeze for at least 1 hour, until completely firm.
💡 Stella’s Pro Tip: The core inserts should be smaller than the dome cavity — aim for about 1 teaspoon each. You can reuse the tray for multiple batches.
Step 4: Bloom Gelatin for Mousse
In a small bowl, sprinkle 2 teaspoons of powdered gelatin over 3 tablespoons of cold water. Let sit for 5 minutes.
Step 5: Steep Hibiscus in Cream
Measure out 1/2 cup of the heavy cream and heat it in a small saucepan until warm (not boiling). Add 2 tablespoons of dried hibiscus flowers, remove from heat, and let steep for 10 minutes. Strain through a fine sieve, pressing on the petals to extract all the liquid. Discard petals and let the infused cream cool to room temperature.
⚠️ Common Mistake to Avoid: If the cream is too hot when you add the hibiscus, it can become bitter. Keep it just warm — around 110°F.
Step 6: Beat Cream Cheese Mixture
In a large bowl, beat the softened cream cheese with 1/3 cup sugar, 1 tsp vanilla extract, and 2 cups lychee puree until smooth and free of lumps. Use an electric mixer on medium speed for about 2 minutes.
Step 7: Combine and Whip Mousse
Microwave the bloomed gelatin from Step 4 for 10 seconds until liquid. Warm the hibiscus-infused cream slightly, then whisk in the liquid gelatin. Pour this gelatin-cream mixture into the cream cheese base and mix well. In a separate clean bowl, whip the remaining 1/2 cup of cold heavy cream to soft peaks (the cream should hold a gentle shape but not be stiff). Gently fold the whipped cream into the cream cheese mixture in three additions, using a spatula. The final mousse should be light and airy.
💡 Stella’s Pro Tip: To get soft peaks, keep the bowl and beaters cold. I pop them in the freezer for 10 minutes before whipping.
Step 8: Assemble Domes
Remove the dome molds from the fridge (with biscuit base set). Spoon or pipe the mousse halfway up each cavity. Place a frozen hibiscus syrup core in the center, pressing it gently into the mousse. Then cover with remaining mousse until the mold is full. Level off the top with a spatula. Tap the mold gently to release air bubbles.
⚠️ Common Mistake to Avoid: If the frozen core is not fully frozen when inserted, it may melt into the mousse and create a soggy patch. Ensure core is rock-hard before assembly.
Step 9: Freeze Domes
Place the filled molds in the freezer for at least 6 hours, or preferably overnight. The domes must be completely frozen solid — this is essential for the mirror glaze to adhere properly.
Step 10: Prepare Mirror Glaze
Bloom 1 tablespoon of gelatin in 3 tablespoons cold water for 5 minutes. In a medium saucepan, combine 1 cup sugar, 1/2 cup water, and 1/2 cup sweetened condensed milk. Heat over medium heat, stirring occasionally, until the mixture is steaming and the sugar has dissolved — do not let it boil. Remove from heat and add 1 cup finely chopped white chocolate. Stir until smooth, then add the bloomed gelatin (warm it slightly if needed). Mix in 1 tsp rosewater and 1–2 drops pink food coloring if desired. For a smooth glaze, blend with an immersion blender or strain through a fine sieve. Let the glaze cool to about 90°F (32°C) before using — it should be thick but pourable.
💡 Stella’s Pro Tip: Check the temperature with an instant-read thermometer. If the glaze is too hot, it will melt the frozen domes; if too cold, it will clump. 90°F is the sweet spot.
Step 11: Glaze Domes
Unmold the frozen domes and place them on a wire rack set over a baking sheet (to catch drips). Working quickly, pour the rose quartz mirror glaze over each dome, covering the entire surface. The glaze will set almost immediately. Let the excess drip off, then transfer the glazed domes to a serving plate or tray.
⚠️ Common Mistake to Avoid: Do not touch the glaze once poured — fingerprints will ruin the mirror finish. Use a small offset spatula to guide glaze if needed.
Step 12: Chill and Garnish
Place the glazed domes in the refrigerator for at least 30 minutes to allow the glaze to fully set and the mousse to soften slightly (it will be too hard frozen). Just before serving, garnish with fresh lychee halves, dried hibiscus petals, and a dusting of edible shimmer dust for that extra sparkle.
| Step | Action | Duration | Key Visual Cue |
|---|---|---|---|
| 1 | Biscuit base | 15 min chill | Firm, holds together when pressed |
| 2 | Bloom gelatin for core | 5 min | Gelatin becomes spongy |
| 3 | Make hibiscus core | 10 min active + 1 hr freeze | Deep red, translucent syrup |
| 4 | Bloom gelatin for mousse | 5 min | Spongy texture |
| 5 | Steep hibiscus in cream | 15 min (incl. steeping) | Cream turns pale pink, fragrant |
| 6 | Beat cream cheese mixture | 2 min | Smooth, no lumps |
| 7 | Whip cream & fold | 5 min | Soft peaks, homogenous mousse |
| 8 | Assemble domes | 10 min | Core centered, mousse level |
| 9 | Freeze | 6+ hours | Rock solid, no give when pressed |
| 10 | Make mirror glaze | 15 min + cooling | Smooth, glossy, coats spoon |
| 11 | Glaze domes | 5 min | Shiny, even coating |
| 12 | Chill & garnish | 30 min chill | Domes softened, glaze set |
Serving & Presentation
I love serving these dream domes on a white plate to let the rose quartz color pop. Place each dome slightly off-center and add a few fresh lychee halves, a sprinkle of dried hibiscus petals (crumbled), and a light dusting of edible shimmer dust — it catches the light beautifully. A small dollop of whipped cream or a drizzle of coconut milk can balance the sweetness, but I find the dome is perfect on its own. The dessert should be served cold but not frozen solid; take it out of the refrigerator 5–10 minutes before serving to let the mousse soften to a silky texture.
In my Parisian training, we learned that presentation is about layers of texture and color. The glossy pink mirror, the creamy mousse, the jewel-like core, and the crunchy biscuit base — each element should be visible. If you want an elegant touch, serve with a side of fresh raspberries or a hibiscus flower ice cube in a glass of sparkling water. It’s a dessert that looks like it took all day (and honestly, it does take time, but the results are so worth it).
| Pairing Type | Suggestions | Why It Works |
|---|---|---|
| Side Dish | Light fruit salad (mango, passionfruit), plain madeleines | Fresh fruit balances richness, madeleines add delicate texture |
| Sauce / Dip | None needed, or light coconut cream drizzle | Dessert is already rich; a drizzle can add visual contrast |
| Beverage | Hibiscus iced tea, sparkling rose, lychee martini (non-alcoholic) | Reinforces floral notes; bubbles cleanse palate |
| Garnish | Fresh lychee, hibiscus petals, edible shimmer dust | Adds color, texture, and elegance |
Make-Ahead, Storage & Reheating
One of the best things about this recipe is that most of the work happens ahead of time. I often make a double batch on a Sunday, freeze the domes, and have them ready for last-minute dinner parties during the week. The mirror glaze can also be made a day ahead and stored in the fridge — just reheat it gently to 90°F when you’re ready to glaze. Here’s what you need to know.
| Method | Container | Duration | Reheating Tip |
|---|---|---|---|
| Refrigerator | Covered airtight container | Up to 3 days | Serve straight from fridge; no reheating needed |
| Freezer | Individually wrapped in plastic then foil | Up to 1 month | Thaw in fridge overnight before glazing or serving |
| Make-Ahead | Freeze unglazed domes on a tray then wrap | Up to 1 month (glaze day of serving) | Glaze directly from frozen for best adhesion |
A few notes from my NYC kitchen: If you’re making these for a party, glaze them no more than 6 hours ahead — the glaze stays shiny and the mousse remains perfectly set. Don’t attempt to reheat a fully assembled dome; the glaze will melt and run off. Instead, if you have leftover unglazed domes, you can freeze them and glaze them fresh later. Also, the biscuit base may lose some crunch after a day in the fridge — that’s normal. For the best texture, assemble and glaze the day you plan to serve.
Variations & Easy Swaps
I love that this recipe is a canvas for creativity. Whether you want to make it vegan, change up the fruit, or add a Moroccan twist, here are my favorite variations.
| Variation | Key Change | Best For | Difficulty Impact |
|---|---|---|---|
| Vegan / Dairy-Free | Use agar-agar instead of gelatin, coconut cream instead of heavy cream, vegan cream cheese | Plant-based diets | Medium (agar sets differently) |
| Rose & Raspberry | Replace lychee with raspberry puree, add extra rosewater | Bright, tart flavor | No change |
| Moroccan Twist | Add pinch of cinnamon and orange flower water to mousse, use almond biscuit base | Warm flavor profile | Easy |
Vegan / Dairy-Free Version
For a vegan version, replace gelatin with agar-agar (use 1 tsp agar powder per 1 tbsp gelatin). The setting temperature is higher — you’ll need to bring the mixture to a boil and let it set at room temperature. Use full-fat coconut cream (chilled) for the whipped cream component, and look for a dairy-free cream cheese like Kite Hill. The mirror glaze can be made with coconut condensed milk and vegan white chocolate. The texture will be slightly less silky but still delicious. 💡 Stella’s Pro Tip: Agar sets at a higher temperature, so work quickly when assembling.
Gluten-Free Variation
The biscuit base is the only source of gluten. Swap digestive biscuits for gluten-free graham crackers or gluten-free shortbread cookies. Use an equal amount by weight. The texture will be slightly more delicate, but the flavor remains wonderful. All other components are naturally gluten-free.
Seasonal Mango Coconut Twist
In summer, replace lychee puree with mango puree and omit the hibiscus (or keep it in the core). Toast shredded coconut and press it into the biscuit base for a tropical vibe. The mirror glaze can be made with a touch of yellow food coloring and coconut milk instead of condensed milk. This version is a hit at pool parties!
What is the best way to make the lychee hibiscus filling for Rose Quartz Lychee Hibiscus Dream Domes?
The lychee hibiscus filling is actually two parts: the hibiscus syrup core and the lychee hibiscus mousse. For the core, simmer dried hibiscus in water with sugar, then add lychee juice and bloomed gelatin. Freeze in small inserts. For the mousse, steep hibiscus in warm cream, then mix with cream cheese, lychee puree, and whipped cream. The key is to freeze the core until rock-hard before inserting it into the mousse. If you want a simpler method, you can skip the core and swirl some hibiscus syrup into the mousse before freezing — but the core gives a beautiful burst of flavor.
Can I substitute fresh lychees with canned lychees for this recipe?
Yes, you can use canned lychees! Drain them well and blend them into a smooth puree. Canned lychees are often packed in a light syrup, so they tend to be sweeter than fresh. I recommend reducing the added sugar in the mousse by about 1 tablespoon to compensate. Also, canned lychee puree can be slightly thinner, so you may need to add a little extra gelatin (about 1/2 tsp) to ensure the mousse sets firmly. Fresh lychees are wonderful if you can find them — their floral notes are brighter — but canned are a perfectly acceptable substitute.
How long do Rose Quartz Lychee Hibiscus Dream Domes need to set in the freezer?
The domes need to freeze for at least 6 hours, but overnight is best. The mousse must be completely solid — when you press it, it should feel rock-hard with no give. This is critical for the mirror glaze to adhere smoothly without melting the mousse. If you try to glaze domes that are only partially frozen, the glaze will soak into the mousse and ruin the finish. I always freeze them overnight for peace of mind. You can also freeze the domes for up to a month if wrapped properly.
What can I use instead of gelatin to make these dream domes vegetarian-friendly?
For a vegetarian version, you can replace powdered gelatin with agar-agar. Use 1 teaspoon of agar powder for every 1 tablespoon of gelatin called for. However, agar sets at a higher temperature — you’ll need to bring the mixture to a full boil (not just warm) to activate the agar. Also, agar sets more firmly and can be slightly brittle. I recommend reducing the agar by 1/4 teaspoon for the mousse to keep it silky. Another option is to use kuzu root starch or a vegan gelatin substitute like “Vege-Gel,” but results may vary. The mirror glaze is trickier with agar because it can become cloudy; I suggest testing a small batch first.
Can I make the Rose Quartz Mirror Glaze without white chocolate?
White chocolate is essential for the mirror glaze’s shine and creaminess. Without it, you’ll get a clear, jelly-like coating instead of the opaque, rosy finish. If you need a dairy-free option, use a high-quality vegan white chocolate (like from Callebaut) — it behaves similarly. Avoid substituting with regular chocolate or cocoa butter alone; the texture won’t be the same. The combination of sweetened condensed milk, sugar, and white chocolate creates the perfect pouring consistency. If you absolutely cannot use white chocolate, consider using a clear gel glaze and adding pink coloring, but the flavor will be less rich.
Why did my mirror glaze crack after pouring?
Cracking usually happens because the glaze was too thick or the domes were too cold. Make sure your glaze is at exactly 90°F (32°C) — too cold and it will be too thick to flow evenly; too hot and it will melt the mousse. The domes should be frozen solid but not freezer-burned. Also, avoid overworking the glaze after pouring — let it find its own level. If you see cracks forming, you can often smooth them by gently reheating the glaze with a hair dryer or heat gun, but work quickly. In my kitchen, I always test one dome first to check the consistency.
Can I use a different fruit puree instead of lychee?
Absolutely! Lychee pairs beautifully with hibiscus, but you can experiment with other fruits. Mango, passion fruit, raspberry, or even strawberry would work. Keep in mind that tart fruits (like passion fruit) may require more sugar in the mousse. Also, adjust the liquid content—if your puree is very watery, you may need to add a little more gelatin (1/2 tsp extra) to maintain the mousse structure. The hibiscus syrup core can also be changed: try a berry coulis or a passion fruit curd instead. Each variation will give the domes a completely different personality.
How do I get a perfectly smooth mirror glaze without bubbles?
Bubbles are the enemy of mirror glaze! To avoid them, first make sure your immersion blender is fully submerged before starting to blend — that prevents air from being trapped. After blending, let the glaze rest for 5 minutes and tap the container on the counter to release any large bubbles. Strain the glaze through a fine-mesh sieve lined with cheesecloth for the ultimate smoothness. When pouring, pour in a steady stream from the center of the dome, letting the glaze flow outward. If a bubble appears on the surface, pop it immediately with a toothpick or a hot knife.
Share Your Version!
I’d absolutely love to see your Rose Quartz Lychee Hibiscus Dream Domes. Did you make the mirror glaze extra shiny? Did you try a vegan version? Tag me in your photos on Instagram (@leosfoods) or save your pin on Pinterest using the button below. Leave a star rating and comment — your feedback helps me create better recipes for you.
One question I always ask: Which part of this recipe surprised you most? For me, it’s how the hibiscus core stays bright and tart even after hours in the freezer. Let me know in the comments!
From my NYC kitchen to yours — I hope this recipe brings as much warmth to your table as it does to mine. — Stella 🧡
Love This Recipe? Save It to Pinterest!
If you enjoyed this Rose Quartz Lychee Hibiscus Dream Domes recipe, don’t let it get lost in your browser tabs! 😄 Pin it now so you can find it again anytime — and explore hundreds more tried-and-tested recipes waiting for you on my Pinterest boards.
👉 Follow Stella on Pinterest @stellarecipeblog
📌 Pin this recipe · 🔁 Re-pin your favorites · 💬 Tag me when you make it — I love seeing your creations!
Rose Quartz Lychee Hibiscus Dream Domes
Delicate dome-shaped dessert with a lychee hibiscus mousse, hibiscus syrup core, biscuit base, and a glossy rose quartz mirror finish.
- Yield: 8 1x
Ingredients
- For the Lychee Hibiscus Mousse:
- 2 cups lychee puree
- 1 cup heavy cream
- 1/2 cup cream cheese, softened
- 1/3 cup granulated sugar
- 2 tbsp dried hibiscus flowers
- 1 tsp vanilla extract
- 2 tsp powdered gelatin
- 3 tbsp cold water
- For the Hibiscus Syrup Core:
- 1 cup water
- 2 tbsp dried hibiscus flowers
- 1/3 cup granulated sugar
- 1/2 cup lychee juice
- 1 tsp powdered gelatin
- 1 tbsp cold water
- For the Biscuit Base:
- 1 cup digestive biscuits, finely crushed
- 3 tbsp melted butter
- For the Rose Quartz Mirror Finish:
- 1 cup granulated sugar
- 1/2 cup water
- 1/2 cup sweetened condensed milk
- 1 cup white chocolate, finely chopped
- 1 tbsp powdered gelatin
- 3 tbsp cold water
- 1 tsp rosewater
- 1–2 drops pink food coloring (optional)
- For Garnish (optional):
- Fresh lychee halves
- Dried hibiscus petals
- Edible shimmer dust
Instructions
- Mix crushed biscuits with melted butter and press into dome molds as the base layer. Chill for 15 minutes.
- Bloom gelatin for hibiscus core in cold water for 5 minutes.
- Simmer water and hibiscus flowers for 5 minutes, strain, then stir in sugar until dissolved.
- Add lychee juice and dissolved gelatin, then pour into small inserts. Freeze until firm.
- Bloom gelatin for mousse in cold water.
- Steep hibiscus in a small portion of warm cream, then strain and cool.
- Beat cream cheese, sugar, vanilla, and lychee puree until smooth.
- Warm hibiscus-infused cream, dissolve gelatin, then mix into base.
- Whip remaining cream to soft peaks and fold into mixture.
- Fill molds halfway with mousse, add a frozen hibiscus core, then cover with remaining mousse.
- Freeze for at least 6 hours until fully set.
- Bloom gelatin for glaze in cold water.
- Heat sugar, water, and condensed milk until steaming (do not boil).
- Remove from heat and add white chocolate and gelatin, stirring until smooth.
- Blend in rosewater and optional pink coloring until glossy.
- Cool glaze to about 90°F (32°C).
- Unmold frozen domes and place on a rack.
- Pour rose quartz glaze evenly over domes until fully coated.
- Chill for 30 minutes before serving.
- Garnish with lychee, hibiscus petals, and shimmer dust.
Nutrition
- Calories: 325
- Sugar: 32 g
- Fat: 17 g
- Carbohydrates: 37 g
- Protein: 4 g
Tried This Recipe? Leave a Comment!
Did you make this recipe? I’d love to hear how it turned out! Please leave a comment and a rating below. Your feedback helps other home cooks and supports cheerychop.com!
For more delicious inspiration, follow me on Pinterest!