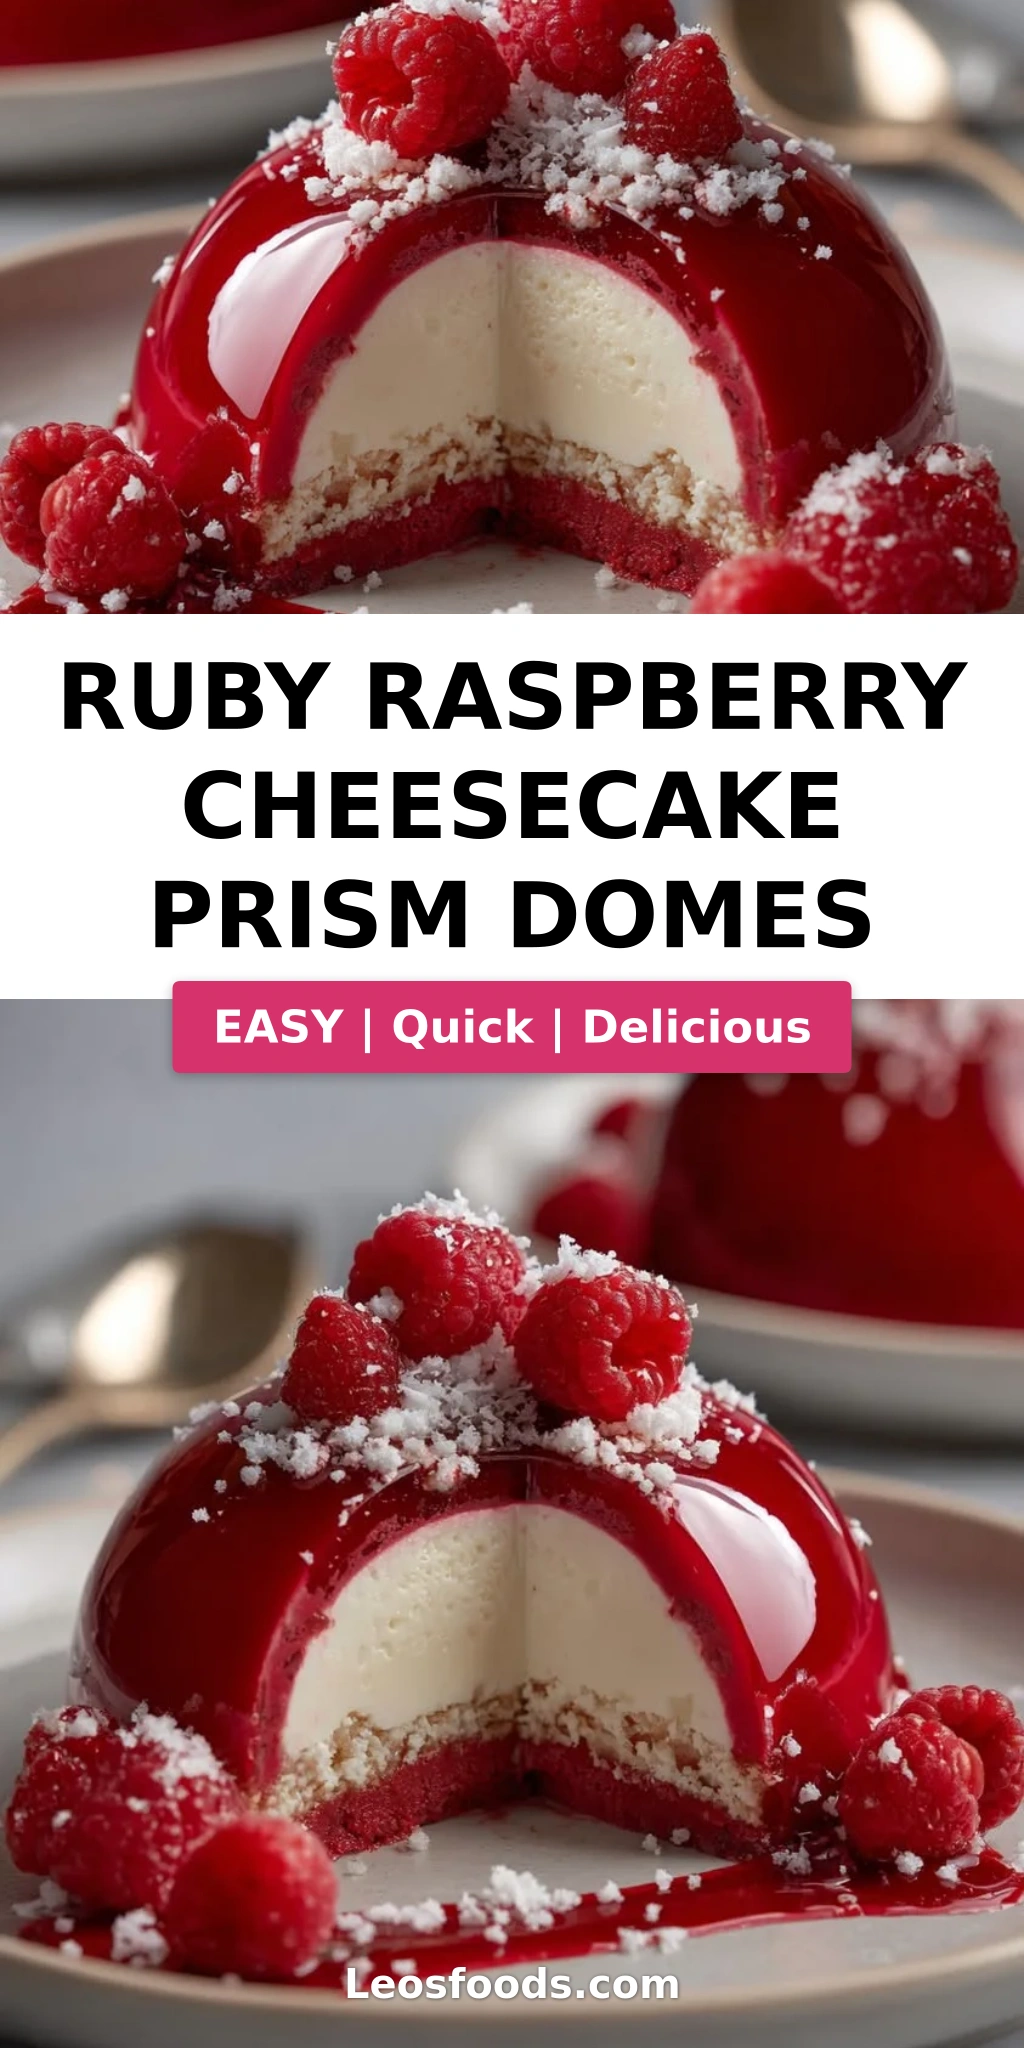
Stunning Ruby Raspberry Cheesecake Prism Domes Recipe
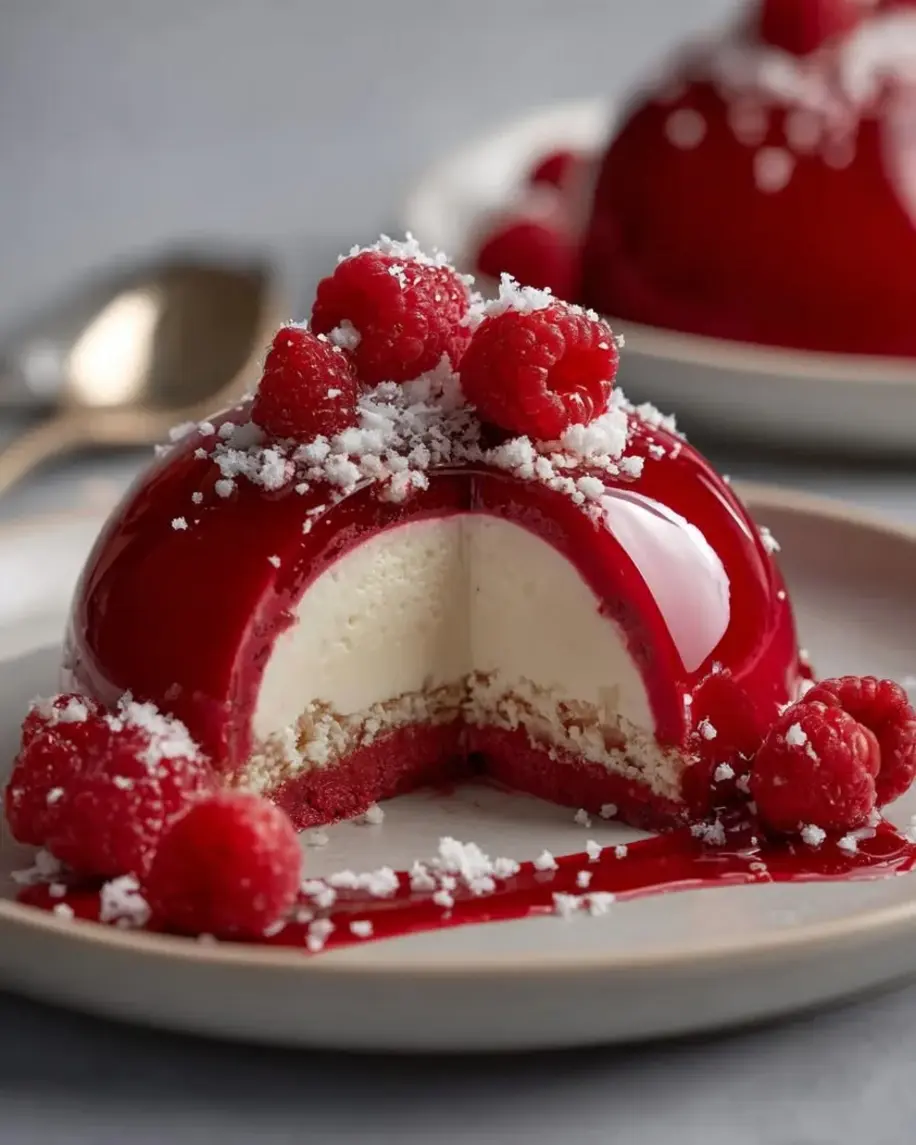
Table of Contents
Ruby Raspberry Cheesecake Prism Domes – A Shimmering Mirror Glaze Dessert
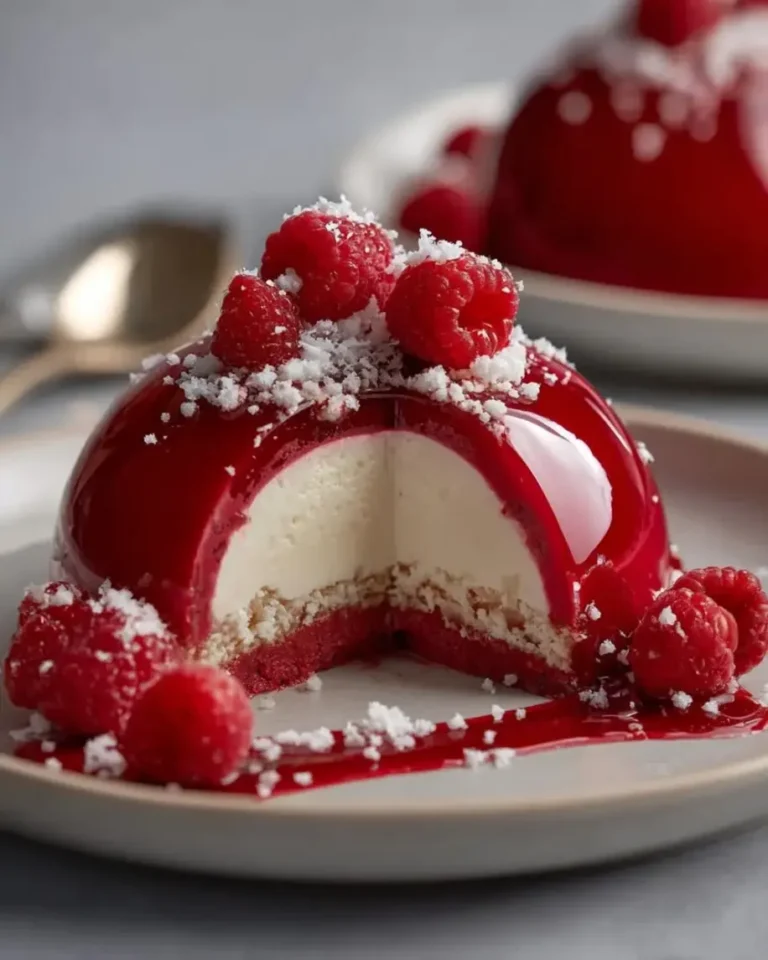
I still remember the first time I saw a mirror glaze dome in a Parisian pâtisserie window — it stopped me mid-stride. The way the light caught the surface, scattering tiny rainbows across the display case, felt almost magical. Years later, after training at Le Cordon Bleu and settling into my NYC kitchen, I set out to create a version that felt both celebratory and achievable for home bakers. These Ruby Raspberry Cheesecake Prism Domes are the result: a luscious raspberry cheesecake with a hidden vanilla cream core, all encased in a shimmering prism mirror glaze that catches the light like a jewel. The ruby chocolate and raspberry pairing is pure elegance — bright, tangy, and not too sweet.
When you slice into one of these domes, the first thing you notice is that mirror-smooth surface — it reflects your kitchen like a still pond at dawn. Then your spoon breaks through the glaze, through the silky raspberry cheesecake, and into the creamy vanilla center. The raspberry puree adds a bright, sun-ripened tang that cuts through the richness of the cream cheese and mascarpone, while the edible ruby shimmer dust gives the glaze a subtle, gemstone-like sparkle. It’s a dessert that tastes as stunning as it looks — bright, creamy, with just the right balance of tart and sweet.
What makes my version different is the double-layered approach: a frozen vanilla cream core tucked inside each dome creates a surprise burst of richness, while the prism mirror glaze — made with white chocolate and a touch of ruby shimmer — delivers that flawless, streak-free finish every time. I’ll walk you through my tested technique for avoiding air bubbles in the glaze, plus the one trick that guarantees a perfect prism effect. Whether you’re making these for a birthday, a holiday table, or just because you want to impress yourself, I promise this recipe is more straightforward than it looks. Let’s shimmer.
Why This Ruby Raspberry Cheesecake Prism Domes Recipe Is the Best
The Flavor Secret: I grew up in Morocco, where fresh raspberries were a rare and beloved treat — my mother would use them in a simple syrup to drizzle over yogurt. That memory of bright, sun-warmed fruit inspired the raspberry puree base here. By combining it with cream cheese and a hint of vanilla, I’ve created a filling that’s tangy, creamy, and deeply fruity. The vanilla cream core, made with mascarpone and vanilla bean paste, adds a lush, almost custard-like contrast. Ruby chocolate, with its naturally berry-forward flavor, amplifies the raspberry notes in the glaze without any artificial taste.
Perfected Texture: The key to a dome that’s both creamy and sliceable is the gelatin in the cheesecake mixture — it firms up just enough to hold its shape after freezing, without becoming rubbery. The mirror glaze, meanwhile, uses a precise ratio of white chocolate, condensed milk, and bloomed gelatin to achieve that glass-like finish. I learned this technique in Paris, where my pastry chef insisted on cooling the glaze to exactly 95°F before pouring — any warmer and it runs too thin, any cooler and it gets lumpy. That single detail makes all the difference between a streaky mess and a flawless prism surface.
Foolproof & Fast: Even though these domes look like they belong in a high-end pastry case, the process is surprisingly forgiving. The silicone dome molds do most of the shaping work for you, and the glaze can be made ahead and reheated. I’ve tested this recipe with my weekend cooking students in NYC, and the most common feedback is “I can’t believe I made this!” — even from first-timers. Just follow the temperatures and timing, and you’ll get that professional prism finish every time. No pastry degree required.
Ruby Raspberry Cheesecake Prism Domes Ingredients
I source my raspberries from the Union Square Greenmarket in late summer, but good-quality frozen berries work beautifully year-round. The ruby chocolate and edible shimmer dust are available online or at specialty baking stores — I like to keep them on hand for when I want to add a little magic to a special occasion. Here’s everything you’ll need.
Ingredients List
- For the Raspberry Cheesecake Domes: 2 cups fresh raspberries, pureed
- 8 oz cream cheese, softened
- 1 cup heavy cream
- 1/3 cup powdered sugar
- 1 tsp vanilla extract
- 2 tsp unflavored gelatin
- 2 tbsp cold water
- Red gel food coloring (optional)
- For the Vanilla Cream Core: 1/2 cup mascarpone cheese
- 2 tbsp heavy cream
- 1 tbsp powdered sugar
- 1 tsp vanilla bean paste
- For the Prism Mirror Glaze: 1 cup white chocolate, finely chopped
- 1/2 cup sweetened condensed milk
- 2 tsp unflavored gelatin
- 2 tbsp cold water
- 1/4 cup warm water
- 1 tsp edible ruby shimmer dust
- For Garnish (optional): Fresh raspberries, Edible sugar crystals, White chocolate shards
Ingredient Spotlight
Raspberries: The star of the show. Fresh berries give the brightest flavor, but frozen (thawed and drained) work well too. If your berries are tart, add an extra tablespoon of powdered sugar to the puree. For a deeper berry flavor, you can swap half the raspberries for blackberries or strawberries — just adjust the sugar to taste.
Ruby Chocolate: This vibrant pink chocolate has a natural berry-like tang that complements the raspberry cheesecake perfectly. If you can’t find ruby chocolate, substitute high-quality white chocolate and add an extra 1/4 teaspoon of ruby shimmer dust to the glaze for color. The flavor will be milder but still beautiful.
Mascarpone: The creamy heart of the vanilla core. Mascarpone is richer than cream cheese and gives the core a silky, almost pudding-like texture. In a pinch, you can substitute an equal amount of full-fat cream cheese blended with a tablespoon of heavy cream — but mascarpone is worth seeking out for that luxurious finish.
Unflavored Gelatin: The structural backbone of both the cheesecake and the glaze. Use sheet gelatin if you prefer — one sheet equals about 1 teaspoon of powdered gelatin. I recommend bloom strength of at least 200 bloom for a firm but tender set. Too much gelatin can make the cheesecake rubbery, so measure carefully.
| Original Ingredient | Best Substitution | Flavor / Texture Impact |
|---|---|---|
| Ruby chocolate (glaze) | White chocolate + extra ruby shimmer dust | Milder berry flavor, color still vibrant |
| Mascarpone (core) | Cream cheese + 1 tbsp heavy cream | Slightly tangier, less rich |
| Fresh raspberries | Frozen raspberries, thawed and drained | Slightly less bright, still delicious |
| Vanilla bean paste | 1 tsp vanilla extract + seeds of 1 vanilla bean | Slightly less intense vanilla flavor |
How to Make Ruby Raspberry Cheesecake Prism Domes — Step-by-Step
I’ll guide you through every step, from blooming the gelatin to achieving that flawless mirror finish. Take your time with the glaze temperature — it’s the one step where precision really pays off.
Step 1: Bloom the Gelatin
In a small bowl, sprinkle 2 teaspoons of unflavored gelatin over 2 tablespoons of cold water. Let it sit for 5 minutes until the gelatin absorbs the water and becomes a firm, jiggly mass. This step is crucial — blooming hydrates the gelatin so it dissolves smoothly into the cheesecake mixture without clumps.
💡 Stella’s Pro Tip: If you’re in a hurry, you can bloom gelatin in warm water, but cold water gives a more even hydrate. Never bloom gelatin in hot water — it will clump instantly and ruin the texture.
Step 2: Make the Raspberry Cheesecake Base
In a large mixing bowl, beat 8 oz softened cream cheese with 1/3 cup powdered sugar, 1 tsp vanilla extract, and the raspberry puree until smooth and completely lump-free. I use a hand mixer on medium speed for about 2 minutes. If you like a deeper pink color, add a drop or two of red gel food coloring — but the raspberry puree usually gives a lovely natural blush.
⚠️ Common Mistake to Avoid: Don’t over-beat the cream cheese — it can become thin and grainy. Mix just until smooth, then stop.
Step 3: Melt and Incorporate the Gelatin
Gently melt the bloomed gelatin in the microwave in 10-second bursts (or in a small saucepan over low heat) until it’s liquid — about 15-20 seconds. Let it cool for 30 seconds, then stir it into the raspberry cream cheese mixture until fully incorporated. The mixture should be smooth and slightly thickened.
Step 4: Whip and Fold the Cream
In a separate chilled bowl, whip 1 cup of heavy cream to soft peaks — when you lift the whisk, the cream should hold a gentle, droopy peak. Gently fold the whipped cream into the raspberry mixture using a spatula. Use a light hand: fold in three additions, cutting through the center and scraping the sides, until no white streaks remain.
💡 Stella’s Pro Tip: Chill your bowl and beaters in the freezer for 10 minutes before whipping the cream — it whips faster and holds its shape better.
Step 5: Make the Vanilla Cream Core
Combine 1/2 cup mascarpone, 2 tbsp heavy cream, 1 tbsp powdered sugar, and 1 tsp vanilla bean paste in a small bowl. Stir until smooth — no mixer needed. Transfer the mixture to a piping bag (or a zip-top bag with a corner snipped off) and pipe small, marble-sized dollops into the cavities of a silicone mini-dome or small round mold. Freeze for at least 45 minutes, until firm.
⚠️ Common Mistake to Avoid: If the mascarpone mixture is too soft to pipe, chill it for 15 minutes first. Warm mascarpone can split when piped.
Step 6: Assemble the Domes
Fill each cavity of your silicone dome molds about halfway with the raspberry cheesecake mixture. Place a frozen vanilla cream core into the center of each, gently pressing it down slightly. Cover with the remaining raspberry mixture, filling to the top. Smooth the flat surface with an offset spatula. Freeze for at least 5 hours — overnight is even better. The domes must be completely frozen solid before glazing.
💡 Stella’s Pro Tip: Place the filled molds on a flat baking sheet in the freezer — this keeps them level and prevents the cores from shifting.
Step 7: Make the Prism Mirror Glaze
Bloom 2 tsp gelatin in 2 tbsp cold water for 5 minutes. In a small saucepan, heat 1/2 cup sweetened condensed milk and 1/4 cup warm water over medium heat until steaming — do not boil. Remove from heat and stir in the bloomed gelatin until completely dissolved. Pour the hot liquid over 1 cup finely chopped white chocolate in a heatproof bowl. Let sit for 1 minute, then stir gently until smooth and glossy. Stir in 1 tsp edible ruby shimmer dust until evenly blended and the glaze is a uniform, sparkling pink. Cool to 95°F — about the temperature of a warm bath — before pouring.
⚠️ Common Mistake to Avoid: If the glaze is too hot (above 100°F), it will be too thin and run off the domes, leaving a patchy finish. If it’s too cool (below 90°F), it will thicken and not self-level. Use an instant-read thermometer for accuracy.
Step 8: Glaze the Domes
Unmold the frozen domes and place each one on a wire rack set over a baking sheet (to catch drips). Pour the cooled glaze evenly over each dome, starting at the top center and letting it flow down the sides. Work quickly — the glaze sets in about 30 seconds. Use a small offset spatula to gently nudge any bare spots. Let the excess drip off for a few seconds, then transfer each dome to a serving plate using a thin spatula.
💡 Stella’s Pro Tip: For the cleanest prism effect, hold the dome with a fork or glazing tool and pour the glaze in one steady stream — avoid going back over the same area.
Step 9: Garnish and Chill
While the glaze is still slightly tacky, garnish with fresh raspberries, edible sugar crystals, and white chocolate shards. Transfer the glazed domes to the refrigerator and chill for at least 2 hours to thaw the cheesecake gently — this ensures a creamy, sliceable texture. Serve cold.
⚠️ Common Mistake to Avoid: Don’t let the glazed domes sit at room temperature for more than a few minutes — the glaze can soften and lose its mirror shine. Keep them refrigerated until just before serving.
| Step | Action | Duration | Key Visual Cue |
|---|---|---|---|
| 1 | Bloom gelatin | 5 min | Firm, jiggly mass |
| 2 | Make cheesecake base | 3 min | Smooth, lump-free, pink |
| 3 | Incorporate gelatin | 1 min | Shiny, slightly thickened |
| 4 | Whip and fold cream | 3 min | Soft peaks, no white streaks |
| 5 | Make vanilla core | 5 min + freeze 45 min | Smooth, pipeable, firm when frozen |
| 6 | Assemble domes | 10 min + freeze 5 hrs | Domes solid, cores centered |
| 7 | Make mirror glaze | 10 min | Glossy, smooth, 95°F |
| 8 | Glaze domes | 5 min | Even coating, prism shine |
| 9 | Garnish and chill | 15 min + chill 2 hrs | Garnishes set, cheesecake creamy |
Serving & Presentation
These Ruby Raspberry Cheesecake Prism Domes are meant to be the centerpiece of the table. Place each dome on a chilled white plate to let the pink mirror glaze pop — the contrast is stunning. For an extra touch, drizzle a few drops of raspberry coulis around the base and add a tiny pinch of edible sugar crystals that catch the light. I like to serve them with a dollop of lightly sweetened whipped cream on the side for those who want extra creaminess.
In my NYC apartment, I often pair these domes with a glass of chilled sparkling rosé — the bubbles and acidity cut through the richness beautifully. For a non-alcoholic option, a raspberry-lime sparkling water or a cup of jasmine tea echoes the floral notes of the vanilla cream core. If you’re serving a crowd, set up a small garnish bar with extra raspberries, white chocolate shards, and edible flowers so guests can customize their own dome. It’s a fun, interactive way to end a dinner party.
| Pairing Type | Suggestions | Why It Works |
|---|---|---|
| Side Dish | Fresh raspberries, mint leaves | Brightens the plate, adds freshness |
| Sauce / Dip | Raspberry coulis, chocolate sauce | Extra layer of fruit or chocolate |
| Beverage | Sparkling rosé, jasmine tea, raspberry lime water | Acidity and floral notes cut richness |
| Garnish | Sugar crystals, white chocolate shards, edible flowers | Adds crunch, sparkle, elegance |
Make-Ahead, Storage & Reheating
As a busy NYC cook, I love that these domes can be made almost entirely ahead. You can prepare the cheesecake mixture and vanilla core up to 2 days in advance and store them separately in the fridge — then assemble and freeze when you’re ready. The mirror glaze can be made a day ahead and stored in the fridge; just reheat gently to 95°F before pouring. Here’s my tested storage guide.
| Method | Container | Duration | Reheating Tip |
|---|---|---|---|
| Refrigerator | Airtight container, single layer | Up to 3 days | Serve cold directly from fridge |
| Freezer | Freezer-safe wrap or container | Up to 1 month | Thaw in fridge overnight before serving |
| Make-Ahead | Unfilled domes frozen in molds | Up to 5 days before glazing | Glaze directly from frozen, then chill |
A note on reheating: these domes are meant to be served cold, so there’s no reheating involved. If you’ve frozen them, simply transfer to the refrigerator 6-8 hours before serving (or overnight) to allow the cheesecake to thaw to a creamy, sliceable texture. The mirror glaze will remain glossy and intact as long as the domes are kept cold — condensation can dull the shine, so pat any moisture gently with a paper towel before serving.
Variations & Easy Swaps
| Variation | Key Change | Best For | Difficulty Impact |
|---|---|---|---|
| Chocolate-Hazelnut Core | Replace mascarpone core with Nutella + cream cheese | Chocolate lovers, special occasions | Same |
| Mango-Passion Fruit | Swap raspberry puree for mango-passion fruit puree | Summer entertaining, tropical twist | Same |
| Dairy-Free / Vegan | Use vegan cream cheese, coconut cream, and dairy-free white chocolate | Dairy-free diets | Moderate — texture may vary |
Chocolate-Hazelnut Core
Growing up, my mother would sometimes swirl a spoonful of Moroccan almond paste into our cream desserts for a nutty surprise. This variation channels that memory: replace the mascarpone core with a mixture of 1/4 cup Nutella and 1/4 cup cream cheese, beaten until smooth. The chocolate-hazelnut flavor pairs beautifully with the raspberry cheesecake — it’s like a fancy Ferrero Rocher in dome form. Freeze the cores as directed, and proceed with the recipe. No other changes needed.
Mango-Passion Fruit Twist
For a tropical take, swap the raspberry puree for 1 cup of mango puree (from fresh or frozen mango) mixed with 2 tablespoons of passion fruit pulp. The tangy-passion fruit cuts the sweetness of the white chocolate glaze beautifully. I discovered this combination at a Brooklyn pop-up last summer, and it’s been a hit ever since. The glaze stays the same — the ruby shimmer dust still gives it that prism effect, now in a sunset-gold hue. Serve with a sprinkle of toasted coconut on top.
Dairy-Free / Vegan Version
I’ve tested this with my friend who’s dairy-free, and it works surprisingly well. Use a high-quality vegan cream cheese (I like Miyoko’s) and replace the heavy cream with full-fat coconut cream (chilled, then whipped to soft peaks). For the vanilla core, use a vegan mascarpone-style spread or extra coconut cream with vanilla. The mirror glaze needs dairy-free white chocolate — many brands now make oat-milk or rice-milk versions. The texture is slightly less firm but still creamy and delicious. Note that the vegan version may have a slightly softer set, so freeze the domes overnight for best results.
How do you make the mirror glaze for Ruby Raspberry Cheesecake Prism Domes without streaks?
The key to a streak-free mirror glaze is all about temperature and technique. First, make sure your glaze is cooled to exactly 95°F — use an instant-read thermometer. If it’s warmer, it will be too thin and run off unevenly; if cooler, it will thicken and not self-level. Second, strain the glaze through a fine-mesh sieve before pouring to catch any undissolved bits of gelatin or chocolate. Third, pour the glaze in one steady stream over the center of the frozen dome, letting it flow naturally over the sides — don’t go back and touch it once it’s poured. Finally, make sure the domes are completely frozen (at least 5 hours) so the glaze sets instantly on contact. I’ve found that using a small offset spatula to gently nudge any bare spots right after pouring helps, but only if you do it within the first 5 seconds. Practice on one dome first, and you’ll get a feel for the perfect pour.
What is the best substitute for ruby chocolate in this cheesecake dome recipe?
The best substitute for ruby chocolate is high-quality white chocolate combined with an extra boost of ruby shimmer dust. Ruby chocolate has a naturally tangy, berry-like flavor that white chocolate lacks, so you’ll need to compensate. Use 1 cup of finely chopped white chocolate (I recommend Valrhona or Ghirardelli for smooth melting) and add 1 1/4 teaspoons of edible ruby shimmer dust instead of the 1 teaspoon called for. The extra shimmer dust helps mimic the pink color and subtle sparkle of ruby chocolate. If you want to add a hint of berry flavor back, you can stir in 1/2 teaspoon of freeze-dried raspberry powder (sold at specialty baking stores). The texture of the glaze will be the same, but the flavor will be slightly sweeter and less tangy. For the most authentic result, order ruby chocolate online — it’s becoming easier to find and well worth the search.
Can I prepare Ruby Raspberry Cheesecake Prism Domes a day ahead of serving?
Absolutely — in fact, I recommend it! These domes are perfect for make-ahead entertaining. The best approach is to prepare the cheesecake mixture, vanilla cream cores, and fill the dome molds up to 2 days before serving. Freeze the filled molds solid, then pop them out of the silicone molds and store the frozen domes in an airtight container for up to 1 week. On the day you plan to serve them, make the mirror glaze, pour it over the frozen domes, and then transfer them to the refrigerator to chill for at least 4 hours (up to 24 hours). This gentle thawing in the fridge ensures the cheesecake becomes perfectly creamy while the glaze stays glossy and intact. I’ve done this for many dinner parties in my NYC apartment, and the domes look and taste just as stunning as freshly made. Just don’t glaze them more than 24 hours ahead — the mirror finish can start to dull over time.
How do you achieve the perfect prism effect on the dome surface without air bubbles?
The perfect prism effect comes from three things: a smooth, air-free glaze, a frozen dome, and a steady hand. To avoid air bubbles, start by straining the finished glaze through a fine-mesh sieve into a clean bowl — this catches any tiny bubbles created during mixing. Then, gently tap the bowl on the counter a few times to bring any remaining bubbles to the surface, and pop them with a toothpick or a quick pass of a kitchen torch. Let the glaze cool to 95°F while stirring occasionally — if you stir too vigorously, you’ll incorporate more air, so use a gentle folding motion. When you pour, hold the dome with a glazing fork or your fingers (wearing gloves) and pour the glaze from about 4 inches above the center of the dome in a slow, steady stream. The glaze should flow evenly over the surface without pooling. If you see a bubble form on the dome after pouring, gently touch it with the tip of a toothpick while the glaze is still wet — it will self-level. With practice, you’ll get a flawless prism finish every time.
Can I use frozen raspberries instead of fresh for the cheesecake filling?
Yes, frozen raspberries work perfectly. Thaw them at room temperature for about 30 minutes, then drain off any excess liquid before pureeing. Frozen berries tend to release more water than fresh, so you may need to cook the puree for 3-4 minutes over medium heat to reduce it slightly — this concentrates the flavor and removes extra moisture that could make the cheesecake filling too soft. Let the puree cool completely before mixing it with the cream cheese. I actually prefer using frozen raspberries in the winter when fresh berries aren’t at their peak. One bag of frozen raspberries (12 oz) will give you more than enough for the 2 cups of puree needed for this recipe. The flavor will be just as bright, especially if you add a tiny pinch of citric acid or a squeeze of fresh lemon juice to brighten the berry notes.
How long do I need to freeze the domes before glazing?
The domes must be completely frozen solid — at least 5 hours, but overnight is ideal. The surface temperature of the dome needs to be below 32°F so that the mirror glaze sets instantly upon contact. If the dome is even slightly soft, the glaze will absorb into the cheesecake rather than forming a smooth, glass-like shell. I always freeze mine overnight (about 10-12 hours) for the most reliable results. You can also freeze them for up to 1 week before glazing — just wrap the filled molds tightly in plastic wrap after they’re fully frozen to prevent freezer burn. When you’re ready to glaze, unmold the domes and place them directly on a wire rack. Work with only 3-4 domes at a time, keeping the rest in the freezer until you’re ready to glaze them. This ensures each dome is rock-solid when the glaze hits it.
Can I make these without silicone dome molds?
Yes, you can! If you don’t have silicone dome molds, you can use a standard muffin tin lined with plastic wrap or a large ice cube tray with rounded cavities. For a more creative approach, use small glass bowls or ramekins — just line them with plastic wrap so you can lift the cheesecake out once frozen. The shape won’t be a perfect hemisphere, but the mirror glaze will still look beautiful over any rounded surface. If using a muffin tin, fill each cup about three-quarters full and freeze solid. Once frozen, use a small offset spatula or butter knife to gently loosen the edges and pop the domes out. The texture and flavor will be identical — the shape is mostly for visual drama. I’ve even made these as mini “egg” shapes using silicone egg molds, and they were a huge hit at a spring brunch.
What can I use instead of edible ruby shimmer dust for the glaze?
If you don’t have edible ruby shimmer dust, you have several options. The simplest substitute is a combination of pink gel food coloring and a pinch of edible gold or silver luster dust (available at most baking supply stores). Use about 2 drops of pink gel coloring to achieve the same rosy hue, then stir in 1/2 teaspoon of edible luster dust for shimmer. Alternatively, you can use powdered pearl dust (also called pearl powder) which gives a soft, luminous sheen without the pink color — add a drop of red food coloring to adjust the hue. For a natural option, try beetroot powder (1/2 teaspoon) mixed into the glaze — it will give a subtle pink tint and a very faint earthy sweetness. Note that beetroot powder won’t add shimmer, so the finish will be matte rather than glossy-prism. The best online source for edible shimmer dust is Amazon or specialty baking stores like King Arthur Baking.
How do I store leftover mirror glaze?
Leftover mirror glaze can be stored in an airtight container in the refrigerator for up to 5 days. When you’re ready to use it, warm it gently in the microwave in 10-second bursts at 50% power, stirring between each burst, until it reaches 95°F. If the glaze has thickened too much, you can thin it with a teaspoon of warm water or condensed milk at a time. I always make a little extra glaze to account for any mishaps — it’s better to have too much than too little. The glaze can also be frozen for up to 2 months; thaw it overnight in the fridge, then reheat as directed. One important note: if you’ve already poured the glaze over domes and have leftover drippings from the baking sheet, those cannot be reused because they may contain tiny bits of cheesecake or dust from the dome surface. Always store fresh, unused glaze for best results.
Can I add alcohol to the raspberry cheesecake filling?
Absolutely — a splash of spirits can elevate the flavor beautifully. I recommend adding 1 to 2 tablespoons of Chambord (raspberry liqueur), framboise, or a good-quality raspberry vodka to the cream cheese mixture before folding in the whipped cream. Chambord pairs especially well with the vanilla cream core and the shimmer glaze, adding a subtle boozy warmth that adults will love. If you prefer a non-alcoholic option, try 1 teaspoon of raspberry extract or a tablespoon of pomegranate molasses for a similar depth of flavor. Note that adding alcohol or extra liquid may slightly soften the set of the cheesecake — reduce the water in the gelatin bloom by 1 teaspoon to compensate. I tested this with a splash of Grand Marnier once, and the orange-raspberry combination was incredible. Just remember: the alcohol won’t freeze solid, so the filling will be slightly softer than the non-alcoholic version. Serve within 2 days for the best texture.
Share Your Version!
I truly love seeing how you make these Ruby Raspberry Cheesecake Prism Domes your own — whether you stick with the classic raspberry-vanilla combination or try one of the variations. Drop a comment below and let me know how they turned out, or ask me any questions about the process — I read every single one and I’m always here to help troubleshoot. If you’re feeling proud (and you should be!), snap a photo and tag me on Instagram or Pinterest — I love seeing your beautiful creations shine.
From my NYC kitchen to yours — I hope this recipe brings as much warmth to your table as it does to mine. — Stella 🧡
Love This Recipe? Save It to Pinterest!
If you enjoyed this Ruby Raspberry Cheesecake Prism Domes recipe, don’t let it get lost in your browser tabs! 😄 Pin it now so you can find it again anytime — and explore hundreds more tried-and-tested recipes waiting for you on my Pinterest boards.
👉 Follow Stella on Pinterest @stellarecipeblog
📌 Pin this recipe · 🔁 Re-pin your favorites · 💬 Tag me when you make it — I love seeing your creations!
Did You Make This Recipe?
If you tried these Ruby Raspberry Cheesecake Prism Domes, I’d love to hear from you! Rate the recipe below, leave a comment with your experience, or tag @stellarecipeblog on Instagram so I can see your beautiful work. Your feedback helps me create even better recipes for you!
⭐ ⭐ ⭐ ⭐ ⭐ — Tap a star to rate this recipe!
Ruby Raspberry Cheesecake Prism Domes
Elegant ruby-inspired cheesecake domes with a vanilla cream core and shimmering mirror glaze.
- Yield: 8 1x
Ingredients
- For the Raspberry Cheesecake Domes:
- 2 cups fresh raspberries, pureed
- 8 oz cream cheese, softened
- 1 cup heavy cream
- 1/3 cup powdered sugar
- 1 tsp vanilla extract
- 2 tsp unflavored gelatin
- 2 tbsp cold water
- Red gel food coloring (optional)
- For the Vanilla Cream Core:
- 1/2 cup mascarpone cheese
- 2 tbsp heavy cream
- 1 tbsp powdered sugar
- 1 tsp vanilla bean paste
- For the Prism Mirror Glaze:
- 1 cup white chocolate, finely chopped
- 1/2 cup sweetened condensed milk
- 2 tsp unflavored gelatin
- 2 tbsp cold water
- 1/4 cup warm water
- 1 tsp edible ruby shimmer dust
- For Garnish (optional):
- Fresh raspberries
- Edible sugar crystals
- White chocolate shards
Instructions
- 1. Bloom gelatin in cold water for 5 minutes.
- 2. Beat cream cheese, powdered sugar, vanilla extract, and raspberry puree until smooth.
- 3. Melt bloomed gelatin and stir into the raspberry mixture.
- 4. Whip heavy cream to soft peaks and gently fold into the mixture.
- 5. Combine mascarpone, heavy cream, powdered sugar, and vanilla bean paste until smooth.
- 6. Pipe small vanilla cream cores into silicone molds and freeze until firm.
- 7. Fill prism molds halfway with raspberry mixture.
- 8. Place frozen cream cores into each mold.
- 9. Cover with remaining raspberry mixture and smooth tops.
- 10. Freeze for at least 5 hours until fully set.
- 11. Bloom gelatin for the glaze.
- 12. Heat condensed milk and warm water, then dissolve gelatin into it.
- 13. Pour over white chocolate and mix until glossy and smooth.
- 14. Stir in ruby shimmer dust until evenly blended.
- 15. Cool glaze to a pourable consistency.
- 16. Unmold domes and place on a rack.
- 17. Pour glaze evenly to create a crystal prism finish.
- 18. Garnish with raspberries, sugar crystals, and white chocolate shards.
- 19. Chill before serving.
- 20. Serve cold.
Nutrition
- Calories: 370
- Sugar: 27 g
- Fat: 26 g
- Carbohydrates: 31 g
- Protein: 5 g
Tried This Recipe? Leave a Comment!
Did you make this recipe? I’d love to hear how it turned out! Please leave a comment and a rating below. Your feedback helps other home cooks and supports cheerychop.com!
For more delicious inspiration, follow me on Pinterest!